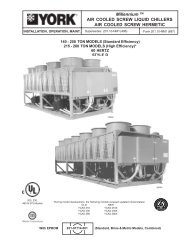
YVAA Style A Air-Cooled Screw Liquid Chillers ... - Johnson Controls
YVAA Style A Air-Cooled Screw Liquid Chillers ... - Johnson Controls
YVAA Style A Air-Cooled Screw Liquid Chillers ... - Johnson Controls

Create successful ePaper yourself
Turn your PDF publications into a flip-book with our unique Google optimized e-Paper software.
SECTION 6 - COMMISSIONING<br />
Avoid levels in either oil separator that are above the<br />
middle of the top sight glass. This may cause excessive<br />
oil carryover in the system. High oil concentration<br />
in the system may cause nuisance trips resulting from<br />
incorrect readings on the level sensor and temperature<br />
sensors. Temperature sensor errors may result in poor<br />
liquid control which will result in liquid overfeed and<br />
subsequently damage the compressor. High oil carryover<br />
may also cause liquid to be returned to the compressor,<br />
which can damage the compressor.<br />
Fans<br />
Check that all fans are free to rotate and are not damaged.<br />
Ensure blades are at the same height when rotated.<br />
Ensure fan guards are securely fixed.<br />
Isolation / Protection<br />
Verify all sources of electrical supply to the unit are<br />
taken from a single point of isolation. Check that the<br />
maximum recommended fuse sizes given in SECTION<br />
5 - TECHNICAL DATA on Page 49 has not been exceeded.<br />
Control Panel<br />
Check the panel to see that it is free of foreign materials<br />
(wire, metal chips, etc.) and clean out if required.<br />
Power Connections<br />
Check that the customer power cables are connected correctly<br />
to the terminal blocks or optional circuit breaker.<br />
Ensure that connections of power cables within the panels<br />
to the circuit breaker or terminal blocks are tight.<br />
Grounding<br />
Verify that the unit’s protective ground terminal(s) are<br />
properly connected to a suitable grounding point. Ensure<br />
that all unit internal ground connections are tight.<br />
Water System<br />
Verify the chilled liquid system has been installed correctly,<br />
and has been commissioned with the correct direction<br />
of water flow through the evaporator. The inlet<br />
should be at the bottom connection on a two pass evaporator.<br />
Purge air from the top of the evaporator using the<br />
plugged air vent mounted on the top of the evaporator<br />
body.<br />
Flow rates and pressure drops must be within the limits<br />
given in SECTION 5 - TECHNICAL DATA on Page<br />
49. Operation outside of these limits is undesirable<br />
and could cause damage.<br />
82<br />
FORM 201.28-NM1.1<br />
ISSUE DATE: 8/29/2012<br />
If main power must be switched OFF for extended<br />
maintenance or an extended shutdown period, precautions<br />
must be taken. If there is a possibility of<br />
liquid freezing due to low ambient temperatures, the<br />
evaporator should be drained or power should be applied<br />
to the chiller. This will allow the evaporator<br />
heater to protect the evaporator from freezing down to<br />
0°F (-17.7°C). Before placing the unit back in service,<br />
valves should be opened and power must be switched<br />
on (if power is removed for more than 8 hours) for at<br />
least 8 hours (24 hours if ambient temperature is below<br />
86°F [30°C]) before the unit is restarted.<br />
Flow Switch<br />
Verify a chilled water flow switch is correctly fitted<br />
in the customer’s piping on the evaporator outlet, and<br />
wired into the control panel correctly using shielded<br />
cable.<br />
There should be a straight run of at least five pipe diameters<br />
on either side of the flow switch. The flow switch<br />
should be connected to Terminals 2 and 13 in the panel.<br />
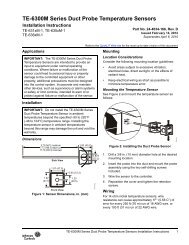
Temperature Sensor(s)<br />
Ensure the leaving liquid temperature sensor is coated<br />
with heat conductive compound (Part No. 013-00890-<br />
000) and is inserted to the bottom of the water outlet<br />
sensor well in the evaporator. This sensor also provides<br />
some freeze protection and must always be fully inserted<br />
in the water outlet sensor well.<br />
Programmed Options<br />
Verify that the options factory-programmed into the<br />
Micro Panel are in accordance with the customer’s<br />
order requirements by pressing the OPTIONS key on<br />
the keypad and reading the settings from the display.<br />
Programmed Settings<br />
Ensure the system cutout and operational settings are in<br />
accordance with the operating requirements by pressing<br />
the PROGRAM key.<br />
Date and Time<br />
Program the date and time by first ensuring that the CLK<br />
jumper JP2 on the Chiller Control Board is in the ON<br />
position. Then press the DATE/TIME key and set the<br />
date and time (see SECTION 8 - MICROPANEL Date/<br />
Time and Schedule Keys on Page 120).<br />
JOHNSON CONTROLS