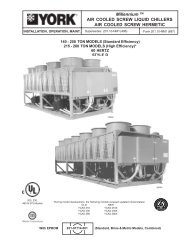
YVAA Style A Air-Cooled Screw Liquid Chillers ... - Johnson Controls
YVAA Style A Air-Cooled Screw Liquid Chillers ... - Johnson Controls
YVAA Style A Air-Cooled Screw Liquid Chillers ... - Johnson Controls

You also want an ePaper? Increase the reach of your titles
YUMPU automatically turns print PDFs into web optimized ePapers that Google loves.
FORM 201.28-NM1.1<br />
ISSUE DATE: 8/29/2012<br />
GENERAL REQUIREMENTS<br />
The units have been designed to operate continuously,<br />
provided they are regularly maintained and operated<br />
within the limitations given in this manual. Each unit<br />
should be included in a routine schedule of daily maintenance<br />
checks by the operator/customer, backed up by<br />
regular service inspection and maintenance visits by a<br />
suitably qualified Service Engineer.<br />
It is entirely the responsibility of the owner to provide<br />
for these regular maintenance requirements and/<br />
or enter into a maintenance agreement with a <strong>Johnson</strong><br />
<strong>Controls</strong> service organization to protect the operation<br />
of the unit. If damage or a system failure occurs due<br />
to improper maintenance during the warranty period,<br />
<strong>Johnson</strong> <strong>Controls</strong> shall not be liable for costs incurred<br />
to return the unit to satisfactory condition.<br />
Weekly Maintenance<br />
This “Maintenance” section applies to<br />
the basic unit only and may, on individual<br />
contracts, be supplemented by additional<br />
requirements to cover any modifications<br />
or ancillary equipment as applicable.<br />
The “Safety” section of this manual<br />
should be read carefully before attempting<br />
any maintenance operations on the<br />
unit.<br />
The following maintenance checks should be carried<br />
out on a weekly basis by the operator/customer. Please<br />
note that the units are not generally user serviceable<br />
and no attempt should be made to rectify faults or<br />
problems found during daily checks unless competent<br />
and equipped to do so. If in any doubt, contact your<br />
local <strong>Johnson</strong> <strong>Controls</strong> Service Agent.<br />
Unit Status<br />
Press the ‘STATUS’ key on the keypad and ensure no<br />
fault messages are displayed.<br />
SECTION 9 - MAINTENANCE<br />
Refrigerant Leaks<br />
Visually check the heat exchangers, compressors and<br />
pipework for damage and gas leaks.<br />
Operating Conditions<br />
Read the operating pressures and temperatures at the<br />
control panel using the display keys and check that<br />
these are within the operating limitations given in the<br />
manual.<br />
Compressor Oil Level<br />
Compressor oil level will typically run below the bottom<br />
of the sight glass. Oil levels will only be visible<br />
in the sight glass after running for periods of 15 to 30<br />
minutes at full compressor speed. Do not run with oil<br />
levels above the sight glass. Be careful when viewing<br />
the sight glass not to confuse a full sight glass with an<br />
empty sight glass.<br />
Refrigerant Charge<br />
Assure there is a level of refrigerant in the evaporator<br />
sight glass while running at “Full Load” for 15 to 30<br />
minutes.<br />
Adding Charge to a System<br />
A sight glass is located in the evaporator. When optimally<br />
charged after running full load, the refrigerant<br />
level should be approximately in the center of the sight<br />
glass. There should be little concern if the level is high<br />
or low in the glass, it should not affect operation.<br />
It is not necessary to weigh charge unless<br />
the entire charge has been lost. The ease<br />
of charging is possible since the microchannel<br />
coils hold only a small amount<br />
of refrigerant charge. A charging valve,<br />
located between the fixed orifice and the<br />
evaporator, may be used if charge adjustment<br />
is required. Charge should be<br />
added as liquid while circulating water<br />
through the evaporator. If the complete<br />
charge needs to be added, see Refrigerant<br />
Removal, Evacuation and Charging a<br />
<strong>YVAA</strong> Chiller on Page 130 in this section.<br />
Use the valve on the liquid line for adding<br />
the full charge and open the valves per<br />
the procedure.<br />
JOHNSON CONTROLS 129<br />
9