YVAA Style A Air-Cooled Screw Liquid Chillers ... - Johnson Controls
YVAA Style A Air-Cooled Screw Liquid Chillers ... - Johnson Controls
YVAA Style A Air-Cooled Screw Liquid Chillers ... - Johnson Controls

Create successful ePaper yourself
Turn your PDF publications into a flip-book with our unique Google optimized e-Paper software.
AIR-COOLED SCREW<br />
LIQUID CHILLERS<br />
INSTALLATION, OPERATION, MAINTENANCE Supersedes: 201.28-NM1.1 (111) Form 201.28-NM1.1 (812)<br />
MODEL <strong>YVAA</strong> STYLE A<br />
AIR-COOLED SCREW LIQUID CHILLERS WITH<br />
VARIABLE SPEED DRIVE<br />
FRAME SIZES 015 - 052<br />
150 - 500 TONS<br />
525 - 1750 KW<br />
2 COMPRESSOR<br />
50 AND 60 HZ<br />
HFC-134A<br />
Issue Date:<br />
August 29, 2012<br />
LD15045<br />
035-23219-100
2<br />
IMPORTANT!<br />
READ BEFORE PROCEEDING!<br />
This equipment is a relatively complicated apparatus.<br />
During installation, operation maintenance or service,<br />
individuals may be exposed to certain components or<br />
conditions including, but not limited to: refrigerants,<br />
materials under pressure, rotating components, and<br />
both high and low voltage. Each of these items has the<br />
potential, if misused or handled improperly, to cause<br />
bodily injury or death. It is the obligation and responsibility<br />
of operating/service personnel to identify and<br />
recognize these inherent hazards, protect themselves,<br />
and proceed safely in completing their tasks. Failure<br />
to comply with any of these requirements could result<br />
in serious damage to the equipment and the property in<br />
GENERAL SAFETY GUIDELINES<br />
SAFETY SYMBOLS<br />
FORM 201.28-NM1.1<br />
ISSUE DATE: 8/29/2012<br />
which it is situated, as well as severe personal injury or<br />
death to themselves and people at the site.<br />
This document is intended for use by owner-authorized<br />
operating/service personnel. It is expected that these<br />
individuals possess independent training that will enable<br />
them to perform their assigned tasks properly and<br />
safely. It is essential that, prior to performing any task<br />
on this equipment, this individual shall have read and<br />
understood this document and any referenced materials.<br />
This individual shall also be familiar with and<br />
comply with all applicable governmental standards and<br />
regulations pertaining to the task in question.<br />
The following symbols are used in this document to alert the reader to specific situations:<br />
Indicates a possible hazardous situation<br />
which will result in death or serious injury<br />
if proper care is not taken.<br />
Indicates a potentially hazardous situation<br />
which will result in possible injuries<br />
or damage to equipment if proper care is<br />
not taken.<br />
Identifies a hazard which could lead to<br />
damage to the machine, damage to other<br />
equipment and/or environmental pollution<br />
if proper care is not taken or instructions<br />
and are not followed.<br />
Highlights additional information useful<br />
to the technician in completing the work<br />
being performed properly.<br />
External wiring, unless specified as an optional connection in the manufacturer’s product line, is not<br />
to be connected inside the control cabinet. Devices such as relays, switches, transducers and controls<br />
and any external wiring must not be installed inside the micro panel. All wiring must be in accordance<br />
with <strong>Johnson</strong> <strong>Controls</strong>’ published specifications and must be performed only by a qualified<br />
electrician. <strong>Johnson</strong> <strong>Controls</strong> will NOT be responsible for damage/problems resulting from improper<br />
connections to the controls or application of improper control signals. Failure to follow this warning<br />
will void the manufacturer’s warranty and cause serious damage to property or personal injury.<br />
JOHNSON CONTROLS
FORM 201.28-NM1.1<br />
ISSUE DATE: 8/29/2012<br />
In complying with <strong>Johnson</strong> <strong>Controls</strong>’ policy for continuous<br />
product improvement, the information contained<br />
in this document is subject to change without<br />
notice. <strong>Johnson</strong> <strong>Controls</strong> makes no commitment to<br />
update or provide current information automatically to<br />
the manual owner. Updated manuals, if applicable, can<br />
be obtained by contacting the nearest <strong>Johnson</strong> <strong>Controls</strong><br />
Service office.<br />
Operating/service personnel maintain responsibility for<br />
the applicability of these documents to the equipment.<br />
If there is any question regarding the applicability of<br />
CHANGEABILITY OF THIS DOCUMENT<br />
The Control/VSD Cabinet contains lethal<br />
high AC and DC voltages. Before performing<br />
service inside the cabinet, remove<br />
the AC supply feeding the chiller and<br />
verify using a non-contact voltage sensor.<br />
The DC voltage on the VSD DC Bus will<br />
take 5 minutes to bleed off, after AC<br />
power is removed. Always check the DC<br />
Bus Voltage with a Voltmeter to assure<br />
the capacitor charge has bled off before<br />
working on the system.<br />
NEVER short out the DC Bus to discharge<br />
the filter capacitors.<br />
NEVER place loose tools, debris, or any<br />
objects inside the Control Panel/VSD<br />
Cabinet.<br />
these documents, the technician should verify whether<br />
the equipment has been modified and if current literature<br />
is available from the owner of the equipment prior<br />
to performing any work on the chiller.<br />
CHANGE BARS<br />
ASSOCIATED LITERATURE<br />
Revisions made to this document are indicated with a<br />
line along the left or right hand column in the area the<br />
revision was made. These revisions are to technical information<br />
and any other changes in spelling, grammar<br />
or formatting are not included.<br />
NEVER allow the Control Panel VSD<br />
Cabinet doors to remain open if there is<br />
a potential for rain to enter the panel.<br />
Keep doors closed and assure all latches<br />
are engaged on each door unless the unit<br />
is being serviced.<br />
ALWAYS lockout the disconnect supplying<br />
AC to the chiller.<br />
The 1L Line Inductor will reach operating<br />
temperatures of over 150°C (300°F.) DO<br />
NOT open panel doors during operation.<br />
Assure the inductor is cool whenever<br />
working near the inductor with power<br />
OFF.<br />
MANUAL DESCRIPTION FORM NUMBER<br />
Equipment Pre-Startup and Startup Checklist 201.28-CL2<br />
<strong>YVAA</strong> Frame Size 015 - 027, 2 Compressor 60 Hz (150-275 Tons)<br />
<strong>YVAA</strong> Frame Size 054 - 098, 2 Compressor 50 Hz (525-950 KW)<br />
201.28-RP1<br />
JOHNSON CONTROLS 3
THIS PAGE INTENTIONALLY LEFT BLANK
FORM 201.28-NM1.1<br />
ISSUE DATE: 8/29/2012<br />
TABLE OF CONTENTS<br />
SECTION 1 - GENERAL CHILLER INFORMATION AND SAFETY ........................................................................9<br />
Introduction .......................................................................................................................................................9<br />
Warranty ...........................................................................................................................................................9<br />
Quality Assurance and Safety ..........................................................................................................................9<br />
Fluorinated Greenhouse Gases .....................................................................................................................10<br />
Responsibility for Safety .................................................................................................................................10<br />
About This Manual..........................................................................................................................................10<br />
Misuse of Equipment ......................................................................................................................................10<br />
SECTION 2 - PRODUCT DESCRIPTION ...............................................................................................................13<br />
General System Description ...........................................................................................................................13<br />
Semi-Hermetic York Twin-<strong>Screw</strong> Compressors ..............................................................................................14<br />
Evaporator ......................................................................................................................................................15<br />
Condenser ......................................................................................................................................................15<br />
Refrigerant Circuit ..........................................................................................................................................15<br />
Electrical .........................................................................................................................................................15<br />
Building Automation System Capabilities .......................................................................................................15<br />
Microcomputer Control Center .......................................................................................................................16<br />
Accessories and Options ................................................................................................................................17<br />
SECTION 3 - HANDLING AND STORAGE ............................................................................................................19<br />
Delivery and Storage ......................................................................................................................................19<br />
Inspection .......................................................................................................................................................19<br />
Moving the Chiller ...........................................................................................................................................19<br />
Lifting Weights ................................................................................................................................................19<br />
Lifting Unit ......................................................................................................................................................20<br />
Unit Removal From Shipping Container .........................................................................................................21<br />
Lifting Using Lugs ...........................................................................................................................................22<br />
Lifting Using Shackles ....................................................................................................................................22<br />
SECTION 4 - INSTALLATION ................................................................................................................................23<br />
Location Requirements ..................................................................................................................................23<br />
Outdoor Installations ......................................................................................................................................23<br />
Location Clearances .......................................................................................................................................23<br />
Vibration Isolators ...........................................................................................................................................24<br />
Shipping Braces .............................................................................................................................................24<br />
Chilled <strong>Liquid</strong> Piping .......................................................................................................................................24<br />
Water Treatment .............................................................................................................................................26<br />
Pipework Arrangement ...................................................................................................................................26<br />
Minimum Water Volume .................................................................................................................................26<br />
Leaving Water Temperature Out of Range .....................................................................................................26<br />
Flow Rate Out of Range .................................................................................................................................26<br />
Thermal Storage .............................................................................................................................................27<br />
Variable Primary Flow ....................................................................................................................................27<br />
Connection Types and Sizes ..........................................................................................................................27<br />
Evaporator Connections .................................................................................................................................27<br />
Refrigerant Relief Valve Piping .......................................................................................................................29<br />
Electrical Connection ......................................................................................................................................29<br />
JOHNSON CONTROLS 5
6<br />
TABLE OF CONTENTS (CONT'D)<br />
FORM 201.28-NM1.1<br />
ISSUE DATE: 8/29/2012<br />
Power Wiring ..................................................................................................................................................29<br />
Power Supply Wiring ......................................................................................................................................30<br />
115VAC Control Supply Transformer ..............................................................................................................30<br />
Control Wiring .................................................................................................................................................30<br />
Volts Free Contacts ........................................................................................................................................30<br />
System Inputs .................................................................................................................................................30<br />
Power Supply Wiring ......................................................................................................................................32<br />
Customer Control Wiring ................................................................................................................................33<br />
SECTION 5 - TECHNICAL DATA ...........................................................................................................................49<br />
Nomenclature .................................................................................................................................................49<br />
SECTION 6 - COMMISSIONING ............................................................................................................................81<br />
Preparation .....................................................................................................................................................81<br />
First Time Start Up .........................................................................................................................................83<br />
SECTION 7 - OPERATION .....................................................................................................................................85<br />
Operating <strong>Controls</strong> .........................................................................................................................................85<br />
Basic Operating Sequence .............................................................................................................................87<br />
Unit Warning ...................................................................................................................................................87<br />
Unit Safeties ...................................................................................................................................................88<br />
System Safeties (Faults) ................................................................................................................................89<br />
SECTION 8 - MICROPANEL ..................................................................................................................................95<br />
SECTION 9 - MAINTENANCE ..............................................................................................................................129<br />
General Requirements .................................................................................................................................129<br />
Refrigerant Removal, Evacuation and Charging a <strong>YVAA</strong> Chiller .................................................................130<br />
Microchannel Coil Cleaning ..........................................................................................................................131<br />
Maintenance Requirements for <strong>YVAA</strong> <strong>Chillers</strong> .............................................................................................132<br />
SECTION 10 - DECOMMISSIONING, DISMANTLING AND DISPOSAL ............................................................141<br />
General .........................................................................................................................................................141<br />
JOHNSON CONTROLS
FORM 201.28-NM1.1<br />
ISSUE DATE: 8/29/2012<br />
LIST OF FIGURES<br />
FIGURE 1 - <strong>YVAA</strong> <strong>Air</strong>-<strong>Cooled</strong> <strong>Screw</strong> <strong>Liquid</strong> Chiller with Variable Speed Drive .......................................................13<br />
FIGURE 2 - Chiller Control System .........................................................................................................................14<br />
FIGURE 3 - View of York Control Center User Interface .........................................................................................16<br />
FIGURE 4 - Proper Lifting of <strong>YVAA</strong> Chiller ..............................................................................................................20<br />
FIGURE 5 - Acceptable Minimum Clearances Around/Between Unit(s) .................................................................24<br />
FIGURE 6 - Pipework Arrangement ........................................................................................................................26<br />
FIGURE 7 - Leaving Water Temperature Out of Range Suggested Layout ............................................................26<br />
FIGURE 8 - Suggested Layout For Applications With A Flow Rate Less Than<br />
The Evaporator Minimum Allowable Flow Rate ...................................................................................27<br />
FIGURE 9 - Suggested Layout For Applications With A Flow Rate Less Than<br />
The Evaporator Minimum Allowable Flow Rate ...................................................................................27<br />
FIGURE 10 - Victaulic Groove .................................................................................................................................27<br />
FIGURE 11 - Flange For GB Vessels ......................................................................................................................28<br />
FIGURE 12 - Flange Attachment .............................................................................................................................29<br />
FIGURE 13 - Power Wiring - 2 Compressor Connections.......................................................................................32<br />
FIGURE 14 - Customer Control Connections .........................................................................................................33<br />
FIGURE 15 - <strong>YVAA</strong> Dimensions ..............................................................................................................................55<br />
FIGURE 16 - Keyboard and Display........................................................................................................................85<br />
JOHNSON CONTROLS 7
8<br />
LIST OF TABLES<br />
FORM 201.28-NM1.1<br />
ISSUE DATE: 8/29/2012<br />
TABLE 1 - Minimum Evaporator Tube Removal Clearance ....................................................................................24<br />
TABLE 2 - Evaporator Flange Dimensions For GB Units .......................................................................................28<br />
TABLE 3 - Electrical Lug Data ................................................................................................................................34<br />
TABLE 4 - Physical Data .........................................................................................................................................50<br />
TABLE 5 - Unit Rigging ...........................................................................................................................................56<br />
TABLE 6 - Isolator Selection and Mounting Locations ............................................................................................62<br />
TABLE 7 - Low Differential Oil Pressure Cutout .....................................................................................................91<br />
TABLE 8 - Start Inhibit Sensor Thresholds .............................................................................................................92<br />
TABLE 9 - Sensor Min/Max Outputs .....................................................................................................................102<br />
TABLE 10 - Setpoint Limits ................................................................................................................................... 113<br />
TABLE 11 - Programmable Operating Parameters ............................................................................................... 116<br />
TABLE 12 - Printout Types ....................................................................................................................................124<br />
TABLE 13 - Troubleshooting Guide ......................................................................................................................133<br />
TABLE 14 - Temperature Input Voltage Sensor<br />
(Measured Signal To Shield At The Sensor) ......................................................................................136<br />
TABLE 15 - Outside <strong>Air</strong> Temperature Sensor Input Voltage<br />
(Measured Signal To Shield At The Sensor) ......................................................................................137<br />
TABLE 16 - Pressure Transducer Output Voltage<br />
(Measured Signal To Return At The Transducer) ..............................................................................138<br />
TABLE 17 - Motor Temperature Sensor Resistance<br />
(Check At The Motor) ........................................................................................................................139<br />
TABLE 18 - SI Metric Conversion .........................................................................................................................143<br />
JOHNSON CONTROLS
FORM 201.28-NM1.1<br />
ISSUE DATE: 8/29/2012<br />
INTRODUCTION<br />
SECTION 1 - GENERAL CHILLER INFORMATION AND SAFETY<br />
YORK <strong>YVAA</strong> chillers are manufactured to the highest<br />
design and construction standards to ensure high performance,<br />
reliability and adaptability to all types of air<br />
conditioning installations.<br />
The unit is intended for cooling water or glycol solutions<br />
and is not suitable for purposes other than those<br />
specified in this manual.<br />
This manual contains all the information required for<br />
correct installation and commissioning of the unit, together<br />
with operating and maintenance instructions.<br />
The manual should be read thoroughly before attempting<br />
to operate or service the unit.<br />
All procedures detailed in the manual, including installation,<br />
commissioning and maintenance tasks must<br />
only be performed by suitably trained and qualified<br />
personnel.<br />
The manufacturer will not be liable for any injury or<br />
damage caused by incorrect installation, commissioning,<br />
operation or maintenance resulting from a failure<br />
to follow the procedures and instructions detailed in<br />
the manual.<br />
WARRANTY<br />
<strong>Johnson</strong> <strong>Controls</strong> warrants <strong>YVAA</strong> chillers in accordance<br />
with the "Limited Warranty Engineered Systems<br />
Equipment" procedure, Form 50.05-NM2.<br />
<strong>Johnson</strong> <strong>Controls</strong> warrants all equipment and materials<br />
against defects in workmanship and materials for<br />
a period of eighteen months from date of shipment or<br />
12 months from date of startup, whichever comes first,<br />
unless labor or extended warranty has been purchased<br />
as part of the contract.<br />
The warranty is limited to parts only replacement and<br />
shipping of any faulty part, or sub-assembly, which has<br />
failed due to poor quality or manufacturing errors. All<br />
claims must be supported by evidence that the failure<br />
has occurred within the warranty period, and that the<br />
unit has been operated within the designed parameters<br />
specified.<br />
All warranty claims must specify the unit model, serial<br />
number, order number and run hours/starts. Model and<br />
serial number information is printed on the unit identification<br />
plate.<br />
The unit warranty will be void if any modification to<br />
the unit is carried out without prior written approval<br />
from <strong>Johnson</strong> <strong>Controls</strong>.<br />
For warranty purposes, the following conditions must<br />
be satisfied:<br />
• The initial start of the unit must be carried out<br />
by trained personnel from an authorized <strong>Johnson</strong><br />
<strong>Controls</strong> Service Center. Refer to SECTION 6 -<br />
COMMISSIONING on Page 81 for more information.<br />
• Only genuine YORK approved spare parts, oils,<br />
coolants, and refrigerants must be used.<br />
• All the scheduled maintenance operations detailed<br />
in this manual must be performed at the specified<br />
times by suitably trained and qualified personnel.<br />
See SECTION 9 - MAINTENANCE on Page 129<br />
for more information.<br />
• Failure to satisfy any of these conditions will<br />
automatically void the warranty. Refer to Form<br />
50.05-NM2 for complete details.<br />
QUALITY ASSURANCE AND SAFETY<br />
<strong>YVAA</strong> chillers are designed within EN ISO 9001 and<br />
built within an EN ISO 9002 accredited manufacturing<br />
organization.<br />
Units conform with the following European Directives:<br />
• Machinery Directive (2006/42/EC)<br />
• EMC Directive (2004/108/EC)<br />
• Pressure Equipment Directive (97/23/EC)<br />
• Low Voltage Directive (2006/95/EC)<br />
• Safety Code for Mechanical Refrigeration<br />
(EN378-2(2008))<br />
CE/PED marked units conform to the following standards:<br />
• Machinery Directive (2006/42/EC).<br />
• EMC Directive (2004/108/EC).<br />
• Pressure Equipment Directive (97/23/EC).<br />
• Low Voltage Directive (2006/95/EC).<br />
• Safety Code for Mechanical Refrigeration<br />
(EN378-2(2008)).<br />
JOHNSON CONTROLS 9<br />
1
SECTION 1 - GENERAL CHILLER INFORMATION AND SAFETY<br />
ETL/ASME marked units conform to the following<br />
standards:<br />
10<br />
• ANSI/ASHRAE 15 – Safety Code for Mechanical<br />
Refrigeration.<br />
• ANSI/ASHRAE 34 – Number Designation and<br />
Safety Classification of Refrigerants.<br />
• ANSI/NFPA 70 – National Electrical Code<br />
(N.E.C.).<br />
• ASME Boiler and Pressure Vessel Code, Section<br />
VIII, Division 1.<br />
GB marked units conform to the following standards:<br />
• GB5226.1 Safety of machinery- Electrical equipment<br />
of machines – Part 1: General requirements.<br />
• GB25131 Safety requirements for water chiller<br />
(heat pump) using the vapor compression cycle.<br />
FLUORINATED GREENHOUSE GASES<br />
• This equipment contains fluorinated greenhouse<br />
gases covered by the Kyoto Protocol.<br />
• The global warming potential of the refrigerant<br />
(RI34a) used in this unit is 1300.<br />
• The refrigerant quantity is stated in Table 4 on<br />
page 50 of this document.<br />
• The fluorinated greenhouse gases in this equipment<br />
may not be vented to the atmosphere.<br />
• This equipment should only be serviced by qualified<br />
technicians.<br />
RESPONSIBILITY FOR SAFETY<br />
Every care has been taken in the design and manufacture<br />
of the unit to ensure compliance with the safety<br />
requirements listed above. However, the individual<br />
operating or working on any machinery is primarily<br />
responsible for:<br />
• Personal safety, safety of other personnel, and the<br />
machinery.<br />
• Correct utilization of the machinery in accordance<br />
with the procedures detailed in the manual.<br />
ABOUT THIS MANUAL<br />
The contents of this manual include suggested best<br />
working practices and procedures. These are issued for<br />
guidance only, and they do not take precedence over<br />
the above stated individual responsibility and/or local<br />
safety regulations.<br />
FORM 201.28-NM1.1<br />
ISSUE DATE: 8/29/2012<br />
This manual and any other document supplied with<br />
the unit are the property of <strong>Johnson</strong> <strong>Controls</strong> which reserves<br />
all rights. They may not be reproduced, in whole<br />
or in part, without prior written authorization from an<br />
authorized <strong>Johnson</strong> <strong>Controls</strong> representative.<br />
MISUSE OF EQUIPMENT<br />
Suitability for Application<br />
The unit is intended for cooling water or glycol solutions<br />
and is not suitable for purposes other than those<br />
specified in these instructions. Any use of the equipment<br />
other than its intended use, or operation of the<br />
equipment contrary to the relevant procedures may result<br />
in injury to the operator, or damage to the equipment.<br />
The unit must not be operated outside the design parameters<br />
specified in this manual.<br />
Structural Support<br />
Structural support of the unit must be provided as indicated<br />
in these instructions. Failure to provide proper<br />
support may result in injury to the operator, or damage<br />
to the equipment and/or building.<br />
Mechanical Strength<br />
The unit is not designed to withstand loads or stresses<br />
from adjacent equipment, pipework or structures. Additional<br />
components must not be mounted on the unit.<br />
Any such extraneous loads may cause structural failure<br />
and may result in injury to the operator, or damage to<br />
the equipment.<br />
General Access<br />
There are a number of areas and features, which may<br />
be a hazard and potentially cause injury when working<br />
on the unit unless suitable safety precautions are taken.<br />
It is important to ensure access to the unit is restricted<br />
to suitably qualified persons who are familiar with the<br />
potential hazards and precautions necessary for safe<br />
operation and maintenance of equipment containing<br />
high temperatures, pressures and voltages.<br />
Pressure Systems<br />
The unit contains refrigerant vapor and liquid under pressure,<br />
release of which can be a danger and cause injury.<br />
The user should ensure that care is taken during installation,<br />
operation and maintenance to avoid damage to the<br />
pressure system. No attempt should be made to gain access<br />
to the component parts of the pressure system other<br />
than by suitably trained and qualified personnel.<br />
JOHNSON CONTROLS
FORM 201.28-NM1.1<br />
ISSUE DATE: 8/29/2012<br />
Electrical<br />
The unit must be grounded. No installation or maintenance<br />
work should be attempted on the electrical<br />
equipment without first switching power OFF, isolating<br />
and locking-off the power supply. Servicing and<br />
maintenance on live equipment must not be attempted.<br />
No attempt should be made to gain access to the control<br />
panel or electrical enclosures during normal operation<br />
of the unit.<br />
Rotating Parts<br />
Fan guards must be fitted at all times and not removed<br />
unless the power supply has been isolated. If ductwork<br />
is to be fitted, requiring the wire fan guards to be removed,<br />
alternative safety measures must be taken to<br />
protect against the risk of injury from rotating fans.<br />
Sharp Edges<br />
The fins on the air-cooled condenser coils have sharp<br />
metal edges. Reasonable care should be taken when<br />
working in contact with the coils to avoid the risk of<br />
minor abrasions and lacerations. The use of gloves is<br />
recommended.<br />
Frame rails, brakes, and other components may also<br />
have sharp edges. Reasonable care should be taken<br />
when working in contact with any components to avoid<br />
risk of minor abrasions and lacerations.<br />
Refrigerants and Oils<br />
Refrigerants and oils used in the unit are generally nontoxic,<br />
non-flammable and non-corrosive, and pose no<br />
special safety hazards. Use of gloves and safety glasses<br />
is, however, recommended when working on the unit.<br />
The buildup of refrigerant vapor, from a leak for example,<br />
does pose a risk of asphyxiation in confined or<br />
enclosed spaces and attention should be given to good<br />
ventilation.<br />
High Temperature and Pressure Cleaning<br />
High temperature and pressure cleaning methods<br />
(e.g. steam cleaning) should not be used on any part<br />
of the pressure system as this may cause operation of<br />
the pressure relief device(s). Detergents and solvents,<br />
which may cause corrosion, should also be avoided.<br />
SECTION 1 - GENERAL CHILLER INFORMATION AND SAFETY<br />
Emergency Shutdown<br />
In case of emergency , the control panel is fitted with<br />
an incoming supply circuit breaker with a red and yellow<br />
handle which can be used as the emergency stop<br />
device. When operated it removes the electrical supply<br />
to the inverter, fans, and control circuit thus shutting<br />
down the unit.<br />
Safety Labels<br />
White symbol on blue background.<br />
For safe operation, read the Instructions<br />
first.<br />
Black symbol on yellow background.<br />
Warning: This machine may start automatically<br />
without prior warning<br />
Black symbol on yellow background.<br />
Warning: Hot surface.<br />
Black symbol on yellow background.<br />
Warning: Safety relief valve may discharge<br />
gas or liquid without prior warning.<br />
Black symbol on yellow background.<br />
Warning: Isolate all electrical sources of<br />
supply before opening or removing the<br />
cover, as lethal voltages may exist.<br />
Black symbol on yellow background.<br />
General attention symbol.<br />
Black symbol on yellow background.<br />
Warning: On isolating the supply it may<br />
take up to 300 seconds for the capacitor<br />
voltage to fall below 50 volts.<br />
JOHNSON CONTROLS 11<br />
1
THIS PAGE INTENTIONALLY LEFT BLANK
FORM 201.28-NM1.1<br />
ISSUE DATE: 8/29/2012<br />
SECTION 2 - PRODUCT DESCRIPTION<br />
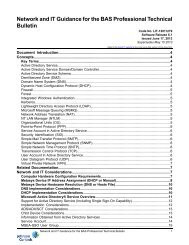
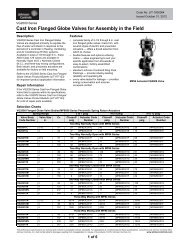
FIGURE 1 - <strong>YVAA</strong> AIR-COOLED SCREW LIQUID CHILLER WITH VARIABLE SPEED DRIVE<br />
YORK <strong>YVAA</strong> R134a chillers are designed for water<br />
or glycol cooling. All units are designed to be located<br />
outside on the roof of a building or at ground level.<br />
The units are completely assembled with all interconnecting<br />
refrigerant piping and internal wiring, ready<br />
for field installation.<br />
Prior to delivery, the unit is pressure tested, evacuated,<br />
and fully charged with refrigerant and oil in each of the<br />
two independent refrigerant circuits. After assembly,<br />
an operational test is performed with water flowing<br />
through the evaporator to ensure that each refrigerant<br />
circuit operates correctly.<br />
The unit structure is manufactured from heavy gauge,<br />
galvanized steel. Many external structural parts are<br />
coated with “Champagne” baked-on enamel powder<br />
paint.<br />
All exposed power wiring is routed through liquidtight,<br />
non-metallic conduit.<br />
GENERAL SYSTEM DESCRIPTION<br />
The <strong>YVAA</strong> Chiller combines the best of modern screw<br />
compressor design with the latest technology in vari-<br />
LD15045<br />
able speed drives. The result is superior control and<br />
efficiency in real world conditions. The VSD enables<br />
slowing the speed of the compressor to match the load<br />
on the system resulting in precise chilled liquid control,<br />
minimized sound, maximum energy efficiency,<br />
and reduced cost of ownership. The VSD also provides<br />
soft starts with no electrical inrush. The lack of heat<br />
build-up on start also enables required off time between<br />
starts to be reduced to a period of two minutes.<br />
The <strong>YVAA</strong> <strong>Air</strong>-<strong>Cooled</strong> <strong>Screw</strong> Chiller utilizes many<br />
components, which are the same or nearly the same as<br />
a standard screw chiller of a similar size. This includes<br />
modular frame rails, condenser, fans, compressors and<br />
evaporator.<br />
The chiller consists of two screw compressors in a corresponding<br />
number of separate refrigerant circuits, a<br />
hybrid falling film evaporator, an air-cooled condenser,<br />
receiver/flash tanks, feed valves, oil separators, and<br />
compressor mufflers. Oil separators utilize no moving<br />
parts. Oil cooling is accomplished by refrigerant leaving<br />
the eductor flashing in the suction line which cools<br />
the oil, motor and compressor.<br />
JOHNSON CONTROLS 13<br />
2
SECTION 2 - PRODUCT DESCRIPTION<br />
14<br />
INPUTS<br />
Pressure Transducers<br />
Temperature Sensors<br />
Switches<br />
<strong>Liquid</strong> Flow<br />
High Pressure<br />
Start/Stop<br />
Level<br />
Customer Supplied<br />
Contacts<br />
COMMUNICATIONS<br />
Building Automation<br />
Printer Modem<br />
3 Phase Power Line<br />
Rectifier<br />
AC/DC Rectifier<br />
Rectifier Controller<br />
SCR Trigger Board<br />
Signal From Main Control Panel<br />
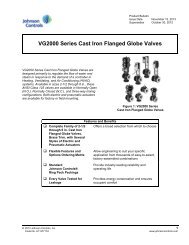
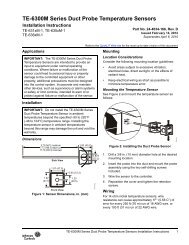
FIGURE 2 - CHILLER CONTROL SYSTEM<br />
An integral liquid cooled, transistorized, PWM, Variable<br />
Speed Drive (VSD) is controlled by the chiller<br />
microprocessor control panel to start/stop, select compressors<br />
to run, and select compressor speed. Displacement<br />
Power Factor is 0. 95 at part or full load.<br />
The chiller microprocessor communicates with the<br />
VSD Logic Board via a 3-wire RS-485 opto coupled<br />
data link. The VSD Logic Board runs the number of<br />
compressors required to meet the load and the compressors<br />
to the speed requested by the chiller microprocessor.<br />
CONTROL<br />
PANEL<br />
Chiller Control<br />
Board)<br />
Microprocessor<br />
User Interface<br />
Display and<br />
Keypad<br />
DISPLAY KEYPAD<br />
VSD Logic Board<br />
Power Driver<br />
(IGBT)<br />
IGBT Gate Driver<br />
PWM Signal<br />
OUTPUTS<br />
Relay Output Board)<br />
Solenoids<br />
Contactors<br />
Alarm<br />
Pump<br />
Compressor Heater<br />
Run Status<br />
Evaporator Heater<br />
VSD<br />
VSD Logic Board<br />
SCR Trigger Board<br />
Power Components<br />
PWM (Speed Control)<br />
Inverter<br />
MOTOR<br />
FORM 201.28-NM1.1<br />
ISSUE DATE: 8/29/2012<br />
Compressor 1<br />
Compressor 2<br />
LD15158<br />
The basic system control and VSD system architecture<br />
is shown in Figure 2.<br />
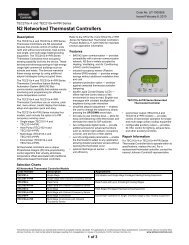
SEMI-HERMETIC YORK TWIN-SCREW<br />
COMPRESSORS<br />
LD15028<br />
Compressors are direct drive, semi-hermetic, rotary<br />
twin-screw type, including: muffler, temperature actuated<br />
‘off-cycle’ heater, IP55 terminal board and precision<br />
machined cast iron housing.<br />
Reliable suction gas cooled, high efficiency, accessible<br />
hermetic compressor motor, full suction gas flow<br />
JOHNSON CONTROLS
FORM 201.28-NM1.1<br />
ISSUE DATE: 8/29/2012<br />
through mesh screen filter, with inherent internal thermal<br />
overload protection and external current overload<br />
on all three phases.<br />
Continuous function, microprocessor controlled, Variable<br />
Speed Drive (VSD) shall provide valve-less,<br />
smooth capacity control from 100% down to 10% of<br />
chiller capacity.<br />
In addition, elimination of the slide valve and associated<br />
unloading components has resulted in a 50% reduction<br />
in compressor moving parts.<br />
EVAPORATOR<br />
The evaporator is a shell and tube, hybrid falling film<br />
type heat exchanger. It contains a balance of flooded<br />
and falling film technology to optimize efficiency, minimize<br />
refrigerant charge, and maintain reliable control.<br />
A specifically designed distribution system provides<br />
uniform refrigerant flow for optimum performance.<br />
CONDENSER<br />
The <strong>YVAA</strong> introduces micro-channel coil to the York<br />
screw compressor chiller line. The micro-channel maximizes<br />
condenser heat transfer, resulting in a smaller<br />
footprint, and reduces refrigerant charge by as much<br />
as 50%.<br />
Each condenser coil is a single piece all aluminum<br />
construction including headers, tubes and fins to avoid<br />
galvanic corrosion due to dissimilar metals. Coils and<br />
headers are brazed as one piece. Integral sub-cooling is<br />
included. The design working pressure is 43 bar.<br />
Multiple, standard low sound, high efficiency, TEAO<br />
motor driven fans move air through the coils. They are<br />
dynamically and statically balanced, direct drive with<br />
corrosion-resistant glass fiber reinforced composite<br />
blades molded into low-noise, full airfoil cross sections,<br />
providing vertical air discharge from extended<br />
orifices for efficiency and low sound.<br />
Fan motors are Totally Enclosed <strong>Air</strong>-Over (TEAO),<br />
squirrel-cage type and current protected. The direct<br />
drive motors feature double-sealed and permanently<br />
lubricated ball bearings, cutting down on maintenance<br />
cost over the life of the unit.<br />
REFRIGERANT CIRCUIT<br />
An independent refrigerant circuit is provided per<br />
compressor. Each circuit uses copper refrigerant pipe<br />
formed on computer controlled bending machines to<br />
SECTION 2 - PRODUCT DESCRIPTION<br />
reduce the number of brazed joints resulting in a reliable<br />
and leak resistant system.<br />
• Discharge lines are provided with a manual compressor<br />
shutoff service valve (See Accessories<br />
and Options on Page 17 for suction line service<br />
valve).<br />
• The external oil separators, with no moving parts<br />
and designed for minimum oil carry-over, are<br />
mounted in the discharge line of the compressor.<br />
• <strong>Liquid</strong> line components include: high absorption<br />
removable core filter-drier, sight glasses with<br />
moisture indicators, manual shut-off valve with<br />
charging port, orifice and electronic expansion<br />
valve.<br />
• An economizer (flash) tank is located in each refrigerant<br />
circuit to increase the system efficiency.<br />
ELECTRICAL<br />
YORK has over 25 years of experience designing variable<br />
-speed drives specifically for chiller applications.<br />
The result is an extremely reliable air-cooled chiller<br />
system that offers industry leading efficiency at real<br />
world operating conditions, valve-less compressor<br />
loading/unloading, excellent capacity control, high<br />
power factor and soft start..<br />
Incoming single point power is standard utilizing a<br />
lockable circuit breaker, 115VACcontrol transformer,<br />
VSD, fan contactors, ON/OFF unit switch, microcomputer<br />
keypad and display, Chiller Control and VSD<br />
Logic boards, and relay boards.<br />
Standard design includes IP55 rating, powder painted<br />
steel cabinet with hinged, latched, and gasket sealed<br />
outer doors equipped with wind struts for safer servicing.<br />
The panel includes a control display access door so<br />
that display and control features can be accessed without<br />
opening main cabinet doors.<br />
All exposed power wiring is routed through liquidtight,<br />
UV-stabilized, non-metallic conduit.<br />
BUILDING AUTOMATION SYSTEM<br />
CAPABILITIES<br />
The E-Link Gateway provides an economical and versatile<br />
connection between York equipment and open/<br />
standard protocols. It efficiently manages the communication<br />
protocols currently used by York equipment,<br />
exposing the data in a consistent, organized, and defined<br />
fashion. The E-Link Gateway is available as a<br />
field-installed option on <strong>YVAA</strong>. A simple switch se-<br />
JOHNSON CONTROLS 15<br />
2
SECTION 2 - PRODUCT DESCRIPTION<br />
lection allows configuration of the required equipment<br />
profile and output protocol, which reduces equipment<br />
connectivity startup time.<br />
MICROCOMPUTER CONTROL CENTER<br />
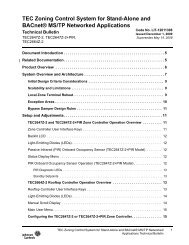
The microcomputer control center (see Figure 3 on<br />
Page 16) provides automatic control of chiller operation<br />
including compressor start/ stop and load/<br />
unload anti-recycle timers, condenser fans, evaporator<br />
pump, evaporator heater, unit alarm contacts and<br />
run signal contacts. The microcomputer control center<br />
comes online as soon as the main power switch on the<br />
unit is switched on; immediately, the microcomputer<br />
control center will begin to check all variables with a<br />
frequency ranging from 30 seconds to almost continuous<br />
monitoring.<br />
The microprocessor controls the unit’s capacity by<br />
matching the actual leaving chilled water temperature<br />
(LCWT) to the user-defined setpoint. Factors that<br />
may cause the system’s actual LCWT to fluctuate are<br />
changes in ambient temperature, loop flow rate, load,<br />
and loop volume. The control system reacts to such<br />
changes by adjusting the number of compressors that<br />
are on and the loading of each compressor in order to<br />
keep the LCWT at the setpoint.<br />
The control system logic monitors the rate at which the<br />
LCWT is approaching the setpoint to ramp up or down<br />
compressor capacity as required. The variable frequency<br />
drive allows the compressor capacity to match the<br />
load.<br />
Display Data<br />
16<br />
• Leaving Chilled <strong>Liquid</strong> Temperature<br />
• Returning <strong>Liquid</strong> Temperature<br />
• Ambient Temperature<br />
• Lead System<br />
• Compressor Capacity (% of Full Load Amps)<br />
• VSD Output Frequency / Compressor Speed<br />
• Compressor Run Hours<br />
• Compressor Number of Starts<br />
• Oil Pressure and Temperature (per Compressor)<br />
• Evaporator Pump Status<br />
• Evaporator Heater Status<br />
• History Data for Last Twenty Normal Shutdowns<br />
• History Data for Last Ten Shutdown Faults<br />
Programmable Setpoints<br />
• Chiller On/Off<br />
• Chilled <strong>Liquid</strong> (Water or Glycol)<br />
• Local or Remote Control<br />
• Units of Measure (Imperial or SI)<br />
• System Lead / Lag<br />
• Remote Temperature Reset<br />
• Remote Current Limit<br />
FORM 201.28-NM1.1<br />
ISSUE DATE: 8/29/2012<br />
• Leaving Chilled <strong>Liquid</strong> Temperature Setpoint and<br />
Range<br />
<strong>Johnson</strong> <strong>Controls</strong>’ systems or another vendor’s systems<br />
can incorporate these setpoints and data outputs to give<br />
the customer a complete understanding of how the system<br />
is running through a Building Automation System.<br />
Extreme Conditions - During extreme or unusual conditions<br />
(i.e. blocked condenser coils, ambient above<br />
scheduled maximum, etc.) the chiller control system<br />
will avoid shutdown by varying capacity. By monitoring<br />
motor current and suction and discharge pressures,<br />
the chiller can maintain maximum available cooling<br />
output without shutting down.<br />
FIGURE 3 - VIEW OF YORK CONTROL CENTER<br />
USER INTERFACE<br />
JOHNSON CONTROLS
FORM 201.28-NM1.1<br />
ISSUE DATE: 8/29/2012<br />
Unit Safeties are provided for the chiller to perform<br />
auto-reset shut down for the following conditions:<br />
• Ambient temperature above or below allowable<br />
range<br />
• Out of range leaving chilled liquid temperature<br />
• Under voltage<br />
• Flow switch operation<br />
ACCESSORIES AND OPTIONS<br />
All options factory mounted unless otherwise noted.<br />
SOUND ATTENUATION<br />
Low Noise Kits – The standard chiller configuration is<br />
equipped with low sound fans and acoustic treatments<br />
on the refrig erant lines and compressors. There are<br />
several sound attenuation options available to further<br />
reduce sound at its source thereby meeting local sound<br />
level regulations.<br />
SilentNight - Due to time of day based sound regulations<br />
in some locations it may be desirable to force the<br />
chiller to a lower sound level on demand. The Silent-<br />
Night control option provides a control input to limit<br />
sound output of the chiller based on time of day. This<br />
feature is programmable at the chiller panel or can be<br />
controlled remotely via a signal (4-20mA or 0-10VDC)<br />
from a BAS system.<br />
FAN OPTIONS<br />
Ultra Quiet Fans – The chiller is equipped with specially<br />
designed fans and motors to provide lower sound<br />
levels yet retain appropriate airflow. The result is reduced<br />
fan generated sound with minimal effect on the<br />
chiller capacity or efficiency.<br />
High Static Fans - The chiller is equipped with condenser<br />
fans with higher power motors suitable for high<br />
external static pressure, up to 100 Pa (0.4 in. water),<br />
across condenser coils. This option should be selected<br />
if additional airflow resistance may be present due to<br />
flow restrictions such as field installed ducts, filters,<br />
sound enclosures etc. Please contact your local JCI<br />
representative for more information.<br />
High <strong>Air</strong>flow Fans - The chiller is equipped with condenser<br />
fans with airfoil type blades and high power motors<br />
providing extra airflow across coils. In some chiller<br />
configurations, this option can provide an increase in<br />
chiller capacity at high ambient. The high airflow fans are<br />
also available with variable speed control. Please contact<br />
your local JCI representative for more information.<br />
SECTION 2 - PRODUCT DESCRIPTION<br />
CONDENSER COIL PROTECTION<br />
The aluminum alloys used in the <strong>YVAA</strong> micro-channel<br />
condenser have been carefully selected and tested<br />
for high corrosion resistance. However, all metals can<br />
corrode in harsh conditions. Consider protecting coils<br />
from corrosive environments such as coastal, marine,<br />
urban and industrial.<br />
Post-Coated Epoxy Dipped Condenser - Microchannel<br />
condenser coils applied with electro-deposited<br />
and baked flexible epoxy coating that is finished with a<br />
polyurethane UV resistant top-coat suitable for highly<br />
corrosive applications.<br />
PROTECTIVE CHILLER PANELS<br />
Wire Panels – UV stabilized black polyvinyl chloride<br />
coated, heavy gauge, welded wire mesh guards mounted<br />
on the exterior of the full unit. Protects condenser coil<br />
faces and prevents unauthorized access to refrigerant<br />
components (compressors, pipes, evaporator, etc.), yet<br />
provides free air flow. This can cut installation cost by<br />
eliminating the need for separate, expensive fencing.<br />
Louvered Panels – Louvered panels, painted the same<br />
color as the unit, enclose the unit to visually screen<br />
and protect the coils as well as preventing unauthorized<br />
access to internal components. Also available as a<br />
condenser-only option.<br />
Louvered/Wire Panels Combination - Louvered panels,<br />
painted the same color as the unit, are mounted on<br />
external condenser coil faces. Heavy gauge, welded<br />
wire-mesh panels, coated to resist corrosion, are mounted<br />
around base of machine to restrict unauthorized access.<br />
End Hail Guard – Louvered panels, painted the same<br />
color as the unit, are installed on the rear of the unit<br />
(opposite end of the control panel) to protect the exposed<br />
condenser from flying debris or hail.<br />
V-Guard Panels – Solid panels, painted the same color<br />
as the unit, are installed along the sides of the units<br />
to cover exposed piping within the condenser section<br />
without impacting airflow. These guard panels can be<br />
combined with End Hail Guard option for additional<br />
protection from debris.<br />
EVAPORATOR OPTIONS<br />
38 mm insulation – Double thickness insulation provided.<br />
Flange Kit – Provides contractor with the couplings<br />
best suited to tie into the chilled water piping. All<br />
flanges are PN10.<br />
JOHNSON CONTROLS 17<br />
2
SECTION 2 - PRODUCT DESCRIPTION<br />
Connection Location - The standard unit configuration<br />
is available with fluid inlet connections at rear (opposite<br />
control panel end) of unit. Option available for<br />
front fluid inlet on select configurations.<br />
Water Box Heater - The standard unit comes with<br />
freeze protection on the evaporator down to -17.8°C<br />
(0°F).The waterbox heater option provides additional<br />
freeze protection down to -28°C(-20°F).<br />
CONTROLS OPTIONS<br />
High Ambient Operation – This provides special<br />
control logic coupled with high airflow fans to permit<br />
high ambient up to 52°C (125°F) operation. Fans are<br />
airfoil type blades with high power motors. This option<br />
may also allow for increased machine capacity, allowing<br />
the selection of a smaller chassis to meet specific<br />
capacity requirements.<br />
Building Automation System Interface (Temperature)<br />
- Factory installed option to accept a 4 to 20mA<br />
or a 0 to 10VDC input to allow remote reset of the<br />
Leaving Chilled <strong>Liquid</strong> Temperature Setpoint. The<br />
setpoint can be positively offset upwards up to 22.2°C<br />
(40°F). This option is useful for ice storage or process<br />
applications or for periods where higher chilled liquid<br />
temperatures are adequate for low loads. Available<br />
alone or in combination with BAS Load Limit.<br />
Building Automation System Interface (Load Limit)<br />
- Factory installed option to accept a 4 to 20mA or<br />
a 0 to 10VDC input to allow remote reset of the Load<br />
Limit Setpoint. The setpoint can limit system demand<br />
from 30-100%. Available alone or in combination with<br />
BAS Temperature Reset.<br />
E-Link – The optional E-Link gateway provides communication<br />
between the equipment and Building Automation<br />
Systems, including BACnet (MS/TP), Modbus,<br />
LON and N2.<br />
Thermal Storage – Provides special control logic and<br />
modifications to produce leaving chilled brine temperatures<br />
below 4.4°C (40°F) primarily at times of low<br />
ambient temperatures (night time). Option can be used<br />
to produce ice to supplement cooling and significantly<br />
decrease energy costs. The capability of the chiller is<br />
enhanced by using both ice and chilled water simultaneously<br />
during times of peak cooling needs.<br />
GENERAL OPTIONS<br />
Flow Switch Accessory - Vapor proof SPDT, NEMA 3R<br />
switch, 10.3 barg (150 psig) DWP, -29°C to 121°C (-20°F<br />
to 250°F) with 1" NPT (IPS) connection for upright mount-<br />
18<br />
FORM 201.28-NM1.1<br />
ISSUE DATE: 8/29/2012<br />
ing in horizontal pipe. This flow switch or equivalent must<br />
be furnished with each unit. Field mounted.<br />
Differential Pressure Switch – This 0.2-3 barg (3-45<br />
psig) range switch, with 1/4" NPTE pressure connections,<br />
is an alternative to the paddle-type flow switch.<br />
Field mounted.<br />
Service Isolation Valve – Service suction isolation<br />
valve added to unit for each refrigerant circuit.<br />
Dual Pressure Relief Valve – Two safety relief valves<br />
are mounted in parallel; one is always operational to<br />
assist in valve replacement during maintenance.<br />
Terminal Block [not available for CE marked units]<br />
– Terminal Block connections shall be provided at<br />
the point of incoming single point connection for<br />
field connection and interconnecting wiring to the<br />
compressors. Separate external protection must be<br />
supplied, by others, in the incoming power wiring,<br />
which must comply with local codes.<br />
Circuit Breaker – A unit-mounted circuit breaker with<br />
external lockable handle will be supplied to isolate the<br />
single point power voltage for servicing. The circuit<br />
breaker is sized to provide motor branch circuit protection,<br />
short circuit protection and ground fault protection<br />
for the motor branch-circuit conductors, the motor<br />
control apparatus and the motors.<br />
Non-Fused Disconnect Switch – Unit-mounted disconnect<br />
switch with external lockable handle can be<br />
supplied to isolate the unit power voltage for servicing.<br />
Separate external fusing must be supplied by the power<br />
wiring, which must comply with local codes.<br />
VIBRATION ISOLATION<br />
Elastomeric Isolation – This option is recommended<br />
for normal installations. It provides very good performance<br />
in most applications for the least cost. Field<br />
mounted.<br />
25 mm (1") Spring Isolators – Spring and cage type<br />
isolators for mounting under the unit base rails are<br />
available to support unit. They are level adjustable. 25<br />
mm (1") nominal deflection may vary slightly by applic<br />
ation. Field mounted.<br />
50 mm (2") Restrained Spring Isolators – Restrained<br />
Spring-Flex Mounting isolators incorporate a rugged<br />
welded steel housing with vertical and horizontal limit<br />
stops. Housings designed to withstand a minimum 1.0g<br />
accelerated force in all directions up to 51 mm (2").<br />
The deflection may vary slightly by application. They<br />
are level adjustable. Field mounted.<br />
JOHNSON CONTROLS
FORM 201.28-NM1.1<br />
ISSUE DATE: 8/29/2012<br />
DELIVERY AND STORAGE<br />
SECTION 3 - HANDLING AND STORAGE<br />
To ensure consistent quality and maximum reliability,<br />
all units are tested and inspected before leaving the factory.<br />
Units are shipped completely assembled and containing<br />
refrigerant under pressure. Units are shipped<br />
without export crating unless crating has been specified<br />
on the Sales Order.<br />
If the unit is to be put into storage, prior to installation,<br />
the following precautions should be observed:<br />
• The chiller must be “blocked” so that the base is<br />
not permitted to sag or bow.<br />
• Ensure that all openings, such as water connections,<br />
are securely capped.<br />
• Do not store where exposed to ambient air temperatures<br />
exceeding 43°C (110°F).<br />
• The condensers should be covered to protect the<br />
coils and fins from potential damage and corrosion,<br />
particularly where building work is in progress.<br />
• The unit should be stored in a location where there<br />
is minimal activity in order to limit the risk of accidental<br />
physical damage.<br />
• To prevent inadvertent operation of the pressure<br />
relief devices the unit must not be steam cleaned.<br />
• It is recommended that the unit is periodically inspected<br />
during storage.<br />
INSPECTION<br />
Remove any transit packing and inspect the unit to ensure<br />
that all components have been delivered and that<br />
no damage has occurred during transit. If any damage<br />
is evident, it should be noted on the carrier’s freight bill<br />
and a claim entered in accordance with the instructions<br />
given on the advice note.<br />
Major damage must be reported immediately to your<br />
local <strong>Johnson</strong> <strong>Controls</strong> representative.<br />
MOVING THE CHILLER<br />
Prior to moving the unit, ensure that the installation<br />
site is suitable for installing the unit and is easily capable<br />
of supporting the weight of the unit and all associated<br />
services.<br />
The units are designed to be lifted using shackles or<br />
safety hooks. A spreader bar or frame should be used<br />
in order to prevent damage to the unit from the lifting<br />
chains. (Refer to Figure 4 on Page 20 for hooks.)<br />
Units are provided with lifting eyes in the sides of the<br />
base frame, which can be attached directly using container<br />
lugs, shackles or safety hooks (see Figure 4 on<br />
Page 20 for proper lifting illustration).<br />
The unit must only be lifted by the base<br />
frame at the points provided. Never move<br />
the unit on rollers, or lift the unit using a<br />
forklift truck.<br />
Care should be taken to avoid damaging the condenser<br />
cooling fins when moving the unit.<br />
LIFTING WEIGHTS<br />
For details of weights and weight distribution, refer to<br />
the data shipped in the chiller information packet and<br />
unit nameplate.<br />
JOHNSON CONTROLS 19<br />
3
SECTION 3 - HANDLING AND STORAGE<br />
LIFTING UNIT<br />
Container lugs should be inserted into the holes provided<br />
in the bottom of the frame rail.<br />
Use spreader bars to avoid lifting chains hitting the<br />
chiller. Various methods of spreader bar arrangements<br />
may be used; keeping in mind the intent is to keep the<br />
unit stable and to keep the chains from hitting the chiller<br />
and causing damage.<br />
FIGURE 4 - PROPER LIFTING OF <strong>YVAA</strong> CHILLER<br />
20<br />
FORM 201.28-NM1.1<br />
ISSUE DATE: 8/29/2012<br />
Never lift the chiller using a forklift or by<br />
hooking to the top rails. Use only the lifting<br />
holes provided.<br />
Lifting instructions are placed on a label on the chiller<br />
and on the shipping bag.<br />
JOHNSON CONTROLS
FORM 201.28-NM1.1<br />
ISSUE DATE: 8/29/2012<br />
UNIT REMOVAL FROM SHIPPING<br />
CONTAINER<br />
1. Place a clevis pin into the holes provided at the<br />
end of each base rail on the unit. Attach chains or<br />
nylon straps through the clevis pins and hook onto<br />
a suitable lift truck for pulling the unit out of the<br />
container.(chain shown)<br />
2. Slowly place tension on the chains or straps until<br />
the unit begins to move and then slowly pull the<br />
unit from the container. Be sure to pull straight so<br />
the sides do not scrape the container.<br />
3. Place a lifting fixture on the forks of the lift truck<br />
and reattach the chain or strap. Slightly lift the<br />
front of the unit to remove some weight from the<br />
floor of the container. Continue pulling the unit<br />
with an operator on each side to guide the lift<br />
truck operator.<br />
4. Pull the unit until the lifting locations are outside<br />
of the container. Place 4 X 4 blocks of wood under<br />
the base rails of the unit. Gently rest the unit on<br />
the blocks and remove the chains and lift truck.<br />
5. Attach lifting rigging from the crane and slowly<br />
complete the removal from the container then lift<br />
up and away.<br />
SECTION 3 - HANDLING AND STORAGE<br />
JOHNSON CONTROLS 21<br />
3
SECTION 3 - HANDLING AND STORAGE<br />
LIFTING USING LUGS<br />
Units are provided with lifting holes in the base frame<br />
which accept the accessory lifting lug set as shown in<br />
the figure below. The lugs (RH and LH) should be inserted<br />
into the respective holes in the base frame and<br />
turned so that the spring loaded pin engages into the<br />
hole and the flanges on the lug lock behind the hole.<br />
The lugs should be attached to the cables/chains using<br />
shackles or safety hooks.<br />
LUG<br />
22<br />
LOCKING PIN<br />
CORRECT<br />
LOCKING<br />
PIN<br />
LIFTING HOLE<br />
IN BASE FRAME<br />
FLANGE<br />
LUG<br />
LIFTING USING SHACKLES<br />
FLANGE<br />
LOCKING PIN<br />
LIFTING HOLE<br />
IN BASE FRAME<br />
INCORRECT<br />
LUG<br />
FLANGE<br />
The shackles should be inserted into the respective<br />
holes in the base frame and secured from the inside.<br />
36 mm<br />
67 mm<br />
Use spreader bars to avoid lifting chains hitting the<br />
chiller. Various methods of spreader bar arrangements<br />
may be used, keeping in mind the intent is to keep the<br />
unit stable and to keep the chains from hitting the chiller<br />
and causing damage..<br />
FORM 201.28-NM1.1<br />
ISSUE DATE: 8/29/2012<br />
Never lift the chiller using a forklift or by<br />
hooking to the top rails. Use only the lifting<br />
holes provided.<br />
Lifting Instructions are placed on a label on the chiller<br />
and on the shipping bag.<br />
JOHNSON CONTROLS
FORM 201.28-NM1.1<br />
ISSUE DATE: 8/29/2012<br />
LOCATION REQUIREMENTS<br />
For optimum performance and trouble-free service, it<br />
is essential that the installation site meet the location<br />
and space requirements for the model being installed.<br />
It is important to ensure that the minimum service access<br />
space is maintained for cleaning and maintenance<br />
purposes.<br />
OUTDOOR INSTALLATIONS<br />
The units are designed for outdoor installation and<br />
can be installed at ground level on a suitable flat level<br />
foundation easily capable of supporting the weight of<br />
the unit, or on a suitable rooftop location. In both cases<br />
an adequate supply of air is required. Avoid locations<br />
where the sound output and air discharge from the unit<br />
may be objectionable.<br />
The location should be selected for minimum sun exposure<br />
and away from boiler flues and other sources<br />
of airborne chemicals that could attack the condenser<br />
coils and steel parts of the unit.<br />
If located in an area accessible to unauthorized persons,<br />
steps must be taken to prevent access to the unit<br />
by means of a protective fence. This will help to prevent<br />
the possibility of vandalism, accidental damage,<br />
or possible harm caused by unauthorized removal of<br />
protective guards or opening panels to expose rotating<br />
or high voltage components.<br />
For ground level locations, the unit must be installed<br />
on a suitable flat and level concrete base that extends<br />
to fully support the two side channels of the unit base<br />
frame. A one-piece concrete slab, with footings extending<br />
below the frost line is recommended. To avoid<br />
noise and vibration transmission, the unit should not be<br />
secured to the building foundation.<br />
On rooftop locations, choose a place with adequate<br />
structural strength to safely support the entire operating<br />
weight of the unit and service personnel. The unit can<br />
be mounted on a concrete slab, similar to ground floor<br />
locations, or on steel channels of suitable strength. The<br />
channels should be spaced with the same centers as the<br />
unit side and front base rails. This will allow vibration<br />
isolators to be fitted if required. Isolators are recommended<br />
for rooftop locations.<br />
SECTION 4 - INSTALLATION<br />
LOCATION CLEARANCES<br />
Adequate clearances around the unit(s) are required for<br />
the unrestricted airflow for the air-cooled condenser<br />
coils and to prevent re-circulation of warm discharge<br />
air back onto the coils. If clearances given are not<br />
maintained, airflow restriction or re-circulation will<br />
cause a loss of unit performance, an increase in power<br />
consumption, and may cause the unit to malfunction.<br />
Consideration should also be given to the possibility of<br />
down drafts, caused by adjacent buildings, which may<br />
cause re-circulation or uneven unit airflow.<br />
For locations where significant cross winds are expected,<br />
such as exposed roof tops, an enclosure of solid<br />
or louver type is recommended to prevent wind turbulence<br />
interfering with the unit airflow.<br />
When units are installed in an enclosure, the enclosure<br />
height should not exceed the height of the unit on more<br />
than one side. If the enclosure is of louvered construction,<br />
the same requirement of static pressure loss applies<br />
as for ducts and attenuators stated above.<br />
Recommended Minimum Clearances<br />
Recommended clearances for the <strong>YVAA</strong> units are:<br />
• Side to wall – 6' (1.8 m)<br />
• Rear to wall – 6' (1.8 m)<br />
• Control panel end to wall – 4' (1.2 m)<br />
• Top – no obstructions whatsoever<br />
• Distance between adjacent units – 10' (3 m)<br />
JOHNSON CONTROLS 23<br />
4
SECTION 4 - INSTALLATION<br />
FIGURE 5 - ACCEPTABLE MINIMUM CLEARANCES<br />
AROUND/BETWEEN UNIT(S)<br />
24<br />
1.8 m (6')<br />
Minimum<br />
Tube Removal<br />
Clearance Area<br />
1.2 m (4')<br />
Minimum<br />
3 m (10')<br />
Minimum<br />
Control Panel<br />
Tube Removal<br />
Clearance Area<br />
TABLE 1 - MINIMUM EVAPORATOR TUBE REMOV-<br />
AL CLEARANCE<br />
TUBE REMOVAL<br />
MODEL <strong>YVAA</strong> CLEARANCE DIMENSIONS<br />
A B C<br />
FRAME EVAP COND IN. MM IN. MM IN. MM<br />
015 3 B 26 663 36 914 132 3353<br />
016 5 B 26 663 36 914 132 3353<br />
017 8 C 26 663 36 914 156 3962<br />
018 3 A 26 663 36 914 144 3658<br />
019 5 A 26 663 36 914 144 3658<br />
019 8 B 26 663 36 914 132 3353<br />
020 0 C 26 663 36 914 156 3962<br />
021 3 A 26 663 36 914 144 3658<br />
021 5 C 26 663 36 914 156 3962<br />
021 8 C 26 663 36 914 156 3962<br />
023 3 B 26 663 36 914 132 3353<br />
024 5 C 26 663 36 914 156 3962<br />
024 8 C 26 663 36 914 156 3962<br />
026 3 B 26 663 36 914 132 3353<br />
027 3 D 26 663 36 914 192 4877<br />
027 5 E 26 663 36 914 192 4877<br />
027 8 E 26 663 36 914 192 4877<br />
029 5 E 26 663 36 914 192 4877<br />
030 3 C 26 663 36 914 156 3962<br />
030 5 C 26 663 36 914 156 3962<br />
030 8 E 26 663 36 914 192 4877<br />
031 8 E 26 663 36 914 192 4877<br />
032 3 E 26 663 36 914 192 4877<br />
033 3 C 26 663 36 914 156 3962<br />
034 3 E 26 663 36 914 192 4877<br />
034 5 E 26 663 36 914 192 4877<br />
050 0 J 26 663 36 914 192 4877<br />
052 3 J 26 663 36 914 192 4877<br />
FORM 201.28-NM1.1<br />
ISSUE DATE: 8/29/2012<br />
Clearance dimensions provided in Figure<br />
5 are necessary to maintain good airflow<br />
and ensure correct unit operation. It is<br />
also necessary to consider access requirements<br />
for safe operation and maintenance<br />
of the unit and power and control<br />
panels. Local health and safety regulations,<br />
or practical considerations for<br />
service replacement of large components,<br />
may require larger clearances than those<br />
recommended.<br />
VIBRATION ISOLATORS<br />
Optional sets of vibration isolators can be supplied<br />
loose with each unit.<br />
Using the Isolator tables shipped with the unit in the<br />
information pack. Identify each mount and its correct<br />
location on the unit.<br />
Installation<br />
Place each mount in its correct position and lower the<br />
unit carefully onto the mounts ensuring the mount engages<br />
in the mounting holes in the unit base frame.<br />
On adjustable mounts, transfer the unit weight evenly<br />
to the springs by turning the mount adjusting nuts (located<br />
just below the top plate of the mount) counterclockwise<br />
to raise and clockwise to lower. This should<br />
be done two turns at a time until the top plates of all<br />
mounts are between 1/4" (6 mm) and 1/2" (12 mm)<br />
clear of top of their housing and the unit base is level.<br />
SHIPPING BRACES<br />
The chiller’s modular design does not require shipping<br />
braces.<br />
CHILLED LIQUID PIPING<br />
General Requirements<br />
The following piping recommendations are intended to<br />
ensure satisfactory operation of the unit(s). Failure to<br />
follow these recommendations could cause damage to<br />
the unit, or loss of performance, and may invalidate the<br />
warranty.<br />
The maximum flow rate and pressure<br />
drop for the evaporator must not be exceeded<br />
at any time. Refer to SECTION 5<br />
- TECHNICAL DATA on Page 49 for<br />
details.<br />
JOHNSON CONTROLS
FORM 201.28-NM1.1<br />
ISSUE DATE: 8/29/2012<br />
The liquid must enter the evaporator at<br />
the inlet connection. The standard inlet<br />
connection for the evaporator is opposite<br />
the control panel end of the evaporator.<br />
A flow switch must be installed in the<br />
customer piping at the outlet of the evaporator<br />
and wired back to the control panel<br />
using shielded cable.<br />
There should be a straight run of piping of at least 5<br />
pipe diameters on either side. The flow switch should<br />
be wired to Terminals 2 and 13 on the 1TB terminal<br />
block. A flow switch is required to prevent damage to<br />
the evaporator caused by the unit operating without adequate<br />
liquid flow.<br />
The flow switch used must have gold plated contacts<br />
for low voltage/current operation. Paddle type flow<br />
switches suitable for 10 bar (150 PSIG) working pressure<br />
and having a 1" N.P.T. connection can be obtained<br />
from <strong>Johnson</strong> <strong>Controls</strong> as an accessory for the unit. Alternatively,<br />
a differential pressure switch fitted across<br />
an orifice plate may be used, preferably of the high/low<br />
limit type.<br />
The chilled liquid pump(s) installed in the piping<br />
system(s) should discharge directly into the unit evaporator<br />
section of the system. The pump(s) may be controlled<br />
by the chiller controls or external to the unit.<br />
Pipework and fittings must be separately supported to<br />
prevent any loading on the evaporator. Flexible connections<br />
are recommended which will also minimize<br />
transmission of vibrations to the building. Flexible<br />
connections must be used if the unit is mounted on<br />
anti-vibration mounts, as some movement of the unit<br />
can be expected in normal operation.<br />
Piping and fittings immediately next to the evaporator<br />
should be readily de-mountable to enable cleaning before<br />
operation, and to facilitate visual inspection of the<br />
exchanger nozzles.<br />
The evaporator must be protected by a<br />
strainer, preferably of 40 mesh, fitted as<br />
close as possible to the liquid inlet connection,<br />
and provided with a means of local<br />
isolation.<br />
SECTION 4 - INSTALLATION<br />
The evaporator must not be exposed to flushing velocities<br />
or debris released during flushing. It is recommended<br />
that a suitably sized bypass and valve arrangement<br />
is installed to allow flushing of the piping system.<br />
The bypass can be used during maintenance to isolate<br />
the heat exchanger without disrupting flow to other<br />
units.<br />
Thermometer and pressure gauge connections should<br />
be provided on the inlet and outlet connections of each<br />
evaporator. Gauges and thermometers are not provided<br />
with the unit and are to be furnished by others.<br />
Drain and air vent connections should be provided at<br />
all low and high points in the piping to permit drainage<br />
of the system and to vent any air in the pipes.<br />
<strong>Liquid</strong> system lines at risk of freezing, due to low ambient<br />
temperatures should be protected using insulation<br />
and heater tape and/or a suitable glycol solution.<br />
The liquid pump(s) may also be used to ensure liquid<br />
is circulated when the ambient temperature approaches<br />
freezing point.<br />
Insulation should also be installed around the evaporator<br />
nozzles. Heater tape of 21 Watts per meter under<br />
the insulation is recommended, supplied independently<br />
and controlled by an ambient temperature thermostat<br />
set to switch ON at approximately 2.2°C (4°F), above<br />
the freezing temperature of the chilled liquid.<br />
The evaporator is protected by heater mats placed under<br />
the insulation, which are powered from the unit<br />
control system power supply. During cold weather<br />
when there is a risk of freezing, chiller power should be<br />
left switched on to provide the freeze protection function<br />
unless the liquid systems have been drained.<br />
Any debris left in the water piping between<br />
the strainer and evaporator could<br />
cause serious damage to the tubes in the<br />
evaporator and must be avoided. Be sure<br />
the piping is clean before connecting it to<br />
the evaporator. Keep evaporator nozzles<br />
and chilled liquid piping capped prior to<br />
installation to assure construction debris<br />
is not allowed to enter.<br />
The installer/user must also ensure that<br />
the quality of the water in circulation is<br />
adequate, without any dissolved gases,<br />
which can cause oxidation of steel or<br />
copper parts within the evaporator.<br />
JOHNSON CONTROLS 25<br />
4
SECTION 4 - INSTALLATION<br />
WATER TREATMENT<br />
The unit performance provided in the Design Guide<br />
is based on a fouling factor of 0.018m2/hr °C/kW<br />
(0.0001 ft2hr°F/Btu). Dirt, scale, grease and certain<br />
types of water treatment will adversely affect the heat<br />
exchanger surfaces and therefore the unit performance.<br />
Foreign matter in the water system(s) can increase the<br />
heat exchanger pressure drop, reducing the flow rate<br />
and causing potential damage to the heat exchanger<br />
tubes.<br />
Aerated, brackish or salt water is not recommended for<br />
use in the water system(s). <strong>Johnson</strong> <strong>Controls</strong> recommends<br />
that a water treatment specialist should be consulted<br />
to determine whether the proposed water composition<br />
will adversely affect the evaporator materials<br />
of carbon steel and copper. The pH value of the water<br />
flowing through the evaporator must be kept in a range<br />
between 7 and 8.5.<br />
PIPEWORK ARRANGEMENT<br />
The following is a suggested piping arrangement for<br />
single unit installations.<br />
FIGURE 6 - PIPEWORK ARRANGEMENT<br />
26<br />
-Isolating Valve - Normally Open<br />
-Isolating Valve - Normally Closed<br />
-Flow Regulating Valve<br />
-Flow Measurement Device<br />
-Strainer<br />
-Pressure Tapping<br />
-Flow Switch<br />
-Flanged Connection<br />
-Pipework<br />
MINIMUM WATER VOLUME<br />
LD15151<br />
It is good practice to include as much water volume<br />
as possible in a chilled water loop. This increases the<br />
thermal mass and “Flywheel” effect within the system<br />
(i.e. the more; the better) which in turn promotes stable<br />
water temperature control and increases reliability by<br />
reducing compressor cycling.<br />
FORM 201.28-NM1.1<br />
ISSUE DATE: 8/29/2012<br />
For air conditioning applications, a minimum of 3 gallons/ton<br />
is required. It is preferred that the gallon/ton<br />
ratio be within the 5 to 8 range. For process applications,<br />
a minimum of 6 gallons/ton ratio is required with<br />
preference towards a range of 7 to 11. Install a tank or<br />
increase pipe sizes to provide sufficient water volume.<br />
LEAVING WATER TEMPERATURE OUT OF<br />
RANGE<br />
The <strong>YVAA</strong> chiller line has a maximum leaving<br />
water temperature of 15.6°C (60°F). Where process<br />
applications require a chilled water temperature higher<br />
than what the chiller provides, a simple piping change<br />
can remove the problem. By using a mixture of chillercooled<br />
water and returning process water, the chilled<br />
water entering the process can be held at the desired<br />
temperature. A tank can also be used to meet high leaving<br />
water temperature requirements.<br />
SUPPLY TO LOAD<br />
RECIRCULATION<br />
LOAD<br />
FIGURE 7 - LEAVING WATER TEMPERATURE OUT<br />
OF RANGE SUGGESTED LAYOUT<br />
FLOW RATE OUT OF RANGE<br />
RETURN FROM LOAD<br />
LD15049<br />
Each <strong>YVAA</strong> evaporator has a minimum and maximum<br />
flow rate. Some process applications require a flow<br />
rate that is out of range for the evaporator. In those applications,<br />
a piping change can remove the problem.<br />
In applications where the required flow rate is less than<br />
the evaporator’s minimum allowable, the chilled water<br />
can be recirculated to the chiller.<br />
JOHNSON CONTROLS
FORM 201.28-NM1.1<br />
ISSUE DATE: 8/29/2012<br />
SUPPLY TO LOAD<br />
LOAD<br />
BYPASS<br />
RETURN FROM LOAD<br />
LD15049<br />
FIGURE 8 - SUGGESTED LAYOUT FOR APPLICA-<br />
TIONS WITH A FLOW RATE LESS THAN<br />
THE EVAPORATOR MINIMUM ALLOW-<br />
ABLE FLOW RATE<br />
In applications where the required flow rate is greater<br />
than the evaporator’s maximum allowable, the chilled<br />
water can be recirculated to the load.<br />
SUPPLY TO LOAD<br />
FIGURE 9 - SUGGESTED LAYOUT FOR APPLICA-<br />
TIONS WITH A FLOW RATE LESS THAN<br />
THE EVAPORATOR MINIMUM ALLOW-<br />
ABLE FLOW RATE<br />
THERMAL STORAGE<br />
LOAD<br />
BYPASS<br />
RETURN FROM LOAD<br />
LD15049<br />
Thermal storage is the practice of storing cooling energy<br />
during a period of little or no load and/or low energy<br />
costs for use during periods of high load and/or energy<br />
costs. Conventional cooling systems produce cooling<br />
SECTION 4 - INSTALLATION<br />
when it is needed which is commonly during times of<br />
peak demand. Thermal storage allows generation of<br />
cooling capacity to occur during off-peak periods and<br />
store that capacity to meet future cooling requirements.<br />
Using thermal storage can result in smaller equipment<br />
sizes, thereby reducing capital cost, and also can result<br />
in significant energy cost savings<br />
The <strong>YVAA</strong> has special control logic to be able to produce<br />
chilled leaving brine temperatures below 4.4°C<br />
(40°F) so as to supply a storage tank with chilled liquid<br />
during times of low demand. <strong>YVAA</strong> chillers selected<br />
for thermal storage operation can also be selected to efficiently<br />
provide chilled fluid at nominal cooling loads.<br />
VARIABLE PRIMARY FLOW<br />
<strong>Johnson</strong> <strong>Controls</strong> recommends a maximum 10% per<br />
minute flow rate of change, based on design flow, for<br />
variable primary flow applications. Provide 8 to 10 gallons<br />
per chiller ton (8.6 to 10.8 liter per cooling KW)<br />
system water volume. Insufficient system volume and<br />
rapid flow changes can cause control problems or can<br />
even cause chiller shutdowns. There are many other<br />
design issues to evaluate with variable primary flow<br />
systems. Consult your <strong>Johnson</strong> <strong>Controls</strong> Sales Office<br />
for more information about successfully applying<br />
<strong>YVAA</strong> chillers.<br />
CONNECTION TYPES AND SIZES<br />
For connection sizes relevant to individual models refer<br />
to SECTION 5 - TECHNICAL DATA.<br />
EVAPORATOR CONNECTIONS<br />
Standard chilled liquid connections on evaporators<br />
are of the Victaulic Groove type for ASME and PED<br />
marked units and Flange type for GB marked units (see<br />
Figure 11 on page 28 for flange dimensions on GB<br />
marked vessels).<br />
FIGURE 10 - VICTAULIC GROOVE<br />
LD10494<br />
JOHNSON CONTROLS 27<br />
4
SECTION 4 - INSTALLATION<br />
TABLE 2 - EVAPORATOR CONNECTIONS DIMENSIONS<br />
FRAME COND. EVAP.<br />
28<br />
VICTAULIC<br />
CONNECTIONS<br />
SIZE<br />
NOMINAL<br />
DIAMETER<br />
FLANGE DIMENSONS (GB ONLY) IN MM*<br />
B C D K L d n<br />
FORM 201.28-NM1.1<br />
ISSUE DATE: 8/29/2012<br />
015 3 B 6" DN150 170.5 27 280 241.5 22 216 8 2<br />
016 5 B 6" DN150 170.5 27 280 241.5 22 216 8 2<br />
017 8 C 6" DN150 170.5 27 280 241.5 22 216 8 2<br />
018 3 A 6" DN150 170.5 27 280 241.5 22 216 8 2<br />
019 5 A 6" DN150 170.5 27 280 241.5 22 216 8 2<br />
019 8 B 6" DN150 170.5 27 280 241.5 22 216 8 2<br />
020 0 C 6" DN150 170.5 27 280 241.5 22 216 8 2<br />
021 3 A 6" DN150 170.5 27 280 241.5 22 216 8 2<br />
021 5 C 6" DN150 170.5 27 280 241.5 22 216 8 2<br />
021 8 C 6" DN150 170.5 27 280 241.5 22 216 8 2<br />
023 3 B 6" DN150 170.5 27 280 241.5 22 216 8 2<br />
024 5 C 6" DN150 170.5 27 280 241.5 22 216 8 2<br />
024 8 C 6" DN150 170.5 27 280 241.5 22 216 8 2<br />
026 3 B 6" DN150 170.5 27 280 241.5 22 216 8 2<br />
027 3 D 6" DN150 170.5 27 280 241.5 22 216 8 2<br />
027 5 E 8" DN200 221.5 27 345 298.5 22 270 8 2<br />
027 8 E 8" DN200 221.5 27 345 298.5 22 270 8 2<br />
029 5 E 8" DN200 221.5 27 345 298.5 22 270 8 2<br />
030 3 C 6" DN150 170.5 27 280 241.5 22 216 8 2<br />
030 5 C 6" DN150 170.5 27 280 241.5 22 216 8 2<br />
030 8 E 8" DN200 221.5 27 345 298.5 22 270 8 2<br />
031 8 E 8" DN200 221.5 27 345 298.5 22 270 8 2<br />
032 3 E 8" DN200 221.5 27 345 298.5 22 270 8 2<br />
033 3 C 6" DN150 170.5 27 280 241.5 22 216 8 2<br />
034 3 E 8" DN200 221.5 27 345 298.5 22 270 8 2<br />
034 5 E 8" DN200 221.5 27 345 298.5 22 270 8 2<br />
050 0 J 8" DN200 221.5 27 345 298.5 22 270 8 2<br />
052 3 J 8" DN200 221.5 27 345 298.5 22 270 8 2<br />
* Reference Figure 34 for flange dimensions.<br />
B<br />
n-L<br />
K<br />
D<br />
d<br />
B<br />
n-L<br />
K<br />
D<br />
d<br />
C C<br />
4" / 6" / 8" FLANGE 10" FLANGE<br />
FIGURE 11 - FLANGE FOR GB VESSELS<br />
LD16185a<br />
QUAN-<br />
TITY<br />
JOHNSON CONTROLS
FORM 201.28-NM1.1<br />
ISSUE DATE: 8/29/2012<br />
Option Flanges<br />
One of two types of flanges may be fitted depending<br />
on the customer or local pressure vessel code requirements.<br />
These are Victaulic-Adapter flanges, normally<br />
supplied loose, or weld flanges, which may be supplied<br />
loose or ready-fitted. Victaulic-Adapter and weld<br />
flange dimensions are to ISO 7005 - NP10.<br />
WELD FLANGE VICTAULIC ADAPTER<br />
FIGURE 12 - FLANGE ATTACHMENT<br />
REFRIGERANT RELIEF VALVE PIPING<br />
LD10495<br />
The evaporator is protected against internal refrigerant<br />
overpressure by refrigerant relief valves. A pressure relief<br />
valve is mounted on each of the main refrigerant<br />
lines connecting the evaporator to the compressors.<br />
A piece of pipe is fitted to each valve and directed so<br />
that when the valve is activated the release of high<br />
pressure gas and liquid cannot be a danger or cause<br />
injury. For indoor installations (not recommended),<br />
pressure relief valves should be piped to the exterior<br />
of the building.<br />
The size of any piping attached to a relief valve must<br />
be of sufficient diameter so as not to cause resistance to<br />
the operation of the valve. Unless otherwise specified<br />
by local regulations. Internal diameter depends on the<br />
length of pipe required and is given by the following<br />
formula:<br />
D 5 = 1.447 x L<br />
• Where:<br />
• D = minimum pipe internal diameter in cm<br />
• L = length of pipe in meters<br />
SECTION 4 - INSTALLATION<br />
If relief piping is common to more than one valve, its<br />
cross-sectional area must be at least the total required<br />
by each valve. Valve types should not be mixed on a<br />
common pipe. Precautions should be taken to ensure<br />
the outlets of relief valves or relief valve vent pipes<br />
remain clear of obstructions at all times.<br />
ELECTRICAL CONNECTION<br />
The following connection recommendations are intended<br />
to ensure safe and satisfactory operation of the<br />
unit. Failure to follow these recommendations could<br />
cause harm to persons or damage the unit, and may<br />
invalidate the warranty.<br />
POWER WIRING<br />
No additional controls (relays, etc.)<br />
should be mounted in the control panel.<br />
Power and control wiring not connected<br />
to the control panel should not be run<br />
through the control panel. If these precautions<br />
are not followed it could lead to<br />
a risk of electrocution. In addition, electrical<br />
noise could cause malfunctions or<br />
damage the unit and its controls.<br />
After power wiring connection, do not<br />
switch on mains power to the unit. Some<br />
internal components are live when the<br />
mains are switched on and this must only<br />
be done by “Authorized” persons familiar<br />
with starting, operating, and troubleshooting<br />
this type of equipment.<br />
All electrical wiring should be carried out in accordance<br />
with local regulations. Route properly sized<br />
cables to cable entries on the unit.<br />
In accordance with local codes, NEC codes, U.L. and<br />
C.E. standards, it is the responsibility of the user to install<br />
over current protection devices between the supply<br />
conductors and the power supply terminals on the<br />
unit.<br />
To ensure that no eddy currents are set up in the power<br />
panel, the cables forming the 3-phase power supply<br />
must enter via the same cable entry.<br />
All sources of supply to the unit must be<br />
taken via a common point of isolation (not<br />
supplied by <strong>Johnson</strong> <strong>Controls</strong>).<br />
JOHNSON CONTROLS 29<br />
4
SECTION 4 - INSTALLATION<br />
POWER SUPPLY WIRING<br />
Units require only one 3-phase supply, plus earth.<br />
Connect the 3-phase supplies to the circuit breaker located<br />
in the panel (See Electrical Lug Data in Table 3<br />
on page 34 ).<br />
Connect a suitably sized earth wire to the PE terminal<br />
in the panel.<br />
115VAC CONTROL SUPPLY TRANSFORMER<br />
A 3-wire high voltage to 115VAC supply transformer<br />
is standard in the chiller. This transformer is mounted<br />
in the cabinet and steps down the high voltage supply<br />
to 115VAC to be used by the controls, VSD, Feed and<br />
Drain Valve Controller, valves, solenoids, heaters, etc.<br />
The high voltage for the transformer primary is taken<br />
from the chiller input. Fusing is provided for the transformer.<br />
CONTROL WIRING<br />
30<br />
Removing high voltage power to the<br />
chiller will remove the 115VAC supply<br />
voltage to the control panel circuitry and<br />
the evaporator heater. In cold weather,<br />
this could cause serious damage to the<br />
chiller due to evaporator freeze-up. Do<br />
not remove power unless alternate means<br />
are taken to ensure operation of the<br />
evaporator heater.<br />
All control wiring utilizing contact closures to the control<br />
panel terminal block is nominal 115VAC and must<br />
be run in shielded cable, with the shield grounded at<br />
the panel end only, and run in water tight conduit. Run<br />
shielded cable separately from mains cable to avoid<br />
electrical noise pick-up. Use the control panel cable<br />
entry to avoid the power cables.<br />
Voltage free contacts connected to the panel must be<br />
suitable for 115VAC10 ma (gold contacts recommended).<br />
If the voltage free contacts form part of a relay or<br />
contactor, the coil of the device must be suppressed using<br />
a standard R/C suppressor. The above precautions must<br />
be taken to avoid electrical noise, which could cause a<br />
malfunction or damage to the unit and its controls.<br />
VOLTS FREE CONTACTS<br />
Chilled <strong>Liquid</strong> Pump Starter<br />
FORM 201.28-NM1.1<br />
ISSUE DATE: 8/29/2012<br />
Terminals 23 and 24 on 1TB close to start the chilled<br />
liquid pump. This contact can be used as a master start/<br />
stop for the pump in conjunction with the daily start/<br />
stop schedule.<br />
Run Contact<br />
Terminals 21 and 22 on 1TB close to indicate that a<br />
system is running.<br />
Alarm Contacts<br />
Each system has a single voltage-free contact, which<br />
will operate to signal an alarm condition whenever any<br />
system locks out, or there is a power failure. To obtain<br />
system alarm signal, connect the alarm circuit to volt<br />
free Terminals 25 & 26 (Sys 1), Terminals 27 and 28<br />
(Sys 2) of 1TB.<br />
SYSTEM INPUTS<br />
Flow Switch<br />
A chilled liquid flow switch of suitable type MUST be<br />
connected between Terminals 2 and 13 of 1TB to provide<br />
protection against loss of liquid flow, which will<br />
cause evaporator freeze-up if the chiller is permitted<br />
to run. The flow switch circuitry is a 115VACcircuit.<br />
Contacts must be rated for low current (5mA). Gold<br />
contacts should be used.<br />
Remote Run / Stop<br />
A Remote Run/Stop input is available for each systems.<br />
These inputs require a dry contact to start and stop the<br />
system. System 1 remote dry contacts are connected<br />
between Terminals 2 and 15 of 1TB and System 2 dry<br />
contacts are connected between Terminals 2 and 16 of<br />
1TB. If remote start/stop is not utilized, a jumper must<br />
be paced across the terminals to allow the system to<br />
run. The remote run/stop circuitry is a 115VACcircuit.<br />
Contacts must be rated for low current (5mA). Gold<br />
contacts should be used.<br />
Remote Print<br />
Closure of suitable contacts connected to Terminals 2<br />
and 14 of 1TB will cause a hard copy printout of Operating<br />
Data/Fault History to be made if an optional printer<br />
is connected to the RS-232 port. The remote print circuitry<br />
is a 115VACcircuit. Contacts must be rated for<br />
low current (5mA). Gold contacts should be used.<br />
JOHNSON CONTROLS
FORM 201.28-NM1.1<br />
ISSUE DATE: 8/29/2012<br />
Optional Remote Setpoint Offset –<br />
Temperature<br />
A voltage signal connected to Terminals 17 and 18 of<br />
1TB will provide a remote offset function of the chilled<br />
liquid setpoint, if required.<br />
Optional Remote Setpoint Offset – Current<br />
A voltage signal connected to Terminals 19 and 20<br />
of 1TB will provide a remote setting of current limit<br />
setpoint, if required.<br />
SECTION 4 - INSTALLATION<br />
Optional Remote Setpoint Offset – Sound<br />
Limiting<br />
A voltage signal connected to Terminals 40 and 41 of<br />
1TB will provide remote setting of sound limit setpoint,<br />
if required.<br />
JOHNSON CONTROLS 31<br />
4
SECTION 4 - INSTALLATION<br />
POWER SUPPLY WIRING<br />
32<br />
INVERTER 1 INVERTER 2<br />
UNIT MOUNTED CONNECTIONS<br />
STANDARD<br />
CONTROL<br />
TRANSFORMER<br />
LINE<br />
REACTOR<br />
TERMINAL BLOCK<br />
(Circuit Breaker - Opt.)<br />
(Non-Fused Disconnect<br />
Switch - Opt.)<br />
FIELD PROVIDED<br />
UNIT POWER<br />
SUPPLY<br />
Minimum Circuit Ampacity (MCA),<br />
Minimum/Maximum Fuse Size and<br />
Minimum/Maximum Circuit Breaker size<br />
varies on chillers based upon model and<br />
options ordered. Consult YorkWorks or<br />
the chiller data plate for electrical data<br />
on a specific chiller.<br />
UNIT CONTROLS<br />
FIGURE 13 - POWER WIRING - 2 COMPRESSOR CONNECTIONS<br />
EVAPORATOR HEATER<br />
FAN<br />
CONTACTORS<br />
GRD<br />
See Note 1<br />
Voltage Utilization Range<br />
RATED<br />
VOLTAGE<br />
FORM 201.28-NM1.1<br />
ISSUE DATE: 8/29/2012<br />
UTILIZATION RANGE<br />
200/60/3 180-220<br />
230/60/3 208-254<br />
380/60/3 342-402<br />
460/60/3 414-508<br />
575/60/3 520-635<br />
400/50/3 360-440<br />
LD15893<br />
JOHNSON CONTROLS
FORM 201.28-NM1.1<br />
ISSUE DATE: 8/29/2012<br />
CUSTOMER CONTROL WIRING<br />
FLOW SWITCH (-SF)<br />
PRINT (PNT)<br />
SYS. No. 1 RUN PERM<br />
SYS. No. 2 RUN PERM<br />
CONTROL<br />
BOARD<br />
FIGURE 14 - CUSTOMER CONTROL CONNECTIONS<br />
SYS. No. 1<br />
ALARM<br />
CONTACTS<br />
EVAP. PUMP<br />
START<br />
SIGNAL<br />
SYS. No. 2<br />
ALARM<br />
CONTACTS<br />
CHILLER<br />
RUN<br />
LEGEND<br />
TERMINAL BLOCK FOR CUSTOMER CONNECTIONS<br />
TERMINAL BLOCK FOR YORK CONNECTIONS<br />
WIRING AND COMPONENTS BY YORK<br />
OPTIONAL EQUIPMENT<br />
WIRING AND/OR COMPONENTS BY OTHERS<br />
SECTION 4 - INSTALLATION<br />
RELAY<br />
BOARD<br />
No. 1<br />
RELAY<br />
BOARD<br />
No. 2<br />
JOHNSON CONTROLS 33<br />
4
SECTION 4 - INSTALLATION<br />
TABLE 3 - ELECTRICAL LUG DATA<br />
34<br />
FIELD WIRING LUGS<br />
<strong>YVAA</strong> MODEL<br />
FRAME COND EVAP<br />
015 3 B<br />
016 5 B<br />
017 8 C<br />
018 3 A<br />
INPUT<br />
VOLTS<br />
INPUT<br />
FREQ<br />
STANDARD & ULTRA QUIET CONDENSER FANS<br />
TERMINAL BLOCK<br />
WIRES<br />
PER<br />
PHASE<br />
LUG WIRE<br />
RANGE<br />
200 60 4 #2 - 600 kcmil<br />
CIRCUIT<br />
BREAKER<br />
WIRES<br />
PER<br />
PHASE<br />
230 60 4 #2 - 600 kcmil 4<br />
380 60 2 #2 - 600 kcmil 2<br />
400 50 2 #2 - 600 kcmil 2<br />
460 60 2 #2 - 600 kcmil 2<br />
575 60 2 #2 - 600 kcmil 2<br />
200 60 4 #2 - 600 kcmil<br />
230 60 4 #2 - 600 kcmil 4<br />
380 60 2 #2 - 600 kcmil 2<br />
400 50 2 #2 - 600 kcmil 2<br />
460 60 2 #2 - 600 kcmil 2<br />
575 60 2 #2 - 600 kcmil 2<br />
200 60 4 #2 - 600 kcmil<br />
230 60 4 #2 - 600 kcmil 4<br />
380 60 2 #2 - 600 kcmil 2<br />
400 50 2 #2 - 600 kcmil 2<br />
460 60 2 #2 - 600 kcmil 2<br />
575 60 2 #2 - 600 kcmil 2<br />
200 60 4 #2 - 600 kcmil<br />
230 60 4 #2 - 600 kcmil 4<br />
380 60 2 #2 - 600 kcmil 2<br />
400 50 2 #2 - 600 kcmil 2<br />
460 60 2 #2 - 600 kcmil 2<br />
575 60 2 #2 - 600 kcmil 2<br />
* Up to 4 wires per phase, consisting of 2 lugs per phase where each lug can accomodate 2 wires.<br />
LUG<br />
WIRE<br />
RANGE<br />
4/0 - 500<br />
kcmil<br />
#2/0 -<br />
500 kcmil<br />
#2/0 -<br />
500 kcmil<br />
#1 - 500<br />
kcmil<br />
#1 - 500<br />
kcmil<br />
4/0 - 500<br />
kcmil<br />
#2/0 -<br />
500 kcmil<br />
#2/0 -<br />
500 kcmil<br />
#1 - 500<br />
kcmil<br />
#1 - 500<br />
kcmil<br />
4/0 - 500<br />
kcmil<br />
#2/0 -<br />
500 kcmil<br />
#2/0 -<br />
500 kcmil<br />
#1 - 500<br />
kcmil<br />
#1 - 500<br />
kcmil<br />
4/0 - 500<br />
kcmil<br />
#1 - 500<br />
kcmil<br />
#1 - 500<br />
kcmil<br />
#1 - 500<br />
kcmil<br />
#1 - 500<br />
kcmil<br />
FORM 201.28-NM1.1<br />
ISSUE DATE: 8/29/2012<br />
NON-FUSED<br />
DISCONNECT SWITCH<br />
WIRES<br />
PER<br />
PHASE<br />
LUG WIRE<br />
RANGE<br />
2 #2 - 600 kcmil<br />
2 #2 - 600 kcmil<br />
2 #2 - 600 kcmil<br />
2 #2 - 600 kcmil<br />
2 #2 - 600 kcmil<br />
2 #2 - 600 kcmil<br />
2 #2 - 600 kcmil<br />
2 #2 - 600 kcmil<br />
2 #2 - 600 kcmil<br />
2 #2 - 600 kcmil<br />
2 #2 - 600 kcmil<br />
2 #2 - 600 kcmil<br />
3 #2 - 600 kcmil<br />
3 #2 - 600 kcmil<br />
2 #2 - 600 kcmil<br />
2 #2 - 600 kcmil<br />
Electrical Data Charts 04 08 2011<br />
JOHNSON CONTROLS
FORM 201.28-NM1.1<br />
ISSUE DATE: 8/29/2012<br />
TABLE 3 - ELECTRICAL LUG DATA (CONT'D)<br />
FIELD WIRING LUGS<br />
<strong>YVAA</strong> MODEL<br />
FRAME COND EVAP<br />
015 3 B<br />
016 5 B<br />
017 8 C<br />
018 3 A<br />
INPUT<br />
VOLTS<br />
INPUT<br />
FREQ<br />
HIGH AIRFLOW/HIGH STATIC CONDENSER FANS<br />
TERMINAL BLOCK<br />
WIRE<br />
PER<br />
PHASE<br />
LUG WIRE<br />
RANGE<br />
200 60 4 #1/0 - 700 kcmil<br />
WIRES<br />
PER<br />
PHASE<br />
230 60 4 #2 - 600 kcmil 4<br />
380 60 2 #2 - 600 kcmil 2<br />
400 50 2 #2 - 600 kcmil 2<br />
460 60 2 #2 - 600 kcmil 2<br />
575 60 2 #2 - 600 kcmil 2<br />
200 60 4 #1/0 - 700 kcmil<br />
230 60 4 #2 - 600 kcmil 4<br />
380 60 2 #2 - 600 kcmil 2<br />
400 50 2 #2 - 600 kcmil 2<br />
460 60 2 #2 - 600 kcmil 2<br />
575 60 2 #2 - 600 kcmil 2<br />
200 60 4 #1/0 - 700 kcmil<br />
230 60 4 #2 - 600 kcmil 4<br />
380 60 2 #2 - 600 kcmil 2<br />
400 50 2 #2 - 600 kcmil 2<br />
460 60 2 #2 - 600 kcmil 2<br />
575 60 2 #2 - 600 kcmil 2<br />
200 60 4 #1/0 - 700 kcmil<br />
230 60 4 #2 - 600 kcmil 4<br />
380 60 3 #2 - 600 kcmil 3<br />
400 50 3 #2 - 600 kcmil 3<br />
460 60 2 #2 - 600 kcmil 2<br />
575 60 2 #2 - 600 kcmil 2<br />
* Up to 4 wires per phase, consisting of 2 lugs per phase where each lug can accomodate 2 wires.<br />
CIRCUIT<br />
BREAKER<br />
LUG<br />
WIRE<br />
RANGE<br />
4/0 - 500<br />
kcmil<br />
#1 - 500<br />
kcmil<br />
#1 - 500<br />
kcmil<br />
#1 - 500<br />
kcmil<br />
#1 - 500<br />
kcmil<br />
4/0 - 500<br />
kcmil<br />
#1 - 500<br />
kcmil<br />
#1 - 500<br />
kcmil<br />
#1 - 500<br />
kcmil<br />
#1 - 500<br />
kcmil<br />
4/0 - 500<br />
kcmil<br />
#1 - 500<br />
kcmil<br />
#1 - 500<br />
kcmil<br />
#1 - 500<br />
kcmil<br />
#1 - 500<br />
kcmil<br />
4/0 - 500<br />
kcmil<br />
3/0 - 400<br />
kcmil<br />
3/0 - 400<br />
kcmil<br />
#1 - 500<br />
kcmil<br />
#1 - 500<br />
kcmil<br />
SECTION 4 - INSTALLATION<br />
NON-FUSED DIS-<br />
CONNECT SWITCH<br />
WIRES<br />
PER<br />
PHASE<br />
LUG WIRE<br />
RANGE<br />
3 #2 - 600 kcmil<br />
3 #2 - 600 kcmil<br />
3 #2 - 600 kcmil<br />
2 #2 - 600 kcmil<br />
3 #2 - 600 kcmil<br />
3 #2 - 600 kcmil<br />
3 #2 - 600 kcmil<br />
2 #2 - 600 kcmil<br />
3 #2 - 600 kcmil<br />
3 #2 - 600 kcmil<br />
3 #2 - 600 kcmil<br />
2 #2 - 600 kcmil<br />
3 #2 - 600 kcmil<br />
3 #2 - 600 kcmil<br />
3 #2 - 600 kcmil<br />
2 #2 - 600 kcmil<br />
Electrical Data Charts 04 08 2011<br />
JOHNSON CONTROLS 35<br />
4
SECTION 4 - INSTALLATION<br />
TABLE 3 - ELECTRICAL LUG DATA (CONT'D)<br />
36<br />
FIELD WIRING LUGS<br />
<strong>YVAA</strong> MODEL<br />
FRAME COND EVAP<br />
019 5 A<br />
019 8 B<br />
020 0 C<br />
021 3 A<br />
INPUT<br />
VOLTS<br />
INPUT<br />
FREQ<br />
STANDARD & ULTRA QUIET CONDENSER FANS<br />
TERMINAL BLOCK<br />
WIRES<br />
PER<br />
PHASE<br />
LUG WIRE<br />
RANGE<br />
200 60 4 #2 - 600 kcmil<br />
CIRCUIT<br />
BREAKER<br />
WIRES<br />
PER<br />
PHASE<br />
230 60 4 #2 - 600 kcmil 4<br />
380 60 2 #2 - 600 kcmil 2<br />
400 50 2 #2 - 600 kcmil 2<br />
460 60 2 #2 - 600 kcmil 2<br />
575 60 2 #2 - 600 kcmil 2<br />
200 60 4 #2 - 600 kcmil<br />
230 60 4 #2 - 600 kcmil 4<br />
380 60 2 #2 - 600 kcmil 2<br />
400 50 2 #2 - 600 kcmil 2<br />
460 60 2 #2 - 600 kcmil 2<br />
575 60 2 #2 - 600 kcmil 2<br />
200 60 4 #2 - 600 kcmil<br />
230 60 4 #2 - 600 kcmil 4<br />
380 60 3 #2 - 600 kcmil 3<br />
400 50 3 #2 - 600 kcmil 3<br />
460 60 2 #2 - 600 kcmil 2<br />
575 60 2 #2 - 600 kcmil 2<br />
200 60 4 #2 - 600 kcmil<br />
230 60 4 #2 - 600 kcmil 4<br />
380 60 2 #2 - 600 kcmil 2<br />
400 50 2 #2 - 600 kcmil 2<br />
460 60 2 #2 - 600 kcmil 2<br />
575 60 2 #2 - 600 kcmil 2<br />
* Up to 4 wires per phase, consisting of 2 lugs per phase where each lug can accomodate 2 wires.<br />
LUG<br />
WIRE<br />
RANGE<br />
4/0 - 500<br />
kcmil<br />
#1 - 500<br />
kcmil<br />
#1 - 500<br />
kcmil<br />
#1 - 500<br />
kcmil<br />
#1 - 500<br />
kcmil<br />
4/0 - 500<br />
kcmil<br />
#1 - 500<br />
kcmil<br />
#1 - 500<br />
kcmil<br />
#1 - 500<br />
kcmil<br />
#1 - 500<br />
kcmil<br />
4/0 - 500<br />
kcmil<br />
3/0 - 400<br />
kcmil<br />
3/0 - 400<br />
kcmil<br />
#1 - 500<br />
kcmil<br />
#1 - 500<br />
kcmil<br />
4/0 - 500<br />
kcmil<br />
#1 - 500<br />
kcmil<br />
#1 - 500<br />
kcmil<br />
#1 - 500<br />
kcmil<br />
#1 - 500<br />
kcmil<br />
FORM 201.28-NM1.1<br />
ISSUE DATE: 8/29/2012<br />
NON-FUSED<br />
DISCONNECT SWITCH<br />
WIRES<br />
PER<br />
PHASE<br />
LUG WIRE<br />
RANGE<br />
3 #2 - 600 kcmil<br />
3 #2 - 600 kcmil<br />
2 #2 - 600 kcmil<br />
2 #2 - 600 kcmil<br />
3 #2 - 600 kcmil<br />
3 #2 - 600 kcmil<br />
2 #2 - 600 kcmil<br />
2 #2 - 600 kcmil<br />
3 #2 - 600 kcmil<br />
3 #2 - 600 kcmil<br />
3 #2 - 600 kcmil<br />
2 #2 - 600 kcmil<br />
3 #2 - 600 kcmil<br />
3 #2 - 600 kcmil<br />
2 #2 - 600 kcmil<br />
2 #2 - 600 kcmil<br />
Electrical Data Charts 04 08 2011<br />
JOHNSON CONTROLS
FORM 201.28-NM1.1<br />
ISSUE DATE: 8/29/2012<br />
TABLE 3 - ELECTRICAL LUG DATA (CONT'D)<br />
FIELD WIRING LUGS<br />
<strong>YVAA</strong> MODEL<br />
FRAME COND EVAP<br />
019 5 A<br />
019 8 B<br />
020 0 C<br />
021 3 A<br />
INPUT<br />
VOLTS<br />
INPUT<br />
FREQ<br />
HIGH AIRFLOW/HIGH STATIC CONDENSER FANS<br />
TERMINAL BLOCK<br />
WIRE<br />
PER<br />
PHASE<br />
LUG WIRE<br />
RANGE<br />
200 60 4 #1/0 - 700 kcmil<br />
WIRES<br />
PER<br />
PHASE<br />
230 60 4 #2 - 600 kcmil 4<br />
380 60 3 #2 - 600 kcmil 3<br />
400 50 3 #2 - 600 kcmil 3<br />
460 60 2 #2 - 600 kcmil 2<br />
575 60 2 #2 - 600 kcmil 2<br />
200 60 4 #1/0 - 700 kcmil<br />
230 60 4 #2 - 600 kcmil 4<br />
380 60 3 #2 - 600 kcmil 3<br />
400 50 3 #2 - 600 kcmil 3<br />
460 60 2 #2 - 600 kcmil 2<br />
575 60 2 #2 - 600 kcmil 2<br />
200 60 4 #1/0 - 700 kcmil<br />
230 60 4 #2 - 600 kcmil 4<br />
380 60 3 #2 - 600 kcmil 3<br />
400 50 3 #2 - 600 kcmil 3<br />
460 60 3 #2 - 600 kcmil 3<br />
575 60 2 #2 - 600 kcmil 2<br />
200 60 4 #1/0 - 700 kcmil<br />
230 60 4 #2 - 600 kcmil 4<br />
380 60 3 #2 - 600 kcmil 3<br />
400 50 3 #2 - 600 kcmil 3<br />
460 60 2 #2 - 600 kcmil 2<br />
575 60 2 #2 - 600 kcmil 2<br />
CIRCUIT<br />
BREAKER<br />
* Up to 4 wires per phase, consisting of 2 lugs per phase where each lug can accomodate 2 wires.<br />
LUG<br />
WIRE<br />
RANGE<br />
4/0 - 500<br />
kcmil<br />
3/0 - 400<br />
kcmil<br />
3/0 - 400<br />
kcmil<br />
#1 - 500<br />
kcmil<br />
#1 - 500<br />
kcmil<br />
4/0 - 500<br />
kcmil<br />
3/0 - 400<br />
kcmil<br />
3/0 - 400<br />
kcmil<br />
#1 - 500<br />
kcmil<br />
#1 - 500<br />
kcmil<br />
4/0 - 500<br />
kcmil<br />
3/0 - 400<br />
kcmil<br />
3/0 - 400<br />
kcmil<br />
3/0 - 400<br />
kcmil<br />
#1 - 500<br />
kcmil<br />
4/0 - 500<br />
kcmil<br />
3/0 - 400<br />
kcmil<br />
3/0 - 400<br />
kcmil<br />
#1 - 500<br />
kcmil<br />
#1 - 500<br />
kcmil<br />
SECTION 4 - INSTALLATION<br />
NON-FUSED DIS-<br />
CONNECT SWITCH<br />
WIRES<br />
PER<br />
PHASE<br />
LUG WIRE<br />
RANGE<br />
3 #2 - 600 kcmil<br />
3 #2 - 600 kcmil<br />
3 #2 - 600 kcmil<br />
2 #2 - 600 kcmil<br />
3 #2 - 600 kcmil<br />
3 #2 - 600 kcmil<br />
3 #2 - 600 kcmil<br />
2 #2 - 600 kcmil<br />
3 #2 - 600 kcmil<br />
3 #2 - 600 kcmil<br />
3 #2 - 600 kcmil<br />
2 #2 - 600 kcmil<br />
3 #2 - 600 kcmil<br />
3 #2 - 600 kcmil<br />
3 #2 - 600 kcmil<br />
2 #2 - 600 kcmil<br />
Electrical Data Charts 04 08 2011<br />
JOHNSON CONTROLS 37<br />
4
SECTION 4 - INSTALLATION<br />
TABLE 3 - ELECTRICAL LUG DATA (CONT'D)<br />
38<br />
FIELD WIRING LUGS<br />
<strong>YVAA</strong> MODEL<br />
FRAME COND EVAP<br />
021 5 C<br />
021 8 C<br />
023 3 B<br />
024 5 C<br />
INPUT<br />
VOLTS<br />
INPUT<br />
FREQ<br />
STANDARD & ULTRA QUIET CONDENSER FANS<br />
TERMINAL BLOCK<br />
WIRES<br />
PER<br />
PHASE<br />
LUG WIRE<br />
RANGE<br />
200 60 4 #2 - 600 kcmil<br />
CIRCUIT<br />
BREAKER<br />
WIRES<br />
PER<br />
PHASE<br />
230 60 4 #2 - 600 kcmil 4<br />
380 60 2 #2 - 600 kcmil 2<br />
400 50 2 #2 - 600 kcmil 2<br />
460 60 2 #2 - 600 kcmil 2<br />
575 60 2 #2 - 600 kcmil 2<br />
200 60 4 #2 - 600 kcmil<br />
230 60 4 #2 - 600 kcmil 4<br />
380 60 2 #2 - 600 kcmil 2<br />
400 50 2 #2 - 600 kcmil 2<br />
460 60 2 #2 - 600 kcmil 2<br />
575 60 2 #2 - 600 kcmil 2<br />
200 60 4 #2 - 600 kcmil<br />
230 60 4 #2 - 600 kcmil 4<br />
380 60 3 #2 - 600 kcmil 3<br />
400 50 3 #2 - 600 kcmil 3<br />
460 60 2 #2 - 600 kcmil 2<br />
575 60 2 #2 - 600 kcmil 2<br />
200 60 4 #2 - 600 kcmil<br />
230 60 4 #2 - 600 kcmil 4<br />
380 60 3 #2 - 600 kcmil 3<br />
400 50 3 #2 - 600 kcmil 3<br />
460 60 2 #2 - 600 kcmil 2<br />
575 60 2 #2 - 600 kcmil 2<br />
* Up to 4 wires per phase, consisting of 2 lugs per phase where each lug can accomodate 2 wires.<br />
LUG<br />
WIRE<br />
RANGE<br />
4/0 - 500<br />
kcmil<br />
#1 - 500<br />
kcmil<br />
#1 - 500<br />
kcmil<br />
#1 - 500<br />
kcmil<br />
#1 - 500<br />
kcmil<br />
4/0 - 500<br />
kcmil<br />
#1 - 500<br />
kcmil<br />
#1 - 500<br />
kcmil<br />
#1 - 500<br />
kcmil<br />
#1 - 500<br />
kcmil<br />
4/0 - 500<br />
kcmil<br />
3/0 - 400<br />
kcmil<br />
3/0 - 400<br />
kcmil<br />
#1 - 500<br />
kcmil<br />
#1 - 500<br />
kcmil<br />
4/0 - 500<br />
kcmil<br />
3/0 - 400<br />
kcmil<br />
3/0 - 400<br />
kcmil<br />
#1 - 500<br />
kcmil<br />
#1 - 500<br />
kcmil<br />
FORM 201.28-NM1.1<br />
ISSUE DATE: 8/29/2012<br />
NON-FUSED<br />
DISCONNECT SWITCH<br />
WIRES<br />
PER<br />
PHASE<br />
LUG WIRE<br />
RANGE<br />
3 #2 - 600 kcmil<br />
3 #2 - 600 kcmil<br />
2 #2 - 600 kcmil<br />
2 #2 - 600 kcmil<br />
3 #2 - 600 kcmil<br />
3 #2 - 600 kcmil<br />
2 #2 - 600 kcmil<br />
2 #2 - 600 kcmil<br />
3 #2 - 600 kcmil<br />
3 #2 - 600 kcmil<br />
3 #2 - 600 kcmil<br />
2 #2 - 600 kcmil<br />
3 #2 - 600 kcmil<br />
3 #2 - 600 kcmil<br />
3 #2 - 600 kcmil<br />
2 #2 - 600 kcmil<br />
Electrical Data Charts 04 08 2011<br />
JOHNSON CONTROLS
FORM 201.28-NM1.1<br />
ISSUE DATE: 8/29/2012<br />
TABLE 3 - ELECTRICAL LUG DATA (CONT'D)<br />
FIELD WIRING LUGS<br />
<strong>YVAA</strong> MODEL<br />
FRAME COND EVAP<br />
021 5 C<br />
021 8 C<br />
023 3 B<br />
024 5 C<br />
INPUT<br />
VOLTS<br />
INPUT<br />
FREQ<br />
HIGH AIRFLOW/HIGH STATIC CONDENSER FANS<br />
TERMINAL BLOCK<br />
WIRE<br />
PER<br />
PHASE<br />
LUG WIRE<br />
RANGE<br />
200 60 4 #1/0 - 700 kcmil<br />
WIRES<br />
PER<br />
PHASE<br />
230 60 4 #2 - 600 kcmil 4<br />
380 60 3 #2 - 600 kcmil 3<br />
400 50 3 #2 - 600 kcmil 3<br />
460 60 2 #2 - 600 kcmil 2<br />
575 60 2 #2 - 600 kcmil 2<br />
200 60 4 #1/0 - 700 kcmil<br />
230 60 4 #2 - 600 kcmil 4<br />
380 60 3 #2 - 600 kcmil 3<br />
400 50 3 #2 - 600 kcmil 3<br />
460 60 2 #2 - 600 kcmil 2<br />
575 60 2 #2 - 600 kcmil 2<br />
200 60 4 #1/0 - 700 kcmil<br />
230 60 4 #2 - 600 kcmil 4<br />
380 60 3 #2 - 600 kcmil 3<br />
400 50 3 #2 - 600 kcmil 3<br />
460 60 3 #2 - 600 kcmil 3<br />
575 60 2 #2 - 600 kcmil 2<br />
200 60 4 #1/0 - 700 kcmil<br />
230 60 4 #2 - 600 kcmil 4<br />
380 60 3 #2 - 600 kcmil 3<br />
400 50 3 #2 - 600 kcmil 3<br />
460 60 3 #2 - 600 kcmil 3<br />
575 60 2 #2 - 600 kcmil 2<br />
CIRCUIT<br />
BREAKER<br />
* Up to 4 wires per phase, consisting of 2 lugs per phase where each lug can accomodate 2 wires.<br />
LUG<br />
WIRE<br />
RANGE<br />
4/0 - 500<br />
kcmil<br />
3/0 - 400<br />
kcmil<br />
3/0 - 400<br />
kcmil<br />
#1 - 500<br />
kcmil<br />
#1 - 500<br />
kcmil<br />
4/0 - 500<br />
kcmil<br />
3/0 - 400<br />
kcmil<br />
3/0 - 400<br />
kcmil<br />
#1 - 500<br />
kcmil<br />
#1 - 500<br />
kcmil<br />
4/0 - 500<br />
kcmil<br />
3/0 - 400<br />
kcmil<br />
3/0 - 400<br />
kcmil<br />
3/0 - 400<br />
kcmil<br />
#1 - 500<br />
kcmil<br />
4/0 - 500<br />
kcmil<br />
3/0 - 400<br />
kcmil<br />
3/0 - 400<br />
kcmil<br />
3/0 - 400<br />
kcmil<br />
#1 - 500<br />
kcmil<br />
SECTION 4 - INSTALLATION<br />
NON-FUSED DIS-<br />
CONNECT SWITCH<br />
WIRES<br />
PER<br />
PHASE<br />
LUG WIRE<br />
RANGE<br />
3 #2 - 600 kcmil<br />
3 #2 - 600 kcmil<br />
3 #2 - 600 kcmil<br />
2 #2 - 600 kcmil<br />
3 #2 - 600 kcmil<br />
3 #2 - 600 kcmil<br />
3 #2 - 600 kcmil<br />
2 #2 - 600 kcmil<br />
3 #2 - 600 kcmil<br />
3 #2 - 600 kcmil<br />
3 #2 - 600 kcmil<br />
2 #2 - 600 kcmil<br />
3 #2 - 600 kcmil<br />
3 #2 - 600 kcmil<br />
3 #2 - 600 kcmil<br />
2 #2 - 600 kcmil<br />
Electrical Data Charts 04 08 2011<br />
JOHNSON CONTROLS 39<br />
4
SECTION 4 - INSTALLATION<br />
TABLE 3 - ELECTRICAL LUG DATA (CONT'D)<br />
40<br />
FIELD WIRING LUGS<br />
<strong>YVAA</strong> MODEL<br />
FRAME COND EVAP<br />
024 8 C<br />
026 3 B<br />
027 3 D<br />
027 5 E<br />
INPUT<br />
VOLTS<br />
INPUT<br />
FREQ<br />
STANDARD & ULTRA QUIET CONDENSER FANS<br />
TERMINAL BLOCK<br />
WIRES<br />
PER<br />
PHASE<br />
LUG WIRE<br />
RANGE<br />
200 60 4 #2 - 600 kcmil<br />
CIRCUIT<br />
BREAKER<br />
WIRES<br />
PER<br />
PHASE<br />
230 60 4 #2 - 600 kcmil 4<br />
380 60 3 #2 - 600 kcmil 3<br />
400 50 3 #2 - 600 kcmil 3<br />
460 60 2 #2 - 600 kcmil 2<br />
575 60 2 #2 - 600 kcmil 2<br />
200 60 4 #2 - 600 kcmil<br />
230 60 4 #2 - 600 kcmil 4<br />
380 60 3 #2 - 600 kcmil 3<br />
400 50 3 #2 - 600 kcmil 3<br />
460 60 2 #2 - 600 kcmil 2<br />
575 60 2 #2 - 600 kcmil 2<br />
200 60 4 #2 - 600 kcmil<br />
230 60 4 #2 - 600 kcmil 4<br />
380 60 3 #2 - 600 kcmil 3<br />
400 50 3 #2 - 600 kcmil 3<br />
460 60 2 #2 - 600 kcmil 2<br />
575 60 2 #2 - 600 kcmil 2<br />
200 60 4 #2 - 600 kcmil<br />
230 60 4 #2 - 600 kcmil 4<br />
380 60 3 #2 - 600 kcmil 3<br />
400 50 3 #2 - 600 kcmil 3<br />
460 60 2 #2 - 600 kcmil 2<br />
575 60 2 #2 - 600 kcmil 2<br />
* Up to 4 wires per phase, consisting of 2 lugs per phase where each lug can accomodate 2 wires.<br />
LUG<br />
WIRE<br />
RANGE<br />
4/0 - 500<br />
kcmil<br />
3/0 - 400<br />
kcmil<br />
3/0 - 400<br />
kcmil<br />
#1 - 500<br />
kcmil<br />
#1 - 500<br />
kcmil<br />
4/0 - 500<br />
kcmil<br />
3/0 - 400<br />
kcmil<br />
3/0 - 400<br />
kcmil<br />
#1 - 500<br />
kcmil<br />
#1 - 500<br />
kcmil<br />
4/0 - 500<br />
kcmil<br />
3/0 - 400<br />
kcmil<br />
3/0 - 400<br />
kcmil<br />
#1 - 500<br />
kcmil<br />
#1 - 500<br />
kcmil<br />
4/0 - 500<br />
kcmil<br />
3/0 - 400<br />
kcmil<br />
3/0 - 400<br />
kcmil<br />
#1 - 500<br />
kcmil<br />
#1 - 500<br />
kcmil<br />
FORM 201.28-NM1.1<br />
ISSUE DATE: 8/29/2012<br />
NON-FUSED<br />
DISCONNECT SWITCH<br />
WIRES<br />
PER<br />
PHASE<br />
LUG WIRE<br />
RANGE<br />
3 #2 - 600 kcmil<br />
3 #2 - 600 kcmil<br />
3 #2 - 600 kcmil<br />
2 #2 - 600 kcmil<br />
3 #2 - 600 kcmil<br />
3 #2 - 600 kcmil<br />
3 #2 - 600 kcmil<br />
2 #2 - 600 kcmil<br />
3 #2 - 600 kcmil<br />
3 #2 - 600 kcmil<br />
3 #2 - 600 kcmil<br />
2 #2 - 600 kcmil<br />
3 #2 - 600 kcmil<br />
3 #2 - 600 kcmil<br />
3 #2 - 600 kcmil<br />
2 #2 - 600 kcmil<br />
Electrical Data Charts 04 08 2011<br />
JOHNSON CONTROLS
FORM 201.28-NM1.1<br />
ISSUE DATE: 8/29/2012<br />
TABLE 3 - ELECTRICAL LUG DATA (CONT'D)<br />
FIELD WIRING LUGS<br />
<strong>YVAA</strong> MODEL<br />
FRAME COND EVAP<br />
024 8 C<br />
026 3 B<br />
027 3 D<br />
027 5 E<br />
INPUT<br />
VOLTS<br />
INPUT<br />
FREQ<br />
HIGH AIRFLOW/HIGH STATIC CONDENSER FANS<br />
TERMINAL BLOCK<br />
WIRE<br />
PER<br />
PHASE<br />
LUG WIRE<br />
RANGE<br />
200 60 4 #1/0 - 700 kcmil<br />
WIRES<br />
PER<br />
PHASE<br />
230 60 4 #2 - 600 kcmil 4<br />
380 60 3 #2 - 600 kcmil 3<br />
400 50 3 #2 - 600 kcmil 3<br />
460 60 3 #2 - 600 kcmil 3<br />
575 60 2 #2 - 600 kcmil 2<br />
200 60 4 #1/0 - 700 kcmil<br />
230 60 4 #2 - 600 kcmil 4<br />
380 60 3 #2 - 600 kcmil 3<br />
400 50 3 #2 - 600 kcmil 3<br />
460 60 3 #2 - 600 kcmil 3<br />
575 60 2 #2 - 600 kcmil 2<br />
200 60 4 #1/0 - 700 kcmil<br />
230 60 4 #2 - 600 kcmil 4<br />
380 60 3 #2 - 600 kcmil 3<br />
400 50 3 #2 - 600 kcmil 3<br />
460 60 3 #2 - 600 kcmil 3<br />
575 60 2 #2 - 600 kcmil 2<br />
200 60 4 #1/0 - 700 kcmil<br />
230 60 4 #2 - 600 kcmil 4<br />
380 60 3 #2 - 600 kcmil 3<br />
400 50 3 #2 - 600 kcmil 3<br />
460 60 3 #2 - 600 kcmil 3<br />
575 60 2 #2 - 600 kcmil 2<br />
CIRCUIT<br />
BREAKER<br />
* Up to 4 wires per phase, consisting of 2 lugs per phase where each lug can accomodate 2 wires.<br />
LUG<br />
WIRE<br />
RANGE<br />
4/0 - 500<br />
kcmil<br />
3/0 - 400<br />
kcmil<br />
3/0 - 400<br />
kcmil<br />
3/0 - 400<br />
kcmil<br />
#1 - 500<br />
kcmil<br />
4/0 - 500<br />
kcmil<br />
3/0 - 400<br />
kcmil<br />
3/0 - 400<br />
kcmil<br />
3/0 - 400<br />
kcmil<br />
#1 - 500<br />
kcmil<br />
4/0 - 500<br />
kcmil<br />
3/0 - 400<br />
kcmil<br />
3/0 - 400<br />
kcmil<br />
3/0 - 400<br />
kcmil<br />
#1 - 500<br />
kcmil<br />
4/0 - 500<br />
kcmil<br />
3/0 - 400<br />
kcmil<br />
3/0 - 400<br />
kcmil<br />
3/0 - 400<br />
kcmil<br />
#1 - 500<br />
kcmil<br />
SECTION 4 - INSTALLATION<br />
NON-FUSED DIS-<br />
CONNECT SWITCH<br />
WIRES<br />
PER<br />
PHASE<br />
LUG WIRE<br />
RANGE<br />
3 #2 - 600 kcmil<br />
3 #2 - 600 kcmil<br />
3 #2 - 600 kcmil<br />
2 #2 - 600 kcmil<br />
3 #2 - 600 kcmil<br />
3 #2 - 600 kcmil<br />
3 #2 - 600 kcmil<br />
2 #2 - 600 kcmil<br />
3 #2 - 600 kcmil<br />
3 #2 - 600 kcmil<br />
3 #2 - 600 kcmil<br />
2 #2 - 600 kcmil<br />
3 #2 - 600 kcmil<br />
3 #2 - 600 kcmil<br />
3 #2 - 600 kcmil<br />
2 #2 - 600 kcmil<br />
Electrical Data Charts 04 08 2011<br />
JOHNSON CONTROLS 41<br />
4
SECTION 4 - INSTALLATION<br />
TABLE 3 - ELECTRICAL LUG DATA (CONT'D)<br />
42<br />
FIELD WIRING LUGS<br />
<strong>YVAA</strong> MODEL<br />
FRAME COND EVAP<br />
027 8 E<br />
029 5 E<br />
030 3 C<br />
030 5 C<br />
INPUT<br />
VOLTS<br />
INPUT<br />
FREQ<br />
STANDARD & ULTRA QUIET CONDENSER FANS<br />
TERMINAL BLOCK<br />
WIRES<br />
PER<br />
PHASE<br />
LUG WIRE<br />
RANGE<br />
200 60 4 #2 - 600 kcmil<br />
CIRCUIT<br />
BREAKER<br />
WIRES<br />
PER<br />
PHASE<br />
230 60 4 #2 - 600 kcmil 4<br />
380 60 3 #2 - 600 kcmil 3<br />
400 50 3 #2 - 600 kcmil 3<br />
460 60 2 #2 - 600 kcmil 2<br />
575 60 2 #2 - 600 kcmil 2<br />
200 60<br />
230 60<br />
380 60 3 #2 - 600 kcmil 4<br />
400 50 3 #2 - 600 kcmil 4<br />
460 60 3 #2 - 600 kcmil 3<br />
575 60 3 #2 - 600 kcmil 3<br />
200 60<br />
230 60<br />
380 60 3 #2 - 600 kcmil 4<br />
400 50 3 #2 - 600 kcmil 4<br />
460 60 3 #2 - 600 kcmil 3<br />
575 60 3 #2 - 600 kcmil 3<br />
200 60<br />
230 60<br />
380 60 3 #2 - 600 kcmil 4<br />
400 50 3 #2 - 600 kcmil 4<br />
460 60 3 #2 - 600 kcmil 3<br />
575 60 3 #2 - 600 kcmil 3<br />
* Up to 4 wires per phase, consisting of 2 lugs per phase where each lug can accomodate 2 wires.<br />
LUG<br />
WIRE<br />
RANGE<br />
4/0 - 500<br />
kcmil<br />
3/0 - 400<br />
kcmil<br />
3/0 - 400<br />
kcmil<br />
#1 - 500<br />
kcmil<br />
#1 - 500<br />
kcmil<br />
#4/0 -<br />
500 kcmil<br />
#4/0 -<br />
500 kcmil<br />
#3/0 -<br />
400 kcmil<br />
#3/0 -<br />
400 kcmil<br />
#4/0 -<br />
500 kcmil<br />
#4/0 -<br />
500 kcmil<br />
#3/0 -<br />
400 kcmil<br />
#3/0 -<br />
400 kcmil<br />
#4/0 -<br />
500 kcmil<br />
#4/0 -<br />
500 kcmil<br />
#3/0 -<br />
400 kcmil<br />
#3/0 -<br />
400 kcmil<br />
FORM 201.28-NM1.1<br />
ISSUE DATE: 8/29/2012<br />
NON-FUSED<br />
DISCONNECT SWITCH<br />
WIRES<br />
PER<br />
PHASE<br />
LUG WIRE<br />
RANGE<br />
3 #2 - 600 kcmil<br />
3 #2 - 600 kcmil<br />
3 #2 - 600 kcmil<br />
2 #2 - 600 kcmil<br />
4* #2 - 600 kcmil<br />
3 #2 - 600 kcmil<br />
3 #2 - 600 kcmil<br />
3 #2 - 600 kcmil<br />
4* #2 - 600 kcmil<br />
3 #2 - 600 kcmil<br />
3 #2 - 600 kcmil<br />
3 #2 - 600 kcmil<br />
4* #2 - 600 kcmil<br />
3 #2 - 600 kcmil<br />
3 #2 - 600 kcmil<br />
3 #2 - 600 kcmil<br />
Electrical Data Charts 04 08 2011<br />
JOHNSON CONTROLS
FORM 201.28-NM1.1<br />
ISSUE DATE: 8/29/2012<br />
TABLE 3 - ELECTRICAL LUG DATA (CONT'D)<br />
FIELD WIRING LUGS<br />
<strong>YVAA</strong> MODEL<br />
FRAME COND EVAP<br />
027 8 E<br />
029 5 E<br />
030 3 C<br />
030 5 C<br />
INPUT<br />
VOLTS<br />
INPUT<br />
FREQ<br />
HIGH AIRFLOW/HIGH STATIC CONDENSER FANS<br />
TERMINAL BLOCK<br />
WIRE<br />
PER<br />
PHASE<br />
LUG WIRE<br />
RANGE<br />
200 60 4 #1/0 - 700 kcmil<br />
WIRES<br />
PER<br />
PHASE<br />
230 60 4 #2 - 600 kcmil 4<br />
380 60 3 #2 - 600 kcmil 3<br />
400 50 3 #2 - 600 kcmil 3<br />
460 60 3 #2 - 600 kcmil 3<br />
575 60 2 #2 - 600 kcmil 2<br />
200 60<br />
230 60<br />
380 60 4 #2 - 600 kcmil 4<br />
400 50 4 #2 - 600 kcmil 4<br />
460 60 3 #2 - 600 kcmil 4<br />
575 60 3 #2 - 600 kcmil 3<br />
200 60<br />
230 60<br />
380 60 4 #2 - 600 kcmil 4<br />
400 50 4 #2 - 600 kcmil 4<br />
460 60 3 #2 - 600 kcmil 4<br />
575 60 3 #2 - 600 kcmil 3<br />
200 60<br />
230 60<br />
380 60 4 #2 - 600 kcmil 4<br />
400 50 4 #2 - 600 kcmil 4<br />
460 60 3 #2 - 600 kcmil 4<br />
575 60 3 #2 - 600 kcmil 3<br />
CIRCUIT<br />
BREAKER<br />
* Up to 4 wires per phase, consisting of 2 lugs per phase where each lug can accomodate 2 wires.<br />
LUG<br />
WIRE<br />
RANGE<br />
4/0 - 500<br />
kcmil<br />
3/0 - 400<br />
kcmil<br />
3/0 - 400<br />
kcmil<br />
3/0 - 400<br />
kcmil<br />
#1 - 500<br />
kcmil<br />
#4/0 - 500<br />
kcmil<br />
#4/0 - 500<br />
kcmil<br />
#4/0 - 500<br />
kcmil<br />
#3/0 - 400<br />
kcmil<br />
#4/0 - 500<br />
kcmil<br />
#4/0 - 500<br />
kcmil<br />
#4/0 - 500<br />
kcmil<br />
#3/0 - 400<br />
kcmil<br />
#4/0 - 500<br />
kcmil<br />
#4/0 - 500<br />
kcmil<br />
#4/0 - 500<br />
kcmil<br />
#3/0 - 400<br />
kcmil<br />
SECTION 4 - INSTALLATION<br />
NON-FUSED DIS-<br />
CONNECT SWITCH<br />
WIRES<br />
PER<br />
PHASE<br />
LUG WIRE<br />
RANGE<br />
3 #2 - 600 kcmil<br />
3 #2 - 600 kcmil<br />
3 #2 - 600 kcmil<br />
2 #2 - 600 kcmil<br />
4* #2 - 600 kcmil<br />
4* #2 - 600 kcmil<br />
3 #2 - 600 kcmil<br />
3 #2 - 600 kcmil<br />
4* #2 - 600 kcmil<br />
4* #2 - 600 kcmil<br />
3 #2 - 600 kcmil<br />
3 #2 - 600 kcmil<br />
4* #2 - 600 kcmil<br />
4* #2 - 600 kcmil<br />
3 #2 - 600 kcmil<br />
3 #2 - 600 kcmil<br />
Electrical Data Charts 04 08 2011<br />
JOHNSON CONTROLS 43<br />
4
SECTION 4 - INSTALLATION<br />
TABLE 3 - ELECTRICAL LUG DATA (CONT'D)<br />
44<br />
FIELD WIRING LUGS<br />
<strong>YVAA</strong> MODEL<br />
FRAME COND EVAP<br />
030 8 E<br />
031 8 E<br />
032 3 E<br />
033 3 C<br />
INPUT<br />
VOLTS<br />
INPUT<br />
FREQ<br />
200 60<br />
230 60<br />
STANDARD & ULTRA QUIET CONDENSER FANS<br />
TERMINAL BLOCK<br />
WIRES<br />
PER<br />
PHASE<br />
LUG WIRE<br />
RANGE<br />
CIRCUIT<br />
BREAKER<br />
WIRES<br />
PER<br />
PHASE<br />
380 60 3 #2 - 600 kcmil 4<br />
400 50 3 #2 - 600 kcmil 4<br />
460 60 3 #2 - 600 kcmil 3<br />
575 60 3 #2 - 600 kcmil 3<br />
200 60<br />
230 60<br />
380 60 3 #2 - 600 kcmil 4<br />
400 50 3 #2 - 600 kcmil 4<br />
460 60 3 #2 - 600 kcmil 3<br />
575 60 3 #2 - 600 kcmil 3<br />
200 60<br />
230 60<br />
380 60 3 #2 - 600 kcmil 4<br />
400 50 3 #2 - 600 kcmil 4<br />
460 60 3 #2 - 600 kcmil 3<br />
575 60 3 #2 - 600 kcmil 3<br />
200 60<br />
230 60<br />
380 60 3 #2 - 600 kcmil 4<br />
400 50 3 #2 - 600 kcmil 4<br />
460 60 3 #2 - 600 kcmil 3<br />
575 60 3 #2 - 600 kcmil 3<br />
* Up to 4 wires per phase, consisting of 2 lugs per phase where each lug can accomodate 2 wires.<br />
LUG<br />
WIRE<br />
RANGE<br />
#4/0 -<br />
500 kcmil<br />
#4/0 -<br />
500 kcmil<br />
#3/0 -<br />
400 kcmil<br />
#3/0 -<br />
400 kcmil<br />
#4/0 -<br />
500 kcmil<br />
#4/0 -<br />
500 kcmil<br />
#3/0 -<br />
400 kcmil<br />
#3/0 -<br />
400 kcmil<br />
#4/0 -<br />
500 kcmil<br />
#4/0 -<br />
500 kcmil<br />
#3/0 -<br />
400 kcmil<br />
#3/0 -<br />
400 kcmil<br />
#4/0 -<br />
500 kcmil<br />
#4/0 -<br />
500 kcmil<br />
#3/0 -<br />
400 kcmil<br />
#3/0 -<br />
400 kcmil<br />
FORM 201.28-NM1.1<br />
ISSUE DATE: 8/29/2012<br />
NON-FUSED<br />
DISCONNECT SWITCH<br />
WIRES<br />
PER<br />
PHASE<br />
LUG WIRE<br />
RANGE<br />
4* #2 - 600 kcmil<br />
3 #2 - 600 kcmil<br />
3 #2 - 600 kcmil<br />
3 #2 - 600 kcmil<br />
4* #2 - 600 kcmil<br />
3 #2 - 600 kcmil<br />
3 #2 - 600 kcmil<br />
3 #2 - 600 kcmil<br />
4* #2 - 600 kcmil<br />
3 #2 - 600 kcmil<br />
3 #2 - 600 kcmil<br />
3 #2 - 600 kcmil<br />
4* #2 - 600 kcmil<br />
3 #2 - 600 kcmil<br />
3 #2 - 600 kcmil<br />
3 #2 - 600 kcmil<br />
Electrical Data Charts 04 08 2011<br />
JOHNSON CONTROLS
FORM 201.28-NM1.1<br />
ISSUE DATE: 8/29/2012<br />
TABLE 3 - ELECTRICAL LUG DATA (CONT'D)<br />
FIELD WIRING LUGS<br />
<strong>YVAA</strong> MODEL<br />
FRAME COND EVAP<br />
030 8 E<br />
031 8 E<br />
032 3 E<br />
033 3 C<br />
INPUT<br />
VOLTS<br />
INPUT<br />
FREQ<br />
200 60<br />
230 60<br />
HIGH AIRFLOW/HIGH STATIC CONDENSER FANS<br />
TERMINAL BLOCK<br />
WIRE<br />
PER<br />
PHASE<br />
LUG WIRE<br />
RANGE<br />
WIRES<br />
PER<br />
PHASE<br />
380 60 4 #2 - 600 kcmil 4<br />
400 50 4 #2 - 600 kcmil 4<br />
460 60 3 #2 - 600 kcmil 4<br />
575 60 3 #2 - 600 kcmil 3<br />
200 60<br />
230 60<br />
380 60 4 #2 - 600 kcmil 4<br />
400 50 4 #2 - 600 kcmil 4<br />
460 60 3 #2 - 600 kcmil 4<br />
575 60 3 #2 - 600 kcmil 3<br />
200 60<br />
230 60<br />
380 60 4 #2 - 600 kcmil 4<br />
400 50 4 #2 - 600 kcmil 4<br />
460 60 3 #2 - 600 kcmil 4<br />
575 60 3 #2 - 600 kcmil 3<br />
200 60<br />
230 60<br />
380 60 4 #2 - 600 kcmil 4<br />
400 50 4 #2 - 600 kcmil 4<br />
460 60 3 #2 - 600 kcmil 4<br />
575 60 3 #2 - 600 kcmil 3<br />
CIRCUIT<br />
BREAKER<br />
* Up to 4 wires per phase, consisting of 2 lugs per phase where each lug can accomodate 2 wires.<br />
LUG<br />
WIRE<br />
RANGE<br />
#4/0 - 500<br />
kcmil<br />
#4/0 - 500<br />
kcmil<br />
#4/0 - 500<br />
kcmil<br />
#3/0 - 400<br />
kcmil<br />
#4/0 - 500<br />
kcmil<br />
#4/0 - 500<br />
kcmil<br />
#4/0 - 500<br />
kcmil<br />
#3/0 - 400<br />
kcmil<br />
#4/0 - 500<br />
kcmil<br />
#4/0 - 500<br />
kcmil<br />
#4/0 - 500<br />
kcmil<br />
#3/0 - 400<br />
kcmil<br />
#4/0 - 500<br />
kcmil<br />
#4/0 - 500<br />
kcmil<br />
#4/0 - 500<br />
kcmil<br />
#3/0 - 400<br />
kcmil<br />
SECTION 4 - INSTALLATION<br />
NON-FUSED DIS-<br />
CONNECT SWITCH<br />
WIRES<br />
PER<br />
PHASE<br />
LUG WIRE<br />
RANGE<br />
4* #2 - 600 kcmil<br />
4* #2 - 600 kcmil<br />
3 #2 - 600 kcmil<br />
3 #2 - 600 kcmil<br />
4* #2 - 600 kcmil<br />
4* #2 - 600 kcmil<br />
3 #2 - 600 kcmil<br />
3 #2 - 600 kcmil<br />
4* #2 - 600 kcmil<br />
4* #2 - 600 kcmil<br />
3 #2 - 600 kcmil<br />
3 #2 - 600 kcmil<br />
4* #2 - 600 kcmil<br />
4* #2 - 600 kcmil<br />
3 #2 - 600 kcmil<br />
3 #2 - 600 kcmil<br />
Electrical Data Charts 04 08 2011<br />
JOHNSON CONTROLS 45<br />
4
SECTION 4 - INSTALLATION<br />
TABLE 3 - ELECTRICAL LUG DATA (CONT'D)<br />
46<br />
FIELD WIRING LUGS<br />
<strong>YVAA</strong> MODEL<br />
FRAME COND EVAP<br />
034 3 E<br />
034 5 E<br />
050 0 J<br />
052 3 J<br />
INPUT<br />
VOLTS<br />
INPUT<br />
FREQ<br />
200 60<br />
230 60<br />
STANDARD & ULTRA QUIET CONDENSER FANS<br />
TERMINAL BLOCK<br />
WIRES<br />
PER<br />
PHASE<br />
LUG WIRE<br />
RANGE<br />
CIRCUIT<br />
BREAKER<br />
WIRES<br />
PER<br />
PHASE<br />
380 60 3 #2 - 600 kcmil 4<br />
400 50 3 #2 - 600 kcmil 4<br />
460 60 3 #2 - 600 kcmil 3<br />
575 60 3 #2 - 600 kcmil 3<br />
200 60<br />
230 60<br />
380 60 3 #2 - 600 kcmil 4<br />
400 50 3 #2 - 600 kcmil 4<br />
460 60 3 #2 - 600 kcmil 3<br />
575 60 3 #2 - 600 kcmil 3<br />
200 60<br />
230 60<br />
380 60 3 #2 - 600 kcmil 3<br />
400 50 3 #2 - 600 kcmil 3<br />
460 60 2 #2 - 600 kcmil 2<br />
575 60 2 #2 - 600 kcmil 2<br />
200 60<br />
230 60<br />
380 60 3 #2 - 600 kcmil 3<br />
400 50 3 #2 - 600 kcmil 3<br />
460 60 2 #2 - 600 kcmil 2<br />
575 60 2 #2 - 600 kcmil 2<br />
* Up to 4 wires per phase, consisting of 2 lugs per phase where each lug can accomodate 2 wires.<br />
LUG<br />
WIRE<br />
RANGE<br />
#4/0 -<br />
500 kcmil<br />
#4/0 -<br />
500 kcmil<br />
#3/0 -<br />
400 kcmil<br />
#3/0 -<br />
400 kcmil<br />
#4/0 -<br />
500 kcmil<br />
#4/0 -<br />
500 kcmil<br />
#3/0 -<br />
400 kcmil<br />
#3/0 -<br />
400 kcmil<br />
#3/0 -<br />
500 kcmil<br />
#3/0 -<br />
500 kcmil<br />
#1 - 500<br />
kcmil<br />
#1 - 500<br />
kcmil<br />
#3/0 -<br />
500 kcmil<br />
#3/0 -<br />
500 kcmil<br />
#1 - 500<br />
kcmil<br />
#1 - 500<br />
kcmil<br />
FORM 201.28-NM1.1<br />
ISSUE DATE: 8/29/2012<br />
NON-FUSED<br />
DISCONNECT SWITCH<br />
WIRES<br />
PER<br />
PHASE<br />
LUG WIRE<br />
RANGE<br />
4* #2 - 600 kcmil<br />
3 #2 - 600 kcmil<br />
3 #2 - 600 kcmil<br />
3 #2 - 600 kcmil<br />
4* #2 - 600 kcmil<br />
3 #2 - 600 kcmil<br />
3 #2 - 600 kcmil<br />
3 #2 - 600 kcmil<br />
3<br />
3<br />
#3/0 - 500<br />
kcmil<br />
#3/0 - 500<br />
kcmil<br />
2 #1 - 500 kcmil<br />
2 #1 - 500 kcmil<br />
3<br />
3<br />
#3/0 - 500<br />
kcmil<br />
#3/0 - 500<br />
kcmil<br />
2 #1 - 500 kcmil<br />
2 #1 - 500 kcmil<br />
Electrical Data Charts 04 08 2011<br />
JOHNSON CONTROLS
FORM 201.28-NM1.1<br />
ISSUE DATE: 8/29/2012<br />
TABLE 3 - ELECTRICAL LUG DATA (CONT'D)<br />
FIELD WIRING LUGS<br />
<strong>YVAA</strong> MODEL<br />
FRAME COND EVAP<br />
034 3 E<br />
034 5 E<br />
050 0 J<br />
052 3 J<br />
INPUT<br />
VOLTS<br />
INPUT<br />
FREQ<br />
200 60<br />
230 60<br />
HIGH AIRFLOW/HIGH STATIC CONDENSER FANS<br />
TERMINAL BLOCK<br />
WIRE<br />
PER<br />
PHASE<br />
LUG WIRE<br />
RANGE<br />
WIRES<br />
PER<br />
PHASE<br />
380 60 4 #2 - 600 kcmil 4<br />
400 50 4 #2 - 600 kcmil 4<br />
460 60 3 #2 - 600 kcmil 4<br />
575 60 3 #2 - 600 kcmil 3<br />
200 60<br />
230 60<br />
380 60 4 #2 - 600 kcmil 4<br />
400 50 4 #2 - 600 kcmil 4<br />
460 60 3 #2 - 600 kcmil 4<br />
575 60 3 #2 - 600 kcmil 3<br />
200 60<br />
230 60<br />
380 60 3 #2 - 600 kcmil 3<br />
400 50 3 #2 - 600 kcmil 3<br />
460 60 3 #2 - 600 kcmil 3<br />
575 60<br />
200 60<br />
230 60<br />
380 60 3 #2 - 600 kcmil 3<br />
400 50 3 #2 - 600 kcmil 3<br />
460 60 3 #2 - 600 kcmil 3<br />
575 60<br />
CIRCUIT<br />
BREAKER<br />
* Up to 4 wires per phase, consisting of 2 lugs per phase where each lug can accomodate 2 wires.<br />
LUG<br />
WIRE<br />
RANGE<br />
#4/0 - 500<br />
kcmil<br />
#4/0 - 500<br />
kcmil<br />
#4/0 - 500<br />
kcmil<br />
#3/0 - 400<br />
kcmil<br />
#4/0 - 500<br />
kcmil<br />
#4/0 - 500<br />
kcmil<br />
#4/0 - 500<br />
kcmil<br />
#3/0 - 400<br />
kcmil<br />
#3/0 - 400<br />
kcmil<br />
#3/0 - 400<br />
kcmil<br />
#3/0 - 400<br />
kcmil<br />
#3/0 - 400<br />
kcmil<br />
#3/0 - 400<br />
kcmil<br />
#3/0 - 400<br />
kcmil<br />
SECTION 4 - INSTALLATION<br />
NON-FUSED DIS-<br />
CONNECT SWITCH<br />
WIRES<br />
PER<br />
PHASE<br />
LUG WIRE<br />
RANGE<br />
4* #2 - 600 kcmil<br />
4* #2 - 600 kcmil<br />
3 #2 - 600 kcmil<br />
3 #2 - 600 kcmil<br />
4* #2 - 600 kcmil<br />
4* #2 - 600 kcmil<br />
3 #2 - 600 kcmil<br />
3 #2 - 600 kcmil<br />
JOHNSON CONTROLS 47<br />
3<br />
3<br />
3<br />
3<br />
3<br />
3<br />
#3/0 - 400<br />
kcmil<br />
#3/0 - 400<br />
kcmil<br />
#3/0 - 400<br />
kcmil<br />
#3/0 - 400<br />
kcmil<br />
#3/0 - 400<br />
kcmil<br />
#3/0 - 400<br />
kcmil<br />
Electrical Data Charts 04 08 2011<br />
4
THIS PAGE INTENTIONALLY LEFT BLANK
FORM 201.28-NM1.1<br />
ISSUE DATE: 8/29/2012<br />
NOMENCLATURE<br />
ASHRAE 90.1 Compliant<br />
SECTION 5 - TECHNICAL DATA<br />
<strong>YVAA</strong> 015 XXXX 46 AA<br />
1 2 3 4 5 6 7 8 9 10 11 12 13 14 15<br />
BASE<br />
PRODUCT<br />
TYPE<br />
FRAME<br />
SIZE<br />
CONFIGURATION<br />
VOLTAGE<br />
LEVEL<br />
/ REFRIGERANT<br />
Y : York # # # # : Condenser code 1 7 : 200 / 3 / 60 A : Development Level A<br />
V : Variable Speed<br />
# : Evaporator code 2 8 : 230 / 3 / 60 A : Refrigerant R134a<br />
<strong>Screw</strong><br />
# : Compressor code 4 0 : 380 / 3 / 60<br />
A : <strong>Air</strong> cooled # : Condenser fan & sound kit code 4 6 : 460 / 3 / 60<br />
A 5 0 : 380-415 / 3 / 50<br />
5 8 : 575 / 3 / 60<br />
���������������������������<br />
�����������������������<br />
�����������������������<br />
�������������������<br />
JOHNSON CONTROLS 49<br />
5
SECTION 5 - TECHNICAL DATA<br />
TABLE 4 - PHYSICAL DATA<br />
The data shown in this table is applicable to selected<br />
typical configurations. Other configurations are available<br />
through our configuration/selection software.<br />
50<br />
FORM 201.28-NM1.1<br />
ISSUE DATE: 8/29/2012<br />
UNIT FRAME 015 016 017 018 019 019<br />
CONDENSER CODE 3 5 8 3 5 8<br />
EVAPORATOR CODE B B C A A B<br />
GENERAL UNIT DATA<br />
Number of Independent Refrigerant Circuits 2<br />
Refrigerant Charge, R-134a,<br />
Ckt.-1/Ckt.-2, lbs (kg)<br />
Oil Charge, Ckt.-1/Ckt.-2, gal (liters)<br />
175/175<br />
(80/80)<br />
2.1/2.0<br />
(8.0/7.7)<br />
190/190<br />
(86/86)<br />
2.2/2.2<br />
(8.5/8.5)<br />
225/225<br />
(102/102)<br />
2.5/2.5<br />
(9.3/9.3)<br />
% Minimum Load 10%<br />
Unit shipping weight, lbs (kg) 1<br />
Operating Weight, lbs (kg) 1<br />
Chassis Dimensions - Length, Ft (mm)<br />
Chassis Dimensions - Width, Ft (mm)<br />
Chassis Dimensions - Height, Ft (mm)<br />
COMPRESSORS, SEMI-HERMETIC SCREW<br />
11518<br />
(5224)<br />
11979<br />
(5434)<br />
203.3<br />
(5163)<br />
88.3<br />
(2242)<br />
94.6<br />
(2403)<br />
12084<br />
(5481)<br />
12546<br />
(5691)<br />
247.2<br />
(6280)<br />
88.3<br />
(2242)<br />
94.6<br />
(2403)<br />
14668<br />
(6653)<br />
15432<br />
(7000)<br />
291.2<br />
(7397)<br />
88.3<br />
(2242)<br />
94.6<br />
(2403)<br />
Qty per Chiller 2<br />
CONDENSER FANS<br />
175/155<br />
(80/70)<br />
2.4/2.0<br />
(9.2/7.7)<br />
12019<br />
(5452)<br />
12460<br />
(5652)<br />
247.0<br />
(6274)<br />
88.3<br />
(2242)<br />
94.6<br />
(2403)<br />
190/170<br />
(86/78)<br />
2.6/2.1<br />
(9.7/8.0)<br />
12781<br />
(5797)<br />
13222<br />
(5997)<br />
291.2<br />
(7397)<br />
88.3<br />
(2242)<br />
94.6<br />
(2403)<br />
220/195<br />
(100/89)<br />
2.7/2.2<br />
(10.4/8.5)<br />
Number Ckt-1/Ckt-2 4/4 5/5 6/6 6/4 7/5 8/6<br />
<strong>Air</strong> on Condenser (Min/Max), °F (°C ) 0/125 (4.4/15.6)<br />
EVAPORATOR, SHELL AND TUBE HYBRID FALLING FILM 2<br />
13776<br />
(6248<br />
14237<br />
(6458)<br />
335.2<br />
(8514)<br />
88.3<br />
(2242)<br />
94.6<br />
(2403)<br />
Water Volume, gal (liters) 58 (220) 58 (220) 71 (269) 48 (182) 48 (182) 58 (220)<br />
Leaving Water Temperature<br />
(Min/Max), °F (°C ) 3<br />
Maximum Water Side Pressure,<br />
psig (bar)<br />
Maximum Refrigerant Side<br />
Pressure, psig (bar)<br />
40/60 (4.4/15.6)<br />
150 (10.3)<br />
235 (16.2)<br />
Evap Drain Connection, in 3/4<br />
NOTES:<br />
1. Shipping and operating weights shown are for base unit; selected options may add weight to unit. Contact your nearest <strong>Johnson</strong> <strong>Controls</strong><br />
Sales office for weight data.<br />
2. The evaporator is protected against freezing to 0°F(-17.8°C) with a standard heater.<br />
Please contact your nearest <strong>Johnson</strong> <strong>Controls</strong> Sales Office<br />
for the chiller configuration that best matches your<br />
specific needs.<br />
3. For leaving liquid temperature below 40°F(4.4°C) or above 60°F (15.6°C), contact your nearest <strong>Johnson</strong> <strong>Controls</strong> Sales Office for application<br />
requirements.<br />
JOHNSON CONTROLS
FORM 201.28-NM1.1<br />
ISSUE DATE: 8/29/2012<br />
TABLE 4 - PHYSICAL DATA (CONT'D)<br />
SECTION 5 - TECHNICAL DATA<br />
UNIT FRAME 020 021 021 021 023 024<br />
CONDENSER CODE 0 3 5 8 3 5<br />
EVAPORATOR CODE C A C C B C<br />
GENERAL UNIT DATA<br />
Number of Independent Refrigerant Circuits 2<br />
Refrigerant Charge, R-134a,<br />
Ckt.-1/Ckt.-2, lbs (kg)<br />
Oil Charge, Ckt.-1/Ckt.-2, gal (liters)<br />
205/205<br />
(93/93)<br />
2.6/2.6<br />
(10.0/10.0)<br />
175/175<br />
(80/80)<br />
2.5/2.5<br />
(9.3/9.3)<br />
225/225<br />
(102/102)<br />
2.8/2.8<br />
(10.5/10.5)<br />
% Minimum Load 10%<br />
Unit shipping weight, lbs (kg) 1<br />
Operating Weight, lbs (kg) 1<br />
Chassis Dimensions - Length, Ft (mm)<br />
Chassis Dimensions - Width, Ft (mm)<br />
Chassis Dimensions - Height, Ft (mm)<br />
COMPRESSORS, SEMI-HERMETIC SCREW<br />
13392<br />
(6074)<br />
14155<br />
(6421)<br />
226.0<br />
(5741)<br />
88.3<br />
(2242)<br />
94.6<br />
(2403)<br />
12859<br />
(5833)<br />
13300<br />
(6033)<br />
291.2<br />
(7397)<br />
88.3<br />
(2242)<br />
94.6<br />
(2403)<br />
14915<br />
(6765)<br />
15678<br />
(7111)<br />
291.2<br />
(7397)<br />
88.3<br />
(2242)<br />
94.6<br />
(2403)<br />
Qty per Chiller 2<br />
CONDENSER FANS<br />
240/240<br />
(109/109)<br />
2.9/2.9<br />
(10.8/10.8)<br />
15677<br />
(7111)<br />
16440<br />
(7457)<br />
335.2<br />
(8514)<br />
88.3<br />
(2242)<br />
94.6<br />
(2403)<br />
210/190<br />
(96/86)<br />
2.7/2.6<br />
(10.1/9.7)<br />
13288<br />
(6027)<br />
13750<br />
(6237)<br />
291.2<br />
(7397)<br />
88.3<br />
(2242)<br />
94.6<br />
(2403)<br />
250/225<br />
(114/102)<br />
2.9/2.8<br />
(11.1/10.5)<br />
Number Ckt-1/Ckt-2 4/4 6/6 6/6 7/7 7/5 8/6<br />
<strong>Air</strong> on Condenser (Min/Max), °F (°C ) 0/125 (-17.8/51.7)<br />
EVAPORATOR, SHELL AND TUBE HYBRID FALLING FILM 2<br />
15873<br />
(7200)<br />
16636<br />
(7546)<br />
335.2<br />
(8514)<br />
88.3<br />
(2242)<br />
94.6<br />
(2403)<br />
Water Volume, gal (liters) 71 (269) 48 (182) 71 (269) 71 (269) 58 (220) 71 (269)<br />
Leaving Water Temperature<br />
(Min/Max), °F (°C ) 3<br />
Maximum Water Side Pressure,<br />
psig (bar)<br />
Maximum Refrigerant Side<br />
Pressure, psig (bar)<br />
40/60 (4.4/15.6)<br />
150 (10.3)<br />
235 (16.2)<br />
Evap Drain Connection, in 3/4<br />
NOTES:<br />
1. Shipping and operating weights shown are for base unit; selected options may add weight to unit. Contact your nearest <strong>Johnson</strong> <strong>Controls</strong><br />
Sales office for weight data.<br />
2. The evaporator is protected against freezing to 0°F(-17.8°C) with a standard heater.<br />
3. For leaving liquid temperature below 40°F(4.4°C) or above 60°F (15.6°C), contact your nearest <strong>Johnson</strong> <strong>Controls</strong> Sales Office for application<br />
requirements.<br />
JOHNSON CONTROLS 51<br />
5
SECTION 5 - TECHNICAL DATA<br />
TABLE 4 - PHYSICAL DATA (CONT'D)<br />
52<br />
FORM 201.28-NM1.1<br />
ISSUE DATE: 8/29/2012<br />
UNIT FRAME 024 026 027 027 027 029<br />
CONDENSER CODE 8 3 3 5 8 5<br />
EVAPORATOR CODE C B D E E E<br />
GENERAL UNIT DATA<br />
Number of Independent Refrigerant Circuits 2<br />
Refrigerant Charge, R-134a,<br />
Ckt.-1/Ckt.-2, lbs (kg)<br />
Oil Charge, Ckt.-1/Ckt.-2, gal (liters)<br />
250/250<br />
(114/114)<br />
2.9/2.9<br />
(11.1/11.1)<br />
210/210<br />
(96/96)<br />
2.7/2.7<br />
(10.1/10.1)<br />
265/265<br />
(120/120)<br />
3.0/3.0<br />
(11.4/11.4)<br />
% Minimum Load 10%<br />
Unit shipping weight, lbs (kg) 1<br />
Operating Weight, lbs (kg) 1<br />
Chassis Dimensions - Length, Ft (mm)<br />
Chassis Dimensions - Width, Ft (mm)<br />
Chassis Dimensions - Height, Ft (mm)<br />
COMPRESSORS, SEMI-HERMETIC SCREW<br />
16634<br />
(7545)<br />
17398<br />
(7891)<br />
379.1<br />
(9631)<br />
88.3<br />
(2242)<br />
94.6<br />
(2403)<br />
14076<br />
(6385)<br />
14538<br />
(6594)<br />
335.2<br />
(8514)<br />
88.3<br />
(2242)<br />
94.6<br />
(2403)<br />
16275<br />
(7382)<br />
17103<br />
(7758)<br />
335.2<br />
(8514)<br />
88.3<br />
(2242)<br />
94.6<br />
(2403)<br />
Qty per Chiller 2<br />
CONDENSER FANS<br />
265/265<br />
(121/121)<br />
3.0/3.0<br />
(11.4/11.4)<br />
16991<br />
(7707)<br />
17851<br />
(8097)<br />
335.2<br />
(8514)<br />
88.3<br />
(2242)<br />
94.6<br />
(2403)<br />
270/270<br />
(123/123)<br />
3.1/3.1<br />
(11.6/11.6)<br />
17753<br />
(8052)<br />
18612<br />
(8442)<br />
379.2<br />
(9631)<br />
88.3<br />
(2242)<br />
94.6<br />
(2403)<br />
310/265<br />
(141/120)<br />
4.2/3.1<br />
(15.9/11.7)<br />
Number Ckt-1/Ckt-2 8/8 7/7 7/7 7/7 8/8 9/7<br />
<strong>Air</strong> on Condenser (Min/Max), °F (°C ) 0/125 (-17.8/51.7)<br />
EVAPORATOR, SHELL AND TUBE HYBRID FALLING FILM 2<br />
18205<br />
(8258)<br />
19065<br />
(8648)<br />
379.2<br />
(9631)<br />
88.3<br />
(2242)<br />
94.6<br />
(2403)<br />
Water Volume, gal (liters) 71 (269) 58 (220) 82 (310) 113 (428) 113 (428) 113 (428)<br />
Leaving Water Temperature<br />
(Min/Max), °F (°C ) 3<br />
Maximum Water Side Pressure,<br />
psig (bar)<br />
Maximum Refrigerant Side<br />
Pressure, psig (bar)<br />
40/60 (4.4/15.6)<br />
150 (10.3)<br />
235 (16.2)<br />
Evap Drain Connection, in 3/4<br />
NOTES:<br />
1. Shipping and operating weights shown are for base unit; selected options may add weight to unit. Contact your nearest <strong>Johnson</strong> <strong>Controls</strong><br />
Sales office for weight data.<br />
2. The evaporator is protected against freezing to 0°F(-17.8°C) with a standard heater.<br />
3. For leaving liquid temperature below 40°F(4.4°C) or above 60°F (15.6°C), contact your nearest <strong>Johnson</strong> <strong>Controls</strong> Sales Office for application<br />
requirements.<br />
JOHNSON CONTROLS
FORM 201.28-NM1.1<br />
ISSUE DATE: 8/29/2012<br />
TABLE 4 - PHYSICAL DATA (CONT'D)<br />
SECTION 5 - TECHNICAL DATA<br />
UNIT FRAME 030 030 030 031 032<br />
CONDENSER CODE 3 5 8 8 3<br />
EVAPORATOR CODE C C E E E<br />
GENERAL UNIT DATA<br />
Number of Independent Refrigerant Circuits 2<br />
Refrigerant Charge, R-134a, Ckt.-1/Ckt.-2, lbs (kg)<br />
Oil Charge, Ckt.-1/Ckt.-2, gal (liters)<br />
290/245<br />
(132/111)<br />
4.1/3.0<br />
(15.5/11.4)<br />
295/250<br />
(134/114)<br />
4.1/3.0<br />
(15.5/11.4)<br />
315/275<br />
(143/125)<br />
4.3/3.2<br />
(16.3/12.1)<br />
% Minimum Load 10%<br />
Unit shipping weight, lbs (kg) 1<br />
Operating Weight, lbs (kg) 1<br />
Chassis Dimensions - Length, Ft (mm)<br />
17114<br />
(7763)<br />
17877<br />
(8109)<br />
379.2<br />
(9631)<br />
18967<br />
(8603)<br />
19827<br />
(8993)<br />
423.1<br />
(10748)<br />
18967<br />
(8603)<br />
19827<br />
(8993)<br />
423.1<br />
(10748)<br />
315/275<br />
(143/134)<br />
4.3/3.2<br />
(16.3/12.5)<br />
19728<br />
(8948)<br />
20588<br />
(9339)<br />
467.1<br />
(11865)<br />
295/295<br />
(134/134)<br />
4.1/4.1<br />
(15.5/15.5)<br />
18554<br />
(8416)<br />
19414<br />
(8806)<br />
379.2<br />
(9631)<br />
Chassis Dimensions - Width, Ft (mm) 88.3 (2242) 88.3 (2242) 88.3 (2242) 88.3 (2242) 88.3 (2242)<br />
Chassis Dimensions - Height, Ft (mm) 94.6 (2403) 94.6 (2403) 94.6 (2403) 94.6 (2403) 94.6 (2403)<br />
COMPRESSORS, SEMI-HERMETIC SCREW<br />
Qty per Chiller 2<br />
CONDENSER FANS<br />
Number Ckt-1/Ckt-2 9/7 10/8 10/8 10/10 8/8<br />
<strong>Air</strong> on Condenser (Min/Max), °F (°C ) 0/125 (-17.8/51.7)<br />
EVAPORATOR, SHELL AND TUBE HYBRID FALLING FILM 2<br />
Water Volume, gal (liters) 71 (269) 71 (269) 113 (428) 113 (428) 113 (428)<br />
Leaving Water Temperature (Min/Max), °F (°C ) 3 40/60 (4.4/15.6)<br />
Maximum Water Side Pressure, psig (bar) 150 (10.3)<br />
Maximum Refrigerant Side Pressure, psig (bar) 235 (16.2)<br />
Evap Drain Connection, in 3/4<br />
NOTES:<br />
1. Shipping and operating weights shown are for base unit; selected options may add weight to unit. Contact your nearest <strong>Johnson</strong> <strong>Controls</strong><br />
Sales office for weight data.<br />
2. The evaporator is protected against freezing to 0°F(-17.8°C) with a standard heater.<br />
3. For leaving liquid temperature below 40°F(4.4°C) or above 60°F (15.6°C), contact your nearest <strong>Johnson</strong> <strong>Controls</strong> Sales Office for application<br />
requirements.<br />
JOHNSON CONTROLS 53<br />
5
SECTION 5 - TECHNICAL DATA<br />
TABLE 4 - PHYSICAL DATA (CONT'D)<br />
54<br />
FORM 201.28-NM1.1<br />
ISSUE DATE: 8/29/2012<br />
UNIT FRAME 033 034 034 050 052<br />
CONDENSER CODE 3 3 5 0 3<br />
EVAPORATOR CODE C E E J J<br />
GENERAL UNIT DATA<br />
Number of Independent Refrigerant Circuits 2<br />
Refrigerant Charge, R-134a, Ckt.-1/Ckt.-2, lbs<br />
(kg)<br />
Oil Charge, Ckt.-1/Ckt.-2, gal (liters)<br />
290/290<br />
(132/132)<br />
4.1/4.1<br />
(15.5/15.5)<br />
310/310<br />
(141/141)<br />
4.2/4.2<br />
(15.9/15.9)<br />
315/315<br />
(143/143)<br />
4.3/4.3<br />
(16.3/16.3)<br />
% Minimum Load 10%<br />
Unit shipping weight, lbs (kg) 1<br />
Operating Weight, lbs (kg) 1<br />
Chassis Dimensions - Length, Ft (mm)<br />
18224<br />
(8266)<br />
18987<br />
(8612)<br />
423.1<br />
(10748)<br />
19315<br />
(8761)<br />
20175<br />
(9151)<br />
423.1<br />
(10748)<br />
20077<br />
(9107)<br />
20937<br />
(9497)<br />
467.1<br />
(11865)<br />
405/405<br />
(184/184)<br />
5.2/5.2<br />
(19.7/19.7)<br />
25968<br />
(11779)<br />
27325<br />
(12394)<br />
467.1<br />
(11865)<br />
445/445<br />
(202/202)<br />
5.4/5.4<br />
(20.4/20.4)<br />
28427<br />
(12894)<br />
29784<br />
(13510)<br />
599.3<br />
(15222)<br />
Chassis Dimensions - Width, Ft (mm) 88.3 (2242) 88.3 (2242) 88.3 (2242) 88.3 (2242) 88.3 (2242)<br />
Chassis Dimensions - Height, Ft (mm) 94.6 (2403) 94.6 (2403) 94.6 (2403) 94.7 (2405) 94.7 (2405)<br />
COMPRESSORS, SEMI-HERMETIC SCREW<br />
Qty per Chiller 2<br />
CONDENSER FANS<br />
Number Ckt-1/Ckt-2 9/9 9/9 10/10 10/10 13/13<br />
<strong>Air</strong> on Condenser (Min/Max), °F (°C ) 0/125 (-17.8/51.7)<br />
EVAPORATOR, SHELL AND TUBE HYBRID FALLING FILM 2<br />
Water Volume, gal (liters) 71 (269) 113 (428) 113 (428) 147 (556) 147 (556)<br />
Leaving Water Temperature (Min/Max), °F (°C ) 3 40/60 (4.4/15.6)<br />
Maximum Water Side Pressure, psig (bar) 150 (10.3)<br />
Maximum Refrigerant Side Pressure, psig (bar) 235 (16.2)<br />
Evap Drain Connection, in 3/4<br />
NOTES:<br />
1. Shipping and operating weights shown are for base unit; selected options may add weight to unit. Contact your nearest <strong>Johnson</strong> <strong>Controls</strong><br />
Sales office for weight data.<br />
2. The evaporator is protected against freezing to 0°F(-17.8°C) with a standard heater.<br />
3. For leaving liquid temperature below 40°F(4.4°C) or above 60°F (15.6°C), contact your nearest <strong>Johnson</strong> <strong>Controls</strong> Sales Office for application<br />
requirements.<br />
JOHNSON CONTROLS
FORM 201.28-NM1.1<br />
ISSUE DATE: 8/29/2012<br />
The data below is applicable to select configurations.<br />
Other configurations are available through our configuration/selection<br />
software. Please contact your nearest<br />
<strong>Johnson</strong> <strong>Controls</strong> Sales Office for the chiller configuration<br />
that best matches your specific needs.<br />
94.6"<br />
(2403 mm)<br />
A" PIPE WATER OUTLET A" PIPE WATER INLET<br />
120"<br />
(305 mm)<br />
VIEW A-A<br />
FIGURE 15 - <strong>YVAA</strong> DIMENSIONS<br />
C<br />
B<br />
CONTROL ENTRY<br />
3.0" (76 mm) WIDE X<br />
11.5" (292 mm) HIGH<br />
3.0"<br />
(75 mm)<br />
4.0"<br />
(102 mm)<br />
VIEW B-B<br />
88.3" (2242 mm)<br />
SECTION 5 - TECHNICAL DATA<br />
POWER ENTRY<br />
10" (254 mm) WIDE X<br />
13" (330 mm) HIGH<br />
JOHNSON CONTROLS 55<br />
B<br />
1.5"<br />
(38 mm)<br />
B<br />
LD16178<br />
VSD / CONTROL PANEL<br />
60.0"<br />
(1524 mm)<br />
14.1"<br />
(359 mm)<br />
47.4"<br />
(1204 mm)<br />
5
SECTION 5 - TECHNICAL DATA<br />
TABLE 5 - UNIT RIGGING<br />
Notes<br />
56<br />
FORM 201.28-NM1.1<br />
ISSUE DATE: 8/29/2012<br />
<strong>YVAA</strong> MODEL<br />
DESCRIPTION UNITS A B C D E F G<br />
CENTER<br />
OF<br />
GRAVITY<br />
Frame Condenser Evaporator X Y<br />
015 3 B<br />
Rigging Hole Location<br />
Point Load<br />
in.<br />
mm.<br />
lbs.<br />
kg.<br />
18<br />
464<br />
1036<br />
470<br />
60 116 192<br />
1512 2937 4866<br />
1675 1675 1372<br />
760 760 622<br />
106 46<br />
2682 1164<br />
016 5 B<br />
Rigging Hole Location<br />
Point Load<br />
in.<br />
mm.<br />
lbs.<br />
kg.<br />
18<br />
464<br />
626<br />
284<br />
60 137 214<br />
1533 3485 5436<br />
1141 3081 1194<br />
518 1398 542<br />
132 46<br />
3348 1158<br />
017 8 C<br />
Rigging Hole Location<br />
Point Load<br />
in.<br />
mm.<br />
lbs.<br />
kg.<br />
12<br />
314<br />
625<br />
283<br />
73 144 197 260<br />
1845 3654 5012 6593<br />
1746 2573 1287 1103<br />
792 1167 584 500<br />
151 46<br />
3835 1173<br />
018 3 A<br />
Rigging Hole Location<br />
Point Load<br />
in.<br />
mm.<br />
lbs.<br />
kg.<br />
18<br />
464<br />
502<br />
228<br />
60 143 220<br />
1533 3637 5599<br />
1454 2886 1143<br />
660 1309 518<br />
132 46<br />
3365 1161<br />
019 5 A<br />
Rigging Hole Location<br />
Point Load<br />
in.<br />
mm.<br />
lbs.<br />
kg.<br />
18<br />
464<br />
469<br />
213<br />
60 143 227 272<br />
1533 3636 5761 6920<br />
1471 2779 1390 256<br />
667 1261 630 116<br />
144 46<br />
3649 1162<br />
019 8 B<br />
Rigging Hole Location<br />
Point Load<br />
in.<br />
mm.<br />
lbs.<br />
kg.<br />
18<br />
464<br />
418<br />
190<br />
60 137 215 302<br />
1533 3485 5456 7670<br />
1630 2443 1657 715<br />
739 1108 752 324<br />
154 46<br />
3912 1161<br />
020 0 C<br />
Rigging Hole Location<br />
Point Load<br />
in.<br />
mm.<br />
lbs.<br />
kg.<br />
18<br />
464<br />
1199<br />
544<br />
60 131 214<br />
1518 3332 5430<br />
750 3466 1280<br />
340 1572 581<br />
114 46<br />
2907 1168<br />
021 3 A<br />
Rigging Hole Location<br />
Point Load<br />
in.<br />
mm.<br />
lbs.<br />
kg.<br />
18<br />
464<br />
472<br />
214<br />
60 143 227 272<br />
1533 3636 5761 6920<br />
1467 2824 1412 257<br />
665 1281 640 117<br />
144 45<br />
3655 1155<br />
021 5 C<br />
Rigging Hole Location<br />
Point Load<br />
in.<br />
mm.<br />
lbs.<br />
kg.<br />
12<br />
314<br />
483<br />
219<br />
73 144 197 260<br />
1845 3654 5012 6593<br />
1990 1990 1673 1322<br />
903 903 759 600<br />
158 46<br />
4013 1176<br />
1. Operating weight shown is for base unit (460/3/60, no options); selected option may add weight to unit. Contact you nearest <strong>Johnson</strong><br />
<strong>Controls</strong> Sales office for weight data.<br />
2. All rigging holes are 3" x 2".<br />
M<br />
N<br />
G<br />
LD15892<br />
JOHNSON CONTROLS
FORM 201.28-NM1.1<br />
ISSUE DATE: 8/29/2012<br />
TABLE 5 - UNIT RIGGING (CONT'D)<br />
SECTION 5 - TECHNICAL DATA<br />
<strong>YVAA</strong> MODEL<br />
DESCRIPTION UNITS H I J K L M N O P<br />
CENTER<br />
OF<br />
GRAVITY<br />
Frame Cond Evap X Y<br />
Rigging Hole in. 18 60 116 192 106 46<br />
015 3 B<br />
Location<br />
Point Load<br />
mm.<br />
lbs.<br />
kg.<br />
464<br />
952<br />
432<br />
1512 2937 4866<br />
1655 1655 1496<br />
751 751 679<br />
2682 1164<br />
Rigging Hole in. 18 60 137 214 132 46<br />
016 5 B<br />
Location<br />
Point Load<br />
mm.<br />
lbs.<br />
kg.<br />
464<br />
608<br />
276<br />
1533 3485 5436<br />
1121 3058 1255<br />
508 1387 569<br />
3348 1158<br />
Rigging Hole in. 12 73 144 197 260 151 46<br />
017 8 C<br />
Location<br />
Point Load<br />
mm.<br />
lbs.<br />
kg.<br />
314<br />
634<br />
288<br />
1845 3654 5012 6593<br />
1612 2611 1305 1172<br />
731 1184 592 532<br />
3835 1173<br />
Rigging Hole in. 18 60 143 220 132 46<br />
018 3 A<br />
Location<br />
Point Load<br />
mm.<br />
lbs.<br />
kg.<br />
464<br />
508<br />
230<br />
1533 3637 5599<br />
1422 2912 1193<br />
645 1321 541<br />
3365 1161<br />
Rigging Hole in. 18 60 143 227 272 144 46<br />
019 5 A<br />
Location<br />
Point Load<br />
mm.<br />
lbs.<br />
kg.<br />
464<br />
484<br />
220<br />
1533 3636 5761 6920<br />
1419 2833 1416 264<br />
644 1285 642 120<br />
3649 1162<br />
Rigging Hole in. 18 60 137 215 302 154 46<br />
019 8 B<br />
Location<br />
Point Load<br />
mm.<br />
lbs.<br />
kg.<br />
464<br />
398<br />
181<br />
1533 3485 5456 7670<br />
1633 2451 1716 715<br />
741 1112 778 324<br />
3912 1161<br />
Rigging Hole in. 18 60 131 214 114 46<br />
020 0 C<br />
Location<br />
Point Load<br />
mm.<br />
lbs.<br />
kg.<br />
464<br />
1107<br />
502<br />
1518 3332 5430<br />
776 3428 1384<br />
352 1555 628<br />
2907 1168<br />
Rigging Hole in. 18 60 143 227 272 144 45<br />
021 3 A<br />
Location<br />
Point Load<br />
mm.<br />
lbs.<br />
kg.<br />
464<br />
485<br />
220<br />
1533 3636 5761 6920<br />
1416 2842 1421 265<br />
642 1289 645 120<br />
3655 1155<br />
Rigging Hole in. 12 73 144 197 260 158 46<br />
021 5 C<br />
Location<br />
Point Load<br />
mm.<br />
lbs.<br />
kg.<br />
314<br />
475<br />
215<br />
1845 3654 5012 6593<br />
1937 1937 1721 1387<br />
879 879 781 629<br />
4013 1176<br />
Notes<br />
1. Operating weight shown is for base unit (460/3/60, no options); selected option may add weight to unit. Contact you nearest <strong>Johnson</strong><br />
<strong>Controls</strong> Sales office for weight data.<br />
2. All rigging holes are 3" x 2".<br />
JOHNSON CONTROLS 57<br />
M<br />
N<br />
G<br />
LD15892<br />
5
SECTION 5 - TECHNICAL DATA<br />
TABLE 5 - UNIT RIGGING (CONT'D)<br />
58<br />
M<br />
N<br />
G<br />
FORM 201.28-NM1.1<br />
ISSUE DATE: 8/29/2012<br />
<strong>YVAA</strong> MODEL<br />
DESCRIPTION UNITS A B C D E F G<br />
CENTER<br />
OF<br />
GRAVITY<br />
Frame Condenser Evaporator X Y<br />
021 8 C<br />
Rigging Hole Location<br />
Point Load<br />
in.<br />
mm.<br />
lbs.<br />
kg.<br />
12<br />
314<br />
518<br />
235<br />
73 163 254 324<br />
1845 4144 6443 8217<br />
2344 3047 1501 428<br />
1063 1382 681 194<br />
161 46<br />
4086 1173<br />
023 3 B<br />
Rigging Hole Location<br />
Point Load<br />
in.<br />
mm.<br />
lbs.<br />
kg.<br />
18<br />
464<br />
342<br />
155<br />
60 137 215 272<br />
1533 3484 5455 6919<br />
2052 2048 2048 144<br />
931 929 929 65<br />
140 46<br />
3553 1160<br />
024 5 C<br />
Rigging Hole Location<br />
Point Load<br />
in.<br />
mm.<br />
lbs.<br />
kg.<br />
18<br />
464<br />
358<br />
162<br />
60 149 240 324<br />
1533 3789 6088 8217<br />
2130 2982 2151 307<br />
966 1353 976 139<br />
159 46<br />
4033 1174<br />
024 8 C<br />
Rigging Hole Location<br />
Point Load<br />
in.<br />
mm.<br />
lbs.<br />
kg.<br />
12<br />
314<br />
697<br />
316<br />
73 163 254 347<br />
1845 4144 6525 6525<br />
1921 3078 1741 871<br />
871 1396 790 395<br />
177 46<br />
4500 1172<br />
026 3 B<br />
Rigging Hole Location<br />
Point Load<br />
in.<br />
mm.<br />
lbs.<br />
kg.<br />
18<br />
464<br />
515<br />
234<br />
60 137 215 302<br />
1533 3484 5455 7669<br />
1613 2513 1682 714<br />
732 1140 763 324<br />
152 45<br />
3866 1153<br />
027 3 D<br />
Rigging Hole Location<br />
Point Load<br />
in.<br />
mm.<br />
lbs.<br />
kg.<br />
12<br />
314<br />
736<br />
334<br />
73 121 181 243 324<br />
1845 3073 4602 6170 8219<br />
1021 1226 3065 1393 696<br />
463 556 1390 632 316<br />
177 46<br />
4506 1176<br />
027 5 E<br />
Rigging Hole Location<br />
Point Load<br />
in.<br />
mm.<br />
lbs.<br />
kg.<br />
12<br />
314<br />
872<br />
396<br />
73 121 181 264 324<br />
1845 3073 4602 6717 8218<br />
569 1525 3812 1146 573<br />
258 692 1729 520 260<br />
177 46<br />
4506 1176<br />
027 8 E<br />
Rigging Hole Location<br />
Point Load<br />
in.<br />
mm.<br />
lbs.<br />
kg.<br />
12<br />
314<br />
616<br />
279<br />
73 121 181 243 347<br />
1845 3073 4602 6170 8826<br />
1372 1138 2845 1937 968<br />
622 516 1290 879 439<br />
187 46<br />
4747 1173<br />
029 5 E<br />
Rigging Hole Location<br />
Point Load<br />
in.<br />
mm.<br />
lbs.<br />
kg.<br />
12<br />
314<br />
500<br />
227<br />
73 179 290 347<br />
1845 4551 7358 8825<br />
1930 4518 1506 533<br />
875 2049 683 242<br />
186 47<br />
4712 1186<br />
Notes<br />
1. Operating weight shown is for base unit (460/3/60, no options); selected option may add weight to unit. Contact you nearest <strong>Johnson</strong><br />
<strong>Controls</strong> Sales office for weight data.<br />
2. All rigging holes are 3" x 2".<br />
LD15892<br />
JOHNSON CONTROLS
FORM 201.28-NM1.1<br />
ISSUE DATE: 8/29/2012<br />
TABLE 5 - UNIT RIGGING (CONT'D)<br />
Notes<br />
SECTION 5 - TECHNICAL DATA<br />
<strong>YVAA</strong> MODEL<br />
DESCRIPTION UNITS H I J K L M N O P<br />
CENTER<br />
OF<br />
GRAVITY<br />
Frame Cond Evap X Y<br />
Rigging Hole in. 12 73 163 254 324 161 46<br />
021 8 C<br />
Location<br />
Point Load<br />
mm.<br />
lbs.<br />
kg.<br />
314<br />
510<br />
231<br />
1845 4144 6443 8217<br />
2282 2967 1743 336<br />
1035 1346 791 152<br />
4086 1173<br />
Rigging Hole in. 18 60 137 215 272 140 46<br />
023 3 B<br />
Location<br />
Point Load<br />
mm.<br />
lbs.<br />
kg.<br />
464<br />
330<br />
150<br />
1533 3484 5455 6919<br />
2037 2067 2067 152<br />
924 938 938 69<br />
3553 1160<br />
Rigging Hole in. 18 60 149 240 324 159 46<br />
024 5 C<br />
Location<br />
Point Load<br />
mm.<br />
lbs.<br />
kg.<br />
464<br />
354<br />
161<br />
1533 3789 6088 8217<br />
2079 2911 2340 261<br />
943 1320 1061 118<br />
4033 1174<br />
Rigging Hole in. 12 73 163 254 347 177 46<br />
024 8 C<br />
Location<br />
Point Load<br />
mm.<br />
lbs.<br />
kg.<br />
314<br />
697<br />
316<br />
1845 4144 6525 6525<br />
1800 3169 1773 886<br />
816 1437 804 402<br />
4500 1172<br />
Rigging Hole in. 18 60 137 215 302 152 45<br />
026 3 B<br />
Location<br />
Point Load<br />
mm.<br />
lbs.<br />
kg.<br />
464<br />
493<br />
224<br />
1533 3484 5455 7669<br />
1623 2486 1723 714<br />
736 1128 782 324<br />
3866 1153<br />
Rigging Hole in. 12 73 121 181 243 324 177 46<br />
027 3 D<br />
Location<br />
Point Load<br />
mm.<br />
lbs.<br />
kg.<br />
314<br />
653<br />
296<br />
1845 3073 4602 6170 8219<br />
1083 1174 2936 1527 763<br />
491 533 1332 693 346<br />
4506 1176<br />
Rigging Hole in. 12 73 121 181 264 324 177 46<br />
027 5 E<br />
Location<br />
Point Load<br />
mm.<br />
lbs.<br />
kg.<br />
314<br />
803<br />
364<br />
1845 3073 4602 6717 8218<br />
586 1494 3734 1252 626<br />
266 678 1694 568 284<br />
4506 1176<br />
Rigging Hole in. 12 73 121 181 243 347 187 46<br />
027 8 E<br />
Location<br />
Point Load<br />
mm.<br />
lbs.<br />
kg.<br />
314<br />
542<br />
246<br />
1845 3073 4602 6170 8826<br />
1407 1099 2747 2054 1027<br />
638 498 1246 932 466<br />
4747 1173<br />
Rigging Hole in. 12 73 179 290 347 186 47<br />
029 5 E<br />
Location<br />
Point Load<br />
mm.<br />
lbs.<br />
kg.<br />
314<br />
434<br />
197<br />
1845 4551 7358 8825<br />
1937 4698 1566 583<br />
879 2131 710 264<br />
4712 1186<br />
1. Operating weight shown is for base unit (460/3/60, no options); selected option may add weight to unit. Contact you nearest <strong>Johnson</strong><br />
<strong>Controls</strong> Sales office for weight data.<br />
2. All rigging holes are 3" x 2".<br />
JOHNSON CONTROLS 59<br />
M<br />
N<br />
G<br />
LD15892<br />
5
SECTION 5 - TECHNICAL DATA<br />
TABLE 5 - UNIT RIGGING (CONT'D)<br />
Notes<br />
60<br />
M<br />
N<br />
G<br />
FORM 201.28-NM1.1<br />
ISSUE DATE: 8/29/2012<br />
<strong>YVAA</strong> MODEL<br />
DESCRIPTION UNITS A B C D E F G<br />
CENTER<br />
OF<br />
GRAVITY<br />
Frame Condenser Evaporator X Y<br />
030 3 C<br />
Rigging Hole Location<br />
Point Load<br />
in.<br />
mm.<br />
lbs.<br />
kg.<br />
12<br />
314<br />
748<br />
339<br />
73 161 254 348<br />
1845 4092 6443 8824<br />
1875 3196 1748 874<br />
850 1450 793 396<br />
175 47<br />
4441 1184<br />
030 5 C<br />
Rigging Hole Location<br />
Point Load<br />
in.<br />
mm.<br />
lbs.<br />
kg.<br />
12<br />
314<br />
559<br />
254<br />
73 161 254 306 391<br />
1845 4092 6443 7763 9941<br />
2024 3021 2164 302 752<br />
918 1370 982 137 341<br />
186 47<br />
4729 1183<br />
030 8 E<br />
Rigging Hole Location<br />
Point Load<br />
in.<br />
mm.<br />
lbs.<br />
kg.<br />
12<br />
314<br />
1113<br />
505<br />
73 121 179 243 296 391 196 47<br />
1845 3073 4550 6170 7510 9943 4971 1183<br />
323 2182 2182 1309 1505 753<br />
147 990 990 594 683 342<br />
031 8 E<br />
Rigging Hole Location<br />
Point Load<br />
in.<br />
mm.<br />
lbs.<br />
kg.<br />
12<br />
314<br />
1028<br />
466<br />
73 121 179 243 353 435 207 46<br />
1845 3073 4550 6169 8962 11059 5256 1181<br />
575 2009 2009 2022 1580 527<br />
261 911 911 917 717 239<br />
032 3 E<br />
Rigging Hole Location<br />
Point Load<br />
in.<br />
mm.<br />
lbs.<br />
kg.<br />
12<br />
314<br />
701<br />
318<br />
73 121 181 243 347<br />
1845 3073 4602 6170 8826<br />
1261 1250 3125 1960 980<br />
572 567 1417 889 445<br />
186 46<br />
4717 1171<br />
033 3 C<br />
Rigging Hole Location<br />
Point Load<br />
in.<br />
mm.<br />
lbs.<br />
kg.<br />
12<br />
314<br />
550<br />
249<br />
73 163 254 306 391<br />
1845 4144 6443 7765 9942<br />
2052 3327 2098 333 752<br />
931 1509 952 151 341<br />
186 46<br />
4737 1166<br />
034 3 E<br />
Rigging Hole Location<br />
Point Load<br />
in.<br />
mm.<br />
lbs.<br />
kg.<br />
12<br />
314<br />
1087<br />
493<br />
73 121 181 243 296 392 196 46<br />
1845 3073 4602 6170 7510 9943 4974 1169<br />
408 2224 2224 1456 1505 753<br />
185 1009 1009 660 683 342<br />
034 5 E<br />
Rigging Hole Location<br />
Point Load<br />
in.<br />
mm.<br />
lbs.<br />
kg.<br />
12<br />
314<br />
1002<br />
454<br />
73 121 181 243 353 435 207 46<br />
1845 3073 4602 6170 8963 11060 5254 1167<br />
659 2048 2048 2173 1580 527<br />
299 929 929 986 717 239<br />
050 0 J<br />
Rigging Hole Location<br />
Point Load<br />
in.<br />
mm.<br />
lbs.<br />
kg.<br />
12<br />
305<br />
142<br />
64<br />
73 181 238 290 435<br />
1854 4597 6045 7366 11049<br />
3568 4804 961 2572 937<br />
1618 2179 436 1167 425<br />
204 46<br />
5182 1168<br />
052 3 J<br />
Rigging Hole Location<br />
Point Load<br />
in.<br />
mm.<br />
lbs.<br />
kg.<br />
12<br />
305<br />
335<br />
152<br />
73 181 238 290 435 494 234 46<br />
1854 4597 6045 7366 11049 12548 5944 1168<br />
3102 5541 318 2792 518 1055<br />
1407 2513 144 1266 235 478<br />
1. Operating weight shown is for base unit (460/3/60, no options); selected option may add weight to unit. Contact you nearest <strong>Johnson</strong><br />
<strong>Controls</strong> Sales office for weight data.<br />
2. All rigging holes are 3" x 2".<br />
LD15892<br />
JOHNSON CONTROLS
FORM 201.28-NM1.1<br />
ISSUE DATE: 8/29/2012<br />
TABLE 5 - UNIT RIGGING (CONT'D)<br />
SECTION 5 - TECHNICAL DATA<br />
<strong>YVAA</strong> MODEL<br />
DESCRIPTION UNITS H I J K L M N O P<br />
CENTER<br />
OF<br />
GRAVITY<br />
FRAME COND EVAP X Y<br />
Rigging Hole in. 12 73 163 254 347 175 47<br />
030 3 C<br />
Location<br />
Point Load<br />
mm.<br />
lbs.<br />
kg.<br />
314<br />
748<br />
339<br />
1845 4092 6443 8824<br />
1784 3464 1785 892<br />
809 1571 810 405<br />
4441 1184<br />
Rigging Hole in. 12 73 161 254 306 391 186 47<br />
030 5 C<br />
Location<br />
Point Load<br />
mm.<br />
lbs.<br />
kg.<br />
314<br />
411<br />
186<br />
1845 4092 6443 7763 9941<br />
2226 2990 2374 299 752<br />
1010 1356 1077 136 341<br />
4729 1183<br />
Rigging Hole in. 12 73 121 179 243 296 391 196 47<br />
030 8 E<br />
Location<br />
Point Load<br />
mm.<br />
lbs.<br />
kg.<br />
314<br />
1073<br />
487<br />
1845 3073 4550 6170 7510 9943<br />
398 2162 2162 1547 1505 753<br />
181 981 981 702 683 342<br />
4971 1183<br />
Rigging Hole in. 12 73 121 179 243 353 435 207 46<br />
031 8 E<br />
Location<br />
Point Load<br />
mm.<br />
lbs.<br />
kg.<br />
314<br />
988<br />
448<br />
1845 3073 4550 6169 8962 11059<br />
650 1988 1988 2259 1580 527<br />
295 902 902 1025 717 239<br />
5256 1181<br />
Rigging Hole in. 12 73 121 181 243 347 186 46<br />
032 3 E<br />
Location<br />
Point Load<br />
mm.<br />
lbs.<br />
kg.<br />
314<br />
604<br />
274<br />
1845 3072 4601 6169 8825<br />
1370 1204 3010 2060 1030<br />
621 546 1365 934 467<br />
4717 1171<br />
Rigging Hole in. 12 73 163 254 306 391 186 46<br />
033 3 C<br />
Location<br />
Point Load<br />
mm.<br />
lbs.<br />
kg.<br />
314<br />
373<br />
169<br />
1845 4144 6443 7765 9942<br />
2354 2951 2387 295 752<br />
1068 1339 1083 134 341<br />
4737 1166<br />
Rigging Hole in. 12 73 121 181 243 296 392 196 46<br />
034 3 E<br />
Location<br />
Point Load<br />
mm.<br />
lbs.<br />
kg.<br />
314<br />
1038<br />
471<br />
1845 3073 4602 6170 7510 9943<br />
514 2135 2135 1578 1505 753<br />
233 968 968 716 683 342<br />
4974 1169<br />
Rigging Hole in. 12 73 121 181 243 353 435 207 46<br />
034 5 E<br />
Location<br />
Point Load<br />
mm.<br />
lbs.<br />
kg.<br />
314<br />
953<br />
432<br />
1845 3073 4602 6170 8963 11060<br />
765 1959 1959 2295 1580 527<br />
347 889 889 1041 717 239<br />
5254 1167<br />
Rigging Hole in. 572 12 73 181 238 290 435 234 46<br />
050 0 J<br />
Location<br />
Point Load<br />
mm.<br />
lbs.<br />
kg.<br />
14529 305<br />
551 263<br />
250 119<br />
1854 4597 6045 7366 11049<br />
3176 5295 496 2858 518<br />
1441 2402 225 1296 235<br />
5944 1168<br />
Rigging Hole in. 572 12 73 181 238 290 435 494 572 234 46<br />
052<br />
Notes<br />
3 J<br />
Location<br />
Point Load<br />
mm.<br />
lbs.<br />
kg.<br />
14529 305<br />
551 263<br />
250 119<br />
1854 4597 6045 7366 11049 12548 14529 5944 1168<br />
3176 5295 496 2858 518 1055 551<br />
1441 2402 225 1296 235 478 250<br />
1. Operating weight shown is for base unit (460/3/60, no options); selected option may add weight to unit Contact you nearest <strong>Johnson</strong><br />
<strong>Controls</strong> Sales office for weight data.<br />
2. All rigging holes are 3" x 2".<br />
JOHNSON CONTROLS 61<br />
M<br />
N<br />
G<br />
LD15892<br />
5
SECTION 5 - TECHNICAL DATA<br />
62<br />
�<br />
�������������<br />
� � � �� �� ��<br />
� � � � � �<br />
�<br />
TABLE 6 - ISOLATOR SELECTION AND MOUNTING LOCATIONS<br />
<strong>YVAA</strong> CONFIGURATION<br />
FRAME COND EVAP<br />
015 3 B<br />
016 5 B<br />
017 8 C<br />
018 3 A<br />
019 5 A<br />
019 8 B<br />
020 0 C<br />
021 3 A<br />
FORM 201.28-NM1.1<br />
ISSUE DATE: 8/29/2012<br />
DESCRIPTION 1 2 3 4 5 6 7 8<br />
Isolator X-Dimension (in)<br />
10<br />
(263)<br />
73<br />
(1852)<br />
144<br />
(3662)<br />
193<br />
(4900)<br />
Isolator Y-Dimension (in) 1 (34)<br />
Point Load (lbs)<br />
1055<br />
(479)<br />
2150<br />
(975)<br />
2150<br />
(975)<br />
635<br />
(288)<br />
Isolator X-Dimension (in)<br />
10<br />
(263)<br />
77<br />
(1943)<br />
118<br />
(3000)<br />
157<br />
(3985)<br />
220<br />
(5589)<br />
Isolator Y-Dimension (in) 1 (34)<br />
Point Load (lbs)<br />
883<br />
(401)<br />
764<br />
(347)<br />
1788<br />
(811)<br />
1788<br />
(811)<br />
1048<br />
(475)<br />
Isolator X-Dimension (in)<br />
10<br />
(263)<br />
81<br />
(2057)<br />
149<br />
(3779)<br />
187<br />
(4756)<br />
251<br />
(6368)<br />
Isolator Y-Dimension (in) 1 (34)<br />
Point Load (lbs)<br />
734<br />
(333)<br />
2308<br />
(1047)<br />
1598<br />
(725)<br />
1598<br />
(725)<br />
1477<br />
(670)<br />
Isolator X-Dimension (in)<br />
10<br />
(263)<br />
76<br />
(1943)<br />
124<br />
(3152)<br />
163<br />
(4137)<br />
210<br />
(5323)<br />
Isolator Y-Dimension (in) 1 (34)<br />
Point Load (lbs)<br />
714<br />
(324)<br />
1658<br />
(752)<br />
1089<br />
(494)<br />
1089<br />
(494)<br />
1655<br />
(751)<br />
Isolator X-Dimension (in)<br />
10<br />
(259)<br />
76<br />
(1939)<br />
118<br />
(2997)<br />
157<br />
(3982)<br />
208<br />
(5295)<br />
Isolator Y-Dimension (in) 1 (34)<br />
Point Load (lbs)<br />
851<br />
(386)<br />
851<br />
(386)<br />
1315<br />
(596)<br />
2167<br />
(983)<br />
701<br />
(318)<br />
Isolator X-Dimension (in)<br />
10<br />
(263)<br />
76<br />
(1943)<br />
118<br />
(3000)<br />
157<br />
(3985)<br />
209<br />
(5299)<br />
Isolator Y-Dimension (in) 1 (34)<br />
Point Load (lbs)<br />
620<br />
(281)<br />
2105<br />
(955)<br />
664<br />
(301)<br />
664<br />
(301)<br />
2438<br />
(1106)<br />
Isolator X-Dimension (in)<br />
10<br />
(263)<br />
76<br />
(1943)<br />
118<br />
(3000)<br />
157<br />
(3985)<br />
209<br />
(5299)<br />
Isolator Y-Dimension (in) 1 (34)<br />
Point Load (lbs)<br />
853<br />
(387)<br />
853<br />
(387)<br />
1324<br />
(601)<br />
2202<br />
(999)<br />
709<br />
(322)<br />
Isolator X-Dimension (in)<br />
10<br />
(263)<br />
81<br />
(2057)<br />
149<br />
(3779)<br />
187<br />
(4756)<br />
251<br />
(6368)<br />
Isolator Y-Dimension (in) 1 (34)<br />
Point Load (lbs)<br />
661<br />
(300)<br />
2075<br />
(941)<br />
1706<br />
(774)<br />
1706<br />
(774)<br />
1692<br />
(767)<br />
281<br />
(7132)<br />
701<br />
(318)<br />
308<br />
(7823)<br />
603<br />
(274)<br />
281<br />
(7136)<br />
709<br />
(322)<br />
JOHNSON CONTROLS
FORM 201.28-NM1.1<br />
ISSUE DATE: 8/29/2012<br />
�<br />
�������������<br />
<strong>YVAA</strong> CONFIGURATION<br />
FRAME COND EVAP<br />
015 3 B<br />
016 5 B<br />
017 8 C<br />
018 3 A<br />
019 5 A<br />
019 8 B<br />
020 0 C<br />
021 3 A<br />
SECTION 5 - TECHNICAL DATA<br />
� � � �� �� ��<br />
� � � � � �<br />
�<br />
TABLE 6 - ISOLATOR SELECTION AND MOUNTING LOCATIONS (CONT'D)<br />
DESCRIPTION 9 10 11 12 13 14 15 16<br />
Isolator X-Dimension (in)<br />
10<br />
(263)<br />
73<br />
(1852)<br />
144<br />
(3662)<br />
193<br />
(4900)<br />
Isolator Y-Dimension (in) 87 (2206)<br />
Point Load (lbs)<br />
981<br />
(445)<br />
2119<br />
(961)<br />
2119<br />
(961)<br />
771<br />
(350)<br />
Isolator X-Dimension (in)<br />
10<br />
(263)<br />
77<br />
(1943)<br />
118<br />
(3000)<br />
157<br />
(3985)<br />
220<br />
(5589)<br />
Isolator Y-Dimension (in) 87 (2206)<br />
Point Load (lbs)<br />
865<br />
(392)<br />
736<br />
(334)<br />
1786<br />
(810)<br />
1786<br />
(810)<br />
1100<br />
(499)<br />
Isolator X-Dimension (in)<br />
10<br />
(263)<br />
81<br />
(2057)<br />
149<br />
(3779)<br />
187<br />
(4756)<br />
251<br />
(6368)<br />
Isolator Y-Dimension (in) 87 (2206)<br />
Point Load (lbs)<br />
726<br />
(329)<br />
2201<br />
(998)<br />
1616<br />
(733)<br />
1616<br />
(733)<br />
1557<br />
(706)<br />
Isolator X-Dimension (in)<br />
10<br />
(263)<br />
76<br />
(1943)<br />
124<br />
(3152)<br />
163<br />
(4137)<br />
210<br />
(5323)<br />
Isolator Y-Dimension (in) 87 (2206)<br />
Point Load (lbs)<br />
708<br />
(321)<br />
1652<br />
(749)<br />
1085<br />
(492)<br />
1085<br />
(492)<br />
1725<br />
(782)<br />
Isolator X-Dimension (in)<br />
10<br />
(259)<br />
76<br />
(1939)<br />
118<br />
(2997)<br />
157<br />
(3982)<br />
208<br />
(5295)<br />
Isolator Y-Dimension (in) 87 (2206)<br />
Point Load (lbs)<br />
845<br />
(383)<br />
845<br />
(383)<br />
1289<br />
(585)<br />
2224<br />
(1009)<br />
717<br />
(325)<br />
Isolator X-Dimension (in)<br />
10<br />
(263)<br />
76<br />
(1943)<br />
118<br />
(3000)<br />
157<br />
(3985)<br />
209<br />
(5299)<br />
Isolator Y-Dimension (in) 87 (2206)<br />
Point Load (lbs)<br />
600<br />
(272)<br />
2121<br />
(962)<br />
655<br />
(297)<br />
655<br />
(297)<br />
2511<br />
(1139)<br />
Isolator X-Dimension (in)<br />
10<br />
(263)<br />
76<br />
(1943)<br />
118<br />
(3000)<br />
157<br />
(3985)<br />
209<br />
(5299)<br />
Isolator Y-Dimension (in) 87 (2206)<br />
Point Load (lbs)<br />
847<br />
(384)<br />
847<br />
(384)<br />
1293<br />
(586)<br />
2228<br />
(1011)<br />
717<br />
(325)<br />
Isolator X-Dimension (in)<br />
10<br />
(263)<br />
81<br />
(2057)<br />
149<br />
(3779)<br />
187<br />
(4756)<br />
251<br />
(6368)<br />
Isolator Y-Dimension (in) 87 (2206)<br />
Point Load (lbs)<br />
655<br />
(297)<br />
1990<br />
(903)<br />
1711<br />
(776)<br />
1711<br />
(776)<br />
1771<br />
(803)<br />
281<br />
(7132)<br />
717<br />
(325)<br />
308<br />
(7823)<br />
603<br />
(274)<br />
281<br />
(7136)<br />
JOHNSON CONTROLS 63<br />
717<br />
(325)<br />
5
SECTION 5 - TECHNICAL DATA<br />
TABLE 6 - ISOLATOR SELECTION AND MOUNTING LOCATIONS (CONT'D)<br />
<strong>YVAA</strong> CONFIGURATION<br />
FRAME COND EVAP<br />
64<br />
021 5 C<br />
021 8 C<br />
023 3 B<br />
024 5 C<br />
024 8 C<br />
026 3 B<br />
027 3 D<br />
027 5 E<br />
027 8 E<br />
029 5 E<br />
030 3 C<br />
FORM 201.28-NM1.1<br />
ISSUE DATE: 8/29/2012<br />
DESCRIPTION 1 2 3 4 5 6 7 8<br />
Isolator X-Dimension (in)<br />
10<br />
(263)<br />
81<br />
(2057)<br />
149<br />
(3779)<br />
187<br />
(4756)<br />
235<br />
(5968)<br />
Isolator Y-Dimension (in) 1 (34)<br />
Point Load (lbs)<br />
717<br />
(325)<br />
2727<br />
(1237)<br />
564<br />
(256)<br />
564<br />
(256)<br />
2431<br />
(1103)<br />
Isolator X-Dimension (in)<br />
10<br />
(263)<br />
76<br />
(1943)<br />
118<br />
(2999)<br />
157<br />
(3984)<br />
209<br />
(5298)<br />
Isolator Y-Dimension (in) 1 (34)<br />
Point Load (lbs)<br />
950<br />
(431)<br />
950<br />
(431)<br />
1426<br />
(647)<br />
2226<br />
(1010)<br />
658<br />
(298)<br />
Isolator X-Dimension (in)<br />
10<br />
(263)<br />
76<br />
(1943)<br />
128<br />
(3260)<br />
173<br />
(4391)<br />
220<br />
(5579)<br />
Isolator Y-Dimension (in) 1 (34)<br />
Point Load (lbs)<br />
813<br />
(369)<br />
1915<br />
(869)<br />
1459<br />
(662)<br />
1459<br />
(662)<br />
1775<br />
(805)<br />
Isolator X-Dimension (in)<br />
10<br />
(263)<br />
81<br />
(2057)<br />
143<br />
(3638)<br />
187<br />
(4748)<br />
245<br />
(6232)<br />
Isolator Y-Dimension (in) 1 (34)<br />
Point Load (lbs)<br />
663<br />
(301)<br />
1795<br />
(814)<br />
2030<br />
(921)<br />
2030<br />
(921)<br />
1086<br />
(493)<br />
Isolator X-Dimension (in)<br />
10<br />
(263)<br />
76<br />
(1943)<br />
118<br />
(2999)<br />
157<br />
(3984)<br />
209<br />
(5298)<br />
Isolator Y-Dimension (in) 1 (34)<br />
Point Load (lbs)<br />
699<br />
(317)<br />
2111<br />
(958)<br />
694<br />
(315)<br />
694<br />
(315)<br />
2468<br />
(1119)<br />
Isolator X-Dimension (in)<br />
10<br />
(263)<br />
81<br />
(2057)<br />
161<br />
(4084)<br />
201<br />
(5105)<br />
301<br />
(7654)<br />
Isolator Y-Dimension (in) 1 (34)<br />
Point Load (lbs)<br />
712<br />
(323)<br />
1544<br />
(700)<br />
2775<br />
(1259)<br />
2134<br />
(968)<br />
1387<br />
(629)<br />
Isolator X-Dimension (in)<br />
10<br />
(263)<br />
81<br />
(2057)<br />
161<br />
(4084)<br />
201<br />
(5105)<br />
301<br />
(7654)<br />
Isolator Y-Dimension (in) 1 (34)<br />
Point Load (lbs)<br />
691<br />
(313)<br />
1646<br />
(747)<br />
2871<br />
(1302)<br />
2282<br />
(1035)<br />
1435<br />
(651)<br />
Isolator X-Dimension (in)<br />
10<br />
(263)<br />
81<br />
(2057)<br />
161<br />
(4084)<br />
201<br />
(5105)<br />
298<br />
(7582)<br />
Isolator Y-Dimension (in) 1 (34)<br />
Point Load (lbs)<br />
652<br />
(296)<br />
1773<br />
(804)<br />
2533<br />
(1149)<br />
2533<br />
(1149)<br />
907<br />
(411)<br />
Isolator X-Dimension (in)<br />
10<br />
(263)<br />
81<br />
(2057)<br />
161<br />
(4095)<br />
201<br />
(5105)<br />
296<br />
(7512)<br />
Isolator Y-Dimension (in) 1 (34)<br />
Point Load (lbs)<br />
693<br />
(314)<br />
1821<br />
(826)<br />
2532<br />
(1148)<br />
2532<br />
(1148)<br />
919<br />
(417)<br />
Isolator X-Dimension (in)<br />
10<br />
(263)<br />
81<br />
(2057)<br />
143<br />
(3638)<br />
187<br />
(4748)<br />
245<br />
(6232)<br />
Isolator Y-Dimension (in) 1 (34)<br />
Point Load (lbs)<br />
711<br />
(323)<br />
1804<br />
(818)<br />
2071<br />
(939)<br />
2071<br />
(939)<br />
1083<br />
(491)<br />
Isolator X-Dimension (in)<br />
10<br />
(263)<br />
81<br />
(2057)<br />
144<br />
(3663)<br />
187<br />
(4755)<br />
277<br />
(7047)<br />
Isolator Y-Dimension (in) 1 (34)<br />
Point Load (lbs)<br />
870<br />
(395)<br />
1451<br />
(658)<br />
2185<br />
(991)<br />
2185<br />
(991)<br />
1652<br />
(749)<br />
301<br />
(7653)<br />
1216<br />
(552)<br />
281<br />
(7135)<br />
658<br />
(298)<br />
301<br />
(7654)<br />
887<br />
(402)<br />
339<br />
(8609)<br />
1086<br />
(493)<br />
308<br />
(7823)<br />
604<br />
(274)<br />
339<br />
(8609)<br />
907<br />
(411)<br />
339<br />
(8609)<br />
919<br />
(417)<br />
339<br />
(8609)<br />
1083<br />
(491)<br />
383<br />
(9726)<br />
861<br />
(391)<br />
JOHNSON CONTROLS
FORM 201.28-NM1.1<br />
ISSUE DATE: 8/29/2012<br />
TABLE 6 - ISOLATOR SELECTION AND MOUNTING LOCATIONS (CONT'D)<br />
<strong>YVAA</strong> CONFIGURATION<br />
FRAME COND EVAP<br />
021 5 C<br />
021 8 C<br />
023 3 B<br />
024 5 C<br />
024 8 C<br />
026 3 B<br />
027 3 D<br />
027 5 E<br />
027 8 E<br />
029 5 E<br />
030 3 C<br />
SECTION 5 - TECHNICAL DATA<br />
DESCRIPTION 9 10 11 12 13 14 15 16<br />
Isolator X-Dimension (in)<br />
10<br />
(263)<br />
81<br />
(2057)<br />
149<br />
(3779)<br />
187<br />
(4756)<br />
235<br />
(5968)<br />
Isolator Y-Dimension (in) 87 (2206)<br />
Point Load (lbs)<br />
704<br />
(319)<br />
2650<br />
(1202)<br />
571<br />
(259)<br />
571<br />
(259)<br />
2482<br />
(1126)<br />
Isolator X-Dimension (in)<br />
10<br />
(263)<br />
76<br />
(1943)<br />
118<br />
(2999)<br />
157<br />
(3984)<br />
209<br />
(5298)<br />
Isolator Y-Dimension (in) 87 (2206)<br />
Point Load (lbs)<br />
936<br />
(425)<br />
936<br />
(425)<br />
1433<br />
(650)<br />
2243<br />
(1017)<br />
669<br />
(303)<br />
Isolator X-Dimension (in)<br />
10<br />
(263)<br />
76<br />
(1943)<br />
128<br />
(3260)<br />
173<br />
(4391)<br />
220<br />
(5579)<br />
Isolator Y-Dimension (in) 87 (2206)<br />
Point Load (lbs)<br />
807<br />
(366)<br />
1825<br />
(828)<br />
1482<br />
(672)<br />
1482<br />
(672)<br />
1821<br />
(826)<br />
Isolator X-Dimension (in)<br />
10<br />
(263)<br />
81<br />
(2057)<br />
143<br />
(3638)<br />
187<br />
(4748)<br />
245<br />
(6232)<br />
Isolator Y-Dimension (in) 87 (2206)<br />
Point Load (lbs)<br />
663<br />
(301)<br />
1646<br />
(747)<br />
2097<br />
(951)<br />
2097<br />
(951)<br />
1102<br />
(500)<br />
Isolator X-Dimension (in)<br />
10<br />
(263)<br />
76<br />
(1943)<br />
118<br />
(2999)<br />
157<br />
(3984)<br />
209<br />
(5298)<br />
Isolator Y-Dimension (in) 87 (2206)<br />
Point Load (lbs)<br />
680<br />
(308)<br />
2126<br />
(964)<br />
671<br />
(304)<br />
671<br />
(304)<br />
2518<br />
(1142)<br />
Isolator X-Dimension (in)<br />
10<br />
(263)<br />
81<br />
(2057)<br />
161<br />
(4084)<br />
201<br />
(5105)<br />
301<br />
(7654)<br />
Isolator Y-Dimension (in) 87 (2206)<br />
Point Load (lbs)<br />
682<br />
(309)<br />
1377<br />
(625)<br />
3032<br />
(1375)<br />
1944<br />
(882)<br />
1516<br />
(688)<br />
Isolator X-Dimension (in)<br />
10<br />
(263)<br />
81<br />
(2057)<br />
161<br />
(4084)<br />
201<br />
(5105)<br />
301<br />
(7654)<br />
Isolator Y-Dimension (in) 87 (2206)<br />
Point Load (lbs)<br />
662<br />
(300)<br />
1480<br />
(671)<br />
3128<br />
(1419)<br />
2092<br />
(949)<br />
1564<br />
(709)<br />
Isolator X-Dimension (in)<br />
10<br />
(263)<br />
81<br />
(2057)<br />
161<br />
(4084)<br />
201<br />
(5105)<br />
298<br />
(7582)<br />
Isolator Y-Dimension (in) 87 (2206)<br />
Point Load (lbs)<br />
598<br />
(271)<br />
1733<br />
(786)<br />
2527<br />
(1146)<br />
2527<br />
(1146)<br />
961<br />
(436)<br />
Isolator X-Dimension (in)<br />
10<br />
(263)<br />
81<br />
(2057)<br />
161<br />
(4095)<br />
201<br />
(5105)<br />
296<br />
(7512)<br />
Isolator Y-Dimension (in) 87 (2206)<br />
Point Load (lbs)<br />
629<br />
(285)<br />
1830<br />
(830)<br />
2621<br />
(1189)<br />
2621<br />
(1189)<br />
973<br />
(441)<br />
Isolator X-Dimension (in)<br />
10<br />
(259)<br />
81<br />
(2055)<br />
143<br />
(3635)<br />
187<br />
(4745)<br />
245<br />
(6228)<br />
Isolator Y-Dimension (in) 87 (2206)<br />
Point Load (lbs)<br />
711<br />
(323)<br />
1668<br />
(757)<br />
2245<br />
(1018)<br />
2245<br />
(1018)<br />
1092<br />
(495)<br />
Isolator X-Dimension (in)<br />
10<br />
(263)<br />
81<br />
(2057)<br />
144<br />
(3663)<br />
187<br />
(4755)<br />
277<br />
(7047)<br />
Isolator Y-Dimension (in) 87 (2206)<br />
Point Load (lbs)<br />
765<br />
(347)<br />
1551<br />
(704)<br />
2240<br />
(1016)<br />
2240<br />
(1016)<br />
1779<br />
(807)<br />
301<br />
(7653)<br />
1241<br />
(563)<br />
281<br />
(7135)<br />
669<br />
(303)<br />
301<br />
(7654)<br />
910<br />
(413)<br />
339<br />
(8609)<br />
1102<br />
(500)<br />
308<br />
(7823)<br />
JOHNSON CONTROLS 65<br />
604<br />
(274)<br />
339<br />
(8609)<br />
961<br />
(436)<br />
339<br />
(8609)<br />
973<br />
(441)<br />
339<br />
(8606)<br />
1092<br />
(495)<br />
383<br />
(9726)<br />
861<br />
(391)<br />
5
SECTION 5 - TECHNICAL DATA<br />
TABLE 6 - ISOLATOR SELECTION AND MOUNTING LOCATIONS (CONT'D)<br />
<strong>YVAA</strong> CONFIGURATION<br />
FRAME COND EVAP<br />
66<br />
030 5 C<br />
030 8 E<br />
031 8 E<br />
032 3 E<br />
033 3 C<br />
034 3 E<br />
034 5 E<br />
050 0 J<br />
052 3 J<br />
FORM 201.28-NM1.1<br />
ISSUE DATE: 8/29/2012<br />
DESCRIPTION 1 2 3 4 5 6 7 8<br />
Isolator X-Dimension (in)<br />
10<br />
(260)<br />
81<br />
(2054)<br />
161<br />
(4081)<br />
201<br />
(5102)<br />
298<br />
(7579)<br />
383<br />
(9723)<br />
Isolator Y-Dimension (in) 1 (34)<br />
Point Load (lbs)<br />
800<br />
(363)<br />
2001<br />
(908)<br />
2138<br />
(970)<br />
2138<br />
(970)<br />
1857<br />
(842)<br />
863<br />
(391)<br />
Isolator X-Dimension (in)<br />
10<br />
(263)<br />
81<br />
(2057)<br />
161<br />
(4084)<br />
201<br />
(5105)<br />
298<br />
(7582)<br />
427<br />
(10843)<br />
Isolator Y-Dimension (in) 1 (34)<br />
Point Load (lbs)<br />
788<br />
(357)<br />
2032<br />
(922)<br />
2067<br />
(938)<br />
2067<br />
(938)<br />
2211<br />
(1003)<br />
1013<br />
(459)<br />
Isolator X-Dimension (in)<br />
10<br />
(263)<br />
81<br />
(2057)<br />
161<br />
(4084)<br />
201<br />
(5105)<br />
298<br />
(7582)<br />
339<br />
(8609)<br />
Isolator Y-Dimension (in) 1 (34)<br />
Point Load (lbs)<br />
702<br />
(318)<br />
1771<br />
(803)<br />
2699<br />
(1224)<br />
2699<br />
(1224)<br />
918<br />
(416)<br />
918<br />
(416)<br />
Isolator X-Dimension (in)<br />
10<br />
(263)<br />
81<br />
(2057)<br />
143<br />
(3636)<br />
188<br />
(4781)<br />
245<br />
(6232)<br />
383<br />
(9726)<br />
Isolator Y-Dimension (in) 1 (34)<br />
Point Load (lbs)<br />
575<br />
(261)<br />
2930<br />
(1329)<br />
891<br />
(404)<br />
891<br />
(404)<br />
3346<br />
(1518)<br />
861<br />
(391)<br />
Isolator X-Dimension (in)<br />
10<br />
(260)<br />
81<br />
(2054)<br />
161<br />
(4081)<br />
201<br />
(5102)<br />
298<br />
(7579)<br />
383<br />
(9723)<br />
Isolator Y-Dimension (in) 1 (34)<br />
Point Load (lbs)<br />
801<br />
(363)<br />
1996<br />
(905)<br />
2260<br />
(1025)<br />
2260<br />
(1025)<br />
1909<br />
(866)<br />
863<br />
(391)<br />
Isolator X-Dimension (in)<br />
10<br />
(263)<br />
81<br />
(2057)<br />
161<br />
(4084)<br />
201<br />
(5105)<br />
298<br />
(7582)<br />
427<br />
(10843)<br />
Isolator Y-Dimension (in) 1 (34)<br />
Point Load (lbs)<br />
789<br />
(358)<br />
2027<br />
(919)<br />
2188<br />
(992)<br />
2188<br />
(992)<br />
2263<br />
(1026)<br />
1013<br />
(459)<br />
Isolator X-Dimension (in)<br />
10<br />
(263)<br />
81<br />
(2057)<br />
161<br />
(2908)<br />
201<br />
(5219)<br />
298<br />
(7218)<br />
427<br />
(10843)<br />
Isolator Y-Dimension (in) 1 (34)<br />
Point Load (lbs)<br />
789<br />
(355)<br />
2027<br />
(1188)<br />
2188<br />
(1403)<br />
2188<br />
(1403)<br />
2263<br />
(1388)<br />
1013<br />
(460)<br />
Isolator X-Dimension (in)<br />
10<br />
(263)<br />
81<br />
(2057)<br />
154<br />
(2908)<br />
205<br />
(5219)<br />
284<br />
(7218)<br />
427<br />
(10843)<br />
Isolator Y-Dimension (in) 1 (34)<br />
Point Load (lbs)<br />
783<br />
(355)<br />
2619<br />
(1188)<br />
3093<br />
(1403)<br />
3093<br />
(1403)<br />
3061<br />
(1388)<br />
1014<br />
(460)<br />
Isolator X-Dimension (in)<br />
10<br />
(263)<br />
81<br />
(2057)<br />
154<br />
(3907)<br />
206<br />
(5219)<br />
284<br />
(7218)<br />
427<br />
(10842)<br />
Isolator Y-Dimension (in) 1 (34)<br />
Point Load (lbs)<br />
794<br />
(360)<br />
2611<br />
(1184)<br />
3112<br />
(1412)<br />
3112<br />
(1412)<br />
2916<br />
(1323)<br />
1202<br />
(545)<br />
505<br />
(12820)<br />
562<br />
(14265)<br />
Notes:<br />
1. Operating weight shown is for base unit (460/3/60, no options); selected options may add weight to unit. Contact your nearest <strong>Johnson</strong><br />
<strong>Controls</strong> Sales Office for weight data.<br />
2. All isolator mounting holes are 19mm<br />
NOTE: Dimensions are in inches (mm) and weights are in pounds (kg)<br />
386<br />
(175)<br />
759<br />
(344)<br />
Isolator Locations 04 08 11<br />
JOHNSON CONTROLS
FORM 201.28-NM1.1<br />
ISSUE DATE: 8/29/2012<br />
TABLE 6 - ISOLATOR SELECTION AND MOUNTING LOCATIONS (CONT'D)<br />
<strong>YVAA</strong> CONFIGURATION<br />
FRAME COND EVAP<br />
030 5 C<br />
030 8 E<br />
031 8 E<br />
032 3 E<br />
033 3 C<br />
034 3 E<br />
034 5 E<br />
050 0 J<br />
052 3 J<br />
SECTION 5 - TECHNICAL DATA<br />
DESCRIPTION 9 10 11 12 13 14 15 16<br />
Isolator X-Dimension (in)<br />
10<br />
(260)<br />
81<br />
(2054)<br />
161<br />
(4081)<br />
201<br />
(5102)<br />
298<br />
(7579)<br />
383<br />
(9723)<br />
Isolator Y-Dimension (in) 87 (2206)<br />
Point Load (lbs)<br />
789<br />
(358)<br />
1968<br />
(893)<br />
2235<br />
(1014)<br />
2235<br />
(1014)<br />
1938<br />
(879)<br />
863<br />
(391)<br />
Isolator X-Dimension (in)<br />
10<br />
(263)<br />
81<br />
(2057)<br />
161<br />
(4084)<br />
201<br />
(5105)<br />
298<br />
(7582)<br />
427<br />
(10843)<br />
Isolator Y-Dimension (in) 87 (2206)<br />
Point Load (lbs)<br />
778<br />
(353)<br />
1999<br />
(907)<br />
2164<br />
(982)<br />
2164<br />
(982)<br />
2292<br />
(1040)<br />
1013<br />
(459)<br />
Isolator X-Dimension (in)<br />
10<br />
(263)<br />
81<br />
(2057)<br />
161<br />
(4084)<br />
201<br />
(5105)<br />
298<br />
(7582)<br />
339<br />
(8609)<br />
Isolator Y-Dimension (in) 87 (2206)<br />
Point Load (lbs)<br />
635<br />
(288)<br />
1794<br />
(814)<br />
2675<br />
(1213)<br />
2675<br />
(1213)<br />
963<br />
(437)<br />
963<br />
(437)<br />
Isolator X-Dimension (in)<br />
10<br />
(263)<br />
81<br />
(2057)<br />
143<br />
(3636)<br />
188<br />
(4781)<br />
245<br />
(6232)<br />
383<br />
(9726)<br />
Isolator Y-Dimension (in) 87 (2206)<br />
Point Load (lbs)<br />
441<br />
(200)<br />
3177<br />
(1441)<br />
707<br />
(321)<br />
707<br />
(321)<br />
3601<br />
(1633)<br />
861<br />
(391)<br />
Isolator X-Dimension (in)<br />
10<br />
(260)<br />
81<br />
(2054)<br />
161<br />
(4081)<br />
201<br />
(5102)<br />
298<br />
(7579)<br />
383<br />
(9723)<br />
Isolator Y-Dimension (in)<br />
87 (2206)<br />
Point Load (lbs)<br />
789<br />
(358)<br />
1967<br />
(892)<br />
2259<br />
(1025)<br />
2259<br />
(1025)<br />
1951<br />
(885)<br />
863<br />
(391)<br />
Isolator X-Dimension (in)<br />
10<br />
(263)<br />
81<br />
(2057)<br />
161<br />
(4084)<br />
201<br />
(5105)<br />
298<br />
(7582)<br />
427<br />
(10843)<br />
Isolator Y-Dimension (in) 87 (2206)<br />
Point Load (lbs)<br />
778<br />
(353)<br />
1998<br />
(906)<br />
2187<br />
(992)<br />
2187<br />
(992)<br />
2305<br />
(1046)<br />
1013<br />
(459)<br />
Isolator X-Dimension (in)<br />
10<br />
(263)<br />
81<br />
(2057)<br />
161<br />
(2908)<br />
201<br />
(5219)<br />
298<br />
(7218)<br />
427<br />
(10843)<br />
Isolator Y-Dimension (in) 87 (2206)<br />
Point Load (lbs)<br />
778<br />
(349)<br />
1998<br />
(1179)<br />
2187<br />
(1398)<br />
2187<br />
(1398)<br />
2305<br />
(1412)<br />
1013<br />
(460)<br />
Isolator X-Dimension (in)<br />
10<br />
(263)<br />
81<br />
(2057)<br />
154<br />
(2908)<br />
205<br />
(5219)<br />
284<br />
(7218)<br />
427<br />
(10843)<br />
Isolator Y-Dimension (in) 87 (2206)<br />
Point Load (lbs)<br />
769<br />
(349)<br />
2600<br />
(1179)<br />
3083<br />
(1398)<br />
3083<br />
(1398)<br />
3113<br />
(1412)<br />
1014<br />
(460)<br />
Isolator X-Dimension (in)<br />
10<br />
(263)<br />
81<br />
(2057)<br />
154<br />
(3907)<br />
206<br />
(5219)<br />
284<br />
(7218)<br />
427<br />
(10842)<br />
Isolator Y-Dimension (in) 87 (2206)<br />
Point Load (lbs)<br />
772<br />
(350)<br />
2550<br />
(1157)<br />
3098<br />
(1405)<br />
3098<br />
(1405)<br />
3026<br />
(1373)<br />
1202<br />
(545)<br />
505<br />
(12820)<br />
562<br />
(14265)<br />
Notes:<br />
1. Operating weight shown is for base unit (460/3/60, no options); selected options may add weight to unit. Contact your nearest <strong>Johnson</strong><br />
<strong>Controls</strong> Sales Office for weight data.<br />
2. All isolator mounting holes are 19mm<br />
NOTE: Dimensions are in inches (mm) and weights are in pounds (kg)<br />
JOHNSON CONTROLS 67<br />
386<br />
(175)<br />
759<br />
(344)<br />
Isolator Locations 04 08 11<br />
5
SECTION 5 - TECHNICAL DATA<br />
68<br />
ELASTOMETRIC ISOLATOR INSTALLATION<br />
D D<br />
C L<br />
(B)<br />
1. Read the following instructions before beginning<br />
installation.<br />
2. Isolators are shipped fully assembled and are to be<br />
positioned in accordance with the submittal drawings<br />
or as otherwise recommended.<br />
3. Set isolators on floor, housekeeping pad or subbase,<br />
ensuring that all isolators lines match the<br />
equipment mounting holes. The VMC group recommends<br />
that the isolator base (A) be installed on<br />
a level surface. Shim or grout as required, leveling<br />
all isolator bases to the same elevation (0.03125inch<br />
maximum difference can be tolerated).<br />
(C)<br />
CL SECTION D-D<br />
FORM 201.28-NM1.1<br />
ISSUE DATE: 8/29/2012<br />
TOP BOLT<br />
TOP WASHER<br />
(B)<br />
(A)<br />
LD13762C<br />
4. Bolt or anchor all isolators to supporting structure<br />
utilising base thru holes (B).<br />
5. Remove top bolt and top washer. Place equipment<br />
on top of isolators so that mounting holes in<br />
equipment or base line up with threaded hole (C).<br />
6. Reinstall top bolt and washer and tighten down.<br />
JOHNSON CONTROLS
FORM 201.28-NM1.1<br />
ISSUE DATE: 8/29/2012<br />
MOUNT<br />
TYPE<br />
ELASTOMETRIC ISOLATOR SPECIFICATIONS<br />
L<br />
AL<br />
CD<br />
DW<br />
HF DIA. AD THRU<br />
SECTION 5 - TECHNICAL DATA<br />
JOHNSON CONTROLS 69<br />
BT<br />
MOLDED<br />
ELASTOMER<br />
TYP 2 PLACES<br />
DIMENSION DATA (INCHES)<br />
L W HF AL AD BT CD DW<br />
RD1-WR 3.13 1.75 1.25 2.38 0.34 0.19 5/16-18 UNC X 3/4 1.25<br />
RD2-WR 3.88 2.38 1.75 3.00 0.34 0.22 3/8-16 UNC X 1 1.75<br />
RD3-WR 5.50 3.38 2.88 4.13 0.56 0.25 1/2-13 UNC X 1 2.50<br />
RD4-WR 6.25 4.63 2.75 5.00 0.56 0.38 1/2-13 UNC X 1 3.00<br />
MODEL NUMBER ISOLATOR COLOR WEIGHT RANGE (LBS) WEIGHT RANGE (KGS)<br />
RD-3-CHARCOAL-WR CHARCOAL Up thru 825 UP TO 374<br />
RD-4-BRICK RED-WR BRICK RED 826 thru 1688 375 - 766<br />
RD-4-CHARCOAL-WR CHARCOAL 1689 thru 4000 767 - 1814<br />
W<br />
5
SECTION 5 - TECHNICAL DATA<br />
70<br />
UPPER<br />
HOUSING<br />
LOWER<br />
HOUSING<br />
NON-SKID<br />
ELASTOMERIC<br />
PAD<br />
(D)<br />
ONE INCH DEFLECTION ISOLATOR INSTALLATION<br />
1. Read the following instructions before beginning<br />
installation.<br />
2. Isolators are shipped fully assembled and are to be<br />
positioned in accordance with the submittal drawings<br />
or as otherwise recommended.<br />
3. Set isolators on floor, housekeeping pad or subbase,<br />
ensuring that all isolators centerlines match<br />
the equipment mounting holes. The VMC group<br />
recommends that the isolator base (“B”) be installed<br />
on a level surface. Shim or grout as required,<br />
leveling all isolator bases to the same<br />
elevation (0.25-inch maximum difference can be<br />
tolerated).<br />
4. Bolt or anchor all isolators to supporting structure<br />
utilizing base slotted holes (“C”).<br />
POSITIONING<br />
PIN (H)<br />
0.25” min - 0.5” max<br />
(C)<br />
(B)<br />
FORM 201.28-NM1.1<br />
ISSUE DATE: 8/29/2012<br />
EQUIPMENT<br />
BASE<br />
(C)<br />
5. Place equipment on top of isolators making sure<br />
that mounting holes of the equipment line up with<br />
isolator positioning pin (“H”).<br />
6. Equipment or machine is at its full operating<br />
weight.<br />
7. Adjust each isolator in sequence by turning spring<br />
adjusting bolt (“D”) one full counterclockwise<br />
turn at a time. Repeat this procedure on all isolators,<br />
one at a time.<br />
8. Continue adjusting each isolator until a minimum<br />
of 0.25” clearance is achieved between the lower<br />
housing and upper housing. (See illustration<br />
above).<br />
9. Fine adjust isolators to level equipment.<br />
JOHNSON CONTROLS
FORM 201.28-NM1.1<br />
ISSUE DATE: 8/29/2012<br />
MOUNT<br />
TYPE<br />
Notes:<br />
1. Use either all CP's or all CP2's at all locations on a unit.<br />
ONE INCH DEFLECTION SPRING ISOLATOR<br />
��<br />
MODEL NUMBER COLOR CODE<br />
���������������<br />
����������<br />
SECTION 5 - TECHNICAL DATA<br />
2. Installation requires bolting or anchoring mount to support structure with a 2 x 0.625" diameter bolts or 2 x 0.5" diameter concrete anchors.<br />
3. All springs are designed for 50% over-travel.<br />
��<br />
��<br />
CPX-X-<br />
JOHNSON CONTROLS 71<br />
��<br />
��<br />
��<br />
����<br />
��<br />
RATED CAPACITY (FOR UNITS WITH ALL LOAD<br />
POINTS LESS THAN 1785 LBS (810 KG)<br />
(LBS.) (KG) PART NUMBER<br />
CP-1D-510 BLACK Up thru 434 Up thru 197 029-25334-002<br />
CP-1D-900 DARK GREEN 435 thru 765 198 thru 347 029-25334-003<br />
CP-1D-1200 GRAY 766 thru 1020 348 thru 463 029-25334-004<br />
CP-1D-1360 WHITE 1021 thru 1156 464 thru 524 029-25334-005<br />
CP-1D-1785N GRAY/RED 1157 thru 1785 525 thru 810 029-25334-006<br />
MODEL NUMBER COLOR CODE<br />
DIMENSION DATA (INCHES)<br />
W D L B C T H<br />
CP 3 5/8 7-3/4 6-1/2 4-3/4 1/2 5-5/8<br />
C2P 3 5/8 10-1/2 9-1/4 7-3/4 9/16 6<br />
RATED CAPACITY (FOR UNITS WITH ANY LOAD<br />
POINT ABOVE 1518 LBS (689 KG)<br />
(LBS.) (KG) PART NUMBER<br />
C2P-1D-1350 DARK PURPLE Up thru 1148 Up to 521 029-25334-008<br />
C2P-1D-1800 DARK GREEN 1149 thru 1530 522 - 694 029-25334-009<br />
C2P-1D-2400 GRAY 1531 thru 2040 695 - 925 029-25334-010<br />
C2P-1D-2720 WHITE 2041 thru 2312 926 - 1049 029-25334-012<br />
C2P-1D-3570N GRAY/RED 2313 thru 3570 1050 - 1619 029-25334-013<br />
5
SECTION 5 - TECHNICAL DATA<br />
72<br />
FORM 201.28-NM1.1<br />
ISSUE DATE: 8/29/2012<br />
TWO INCH DEFLECTION ISOLATOR INSTALLATION AND ADJUSTMENT<br />
("A")<br />
("E") CL<br />
("G") ("E")<br />
("A")<br />
GROMMET<br />
1. Read the following instructions before beginning<br />
installation.<br />
2. Isolators are shipped fully assembled and are to be<br />
positioned in accordance with the submittal drawings<br />
or as otherwise recomended.<br />
3. Set isolators on floor, housekeeping pad, or subbase,<br />
ensuring that all isolator centerlines match<br />
the equipment mounting holes. The VMC group<br />
recommends that the isolator base plates (“B”) be<br />
installed on a level surface. Shim or grout as required,<br />
leveling all isolator base plates to the same<br />
elevation (0.25-inch maximum difference can be<br />
tolerated).<br />
4. Bolt or anchor all isolators to supporting structure<br />
utilizing base plate thru holes (“C”) or weld base<br />
plate to supporting structure with 0.375" fillet<br />
weld 2” long @ 4” on center around entire base<br />
plate or as engineered for specific load and or field<br />
conditions.<br />
5. Isolators are shipped to the job site with (2) removable<br />
spacer shims (“E”) between the top plate<br />
and the housing. These shims must be in place<br />
when the equipment is positioned over the isolators.<br />
6. With all shims (“E”) in place, position equipment<br />
on top of plate (“A”) of isolator. Bolt equipment<br />
securely to top plate of isolator using a minimum<br />
1/4 - 3/8 GAP<br />
WASHER<br />
("F")<br />
("C")<br />
("B")<br />
("F")<br />
("C")<br />
CL<br />
("E")<br />
EQUIPMENT<br />
of 2 x 0.625" UNC A325 GRADE 5 SAE bolts or<br />
weld equipment or bracket to the top plate (“A”)<br />
of isolator with a minimum 0.375" fillet welds 2”<br />
long @ 3” O.C. for a minimum total weld of 10”.<br />
(All sides of equipment or bracket resting on top<br />
plate (“A”) must be welded).<br />
7. The adjustment process can only begin after the<br />
equipment or machine is at its full operating<br />
weight.<br />
8. Back off each of the 4 limit stop lock nuts (“F”) on<br />
the isolators 0.5”.<br />
9. Adjust each isolator in sequence by turning spring<br />
adjusting nuts (“G”) one full clockwise turn at a<br />
time. Repeat this procedure on all isolators, one<br />
at a time. Check the limit stop lock nuts (“F”)<br />
periodically to ensure that clearance between the<br />
washer and rubber grommet is maintained. Stop<br />
adjustment of isolator only when the top plate<br />
(“A”) has risen just above the shim (“E”).<br />
10. Remove all spacer shims (“E”).<br />
11. Fine adjust isolators to level equipment.<br />
12. Adjust all limit stop lock nuts (“F”) per isolator,<br />
maintaining 0.25-to 0.375-inch gap. The limit<br />
stop nuts must be kept at this gap to ensure uniform<br />
bolt loading during uplift (as the case when<br />
equipment is drained).<br />
JOHNSON CONTROLS
FORM 201.28-NM1.1<br />
ISSUE DATE: 8/29/2012<br />
SECTION 5 - TECHNICAL DATA<br />
TWO INCH DEFLECTION, RESTRAINED SPRING ISOLATOR CROSS REFERENCE<br />
3/4"<br />
7/8"<br />
3/8" GAP<br />
Ø3/4"<br />
TYP.(4)<br />
5/8"<br />
2-3/4"<br />
12-1/4"<br />
14"<br />
Notes:<br />
1. All dimensions are in inches, interpret as per ANSI Y14<br />
5"<br />
1-1/8"<br />
2-3/4"<br />
JOHNSON CONTROLS 73<br />
12"<br />
5/8-11UNC<br />
TYP. (4)<br />
2. Equipment must be bolted or welded to the top plate to meet allowable seismic ratings.<br />
3-1/2"<br />
1/2" LIMIT<br />
STOP &<br />
NUT<br />
5"<br />
8-3/8"<br />
OPER.<br />
HEIGHT<br />
3. All springs are designed for 50% overload capacity with exception of the 029-25336-013 and 029-25336-014.<br />
4. Consult JCI for concrete installation.<br />
Y2RS<br />
MODEL NUMBER WEIGHT RANGE (LBS) WEIGHT RANGE (KGS) YORK P/N<br />
Y2RSI-2D-460 Up thru 391 UP TO 177 029-25336-006<br />
Y2RSI-2D-710 392 thru 604 178 - 274 029-25336-008<br />
Y2RSI-2D-870 605 thru 740 275 - 336 029-25336-009<br />
Y2RSI-2D-1200N 741 thru 1020 337 - 463 029-25336-010<br />
Y2RSI-2D-1690 1021 thru 1437 464 - 652 029-25336-011<br />
Y2RSI-2D-2640N 1438 thru 2244 653 - 1018 029-25336-012<br />
Y2RSI-2D-2870N 2245 thru 2618 1019 - 1188 029-25336-013<br />
Y2RSI-2D-3280N 2619 thru 3740 1189 - 1696 029-25336-014<br />
3/8"<br />
5
FORM 201.28-NM1.1<br />
SECTION 5 - TECHNICAL DATA<br />
ISSUE DATE: 8/29/2012<br />
SECTION 5 - TECHNICAL DATA FORM_201.28-NM1.1.EN (1106)<br />
74<br />
ELASTOMETRIC ISOLATOR INSTALLATION (GB CERTIFIED UNITS)<br />
ELASTOMETRIC ISOLATOR INSTALLATION<br />
1. Read the following instructions before begin<br />
ning installation.<br />
(B") (B)<br />
EE E<br />
2. Isolators are shipped fully assembled and are to<br />
1. Read the following instructions before beginning<br />
be positioned in accordance with the submittal<br />
drawings installation. or as otherwise recommended.<br />
2. 3. Isolators Set isolators are shipped on floor, fully housekeeping assembled pad and or are to be<br />
subbase, positioned ensuring in accordance that all isolators’ with the centerlines submittal draw-<br />
match ings or the as otherwise equipment recommended.<br />
mounting holes. It is<br />
recommends that the isolator base (A) be<br />
3. installed Set isolators on a level on the surface. floor, Shim housekeeping or grout as pad or<br />
required, subbase, leveling ensuring all isolator that all bases isolator to the same centerlines<br />
elevation match the (0.03125" equipment (0.78 mounting mm) holes. maximum It is rec-<br />
difference ommended can that be tolerated). the isolator base (A) be installed<br />
on a level surface. Shim or grout the isolator as<br />
Top Bolt<br />
Top Bolt<br />
Top Washer<br />
4. Bolt or anchor all isolators to supporting structure<br />
utilizing base thru holes (B).<br />
5. Remove top bolt and top washer. Place equiprequired,<br />
leveling all isolator bases to the same<br />
ment on top of isolators so that mounting holes<br />
elevation. The maximum difference that can be<br />
in equipment or base line up with threaded hole<br />
(C).<br />
tolerated is 0.03125" (0.78 mm).<br />
6. Reinstall 4. Bolt top or bolt anchor and all washer isolators and tighten to the supporting down. structure<br />
utilizing base thru holes (B).<br />
5. Remove the top bolt and top washer. Place equipment<br />
on top of the isolators so that the mounting<br />
holes in the equipment or base line up with the<br />
threaded hole (C).<br />
6. Reinstall the top bolt and washer and tighten the<br />
bolt down.<br />
52 JOHNSON CONTROLS<br />
(A)<br />
(A")<br />
(C") (C)<br />
Section Section E-E<br />
Top Washer<br />
(B) (B")<br />
LD16179<br />
JOHNSON CONTROLS
FORM 201.28-NM1.1<br />
SECTION 5 - TECHNICAL DATA<br />
ISSUE DATE: 8/29/2012<br />
FORM_201.28-NM1.1.EN (1106) SECTION 5 - TECHNICAL DATA<br />
�<br />
�<br />
�<br />
�<br />
�<br />
�<br />
�<br />
�<br />
�<br />
�E<br />
�<br />
�<br />
�<br />
�<br />
�<br />
�<br />
�<br />
�<br />
�<br />
�<br />
�<br />
�<br />
�<br />
�<br />
�<br />
ELASTOMETRIC ISOLATOR SPECIFICATIONS (GB CERTIFIED UNITS)<br />
ELASTOMETRIC ISOLATOR SPECIFICATIONS<br />
E E<br />
W<br />
W<br />
C<br />
C<br />
C<br />
C<br />
W<br />
W<br />
4-F I<br />
4-F<br />
MOUNT<br />
MOUNT TYPE<br />
A B<br />
DIMENSION DATA (mm)<br />
DIMENSION C W DATA (MM) H D M F<br />
TYPE<br />
A JG 1 B 146 C95 125 W 150 H 55 D3 M16 M 13 F<br />
JG 1 Φ 146JG 2 Φ 95 176 125 125 150 150 183 55 65 34 M20 M16 13 Φ 13<br />
JG 2 Φ 176 Φ 125 150 183 65<br />
RATED CAPACITY<br />
4 M20 Φ 13<br />
MODEL NUMBER<br />
MODEL<br />
NUMBER<br />
JG 1-1<br />
JG 1-2<br />
JG 1-3<br />
(FOR UNITS WITH ALL LOAD POINTS LESS THAN 1984 LBS<br />
(900 KG))<br />
Weight Range<br />
PART NUMBER<br />
(LBS.) (KG)<br />
RATED CAPACITY<br />
331 thru 661 150 thru 300 028G00031A035<br />
FOR UNITS WITH ALL LOAD POINTS LESS THAN 1984 LBS (900 KG)<br />
662 thru 1213 301 thru 550 028G00031A036<br />
1214 WEIGHT thru 1984 RANGE551<br />
thru 900 028G00031A037<br />
PART NUMBER<br />
(LBS.) RANGE (KG)<br />
JG 1-1<br />
JG 1-2<br />
JG 1-3<br />
RATED CAPACITY<br />
331 thru<br />
(FOR<br />
661<br />
UNITS WITH ALL LOAD<br />
150 thru<br />
POINTS<br />
300<br />
LESS THAN 4409<br />
028G00031A035<br />
LBS<br />
MODEL<br />
662 thru 1213 301 (2000 thru KG))<br />
NUMBER<br />
550 028G00031A036<br />
Weight Range<br />
1214 thru 1984 551 thru 900 PART NUMBER<br />
(LBS.) (KG)<br />
028G00031A037<br />
JG 2-1 882 thru 1984 400 thru 900 028G00031A038<br />
JG 2-2 1985 thru 3527 901 thru 1600 028G00031A039<br />
JG 2-3 3528 thru 4409 1601 thru 2000 028G00031A040<br />
Notes:<br />
RATED CAPACITY<br />
1. All dimensions are in millimeter. FOR UNITS WITH ALL LOAD POINTS LESS THAN 4409 LBS (2000 KG)<br />
2. MODEL Use either NUMBER all JG 1's or all JG 2's at all locations on a unit<br />
3. Installation requires bolting or anchoring mount to support WEIGHT structure with RANGE a 4 x 0.5122"(4 x 13.0mm) diameter bolts or 2 x 0.5"(2 x 12.7mm ) diameter<br />
concrete anchors<br />
PART NUMBER<br />
(LBS.) RANGE (KG)<br />
JG 1-1 882 thru 1984 400 thru 900 028G00031A038<br />
JG 1-2 1985 thru 3527 901 thru 1600 028G00031A039<br />
JG 1-3 3528 thru 4409 1601 thru 2000 028G00031A040<br />
Notes:<br />
1. All dimensions are in millimeters.<br />
2. Use either all JG 1's or all JG 2's at all locations on a unit.<br />
3. Installation requires bolting or anchoring mount to support structure with 4 x 0.5122" (4 x 13.0<br />
mm) diameter bolts or 2 x 0.5" (2 x 12.7mm) diameter concrete anchors.<br />
JOHNSON CONTORLS 53<br />
JOHNSON CONTROLS 75<br />
E<br />
D<br />
D<br />
(A")<br />
A<br />
B<br />
B A<br />
C<br />
W<br />
C<br />
W<br />
Section E-E<br />
Section E-E<br />
Top Bolt<br />
Top Washer<br />
Top Washer<br />
M<br />
(C")<br />
H<br />
(B")<br />
LD16180<br />
H<br />
5<br />
5
SECTION 5 - TECHNICAL DATA<br />
1. Read the following instructions before beginning<br />
1.<br />
installation.<br />
Read the following instructions before beginning<br />
2. Isolators installation. are shipped fully assembled and are to be<br />
2. positioned Isolators are in shipped accordance fully with assembled the submittal and are draw- to be<br />
ings positioned or as otherwise in accordance recommended. with the submittal draw-<br />
3. Set ings isolators or as otherwise on therecommended. floor, housekeeping pad or<br />
3. subbase, Set isolators ensuring on floor, that housekeeping all the isolator pad centerlines or submatch<br />
base, ensuring the equipment that all isolator’s mounting centerlines holes. It match is recommended<br />
the equipment that mounting the isolator holes. base It (B) is recommends be installed<br />
on that a the level isolator surface. base Shim (B) be or grout in- stalled the isolators on a level as<br />
required, surface. Shim leveling or grout all isolator as required, bases leveling to the same all<br />
elevation. isolator bases The to maximum the same elevation difference (0.25"(6.3mm) that can be<br />
tolerated maximum is difference 0.25" (6.3 can mm). be tolerated).<br />
4. Bolt or anchor all isolators to the supporting structure structure<br />
utilizing utilizing base base slotted slotted holes holes (C). (C).<br />
FORM 201.28-NM1.1<br />
ISSUE DATE: 8/29/2012<br />
SECTION ONE 5 - TECHNICAL INCH DEFLECTION DATA ISOLATOR INSTALLATION (GB CERTIFIED FORM_201.28-NM1.1.EN UNITS) (1106)<br />
Lower Housing<br />
Lower<br />
Housing<br />
Non-skid<br />
Non-skid<br />
Elastometric<br />
Elastomeric<br />
Pad<br />
Pad<br />
ONE INCH DEFLECTION ISOLATOR INSTALLATION<br />
Upper<br />
Upper Housing<br />
Housing<br />
(D)<br />
B<br />
B<br />
Section Section A-A A-A<br />
Positioning Pin (H)<br />
PIN(H)<br />
AA<br />
A<br />
Section B-B<br />
5. Place the equipment on top of the isolators mak-<br />
5. Place ing sure equipment that the on mounting top of isolators holes on making the equipment sure<br />
that line mounting up with holes the isolator of the positioning equipment line pin up (H). with<br />
6. isolator Ensure positioning the equipment pin (H). is at full operating weight<br />
6. Equipment before adjusting or machine the isolators. is at its full operating<br />
weight.<br />
7. Adjust each isolator in sequence by turning the<br />
7. Adjust spring each adjusting isolator bolt in sequence (D) one by full turning counterclock- spring<br />
adjusting wise turn bolt at (D) a time. one Repeat full counterclockwise this procedure turn on all<br />
at isolators, a time. Repeat one at a this time. procedure on all isolators,<br />
one at a time.<br />
8. Continue adjusting each isolator until the same<br />
8. Continue clearance adjusting is achieved each between isolator the lower until housing same<br />
clearance and the upper is achieved housing between for all the isolators. lower housing<br />
and upper housing for all isolators.<br />
9. Fine adjust isolators to level the equipment.<br />
9. Fine adjust isolators to level equipment.<br />
76<br />
JOHNSON CONTROLS<br />
54 JOHNSON CONTROLS<br />
(C)<br />
(B)<br />
(C)<br />
LD16181
FORM 201.28-NM1.1<br />
SECTION 5 - TECHNICAL DATA<br />
ISSUE DATE: 8/29/2012<br />
FORM_201.28-NM1.1.EN (1106) SECTION 5 - TECHNICAL DATA<br />
ONE INCH DEFLECTION ISOLATOR SPRING ISOLATOR (GB CERTIFIED UNITS)<br />
ONE INCH DEFLECTION SPRING ISOLATOR<br />
CP-X<br />
Upper<br />
Upper Housing<br />
Housing<br />
Lower<br />
Lower Housing<br />
Housing<br />
D<br />
(D)<br />
WA<br />
WA<br />
CP-X<br />
M16<br />
M16<br />
WB<br />
B<br />
Positioning Pin (H)<br />
PIN(H)<br />
Non-skid<br />
Elastomeric<br />
Pad<br />
(C)<br />
(C)<br />
B<br />
B<br />
L<br />
Section A-A<br />
(B)<br />
Section B-B<br />
A A<br />
D<br />
Non-skid<br />
Elastometric<br />
Pad<br />
(C) (C)<br />
B<br />
B<br />
L<br />
Section A-A<br />
(B) Section B-B<br />
A<br />
W<br />
B<br />
L<br />
MOUNT<br />
TYPE<br />
MOUNT TYPE<br />
WA WB<br />
WA<br />
H<br />
WB<br />
DIMENSION<br />
DIMENSION<br />
DATA (MM)<br />
DATA (mm)<br />
TH<br />
H TH<br />
B<br />
B<br />
L<br />
L<br />
D<br />
D W<br />
W<br />
CP-2 190 CP-2 70 190 168 70 211 168 211 228 228 270 270 16 16 80 80<br />
CP-4 193<br />
CP-4<br />
130<br />
193 130<br />
160<br />
160<br />
202<br />
202<br />
228<br />
228<br />
270<br />
270 16<br />
16<br />
142<br />
142<br />
MODEL NUMBER SPRING<br />
CP-2-200<br />
NUMBER<br />
2<br />
RATED CAPACITY<br />
FOR UNITS WITH ALL LOAD POINTS LESS THAN 1808 LBS (820 KG)<br />
WEIGHT RANGE<br />
PART NUMBER<br />
(LBS.) RANGE (KG)<br />
Up thru 441 Up thru 200 028G00031A028<br />
CP-2-300<br />
CP-2-400<br />
CP-2-550<br />
CP-2-680<br />
2<br />
2<br />
2<br />
2<br />
442 thru 661<br />
662 thru 882<br />
883 thru 1213<br />
1214 hru 1499<br />
201 thru 300<br />
301 thru 400<br />
401 thru 550<br />
551 thru 680<br />
028G00031A029<br />
029G23000A018<br />
029G23000A019<br />
028G00031A030<br />
CP-2-820 2 1500 thru 1808 681 thru 820 029G23000A020<br />
MODEL NUMBER SPRING<br />
MODEL<br />
NUMBER<br />
CP-2-200<br />
CP-2-300<br />
RATED CAPACITY<br />
(FOR UNITS WITH ALL LOAD POINTS LESS THAN 1808<br />
Spring Number<br />
LBS (820 KG))<br />
Weight Range<br />
PART NUMBER<br />
(LBS.) (KG)<br />
2 Up thru 441 Up thru 200 028G00031A028<br />
2 442 thru 661 201 thru 300 028G00031A029<br />
CP-2-400<br />
CP-2-550<br />
CP-2-680<br />
CP-2-820<br />
2<br />
2<br />
2<br />
2<br />
662 thru 882 301 thru 400<br />
883 thru 1213 401 thru 550<br />
1214 thru 1499 551 thru 680<br />
1500 thru 1808 681 thru 820<br />
029G23000A018<br />
029G23000A019<br />
028G00031A030<br />
029G23000A020<br />
RATED CAPACITY<br />
CP-4-400<br />
CP-4-550<br />
CP-4-680<br />
CP-4-820<br />
MODEL<br />
NUMBER<br />
NUMBER CP-4-400<br />
CP-4-550<br />
4<br />
CP-4-680<br />
CP-4-820<br />
4<br />
CP-4-1100<br />
4 CP-4-1360<br />
4 CP-4-1630<br />
(FOR UNITS WITH ALL LOAD POINTS LESS THAN 3594<br />
Spring Number<br />
LBS (1630 KG))<br />
RATED<br />
Weight<br />
CAPACITY<br />
Range<br />
FOR UNITS WITH ALL LOAD POINTS LESS THAN 3594 PART LBS NUMBER<br />
(LBS.) (KG)<br />
(1630 KG)<br />
4 WEIGHT Up RANGE thru 882 Up thru 400 029G23000A021<br />
PART NUMBER<br />
(LBS.) 4 883 thru 1213 RANGE 401 (KG) thru 550 029G23000A022<br />
Up thru 4 882 1214 thru 1499 Up thru 551 400 thru 680 029G23000A023<br />
029G23000A021<br />
4 1500 thru 1808 681 thru 820 029G23000A024<br />
883 thru 1213 401 thru 550 029G23000A022<br />
4 1809 thru 2425 821 thru 1100 029G23000A025<br />
1214 thru<br />
4<br />
1499<br />
2426 thru 2998<br />
551 thru<br />
1101<br />
680<br />
thru 1360 029G23000A026<br />
029G23000A023<br />
1500 thru 4 1808 2999 thru 3594 681 thru 1361 820 thru 1630 029G23000A027<br />
029G23000A024<br />
CP-4-1100 Notes:<br />
4 1809 thru 2425 821 thru 1100 029G23000A025<br />
1. All dimensions are in millimeter.<br />
CP-4-1360 4 2426 thru 2998 1101 thru 1360 029G23000A026<br />
2. Use either all CP-1's or all CP-2's at all locations on a unit.<br />
CP-4-1630 4 2999 thru 3594 1361 thru 1630 029G23000A027<br />
3. Installation requires bolting or anchoring mount to support structure with a 2 x 0.625"(2x16mm) diameter bolts or 2 x 0.5"(2x12.7mm) diameter<br />
Notes:<br />
concrete anchors.<br />
1. All dimensions JOHNSON are in CONTORLS millimeters.<br />
2. Use either all CP-2's or all CP-4's at all locations on a unit.<br />
3. Installation requires bolting or anchoring mount to support structure with 2 x 0.625" (2x16 mm) diameter<br />
bolts or 2 x 0.5" (2x12.7mm) diameter concrete anchors.<br />
55<br />
JOHNSON CONTROLS 77<br />
H<br />
H<br />
W<br />
TH<br />
TH<br />
LD16182<br />
5
FORM 201.28-NM1.1<br />
SECTION 5 - TECHNICAL DATA<br />
ISSUE DATE: 8/29/2012<br />
CTION 5 - TECHNICAL DATA FORM_201.28-NM1.1.EN (1106)<br />
weight 78<br />
TWO INCH DEFLECTION ISOLATOR INSTALLATION AND ADJUSTMENT<br />
(GB CERTIFIED UNITS)<br />
TWO INCH DEFLECTION ISOLATOR INSTALLATION AND ADJUSTMENT<br />
(A)<br />
(G)<br />
Section A-A<br />
M16<br />
M16 Bolt/Washer<br />
Bolt/Washer<br />
A AA<br />
1. Read the following instructions before beginning<br />
installation.<br />
1. Read the following instructions before beginning<br />
installation.<br />
2. Isolators 2. Isolators are shipped are shipped fully fully assembled assembled and and are are to to be be<br />
positioned positioned in accordance in accordance with with the the submittal draw- draw-<br />
ings or as ings otherwise or as otherwise recommended.<br />
3. Set isolators on the floor, housekeeping pad, or<br />
subbase, ensuring that all isolator centerlines<br />
match the equipment mounting holes. It is recommends<br />
that the isolator base plates (B) be installed<br />
on a level surface. Shim or grout the isolators as<br />
required, leveling all isolator bases to the same<br />
elevation. The maximum difference that can be<br />
tolerated is 0.25" (6.35 mm).<br />
3. Set isolators on floor, housekeeping pad, or subbase,<br />
ensuring that all isolator centerlines match<br />
the equipment mounting holes. It is recommends<br />
that the isolator base plates (B) be installed on a<br />
level surface. Shim or grout as required, leveling<br />
all isolator base plates to the same elevation<br />
(0.25"(6.35mm) maximum difference can be<br />
tolerated).<br />
4. Bolt or anchor all isolators to the supporting structure<br />
utilizing base plate thru holes (C) or weld<br />
the base plate to the supporting structure with<br />
0.375" (9.5mm) fillet weld 2"(50.8mm) long @ 4"<br />
(101.6mm) on center around the entire base plate;<br />
or as engineered for specific load and or field conditions.<br />
4. Bolt or anchor all isolators to supporting structure<br />
utilizing base plate thru holes (C) or weld base<br />
plate to supporting structure with 0.375"(9.5mm)<br />
fillet weld 2"(50.8mm) long @ 4"(101.6mm) on<br />
centre around entire base plate or as engineered<br />
for specific load and or field conditions.<br />
5. The adjustment process can only begin after the<br />
equipment or machine is at its full operating<br />
6. Bolt or anchor all isolators to supporting structure<br />
(F)<br />
(C)<br />
(B)<br />
(A)<br />
(C)<br />
Equipment<br />
LD16183<br />
.<br />
7. Place equipment on top of isolators making sure<br />
that mounting holes of the equipment line up with<br />
5. Ensure the equipment is at full operating weight<br />
before adjusting the isolators.<br />
6. Bolt isolator or anchor M16 all bolt. isolators to the supporting structure<br />
utilizing the base slotted holes (C).<br />
8. Adjust each isolator in sequence by turning spring<br />
adjusting nuts (G) one full clockwise turn at a<br />
time. Repeat this procedure on all isolators, one<br />
at a time. Continue adjusting each isolator until<br />
same clearance is achieved between the lower<br />
housing and top plate. Check the limit stop lock<br />
nuts (F) periodically to ensure that clearance<br />
between the washer and grommet is maintained.<br />
7. Place equipment on top of the isolators making<br />
sure that mounting holes of the equipment line up<br />
with the isolator M16 bolt.<br />
8. Adjust each isolator in sequence by turning spring<br />
adjusting nuts (G) one full clockwise turn at a<br />
time. Repeat this procedure on all isolators, one<br />
at a time. Continue adjusting each isolator until<br />
the same clearance is achieved between the lower<br />
housing and top plate. Check the limit stop lock<br />
8. Fine adjust isolators to level equipment.<br />
nuts (F) periodically to ensure that clearance between<br />
the washer and grommet is maintained.<br />
9. Adjust all limit stop lock nuts (F) per isolator,<br />
maintaining 0.25"(6.3mm) to 0.375"(9.5mm) gap.<br />
The limit stop nuts must be kept at this gap to<br />
ensure uniform bolt loading during uplift (as the<br />
9. Fine adjust the isolators to level equipment.<br />
10. Adjust all limit stop lock nuts (F) per isolator,<br />
maintaining a gap between 0.25" (6.3mm) to<br />
0.375" case when (9.5mm). equipment The limit is stop drained) lock nuts must<br />
be kept at this gap to ensure uniform bolt loading<br />
during uplift (as is the case when equipment<br />
is drained)<br />
JOHNSON CONTROLS
FORM 201.28-NM1.1<br />
ISSUE DATE: 8/29/2012<br />
SECTION 5 - TECHNICAL DATA<br />
FORM_201.28-NM1.1.EN (1106) SECTION 5 - TECHNICAL DATA<br />
MOUNT-<br />
TYPE<br />
TWO INCH DEFLECTION, RESTRAINED SPRING ISOLATOR<br />
TWO INCH DEFLECTION, (GB CERTIFIED RESTRAINED UNITS) SPRING ISOLATOR<br />
ZGT-F2<br />
A A<br />
ZGT-F2<br />
(A)<br />
WA<br />
M16<br />
M16 Bolt/Washer (A)<br />
WB<br />
A<br />
(G)<br />
B<br />
L<br />
Section A-A<br />
B<br />
L<br />
Bolt/Washer<br />
DIMENSION DATA (mm)<br />
MOUNT TYPE<br />
A WA WB W H TH B L D F<br />
DIMENSION DATA (MM)<br />
ZGT-F2 290 110 110 110 150 200 283 310 60 16<br />
A WA WB W H TH B L D F<br />
ZGT-F2 290 110 110 110 150 200 283 310 60 Φ16<br />
MODEL NUMBER<br />
ZGT-F2-200<br />
RATED CAPACITY<br />
(FOR UNITS WITH ALL LOAD POINTS LESS THAN 3527<br />
MODEL NUMBER<br />
RATED<br />
LBS<br />
CAPACITY<br />
(1600 KG)<br />
Weight Range<br />
FOR UNITS WITH ALL LOAD POINTS LESS THAN 3527 PART LBS NUMBER (1600 KG)<br />
(LBS.) (KG)<br />
ZGT-F2-200 WEIGHT 0 thru RANGE 441 0 thru 200 029G23000A031<br />
ZGT-F2-300 442 thru 661 201 thru 300 029G23000A032 PART NUMBER<br />
(LBS.) RANGE (KG)<br />
ZGT-F2-350 662 thru 772 301 thru 350 029G23000A033<br />
ZGT-F2-500 0 thru 441 773 thru 1102 0 thru 351 200 thru 500 029G23000A034 029G23000A031<br />
ZGT-F2-300<br />
ZGT-F2-350<br />
ZGT-F2-650<br />
442 thru 661<br />
ZGT-F2-1000<br />
ZGT-F2-1200 662 thru 772<br />
1103 thru 1433<br />
201<br />
501<br />
thru<br />
thru<br />
300<br />
650<br />
1434 thru 2205 651 thru 1000<br />
2206 thru 2646 301 1001 thru thru 3501200 029G23000A035<br />
029G23000A032<br />
029G23000A036<br />
029G23000A037 029G23000A033<br />
ZGT-F2-500 ZGT-F2-1600 773 thru 1102 2647 thru 3527 351 1201 thru thru 5001600 029G23000A038 029G23000A034<br />
Notes:<br />
ZGT-F2-650 1. All dimensions are in millimeter. 1103 thru 1433 501 thru 650 029G23000A035<br />
ZGT-F2-1000 2. Equipment must be bolted or 1434 welded thru to the 2205 top plate to meet allowable 651 seismic thru 1000 ratings.<br />
029G23000A036<br />
3. Consult JCI for concrete installation.<br />
ZGT-F2-1200 2206 thru 2646 1001 thru 1200 029G23000A037<br />
ZGT-F2-1600 2647 thru 3527 1201 thru 1600 029G23000A038<br />
Notes:<br />
1. All dimensions are in millimeters.<br />
2. Equipment must be bolted or welded to the top plate to meet allowable seismic ratings.<br />
3. Consult <strong>Johnson</strong> <strong>Controls</strong> for concrete installation.<br />
JOHNSON CONTORLS 57<br />
JOHNSON CONTROLS 79<br />
(F)<br />
(C)<br />
D<br />
W<br />
(B)<br />
H<br />
4-F<br />
4-F<br />
W<br />
D A<br />
H<br />
D<br />
W<br />
TH<br />
(C)<br />
TH<br />
Equipment<br />
LD16184<br />
5
THIS PAGE INTENTIONALLY LEFT BLANK
FORM 201.28-NM1.1<br />
ISSUE DATE: 8/29/2012<br />
PREPARATION<br />
Commissioning of this unit should only<br />
be carried out by <strong>Johnson</strong> <strong>Controls</strong> Authorized<br />
personnel.<br />
Commissioning personnel should be thoroughly familiar<br />
with the information contained in this document before<br />
starting the unit.<br />
The following basic checks should be made with the<br />
customer power to the unit switched OFF.<br />
Inspection<br />
Proper electrical lock out and tag out<br />
procedures must be followed.<br />
Inspect unit for installation damage. If found, take action<br />
and/or repair as appropriate.<br />
Refrigerant Charge<br />
Packaged units are normally shipped as standard with a<br />
full refrigerant operating charge. Check that refrigerant<br />
pressure is present in both systems and that no leaks<br />
are apparent. If no pressure is present, a leak test must<br />
be undertaken, the leak(s) located and repaired.<br />
Do not evacuate or liquid charge with static water in<br />
the evaporator. Turn the pump on. Take care to liquid<br />
charge slowly to avoid excessive thermal stress at the<br />
charging point and to assure the refrigerant temperature<br />
in the evaporator does not go below the freezing<br />
point with liquid refrigerant in the evaporator. Once<br />
the vacuum is broken, charge into the evaporator or<br />
flash tank with the Condenser Drain Valve (Flash Tank<br />
Feed) open and the chilled liquid pump ON to the full<br />
operating charge, as detailed in SECTION 5 - TECH-<br />
NICAL DATA on Page 49.<br />
SECTION 6 - COMMISSIONING<br />
Correct System Refrigerant Charge<br />
The charge on a system should always be checked<br />
when operating for several minutes at full speed with<br />
the system stable. Stable conditions are defined as operation<br />
without fan cycling, economizer cycling, VI<br />
solenoid cycling, or any other system transient conditions.<br />
Ideal refrigerant charge will be reached when the<br />
refrigerant level in the evaporator is near the middle of<br />
the evaporator sight glass.<br />
Refrigerant should not be added or removed<br />
unless the level is at the bottom or<br />
the top of the glass. It is not necessary to<br />
weigh charge unless the entire charge has<br />
been lost. The ease of charging is possible<br />
since the microchannel coils hold only<br />
a small amount of refrigerant charge.<br />
A charging valve is located between the<br />
fixed orifice and the evaporator for adjusting<br />
charge. Charge should be added<br />
as liquid with the pump ON and liquid<br />
flowing through the evaporator.<br />
Service and Oil Line Valves<br />
Open each compressor oil, economizer, and discharge<br />
ball or service valves. If valves are of the back-seat<br />
type, open them fully (counterclockwise) then close<br />
one turn of the stem to ensure operating pressure is fed<br />
to pressure transducers.<br />
Compressor Oil<br />
To add oil to a circuit - connect a YORK hand oil pump<br />
(Part No. 470-10654-000) to the 1/4" (6.35 mm) oil<br />
charging valve on the oil separator piping with a length<br />
of clean hose or copper line, but do not tighten the flare<br />
nut. Using clean oil of the correct type (“L” oil), pump<br />
oil until all air has been purged from the hose then<br />
tighten the nut. Stroke the oil pump to add oil to the oil<br />
system. While the compressor is running at full speed,<br />
the oil level should be visible in the sight glass of the<br />
oil separator. Approximately 2 to 3.1 gallons (7.5 to<br />
11.6 liters) are present in each refrigerant system.<br />
JOHNSON CONTROLS 81<br />
6
SECTION 6 - COMMISSIONING<br />
Avoid levels in either oil separator that are above the<br />
middle of the top sight glass. This may cause excessive<br />
oil carryover in the system. High oil concentration<br />
in the system may cause nuisance trips resulting from<br />
incorrect readings on the level sensor and temperature<br />
sensors. Temperature sensor errors may result in poor<br />
liquid control which will result in liquid overfeed and<br />
subsequently damage the compressor. High oil carryover<br />
may also cause liquid to be returned to the compressor,<br />
which can damage the compressor.<br />
Fans<br />
Check that all fans are free to rotate and are not damaged.<br />
Ensure blades are at the same height when rotated.<br />
Ensure fan guards are securely fixed.<br />
Isolation / Protection<br />
Verify all sources of electrical supply to the unit are<br />
taken from a single point of isolation. Check that the<br />
maximum recommended fuse sizes given in SECTION<br />
5 - TECHNICAL DATA on Page 49 has not been exceeded.<br />
Control Panel<br />
Check the panel to see that it is free of foreign materials<br />
(wire, metal chips, etc.) and clean out if required.<br />
Power Connections<br />
Check that the customer power cables are connected correctly<br />
to the terminal blocks or optional circuit breaker.<br />
Ensure that connections of power cables within the panels<br />
to the circuit breaker or terminal blocks are tight.<br />
Grounding<br />
Verify that the unit’s protective ground terminal(s) are<br />
properly connected to a suitable grounding point. Ensure<br />
that all unit internal ground connections are tight.<br />
Water System<br />
Verify the chilled liquid system has been installed correctly,<br />
and has been commissioned with the correct direction<br />
of water flow through the evaporator. The inlet<br />
should be at the bottom connection on a two pass evaporator.<br />
Purge air from the top of the evaporator using the<br />
plugged air vent mounted on the top of the evaporator<br />
body.<br />
Flow rates and pressure drops must be within the limits<br />
given in SECTION 5 - TECHNICAL DATA on Page<br />
49. Operation outside of these limits is undesirable<br />
and could cause damage.<br />
82<br />
FORM 201.28-NM1.1<br />
ISSUE DATE: 8/29/2012<br />
If main power must be switched OFF for extended<br />
maintenance or an extended shutdown period, precautions<br />
must be taken. If there is a possibility of<br />
liquid freezing due to low ambient temperatures, the<br />
evaporator should be drained or power should be applied<br />
to the chiller. This will allow the evaporator<br />
heater to protect the evaporator from freezing down to<br />
0°F (-17.7°C). Before placing the unit back in service,<br />
valves should be opened and power must be switched<br />
on (if power is removed for more than 8 hours) for at<br />
least 8 hours (24 hours if ambient temperature is below<br />
86°F [30°C]) before the unit is restarted.<br />
Flow Switch<br />
Verify a chilled water flow switch is correctly fitted<br />
in the customer’s piping on the evaporator outlet, and<br />
wired into the control panel correctly using shielded<br />
cable.<br />
There should be a straight run of at least five pipe diameters<br />
on either side of the flow switch. The flow switch<br />
should be connected to Terminals 2 and 13 in the panel.<br />
Temperature Sensor(s)<br />
Ensure the leaving liquid temperature sensor is coated<br />
with heat conductive compound (Part No. 013-00890-<br />
000) and is inserted to the bottom of the water outlet<br />
sensor well in the evaporator. This sensor also provides<br />
some freeze protection and must always be fully inserted<br />
in the water outlet sensor well.<br />
Programmed Options<br />
Verify that the options factory-programmed into the<br />
Micro Panel are in accordance with the customer’s<br />
order requirements by pressing the OPTIONS key on<br />
the keypad and reading the settings from the display.<br />
Programmed Settings<br />
Ensure the system cutout and operational settings are in<br />
accordance with the operating requirements by pressing<br />
the PROGRAM key.<br />
Date and Time<br />
Program the date and time by first ensuring that the CLK<br />
jumper JP2 on the Chiller Control Board is in the ON<br />
position. Then press the DATE/TIME key and set the<br />
date and time (see SECTION 8 - MICROPANEL Date/<br />
Time and Schedule Keys on Page 120).<br />
JOHNSON CONTROLS
FORM 201.28-NM1.1<br />
ISSUE DATE: 8/29/2012<br />
Start/Stop Schedule<br />
Program the daily and holiday start/stop by pressing<br />
the SCHEDULE key (see SECTION 8 - MICROPANEL<br />
Date/Time and Schedule Keys on Page 120).<br />
Setpoint and Remote Offset<br />
Set the required leaving chilled liquid temperature<br />
setpoint and Control Range under the SETPOINTS key.<br />
The chilled liquid temperature control settings need to<br />
be set according to the required operating conditions.<br />
If remote temperature reset (offset) is to be used,<br />
the maximum reset required must be programmed<br />
by pressing the SETPOINTS key (see SECTION 8 -<br />
MICROPANEL Setpoints Key on Page 112).<br />
FIRST TIME START UP<br />
Interlocks<br />
During the commissioning period there<br />
should be sufficient heat load to run the<br />
unit under stable full load operation to<br />
enable the unit controls, and system operation<br />
to be set up correctly, and a commissioning<br />
log taken.<br />
Verify that liquid is flowing through the evaporator<br />
and that heat load is present. Ensure that any remote<br />
run interlocks are in the run position and that the Daily<br />
Schedule requires the unit to run or is overridden.<br />
Unit Switch<br />
Place the UNIT switch on the keypad to the ON position.<br />
Startup<br />
Press the SYSTEM SWITCHES key and place the<br />
system switch for System 1 to the ON position. There<br />
may be a few seconds delay before the first compressor<br />
starts because of the anti-recycle timer). Be ready<br />
when each compressor starts, to switch the UNIT<br />
switch OFF immediately, if any unusual noises or other<br />
adverse conditions develop.<br />
When a compressor is running, the controller monitors<br />
oil pressure, motor current, and various other system<br />
parameters such as discharge pressure, chilled liquid<br />
temperature, etc. Should any problems occur; the control<br />
system will immediately take appropriate action<br />
and display the nature of the fault.<br />
Oil Pressure<br />
SECTION 6 - COMMISSIONING<br />
When a compressor starts, press the relevant “System<br />
Pressures” key and verify that oil differential pressure<br />
(oil pressure-suction pressure) develops immediately.<br />
If oil pressure does not develop, the automatic controls<br />
will shut down the compressor. Under no circumstances<br />
should a restart attempt be made on a compressor,<br />
which does not develop oil pressure immediately.<br />
Switch the UNIT switch to the OFF position.<br />
Loading<br />
Once the unit has been started, all operations are fully<br />
automatic. After an initial period at minimum capacity,<br />
the control system will adjust the unit load depending<br />
on the chilled liquid temperature and rate of temperature<br />
change. If a high heat load is present, the controller<br />
will increase the speed of the compressor(s).<br />
Condenser and Fan Rotation<br />
Once a compressor is running, discharge pressure rises<br />
as refrigerant is pumped into the air-cooled condenser<br />
coils. This pressure is controlled by stages of fans to<br />
ensure maximum unit efficiency while maintaining<br />
sufficient pressure for correct operation of the condensers<br />
and the lubrication system.<br />
As discharge pressure rises, the condenser fans operate<br />
in stages or ramp up in speed to control the pressure.<br />
Verify that the fans operate in the correct direction of<br />
rotation and operation is correct for the type of unit.<br />
System Charge<br />
Check system charge at steady full compressor load<br />
only. It is important that all fans are running for the<br />
system. The refrigerant level in the evaporator should<br />
be about in the middle of the sight glass. Unless levels<br />
are at the bottom or the top of the sight glass, they<br />
should not cause concern or require adding or removing<br />
charge.<br />
General Operation<br />
After completion of the above checks for System 1,<br />
switch OFF the SYS 1 switch on the keypad and repeat<br />
the process for each subsequent system. When all run<br />
correctly, stop the unit, switch all applicable switches<br />
to the ‘ON’ position and restart the unit.<br />
Assure all checks are completed in the Equipment Pre -<br />
Startup and Startup Checklist. The chiller is then ready<br />
to be placed into operation.<br />
JOHNSON CONTROLS 83<br />
6
THIS PAGE INTENTIONALLY LEFT BLANK
FORM 201.28-NM1.1<br />
ISSUE DATE: 8/29/2012<br />
OPERATING CONTROLS<br />
Unit Switch<br />
A double pole single throw ON/OFF rocker switch on<br />
the front of the control panel is used to turn the entire<br />
chiller ON and OFF. When the switch is placed in the<br />
OFF position, the entire unit shuts down immediately<br />
and all systems will be disabled. One pole of the UNIT<br />
switch contacts is wired to the Run Signal input and the<br />
Chiller Control Board “UNIT switch X” digital input<br />
(X equals System 1 or 2). Separate System Fuses are<br />
also wired in series with each set of UNIT switch contacts.<br />
If either fuse is pulled or blown, only the system<br />
with the good fuse (Input is high) will run. When both<br />
inputs are high, the entire chiller will be enabled to run.<br />
When both inputs are low, the chiller will be disabled<br />
as a UNIT switch OFF Shutdown.<br />
Keypad<br />
DISPLAY<br />
KEYPAD<br />
UNIT<br />
SWITCH<br />
FIGURE 16 - KEYBOARD AND DISPLAY<br />
An operator keypad allows complete control of the system<br />
from a central location. The keypad offers a multitude<br />
of command keys on the left and right side of the<br />
keypad to access displays, program setpoints, history<br />
data, and initiate system commands. Most keys have<br />
multiple displays that can be accessed by repetitively<br />
pressing the key or by pressing the ▲,▼,◄, and ►<br />
(ARROW) keys. The keypad utilizes an overlay to<br />
convert the keypad to various languages.<br />
SECTION 7 - OPERATION<br />
LD10605<br />
The keypad also contains keys in the center section for<br />
data entry in the various program modes. These keys<br />
are listed below:<br />
• 0-9 Keys NUMERIC KEYPAD<br />
• PERIOD/DECIMAL<br />
• +/- PLUS/MINUS<br />
• � ENTER<br />
• � CANCEL<br />
• ▲ UP ARROW<br />
• ▼ DOWN ARROW<br />
• ◄ LEFT ARROW<br />
• ► RIGHT ARROW<br />
The numeric keys allow keying numeric values into<br />
memory.<br />
The • (PERIOD/DECIMAL) key allows keying a<br />
decimal point into numeric values.<br />
The +/- (PLUS/MINUS) key allows making numeric<br />
values negative.<br />
The � (ENTER) key stores program changes into<br />
memory.<br />
The X (CANCEL) key is used to cancel the data entry<br />
operation and returns the programmed value to the<br />
original value, before any programming changes were<br />
made, when an error is made.<br />
The ▲ (UP ARROW) and ▼ (DOWN ARROW)<br />
keys allow scrolling backward (▲) and forward (▼)<br />
through items to be programmed under keys such as the<br />
PROGRAM or OPTIONS key.<br />
The ▲ (UP ARROW) and ▼ (DOWN ARROW)<br />
keys also allow scrolling forward (▼) or backwards<br />
(▲) through data display keys that have multiple<br />
displays under keys such as UNIT DATA, SYSTEM<br />
DATA, HISTORY, PROGRAM, OPTIONS, etc. The<br />
arrow keys can be used instead of repeatedly pressing<br />
the data key to see the multiple displays under a key.<br />
Once the ▲ ▼ (ARROW) keys are pressed and used<br />
for scrolling, pressing the original data key will return<br />
to the first display message displayed under the data<br />
(UNIT DATA, SYSTEM DATA, etc.) keys.<br />
JOHNSON CONTROLS 85<br />
7
SECTION 7 - OPERATION<br />
The ◄ ► (LEFT and RIGHT ARROW) keys allow<br />
scrolling between non-numeric program choices under<br />
the OPTION, DATE/TIME, and SCHEDULE keys.<br />
The ◄ (LEFT ARROW) key allows programming the<br />
default value when programming numeric values. For<br />
changing numeric values, the ► (RIGHT ARROW)<br />
key has no function.<br />
The ◄ ► (ARROW) keys also allow scrolling sideways<br />
between the same displays on different systems.<br />
For example, pressing the ► (RIGHT ARROW) key<br />
while viewing the system #1 suction pressure moves the<br />
display to system #2 suction pressure.<br />
Pressing the ◄ (LEFT ARROW) key moves the<br />
opposite direction. The arrow keys also allow fast<br />
scrolling through data under keys such as HISTORY<br />
by enabling the operator to move between subgroups<br />
of data such as Unit, System, and VSD data.<br />
Keypad Data Entry Mode<br />
For numeric programmable items, the data entry mode<br />
is entered by pressing any of the number keys, the decimal<br />
point key, or the +/- key. When the data entry mode<br />
is entered, the data from the key press will be entered<br />
and the cursor will appear under the position where the<br />
data is being entered.<br />
For non-numeric programmable items, data entry<br />
mode is entered by pressing the ◄ or ► (ARROW)<br />
keys. When the data entry mode is entered, the cursor<br />
will appear under the first position of the non-numeric<br />
string. The programmable choice may be changed by<br />
pressing the ◄ or ► (ARROW) keys.<br />
To exit the data entry mode and store the programmed<br />
value, the � (ENTER) key must be pressed. When<br />
the � (ENTER) key is pressed, the cursor will disappear.<br />
The data entry mode may also be exited by pressing<br />
the X (CANCEL) key. The programmed data will be<br />
returned to its original value when the X (CANCEL)<br />
key is pressed.<br />
When the data entry mode is exited, the cursor will disappear.<br />
If any other key is pressed while in the Data<br />
Entry Mode, the following display will appear for 2<br />
seconds indicating the user must choose between<br />
accepting or canceling the change:<br />
86<br />
XXXXXXXXXXX PRESS � TO ACCEPT VALUE OR<br />
X TO CANCEL DATA ENTRY<br />
FORM 201.28-NM1.1<br />
ISSUE DATE: 8/29/2012<br />
If the � (ENTER) key was pressed from the data entry<br />
mode and the numeric value entered was out of<br />
range, the following message will appear for 2 seconds<br />
followed by the original data display.<br />
XXXXXXXXXXX OUT OF RANGE TRY AGAIN!<br />
XXXXXXXXXXXXXXXXXXXXXXXXXXXXXXXXXXXX<br />
Display<br />
The 80 character (2 lines of 40 characters per line)<br />
display is a <strong>Liquid</strong> Crystal Display (LCD) used for<br />
displaying unit parameters, system parameters, and<br />
operator messages. The display has an LED backlight<br />
background for night viewing and is viewable in direct<br />
sunlight.<br />
Anti-recycle Timer<br />
On power-up of the control panel, the anti-recycle timer<br />
for each system will be set to 120 seconds and must<br />
time out before a compressor is allowed to start.<br />
Whenever a system starts, the anti-recycle timer for all<br />
systems will be set to 120 seconds and will count down<br />
from the time the motor starts. The timer must time out<br />
before another compressor is allowed to start.<br />
Whenever a system shuts down, the anti-recycle timer<br />
for that system will be set to 120 seconds. The timer<br />
must time out before the system is allowed to restart.<br />
Evaporator Pump Control<br />
The evaporator pump dry contacts are energized when<br />
any of the following conditions are true:<br />
• If a Low Leaving Chilled <strong>Liquid</strong> Fault occurs.<br />
• Whenever a compressor is running.<br />
• The Daily Schedule is ON and the UNIT switch<br />
is ON.<br />
Even if one of above is true, the pump will not run if<br />
the panel has been powered up for less than 30 seconds<br />
or if the pump has run in the last 30 seconds to prevent<br />
pump motor overheating.<br />
Evaporator Heater Control<br />
The evaporator heater is controlled by ambient<br />
air temperature. If no systems are running and the<br />
ambient temperature drops below 4.4 °C (40°F), the<br />
heater is turned ON. If no systems are running and<br />
the temperature rises above 7.2°C (45°F) the heater is<br />
turned OFF. Whenever a system is running, the evapo-<br />
JOHNSON CONTROLS
FORM 201.28-NM1.1<br />
ISSUE DATE: 8/29/2012<br />
rator heater is turned OFF. Both evaporator heater outputs<br />
will always be turned ON and OFF together. An<br />
under voltage condition will keep the heater OFF until<br />
full voltage is restored to the system.The heater will<br />
protect the evaporator from freeze-up down to -29°C(-<br />
20°F ).<br />
Compressor Heater Control<br />
Each compressor has its own heater. The purpose of<br />
the heater is to assure refrigerant does not condense<br />
in the compressor. There is no oil sump, but refrigerant<br />
could possibly condense in the rotors or the motor<br />
housing.The heater will be OFF whenever the respective<br />
compressor is running. As soon as the compressor<br />
shuts OFF, the heater will turn ON as long as all motor<br />
temperature sensors in the compressor read less than<br />
70°C (158°F). The heater will turn OFF, if any internal<br />
compressor motor temperature sensor reads more than<br />
71.1°C (160°F).<br />
Alarms<br />
Each system has its own alarm. The Alarm output is ON<br />
(dry contact closed) when no fault condition is present<br />
and OFF (dry contact open) to indicate an alarm<br />
situation. The Alarm will be activated (contacts open),<br />
if any of the following are true.<br />
• A System is faulted or inhibited from starting for<br />
more than 5 seconds.<br />
• The Unit is faulted or inhibited from starting for<br />
more than 5 seconds.<br />
• A System is locked out.<br />
• The Unit is locked out.<br />
• Power is removed from the chiller.<br />
Chiller Run Contact<br />
The Chiller Run dry contact is closed whenever any system<br />
is running. It is open when all systems are shut OFF.<br />
Flow Switch Control<br />
A chilled liquid flow switch of suitable type MUST be<br />
connected between Terminals 2 and 13 of 1TB to provide<br />
protection against loss of liquid flow, which will<br />
cause evaporator freeze-up if the chiller is permitted<br />
to run.<br />
Remote Run / Stop<br />
A Remote Run/Stop input is available for each system.<br />
BASIC OPERATING SEQUENCE<br />
Start Sequence and Loading<br />
SECTION 7 - OPERATION<br />
To initiate the start sequence of the chiller, the following<br />
conditions must be satisfied before the precharge<br />
of the DC Bus will take place:<br />
• UNIT SWITCH must be ON.<br />
• At least one System Switch is ON<br />
• Run permissive inputs (Remote Cycling Contacts)<br />
must be closed.<br />
• No unit faults exist.<br />
• No unit start inhibits exist.<br />
• At least one system not faulted or inhibited.<br />
• The Daily Schedule is calling for the chiller to<br />
run.<br />
• The Flow Switch is closed.<br />
• Leaving Chilled <strong>Liquid</strong> Setpoint is above the<br />
Setpoint plus CR (Setpoint High Limit).<br />
Once the precharge takes place, if the anti-recycle timer<br />
is timed out the chiller control system on the Chiller<br />
Control Board will select the number of compressors<br />
to start and begin operation of the compressors. The<br />
compressor(s) speed will be ramped to the minimum<br />
start frequency and increase speed as needed in an effort<br />
to regulate the leaving chilled liquid temperature<br />
to meet the desired Setpoint.Unit Warnings<br />
UNIT WARNING<br />
Unit Warning Operation<br />
Unit warnings are caused when a condition is present<br />
requiring operator intervention to restart the unit.<br />
All setpoints, program values, and options should be<br />
checked before operating the unit. Warnings are not<br />
logged to the history buffer. If a unit warning is in<br />
effect, the message will be displayed to the operator<br />
when the STATUS key is pressed.<br />
Low Battery Warning<br />
The LOW BATTERY WARNING can only occur at<br />
unit power-up. On micropanel power-up, the RTC battery<br />
is checked to see if it is still operational. If it is,<br />
normal unit operation is allowed. If the battery voltage<br />
is determined to be low, the following warning message<br />
is displayed indefinitely.<br />
UNIT WARNING: !! LOW BATTERY !!<br />
CHECK SETPOINTS/PROGRAM/OPTIONS/TIME<br />
JOHNSON CONTROLS 87<br />
7
SECTION 7 - OPERATION<br />
If a low battery condition exists, all programmed<br />
setpoints, program values, time, schedule, and history<br />
buffers will have been lost. These values will all be reset<br />
to their default values, which may not be the desired<br />
operating values. Once a bad battery is detected, the<br />
unit will be prevented from running until the MANU-<br />
AL OVERRIDE key is pressed. Once the MANUAL<br />
OVERRIDE key is pressed, the anti recycle timers will<br />
be set to the programmed default anti recycle time to<br />
allow the operator sufficient time to check setpoints,<br />
program values, etc.<br />
If a low battery is detected, it should be replaced as<br />
soon as possible. The programmed values will all be<br />
lost and the unit will be prevented from running on the<br />
next power interruption.<br />
Invalid Number of Compressors Warning<br />
The INVALID NUMBER OF COMPRESSORS SE-<br />
LECTED Warning will occur after the VSD has been<br />
initialized, if no ”Number of Compressors Select”<br />
jumpers are installed or if more than 1 jumper is installed.<br />
The following warning message will be displayed<br />
indefinitely.<br />
88<br />
UNIT WARNING:<br />
INVALID NUMBER OF COMPRESSORS SELECTED<br />
To clear this warning, both the control panel and VSD<br />
control voltage must be turned OFF and the jumpers<br />
properly installed in the VSD wiring harness.<br />
These jumpers are factory installed in the<br />
wire harness plug and should not require<br />
changes.<br />
Invalid Serial Number Warning<br />
If the INVALID SERIAL NUMBER message appears,<br />
immediately contact <strong>Johnson</strong> <strong>Controls</strong> Product Technical<br />
Support. The appearance of this message may mean<br />
the chiller has lost important factory programmed information.<br />
The serial number can be entered using the<br />
SERVICE key.<br />
UNIT WARNING: INVALID SERIAL NUMBER<br />
ENTER UNIT SERIAL NUMBER<br />
This status message can be bypassed to view additional<br />
messages under the STATUS key by pressing the STA-<br />
TUS key repeatedly to scroll through as many as three<br />
STATUS messages that could possibly be displayed at<br />
any time.<br />
UNIT SAFETIES<br />
FORM 201.28-NM1.1<br />
ISSUE DATE: 8/29/2012<br />
Unit Safety Operation<br />
Unit faults are safeties that cause all running compressors<br />
to be shut down, if a safety threshold is exceeded<br />
for 3 seconds. Unit faults are recorded in the history<br />
buffer along with all data on the unit and system operating<br />
conditions. Unit faults are auto reset faults where<br />
the unit will be allowed to restart automatically after<br />
the fault condition is no longer present. The only exception<br />
is any of the VSD related unit faults. If any 3<br />
VSD unit faults occur within 90 minutes, the unit will<br />
be locked out on the last fault. A VSD lockout condition<br />
requires a manual reset using the system switches.<br />
Both system switches must be cycled OFF and ON to<br />
clear a VSD unit lockout fault. If a unit safety is in<br />
effect, the message will be displayed to the operator<br />
when the STATUS key is pressed.<br />
In the descriptions of the fault displays that follow, the<br />
fault message will show a YYYYYYY to indicate that a<br />
system is in a “FAULT” condition and will restart when<br />
the fault clears or LOCKOUT” and will not restart until<br />
the operator clears the fault using the keypad.<br />
If a control panel safety occurs after the VSD fault, but<br />
before the fault is reset, the control panel fault is an<br />
ALL FAULT of the VSD fault, meaning it will be registered<br />
as such in the History because it occurred while<br />
the VSD was shutting down or while the systems were<br />
shut down. All faults do not store operating data at the<br />
time of the fault.<br />
If a “VSD” fault occurs during the fault rampdown or<br />
while the systems are shut down, the VSD fault will<br />
be registered as a new fault. The reason for this is the<br />
belief any VSD fault should be registered with a full<br />
account of the systems data at the time of the fault.<br />
High Ambient Temp Fault<br />
If the ambient temperature rises above 54°C (130°F),<br />
the chiller will shut down with a controlled ramped<br />
shutdown. Restart will automatically occur, if demand<br />
allows, when temperature falls 1.1°C (2°F) below the<br />
cutout (52.9°C[128°F]). This fault cannot cause a lockout.<br />
The fault display message will be present only during<br />
the time when the ambient temperature is causing a<br />
fault condition. A sample display is shown below:<br />
UNIT YYYYYYYY<br />
HIGH AMBIENT TEMP<br />
The unit will also be inhibited from starting any time<br />
the temperature is above 52.9°C (128°F).<br />
JOHNSON CONTROLS
FORM 201.28-NM1.1<br />
ISSUE DATE: 8/29/2012<br />
Low Ambient Temp Fault<br />
If the ambient temperature falls below the programmable<br />
Low Ambient Temp Cutout the chiller will shut<br />
down with a controlled ramped shutdown. This fault<br />
will only occur if the Low Ambient Cutout is “EN-<br />
ABLED” under the OPTIONS key. Restart can occur,<br />
if demand allows, when temperature rises 1.1°C (2°F)<br />
above the cutout. This fault cannot cause a lockout.<br />
The fault display message will be present only during<br />
the time when the ambient temperature is causing a<br />
fault condition. A sample display is shown below:<br />
UNIT YYYYYYYY<br />
LOW AMBIENT TEMP<br />
The unit is also inhibited from starting any time the<br />
temperature is below the cutout plus 1.1°C (2°F).<br />
Low Leaving Chilled <strong>Liquid</strong> Temp Fault<br />
The Low Leaving Chilled <strong>Liquid</strong> Temp Cutout helps to<br />
protect the chiller from an evaporator freeze-up should<br />
the chilled liquid temp drop below the freeze point.<br />
This situation could occur under low flow conditions<br />
or if the Micro Panel setpoint values are improperly<br />
programmed. Any time the leaving chilled liquid temperature<br />
(water or brine) drops below the programmable<br />
cutout point, the chiller will fault and shutdown<br />
with a controlled ramped shutdown. Restart can occur,<br />
if demand allows, when chilled liquid temperature rises<br />
2.2°C (4°F) above the cutout. This fault cannot cause a<br />
lockout. A sample shutdown message is shown below:<br />
UNIT YYYYYYYY<br />
LOW LEAVING CHILLED LIQUID TEMP<br />
The unit is inhibited from starting any time the chilled<br />
liquid temperature is below the cutout plus 2.2°C (4°F).<br />
VSD Communications Failure Fault<br />
The VSD Communications Failure is to prevent the<br />
unit from trying to run, if the Chiller Control Board<br />
never initializes communications with the VSD Logic<br />
Board. The unit will also shut down with a controlled<br />
ramped shutdown if the Chiller Control Board loses<br />
communications with the VSD Logic Board while the<br />
chiller is operating.<br />
On power-up, the Chiller Microprocessor Board will<br />
attempt to initialize communications with the VSD<br />
Logic Board. The control panel will request data from<br />
the VSD, which includes the number of compressors<br />
and the VSD software version. Once these data points<br />
have been received by the Chiller Control Board, and<br />
SECTION 7 - OPERATION<br />
have been successfully initialized, the Chiller Control<br />
Board will not request them again. If the comms connection<br />
fails to occur and a reply from the VSD Logic<br />
Board does take place in 8 seconds, the Chiller Control<br />
Board will prevent the chiller from operating and a<br />
fault message will be displayed.<br />
During normal operation, if the control panel Chiller<br />
Control Board receives no valid response to messages<br />
for 8 seconds, the unit will shut down all compressors<br />
on a Comms fault. The Chiller Control Board will continue<br />
to send messages to the VSD while faulted. The<br />
unit will be inhibited from starting until communications<br />
is established. The fault will automatically reset<br />
when the Chiller Control Board receives a valid response<br />
from the VSD for a data request. Shown below<br />
is an example of a Comms Failure fault message:<br />
UNIT YYYYYYYY<br />
VSD COMMUNICATIONS FAILURE<br />
SYSTEM SAFETIES (FAULTS)<br />
System Safety (Fault) Operation<br />
System safeties are faults that cause individual systems<br />
to be shut down if a safety threshold is exceeded for 3<br />
seconds. System faults are auto reset faults in that the<br />
system will be allowed to restart automatically after the<br />
120 second anti-recycle timer times out. The only exception<br />
is after any 3 faults on the same system occur<br />
within 90 minutes, that system will be “locked out” on<br />
the last fault. The lockout condition requires a manual<br />
reset using the system switch. The respective system<br />
switch must be cycled OFF and ON to clear the lockout<br />
fault.<br />
When multiple systems are operating and a system<br />
fault occurs, the running systems will ramp down and<br />
the faulted system will be shut OFF and the previously<br />
operating will restart if required after the fault clears<br />
and/or the 120 second anti-recycle timer times out.<br />
In the descriptions of the fault displays that follow, the<br />
fault message will show a YYYYYYYY to indicate<br />
that a system is in a “FAULT” condition and will restart<br />
when the fault clears, or “LOCKOUT” and will<br />
not restart until the operator clears the fault using the<br />
keypad. If a system safety is in effect, the message will<br />
be displayed to the operator when the STATUS key is<br />
pressed.<br />
In some cases, a control panel fault will occur after<br />
a VSD fault, possibly during system shutdown or at<br />
some later time. This is known as an “ALL FAULT”<br />
JOHNSON CONTROLS 89<br />
7
SECTION 7 - OPERATION<br />
and these faults will be recorded as such under the<br />
HISTORY information stored at the instant of the primary<br />
fault. In some cases, this information may be<br />
valuable in troubleshooting the primary fault. An example<br />
of the “ALL FAULT” history message is shown<br />
on page 106 under the HISTORY key. When an “ALL<br />
FAULT” occurs, associated history information will<br />
not be stored. If an additional fault does not occur, the<br />
“ALL FAULTS” display will indicate NONE.<br />
In cases where a VSD fault occurs during the rampdown<br />
of a control panel fault (i.e.: low suction pressure,<br />
low water temp, etc.), the VSD fault will be stored as a<br />
new fault with the associated fault information stored<br />
at the instant the VSD fault occurred (i.e.: IGBT Gate<br />
Drive, Single Phase Input, VSD CT Plug, etc.). The<br />
control panel fault that occurred prior to the VSD fault<br />
will be stored with the associated complete data related<br />
to the fault as a numerically lower numbered history in<br />
the history buffers.<br />
High Discharge Pressure Cutout (Software)<br />
Fault<br />
The High Discharge Pressure Cutout is a software<br />
fault. A system will fault and shut down with a controlled<br />
ramped shutdown on high discharge pressure<br />
when the discharge pressure rises above 22.4 barg (325<br />
PSIG) for 0.5 seconds. The system will be allowed to<br />
restart when the discharge pressure falls to 20.3 barg<br />
(295 PSIG). The system will also be inhibited from<br />
starting if the pressure is above 20.3 barg (295 PSIG).<br />
The fault message for this safety is shown below:<br />
90<br />
SYS X YYYYYYYY HIGH DISCHARGE PRESSURE<br />
The X indicates the system and YYYYYYYY indicates<br />
the system is in a “FAULT” condition and will<br />
restart when the 120 second anti-recycle timer times<br />
out, or “LOCKOUT” and will not restart until the operator<br />
clears the fault using the keypad.<br />
High Discharge Pressure Cutout<br />
(HPCO) (Hardware) Fault<br />
The mechanical High Pressure Cutout protects the<br />
system from experiencing dangerously high discharge<br />
pressure. A system will fault and shut down immediately<br />
when the mechanical high pressure cutout contacts<br />
open. The fault will occur immediately and not<br />
wait 3 seconds, which is typical of most system faults.<br />
The HPCO is wired in series with the VSD Run Signal<br />
and will only be checked by the Chiller Control Board<br />
FORM 201.28-NM1.1<br />
ISSUE DATE: 8/29/2012<br />
when the system is running. The mechanical cutout<br />
opens at 23.2 barg ± 0.55 barg (337 PSIG ± 8 PSIG)<br />
and closes at 17.4 barg ± 0.69 barg (252 PSIG ± 10<br />
PSIG). The Status display fault message for this system<br />
is shown below:<br />
SYS X YYYYYYYY HPCO FAULT<br />
The X indicates the system and YYYYYYY indicates<br />
the system is in a “FAULT” condition and will restart<br />
when the 120 second anti-recycle timer times out or<br />
“LOCKOUT” and will not restart until the operator<br />
clears the fault using the keypad.<br />
Low Suction Pressure Cutout (Software) Fault<br />
The programmable Low Suction Pressure Cutout is<br />
a secondary back-up for the flow switch and protects<br />
against operation with low refrigerant charge, which<br />
helps protect the chiller from an evaporator freeze-up,<br />
should the system attempt to run with a low refrigerant<br />
charge. The Status display fault message for this cutout<br />
is shown below:<br />
SYS X YYYYYYYY LOW SUCTION PRESSURE<br />
The X indicates the system and YYYYYYY indicates<br />
the system is in a “FAULT” condition and will restart<br />
when the 120 second anti-recycle timer times out or<br />
“LOCKOUT” and will not restart until the operator<br />
clears the fault using the keypad. Typically, the cutout<br />
will be set at 1.65 barg (24 PSIG) for chilled water applications.<br />
The cutout is ignored for the first 30 seconds of system<br />
run time. During the next 3 minutes of run time the<br />
cutout point is linearly ramped from 10% of the cutout<br />
value up to the programmed cutout point. If at any time<br />
during the first 3 minutes of operation the suction pressure<br />
falls below the ramped cutout point, the system<br />
will shut down with a controlled ramped shutdown.<br />
The cutout pressure during operating periods of 30 seconds<br />
to 210 seconds is ramped and can be calculated<br />
by:<br />
(Programmed Cutout x Run Time) -1.2 PSIG<br />
Cutout =<br />
200<br />
After the first 3 minutes and 30 seconds of run time, if<br />
the suction pressure falls below the cutout as a result<br />
of a transient in the system, a transient timer is set at<br />
30 seconds and a linearly ramped cutout is set start-<br />
JOHNSON CONTROLS
FORM 201.28-NM1.1<br />
ISSUE DATE: 8/29/2012<br />
ing at 10% of the programmed cutout. If over the next<br />
30 seconds, the suction pressure does not stay above<br />
the ramped cutout, which ramps between 10% of the<br />
cutout and the programmed cutout over the 30 second<br />
period, the system will fault on low suction pressure.<br />
Low Motor Current Cutout Fault<br />
The Motor Current Cutout shuts the system down with<br />
a controlled ramped shutdown when the microprocessor<br />
detects the absence of motor current (less than 10%<br />
FLA), usually indicating that a compressor is not running.<br />
This safety is ignored for the first 10 seconds of<br />
operation.<br />
The status display fault message for this safety is<br />
shown below:<br />
SYS X YYYYYYYY LOW MOTOR CURRENT<br />
The X indicates the system and YYYYYYY indicates<br />
the system is in a “FAULT” condition and will restart<br />
when the 120 second anti-recycle timer times out or<br />
“LOCKOUT” and will not restart until the operator<br />
clears the fault using the keypad.<br />
High Differential Oil Pressure Cutout Fault<br />
The High Differential Oil Pressure Cutout protects the<br />
compressor from low oil flow and insufficient lubrication,<br />
possibly from a dirty oil filter. A system will fault<br />
and shut down with a controlled ramped shutdown<br />
when its Discharge to Oil Differential Pressure rises<br />
above the cutout of 4.48 bard (65 PSID). This safety is<br />
ignored for the first 90 seconds of run time. This safety<br />
measures the pressure differential between discharge<br />
and oil pressure, which is the pressure drop across the<br />
oil filter. The Status display fault message for this safety<br />
is shown below:<br />
SYS X YYYYYYYY HIGH DIFF OIL PRESSURE<br />
The X indicates the system and YYYYYYY indicates<br />
the system is in a “FAULT” condition and will restart<br />
when the 120 second anti-recycle timer times out or<br />
“LOCKOUT” and will not restart until the operator<br />
clears the fault using the keypad.<br />
Low Differential Oil Pressure Cutout Fault<br />
The Low Differential Oil Pressure Cutout protects the<br />
compressor from low oil flow and insufficient lubrication.<br />
A system will fault and shut down with a controlled<br />
SECTION 7 - OPERATION<br />
ramped shutdown when it’s differential between oil<br />
and suction pressure falls below the cutout. This safety<br />
assures that the compressor is pumping sufficiently to<br />
push oil through the oil cooling circuit and through the<br />
internal compressor lubrication system. The Status display<br />
fault message for this safety is shown below:<br />
SYS X YYYYYYYY LOW DIFF OIL PRESSURE<br />
The X indicates the system and YYYYYYY indicates<br />
the system is in a “FAULT” condition and will restart<br />
when the 120 second anti-recycle timer times out or<br />
“LOCKOUT” and will not restart until the operator<br />
clears the fault using the keypad.<br />
The safety is ignored for the first 60 seconds of run<br />
time. After the first 60 seconds of operation, the cutout<br />
is linearly ramped from 0 bard to 2.09 bard (0 PSID to<br />
30 PSID) in 5 to 10 minutes based on ambient temperature.<br />
See the following table for the ramp times for the<br />
given ambient temperatures.<br />
TABLE 7 - LOW DIFFERENTIAL OIL PRESSURE<br />
CUTOUT<br />
AMBIENT TEMPERATURE<br />
RAMP<br />
TIME<br />
more than 10°C (50ºF) 5 Minutes<br />
more than 7.2°C (45ºF) 6 Minutes<br />
more than 4.4°C (40ºF) 7 Minutes<br />
more than 1.6°C (35ºF) 8 Minutes<br />
more than 1.1°C (30ºF) 9 Minutes<br />
more than or equal to 1.1°C (30ºF) 10 Minutes<br />
A 30 second safety bypass below 50 Hertz is employed<br />
during rampdown. The bypass is primarily needed<br />
under conditions where another compressor is being<br />
brought on and the running compressor is being<br />
ramped down to 5 Hertz to add the additional compressor<br />
due to load requirements. Under these conditions,<br />
the slow speed of the running compressor(s) causes the<br />
oil differential to become very low, especially if the<br />
water temperature is high and the suction pressure is<br />
high. The bypass assures the compressor(s) will not<br />
trip on a nuisance low oil differential fault.<br />
High Discharge Temperature Cutout Fault<br />
The High Discharge Temperature Cutout protects the<br />
motor and compressor from overheating. A system will<br />
fault and shut down with a controlled ramped shutdown<br />
when its Discharge Temperature rises above 121°C<br />
JOHNSON CONTROLS 91<br />
7
SECTION 7 - OPERATION<br />
(250°F). A system will also be inhibited from starting if<br />
the discharge temperature is above 93°C (200°F). The<br />
Status display fault message for this safety is shown<br />
below:<br />
92<br />
SYS X YYYYYYYY HIGH DISCHARGE TEMP<br />
The X indicates the system and YYYYYYY indicates<br />
the system is in a “FAULT” condition and will restart<br />
when the 120 second anti-recycle timer times out or<br />
“LOCKOUT” and will not restart until the operator<br />
clears the fault using the keypad.<br />
Low Discharge Superheat Cutout Fault<br />
The Low Discharge Superheat safety helps protect the<br />
compressor from liquid floodback through the economizer<br />
line due to a high flashtank level. It also helps<br />
protect the compressor from excessive oil in circulation<br />
due to excess oil charge in the system.Excessive<br />
oil in circulation brings back liquid refrigerant which<br />
is entrained in the oil. The liquid then drops out once it<br />
enters the compressor.<br />
The safety is ignored for the first 10 minutes of operation<br />
if the system economizer feed valve is closed<br />
(0%) and for 5 minutes of operation if the economizer<br />
feed valve is open greater than 0%. If the discharge superheat<br />
falls below 2.8°C (5.0°F) for 5 minutes under<br />
either condition, the system will shut down.<br />
The X indicates the system and YYYYYYY indicates<br />
the system is in a “FAULT” condition and will restart<br />
when the 120 second anti-recycle timer times out or<br />
“LOCKOUT” and will not restart until the operator<br />
clears the fault using the keypad.<br />
Sensor Failure Cutout Fault<br />
The Sensor Failure Cutout prevents the system from<br />
running when a critical sensor (transducer, level sensor,<br />
or motor winding temp sensor) is not functioning<br />
properly and reading out of range. This safety is<br />
checked at startup and will prevent the system from<br />
running if one of the sensors has failed.<br />
The sensor failure safety will also fault and shutdown<br />
a system while in operation, if a safety threshold is exceeded<br />
or a sensor reads out of range (high or low).<br />
Following is the Status display fault message.<br />
SYS X YYYYYYYY SENSOR FAILURE:<br />
ZZZZZZZZZZZZ<br />
FORM 201.28-NM1.1<br />
ISSUE DATE: 8/29/2012<br />
The X indicates the specific system.<br />
YYYYYYYY will either indicate the system<br />
is in a “FAULT” condition and will restart<br />
when the fault clears, or “LOCKOUT”<br />
after 3 faults and will not restart until the<br />
operator clears the fault using the keypad.<br />
ZZZZZZZZZZZ indicates the failed sensor below:<br />
• SUCT PRESS<br />
• OIL PRESS<br />
• DSCH PRESS<br />
• MOTOR TEMP X *<br />
* The Unit Setup Mode allows a specific motor temperature sensor<br />
to be ignored, if it fails.<br />
The start inhibit thresholds for each sensor are shown<br />
in the following table.<br />
TABLE 8 - START INHIBIT SENSOR THRESHOLDS<br />
SENSOR<br />
SUCTION<br />
TRANSDUCER<br />
OIL<br />
TRANSDUCER<br />
DISCHARGE<br />
TRANSDUCER<br />
MOTOR TEMP.<br />
SENSOR<br />
LOW<br />
THRESHOLD<br />
HIGH<br />
THRESHOLD<br />
0.3VDC 4.7VDC<br />
0.3VDC 4.7VDC<br />
0.3VDC 4.7VDC<br />
0°C (0ºF) 116°C (240ºF)<br />
High Motor Temperature Cutout Fault<br />
The High Motor Temperature Cutout prevents a compressor<br />
from running when its motor temperature is too<br />
high. A system will fault and shut down when any compressor<br />
motor temperature sensor rises above 121°C<br />
(250°F). The system will be inhibited from starting if<br />
its motor temperatures sensors indicate temperatures<br />
above 116°C (240°F). If any single temperature sensor<br />
is being ignored under the Unit Set-up Mode, that<br />
sensor will not be utilized when evaluating motor temperature.<br />
Below is a sample Status display fault message:<br />
SYS X YYYYYYYY HIGH MOTOR TEMP<br />
JOHNSON CONTROLS
FORM 201.28-NM1.1<br />
ISSUE DATE: 8/29/2012<br />
The X indicates the system and YYYYYYY indicates<br />
the system is in a “FAULT” condition and will restart<br />
when the fault clears or “LOCKOUT” and will not restart<br />
until the operator clears the fault using the keypad.<br />
System Control Voltage Cutout Fault<br />
The System Control Voltage Cutout alerts the operator<br />
the 115VAC Control voltage to one of the systems is<br />
missing. This could be due to a system fuse that has<br />
been removed or is blown. The affected system will<br />
fault and shut down immediately when the 115VAC<br />
supply is lost.<br />
The safety will “not” shut down a system if the UNIT<br />
switch is OFF, which electrically removes the 115VAC<br />
to “all” systems. The safety is only used to indicate a<br />
situation where a single system is missing the 115VAC.<br />
The safety will not cause a lockout and the system fault<br />
will reset when power is returned. A sample message<br />
is shown below:<br />
SYS X YYYYYYYY CONTROL VOLTAGE<br />
The X indicates the system and YYYYYYY indicates<br />
the system is in a “FAULT” condition and will restart<br />
when the fault clears or “LOCKOUT” and will not restart<br />
until the operator clears the fault using the keypad.<br />
Eductor Clog Fault<br />
To sense a loss of oil return to the compressor, an eductor<br />
clog detection safety is utilized. The safety monitors<br />
the temperature of the line between the eductor<br />
and the suction line.<br />
SECTION 7 - OPERATION<br />
The control algorithm looks at the eductor line temperature<br />
once a second. At start, a clog timer is set at 600<br />
seconds. If the eductor line temperature is less than the<br />
saturated suction temperature plus 5.5°C (10°F) each<br />
time the control circuit looks at the temperature, the<br />
clog timer is reset to 600 seconds.<br />
If the eductor line temperatures is greater than the saturated<br />
suction temperature plus 5.5°C (10°F), the clog<br />
timer is decremented one second. If the temperature<br />
remains above the saturated suction temperature plus<br />
5.5°C (10°F) for 600 seconds, the clog timer will count<br />
to “0” and the system will shut down and lock out. The<br />
status fault will indicate an eductor clog fault.<br />
EDUCTOR CLOG FAULT<br />
Whenever this fault occurs, the eductor filter should be<br />
changed.<br />
The clog timer resets to 600 seconds whenever the control<br />
algorithm sees the eductor line temperature is less<br />
than the saturated suction pressure plus 5.5°C (10°F).<br />
This prevents nuisance eductor clog faults.<br />
JOHNSON CONTROLS 93<br />
7
THIS PAGE INTENTIONALLY LEFT BLANK
FORM 201.28-NM1.1<br />
ISSUE DATE: 8/29/2012<br />
Status Key Operation<br />
STATUS KEY<br />
STATUS<br />
KEY<br />
The STATUS key displays the current chiller or system<br />
operational status. The messages displayed include<br />
running status, cooling demand, system faults,<br />
unit faults, VSD faults, unit warnings, external device<br />
status, load limiting, anti-recycle timer, status of unit/<br />
system switches, and a number of other messages.<br />
Pressing the STATUS key will enable the operator to<br />
view the current status of the chiller. The display will<br />
show one message relating to the “highest priority” information<br />
as determined by the microprocessor. There<br />
are three types of status data, which may appear on the<br />
display:<br />
• General Status messages<br />
• Unit Safeties<br />
• System Safeties.<br />
When power is first applied to the control panel, the<br />
following message displaying York International Corporation,<br />
the EPROM version, date, and time will be<br />
displayed for 2 seconds, followed by the appropriate<br />
general status message:<br />
(C)2004 YORK INTERNATIONAL CORPORATION<br />
C.XXX.XX.XX 18-SEPT-2010 12:45: AM<br />
SECTION 8 - MICROPANEL<br />
JOHNSON CONTROLS 95<br />
LD10605<br />
Unit status messages occupy 2 lines of the Status message<br />
display. If no unit status message applies, individual<br />
status messages for each system will be displayed.<br />
Any time the STATUS key is pressed or after the<br />
EPROM message disappears at power-up, a status display<br />
indicating chiller or system status will appear.<br />
Multiple STATUS messages may appear and can be<br />
viewed by pressing the STATUS key repeatedly to allow<br />
scrolling through as many as three STATUS messages,<br />
which could possibly be displayed at any time<br />
on a 2 compressor chiller.<br />
Examples of the typical Status messages are shown in<br />
the next topic<br />
General Status Messages<br />
UNIT STATUS<br />
MANUAL OVERRIDE<br />
This message indicates the chiller is operating in<br />
MANUAL OVERRIDE mode. This message is a priority<br />
message and cannot be overridden by any other<br />
STATUS message. When in Manual Override, no other<br />
status message will ever be present.<br />
8
SECTION 8 - MICROPANEL<br />
96<br />
UNIT STATUS<br />
UNIT SWITCH OFF SHUTDOWN<br />
This message indicates the UNIT SWITCH is in the<br />
OFF position and not allowing the unit to run.<br />
UNIT STATUS<br />
DAILY SCHEDULE SHUTDOWN<br />
This message indicates that either the daily or holiday<br />
schedule programmed is keeping the chiller from<br />
running.<br />
UNIT STATUS<br />
REMOTE CONTROLLED SHUTDOWN<br />
This message indicates that either an ISN or RCC has<br />
turned the chiller OFF and is not allowing it to run.<br />
UNIT STATUS<br />
FLOW SWITCH SHUTDOWN<br />
This message indicates the flow switch is not allowing<br />
the chiller to run. There is a 1 second delay on this safety<br />
to assure the flow switch did not momentarily open.<br />
UNIT STATUS<br />
VSD COOLING SHUTDOWN<br />
This message indicates the chiller is shutdown, but<br />
running all the condenser fans, VSD glycol pump, and<br />
VSD fan in an effort to bring the internal VSD ambient<br />
temperature down to an acceptable level before allowing<br />
the chiller to start.<br />
SYS X REMOTE RUN CONTACT IS OPEN<br />
This message indicates the remote start/stop contact between<br />
2 and 15 or 2 and 16 of the 1TB terminal block is<br />
open. There is a 1 second delay on this safety to assure<br />
the remote contacts did not momentarily open.<br />
SYS X SYSTEM SWITCH IS OFF<br />
This message indicates the system switch (software via<br />
keypad) is turned OFF. The system will not be allowed to<br />
run until the system switch is turned ON via the keypad.<br />
SYS X NOT RUNNING<br />
This message indicates the system is not running because<br />
the chilled liquid is below the setpoint or the<br />
micro has not loaded the lead system far enough into<br />
the loading sequence to bring the lag system ON. This<br />
FORM 201.28-NM1.1<br />
ISSUE DATE: 8/29/2012<br />
message will be displayed on the lag system until the<br />
loading sequence is ready for the lag system to start.<br />
SYS X COOLING DEMAND SHUTDOWN<br />
This message is only displayed in the Normal Shutdown<br />
History display to indicate a capacity control<br />
shutdown.<br />
SYS X COMPRESSOR RUNNING<br />
This message indicates the system is running as a result<br />
of cooling demand.<br />
SYS X SHUTTING DOWN<br />
The compressor shutting down message indicates the respective<br />
system is ramping down in speed prior to shutting<br />
OFF. This message is displayed after the software<br />
run signal is disabled until the VSD notifies the Chiller<br />
Control Board the compressor is no longer running.<br />
SYS X ANTI-RECYCLE TIMER = XXX SEC<br />
This message indicates the amount of time left on the<br />
respective system anti-recycle timer and the system is<br />
unable to start until the timer times out.<br />
SYS X DISCHARGE PRESSURE LIMITING<br />
The Discharge Pressure Limiting message indicates<br />
the discharge pressure load limit or discharge pressure<br />
unloading is in effect.<br />
SYS X SUCTION PRESSURE LIMITING<br />
The Suction Pressure Limiting message indicates the<br />
suction pressure load limit or suction pressure unloading<br />
is in effect.<br />
SYS X MOTOR TEMP LIMITING<br />
The Motor Temp Limiting message indicates the motor<br />
temp load limit or motor temp unloading is in effect.<br />
SYS X MOTOR CURRENT LIMITING<br />
The motor current limiting message indicates the motor<br />
current load limit or motor current unloading is in<br />
effect.<br />
JOHNSON CONTROLS
FORM 201.28-NM1.1<br />
ISSUE DATE: 8/29/2012<br />
SYS X PULLDOWN MOTOR CURRENT LIMITING<br />
The pulldown motor current limiting message indicates<br />
the pulldown motor current load limit or pulldown<br />
motor current unloading is in effect based on the programmed<br />
setpoint.<br />
SYS X ISN CURRENT LIMITING<br />
The ISN Current Limiting message indicates the motor<br />
current load limit or motor current unloading is in effect<br />
through the use of the YORKTalk setpoint.<br />
SYS X REMOTE MOTOR CURRENT LIMITING<br />
The Remote Motor Current Limiting message indicates<br />
the motor current load limit or motor current unloading<br />
is in effect through the use of the remote setpoint offset.The<br />
setpoint may be offset using a remote voltage<br />
or a current signal. The remote current limit must be<br />
activated for this function to operate.<br />
SYS X VSD BASEPLATE TEMP LIMITING<br />
The VSD Baseplate Temp Limiting message indicates<br />
the VSD Baseplate temp is high and load limit or unloading<br />
is in effect.<br />
SECTION 8 - MICROPANEL<br />
SYS X VSD INTERNAL AMBIENT TEMP LIMITING<br />
The VSD Internal Ambient Temp Limiting message indicates<br />
the VSD internal ambient temp is high and load<br />
limit or unloading is in effect.<br />
SYS X SOUND LIMITING<br />
The sound limiting message indicates the sound load<br />
limit is in effect based on the locally programmed<br />
sound limit from the keypad. The sound limit must be<br />
activated for this function to operate.<br />
SYS X ISN SOUND LIMITING<br />
The ISN sound limiting message indicates the sound<br />
load limit is in effect based on the ISN transmitted<br />
sound limit setpoint. The sound limit must be activated<br />
for this function to operate.<br />
SYS X REMOTE SOUND LIMITING<br />
The Remote sound limiting message indicates the<br />
sound load limit is in effect based on the Remote controlled<br />
sound limit setpoint. The setpoint may be offset<br />
using a remote voltage or current signal. The sound<br />
limit option must be activated for this function to operate.<br />
JOHNSON CONTROLS 97<br />
8
SECTION 8 - MICROPANEL<br />
General<br />
98<br />
UNIT DATA KEY<br />
UNIT DATA<br />
KEY<br />
The UNIT DATA key provides the user with displays<br />
of unit temperatures, and unit related data. Displays<br />
can be selected by repeatedly pressing the UNIT DATA<br />
key or the▲ or ▼ Arrow Keys.<br />
Unit Data Key Operation<br />
The first key press displays Evaporator Leaving and<br />
Return Chilled <strong>Liquid</strong> Temperatures.<br />
UNIT CHILLED LIQUID LEAVING = XXX.X °F<br />
ENTERING = XXX.X °F<br />
The next key press of the UNIT DATA key or the ▼<br />
(ARROW) key displays the ambient air temperature.<br />
UNIT<br />
OUTSIDE AMBIENT AIR TEMP = XXX.X °F<br />
The next key press will display the time remaining on<br />
the load and unload timers.<br />
UNIT LOAD TIMER = XXX SEC<br />
UNLOAD TIMER = XXX SEC<br />
The next key press displays the error in temperature<br />
between the actual leaving chilled liquid temperature<br />
and the setpoint temperature. The display also shows<br />
the rate of change of the chilled liquid temperature.<br />
LD10605<br />
UNIT TEMP ERROR = XXX.X °F<br />
RATE = XXX.X °F/M<br />
FORM 201.28-NM1.1<br />
ISSUE DATE: 8/29/2012<br />
The next key press displays the system designated as the<br />
lead system and the Flow Switch status (ON or OFF).<br />
UNIT LEAD SYSTEM NUMBER = X<br />
FLOW SWITCH = XXX<br />
The next key press displays the status of the evaporator<br />
pump and heater, where XXX is either ON or OFF.<br />
UNIT EVAP PUMP RUN = XXX<br />
EVAP HEATER = XXX<br />
The next key press displays the status of Active Remote<br />
Control.<br />
UNIT ACTIVE REMOTE CONTR0L = XXXXXX<br />
TYPE: RCC ISN CURR TEMP SOUND<br />
XXXXX is either ACTIVE or NONE.<br />
If no remote keys are active, the items on the second<br />
line are all blanked out. Any remote items that are active<br />
will be displayed, while the inactive items will be<br />
blanked out.<br />
JOHNSON CONTROLS
FORM 201.28-NM1.1<br />
ISSUE DATE: 8/29/2012<br />
The types of remote control are listed as follows:<br />
• NONE - No remote control is actively controlling<br />
the chiller; however, remote monitoring by a remote<br />
device may still be active.<br />
• RCC - A Remote Control Center is providing remote<br />
control. The chiller is in remote mode.<br />
• ISN - YorkTalk via ISN. The chiller in remote<br />
mode.<br />
• CURR - Remote Current Limiting is enabled.<br />
• TEMP - Remote Temperature Reset is enabled.<br />
• SOUND - Remote Sound Limiting is enabled.<br />
SECTION 8 - MICROPANEL<br />
The next key press displays the sound limit values as set<br />
under the PROGRAM key by the Local, ISN, and the<br />
Remote Sound Limit Inputs. Any sound limits that are<br />
inactive will display XXX instead of a numeric value.<br />
UNIT SOUND LIMIT LOCAL = XXX %<br />
ISN = XXX REMOTE = XXX %<br />
JOHNSON CONTROLS 99<br />
8
SECTION 8 - MICROPANEL<br />
General<br />
100<br />
SYSTEM 1<br />
DATA KEY<br />
SYSTEM 2<br />
DATA KEY<br />
SYSTEM 3<br />
DATA KEY<br />
SYSTEM 4<br />
DATA KEY<br />
The data keys provide the user with many displays of<br />
individual system temperatures, pressures, and other<br />
operating data. These keys have multiple displays,<br />
which can be seen by repeatedly pressing the SYSTEM<br />
DATA or the ▲ or ▼ (Arrow) keys. An explanation of<br />
each key and its messages is provided below.<br />
System 1 Data Key Operation<br />
The SYSTEM 1 DATA key provides the user with access<br />
to System 1 operating parameters. The following<br />
is a list of the data in the order in which it appears.<br />
The first key press of the SYSTEM X DATA key displays<br />
all of the measured system pressures (oil and discharge).<br />
SYS 1 PRESSURES OIL = XXXX PSIG<br />
DISCHARGE = XXXX PSIG<br />
The second key press of the SYSTEM DATA key or<br />
the ▼ (DOWN ARROW) key displays system suction<br />
and condenser liquid pressure.<br />
SYS 1 PRESSURES SUCTION = XXXX PSIG<br />
CONDENSER LIQUID = XXXX PSIG<br />
SYSTEM DATA KEYS 1 THROUGH 4<br />
FORM 201.28-NM1.1<br />
ISSUE DATE: 8/29/2012<br />
LD10605<br />
The next key press displays system oil and eductor<br />
temperatures.<br />
SYS 1 TEMPERATURES OIL = XXX.X °F<br />
EDUCTOR = XXX.X °F<br />
The next key press displays system condenser liquid<br />
temperature, liquid line subcooling and saturated discharge<br />
temperature on the liquid line.<br />
SYS 1 CONDENSER LIQUID TEMP = XXX.X °F<br />
SUBCOOLING = XXX.X SAT TEMP = XXX.X °F<br />
The next key press displays discharge temperature,<br />
discharge superheat and saturated discharge pressure<br />
at the compressor.<br />
SYS 1 DISCHARGE TEMP = XXX.X °F<br />
SUPERHEAT = XXX.X SAT TEMP = XXX.X °F<br />
The next key press displays the System 1 motor thermistor<br />
temperatures.<br />
SYS 1 MOTOR TEMPS T1 = XXX.X °F<br />
T2 = XXX.X °F T3 = XXX.X °F<br />
If any motor temp sensor is being ignored,<br />
(selectable under Unit Set-up Mode), that<br />
sensor’s value will be displayed as<br />
XXXXX.<br />
JOHNSON CONTROLS
FORM 201.28-NM1.1<br />
ISSUE DATE: 8/29/2012<br />
The next key press displays the compressor speed in<br />
% (0 to100%) and the compressor heater status (ON<br />
or OFF)<br />
SYS 1 COMPRESSOR SPEED = XXX.X %<br />
HEATER = XXX<br />
The next key press indicates the flash tank level low/<br />
high and the economizer valve % open.<br />
SYS 1 FLASH TANK LEVEL = XXX.X %<br />
ECONOMIZER VALVE = XXX.X %<br />
The next key press displays the condenser liquid line<br />
subcooling and the drain valve position.<br />
SYS 1 CONDENSER SUBCOOLING = XXX.X °F<br />
CONDENSER DRAIN VALVE = XXX.X %<br />
The next key press indicates the number of condenser<br />
fans steps that are enabled (1 to 4), if the fans are not<br />
operating on a VSD.<br />
SYS 1 CONDENSER FANS ON = X<br />
If the fans are controlled by an optional VSD, the display<br />
will indicate fan speed signal control voltage to<br />
the VSD and the fan speed (0 to 100%).<br />
SYS 1 CONDENSER FANS ON = X<br />
VSD FAN SPEED = XX.X V = XXX %<br />
SECTION 8 - MICROPANEL<br />
The next key press will indicate the state of the optional<br />
VI solenoids where XXX indicates ON or OFF.<br />
SYS 1 VI STEP SOLENOID 1 = XXX<br />
VI STEP SOLENOID 2 = XXX<br />
The next key press displays the system run time in<br />
days, hours, minutes and seconds.<br />
SYS 1 RUN TIME<br />
XX DAYS XX HOURS XX MINUTES XX SECONDS<br />
The next key press indicates the status of the RUN Relay<br />
where XXX is ON or OFF, the status of the RUN<br />
Permissive signal (flow switch/remote start/stop circuit<br />
2 and 15 of 1TB, SYS 1) or 2 and 16 of 1TB, SYS 2)<br />
and whether the internal software is telling the system<br />
to run (ON or OFF)<br />
SYS 1 RUN SIGNALS RELAY = XXX<br />
RUN PERM = XXX SOFTWARE = XXX<br />
System 2 Data Key Operation<br />
System 2 keys function the same as the SYSTEM 1<br />
DATA key except that it displays data for System 2.<br />
On a 2 compressor system, the SYSTEM 3 and SYS-<br />
TEM 4 data keys will display the following messages:<br />
SYS 3 DATA NOT AVAILABLE<br />
SYS 4 DATA NOT AVAILABLE<br />
JOHNSON CONTROLS 101<br />
8
SECTION 8 - MICROPANEL<br />
Sensor Displays<br />
Table 9 lists all the sensors attached to the control<br />
board associated with system data keys. The minimum<br />
and maximum values displayed on the micro display<br />
are provided.<br />
TABLE 9 - SENSOR MIN/MAX OUTPUTS<br />
102<br />
SYSTEM SENSOR<br />
FORM 201.28-NM1.1<br />
ISSUE DATE: 8/29/2012<br />
SENSOR / INPUT TYPE MINIMUM VALUE MAXIMUM VALUE<br />
Suction Pressure Transducer 0.0 PSIG (0 barg) 125.0 PSIG (8.62 barg)<br />
Condenser <strong>Liquid</strong> Pressure Transducer 0.0 PSIG (0 barg) 400.0 PSIG (27.6 barg)<br />
Discharge Pressure Transducer 0.0 PSIG (0 barg) 400.0 PSIG (27.6 barg)<br />
Oil Pressure Transducer 0.0 PSIG (0 barg) 400.0 PSIG (27.6 barg)<br />
Flash Tank Level Switch Low High<br />
Condenser <strong>Liquid</strong> Temp Thermistor -4.1 °F (-20.06 °C) 155.6 °F (68.67°C)<br />
Leaving Chilled <strong>Liquid</strong> Temp Thermistor -19.1 °F (-28.49°C) 110.2 °F (43.44°C)<br />
Return Chilled <strong>Liquid</strong> Temp Thermistor -19.1 °F (-28.49°C) 110.2° F (43.44°C)<br />
Eductor Temp Thermistor -4.1° F (-20.06°C) 132.8 °F (56.00°C)<br />
Ambient <strong>Air</strong> Temp Thermistor -4.6 °F (-20.33°C) 137.9° F (58.83°C)<br />
Compressor Motor Temp Thermistor -30.2 °F (-34.56°C) 302.0° F (150.00°C)<br />
Discharge Temp Thermistor 40.3 °F (4.61°C) 302.6 °F (150.33°C)<br />
Remote Temp Reset<br />
Remote Current Limit<br />
Remote Sound Limit<br />
4 to 20ma, 0 to 10VDC,<br />
0 to 20ma or 2 to 10VDC<br />
4 to 20ma, 0 to 10VDC,<br />
0 to 20ma or 2 to 10VDC<br />
4 to 20ma, 0 to 10VDC,<br />
0 to 20ma or 2 to 10VDC<br />
If values exceed the limits in the table, a < (less than)<br />
or > (more than) sign will be display along with the<br />
minimum or maximum value.<br />
0% 100%<br />
0% 100%<br />
0% 100%<br />
JOHNSON CONTROLS
FORM 201.28-NM1.1<br />
ISSUE DATE: 8/29/2012<br />
General<br />
VSD<br />
DATA KEY<br />
The VSD DATA key provides the user with displays of<br />
VSD temperatures, voltages, currents, and other operating<br />
data. This key has multiple displays, which can<br />
be seen by repeatedly pressing the VSD DATA or the<br />
▲ or ▼ (Arrow) keys. An explanation of each message<br />
is provided below.<br />
VSD Data Key Operation<br />
The first VSD DATA key press displays the actual VSD<br />
Output Frequency and Command Frequency.<br />
VSD FREQUENCY ACTUAL = XXX.X HZ<br />
COMMAND = XXX.X HZ<br />
The second key press of the VSD DATA key or the ▼<br />
(ARROW) key displays the calculated compressor %<br />
FLA and measured motor currents in amps for systems<br />
1 and 2. When measuring motor current keep in mind<br />
that measuring inverter PWM current is difficult and<br />
meter error can be significant.<br />
VSD COMP 1 = XXX AMPS = XXX %FLA<br />
COMP 2 = XXX AMPS = XXX %FLA<br />
The next key press displays the current limit values<br />
set locally on the panel under the PROGRAM key, remotely<br />
by an ISN, and remotely by the Current Limit<br />
input. Any current limits that are inactive will display<br />
“XXX” instead of a numeric value.<br />
VSD CURRENT LIMIT LOCAL = XXX %FLA<br />
ISN = XXX REMOTE = XXX %FLA<br />
VSD DATA KEY<br />
SECTION 8 - MICROPANEL<br />
JOHNSON CONTROLS 103<br />
LD10605<br />
The next key press displays DC Bus voltage.<br />
VSD DC BUS VOLTAGE = XXX VDC<br />
The next key press displays the Control Panel/VSD Internal<br />
Ambient Temperature and VSD Cooling Pump/<br />
Fan Status. YYY will indicate ON or OFF.<br />
VSD INTERNAL AMBIENT TEMP = XXX.X °F<br />
COOLING SYSTEM STATUS = YYY<br />
The next key press displays the IGBT highest baseplate<br />
temperature.<br />
VSD IGBT BASEPLATE TEMPS T1 = XXX °F<br />
T2 = XXX °F<br />
The next key press displays the state of the Precharge<br />
signal, where XXX is either ON or OFF.<br />
VSD PRECHARGE SIGNAL = XXX<br />
The next key press displays the setting of the VSD’s<br />
105% FLA overload potentiometer for Compressor #1<br />
and 2. The settings are determined by the adjustment of<br />
the overload potentiometers on the VSD Logic Board.<br />
These pots are factory set and should not require changing<br />
unless the circuit board is replaced.<br />
VSD COMP 1 MOTOR OVERLOAD = XXX AMPS<br />
COMP 2 MOTOR OVERLOAD = XXX AMPS<br />
8
SECTION 8 - MICROPANEL<br />
OPERATING HOURS/<br />
START COUNTER<br />
KEY<br />
104<br />
OPERATING HOURS / START COUNTER KEY<br />
Compressor operating hours and compressor starts are<br />
displayed with a single key press. The maximum value<br />
for both hours and starts is 99,999, at which point they<br />
will roll over to 0. A single display is available under<br />
this key and is displayed below.<br />
HOURS 1=XXXXX, 2=XXXXX<br />
START 1=XXXXX, 2=XXXXX<br />
`<br />
LD10605<br />
FORM 201.28-NM1.1<br />
ISSUE DATE: 8/29/2012<br />
JOHNSON CONTROLS
FORM 201.28-NM1.1<br />
ISSUE DATE: 8/29/2012<br />
HISTORY<br />
KEY<br />
History Key Operation<br />
The HISTORY key provides the user access to many<br />
unit and system operating parameters captured at the<br />
instant a unit or system safety (fault) shutdown occurs.<br />
The history buffer will also capture system data at the<br />
time of normal shutdowns such as cycling shutdowns.<br />
When the HISTORY key is pressed the following<br />
screen is displayed:<br />
HISTORY CHOOSE HISTORY TYPE<br />
◄ ► XXXXXXXXXXXXXXXXXXXXXXXXXXXX<br />
The ◄ and ► (ARROW) keys allow choosing between<br />
NORMAL SHUTDOWNS and FAULT SHUT-<br />
DOWNS. “Fault” shutdowns provide information on<br />
safety shutdowns, while “Normal” shutdowns provide<br />
chiller cycling information on temperature (demand),<br />
cycling, remote, system switch, etc., shutdowns that<br />
are non-safety related shutdowns. Once the selection<br />
is made, the � (ENTER) key must be pressed to enter<br />
the selection.<br />
Normal Shutdowns History<br />
If the NORMAL SHUTDOWNS History is selected,<br />
the following screen will be displayed:<br />
NORM HIST XX 18-JUN-20004 10:34:58 AM<br />
YYYYYYYYYYYYYYYYYYYYYYYYYYYYYYYYYYYYY<br />
HISTORY KEY<br />
SECTION 8 - MICROPANEL<br />
JOHNSON CONTROLS 105<br />
LD10605<br />
XX is the normal shutdown number. The display will<br />
provide date and time of the shutdown and the reason<br />
for the cycling shutdown (YYY….).<br />
The operator can view any of the stored 20 single display<br />
normal shutdown history buffers. History buffer<br />
number 1 provides the most recent shutdown information<br />
and buffer number 20 is the oldest safety shutdown<br />
information saved. The ◄ and ► (ARROW) keys allow<br />
scrolling between each of the history buffers. The ►<br />
(ARROW) key scrolls to the next normal history shutdown<br />
and the ◄ (ARROW) key scrolls to the previous<br />
normal history shutdown.<br />
The following display will typically be displayed on a<br />
normal shutdown due to shutdown on lack of cooling<br />
demand.<br />
NORM HIST XX 18-JUN-20004 10:34:58 AM<br />
SYS X COOLING DEMAND SHUTDOWN<br />
Fault Shutdowns History<br />
If the FAULT SHUTDOWNS History is selected, the<br />
following screen will be displayed:<br />
FAULT HIST XX 18-JUN-20004 10:34:58 AM<br />
YYYYYYYYYYYYYYYYYYYYYYYYYYYYYYYYYYYYY<br />
8
SECTION 8 - MICROPANEL<br />
XX is the FAULT HISTORY shutdown number. The<br />
display will provide the date, time, and a description of<br />
the specific type of fault that occurred (YYY….).<br />
The operator can view any of the stored 10 fault history<br />
buffers. History buffer number 1 provides the most recent<br />
safety shutdown information and buffer number<br />
10 is the oldest safety shutdown information saved.<br />
The ◄ and ► arrow keys allow scrolling between<br />
each of the FAULT HIST buffers 1 through 10. The ▲<br />
(UP) and ▼ (DOWN) arrow keys can be used to scroll<br />
forwards and backwards through the data in a specific<br />
history buffer, once it is displayed.<br />
There is a large amount of data provided under each<br />
history. Rather than scroll sequentially through the data<br />
in a history, which is possible using the ▼ arrow key,<br />
the use of a combination of the ◄, ►, ▲‚ and ▼ arrow<br />
keys allows fast scrolling to specific data the user<br />
desires to view. To use this feature, the user needs to<br />
be aware the ◄ and ► arrow keys allow scrolling to<br />
the top of the data subgroups. Once a specific history<br />
is selected, the history data is divided under the subgroups<br />
of Unit Data, VSD Data, System Data, Hours/<br />
Starts, Setpoints, Options, and Program data. The ◄<br />
and ► arrow keys allow moving to the first display<br />
under the next or previous subgroup at any time. Once<br />
the first display of a subgroup is displayed, the ▲‚ and<br />
▼ arrow keys allow scrolling though the data in the<br />
subgroup. The ▼ arrow key allows scrolling though<br />
the data from first to last. When the last piece of data<br />
is displayed, the next press of the ▼ arrow key scrolls<br />
to the first piece of data in the next subgroup. The ▲<br />
arrow key allows going to the previous display.<br />
Listed below is a description of the fault data displays<br />
and their meaning. Data will be displayed in a specific<br />
order starting with the Status Display (System Faults<br />
only), Fault Display, All Fault Display, Unit Data, VSD<br />
Data, System Data, Operating Hours/Starts, Setpoints,<br />
Options, and Program Values at the time of the fault.<br />
Status Fault Type<br />
SYS X COMPRESSOR RUNNING<br />
SYS X YYYYYYYY HIGH DIFF OIL PRESSURE<br />
This message indicates the type of system fault. This<br />
screen is skipped if a UNIT Fault caused the shutdown.<br />
106<br />
Unit Fault Type<br />
UNIT FAULT<br />
LOW AMBIENT TEMP<br />
FORM 201.28-NM1.1<br />
ISSUE DATE: 8/29/2012<br />
This message indicates the type of unit fault. This<br />
screen is skipped if a SYSTEM Fault caused the shutdown.<br />
All Fault Data<br />
FAULT HIST XX ALL FAULTS ZZ OF WW<br />
YYYYYYYYYYYYYYYYYYYYYYYYYYYYYYYYYYYYY<br />
The ALL FAULT display indicates whether a fault occurred<br />
while the unit is shutting down on another fault.<br />
If a control panel fault occurred while the unit is shutting<br />
down on a VSD fault before it is reset, the control<br />
panel fault is an ALL FAULT of the VSD fault.<br />
If another VSD fault occurs while the unit is shutting<br />
down on a VSD fault, the next VSD fault will be registered<br />
as an ALL FAULT of the VSD fault.<br />
If a VSD fault occurs during the ramp down shutdown<br />
of a control panel fault, the VSD fault is registered as a<br />
new fault, not an ALL FAULT<br />
XX is the history number, YYY is the ALL FAULT<br />
description, ZZ is the ALL FAULT number and WW<br />
is the total number of All Faults for the current history.<br />
Sometimes, multiple faults may occur during the<br />
shutdown and multiple displays will be observed when<br />
scrolling through the data using the ▼ arrow. In most<br />
cases, the ALL FAULT display will indicate NONE.<br />
The ALL FAULT display will only indicate the cause<br />
of the fault. No additional chiller information will be<br />
displayed under the ALL FAULT, since a snapshot of<br />
all chiller data was taken at the time of the first fault.<br />
Unit Data<br />
Evaporator Leaving and Entering Chilled<br />
<strong>Liquid</strong> Temperatures<br />
UNIT CHILLED LIQUID LEAVING = XXX.X °F<br />
ENTERING = XXX.X °F<br />
This message indicates the leaving and entering chilled<br />
liquid temperatures at the time of the fault.<br />
JOHNSON CONTROLS
FORM 201.28-NM1.1<br />
ISSUE DATE: 8/29/2012<br />
Ambient <strong>Air</strong> Temperature<br />
UNIT<br />
OUTSIDE AMBIENT AIR TEMP = XXX.X °F<br />
This message indicates the ambient air temperature at<br />
the time of the fault.<br />
Load / Unload Timers<br />
UNIT LOAD TIMER = XXX SEC<br />
UNLOAD TIMER = XXX SEC<br />
This message indicates remaining time on the load and<br />
unload timers at the time of the fault.<br />
Chilled <strong>Liquid</strong> Temperature Error and Rate of<br />
Change<br />
UNIT TEMP ERROR = XXX.X °F<br />
RATE = XXX.X °F/M<br />
This message indicates the temperature error between<br />
the actual and the programmed setpoint at the time of<br />
the fault and the rate of temperature change.<br />
Programmed Lead System Selection and<br />
Flow Switch Status<br />
UNIT LEAD SYSTEM NUMBER = X<br />
FLOW SWITCH = XXX<br />
This message indicates the designated lead system at<br />
the time of the fault and whether the flow switch was<br />
ON (Closed) or OFF (Open) at the time of the fault.<br />
Evaporator Pump and Evaporator Heater<br />
Status<br />
UNIT EVAP PUMP RUN = XXX<br />
EVAP HEATER = XXX<br />
This message indicates the status of the evaporator<br />
pump and the evaporator heater at the time of the fault.<br />
XXX indicates ON or OFF.<br />
Active Remote Control Status<br />
UNIT ACTIVE REMOTE CONTR0L = XXXXXX<br />
This message indicates whether the system was operating<br />
under Active Remote Control (RCC, ISN, LOAD,<br />
TEMP, or SOUND) or standard control (NONE) at the<br />
time of the fault.<br />
SECTION 8 - MICROPANEL<br />
UNIT SOUND LIMIT LOCAL = XXX %<br />
ISN = XXX REMOTE = XXX %<br />
This message indicates that sound limiting was in effect,<br />
the amount, and whether it was local or remotely<br />
limited.<br />
VSD Data<br />
VSD Actual and Command Frequency<br />
VSD FREQUENCY ACTUAL = XXX.X HZ<br />
COMMAND = XXX.X HZ<br />
This message indicates the VSD actual operating frequency<br />
and the command frequency at the time of the<br />
fault. Actual and command may not match due to load/<br />
unload timers, limitation of 1 Hz per load/unload increment,<br />
and to allowable acceleration/deceleration of the<br />
motor.<br />
Compressor Amps and %FLA<br />
The message indicates the compressor %FLA and motor<br />
currents for systems 1 and 2 at the time of the fault.<br />
COMP 1 = XXX AMPS = XXX %FLA<br />
COMP 2 = XXX AMPS = XXX %FLA<br />
VSD Current Limit<br />
VSD CURRENT LIMIT LOCAL = XXX %FLA<br />
ISN = XXX REMOTE = XXX %FLA<br />
This message displays the current limit values as set<br />
locally, by an ISN, or a remote current limiting input at<br />
the time of the fault.<br />
DC BUS Voltage<br />
VSD DC BUS VOLTAGE = XXX VDC<br />
This message displays the DC Bus voltage at the time<br />
of the fault.<br />
VSD Internal Ambient Temp<br />
VSD INTERNAL AMBIENT TEMP = XXX.X °F<br />
COOLING SYSTEM STATUS = YYY<br />
This message displays the VSD/Microprocessor internal<br />
ambient cabinet temperature and the cooling system<br />
status (ON or OFF) at the time of the fault.<br />
JOHNSON CONTROLS 107<br />
8
SECTION 8 - MICROPANEL<br />
IGBT Baseplate Temperature<br />
VSD IGBT BASEPLATE TEMPS T1 = XXX °F<br />
T2 = XXX °F<br />
This message displays the IGBT highest baseplate<br />
temperature for 2 and 3 compressor units at the time of<br />
the fault. 4 compressor units display temperatures for<br />
1/3 (T1) and 2/4 (T2).<br />
Precharge Signal Status and VSD Cooling<br />
Status<br />
VSD PRECHARGE SIGNAL = XXX<br />
This display provides the state of the precharge signal,<br />
where XXX is either ON or OFF at the time of the<br />
fault.<br />
Compressor #1 and #2, 105% FLA Motor<br />
Overload Current Setting<br />
VSD COMP 1 MOTOR OVERLOAD = XXX AMPS<br />
COMP 2 MOTOR OVERLOAD = XXX AMPS<br />
This message displays the setting of the VSD’s 100%<br />
FLA potentiometer for Compressor #1 and #2 at the<br />
time of the fault.<br />
System Data<br />
System #1 Pressures<br />
SYS 1 PRESSURES OIL = XXXX PSIG<br />
DISCHARGE = XXXX PSIG<br />
This message displays the measured system oil and<br />
discharge pressures at the time of the fault.<br />
SYS 1 PRESSURES SUCTION = XXXX PSIG<br />
CONDENSER LIQUID = XXXX PSIG<br />
This message displays the measured system suction<br />
and condenser liquid line pressure at the time of the<br />
fault.<br />
System # 1 Temperatures<br />
SYS 1 TEMPERATURES OIL = XXX.X °F<br />
EDUCTOR = XXX.X °F<br />
This message displays the measured system oil and<br />
eductor temperatures at the time of the fault.<br />
108<br />
FORM 201.28-NM1.1<br />
ISSUE DATE: 8/29/2012<br />
SYS 1 CONDENSER LIQUID TEMP = XXX.X °F<br />
SUBCOOLING = XXX.X SAT TEMP = XXX.X °F<br />
This message displays the condenser liquid, liquid line<br />
subcooling and saturated discharge temperatures at the<br />
time of the fault.<br />
SYS 1 DISCHARGE TEMP = XXX.X °F<br />
SUPERHEAT = XXX.X SAT TEMP = XXX.X °F<br />
This message displays the system discharge, discharge<br />
superheat and saturated discharge temperatures at the<br />
time of the fault.<br />
Compressor Speed and Heater Status<br />
SYS 1 COMPRESSOR SPEED = XXX.X %<br />
HEATER = XXX.X °F<br />
This message indicates the compressor speed in % and<br />
the heater status at the time of the fault.<br />
System #1 Motor Temperatures<br />
SYS 1 MOTOR TEMPS T1 = XXX.X °F<br />
T2 = XXX.X T3 = XXX.X °F<br />
This message displays the System 1 motor thermistor<br />
temperatures at the time of the fault.<br />
Flash Tank Level and Economizer Position<br />
SYS 1 FLASH TANK LEVEL Y 512 ADC<br />
ECONOMIZER VALVE = XXX.X %<br />
This message displays the flash tank level and the<br />
economizer valve position in % at the time of the fault.<br />
Condenser Subcooling and Condenser Drain<br />
Valve Position<br />
SYS 1 CONDENSER SUBCOOLING = XXX.X °F<br />
CONDENSER DRAIN VALVE = XXX.X %<br />
This message displays the condenser subcooling and<br />
the Condenser Drain Valve position at the time of the<br />
fault.<br />
JOHNSON CONTROLS
FORM 201.28-NM1.1<br />
ISSUE DATE: 8/29/2012<br />
Condenser Fans<br />
SYS 1 CONDENSER FANS ON = X<br />
SYS 1 CONDENSER FANS ON = X<br />
VSD FAN SPEED XX.X V = XXX %<br />
This message displays the number of condenser fans<br />
ON or the optional VSD fan control speed signal to the<br />
inverter and the % of full speed.<br />
VI Step Solenoid<br />
SYS 1 VI STEP SOLENOID 1 = XXX<br />
VI STEP SOLENOID 2 = XXX<br />
This message displays whether the VI solenoids were<br />
ON or OFF at the time of the fault.<br />
Compressor #1 Run Time<br />
SYS 1 RUN TIME<br />
XX DAYS XX HOURS XX MINUTES XX SECONDS<br />
This message displays the system run time since the<br />
last start in days, hours, minutes, and seconds at the<br />
time of the fault.<br />
System #1 Run Signals<br />
SYS 1 RUN SIGNALS RELAY = XXX<br />
RUN PERM = XXX SOFTWARE = XXX<br />
This message displays the System Run Signal Relay<br />
(Relay Output Board) status, Run Permissive Input<br />
status, and the Internal Software (microprocessor command)<br />
ON/OFF Start status. The status of each will indicate<br />
either ON or OFF.<br />
System 2 Data<br />
Data for the system 2 at the time of the fault is displayed<br />
in the same sequence as the system #1 data.<br />
Compressor Operating Hours and Starts<br />
HOURS 1=XXXXX, 2=XXXXX<br />
START 1=XXXXX, 2=XXXXX<br />
This message displays compressor operating hours and<br />
compressor starts at the time of the fault.<br />
Chilled <strong>Liquid</strong> Setpoint Cooling Setpoints<br />
SETPOINTS<br />
LOCAL COOLING SETPOINT = XXX.X °F<br />
This message displays the programmed cooling<br />
setpoint at the time of the fault.<br />
SECTION 8 - MICROPANEL<br />
SETPOINTS<br />
LOCAL CONTROL RANGE = +/- X.X °F<br />
This message displays the programmed Control Range<br />
at the time of the fault.<br />
Remote Setpoint and Range<br />
SETPOINTS REMOTE SETPOINT = XXX.X °F<br />
REMOTE CONTROL RANGE = +/- X.X °F<br />
This message displays the remote setpoint and Control<br />
Range at the time of the fault.<br />
Maximum Remote Temperature Setpoint<br />
SETPOINTS<br />
MAXIMUM REMOTE TEMP RESET = XXX.X °F<br />
This message displays the maximum remote reset programmed<br />
at the time of the fault.<br />
Options<br />
Display Language<br />
OPTIONS DISPLAY LANGUAGE<br />
◄ ► XXXXXXXXXXXXXXXXXXXX<br />
This message displays the language selected at the time<br />
of the fault.<br />
Chilled <strong>Liquid</strong> Cooling Mode<br />
OPTIONS CHILLED LIQUID COOLING MODE<br />
◄ ► WATER COOLING<br />
This message displays the chilled liquid temperature<br />
mode (water or glycol) selected at the time of the fault.<br />
Local / Remote Control Mode<br />
OPTIONS CHILLED LIQUID COOLING MODE<br />
◄ ► GLYCOL COOLING<br />
This message indicates whether Local or Remote Control<br />
Mode was selected at the time of the fault.<br />
OPTIONS LOCAL / REMOTE CONTROL MODE<br />
◄ ► XXXXXXXXXXXXXXXXXXXXX<br />
When Remote Control Mode is selected, control of the<br />
Chilled <strong>Liquid</strong> Setpoint is from a remote device such<br />
as an ISN/BAS controller.<br />
JOHNSON CONTROLS 109<br />
8
SECTION 8 - MICROPANEL<br />
Display Units Mode<br />
OPTIONS DISPLAY UNITS<br />
◄ ► XXXXXXXXXXXXXXXXXXXX<br />
This message indicates whether SI (°C, barg) or Imperial<br />
units (°F, PSIG) was selected at the time of the<br />
fault.<br />
System Lead/Lag Control Mode<br />
OPTIONS LEAD / LAG CONTROL MODE<br />
◄ ► XXXXXXXXXXXXXXXXXXXXX<br />
This message indicates the type of lead lag control selected<br />
at the time of the fault. Three choices are available:<br />
110<br />
• Automatic<br />
• Sys 1 Lead<br />
• Sys 2 Lead<br />
The default mode will be AUTOMATIC.<br />
Remote Temperature Reset<br />
OPTIONS REMOTE TEMP RESET INPUT<br />
◄ ► XXXXXXXX<br />
This message indicates whether temperature reset was<br />
active or disabled at the chiller keypad at the time of<br />
the fault and if active, the type of reset signal selected.<br />
If the option is not factory enabled, the option will not<br />
appear.<br />
Remote Current Reset<br />
OPTIONS REMOTE CURRENT LIMIT INPUT<br />
◄ ► XXXXXXXXXXX<br />
This message indicates whether remote current reset<br />
was active or disabled at the chiller keypad at the time<br />
of the fault and if active, the type of reset signal selected.<br />
If the option is not factory enabled, the option will not<br />
appear.<br />
Remote Sound Limit Selection<br />
OPTIONS REMOTE SOUND LIMIT INPUT<br />
◄ ► XXXXXXXXXXX<br />
This message indicates whether remote sound limit<br />
was active or disabled at the chiller keypad at the time<br />
of the fault and if active, the type of reset signal selected.<br />
FORM 201.28-NM1.1<br />
ISSUE DATE: 8/29/2012<br />
If the option is not factory enabled, the option will not<br />
appear.<br />
Program Values<br />
Suction Pressure Cutout<br />
PROGRAM<br />
SUCTION PRESSURE CUTOUT = XXX.X PSIG<br />
This message indicates the he suction pressure cutout<br />
programmed at the time of the fault.<br />
Low Ambient Cutout<br />
PROGRAM<br />
LOW AMBIENT TEMP CUTOUT = XXX.X °F<br />
This message displays the low ambient temp cutout<br />
programmed at the time of the fault.<br />
Low Leaving Chilled <strong>Liquid</strong> Temp Cutout<br />
PROGRAM<br />
LEAVING LIQUID TEMP CUTOUT = XXX.X °F<br />
This message displays the low leaving chilled liquid<br />
temperature cutout programmed at the time of the fault.<br />
Motor Current Limit<br />
PROGRAM<br />
MOTOR CURRENT LIMIT = XXX %FLA<br />
This message indicates the motor current limit programmed<br />
at the time of the fault.<br />
Pulldown Current Limit<br />
PROGRAM<br />
PULLDOWN CURRENT LIMIT = XXX %FLA<br />
This message indicates the pulldown current limit programmed<br />
at the time of the fault.<br />
Pulldown Current Limit Time<br />
PROGRAM<br />
PULLDOWN CURRENT LIMIT TIME = XXX MIN<br />
This message indicates the pulldown current limit time<br />
programmed at the time of the fault.<br />
Condenser Subcooling Setpoint<br />
PROGRAM<br />
SUBCOOLING SETPOINT = XXX.X °F<br />
This message indicates the liquid subcooling setpoint<br />
programmed at the time of the fault.<br />
JOHNSON CONTROLS
FORM 201.28-NM1.1<br />
ISSUE DATE: 8/29/2012<br />
Unit ID Number<br />
PROGRAM<br />
REMOTE UNIT ID NUMBER = X<br />
This indicates the unit ID # programmed at the time of<br />
the fault.<br />
Sound Limit Setpoint<br />
PROGRAM<br />
SOUND LIMIT SETPOINT = XXX %<br />
This indicates the sound limit setpoint programmed at<br />
the time of the fault, if the sound limit option is activated<br />
at the factory. If the option is not factory activated,<br />
the display will not appear.<br />
Eductor Differential Temperature<br />
PROGRAM ◄DEF XXXXX LO XXXXX HI XXXXX<br />
EDUCTOR DIFFERENTIAL = XXX °F<br />
This message indicates the programmed eductor differential<br />
temperature at the time of the fault.<br />
SECTION 8 - MICROPANEL<br />
Eductor Safety Time<br />
PROGRAM ◄DEF XXXXX LO XXXXX HI XXXXX<br />
EDUCTOR SAFETY TIME = XXX MIN<br />
This message indicates the eductor safety time programmed<br />
at the time of the fault.<br />
Motor Temperature Unload<br />
PROGRAM ◄DEF XXXXX LO XXXXX HI XXXXX<br />
MOTOR TEMPERATURE UNLOAD = XXX °F<br />
This message indicates the motor temperature programmed<br />
at the time of the fault.<br />
JOHNSON CONTROLS 111<br />
8
SECTION 8 - MICROPANEL<br />
Setpoints Key Operation<br />
Cooling setpoints and ranges may be programmed by<br />
pressing the SETPOINTS key. The first setpoint entry<br />
screen will be displayed as shown below. The first<br />
line of the display will show the chiller default (DEF),<br />
minimum acceptable value (LO) and maximum acceptable<br />
value (HI). The second line shows the actual<br />
programmed value. Table 10 also shows the allowable<br />
ranges for the cooling setpoints and Control Ranges.<br />
Note that the Imperial units are exact values while the<br />
Metric units are only approximate.<br />
SETPOINTS ◄DEF XXXXX LO XXXXX HI XXXXX<br />
LOCAL COOLING SETPOINT = XXX.X °F<br />
Pressing the SETPOINTS key a second time or the ▼<br />
(ARROW) key will display the leaving chilled liquid<br />
Control Range, default, and low/high limits.<br />
SETPOINTS ◄DEF XXXXX LO XXXXX HI XXXXX<br />
LOCAL CONTROL RANGE = +/- X.X °F<br />
Pressing the SETPOINTS key or the ▼ (ARROW) key<br />
a third time will display the remote setpoint and cooling<br />
range. This display automatically updates about<br />
112<br />
SETPOINTS KEY<br />
SETPOINTS<br />
KEY<br />
LD10605<br />
FORM 201.28-NM1.1<br />
ISSUE DATE: 8/29/2012<br />
every 2 seconds. This remote setpoint message is show<br />
below:<br />
SETPOINTS REMOTE SETPOINT = XXX.X °F<br />
REMOTE CONTROL RANGE = +/- X.X °F<br />
If there is no remote setpoint being utilized, the remote<br />
setpoint value will be displayed as XXXXXX and the<br />
remote Control Range will display XXX.<br />
Pressing the SETPOINTS key or the Arrow key a<br />
fourth time will bring up a screen that allows the Maximum<br />
Remote Temperature Reset to be programmed.<br />
This message is show below:<br />
SETPOINTS ◄DEF XXXXX LO XXXXX HI XXXXX<br />
MAXIMUM REMOTE TEMP RESET = XXX.X °F<br />
The values displayed under each of the key presses<br />
may be changed by keying in new values and pressing<br />
the � (ENTER) key to store the new value into memory.<br />
Where more than one value may be keyed in on a<br />
display, a portion of the data that does not need updating<br />
may be skipped by pressing the � (ENTER) key.<br />
The � (ENTER) key must also be pressed after the<br />
last value in the display to store the data into memory.<br />
JOHNSON CONTROLS
FORM 201.28-NM1.1<br />
ISSUE DATE: 8/29/2012<br />
The ▲ (ARROW) key allows scrolling back through<br />
the setpoints displays.<br />
The minimum, maximum, and default values allowed<br />
under the SETPOINTS key are provided in the following<br />
table.<br />
TABLE 10 - SETPOINT LIMITS<br />
SECTION 8 - MICROPANEL<br />
PROGRAM VALUE MODE LOW LIMIT HIGH LIMIT DEFAULT<br />
Leaving Chilled <strong>Liquid</strong> Setpoint<br />
Water Cooling<br />
Glycol Cooling<br />
Leaving Chilled <strong>Liquid</strong> Control Range -<br />
Max. Remote Temperature Reset -<br />
40.0°F 60.0°F 44.0°F<br />
4.4°C 15.6°C 6.7°C<br />
15.0°F 70.0°F 44.0°F<br />
-9.4°C 15.6°C 6.7°C<br />
1.5°F 2.5°F 2.0°F<br />
0.8°C 1.4°C 1.1°C<br />
2°F 40°F 20°F<br />
1°C 22°C 11°C<br />
JOHNSON CONTROLS 113<br />
8
SECTION 8 - MICROPANEL<br />
Program Key Operation<br />
Various operating parameters are programmable by the<br />
user. These are modified by pressing the PROGRAM<br />
key and then the � (ENTER) key to enter Program<br />
Mode. A listing of the limits of the programmable values<br />
is found below. Note that the Imperial units are exact<br />
values, while Metric units are only approximate.<br />
The ▲ and ▼ (ARROW) keys are used to scroll<br />
through the user programmable values. A value may be<br />
changed by keying in the new value and pressing the �<br />
(ENTER) key to store the new value in memory. The<br />
cursor will be displayed on the screen when a number<br />
key is pressed. The first line of each message will indicate<br />
the chiller default (DEF) value), lowest acceptable<br />
programmable value (LO), and highest acceptable programmable<br />
value (HI). The user programmable value<br />
is programmed ON in the second line of the message.<br />
When the PROGRAM key is first pressed, the following<br />
display will appear indicating the user is in the program<br />
mode:<br />
PROGRAM MODE XXXX<br />
PRESS ENTER KEY TO CONTINUE<br />
Pressing the � (ENTER) key again will display the<br />
first programmable selection.<br />
114<br />
PROGRAM KEY<br />
FORM 201.28-NM1.1<br />
ISSUE DATE: 8/29/2012<br />
PROGRAM<br />
KEY<br />
LD10605<br />
Suction Pressure Cutout<br />
PROGRAM ◄DEF XXXXX LO XXXXX HI XXXXX<br />
SUCTION PRESSURE CUTOUT = XXX.X PSIG<br />
The suction pressure cutout is protects the chiller from<br />
a low refrigerant condition. It also helps protect from<br />
a freeze-up due to low or no chilled liquid flow. However,<br />
it is only a back-up for a flow switch and cannot<br />
protect against an evaporator freeze under many conditions.<br />
This cutout is programmable and should generally<br />
be programmed for 1.65 barg (24 PSIG) for chilled<br />
water cooling.<br />
The cutout is programmable between 1.65 and 2.48<br />
barg (24.0 and 36.0 PSIG) in the Water Cooling mode<br />
and 0.34 and 2.28 barg (5.0 and 36.0 PSIG) in the Glycol<br />
Cooling mode. The default value for both modes<br />
will be 1.65 barg (24.0 PSIG).<br />
Low Ambient Cutout<br />
PROGRAM ◄DEF XXXXX LO XXXXX HI XXXXX<br />
LOW AMBIENT TEMP CUTOUT = XXX.X °F<br />
The low ambient temp cutout allows programming the<br />
outdoor temperature at which it is desired to shut down<br />
the chiller to utilize other methods of cooling.<br />
The cutout is programmable between -18.9°C (-2.0°F)<br />
and 10.0°C (50°F) with a -3.9°C (25°F) default.<br />
JOHNSON CONTROLS
FORM 201.28-NM1.1<br />
ISSUE DATE: 8/29/2012<br />
Low Leaving <strong>Liquid</strong> Temp Cutout<br />
PROGRAM ◄DEF XXXXX LO XXXXX HI XXXXX<br />
LEAVING LIQUID TEMP CUTOUT = XXX.X °F<br />
The leaving chilled liquid temp cutout is programmed<br />
to avoid freezing the evaporator due to excessively low<br />
chilled liquid temperatures. The cutout is automatically<br />
set at 2.2 °C (36°F) in the Water Cooling mode and is<br />
programmable in the Glycol Cooling mode. In the Glycol<br />
Cooling Mode, the cutout is programmable from<br />
-11.7°C to 2.2°C (11.0°F to 36.0°F) with a default of<br />
2.2°C (36.0°F).<br />
Motor Current Limit<br />
PROGRAM ◄DEF XXXXX LO XXXXX HI XXXXX<br />
MOTOR CURRENT LIMIT = XXX % FLA<br />
The motor current limit %FLA is programmable. This<br />
allows the microprocessor to limit a system before it<br />
faults on high current. Typically, the limit point is set<br />
at 100%. The unload point is programmable from 30 to<br />
100% with a default of 100%.<br />
Pulldown Current Limit<br />
PROGRAM ◄DEF XXXXX LO XXXXX HI XXXXX<br />
PULLDOWN CURRENT LIMIT = XXX % FLA<br />
The pulldown current limit %FLA is programmable.<br />
This allows the microprocessor to limit a system on<br />
pulldown limiting for the purpose of peak time energy<br />
savings. Typically, the limit point is set at 100%.<br />
The pulldown limit point is programmable from 30 to<br />
100% with a default of 100%. Be aware when using<br />
pulldown motor current limit, the chiller may not be<br />
able to load to satisfy temperature demand<br />
Pulldown Current Limit Time<br />
PROGRAM ◄DEF XXXXX LO XXXXX HI XXXXX<br />
PULLDOWN CURRENT LIMIT TIME = XXX MIN<br />
The pulldown current limit time is programmable.<br />
This allows the microprocessor to limit a system on<br />
pulldown limiting for a defined period of time for the<br />
purpose of peak time energy savings. The pulldown<br />
limit point is programmable from 0 to 255 with a default<br />
of 0 Min.<br />
SECTION 8 - MICROPANEL<br />
Subcooling Setpoint<br />
PROGRAM ◄DEF XXXXX LO XXXXX HI XXXXX<br />
SUBCOOLING SETPOINT = XXX.X °F<br />
The liquid subcooling superheat setpoint is programmable<br />
from 0.0 to 11.1°C (0.0 to 20.0°F) with a 2.8°C<br />
(5.0°F) default. Typically the subcooling control will<br />
be programmed for 2.8°C (5.0 °F).<br />
Unit ID Number<br />
PROGRAM ◄DEF XXXXX LO XXXXX HI XXXXX<br />
REMOTE UNIT ID NUMBER = X<br />
For purposes of remote communications, multiple<br />
chillers may be connected to an RS-485 communications<br />
bus. To allow communications to each chiller, a<br />
chiller ID number may be programmed into memory.<br />
On a single chiller application, the value will be “0”.<br />
Sound Limit Setpoint<br />
PROGRAM ◄DEF XXXXX LO XXXXX HI XXXXX<br />
SOUND LIMIT SETPOINT = XXX %<br />
The sound limit setpoint is programmable from 0 to<br />
100 % with a 0% default. 0% allows operating up to the<br />
full speed capability of the unit with no sound limiting.<br />
Typically the sound limit control setting will be programmed<br />
for 0 % unless sound limiting is utilized on<br />
the chiller. Sound limiting will only permit the unit to<br />
run to a frequency less than the maximum speed capability<br />
of the unit. Programming a value of 1% would be<br />
the minimum sound limiting that can be programmed<br />
and 100% will be the maximum. 100% will only allow<br />
the unit speed to operate at the minimum frequency.<br />
Usually, the sound limit % will be programmed somewhere<br />
between 0 and 100% according the limiting<br />
needed to satisfy the sound requirements of the site.<br />
Typically, sound limiting will be utilized in areas sensitive<br />
to noise during night-time hours. The sound limit<br />
display will only be present if the sound limit option is<br />
programmed at the factory.<br />
JOHNSON CONTROLS 115<br />
8
SECTION 8 - MICROPANEL<br />
Eductor Differential<br />
PROGRAM ◄DEF XXXXX LO XXXXX HI XXXXX<br />
EDUCTOR DIFFERENTIAL = XXX °F<br />
The eductor temperature differential is programmable<br />
from 0°C to 10.0°C (0°F to 50.0°F). The default value<br />
is 5.0°F. The programmed temperature assures the micro<br />
will sense a loss of educator oil flow, if the temperature<br />
differential rises. A small differential of 2.8°C<br />
(5.0°F) is recommended.<br />
Eductor Safety Time<br />
PROGRAM ◄DEF XXXXX LO XXXXX HI XXXXX<br />
EDUCTOR SAFETY TIME = XXXX MIN<br />
The educator safety time allows programming the<br />
time period the system is permitted to run if the safety<br />
threshold is exceeded. The safety time is programmable<br />
for 10 minutes to 1000 minutes with 10 minutes as<br />
the default. A minimum safety time is recommended<br />
to assure the compressor is not starved for oil for long<br />
periods of time due to the educator circuit not siphon-<br />
TABLE 11 - PROGRAMMABLE OPERATING PARAMETERS<br />
116<br />
FORM 201.28-NM1.1<br />
ISSUE DATE: 8/29/2012<br />
ing oil from the evaporator. A minimum time of 10<br />
minutes is recommended as the program point.<br />
Motor Temperature Unload<br />
PROGRAM ◄DEF XXXXX LO XXXXX HI XXXXX<br />
MOTOR TEMPERATURE UNLOAD = XXX °F<br />
The motor temperature unload is programmable from<br />
65.6°C (150.0°F) to 121.1°C 250.0°F. The default value<br />
is 115.5°C (240.0°F). The programmed temperature<br />
assures the micro will sense a rise in motor temperature<br />
due to a lack of compressor cooling. If the temperature<br />
rises above the programmed threshold, the system will<br />
unload the compressor by reducing speed. An unload<br />
temperature of 115.5°C (240.0°F) is recommended to<br />
assure the system does provides maximum capacity.<br />
Default Values<br />
A listing of the low limits, high limits, and default values<br />
for each of the programmable values is noted in<br />
each display and can be found in Table 11. Note that<br />
the Imperial units are exact values while the Metric<br />
units are only approximate.<br />
PROGRAM VALUE MODE LOW LIMIT HIGH LIMIT DEFAULT<br />
Water<br />
24.0 PSIG 36.0 PSIG 24.0 PSIG<br />
Suction Pressure Cutout<br />
Cooling<br />
Glycol<br />
1.65 barg<br />
5.0 PSIG<br />
2.48 barg<br />
36.0 PSIG<br />
1.65 barg<br />
24.0 PSIG<br />
Cooling<br />
0.34 barg 2.48 barg 1.65 barg<br />
Low Ambient Temp. Cutout -<br />
-2.0°F<br />
-18.9°C<br />
50.0°F<br />
10.0°C<br />
25.0°F<br />
-3.9°C<br />
Water<br />
- - 36.0°F<br />
Leaving Chilled <strong>Liquid</strong> Temp. Cutout<br />
Cooling<br />
Glycol<br />
-<br />
11.0°F<br />
-<br />
36.0°F<br />
2.2°C<br />
36.0°F<br />
Cooling<br />
-11.7°C 2.2°C 2.2°C<br />
Motor Current Limit - 30% FLA 103% FLA 103% FLA<br />
Pulldown Motor Current Limit - 30% FLA 100% FLA 100% FLA<br />
Pulldown Motor Current Limit Time - 0 Min 255 Min 0 Min<br />
Condenser Subcooling Setpoint -<br />
0.0°F<br />
0.0°C<br />
20.0°F<br />
11.1°C<br />
5.0°F<br />
2.8°C<br />
Unit ID Number - 0 7 0<br />
Sound Limit Setpoint<br />
Sound Limit<br />
Option Enabled<br />
0% 100% 0%<br />
Eductor Temp Differential -<br />
5.0°F<br />
2.77°C<br />
50.0°F<br />
27.8°C<br />
15.0°F<br />
8.3°C<br />
Eductor Safety Time - 10 Min 1000 Min 30 Min*<br />
Motor Temperature Unload -<br />
150.0°F<br />
65.6°C<br />
250.0°F<br />
121.1°C<br />
240.0°F<br />
115.5°C<br />
JOHNSON CONTROLS
FORM 201.28-NM1.1<br />
ISSUE DATE: 8/29/2012<br />
Options Key Operation<br />
The OPTIONS key provides the user with a display of<br />
unit configuration and the capability to modify the configuration.<br />
These options can only be viewed under the<br />
OPTIONS key. To view the current options settings,<br />
press the OPTIONS key. Each press of the OPTIONS<br />
key or press of the ▲ or ▼ (ARROW) keys will scroll<br />
to the next option setting. The ◄ and ► (ARROW)<br />
keys allow changing the option choices. The � (EN-<br />
TER) key must be pressed after a selection is made to<br />
save the change in memory.<br />
An explanation of each option message is provided below.<br />
Display Language Selection<br />
The display language can be selected for English, Italian,<br />
Polish, Hungarian, German, French, Portuguese,<br />
and Spanish.<br />
OPTIONS DISPLAY LANGUAGE<br />
◄ ► XXXXXXXXXXXXXXXXXX<br />
The default language will be English.<br />
Chilled <strong>Liquid</strong> Cooling Mode Selection<br />
The Chilled liquid cooling mode can be selected for<br />
Water Cooling or low temperature Glycol Cooling.<br />
OPTIONS KEY<br />
SECTION 8 - MICROPANEL<br />
OPTIONS<br />
KEY<br />
JOHNSON CONTROLS 117<br />
LD10605<br />
OPTIONS CHILLED LIQUID COOLING MODE<br />
◄ ► XXXXXXXXXXXXXXXXXX<br />
When Water Cooling is chosen, the chilled liquid temperature<br />
setpoint can only be programmed from 4°C to<br />
21°C (40°F to 70°F).<br />
OPTIONS CHILLED LIQUID COOLING MODE<br />
◄ ► WATER COOLING<br />
When Glycol Cooling is chosen, the chilled liquid<br />
temperature setpoint can be programmed from -12°C<br />
to 21°C (10°F to 70°F).<br />
OPTIONS CHILLED LIQUID COOLING MODE<br />
◄ ► GLYCOL COOLING<br />
The default Chilled <strong>Liquid</strong> Mode will be WATER<br />
COOLING.<br />
Local / Remote Control Mode Selection<br />
Local or Remote Control Mode allows the user to select<br />
the chilled liquid temperature control mode.<br />
OPTIONS LOCAL / REMOTE CONTROL MODE<br />
◄ ► XXXXXXXXXXXXXXXXXX<br />
8
SECTION 8 - MICROPANEL<br />
When LOCAL CONTROL mode is selected, chilled<br />
liquid control is from the keypad of the chiller. In local<br />
mode, a remote device can read system data, but not<br />
reset operating parameters.<br />
OPTIONS LOCAL / REMOTE CONTROL MODE<br />
◄ ► LOCAL CONTROL<br />
When REMOTE CONTROL mode is selected, control<br />
of the chilled liquid setpoint is from a remote device<br />
such as an ISN/BAS controller.<br />
OPTIONS LOCAL / REMOTE CONTROL MODE<br />
◄ ► REMOTE CONTROL<br />
The default mode will be LOCAL CONTROL.<br />
Display Units Selection<br />
Imperial or SI display units may be selected for data<br />
display.<br />
OPTIONS DISPLAY UNITS<br />
◄ ► XXXXXXXXXXXXXXXXXX<br />
The user may select system operating temperatures and<br />
pressures to be displayed in either SI (°C, barg) or Imperial<br />
units (°F, PSIG).<br />
OPTIONS DISPLAY UNITS<br />
◄ ► IMPERIAL<br />
OPTIONS DISPLAY UNITS<br />
◄ ► SI<br />
The default mode is IMPERIAL.<br />
System Lead/Lag Control Mode Selection<br />
The operator may select the type of lead/lag control<br />
desired.<br />
OPTIONS LEAD / LAG CONTROL MODE<br />
◄ ► XXXXXXXXXXXXXXXXXX<br />
In most cases, automatic lead/lag will be selected.<br />
When automatic lead/lag is selected, the microprocessor<br />
will attempt to balance run time by switching the<br />
lead compressor whenever all compressors are shut<br />
OFF. If a compressor is not able to run when the microprocessor<br />
attempts a start, the microprocessor will<br />
select another compressor in an effort to control chilled<br />
liquid temperature. Manual lead/lag allows selecting a<br />
specific compressor to be the lead.<br />
118<br />
FORM 201.28-NM1.1<br />
ISSUE DATE: 8/29/2012<br />
OPTIONS LEAD / LAG CONTROL MODE<br />
◄ ► AUTOMATIC<br />
The default mode will be AUTOMATIC.<br />
Lag selections of individual systems will appear as:<br />
OPTIONS LEAD / LAG CONTROL MODE<br />
◄ ► MANUAL SYS 1 LEAD<br />
OPTIONS LEAD / LAG CONTROL MODE<br />
◄ ► MANUAL SYS 2 LEAD<br />
Remote Temperature Reset Selection<br />
Remote temperature reset from an external source may<br />
be tied directly into the chiller microprocessor board.<br />
OPTIONS REMOTE TEMP RESET INPUT<br />
◄ ► XXXXXXXXXXXXXXXXXX<br />
Selections may be made for DISABLED (no signal),<br />
0 to10VDC, 2 to 10VDC, 0 to 20ma, and 4 to 20ma.<br />
OPTIONS REMOTE TEMP RESET INPUT<br />
◄ ► DISABLED<br />
OPTIONS REMOTE TEMP RESET INPUT<br />
◄ ► 0.0 TO 10.0 VOLTS DC<br />
OPTIONS REMOTE TEMP RESET INPUT<br />
◄ ► 2.0 TO 10.0 VOLTS DC<br />
OPTIONS REMOTE TEMP RESET INPUT<br />
◄ ► 0.0 TO 20.0 MILLIAMPS<br />
OPTIONS REMOTE TEMP RESET INPUT<br />
◄ ► 4.0 TO 20.0 MILLIAMPS<br />
The default setting for Remote Temp Reset is DIS-<br />
ABLED. This display will only appear if the remote<br />
temperature limit option is enabled under the Unit Setup<br />
Mode.<br />
Remote Current Limit Input Selection<br />
Remote current limit from an external source may be<br />
tied directly into the chiller microprocessor board.<br />
OPTIONS REMOTE CURRENT LIMIT INPUT<br />
◄ ► XXXXXXXXXXXXXXXXXXXXX<br />
Selections may be made for DISABLED (no signal),<br />
0 to 10VDC, 2 to 10VDC, 0 to 20ma, and 4 to 20ma.<br />
JOHNSON CONTROLS
FORM 201.28-NM1.1<br />
ISSUE DATE: 8/29/2012<br />
OPTIONS REMOTE CURRENT LIMIT INPUT<br />
◄ ► DISABLED<br />
OPTIONS REMOTE CURRENT LIMIT INPUT<br />
◄ ► 0.0 TO 10.0 VOLTS DC<br />
OPTIONS REMOTE CURRENT LIMIT INPUT<br />
◄ ► 2.0 TO 10 VOLTS DC<br />
OPTIONS REMOTE CURRENT LIMIT INPUT<br />
◄ ► 0.0 TO 20.0 MILLIAMPS<br />
OPTIONS REMOTE CURRENT LIMIT INPUT<br />
◄ ► 4.0 TO 20.0 MILLIAMPS<br />
The default setting for Remote Current Reset is DIS-<br />
ABLED. This display will only appear if the remote<br />
current limit option is enabled under the Unit Setup<br />
Mode.<br />
Remote Sound Limit Selection<br />
Remote sound limit from an external source may be<br />
tied directly into the chiller microprocessor board.<br />
OPTIONS REMOTE SOUND LIMIT INPUT<br />
◄ ► XXXXXXXXXXXXXXXXXXXX<br />
Selections may be made for DISABLED (no signal),<br />
0 to10VDC, 2 to 10VDC, 0 to 20ma, and 4 to 20ma.<br />
SECTION 8 - MICROPANEL<br />
OPTIONS REMOTE SOUND LIMIT INPUT<br />
◄ ► DISABLED<br />
OPTIONS REMOTE SOUND LIMIT INPUT<br />
◄ ► 0.0 TO 10.0 VOLTS DC<br />
OPTIONS REMOTE SOUND LIMIT INPUT<br />
◄ ► 2.0 TO 10.0 VOLTS DC<br />
OPTIONS REMOTE SOUND LIMIT INPUT<br />
◄ ► 0.0 TO 20.0 MILLIAMPS<br />
OPTIONS REMOTE SOUND LIMIT INPUT<br />
◄ ► 4.0 TO 20.0 MILLIAMPS<br />
The default setting for Remote Sound Limit is DIS-<br />
ABLED. This display will only appear if the remote<br />
sound limit option is enabled under the Unit Setup<br />
Mode.<br />
Low Ambient Cutout Enable/Disable<br />
The low ambient cutout may be enabled or disabled.<br />
When enabled, the chiller will cut OFF when the low<br />
ambient cutout is reached. When disabled, the chiller<br />
will run at any temperature.<br />
OPTIONS LOW AMBIENT TEMPERATURE CUTOUT<br />
◄ ► ENABLED<br />
OPTIONS LOW AMBIENT TEMPERATURE CUTOUT<br />
◄ ► DISABLED<br />
The default setting for the low ambient cutout will be<br />
ENABLED.<br />
JOHNSON CONTROLS 119<br />
8
SECTION 8 - MICROPANEL<br />
Date/Time Key Operation<br />
When the DATE/TIME key is pressed, the chiller microprocessor<br />
will display the date and the time. This<br />
feature is useful and required for using the Daily<br />
Schedule. It is also a valuable tool for troubleshooting<br />
to allow a technician to determine the time of the fault,<br />
which is stored in the history memory buffers. When<br />
the DATE/TIME key is pressed, the first display screen<br />
shown below will be displayed:<br />
CLOCK FRI 18-JUN-2011 10:15:33 AM<br />
DAY OF WEEK ◄ ► = XXX<br />
Whenever any changes are made, the � (ENTER) key<br />
must be pressed to store the data.<br />
Pressing the ▲ or ▼ (Arrow) keys allows scrolling to<br />
the next programmed item. Pressing the ▼ (DOWN<br />
ARROW) key scrolls to the next item that can be programmed<br />
and the ▲ (UP ARROW) key scrolls to the<br />
previous item.<br />
The day of the week is the first display and can be<br />
changed by pressing either the ◄ or ► (LEFT OR<br />
RIGHT ARROW) key to select the day. After the day is<br />
selected, the � (ENTER) key must be pressed to store<br />
the data.<br />
CLOCK FRI 18-JUN-2011 10:15:33 AM<br />
DAY OF MONTH = XX<br />
120<br />
DATE/TIME AND SCHEDULE KEYS<br />
LD10605<br />
FORM 201.28-NM1.1<br />
ISSUE DATE: 8/29/2012<br />
DATE/TIME<br />
KEY<br />
SCHEDULE<br />
KEY<br />
Pressing the ▼ (DOWN ARROW) key again scrolls to<br />
the day of the month:<br />
CLOCK FRI 18-JUN-2011 10:15:33 AM<br />
DAY OF MONTH = XX<br />
The day of the month can be selected by keying in the<br />
numerical value to select the day. After the day of the<br />
month is selected, the � (ENTER) key must be pressed<br />
to store the data.<br />
A “0” must be typed in to select dates for<br />
days of the 1st through the 9th.<br />
Pressing the ▼ (DOWN ARROW) key again scrolls<br />
to month:<br />
CLOCK FRI 18-JUN-2011 10:15:33 AM<br />
MONTH ◄ ► = XXX<br />
The month can be selected by scrolling through the<br />
months with the ◄ or ►arrow keys. After the month is<br />
selected, the � (ENTER) key must be pressed to store<br />
the data.<br />
Pressing the ▼ (DOWN ARROW) key again scrolls<br />
to the year:<br />
JOHNSON CONTROLS
FORM 201.28-NM1.1<br />
ISSUE DATE: 8/29/2012<br />
CLOCK FRI 18-JUN-2011 10:15:33 AM<br />
YEAR = XXXX<br />
The year can be selected by keying in the numerical<br />
value to select the year. After the year is selected, the �<br />
(ENTER) key must be pressed to store the data.<br />
Pressing the ▼ (DOWN ARROW) key again scrolls<br />
to the hour:<br />
CLOCK FRI 18-JUN-2011 10:15:33 AM<br />
HOUR = XX<br />
The hour can be selected by keying in the numerical<br />
value for the hour. After the hour is selected, the �<br />
(ENTER) key must be pressed to store the data.<br />
One or two “0’s” must be keyed in for<br />
hours 00-09.<br />
Pressing the ▼ (DOWN ARROW) key again scrolls<br />
to the minute:<br />
CLOCK FRI 18-JUN-2011 10:15:33 AM<br />
MINUTE = XX<br />
The minute can be selected by keying in the numerical<br />
value for the hour. After the minute is selected, the �<br />
(ENTER) key must be pressed to store the data.<br />
One or two “0’s” must be keyed in for<br />
minutes 00 through 09.<br />
Pressing the ▼ (DOWN ARROW) key again scrolls<br />
to AM/PM:<br />
CLOCK FRI 18-JUN-2011 10:15:33 AM<br />
AM/PM ◄ ► = XX<br />
AM/PM can be selected by pressing the ◄ or ►<br />
(ARROW) keys. After the meridian is selected, the<br />
�(ENTER) key must be pressed to store the data.<br />
Pressing the ▼ (DOWN ARROW) key again scrolls to<br />
the time format selection:<br />
CLOCK FRI 18-JUN-2011 10:15:33 AM<br />
TIME FORMAT ◄ ► = XXXXXXX<br />
SECTION 8 - MICROPANEL<br />
The time format may be displayed in either a 12 hour<br />
or 24 hour format. Selection can be changed by pressing<br />
the ◄ or ► (ARROW) keys. The �(ENTER) key<br />
must be pressed to store the data.<br />
Schedule Key Operation<br />
The Daily Schedule must be programmed for the unit<br />
start and stop times. To set the schedule, press the<br />
SCHEDULE key. The display will provide a message<br />
allowing access to 2 types of schedule information:<br />
SCHEDULE CHOOSE SCHEDULE TYPE<br />
◄ ► XXXXXXXXXXXXXXXXXXXXXXXXX<br />
The schedule types are:<br />
• UNIT OPERATING SCHEDULE<br />
• (Default selection)<br />
• SOUND LIMIT SCHEDULE<br />
(Only if Sound Limiting is enabled by the factory<br />
when the option is installed.)<br />
The schedule type (UNIT OPERATING SCHEDULE<br />
or SOUND LIMIT SCHEDULE) may be changed by<br />
pressing the ◄ (LEFT ARROW) or ► (RIGHT AR-<br />
ROW) keys followed by the �(ENTER) key. The selection<br />
must be entered by pressing the � (ENTER)<br />
key before a schedule display will appear.<br />
Unit Operating Schedule<br />
The Unit Operating Schedule is used to enable/disable<br />
the chiller unit on time of day. The chiller can be<br />
enabled and disabled once each day or it can be programmed<br />
to run continuously. Any time the daily or<br />
holiday schedule shuts the chiller down, the running<br />
system(s) will go through a controlled ramped shutdown.<br />
If the UNIT OPERATING SCHEDULE is selected<br />
under the CHOOSE SCHEDULE display, the<br />
following message will appear:<br />
SCHEDULE UNIT OPERATING<br />
MON START = 06:00 AM STOP = 10:00 PM<br />
The line under the 0 above is the cursor. If the start<br />
time is wrong, it can be changed by keying in the new<br />
time from the numeric keypad. Once the correct values<br />
for the START hour and minute are entered, press<br />
the � (ENTER) key. The cursor will then move to the<br />
AM/PM selection. The meridian (AM/PM) value may<br />
be changed by the ◄ (LEFT ARROW) or ► (RIGHT<br />
ARROW) keys and entered by pressing � (ENTER)<br />
key. Repeat this process for the STOP time. Once a<br />
schedule is entered, the schedule for the next day will<br />
JOHNSON CONTROLS 121<br />
8
SECTION 8 - MICROPANEL<br />
appear. The start and stop time of each day may be programmed<br />
differently.<br />
To view the schedule without making a change, simply<br />
press the SCHEDULE key until the day you wish<br />
to view appears. The ▲ (UP ARROW) key will scroll<br />
backwards to the previous screen.<br />
122<br />
If at any time the schedule is changed for<br />
Monday, all the other days will change to<br />
the new Monday schedule. This means if<br />
the Monday times are not applicable for<br />
the whole week, then the exceptional days<br />
would need to be reprogrammed to the<br />
desired schedule.<br />
To program the chiller for 24 hour operation, program<br />
the start and stop times of each day of the week for<br />
00:00.<br />
After the SUN (Sunday) schedule appears on the display,<br />
a subsequent press of the SCHEDULE or ▲ (UP<br />
ARROW) key will display the Holiday schedule. This<br />
is a two-part display. The first reads:<br />
SCHEDULE UNIT OPERATING<br />
HOL START = 00:00 AM STOP = 00:00 PM<br />
The holiday times may be set using the same procedure<br />
as described above for the days of the week. Be sure to<br />
press the � (ENTER) key after setting the START and<br />
STOP times to save the change in memory. Pressing<br />
the SCHEDULE key a second time, the display will<br />
show the individual days:<br />
SCHEDULE UNIT OPERATING<br />
S M T W T F S HOLIDAY NOTED BY *<br />
The line below the empty space is the cursor and will<br />
move to the next or previous empty space when the ◄<br />
(LEFT ARROW) or ► (RIGHT ARROW) keys and<br />
pressed. To set a day for the Holiday Schedule, the cursor<br />
must be moved to the space following the day of<br />
the week. The * key is then pressed and an “*” will<br />
appear in the space signifying that day as a holiday.<br />
The Holiday schedule must be programmed weekly. If<br />
there is no holiday, the “*” key is also used to delete the<br />
“*”. The � (ENTER) key is used to accept the holiday<br />
schedule for the entire week.<br />
The HOLIDAY SCHEDULE is a temporary<br />
schedule. Once the schedule is executed,<br />
the selected holidays will be cleared<br />
from memory for the following week.<br />
FORM 201.28-NM1.1<br />
ISSUE DATE: 8/29/2012<br />
Sound Limit Schedule<br />
The SOUND LIMIT SCHEDULE allows setting the<br />
day and time when the user desires using the “SILENT<br />
NIGHT” factory programmed option to limit chiller<br />
loading and fan operation for reduced audible noise in<br />
the surrounding area. If the SOUND LIMIT SCHED-<br />
ULE is selected under the CHOOSE SCHEDULE display,<br />
the following message will appear:<br />
SCHEDULE SOUND LIMIT = XXX %<br />
MON START = 06:00 AM STOP = 10:00 PM<br />
The Sound Limit option can be enabled and disabled<br />
once each day or the chiller can be set to run continuously<br />
in this mode for sound limiting whenever the<br />
chiller is operating. When sound limiting is enabled,<br />
the unit will be limited by the Sound Limit setpoint<br />
% as set under the PROGRAM key. XXX in the display<br />
above will show the Sound Limit Setpoint % programmed<br />
under the PROGRAM key. 0% will cause no<br />
speed reduction, while 100% only allows running at<br />
minimum speed.<br />
The START Time for a specific day (hour and minute)<br />
is entered using the same guidelines used for the start/<br />
stop schedules, and press the � (ENTER) key to store<br />
it into memory. The cursor will then move to the AM/<br />
PM selection.<br />
The AM/PM selection may be chosen using the ◄<br />
(LEFT ARROW) or ► (RIGHT ARROW) keys and<br />
pressing � (ENTER) key to store the value.<br />
This process is repeated for the STOP time.<br />
Once the schedule for a specific day is programmed<br />
and entered, the schedule for the next day will appear.<br />
The schedule for each day may be programmed the<br />
same or differently.<br />
To view the schedule without changing it, simply press<br />
the SCHEDULE key or the ▼ (DOWN ARROW) key<br />
until the desired day is displayed. The ▲ (UPARROW)<br />
key will scroll backwards to the previous screen.<br />
If the schedule is changed for Monday,<br />
all other days will change to the Monday<br />
schedule. Be aware of this when programming.<br />
JOHNSON CONTROLS
FORM 201.28-NM1.1<br />
ISSUE DATE: 8/29/2012<br />
Manual Override Key Operation<br />
If the MANUAL OVERRIDE key is pressed during<br />
a schedule shutdown, the STATUS display will display<br />
the message below. This indicates that the Daily<br />
Schedule is being ignored and the chiller will start<br />
when chilled liquid temperature allows, Remote Contacts,<br />
UNIT switch and SYSTEM switches permitting.<br />
This is a priority message and cannot be overridden by<br />
MANUAL OVERRIDE KEY<br />
SECTION 8 - MICROPANEL<br />
MANUAL OVERRIDE<br />
KEY<br />
JOHNSON CONTROLS 123<br />
LD10605<br />
anti-recycle messages, fault messages, etc. when in the<br />
STATUS display mode. Therefore, do not expect to see<br />
any other STATUS messages when in the MANUAL<br />
OVERRIDE mode. MANUAL OVERRIDE is to only<br />
be used in emergencies or for servicing. Manual override<br />
mode automatically disables itself after 30 minutes.<br />
MANUAL OVERRIDE<br />
8
SECTION 8 - MICROPANEL<br />
Print Key Operation<br />
The PRINT key is used to initiate a printout of current<br />
operating data (real time data), a complete history<br />
printout of all history (fault) buffers, a printout of all<br />
normal shutdowns (compressor cycling, chiller shutdown,<br />
etc.) or history (fault) data printout of a specific<br />
fault. History Buffer 1 will always be the most recent<br />
fault history printout. Printing may also be canceled<br />
by selecting the CANCEL PRINTING option. The following<br />
message is displayed when the PRINT key is<br />
pressed.<br />
PRINT CHOOSE PRINT REPORT<br />
◄ ► XXXXXXXXXXXXXXXXXXXXX<br />
After pressing the PRINT key, the printout type is<br />
selected by pressing the ◄ (LEFT ARROW) or ►<br />
(RIGHT ARROW) keys until the desired printout is<br />
displayed.<br />
124<br />
PRINT KEY<br />
PRINT<br />
KEY<br />
LD10605<br />
FORM 201.28-NM1.1<br />
ISSUE DATE: 8/29/2012<br />
The following table shows the available printout types.<br />
TABLE 12 - PRINTOUT TYPES<br />
PRINTOUT TYPES<br />
Operating Data<br />
(Default Selection)<br />
All History Buffers<br />
Normal Shutdowns<br />
History Buffer 1<br />
History Buffer 2<br />
History Buffer 3<br />
History Buffer 4<br />
History Buffer 5<br />
History Buffer 6<br />
History Buffer 7<br />
History Buffer 8<br />
History Buffer 9<br />
History Buffer 10<br />
Cancel Printing<br />
The specific printout is initiated by pressing the �<br />
(ENTER) key.<br />
JOHNSON CONTROLS
FORM 201.28-NM1.1<br />
ISSUE DATE: 8/29/2012<br />
A sample of the is shown below. The operating data<br />
printout is a snapshot of current system operating conditions<br />
when the printout was selected. The sample<br />
shows combined printouts of 2, 3, and 4 circuit units.<br />
The actual printout will only show data for the appropriate<br />
chiller type.<br />
Bold italic text below a line of print is not<br />
on the actual printout. Bold italic text<br />
indicates information that may not be<br />
available on all printouts or is additional<br />
information to help explain the difference<br />
in a 2/3 or 4 circuit printout.<br />
Operating Data Printout<br />
SYS 1<br />
YORK INTERNATIONAL CORPORATION<br />
NOT RUNNING<br />
SYS 2<br />
COMPRESSOR RUNNING<br />
<strong>YVAA</strong> SCREW CHILLER<br />
OPERATING DATA<br />
2:04:14 PM 30 DEC 11<br />
OPTIONS<br />
CHILLED LIQUID WATER<br />
LOCAL/REMOTE MODE REMOTE<br />
LEAD/LAG CONTROL AUTOMATIC<br />
REMOTE TEMP RESET DISABLED<br />
REMOTE CURRENT LIMIT 0 TO 10 V<br />
REMOTE SOUND LIMIT 4 TO 20 MA<br />
(if Sound Limiting enabled)<br />
LOW AMBIENT CUTOUT ENABLED<br />
PROGRAM VALUES<br />
SUCT PRESS CUTOUT 44 PSIG<br />
LOW AMBIENT CUTOUT 25.0 DEGF<br />
LEAVING LIQUID CUTOUT 36.0 DEGF<br />
MOTOR CURRENT LIMIT 100 %FLA<br />
PULLDOWN CURRENT LIMIT 100 %FLA<br />
PULLDOWN LIMIT TIME 0 MIN<br />
SUBCOOLING SETPOINT 12.0 DEGF<br />
UNIT ID NUMBER 0<br />
SOUND LIMIT SETPOINT 100%<br />
(if Sound Limiting enabled)<br />
UNIT DATA<br />
SECTION 8 - MICROPANEL<br />
LEAVING LIQUID TEMP 49.0 DEGF<br />
RETURN LIQUID TEMP 58.2 DEGF<br />
TEMP RATE XXX.X DEGF/MIN<br />
COOLING RANGE 42.0+/-2.0 DEGF<br />
REMOTE SETPOINT 44.0 DEGF<br />
AMBIENT AIR TEMP 74.8 DEGF<br />
LEAD SYSTEM SYS 2<br />
FLOW SWITCH ON<br />
EVAPORATOR PUMP RUN ON<br />
EVAPORATOR HEATER OFF<br />
ACTIVE REMOTE CONTROL NONE<br />
OPERATING HOURS 1=XXXXX, 2=XXXXX<br />
START COUNTER 1=XXXXX, 2=XXXXX<br />
SOFTWARE VERSION C.ACS.XX.00<br />
VSD DATA<br />
ACTUAL FREQUENCY XXX.X HZ<br />
COMMAND FREQUENCY XXX.X HZ<br />
DC BUS VOLTAGE XXX VDC<br />
INTERNAL AMBIENT TEMP XXX.X DEGF<br />
COOLING SYSTEM STATUS XXX<br />
BASEPLATE TEMPS XXX XXX DEGF<br />
PRECHARGE SIGNAL XXX<br />
MOTOR OVERLOADS 1/2 XXX XXX AMPS<br />
SOFTWARE VERSION C.VSD.XX.00<br />
UNIT SERIAL NUMBER YYYY XXXZZZ<br />
SYSTEM 1 DATA<br />
COMPRESSOR STATUS OFF<br />
RUN TIME 0- 0- 0- 0 D-H-M-S<br />
MOTOR CURRENT 0AMPS 0 %FLA<br />
SUCTION PRESSURE 125 PSIG<br />
DISCHARGE PRESSURE 131 PSIG<br />
OIL PRESSURE 130 PSIG<br />
CONDENSER LIQUID TEMP 68.4 DEGF<br />
DISCHARGE TEMPERATURE 68.8 DEGF<br />
OIL TEMPERATURE 68.8 DEGF<br />
SAT SUCTION TEMP 71.8 DEGF<br />
SUBCOOLING 3.4 DEGF<br />
SAT DISCHARGE TEMP 74.5 DEGF<br />
DISCHARGE SUPERHEAT 6.3 DEGF<br />
MOTOR TMP XXX.XXXX.XXXX.XDEGF<br />
COMPRESSOR SPEED XXX.X %<br />
FLASH TANK LEVEL > 512 ADC<br />
JOHNSON CONTROLS 125<br />
8
SECTION 8 - MICROPANEL<br />
COND DRAIN % OPEN XXX.X %<br />
ECONOMIZER % OPEN XXX.X %<br />
CONDENSER FANS ON 0<br />
CONDENSER FAN SPEED XXX % (vsd)<br />
COMPRESSOR HEATER ON<br />
VI STEP SOLENOID 1 OFF<br />
VI STEP SOLENOID 2 OFF<br />
RUN PERMISSIVE ON<br />
VSD RUN RELAY OFF<br />
VSD SOFTWARE RUN SIGNAL OFF<br />
126<br />
SYSTEM 2 DATA<br />
COMPRESSOR STATUS ON<br />
RUN TIME 0-0-15-26 D-H-M-S<br />
MOTOR CURRENT 104 AMPS 87 %FLA<br />
SUCTION PRESSURE 57 PSIG<br />
DISCHARGE PRESSURE 233 PSIG<br />
OIL PRESSURE 218 PSIG<br />
CONDENSER LIQUID TEMP 42.9 DEGF<br />
DISCHARGE TEMPERATURE 145.5 DEGF<br />
OIL TEMPERATURE 102.8 DEGF<br />
SAT CONDENSER TEMP 31.7 DEGF<br />
SUBCOOLING 11.2 DEGF<br />
SAT DISCHARGE TEMP 112.1 DEGF<br />
DISCHARGE SUPERHEAT 33.4 DEGF<br />
MOTOR TMP XXX.X XXX.X XXX.X DEGF<br />
COMPRESSOR SPEED XXX.X%<br />
FLASH TANK LEVEL < 512 ADC<br />
COND DRAIN % OPEN XXX.X%<br />
ECONOMIZER % OPEN XXX.X%<br />
CONDENSER FANS ON 3<br />
CONDENSER FAN SPEED XXX% (vsd)<br />
COMPRESSOR HEATER OFF<br />
VI STEP SOLENOID 1 OFF<br />
VI STEP SOLENOID 2 OFF<br />
RUN PERMISSIVE ON<br />
VSD RUN RELAY OFF<br />
VSD SOFTWARE RUN SIGNAL OFF<br />
UNIT OPERATING SCHEDULE<br />
S M T W T F S *=HOLIDAY<br />
MON START=00:00AM STOP=00:00AM<br />
TUE START=00:00AM STOP=00:00AM<br />
FORM 201.28-NM1.1<br />
ISSUE DATE: 8/29/2012<br />
WED START=00:00AM STOP=00:00AM<br />
THU START=00:00AM STOP=00:00AM<br />
FRI START=00:00AM STOP=00:00AM<br />
SAT START=00:00AM STOP=00:00AM<br />
HOL START=00:00AM STOP=00:00AM<br />
SOUND LIMIT SCHEDULE<br />
(if enabled)<br />
MON START=00:00AM STOP=00:00AM<br />
TUE START=00:00AM STOP=00:00AM<br />
WED START=00:00AM STOP=00:00AM<br />
THU START=00:00AM STOP=00:00AM<br />
FRI START=00:00AM STOP=00:00AM<br />
SAT START=00:00AM STOP=00:00AM<br />
HOL START=00:00AM STOP=00:00AM<br />
History Data Printout<br />
History printouts, when selected, provide stored data<br />
relating to all specific system and chiller operating<br />
conditions at the time of the fault, regardless of whether<br />
a lockout occurred. History information is stored in<br />
battery-backed memory on the Chiller Control Board<br />
and is not affected by power failures or resetting of<br />
faults. Whenever a fault of any type occurs, all system<br />
operating data is stored in battery-backed memory at<br />
the instant of the fault. The history printout is similar<br />
to the operating data printout except for the change in<br />
the header information shown below:<br />
YORK INTERNATIONAL CORPORATION<br />
SYS 1 YYYYYYY<br />
<strong>YVAA</strong> SCREW CHILLER<br />
HISTORY NUMBER 1<br />
2:04:14 PM 30 APR 11<br />
HIGH DSCH PRESS SHUTDOWN<br />
STATUS AT TIME OF SHUTDOWN<br />
SYS 1 XXXXXXXXXXXXXXXXXXXXXXXXXX<br />
SYS 2 XXXXXXXXXXXXXXXXXXXXXXXXXX<br />
ALL FAULTS<br />
XXXXXXXXXXXXXXXXXXXXXXXXXXXXXXXX<br />
XXXXXXXXXXXXXXXXXXXXXXXXXXXXXXXX<br />
The most recent fault will always be stored as HIS-<br />
TORY BUFFER #1.<br />
JOHNSON CONTROLS
FORM 201.28-NM1.1<br />
ISSUE DATE: 8/29/2012<br />
System Switches Key Operation<br />
The SYSTEM SWITCHES key allows the operator<br />
to turn individual systems ON and OFF. Safety lockouts<br />
are also reset by selecting the respective system<br />
switch RESET. When the SYSTEM SWITCHES key<br />
is pressed, the following message will appear:<br />
SYSTEM SWITCHES SYS 1 ON / OFF / RESET<br />
◄ ► =XXXXXXXXXXXXXXX<br />
The display indicates the respective system and it’s<br />
ON/OFF /reset switch status. The ▲▼ (ARROW)<br />
keys allow scrolling to the next and previous system<br />
switch (System 1 and 2).<br />
SYSTEM SWITCHES SYS 2 ON / OFF / RESET<br />
◄ ► =XXXXXXXXXXXXXXX<br />
SYSTEM SWITCHES KEY<br />
SECTION 8 - MICROPANEL<br />
SYSTEM<br />
SWITCHES<br />
KEY<br />
JOHNSON CONTROLS 127<br />
LD10605<br />
The ◄ (LEFT ARROW) or ► (RIGHT ARROW)<br />
keys allow scrolling through the choices of:<br />
• SYSTEM OFF (default)<br />
• SYSTEM ON<br />
• RESET (LOCKOUT)<br />
The switch selection is accepted into memory by pressing<br />
the � (ENTER) key.<br />
When the “RESET” selection is made and accepted, it<br />
will not change the position of the switch (either ON<br />
or OFF).<br />
Whenever possible, except in emergencies,<br />
always use the associated system<br />
switch to turn off a compressor, which<br />
allows the compressors to go through a<br />
controlled shutdown. Avoid using the<br />
"UNIT" switch to turn off the compressors.<br />
8
THIS PAGE INTENTIONALLY LEFT BLANK
FORM 201.28-NM1.1<br />
ISSUE DATE: 8/29/2012<br />
GENERAL REQUIREMENTS<br />
The units have been designed to operate continuously,<br />
provided they are regularly maintained and operated<br />
within the limitations given in this manual. Each unit<br />
should be included in a routine schedule of daily maintenance<br />
checks by the operator/customer, backed up by<br />
regular service inspection and maintenance visits by a<br />
suitably qualified Service Engineer.<br />
It is entirely the responsibility of the owner to provide<br />
for these regular maintenance requirements and/<br />
or enter into a maintenance agreement with a <strong>Johnson</strong><br />
<strong>Controls</strong> service organization to protect the operation<br />
of the unit. If damage or a system failure occurs due<br />
to improper maintenance during the warranty period,<br />
<strong>Johnson</strong> <strong>Controls</strong> shall not be liable for costs incurred<br />
to return the unit to satisfactory condition.<br />
Weekly Maintenance<br />
This “Maintenance” section applies to<br />
the basic unit only and may, on individual<br />
contracts, be supplemented by additional<br />
requirements to cover any modifications<br />
or ancillary equipment as applicable.<br />
The “Safety” section of this manual<br />
should be read carefully before attempting<br />
any maintenance operations on the<br />
unit.<br />
The following maintenance checks should be carried<br />
out on a weekly basis by the operator/customer. Please<br />
note that the units are not generally user serviceable<br />
and no attempt should be made to rectify faults or<br />
problems found during daily checks unless competent<br />
and equipped to do so. If in any doubt, contact your<br />
local <strong>Johnson</strong> <strong>Controls</strong> Service Agent.<br />
Unit Status<br />
Press the ‘STATUS’ key on the keypad and ensure no<br />
fault messages are displayed.<br />
SECTION 9 - MAINTENANCE<br />
Refrigerant Leaks<br />
Visually check the heat exchangers, compressors and<br />
pipework for damage and gas leaks.<br />
Operating Conditions<br />
Read the operating pressures and temperatures at the<br />
control panel using the display keys and check that<br />
these are within the operating limitations given in the<br />
manual.<br />
Compressor Oil Level<br />
Compressor oil level will typically run below the bottom<br />
of the sight glass. Oil levels will only be visible<br />
in the sight glass after running for periods of 15 to 30<br />
minutes at full compressor speed. Do not run with oil<br />
levels above the sight glass. Be careful when viewing<br />
the sight glass not to confuse a full sight glass with an<br />
empty sight glass.<br />
Refrigerant Charge<br />
Assure there is a level of refrigerant in the evaporator<br />
sight glass while running at “Full Load” for 15 to 30<br />
minutes.<br />
Adding Charge to a System<br />
A sight glass is located in the evaporator. When optimally<br />
charged after running full load, the refrigerant<br />
level should be approximately in the center of the sight<br />
glass. There should be little concern if the level is high<br />
or low in the glass, it should not affect operation.<br />
It is not necessary to weigh charge unless<br />
the entire charge has been lost. The ease<br />
of charging is possible since the microchannel<br />
coils hold only a small amount<br />
of refrigerant charge. A charging valve,<br />
located between the fixed orifice and the<br />
evaporator, may be used if charge adjustment<br />
is required. Charge should be<br />
added as liquid while circulating water<br />
through the evaporator. If the complete<br />
charge needs to be added, see Refrigerant<br />
Removal, Evacuation and Charging a<br />
<strong>YVAA</strong> Chiller on Page 130 in this section.<br />
Use the valve on the liquid line for adding<br />
the full charge and open the valves per<br />
the procedure.<br />
JOHNSON CONTROLS 129<br />
9
SECTION 9 - MAINTENANCE<br />
REFRIGERANT REMOVAL, EVACUATION<br />
AND CHARGING A <strong>YVAA</strong> CHILLER<br />
Refrigerant Removal<br />
The <strong>YVAA</strong> utilizes a flooded evaporator. Extreme care<br />
must be taken when removing refrigerant to prevent<br />
damage to the evaporator and the chiller. Carefully review<br />
the following caution below before proceeding<br />
with the recommended process.<br />
130<br />
Incorrect removal of refrigerant will result<br />
in catastrophic freeze damage to the<br />
evaporator and possible additional damage<br />
to other chiller components. Whenever<br />
there is water in the evaporator, the<br />
chilled liquid pumps must be ON and<br />
circulating liquid through the evaporator<br />
above minimum recommended flow rates.<br />
When liquid refrigerant is being removed,<br />
monitor the pressure and do not allow the<br />
pressure to drop below the freeze point<br />
of the chilled liquid flowing through the<br />
evaporator until all liquid refrigerant has<br />
been removed from the evaporator and<br />
only gas remains. Once all liquid has<br />
been removed, the remaining refrigerant<br />
vapor can be removed while allowing the<br />
pressure to drop below the freeze point<br />
with the pump circulating liquid through<br />
the evaporator.<br />
To remove refrigerant from the evaporator, follow the<br />
procedure below:<br />
1. Turn the chilled liquid pump ON and assure the<br />
flow is above the minimum recommended flow.<br />
2. Assure all manual valves in the system are open.<br />
Open Condenser Drain and Economizer Feed<br />
valves to 100% in the service mode.<br />
3. Connect the recovery unit and a manifold gauge<br />
to the liquid line feeding the eductor. There may<br />
be a valve in the line or a Schrader fitting on the<br />
eductor filter for this purpose.<br />
4. Connect the recovery unit to a recovery cylinder<br />
sitting on an accurate scale. Turn the recovery<br />
unit ON and observe the liquid refrigerant flowing<br />
from the line into the cylinder. The flow of liquid<br />
should be obvious.<br />
FORM 201.28-NM1.1<br />
ISSUE DATE: 8/29/2012<br />
5. Monitor the pressure gauge to assure that the pressure<br />
does not drop below the freeze point of the<br />
chilled liquid. Throttle the flow as needed with the<br />
manifold gauge valves to prevent pressures from<br />
dropping below the freeze point.<br />
6. Continue to remove the liquid refrigerant while<br />
observing the flow and the pressure. Note the<br />
charge in the system based on the nameplate data<br />
to determine when the charge removal is nearly<br />
complete. Monitor the weight of the recovery<br />
cylinder to determine when the cylinder is full.<br />
Change the cylinder as needed.<br />
7. Continue removing refrigerant until liquid is no<br />
longer observed flowing in the manifold hoses.<br />
8. Once the liquid is removed and no longer visible<br />
in the hose, the remaining gas can be pumped out<br />
with the recovery unit while the pressure is allowed<br />
to drop to 0 barg (0 PSIG).<br />
9. Servicing may now be performed on the system<br />
as needed.<br />
Evacuating a System<br />
To evacuate a system, follow the procedure below:<br />
1. Turn the chilled liquid pump ON and assure the<br />
flow is above the minimum recommended flow.<br />
2. Assure all manual values are open. Open the Condenser<br />
Drain (Flash Tank Feed) and Economizer<br />
Valves in the Service Mode to 100 %<br />
3. Connect vacuum hoses to as many points as possible.<br />
Be sure that at least one connection is made<br />
on both the high and low side of the piping. A connection<br />
to the evacuation fitting on the compressor<br />
is also recommended. Evacuate the system to<br />
a minimum of 500 microns. Close the valves at<br />
the evacuation points and assure the pressure in<br />
the chiller does not rise more than 50 microns in<br />
10 minutes. Check for leaks if the pressure rises.<br />
Charging Refrigerant into a System<br />
To charge the system with refrigerant, follow the procedure<br />
below:<br />
1. With all system valves open and the Condenser<br />
Drain and Economizer Valves open to 100% by<br />
manually opening them in the Service Mode,<br />
JOHNSON CONTROLS
FORM 201.28-NM1.1<br />
ISSUE DATE: 8/29/2012<br />
charge refrigerant vapor into the high side of the<br />
system at the charging port on the liquid line. Continue<br />
charging vapor until the pressure is above<br />
the freeze point of the chilled liquid. Once above<br />
the freeze point, liquid can be charged according<br />
to the recommended nameplate charge.<br />
2. Reconnect the water piping to the water boxes.<br />
3. Close the evaporator drain valves and fill the<br />
evaporator with water from the cooling loop.<br />
4. Fill the water loop and check for leaks.<br />
5. Close (0%) the Condenser Drain and Economizer<br />
Valve in the Service Mode. Recycle the chiller<br />
power.<br />
6. Once the system is operating, the charge will<br />
distribute itself throughout the system. Trim the<br />
charge as needed to a level of about midway on<br />
the evaporator sight glass while running full speed<br />
for 15 minutes.<br />
MICROCHANNEL COIL CLEANING<br />
The coil cleaning procedure for microchannel coils is<br />
significantly different than tube and fin type coils. As<br />
such, care must be taken to understand the differences<br />
to avoid damage to the microchannel coil. These differences<br />
require a number of DO NOT’s that must be<br />
observed:<br />
• DO NOT use coil cleaners or any chemical on a<br />
microchannel coil. This can cause severe damage<br />
to the coils.<br />
• DO NOT use a pressure washer to clean the coils.<br />
While it is possible to clean a coil with a pressure<br />
washer, it’s also possible to destroy it.<br />
• DO NOT contact the coil with a hard surface such<br />
as a hose nozzle or metal vacuum nozzle or any<br />
other tool.<br />
SECTION 9 - MAINTENANCE<br />
Microchannel coils tend to accumulate more dirt on<br />
the surface, but less dirt inside the coils, which makes<br />
them easier to clean. Follow the three steps below for<br />
cleaning the coils:<br />
1. Remove surface debris such as dirt, leaves, insects,<br />
fibers, etc. with a vacuum cleaner having<br />
a soft attachment rather than a metal tube. Compressed<br />
air blown from the inside out can also be<br />
used. When brushing debris off the face of the coil<br />
a soft bristle (not wire) brush can be used. Do not<br />
scrape the coil with the vacuum nozzle, air nozzle,<br />
or any other tool.<br />
2. Rinse the coil with tap water. Do not use coil<br />
cleaners. Rinse the coil from the inside out, running<br />
water through every passage in the heat exchanger<br />
surface until it is clean. Microchannel<br />
coils are stronger than conventional tube and fin<br />
coils, but handle them with care, since you can<br />
cause a leak due to impact. Use a gentle spray<br />
from a spray nozzle with a plastic end or put your<br />
finger on the end of the spray nozzle to reduce<br />
impact and provide a gentle spray.<br />
3. Because of the fin geometry, microchannel coils<br />
retain water more than tube and fin style. It is generally<br />
recommended to blow or vacuum out the<br />
rinse water from the coils to speed drying and prevent<br />
water pooling.<br />
Scheduled Maintenance<br />
The maintenance operations detailed in the following<br />
table should be carried out on a regular basis by a suitably<br />
qualified Service Engineer. It should be noted that<br />
the interval necessary between each ‘minor’ and ‘major’<br />
service can vary depending on, for instance, application,<br />
site conditions and expected operating schedule.<br />
Normally a ‘minor’ service should be carried out<br />
every three to six months and a ‘major’ service once a<br />
year. It is recommended that your local <strong>Johnson</strong> <strong>Controls</strong><br />
Service Center is contacted for recommendations<br />
for individual sites.<br />
JOHNSON CONTROLS 131<br />
9
SECTION 9 - MAINTENANCE<br />
132<br />
PROCEDURE WEEKLY QUARTERLY<br />
Check Oil Level in Oil Separator<br />
Sight Glass.<br />
Check <strong>Liquid</strong> Line Sight Glass/<br />
Moisture Indicator.<br />
Check refrigerant level in the Evaporator<br />
Sight Glass while running<br />
full load for 10 to 15 minutes.<br />
Record System Operating Temperatures<br />
& Pressures.<br />
Check Condenser Coils for dirt /<br />
debris and clean as necessary.<br />
Check Programmable Operating<br />
Setpoints and Safety Cutouts. Assure<br />
they are correct for the application.<br />
Check Compressor and Evaporator<br />
Heater operation.<br />
Check for dirt in the Panel. Check<br />
Door Gasket sealing integrity.<br />
X<br />
X<br />
X<br />
X<br />
SEMI-<br />
ANNUALLY<br />
**Leak check the Chiller. X<br />
**Sample Compressor Oil, check for<br />
Acid, and replace if necessary.<br />
**Disconnect Power Source and<br />
Lock Out. Check tightness of<br />
Power Wiring connections.<br />
Check Glycol concentration on Low<br />
Temp. or other applications where<br />
freezing may be a problem.<br />
MAINTENANCE REQUIREMENTS FOR<br />
<strong>YVAA</strong> CHILLERS<br />
X<br />
X<br />
X<br />
X<br />
ANNUALLY EVERY 5<br />
YEARS<br />
VSD Glycol Change. X<br />
X<br />
X<br />
X<br />
FORM 201.28-NM1.1<br />
ISSUE DATE: 8/29/2012<br />
EVERY *<br />
HOURS<br />
* Reserved for customer use for any special site requirements.<br />
** This procedure must be performed at the specific time by an industry certified technician who has been<br />
trained and qualified to work on this type of equipment. A record of this procedure be successfully carried out should be maintained on file by<br />
the equipment owner should proof of adequate maintenance be required at a later date for warranty purposes.<br />
JOHNSON CONTROLS
FORM 201.28-NM1.1<br />
ISSUE DATE: 8/29/2012<br />
TABLE 13 - TROUBLESHOOTING GUIDE<br />
PROBLEM POSSIBLE CAUSE ACTION<br />
NO DISPLAY ON CON-<br />
TROL PANEL.<br />
UNIT WILL NOT RUN.<br />
LINE FUSE BLOWS.<br />
CHILLER FAULT:<br />
LOW AMBIENT TEMPERATURE<br />
CHILLER FAULT:<br />
HIGH AMBIENT TEMPERATURE<br />
CHILLER FAULT:<br />
LOW LEAVING CHILLED LIQUID<br />
SYSTEM FAULT:<br />
CONTROL VOLTAGE<br />
SYSTEM FAULT:<br />
HIGH OIL TEMPERATURE<br />
Supply to the Panel is missing.<br />
Line Fuse is blown. Check Fuses.<br />
SECTION 9 - MAINTENANCE<br />
High Voltage to the Chiller is missing.<br />
Check 1FU, 2FU, 4FU, 5FU 17FU, or<br />
19FU.<br />
Check 2T or 10T Transformer.<br />
Chiller Control Board is defective. Replace Chiller Control Board.<br />
Display Board defective. Replace Display Board.<br />
SCR Diode Module is defective. Check SCR/Diode Module.<br />
IBGT Module is defective. Check IBGT Module.<br />
VSD Logic Board is defective. Replace VSD Logic Board.<br />
SCR Trigger Board is defective. Replace SCR Trigger Board.<br />
Ambient temperature is lower than<br />
the programmed operating limit.<br />
Ambient Sensor is defective.<br />
Ambient Temperature is above the<br />
maximum operating limit.<br />
Ambient Sensor is defective.<br />
Leaving chilled liquid temperature drops<br />
faster than the unit can unload.<br />
Chilled Water Sensor is defective.<br />
System Fuse is blown.<br />
Oil Temperature Sensor is defective.<br />
Condenser Fans NOT operating or running<br />
backwards.<br />
Check the programmed cutout and<br />
determine if it is programmed correctly.<br />
Check the panel against the thermometer<br />
reading of ambient temperature.<br />
Check outside air temperature.<br />
Check the Panel Display against<br />
Thermometer reading of Ambient<br />
Temperature at the sensor.<br />
Check for restricted flow.<br />
Check for rapid flow changes.<br />
Water loop is too small.<br />
Flow is below minimum for chiller.<br />
Check Sensor against Temp. Gauge in<br />
water line.<br />
Check Sensor for intermittent operation.<br />
Check Wiring for shorts or opens.<br />
Check respective system Fuse 20FU<br />
or 21FU.<br />
Check Sensor with infrared to determine if<br />
reading is reasonable.<br />
Check Fans.<br />
Coils dirty. Check and clean Coils.<br />
NOTE: Always remove power to the chiller and assure the DC Bus voltage has bled off.<br />
JOHNSON CONTROLS 133<br />
9
SECTION 9 - MAINTENANCE<br />
TABLE 13 - TROUBLESHOOTING GUIDE (CONT'D)<br />
134<br />
PROBLEM POSSIBLE CAUSE ACTION<br />
SYSTEM FAULT:<br />
HIGH<br />
DISCHARGE<br />
PRESSURE<br />
SYSTEM FAULT:<br />
HIGH<br />
DISCHARGE<br />
TEMPERATURE<br />
SYSTEM FAULT:<br />
HIGH MOTOR<br />
TEMPERATURE<br />
SYSTEM FAULT:<br />
LOW<br />
SUCTION<br />
PRESSURE<br />
SYSTEM FAULT:<br />
DISCHARGE<br />
PRESSURE<br />
LIMITING<br />
Coils dirty. Check and clean coils.<br />
Coils are damaged. Comb out fins.<br />
Fans NOT operating.<br />
Check fan fuses.<br />
Check fan rotation.<br />
Check fan motor/blade.<br />
FORM 201.28-NM1.1<br />
ISSUE DATE: 8/29/2012<br />
System is overcharged. Remove charge and check subcooling.<br />
Discharge Temperature Sensor is defective. Check Sensor.<br />
Condenser Fans NOT operating or are running<br />
backwards.<br />
Check Fans.<br />
Coils dirty. Check and clean Coils.<br />
High Superheat.<br />
High Motor temperature input from one of<br />
the sensors.<br />
Measure Superheat with gauges and<br />
thermocouple. Determine cause.<br />
Low charge. Check subcooling.<br />
Refrigerant charge low. Check subcooling.<br />
Excess charge in system, High discharge<br />
pressure. Check subcooling.<br />
High Superheat. Drain/Feed Valves NOT<br />
controlling. Isolate cause.<br />
Motor Sensor reading incorrectly. Program<br />
panel to ignore a single sensor.<br />
Economizer Solenoid energized at low<br />
speeds. Valve is leaking through.<br />
Transducer reads incorrectly. Check transducer against a gauge.<br />
Suction Temp. Sensor reads incorrectly. Check sensor against a thermocouple.<br />
Low flow. Check flow.<br />
Condenser Drain (Flash Tank Feed) Valve<br />
NOT operating.<br />
Condenser or Drain (Flash Tank Feed) Valve<br />
defective.<br />
Check Feed and Drain Valve operation.<br />
Check superheat.<br />
Check Feed and Drain Valve operation.<br />
Check superheat.<br />
Discharge Transducer is defective. Check transducer against a gauge.<br />
Ambient Temp. very high. Normal operation.<br />
Fans NOT operating. Check fan operation.<br />
Remote or local discharge pressure<br />
load limiting is programmed.<br />
NOTE: Always remove power to the chiller and assure the DC Bus voltage has bled off.<br />
Normal operation.<br />
JOHNSON CONTROLS
FORM 201.28-NM1.1<br />
ISSUE DATE: 8/29/2012<br />
TABLE 13 - TROUBLESHOOTING GUIDE (CONT'D)<br />
PROBLEM POSSIBLE CAUSE ACTION<br />
SYSTEM STATUS:<br />
MOTOR<br />
CURRENT<br />
LIMITING<br />
VSD FAULT:<br />
HIGH<br />
BASEPLATE<br />
TEMPERATURE<br />
VSD FAULT:<br />
LOW DC<br />
BUS VOLTAGE<br />
A high motor current anticipatory control has<br />
activated current limiting<br />
Coolant level low. Add coolant.<br />
SECTION 9 - MAINTENANCE<br />
Ambient temperature is high, normal<br />
response from controller<br />
Remote or panel limiting is in effect,<br />
Normal response.<br />
Excess charge in system, adjust charge.<br />
Condenser coils dirty, Clean condenser.<br />
Fans NOT operating. Check fans.<br />
Glycol Pump is defective. Replace Glycol Pump.<br />
VSD Board is defective Replace VSD Logic Board.<br />
IBGT Module is defective. Check defective IGBT Module.<br />
SCR / Diode Module is defective. Check SCR / Diode Module.<br />
SCR Trigger Board is defective. Check SCR Trigger Board.<br />
NOTE: Always remove power to the chiller and assure the DC Bus voltage has bled off.<br />
JOHNSON CONTROLS 135<br />
9
SECTION 9 - MAINTENANCE<br />
136<br />
FORM 201.28-NM1.1<br />
ISSUE DATE: 8/29/2012<br />
CHILLED LIQUID AND SUCTION TEMPERATURE SENSOR INPUT VOLTAGE<br />
TABLE 14 - TEMPERATURE INPUT VOLTAGE SENSOR (MEASURED SIGNAL TO SHIELD AT THE SENSOR)<br />
TEMP. ºF (°C) VOLTAGE TEMP. °F (°C) VOLTAGE TEMP. °F (°C) VOLTAGE<br />
16.1 (-8.8) 1.52 35.9 (2.2) 2.19 55.6 (13.1) 2.85<br />
16.7 (-8.5) 1.54 36.5 (2.5) 2.21 56.3 (13.5) 2.87<br />
17.3 (-8.2) 1.56 37.0 (2.8) 2.23 56.9 (13.8) 2.89<br />
17.9 (-7.8) 1.58 37.6 (3.1) 2.25 57.5 (14.2) 2.91<br />
18.5 (-7.5) 1.60 38.2 (3.4) 2.27 58.1 (14.5) 2.93<br />
19.1 (-7.2) 1.62 38.7 (3.7) 2.29 58.7 (14.8) 2.95<br />
19.7 (-6.8) 1.64 39.3 (4.1) 2.30 59.4 (15.2) 2.97<br />
20.3 (-6.5) 1.66 39.9 (4.4) 2.32 60.0 (15.6) 2.99<br />
20.9 (-6.2) 1.68 40.4 (4.7) 2.34 60.6 (15.9) 3.01<br />
21.5 (-5.8) 1.70 41.0 (5.0) 2.36 61.3 (16.3) 3.03<br />
22.1 (-5.5) 1.72 41.6 (5.3) 2.38 61.9 (16.6) 3.05<br />
22.7 (-5.2) 1.74 42.1 (5.6) 2.40 62.5 (16.9) 3.07<br />
23.3 (-4.8) 1.76 42.7 (5.9) 2.42 63.2 (17.3) 3.09<br />
23.9 (-4.5) 1.78 43.3 (6.3) 2.44 63.8 (17.7) 3.11<br />
24.5 (-4.2) 1.80 43.9 (6.6) 2.46 64.5 (18.1) 3.13<br />
25.0 (-3.9) 1.82 44.4 (6.9) 2.48 65.1 (18.4) 3.14<br />
25.6 (-3.6) 1.84 45.0 (7.2) 2.50 65.8 (18.8) 3.16<br />
26.2 (-3.2) 1.86 45.6 (7.5) 2.52 66.5 (19.2) 3.18<br />
26.8 (-2.9) 1.88 46.2 (7.9) 2.54 67.1 (19.5) 3.20<br />
27.3 (-2.6) 1.90 46.7 (8.2) 2.56 67.8 (19.9) 3.22<br />
27.9 (-2.8) 1.91 47.3 (8.5) 2.58 68.5 (20.3) 3.24<br />
28.5 (-1.9) 1.93 47.9 (8.8) 2.60 69.2 (20.7) 3.26<br />
29.0 (-1.7) 1.95 48.5 (9.2) 2.62 69.9 (21.1) 3.28<br />
29.6 (-1.3) 1.97 49.1 (9.5) 2.64 70.6 (21.4) 3.30<br />
30.2 (-1) 1.99 49.7 (9.8) 2.66 71.3 (21.8) 3.32<br />
30.8 (-0.7) 2.01 50.3 (10.2) 2.68 72.0 (22.2) 3.34<br />
31.3 (-0.4) 2.03 50.8 (10.4) 2.70 72.7 (22.6) 3.36<br />
31.9 (-0.1) 2.05 51.4 (10.8) 2.71 73.4 (23) 3.38<br />
32.5 (0.3) 2.07 52.0 (11.1) 2.73 74.2 (23.4) 3.40<br />
33.0 (0.6) 2.09 52.6 (11.4) 2.75 74.9 (23.8) 3.42<br />
33.6 (0.9 ) 2.11 53.2 (11.8) 2.77<br />
34.2 (1.2) 2.13 53.8 (12.1) 2.79<br />
34.8 (1.5) 2.15 54.5 (12.5) 2.81<br />
35.3 (1.8) 2.17 55.0 (12.8) 2.83<br />
JOHNSON CONTROLS
FORM 201.28-NM1.1<br />
ISSUE DATE: 8/29/2012<br />
TABLE 15 - OUTSIDE AIR TEMPERATURE SENSOR INPUT VOLTAGE<br />
(MEASURED SIGNAL TO SHIELD AT THE SENSOR)<br />
SECTION 9 - MAINTENANCE<br />
TEMP. ºF (°C) VOLTAGE TEMP. ºF (°C) VOLTAGE TEMP. ºF (°C) VOLTAGE<br />
0.24 (-17.6) 0.68 49.8 (9.9) 2.00 93.3 (34.1) 3.31<br />
1.79 (-16.8) 0.71 50.7 (10.4) 2.03 94.4 (34.7) 3.34<br />
3.30 (-15.9) 0.74 51.6 (10.9) 2.06 95.6 (35.3) 3.37<br />
4.76 (-15.1) 0.77 52.5 (11.4) 2.09 96.8 (36) 3.40<br />
6.19 (-14.3) 0.80 53.4 (11.9) 2.11 98.0 (36.7) 3.43<br />
7.58 (-13.6) 0.83 54.3 (12.4) 2.14 99.2 (37.3) 3.46<br />
8.94 (-12.8) 0.85 55.3 (12.9) 2.17 100.4 (38) 3.49<br />
10.3 (-12.1) 0.88 56.2 (13.4) 2.20 101.6 (38.7) 3.52<br />
11.6 (-11.3) 0.91 57.1 (13.9) 2.23 102.9 (39.4) 3.55<br />
12.8 (-10.7) 0.94 58.0 (14.4) 2.26 104.2 (40.1) 3.57<br />
14.1 (-9.9) 0.97 58.9 (14.9) 2.29 105.5 (40.8) 3.60<br />
15.3 (-9.3) 1.00 59.8 (15.4) 2.32 106.8 (41.6) 3.63<br />
16.5 (-8.6) 1.03 60.7 (15.9) 2.35 108.1 (42.3) 3.66<br />
17.7 (-7.9) 1.06 61.6 (16.4) 2.38 109.5 (43.1) 3.69<br />
18.9 (-7.3) 1.09 62.6 (17) 2.41 110.9 (43.8) 3.72<br />
20.0 (-6.7) 1.12 63.5 (17.5) 2.44 112.3 (44.6) 3.75<br />
21.2 (-6) 1.15 64.4 (18) 2.47 113.8 (45.4) 3.78<br />
22.3 (-5.4) 1.18 65.3 (18.5) 2.50 115.2 (46.2) 3.81<br />
23.4 (-4.8) 1.21 66.3 (19.1) 2.52 116.7 (47.1) 3.84<br />
24.4 (-4.2) 1.24 67.2 (19.5) 2.55 118.3 (47.9) 3.87<br />
25.5 (-3.6) 1.26 68.1 (20.1) 2.58 119.9 (48.8) 3.90<br />
26.6 (-3) 1.26 69.1 (20.6) 2.61 121.5 (49.7) 3.93<br />
27.6 (-2.4) 1.32 70.0 (21.1) 2.64 123.2 (50.7) 3.96<br />
28.7 (-1.8) 1.35 70.9 (21.6) 2.67 124.9 (51.6) 3.98<br />
29.7 (-1.3) 1.38 71.9 (22.2) 2.70 126.6 (52.6) 4.01<br />
30.7 (-0.7) 1.41 72.8 (22.7) 2.73 128.4 (53.6) 4.04<br />
31.7 (-0.2) 1.44 73.8 (23.2) 2.76 130.3 (54.6) 4.07<br />
32.7 (0.4) 1.47 74.8 (23.8) 2.76<br />
33.7 (0.9) 1.50 75.8 (24.3) 2.82<br />
34.7 (1.5) 1.53 76.7 (24.8) 2.85<br />
35.7 (2.1) 1.56 77.7 (25.4) 2.88<br />
36.7 (2.6) 1.59 78.7 (25.9) 2.91<br />
37.6 (3.1) 1.62 79.7 (26.5) 2.93<br />
38.6 (3.7) 1.65 80.7 (27.1) 2.96<br />
39.6 (4.2) 1.67 81.7 (27.6) 2.99<br />
40.5 (4.7) 1.70 82.7 (28.2) 3.02<br />
41.4 (5.2) 1.73 83.6 (28.7) 3.05<br />
42.4 (5.8) 1.76 84.6 (29.2) 3.08<br />
43.3 (6.3) 1.79 85.7 (29.8) 3.11<br />
44.3 (6.8) 1.82 86.7 (30.4) 3.13<br />
45.2 (7.3) 1.85 87.8 (31) 3.16<br />
46.1 (7.8) 1.88 88.9 (31.6) 3.19<br />
47.0 (8.3) 1.91 90.1 (32.3) 3.22<br />
48.0 (8.9) 1.94 91.1 (32.8) 3.25<br />
48.9 (9.4) 1.97 92.2 (33.4) 3.28<br />
JOHNSON CONTROLS 137<br />
9
SECTION 9 - MAINTENANCE<br />
TABLE 16 - PRESSURE TRANSDUCER OUTPUT VOLTAGE<br />
(MEASURED SIGNAL TO RETURN AT THE TRANSDUCER)<br />
138<br />
SUCTION PRESSURE TRANSDUCER<br />
(125 PSIG)<br />
FORM 201.28-NM1.1<br />
ISSUE DATE: 8/29/2012<br />
DISCHARGE CONDENSER LIQUID PRESSURE AND<br />
DISCHARGE PRESSURE TRANSDUCER<br />
(400 PSIG)<br />
PRESSURE VOLTAGE PRESSURE VOLTAGE<br />
0 0.50 0 0.50<br />
5 0.66 25 0.75<br />
10 0.82 50 1.00<br />
15 0.98 75 1.25<br />
20 1.14 100 1.50<br />
25 1.30 125 1.75<br />
30 1.46 150 2.00<br />
35 1.62 175 2.25<br />
40 1.78 200 2.50<br />
45 1.94 225 2.75<br />
50 2.10 250 3.00<br />
55 2.26 275 3.25<br />
60 2.42 300 3.50<br />
65 2.58 325 3.75<br />
70 2.74 350 4.00<br />
75 2.90 375 4.25<br />
80 3.06 400 4.50<br />
85 3.22<br />
90 3.38<br />
95 3.54<br />
100 3.70<br />
105 3.86<br />
110 4.02<br />
115 4.18<br />
120 4.34<br />
125 4.50<br />
JOHNSON CONTROLS
FORM 201.28-NM1.1<br />
ISSUE DATE: 8/29/2012<br />
TABLE 17 - MOTOR TEMPERATURE SENSOR RESISTANCE (CHECK AT THE MOTOR)<br />
TEMP.<br />
ºF (ºC)<br />
R NOMINAL<br />
(OHMS)<br />
R TOL<br />
(± %)<br />
RMIN<br />
(OHMS)<br />
SECTION 9 - MAINTENANCE<br />
RMAX<br />
(OHMS)<br />
-4 (-20) 97,062 5.00 92,209 101,915<br />
5 (-15) 77,941 4.60 69,586 76,296<br />
14 (-10) 55,391 4.20 52,996 57,643<br />
23 (-5) 42,324 3.85 40,695 43,954<br />
32 (0) 32,654 3.50 31,511 33,797<br />
41 (5) 25,396 3.15 24,596 26,196<br />
50 (10) 19,903 2.80 19,346 20,461<br />
59 (15) 15,713 2.50 15,321 16,106<br />
68 (20) 12,493 2.20 12,218 12,768<br />
77 (25) 10,000 2.00 9,800 10,200<br />
86 (30) 8,056 2.40 7,863 8,250<br />
95 (35) 6,531 2.70 6,354 6,707<br />
104 (40) 5,326 3.00 5,166 5,485<br />
113 (45) 4,368 3.25 4,226 4,510<br />
122 (50) 3,602 3.50 3,476 3,728<br />
131 (55) 2,986 3.75 2,874 3,098<br />
140 (60) 2,488 4.00 2,389 2,588<br />
149 (65) 2,083 4.25 1,995 2,172<br />
158 (70) 1,753 4.50 1,674 1,832<br />
167 (75) 1,481 4.75 1,411 1,551<br />
176 (80) 1,257 5.00 1,194 1,321<br />
185 (85) 1,071 5.20 1,016 1,127<br />
194 (90) 916.9 5.40 867.4 966.4<br />
203 (95) 787.7 5.60 743.6 831.9<br />
212 (100) 679.3 5.80 639.9 718.7<br />
221 (105) 587.9 6.00 552.6 623.2<br />
230 (110) 510.6 6.20 479.9 542.3<br />
239 (115) 445.0 6.40 416.5 473.5<br />
248 (120) 389.0 6.60 363.4 414.7<br />
257 (125) 341.2 6.70 318.4 364.1<br />
266 (130) 300.2 6.90 279.5 320.9<br />
275 (135) 264.9 7.10 246.1 283.7<br />
284 (140) 234.4 7.30 217.3 251.5<br />
293 (145) 208.0 7.40 192.6 223.3<br />
302 (150) 185.0 7.50 171.1 198.9<br />
JOHNSON CONTROLS 139<br />
9
THIS PAGE INTENTIONALLY LEFT BLANK
FORM 201.28-NM1.1<br />
ISSUE DATE: 8/29/2012<br />
SECTION 10 - DECOMMISSIONING, DISMANTLING AND DISPOSAL<br />
Never release refrigerant to the atmosphere<br />
when emptying the refrigerating<br />
circuits. Suitable retrieval equipment<br />
must be used. If reclaimed refrigerant<br />
cannot be reused. It must be returned to<br />
the manufacturer.<br />
Never discard used compressor oil, as it<br />
contains refrigerant in solution. Return<br />
used oil to the oil manufacturer.<br />
Never discard used compressor oil, as it contains refrigerant<br />
in solution. Return used oil to the oil manufacturer.<br />
Unless otherwise indicated, the operations described<br />
below can be performed by any properly trained maintenance<br />
technician.<br />
GENERAL<br />
Isolate all sources of electrical supply to the unit including<br />
any control system supplies switched by the<br />
unit. Ensure that all points of isolation are secured in<br />
the ‘OFF’ position. The supply cables may then be disconnected<br />
and removed. For connection points refer to<br />
SECTION 4 - INSTALLATION.<br />
Remove all refrigerant from each system of the unit<br />
into a suitable container using a refrigerant reclaim or<br />
recovery unit. This refrigerant may then be re-used, if<br />
appropriate, or returned to the manufacturer for disposal.<br />
Under NO circumstances should refrigerant be<br />
vented to atmosphere. Drain the refrigerant oil from<br />
each system into a suitable container and dispose of<br />
according to local laws and regulations governing the<br />
disposal of oily wastes. Any spilt oil should be mopped<br />
up and similarly disposed of.<br />
Isolate the unit heat exchanger from the external water<br />
systems and drain the heat exchanger section of the<br />
system. If no isolation valves are installed it may be<br />
necessary to drain the complete system.<br />
If glycol or similar solutions have been<br />
used in the water system, or chemical additives<br />
are contained, the solution MUST<br />
be disposed of in a suitable and safe manner.<br />
Under NO circumstances should any<br />
system containing glycol or similar solutions<br />
be drained directly into domestic<br />
waste or natural water systems.<br />
After draining, the water pipework can be disconnected<br />
and removed.<br />
Packaged units can generally be removed in one piece<br />
after disconnection as above. Any fixing down bolts<br />
should be removed and then the unit should be lifted<br />
from position using the points provided and equipment<br />
of adequate lifting capacity.<br />
Reference should be made to SECTION 4 - INSTALLA-<br />
TION on Page 23 for unit installation instructions,<br />
SECTION 9 - MAINTENANCE on Page 129 for unit<br />
weights and SECTION 3 - HANDLING AND STOR-<br />
AGE on Page 19 for handling.<br />
Units which cannot be removed in one piece after disconnection<br />
as above must be dismantled in position.<br />
Special care should be taken regarding the weight and<br />
handling of each component. Where possible units<br />
should be dismantled in the reverse order of installation.<br />
Residual refrigerant oil and glycol or<br />
similar solutions may remain in some<br />
parts of the system. These should be<br />
mopped up and disposed of as described<br />
above.<br />
It is important to ensure that whilst components are being<br />
removed the remaining parts are supported in a safe<br />
manner.<br />
Only use lifting equipment of adequate<br />
capacity.<br />
After removal from position the unit parts may be disposed<br />
of according to local laws and regulations.<br />
JOHNSON CONTROLS 141<br />
10
142<br />
NOTES<br />
FORM 201.28-NM1.1<br />
ISSUE DATE: 8/29/2012<br />
JOHNSON CONTROLS
FORM 201.28-NM1.1<br />
ISSUE DATE: 8/29/2012<br />
The following factors can be used to convert from<br />
English to the most common SI Metric values.<br />
TABLE 18 - SI METRIC CONVERSION<br />
MEASUREMENT MULTIPLY ENGLISH UNIT BY FACTOR TO OBTAIN METRIC UNIT<br />
TEMPERATURE<br />
Capacity Tons Refrigerant Effect (ton) 3.516 Kilowatts (kW)<br />
Power Horsepower 0.7457 Kilowatts (kW)<br />
Flow Rate Gallons / Minute (gpm) 0.0631 Liters / Second (l/s)<br />
Length<br />
To convert degrees Fahrenheit (°F) to degrees Celsius<br />
(°C), subtract 32° and multiply by 5/9 or 0.5556.<br />
Example: (45.0°F - 32°) x 0.5556 = 27.2°C<br />
To convert a temperature range (i.e., a range of 10°F)<br />
from Fahrenheit to Celsius, multiply by 5/9 or 0.5556.<br />
Example: 10.0°F range x 0.5556 = 5.6 °C range<br />
Feet (ft) 0.3048 Meters (m)<br />
Inches (in) 25.4 Millimeters (mm)<br />
Weight Pounds (lbs) 0.4538 Kilograms (kg)<br />
Velocity Feet / Second (fps) 0.3048 Meters / Second (m/s)<br />
Pressure Drop<br />
Feet of Water (ft) 2.989 Kilopascals (kPa)<br />
Pounds / Square Inch (psi) 6.895 Kilopascals (kPa)<br />
JOHNSON CONTROLS 143
P.O. Box 1592, York, Pennsylvania USA 17405-1592 800-861-1001<br />
Subject to change without notice. Printed in USA<br />
Copyright © by <strong>Johnson</strong> <strong>Controls</strong> 2012 www.johnsoncontrols.com<br />
ALL RIGHTS RESERVED<br />
Form 201.28-NM1.1 (812)<br />
Issue Date: August 29, 2012<br />
Supersedes 201.28-NM1.1 (111)