Sharpening Your Woodturning Tools - San Diego Woodturners
Sharpening Your Woodturning Tools - San Diego Woodturners
Sharpening Your Woodturning Tools - San Diego Woodturners

Create successful ePaper yourself
Turn your PDF publications into a flip-book with our unique Google optimized e-Paper software.
Recommended Resources:<br />
· AAW <strong>Sharpening</strong> Video (available in the Club’s video library)<br />
· Allan Batty’s <strong>Woodturning</strong> Notes (available from Craft Supplies)<br />
· Club mentors (names in the newsletter)<br />
<strong>Sharpening</strong> <strong>Tools</strong>:<br />
Necessities:<br />
· Grinding wheel (“white” friable wheel)<br />
· Grinding platform/table<br />
· Wheel dresser<br />
· Eye protection<br />
<strong>Sharpening</strong> <strong>Your</strong> <strong>Woodturning</strong> <strong>Tools</strong><br />
<strong>Sharpening</strong> Procedure (freehand or jig):<br />
Joe Fleming<br />
Niceties:<br />
· Diamond flat hone<br />
· Diamond cone hone<br />
· Grinding jig<br />
· Protractor<br />
1. Adjust grinder platform and/or jig.<br />
2. Place your tool on the grinder platform or in the grinding jig.<br />
3. Place the tool in the required grinding position for that tool (and jig).<br />
4. Place your body in a position so that you can start AND finish the grind.<br />
5. Rehearse the grinding motion before turning on grinder to insure that your body is correctly<br />
positioned.<br />
6. Put on safety glasses or face shield.<br />
7. Turn on grinder and grind.<br />
8. Hone edge if desired.<br />
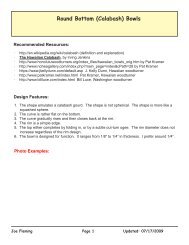
Grinding Angles for Various <strong>Tools</strong>:<br />
Roughing gouge<br />
90°<br />
40°<br />
<strong>San</strong> <strong>Diego</strong> <strong>Woodturners</strong> Page Updated: 0/ 4/2004
Skew<br />
Parting tool<br />
<strong>Sharpening</strong> <strong>Your</strong> <strong>Woodturning</strong> <strong>Tools</strong><br />
Joe Fleming<br />
<strong>San</strong> <strong>Diego</strong> <strong>Woodturners</strong> Page 2 Updated: 0/ 4/2004
Shallow-fluted (spindle) gouge<br />
Scrapers<br />
<strong>Sharpening</strong> <strong>Your</strong> <strong>Woodturning</strong> <strong>Tools</strong><br />
Joe Fleming<br />
<strong>San</strong> <strong>Diego</strong> <strong>Woodturners</strong> Page Updated: 0/ 4/2004
Deep-fluted (bowl) gouge<br />
<strong>Sharpening</strong> <strong>Your</strong> <strong>Woodturning</strong> <strong>Tools</strong><br />
Joe Fleming<br />
<strong>San</strong> <strong>Diego</strong> <strong>Woodturners</strong> Page 4 Updated: 0/ 4/2004
Burrs and Honing <strong>Your</strong> <strong>Tools</strong>:<br />
<strong>Sharpening</strong> <strong>Your</strong> <strong>Woodturning</strong> <strong>Tools</strong><br />
Joe Fleming<br />
Grinding produces a burr of coarse metal on the top edge of the tool. This burr can be an effective<br />
cutting edge in its own right. It can also lead to inconsistent results for clean cuts for some types of<br />
woods.<br />
Honing will remove burrs when desired. Honing will also refresh a cutting edge so that you don’t<br />
have to go back to the grinder every time the edge gets worn.<br />
Here are some general guidelines concerning burrs and honing:<br />
· Using a diamond hone along the cutting edge can usually freshen up all tools once or twice between<br />
grindings.<br />
· Leave burrs on all gouges and parting tools. The burr will be quickly removed by normal turning<br />
operations anyway so don’t bother removing them.<br />
· Leave burrs on skews. Again, the burr will be quickly removed by normal turning operations.<br />
Because the skew makes such a fine cut, though, some people really like to remove the burr. (I<br />
personally don’t).<br />
· For softer woods (maple and softer), leave the burr on scrapers. For harder woods, like exotics,<br />
hone the burr off scrapers.<br />
· If you want to use the burr specifically for shear scraping, hone the grinding wheel burr off, then<br />
use the hone to raise an even burr along the cutting edge. This is typically done to scrapers and<br />
bowl gouges. Not all people bother doing this.<br />
Preparing a new gouge for initial sharpening:<br />
The first question to answer when setting up a gouge for grinding is far back you want to grind<br />
the wings of the flute for the swept-back style of grind. This question must be answered for either<br />
freehand or If you only use the platform, set the nose angle to the desired angle (Stewart Batty<br />
recommends about 40 degrees) at the front of the gouge, with the flute straight up. Grind the<br />
gouge until the grind marks reach from flute to outer edge of the bar. Next, turn the flute to face the<br />
wheel and the gouge at 90 degrees to the wheel. Angle the gouge such that you grind off the wings<br />
with this grind. A good starting angle is around 45 degrees. Grind until the flat area just touches<br />
the nose bevel. At this point, you will have a flat surface on the entire edge of the flute all the way<br />
around the cutting surface. It will look like a horseshoe.<br />
<strong>San</strong> <strong>Diego</strong> <strong>Woodturners</strong> Page Updated: 0/ 4/2004
<strong>Sharpening</strong> <strong>Your</strong> <strong>Woodturning</strong> <strong>Tools</strong><br />
Joe Fleming<br />
Freehand grinding a gouge with just a flat platform for support:<br />
Now, place the gouge bar flush on the Wolverine table/platform. For the rest of the operation,<br />
you will maintain a flush contact with the platform. Support the tool in both hands with one thumb<br />
pressing on the flute near the nose and the other supporting the tool at about the ferrule. Don’t<br />
hold the tool any farther back on the handle or you will tend to lift the gouge off the table. The<br />
grinding operation is to start with the flute straight up. Swing the handle in an arc with the nose<br />
in continuous contact with the wheel. At the same time as you swing the gouge, you will roll the<br />
flute over toward the direction of the swing. Swing the tool back to straight on the wheel and flute<br />
straight up. Continue the swing through to the other side of the platform and rotate the flute into<br />
the swing on that side. Ideally, you can start at one wing and swing the tool entirely through the<br />
motion to the other wing without interruption, hesitation or stopping. This is difficult to do because of<br />
the length of the gouge and the body positions involved. Practice the motion several times without<br />
actually grinding. By doing this, you will find the best grips and body positions to complete the<br />
whole motion.<br />
Now you are ready to grind. If you recall the horseshoe-shaped flat that you ground on top of the<br />
flute earlier. Consider this surface the “shiny” surface. <strong>Your</strong> grinding mission is to swing the gouge<br />
through the above motion and grind the bevel until the shiny spots are all gone on the entire ushaped<br />
profile. You will probably have more grinding to do on the wings than the nose. A light<br />
touch on the nose section is recommended.<br />
Wolverine or True-Grind jig set-up and use on Spindle Gouges and Bowl Gouges:<br />
The steps listed at the beginning of the handout are generic for freehand and jig sharpening. For<br />
using the Wolverine’s Vari-Grind jig or the True-Grind, the procedure is straight forward. Please<br />
read each instruction manual for installation and set-up details. For any other fingernail grinding jig,<br />
the principles here are identical. The procedure is the same for any fingernail grind – bowl or spindle<br />
gouges. Only the angles may vary.<br />
Before setting up the grinder, if you are sharpening the tool for the first time, you need to grind the<br />
wings back on the flute side of the tool. For bowl gouges, the angle between this grind and the bottom<br />
of the flute is about 40°. For spindle gouges, this angle is about 30°. You can grind the tops of<br />
the wings flat or with a swept-back arc to leave a swept-back wing on the flute.<br />
<strong>San</strong> <strong>Diego</strong> <strong>Woodturners</strong> Page Updated: 0/ 4/2004
<strong>Sharpening</strong> <strong>Your</strong> <strong>Woodturning</strong> <strong>Tools</strong><br />
Joe Fleming<br />
Step 1: Insert tool into jig the recommended distance. Fix a stop block on your grinding station to<br />
make this step repeatable.<br />
Oneway Wolverine: 1-3/4”<br />
Woodcut True Grind: 2”<br />
Step 2: Temporarily set the pivoting arm of the jig in approximately a 45° position to the handle of<br />
the gouge.<br />
Step 3: Put the jig in the sliding bar holder. Loosen the bar. Rotate the tool so that the side wing<br />
of the flute is against the grinding wheel. This will be with the flute pointing to the left or right.<br />
Slide the bar in or out to achieve the desired wing grind angle. Lock the bar in position.<br />
Step 4: Rotate the tool so that the flute is straight up. Loosen the pivoting arm of the jig and set the<br />
nose angle to the desired grinding angle. Lock the pivoting arm in place.<br />
Step 5: Repeat Step 3 and Step 4 iteratively until the side angle and the nose angle are locked in<br />
place. You will likely have to make very small adjustments in both the pivot arm and the sliding<br />
bar, but they will be very small.<br />
Step 6: Scribe the pivot arm location on the jig and the sliding bar location on the bar for repeatability.<br />
A scratch awl will work for this.<br />
Step 7: Practice swinging the tool through its complete arc before turning on the grinder. Make<br />
sure your body it out of the way of the swing.<br />
<strong>San</strong> <strong>Diego</strong> <strong>Woodturners</strong> Page Updated: 0/ 4/2004
<strong>Sharpening</strong> <strong>Your</strong> <strong>Woodturning</strong> <strong>Tools</strong><br />
Joe Fleming<br />
Note #1: When your grinding wheel wears down, the angles will gradually drift. You may want to go<br />
back through this setup after taking off 3/8 “ to 1/2” of diameter.<br />
Note #2: For different grinds, repeat these steps, but change the side and nose angles to desired<br />
angles.<br />
Note #3: When grinding a gouge, one hand should be near the flute or on the jig. The other hand<br />
should be near the ferrule. If you hold the tool further down on the handle, you will risk levering<br />
the tool up and changing the angle of the nose grind.<br />
Grinding wheels:<br />
It is recommended that you select a fairly soft wheel. Select a wheel that is coded from “H” to “K”.<br />
Oneway wheels, for example are “J”. These wheels are frequently white, pink or blue.<br />
There are lots of recommendations on what grit you should choose. John Jordan says that his<br />
grinder has two grits: 60 and 60. A good choice for a pair of wheels would be approximately 60 and<br />
80 grit. Oneway, for example, has 54 and 80. Norton has 60 and 80.<br />
Keep the wheel clean and dressed. Clean wheels mean that you are cutting the steel and not<br />
rubbing the steel to cause it to overheat. Of course, to have clean wheels, you will need a diamond<br />
dresser any will advise white aluminum oxide wheels because they break down more easily which<br />
means they run cooler. The fact of the matter is, even those clunky gray wheels will work IF YOU<br />
KEEP THEM CLEAN.<br />
<strong>San</strong> <strong>Diego</strong> <strong>Woodturners</strong> Page Updated: 0/ 4/2004
Grinding Wheel Ring Test:<br />
<strong>Sharpening</strong> <strong>Your</strong> <strong>Woodturning</strong> <strong>Tools</strong><br />
Joe Fleming<br />
Before installing a new wheel on your grinder, you should perform the “ring test”. To do this, support<br />
the wheel on a dowel, or pencil through the mounting hole. <strong>Your</strong> finger will work too. Then tap the<br />
wheel in four places at the 1:30, 4:30, 7:30 and 10:30 positions (45 degrees each side of vertical<br />
through the hub, both below and above the center line), about 1” in from the edge of the wheel.<br />
Then rotate the wheel 45 degrees and repeat the test again for a total of eight taps. To perform the<br />
ring test, wheels should be tapped gently with a light nonmetallic implement, such as the handle of a<br />
screw driver for light wheels, or a wooden mallet for heavier wheels.<br />
A sound and undamaged wheel will give a clear tone. If cracked, there will be a dead sound and not<br />
a clear ring and the wheel shall not be used.<br />
Wheels must be dry and free of sawdust when applying the ring test, otherwise the sound may be<br />
deadened.<br />
For additional information on this topic or any other grinding wheel safety information, please review<br />
ANSI (ANSI B7.1), OSHA and literature provided by the grinding wheel and machine manufacturer.<br />
You may also contact the Saint Gobain Product Safety Department at Tel. (508) 795-2690 or Fax.<br />
(508) 795-5120 for additional product safety information.<br />
This information was found at the following web site:<br />
http://www.nortonabrasives.com/industrial/safety/ringtest.asp<br />
<strong>San</strong> <strong>Diego</strong> <strong>Woodturners</strong> Page Updated: 0/ 4/2004