Simpson Anchors - Anchoring and Fastening Systems - BuildSite.com
Simpson Anchors - Anchoring and Fastening Systems - BuildSite.com
Simpson Anchors - Anchoring and Fastening Systems - BuildSite.com

You also want an ePaper? Increase the reach of your titles
YUMPU automatically turns print PDFs into web optimized ePapers that Google loves.
C-SAS-2009 © 2009 SIMPSON STRONG-TIE COMPANY INC.<br />
1<br />
2<br />
3<br />
ADHESIVE ANCHORING INSTALLATION INSTRUCTIONS<br />
NOTE: Always check expiration date on<br />
product label. Do not use expired product.<br />
HOLE PREPARATION: Concrete, Brick, Hollow <strong>and</strong> Grout-Filled CMU<br />
For horizontal, vertical <strong>and</strong> overhead applications.<br />
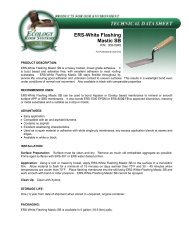
1. Drill–Drill hole to<br />
specifi ed diameter<br />
<strong>and</strong> depth.<br />
2. Blow–Remove dust<br />
from hole with oil-free<br />
<strong>com</strong>pressed air for a<br />
minimum of 4 seconds.<br />
CARTRIDGE PREPARATION: For AT, ET, EDOT , SET <strong>and</strong> SET-XP Adhesives<br />
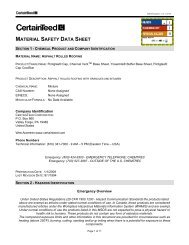
1. Check–Check expiration<br />
date on product label. Do<br />
not use expired product.<br />
Product is usable<br />
until end of printed<br />
expiration month.<br />
2. Open–Open<br />
cartridge per<br />
package<br />
instructions.<br />
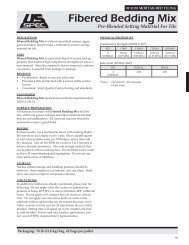
FILLING THE HOLE: Vertical Anchorage: For AT, ET, EDOT , SET <strong>and</strong> SET-XP Adhesives <strong>and</strong> SET-XP Adhesive with IXP Anchor<br />
Prepare the hole per instructions “Hole Preparation”.<br />
Dry <strong>and</strong> Damp Holes:<br />
1. Fill–Fill hole<br />
¹⁄₂ - ²⁄₃ full,<br />
starting from<br />
bottom of hole<br />
to prevent<br />
air pockets.<br />
Withdraw<br />
nozzle as hole<br />
fi lls up.<br />
4<br />
seconds<br />
(min.)<br />
80<br />
psi min.<br />
NOTE: For bulk dispensing, check pail<br />
or drum label for detailed mixing <strong>and</strong><br />
preparation instructions.<br />
IXP<br />
Water Filled Holes: (SET or AT only)<br />
1. Fill–Fill hole<br />
2. Insert–Insert<br />
<strong>com</strong>pletely full,<br />
clean, oil-free<br />
starting from<br />
anchor, turning<br />
bottom of hole<br />
slowly until the<br />
to prevent<br />
anchor contacts<br />
water pockets.<br />
the bottom of<br />
Withdraw<br />
nozzle as hole<br />
fi lls up.<br />
the hole.<br />
anchor Threaded rod<br />
or rebar<br />
Threaded rod or rebar<br />
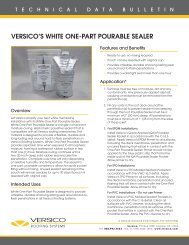
3. Brush–Clean with<br />
a nylon brush (see<br />
page 92) for a<br />
minimum of 4 cycles.<br />
2a. Insert–Insert<br />
clean, oil free<br />
anchor, turning<br />
slowly until the<br />
anchor contacts<br />
the bottom of<br />
the hole.<br />
WARNING: When drilling <strong>and</strong> cleaning hole use eye <strong>and</strong> lung<br />
protection. When installing adhesive use eye <strong>and</strong> skin protection.<br />
4 cycles<br />
(min.)<br />
3. Attach–Attach proper<br />
<strong>Simpson</strong> Strong-Tie ®<br />
nozzle to cartridge.<br />
Do not modify nozzle.<br />
4. Blow–Remove dust<br />
from hole with oil-free<br />
<strong>com</strong>pressed air for a<br />
minimum of 4 seconds.<br />
4. Insert–Insert cartridge<br />
into dispensing tool.<br />
IXP anchor<br />
3. Do not disturb–<br />
Do not disturb<br />
anchor until<br />
fully cured.<br />
(See cure<br />
schedule<br />
for specifi c<br />
adhesive.)<br />
2b. Embed–<br />
Embed IXP<br />
anchor to<br />
the bottom<br />
of UNC<br />
thread.<br />
4<br />
seconds<br />
(min.)<br />
80<br />
psi min.<br />
Notes:<br />
Refer to specifi c product<br />
page (within this<br />
catalog) or product label<br />
for proper drill bit size.<br />
Refer to page 92 of this<br />
catalog for proper brush<br />
part number.<br />
Note: Refer to page 89<br />
for proper mixing nozzle<br />
<strong>and</strong> pages 87–88 for<br />
dispensing tool part<br />
number.<br />
5. Dispense–Dispense adhesive<br />
to the side until properly mixed<br />
(uniform color).<br />
3. Do not disturb–<br />
Do not disturb<br />
anchor until<br />
fully cured.<br />
(See cure<br />
schedule<br />
for specifi c<br />
adhesive.)<br />
Installation instructions continued on page 32.<br />
31