
Create successful ePaper yourself
Turn your PDF publications into a flip-book with our unique Google optimized e-Paper software.
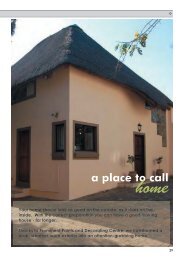
<strong>Home</strong>-<strong>Dzine</strong><br />
It’s all about caring for and improving your home<br />
Happy Mother’s Day<br />
Also in this issue ...<br />
online<br />
May 2010<br />
• Gifts to make • Add <strong>colour</strong> to your home<br />
Spoil yourself or your mom with these The new <strong>MelaWood</strong> range offers<br />
easy and stunning gifts unlimited options for <strong>colour</strong>ing a home
Decorland’s Website Has Rooms With Views<br />
Make your DIY window décor ideas come to life with the innovative new ‘Envision’ room viewer on<br />
Decorland’s recently revamped website. With this inspiring new application, Decorland has given<br />
home decorating new meaning, allowing you to effortlessly and safely experiment and design<br />
perfect window décor solutions.<br />
Simply enter the unique room viewer and, at the click of a mouse, choose the room you plan to<br />
redecorate – bedroom, kitchen or living room. Then, ‘personalise’ that room by changing the<br />
<strong>colour</strong> of the walls and linen and adjusting the floor finishes to match your own. After that, you can<br />
try out various <strong>colour</strong> schemes, weigh up different finishes and, most importantly, browse through<br />
Decorland’s extensive range of window finishes - from wooden and aluminium blinds to curtain<br />
rods and accessories. Finally, select one you like and drag and drop it in place.<br />
With Decorland’s new website, you can also<br />
download the latest catalogue or access helpful<br />
DIY window décor tips and advice. To make your<br />
shopping experience easier, the new store finder<br />
utility locates your nearest outlet. You can even print<br />
out the handy shopping list or fill in the online form<br />
for further information or a quotation.<br />
Whilst exploring the new website, you’ll find that it is filled with plenty of inspiration to make it both<br />
fun and easy to make your DIY window décor ideas a virtual reality.<br />
Decorland products are exclusively available at Game stores<br />
countrywide. For further information, contact Decorland on 0800 002 635<br />
or log on to www.decorland.co.za
a word or two<br />
Do it!<br />
Happy Mother’s Day to all our Divas out<br />
there. Hopefully you all requested tools as<br />
a gift this year! In this issue you will find<br />
some great crafts using Dremel Tools, and I<br />
hope to be able to feature many more in the<br />
future.<br />
I would also like to thank the many Divas<br />
and Guys who have attended the workshops<br />
across the country. You are all stars and<br />
have made the workshops so much fun.<br />
Hope to see you all again soon!<br />
Janice<br />
<strong>Home</strong>-<strong>Dzine</strong> Online is written and compiled by Janice Anderssen.<br />
All projects in this issue, or any other issue, remain the property<br />
of <strong>Home</strong>-<strong>Dzine</strong> and Janice Anderssen, or the respective<br />
copyright holders, and may not be copied or reproduced in any<br />
manner whatsoever without written permission.<br />
Image and content credits:<br />
meredith publishing - good homes - family handyman - sunset<br />
publishing - popular mechanic - house & home - georgia pacific<br />
- expert village - channel4 - pottery barn - flikr - nkba - resene<br />
- mitre10 - lowes and any others.<br />
COMPETITION WINNERS<br />
Here are the winners of the Decorex tickets<br />
Kerry-Ann Chaston<br />
Hein Kruse<br />
Ingrid Young<br />
Kerry Feldman<br />
Susanne Zandberg<br />
Hope you all enjoyed the exhibition!
�<br />
2<br />
room.<br />
Decorate<br />
With the new and exciting range of<br />
<strong>colour</strong>s in the PG Bison range, it’s<br />
never been easier to add <strong>colour</strong> to<br />
your home.<br />
Whilst I love the look of wood, I am<br />
definitely a <strong>colour</strong> junkie and like to<br />
put splashes of bold <strong>colour</strong> in my<br />
kitchen, bathrooms and my sons’<br />
bedrooms (a teen and aa - almost<br />
adult).<br />
<strong>MelaWood</strong> and Formica offers new<br />
ways to design and create without<br />
limitation. And being able to have<br />
all my board materials cut to the<br />
exact size makes it so much easier<br />
to experiment.<br />
THIS PAGE: A funky storage unit<br />
in Poppy Red that can be placed<br />
in an entrance, bathroom or kid’s<br />
<strong>colour</strong><br />
pop<br />
Visit your local hardware store<br />
and ask to see the various<br />
<strong>colour</strong> options available in<br />
the Formica range, or visit<br />
the www.PGBison.co.za website<br />
for even more finishes.<br />
Once you have selected a <strong>colour</strong><br />
- and designed your project - arrange<br />
to have everything cut to size and<br />
edged.<br />
All you have to do now is assemble<br />
and display.<br />
images: pg bison / formica
Decorate<br />
�<br />
3
�<br />
4<br />
Decorate<br />
PG Bison <strong>MelaWood</strong> is<br />
available at your local Builders<br />
Warehouse
DIY Tips:<br />
• Draw the design with a template and pencil,<br />
and then score the surface with a sharp craft<br />
knife.<br />
• Use only quality jigsaw blades - I used Bosch<br />
blades - and select a clean cut blade that will<br />
reduce the amount of chipping around the cut.<br />
• Sand with 120-grit sandpaper and then apply<br />
the edging strip with contact adhesive applied<br />
to both the door and edging strip.<br />
Decorate<br />
�<br />
LEFT and BELOW: A<br />
different approach to<br />
doors. <strong>MelaWood</strong> in<br />
Kiwi Green with cut<br />
outs.<br />
Use 18mm <strong>MelaWood</strong><br />
- cut to size at your<br />
local hardware<br />
store - and a jigsaw<br />
to create the<br />
cut out shapes,<br />
which are then<br />
edged. Add<br />
hinges and<br />
some stylish<br />
brushed<br />
steel<br />
handles.<br />
5
�<br />
6<br />
Trends<br />
<strong>MelaWood</strong> goes coffee crazy...<br />
The <strong>MelaWood</strong> Marketing team is proud to announce<br />
3 brand new <strong>colour</strong>s to the extensive <strong>MelaWood</strong><br />
<strong>colour</strong> range.<br />
The new <strong>colour</strong>s are a true exploration of coffee-<strong>colour</strong>ed<br />
decorative surfaces that are on par with international trends. The<br />
<strong>colour</strong>s have been chosen for their practicality and style. The dark<br />
chocolate tones of Espresso, the creamy warmth of Cappuccino<br />
and the golden shades of Caramel have been chosen to start the<br />
<strong>MelaWood</strong> trend setting <strong>colour</strong> range.<br />
In today’s society kitchens are fast becoming entertainment and<br />
socialising areas of the home. This has turned the kitchen from<br />
being a storage place for pots and pans into a personal space of<br />
expression, identity and creativity. One of the aims of the launch is to<br />
inspire our customers to start experimenting with alternative <strong>colour</strong>s<br />
for their home projects.<br />
Visit www.PGBison.co.za for more information.<br />
BELOW: Cappuccino and Zebrano combined to create a<br />
contemporary kitchen design that is practical and easy to<br />
clean, and perfect for a small kitchen.<br />
image: rotpunkkitchens
kitchens of<br />
the future<br />
A kitchen island table can<br />
take up too much interior<br />
space in some cases, or as<br />
this example shows: it can<br />
more than make up for the<br />
space it displaces with hidden<br />
storage cabinets and foldout<br />
work surfaces. Within this<br />
simple and elegant white box are<br />
all of the essentials for storing food<br />
and preparing a meal, an all-in-one<br />
kitchen island.<br />
When closed, this piece looks like an ordinary<br />
kitchen island that contains a few drawers<br />
and other clever storage spaces – it works as<br />
a singular surface for sitting down to meals<br />
or working on whatever. It is nondescript and<br />
would blend with a living space or fit snugly in<br />
an out-of-the-way corner of an open loft.<br />
When fully opened, this simple-looking island<br />
becomes a complex network of cooking<br />
surfaces, cutting spaces, cleaning places and<br />
pretty much anything else you could want<br />
Trends<br />
out of a kitchen. Essentially, it is an interactive<br />
miniature kitchen that can be deployed in<br />
small condos and studios apartments.<br />
�<br />
7
�<br />
8<br />
Crafts<br />
gifts<br />
for mom<br />
Dremel have put<br />
together two projects<br />
that would make<br />
wonderful Mother’s<br />
Day gifts - whether<br />
for your mom or for<br />
yourself!<br />
And if you haven’t<br />
yet treated yourself<br />
to a set of Dremel<br />
tools - they’re also a<br />
great Mother’s Day<br />
gift<br />
ABOVE and LEFT: Add a touch<br />
of the East to your decor with<br />
our Cherry Blossom flowers and<br />
cushions.<br />
On the next two pages you will<br />
find detailed instructions for<br />
both projects.
You will need:<br />
Dremel Versatip with soldering tip attachment<br />
Dremel Glue Gun<br />
Organza fabric in shades of pink and white*<br />
Natural twigs<br />
Or twigs with LED lights<br />
*use man-made fibre only<br />
Here’s how:<br />
1. Cut out blossom (flower) shapes from the<br />
organza fabric using the Dremel Versatip<br />
with the soldering tip attachment. If using<br />
thicker fabrics, use the Versatip cutting knife<br />
attachment.<br />
2. To create the individual blossoms, place<br />
three organza flowers together, then pinch<br />
them all together in the centre and touch<br />
the point on the back of the flowers with the<br />
Versatip and the soldering tip attachment to<br />
fuse them into one blossom.<br />
Crafts<br />
3. Then simply stick them onto the twigs using<br />
the Dremel Glue Gun.<br />
Finish off by wrapping a length of small<br />
decorative lights around the twigs and display<br />
in a glass vase - perfect!<br />
�<br />
9
�<br />
10<br />
Crafts<br />
You will need:<br />
Dremel Versatip with soldering tip attachment<br />
Dremel Glue Gun<br />
White and pink organza fabric*<br />
Brown strung sequins<br />
Green non-tray fabric such as faux suede or felt<br />
or green sequins<br />
Clear hot fix gems<br />
Cushion pads with silk covers<br />
*Fabric must be man-made fibre only<br />
Here’s how:<br />
1. Cut out blossom (flower) shapes from the<br />
organza fabric using the Dremel Versatip<br />
with the soldering tip attachment. If using<br />
thicker fabrics, use the Versatip cutting knife<br />
attachment.<br />
roll-on<br />
2. To create the individual blossoms, place<br />
three organza flowers together, then pinch<br />
them all together in the centre and touch<br />
the point on the back of the flowers with the<br />
Versatip and the soldering tip attachment to<br />
fuse them into one blossom.<br />
3. Use the Dremel Glue Gun to glue the strung<br />
brown sequins onto the cushion cover to<br />
form the branches, planning the design<br />
carefully first if you want it to run across a<br />
number of cushions.<br />
4. Cut out leaf shapes from green fabric<br />
and use the Dremel Glue Gun to glue the<br />
leaves and blossom in place as shown.<br />
(Alternatively, you could create leaves using<br />
lime green sequins). Add some sparkle to<br />
your cushions by using the Dremel Versatip<br />
to apply the hot fix gems to suggest blossom<br />
buds or more blossoms, if you prefer.
This is a project for Dad<br />
and Kids to make ...<br />
If mom has always<br />
wanted to make her own<br />
jewellery , Mother’s Day<br />
is the perfect time to spoil<br />
her with a set of Dremel<br />
tools!<br />
You will need:<br />
Dremel Engraver<br />
Dremel Versaflame<br />
Dremel Stylus<br />
Dremel accessories: mandrel SC402, polishing<br />
wheel 423S, Polishing compound 421, diamond<br />
engraving tip 9929<br />
Toggle clasp<br />
Necklet end x 2<br />
Black cord 1mm thick<br />
Assortment of beads & large disc bead<br />
2 jump rings 5mm<br />
½ round cutting pliers<br />
Head pin x 52mm<br />
Precious Metal Clay (PMC)<br />
Firing block<br />
Tweezers<br />
Here’s how:<br />
1. Cut a long length of cord and start to thread<br />
on the beads. Tie a knot before and after<br />
each bead has been threaded to hold it in<br />
place. Keep threading on the beads until<br />
the desired length has been achieved. Then,<br />
add the necklet ends, jump rings and toggle<br />
clasp.<br />
Crafts<br />
�<br />
gifts<br />
for mom<br />
2. Roll out the PMC and form it over a bead to<br />
create a decorative bead cap, allow for the<br />
clay to shrink a little. Once it has completely<br />
dried out, fire the clay using the Dremel<br />
Versaflame.<br />
3. Use the Dremel Engraver and diamond<br />
engraving tip 9929 to add a scroll design<br />
over the silver bead cap. Polish the bead<br />
cap using the Dremel Stylus together with<br />
the Dremel SpeedClic Mandrel SC402 and<br />
polishing wheel (SC402<br />
and 423S) By applying<br />
some polishing compound<br />
421 during the process you<br />
will achieve the best finish.<br />
Thread the bead onto the<br />
head pin, then the bead<br />
cap over the bead. Bend<br />
the end of the head pin<br />
into a loop with the pliers<br />
and attach it to the centre<br />
of the necklace.<br />
11
�<br />
12<br />
Crafts<br />
a picture says a thousand words!<br />
click here to join the many DIY Divas who have<br />
discovered just how easy it is to Do-It-Yourself
Competition<br />
‘DEFINE YOUR STYLE’<br />
�<br />
AND WIN WITH<br />
BELGOTEX<br />
FLOORCOVERINGS<br />
Express yourself and win a R10 000 instant<br />
update from the ground up!<br />
13
�<br />
14<br />
Competition<br />
and WIN with Belgotex Floorcoverings<br />
Express yourself and win a R10 000 instant update from the ground up!<br />
Floors form the foundation to define your style and reflect your personality. Often referred to<br />
as the fifth wall, your choice of flooring is influenced by your lifestyle, trends and preferences.<br />
Belgotex Floorcoverings’ “Define Your Style’ quiz helps you identify your personal style and<br />
shows you how to get the look using the flooring of your choice<br />
2 lucky ‘Define Your Style’ readers will win R10 000 floor makeovers from Belgotex<br />
Floorcoverings to be featured in future issues of HOME-DZINE ONLINE.<br />
All you have to do is to send us a pic of the area you want to revamp, your style and whether<br />
you prefer carpets, laminates or vinyl to...<br />
Entries can be sent to home-dzine@iburst.co.za. Remember to include your<br />
full name, physical address and daytime tel or cellphone number. Competition<br />
closes 31 May 2010<br />
1<br />
1. Which statement best describes how you see<br />
yourself?<br />
a. Earthy and natural, I’m in touch with my authentic self and like all<br />
things organic<br />
b. Warm and inviting with a classy, somewhat sophisticated air<br />
without being snobbish<br />
c. Modern but homely, family-oriented without the dowdy “mom ‘n<br />
pop” appearance<br />
d. Confident and fashionable, not afraid to make a statement with a<br />
flair for over-the-top glamour<br />
e. Sentimental and nostalgic with a penchant for antiques and<br />
understated classics<br />
f. Fun and funky with a love of adventure, simplicity and <strong>colour</strong>
2<br />
2. Select which fabrics and patterns you like best.<br />
a. Bold graphics and patterns in bright primary <strong>colour</strong>s reminiscent<br />
of the Seventies<br />
b. Nguni hides and ethnic patterns in natural, earthy <strong>colour</strong>s that<br />
demonstrate your proud African heritage<br />
c. Opulent velvets and fluid, shiny silks and satins in dramatic<br />
statement shades<br />
d. Metallic shades and dark tones with luxuriously comforting<br />
fabrics and textures such as leather and furs<br />
e. Fresh, natural <strong>colour</strong>s and textures inspired by nature such as<br />
grass, coarse bark, chunky weaves and raw wood finishes<br />
f. Intricate and delicate filigree, floral or nostalgic patterns and<br />
textures with a whimsical, romantic touch<br />
3<br />
Competition<br />
3. What type of furniture would you have in your<br />
lounge if money were no object?<br />
a. Modular mix ‘n match suede corner suite with a modern nguni<br />
ottoman<br />
b. Uber-chic white leather couches with chrome & steel finishes<br />
c. Dark leather sofas with heavy mahogany centrepieces and<br />
riempie benches<br />
d. Restored antiques or French Provencal armchair with ball and<br />
claw combined with modern items<br />
e. Bright and modern vinyl or plastic chairs in fun shapes with a<br />
glass table<br />
f. Wicker or wooden slat chairs with calico seats and weathered<br />
white chest for a coffee table<br />
Score<br />
Circle your answer and then add your scores and on the next page read the descriptor closest to your<br />
total to find which look best defines your style. For scores that fall between two categories, read the<br />
descriptors for both looks to find the one that best matches your personality. Occasionally, you may find<br />
you like a combination of looks!<br />
a. b. c. d. e. f.<br />
1. 1 2 3 4 5 6<br />
2. 6 3 4 2 1 5<br />
3. 3 6 2 5 6 1<br />
�<br />
15
�<br />
16<br />
Competition<br />
IVC Woodmark Amazone 845<br />
Mostly 2’s or 4 - 6: Lodge Luxury<br />
You love the finer things in life and celebrate Africa’s<br />
bountiful spirit and rich <strong>colour</strong>s. Deep chocolate, mocha<br />
and coffee tones combine with rich leather and hide<br />
textures to create a sense of affordable opulence. Dark<br />
wood finishes and deep burnished metallics bring warmth<br />
and intimacy to your home.<br />
Recreate this safari-inspired look with Belgotex Carpets’<br />
Granada in Muscade or new multi-tonal Marakesh in<br />
Persia or create a sleek dark floor using BerryFloor’s<br />
Naturals Java or IVC Woodmark in Birma 745.<br />
BerryFloor Laminate - Pure<br />
White<br />
Mostly 1’s or 1 - 3: Organic Expressions<br />
You are environmentally aware, love Mother Nature<br />
and all things natural. Bring the outdoors indoors<br />
- with textures and <strong>colour</strong>s inspired by nature, with<br />
chunky weaves and coarse fabrics. Bring your<br />
look to life with wicker furniture, slats and raw wood<br />
finishes to create harmony in your environment.<br />
Use IVC Woodmark Amazone 845 inside and waterwise<br />
Duraturf Augusta artificial lawn outside for an<br />
evergreen hassle-free lawn. For a similar effect, opt<br />
for BerryFloor Naturals Winter Oak or the durable<br />
herringbone structure of Belgotex Carpets Timbavati<br />
Ultra in Donga.<br />
Belgotex Carpets’ Granada in<br />
Muscade<br />
Mostly 3’s or 7 - 9: <strong>Home</strong>land Harmony<br />
You are proudly South African and discreetly incorporate<br />
elements of your African heritage into your home.<br />
Modern meets rustic in contrasting dark and white tones,<br />
Nguni patterns and ceramics complement contemporary<br />
metalwork. Its urban inspiration with pure African roots –<br />
and the effect is utterly sophisticated. BerryFloor Colours<br />
in Pure White lays the foundation for a sophisticated<br />
urban meets African ambience. Alternatively, try<br />
Belgotex Carpets’ Opulence in <strong>colour</strong> Sumptuous, Royal<br />
Twist in Princess Voile or IVC Woodmark Aspin 805 for a<br />
luminous, light base.
Belgotex Carpets’<br />
Westerminster in Black City<br />
Mostly 5’s or 13 - 15: Boujwa Boudoir<br />
You love the charm and romance of the “Olde World”<br />
coupled with modern furniture pieces. An eclectic mix<br />
of textures and patterns blends classic and modern<br />
influences. Combine intricate wallpaper with understated<br />
carpeting and make a statement with bold accent <strong>colour</strong>s.<br />
Create this look by using Belgotex Carpets’ Georgian in<br />
Windermere or if you prefer smooth surface floors, opt<br />
for IVC Woodmark Amazone 845 or BerryFloor laminates<br />
Naturals range in Smoked Oak.<br />
Belgotex Carpets’ Superweave<br />
in Sago<br />
Competition<br />
Mostly 4’s or 10 - 12: Glam Rock<br />
You are the glamorous fashionista and not afraid<br />
to flaunt it! Only the best will do and you save no<br />
expense to achieve the ultimate in over-the-top style.<br />
Add nightlife to your home life – a sophisticated black<br />
base palette highlights the impact of electric neons and<br />
metallic fabrics. Chrome and silver finishes complement<br />
intricate lighting effects and reflect your own party spirit!<br />
Get dramatic, sensuous and outspoken with deep<br />
cutpile Belgotex Carpets’ Westminster in Black City or<br />
BerryFloor Loft Project Wenge.<br />
Mostly 6’s or 16 - 18: Fresh Produce<br />
Your functional minimalism and purist simplicity is<br />
off-set with a tongue-in-cheek, fun spirit. Play while<br />
you work with a home office structured around bold<br />
primary <strong>colour</strong>s and feature walls. It’s about casual<br />
curves, modular design, vinyls and plastic. It’s a bright<br />
environment, for bright ideas. Use Belgotex Carpets’<br />
Superweave Sago or Essex Chardonnay, IVC<br />
Woodmark Amazone 832 or BerryFloor Colours Pure<br />
White or Mouse Grey to achieve this clean, fresh look.<br />
�<br />
Belgotex Carpets’ Georgian in<br />
Windermere<br />
Check out which products and <strong>colour</strong>ways best<br />
define your style on www.belgotexfloorcoverings.<br />
com or call Head Office (033) 897-750 or Cape<br />
Town (021) 907-3400 or JHB (011) 788-3450 for<br />
your nearest dealer.<br />
17
�<br />
18<br />
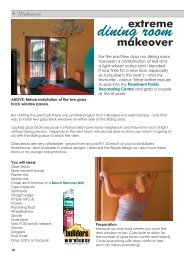
Makeover<br />
ABOVE: Before installation of the two glass<br />
brick window panels.<br />
extreme<br />
dining room<br />
makeover<br />
For the past few days my dining room<br />
has been a combination of red and<br />
a light wheat <strong>colour</strong> and I decided<br />
it was time for a new look, especially<br />
as turquoise is this year’s - and my<br />
favourite - <strong>colour</strong>. What better excuse<br />
to pop into my Prominent Paints<br />
Decorating Centre and grab a couple<br />
of tins of paint.<br />
But starting the paint job there was another project that I decided was well overdue - and that<br />
was to install two glass brick windows on either side of the sliding door.<br />
I picked glass bricks because I unfortunately have nosey neighbours and they let in a lot of light<br />
without losing privacy. Hopefully in the next issue I will also be able to show you what I’m going to<br />
do with the sliding door to block the view.<br />
Glass bricks are very affordable - priced from around R11.00 each at your local Builders<br />
Warehouse - and available in various designs. I selected the Ripple design as I also have these<br />
bricks in my lounge and entrance.<br />
You will need:<br />
Glass bricks<br />
Fibre cement board<br />
Plaster mix<br />
Mortar mix<br />
Chisel and hammer or a Bosch Hammer Drill<br />
Tape measure<br />
Spirit level<br />
Straight edge<br />
Timber offcuts<br />
Trowel<br />
Plastering float<br />
Wheelbarrow<br />
Spade<br />
Hose pipe<br />
Sista F130 acrylic sealant<br />
Gloves<br />
Goggles<br />
Dust mask<br />
Drop cloths or tarpaulin<br />
Preparation<br />
Measure up and mark where you want the<br />
new window to be. Calculate to allow for<br />
the number of glass bricks (width and height).<br />
Cover everything with drop cloths or tarp -<br />
and I do mean everything!
1. I may be a DIY Diva, but that doesn’t mean<br />
I HAVE to do everything myself. Equipped<br />
with the knowledge I promote myself to site<br />
supervisor. The job was started by locating<br />
the existing lintel above the sliding door. I<br />
was hoping it might be the full length of the<br />
wall, but sadly no. A lintel is required above<br />
the new window opening.<br />
3. Once the lintel is in position you can safely<br />
remove the bricks underneath to open up<br />
the space. The bricks need to be cut as<br />
cleanly as possible to prevent having to fill in<br />
afterwards. Cut 4 fibre cement boards to fit<br />
around the opening - you can easily do this<br />
with a jigsaw - and screw these into the wall.<br />
Using fibre cement board gives a perfect<br />
finish to the opening.<br />
Makeover<br />
�<br />
2. Using hammer and chisel the wall was<br />
chased out to the shape for the new opening.<br />
If you can put up with a ton of dust, you<br />
can always use an angle grinder to cut out<br />
and a hammer drill to take out the bricks. I<br />
did a combination of hand and power tool<br />
work to open up the wall. Start at the top<br />
and make the opening for the lintel - insert<br />
the lintel - before removing any bricks below<br />
this level.<br />
4. Use plaster mix to fill in around the lintel and<br />
boards - packing in as much as possible in<br />
any openings, and use a float dipped in<br />
water to smooth the surface. This will need 2<br />
to 3 days to dry.<br />
19
�<br />
5. Now it’s time to start laying the glass bricks.<br />
Make sure that the bottom, sides and top<br />
are level before you start as you won’t be<br />
able to fix this later on. For the first course,<br />
spread a layer of mortar mix on the bottom<br />
of the opening.<br />
20<br />
Makeover<br />
6. The finished window. Now it’s time to start on<br />
the other side of the door, using exactly the<br />
same method.<br />
8. To match the existing plaster finish I<br />
used Prominent Paints Ripple in white<br />
to create the rough effect. Apply a<br />
liberal amount with a paintbrush.<br />
6. Butter the bottom (holding bottom up) and<br />
sides of each brick with a liberal amount of<br />
mortar mix and lay into position. Repeat until<br />
the bottom row is finished. Apply a liberal<br />
amount of mortar mix to the top of the first<br />
row and repeat this for every following row.<br />
7. Sista F130 acrylic sealer was applied as a<br />
sealer between all the bricks, and around<br />
the outside of the bricks as well.<br />
9. While still wet use a paint roller with a<br />
long nap to go over the painted section.<br />
Repeat if a more textured finish is<br />
required.
Finishing the dining room<br />
makeover<br />
All the walls were given a light sanding with<br />
240-grit sandpaper. I prefer to do this rather<br />
than wash with sugar soap, as it gives me<br />
a chance to work on blemishes on the<br />
original plaster. A quick wipe clean, lay<br />
down all the cloths, mask off what needs to<br />
be covered (light switches, plug points, etc)<br />
and I’m ready.<br />
I selected a turquoise <strong>colour</strong> for the feature<br />
wall in the dining room, and the other walls<br />
would be painted white - in contrast to<br />
the black and dark wood furniture for the<br />
room.<br />
Using Prominent Paints Satin in Turquoise<br />
(S2050-B50G) I applied two coats of paint<br />
over the existing red. This paint offers very<br />
good coverage and no more coats were<br />
needed once the paint was dry.<br />
The skirtings had previously been painted<br />
black, which worked very well with<br />
the turquoise <strong>colour</strong>, although I will be<br />
replacing these in the next month or so as<br />
a project on <strong>Home</strong>-<strong>Dzine</strong>, so only a bit of<br />
touch up is required with Prominent Paints<br />
Gloss Enamel - black.<br />
Bennett.Read Hydro<br />
Make cleanup a breeze with<br />
a hydro vacuum cleaner.<br />
The unit uses water instead of<br />
bags and all the dust and<br />
sand is left in the water<br />
and not released back<br />
into the air.<br />
Great investment if you are<br />
planning home improvements.<br />
Makeover<br />
S2050-B50G<br />
�<br />
21
�<br />
22<br />
Makeover<br />
AFTER: The dining room now receives much more<br />
light via the newly added glass block windows. I love<br />
the <strong>colour</strong> and - so that I didn’t need to recover my<br />
dining rooms chairs - I added small designs on the<br />
fabric using the same <strong>colour</strong> paint! I will be covering<br />
them as soon as I get the opportunity.<br />
I haven’t quite finished my ‘extreme’ dining room<br />
makeover, and will still be featuring projects on adding<br />
new skirtings and architraves around the new windows<br />
and the sliding door. I will also be replacing the glass in<br />
the sliding door and adding a product to give a bit more privacy from my nosey neighbours, as I<br />
have decided to leave the curtains down.<br />
All-in-all the project took a week from the start, and that was only because we had so much rain<br />
during that period when we couldn’t paint.
Pain�ng �ps for<br />
working with<br />
enamel or oilbased<br />
paint<br />
• If you need to take a<br />
break from pain�ng,<br />
wrap your brush<br />
and paint tray with<br />
clingwrap to prevent<br />
the paint from<br />
drying, as oil-based<br />
paints become very<br />
s�cky during the<br />
curing process.<br />
• If you need to do<br />
any touch up to the<br />
painted surface,<br />
rather wait un�l the<br />
paint is completely<br />
dry.<br />
• To avoid spoiling the<br />
surface with loose<br />
paintbrush hairs, be<br />
sure to buy a quality<br />
brush. Addis have a<br />
<strong>Home</strong> Decor brush<br />
that is perfect for<br />
using with enamel<br />
and oil-based paints.<br />
• Regularly scrap the<br />
brush against the<br />
inside of the paint<br />
tray to remove<br />
excess paint that<br />
accumulates at the<br />
base of the bristles.<br />
It helps to prevent<br />
paint drops.<br />
• Always use a drop<br />
cloth to protect your<br />
floors from paint<br />
drips and spa�ers.<br />
�<br />
23
�<br />
24<br />
Do it Yourself<br />
paving<br />
perfection<br />
A semicircular patio looks complicated, but installing it requires little more<br />
skill than a rectangular patio but the end result is far more pleasing. A<br />
semicircular In fact, only the central core requires cut bricks, so you may<br />
need to cut fewer bricks than for other designs.<br />
You will need:<br />
Paving bricks<br />
Hardboard, 100mm wide<br />
Wire nails, 60-70mm long<br />
Garden spade<br />
Rake<br />
Tamper<br />
Builder’s line<br />
Rebar, 2 small pieces<br />
Spirit level<br />
Hammer<br />
Pine plank as a screed<br />
Rubber mallet<br />
Sweeping brush<br />
Hose pipe<br />
Gloves<br />
rubber knee<br />
pads - ideal<br />
for floor work<br />
such as paving<br />
and tiling<br />
builder’s line<br />
rebar<br />
hand tamper<br />
meredith publishing
Here’s how:<br />
1. To create the semicircle, drive a piece of<br />
rebar into the centre of the space, tie on a<br />
piece of builder’s line and tie the other end<br />
to another piece of rebar at the desired<br />
radius. Pull the line taut, keeping the rebar<br />
vertical, to mark the locations of stakes<br />
evenly spaced about every about 50cm.<br />
2. Excavate to a 10cm depth. Set the<br />
hardboard edging in place, bending and<br />
levelling it as you go. Attach it to the stakes<br />
with wire nails. Check for a smooth curve.<br />
Stakes are difficult to install accurately; you<br />
may need to move the edging at some<br />
points.<br />
3. Tamp the soil and cover the site with<br />
landscaping fabric. Fill the area with crushed<br />
gravel and sand, or sand alone, until it is 2<br />
to 3cm below the edging. Rake it as smooth<br />
and level as you can.<br />
4. Notch one end of a straight pine plank so<br />
that it rides along the edging as you smooth<br />
the base. The depth of the notch should<br />
equal the thickness of the bricks or pavers.<br />
Screed the sand, tamp it down with a hand<br />
or power vibrating tamper, then screed<br />
again.<br />
5. Start at the outside of the form and lay all the<br />
border bricks. Then work inward, completing<br />
each course before moving on to the next.<br />
Once you’ve laid several courses, avoid<br />
kneeling or standing directly on the bricks.<br />
Use pieces of plywood on the bricks as<br />
kneelers. The joints between the bricks or<br />
pavers will be slightly wedge-shaped and<br />
larger at the end nearest the edging.<br />
6. After the bricks are laid, sweep extra-fine<br />
sand into the joints, moisten with a fine spray,<br />
and sweep in more sand where needed.<br />
Remove the hardboard edging and fill soil<br />
firmly around the perimeter. If required, you<br />
can mix up a batch of cement to lay around<br />
the outside of the bricks as an edging.<br />
DIY Tip<br />
As with all masonry work, have the bricks<br />
or pavers delivered close to the site to<br />
minimise lifting and carrying.<br />
Do it Yourself<br />
�<br />
25
�<br />
26
�<br />
27