VBA Programming Guide for CorelDRAW® 11 - Welcome to Corel.com
VBA Programming Guide for CorelDRAW® 11 - Welcome to Corel.com
VBA Programming Guide for CorelDRAW® 11 - Welcome to Corel.com

You also want an ePaper? Increase the reach of your titles
YUMPU automatically turns print PDFs into web optimized ePapers that Google loves.
<strong>VBA</strong> <strong>Programming</strong> <strong>Guide</strong> <strong>for</strong> <strong><strong>Corel</strong>DRAW®</strong> <strong>11</strong><br />
The contents of this programming guide and the associated <strong>Corel</strong>DRAW software are the property of <strong>Corel</strong><br />
Corporation and its respective licensors, and are protected by copyright. For more <strong>com</strong>plete copyright in<strong>for</strong>mation<br />
about <strong>Corel</strong>DRAW, please refer <strong>to</strong> the About <strong>Corel</strong>DRAW section in the Help menu of the software.<br />
© 2002 <strong>Corel</strong> Corporation. All rights reserved.<br />
<strong>Corel</strong>, the <strong>Corel</strong> logo, <strong>Corel</strong>DRAW, <strong>Corel</strong> PHOTO-PAINT, <strong>Corel</strong> SCRIPT, and WordPerfect are trademarks or<br />
registered trademarks of <strong>Corel</strong> Corporation and/or its subsidiaries in Canada, the U.S., and/or other countries.<br />
Microsoft, Visual Basic, Visual Studio, ActiveX, and Windows are registered trademarks of Microsoft Corporation in<br />
the United States and/or other countries. Au<strong>to</strong>CAD is a registered trademark of Au<strong>to</strong>desk, Inc. Borland and Delphi<br />
are trademarks or registered trademarks of Borland Software Corporation. WinZip is a registered trademark of<br />
WinZip Computing, Inc. PostScript is a registered trademark of Adobe Systems Incorporated in the United States<br />
and/or other countries. Java and JavaScript are trademarks of Sun Microsystems, Inc. Other product, font, and<br />
<strong>com</strong>pany names and logos may be trademarks or registered trademarks of their respective <strong>com</strong>panies.<br />
<strong>VBA</strong> <strong>Programming</strong> <strong>Guide</strong> <strong>for</strong> <strong>Corel</strong>DRAW <strong>11</strong> 2
Table of Contents<br />
Introduction . . . . . . . . . . . . . . . . . . . . . . 7<br />
What’s the purpose of this guide? . . . . . . . . . . . . . . . . . . . . . . . 7<br />
Who should use this guide? . . . . . . . . . . . . . . . . . . . . . . . . . 7<br />
How <strong>to</strong> use this guide . . . . . . . . . . . . . . . . . . . . . . . . . . . 7<br />
About <strong>Corel</strong>DRAW . . . . . . . . . . . . . . . . . . . . . . . . . . . . 7<br />
About <strong>VBA</strong> in <strong>Corel</strong>DRAW . . . . . . . . . . . . . . . . . . . . . . . . . 7<br />
About <strong>Corel</strong> Corporation . . . . . . . . . . . . . . . . . . . . . . . . . . 8<br />
Writing and running macros in <strong>Corel</strong>DRAW . . . . . . . . . . . . . . 9<br />
Installing <strong>VBA</strong> <strong>for</strong> <strong>Corel</strong>DRAW . . . . . . . . . . . . . . . . . . . . . . . . 9<br />
The <strong>VBA</strong> <strong>to</strong>olbar in <strong>Corel</strong>DRAW . . . . . . . . . . . . . . . . . . . . . . . <strong>11</strong><br />
Writing a macro . . . . . . . . . . . . . . . . . . . . . . . . . . . . . <strong>11</strong><br />
Writing macros in the VB Edi<strong>to</strong>r . . . . . . . . . . . . . . . . . . . . . . . <strong>11</strong><br />
Recording macros . . . . . . . . . . . . . . . . . . . . . . . . . . . <strong>11</strong><br />
Running a macro . . . . . . . . . . . . . . . . . . . . . . . . . . . . 12<br />
Introducing au<strong>to</strong>mation and <strong>VBA</strong> . . . . . . . . . . . . . . . . 14<br />
What is au<strong>to</strong>mation? . . . . . . . . . . . . . . . . . . . . . . . . . . . 14<br />
<strong>VBA</strong> <strong>for</strong> non-programmers . . . . . . . . . . . . . . . . . . . . . . . . . 14<br />
<strong>VBA</strong> <strong>for</strong> programmers. . . . . . . . . . . . . . . . . . . . . . . . . . . 15<br />
The main features of <strong>VBA</strong> structure and syntax . . . . . . . . . . . . . . . . . . 15<br />
Comparing <strong>VBA</strong> <strong>to</strong> other programming languages . . . . . . . . . . . . . . . . . 21<br />
Visual Basic Edi<strong>to</strong>r . . . . . . . . . . . . . . . . . . . . 23<br />
Starting the Visual Basic Edi<strong>to</strong>r from <strong>Corel</strong>DRAW . . . . . . . . . . . . . . . . . 23<br />
Visual Basic Edi<strong>to</strong>r user interface . . . . . . . . . . . . . . . . . . . . . . . 23<br />
Project Explorer . . . . . . . . . . . . . . . . . . . . . . . . . . . . 24<br />
Project . . . . . . . . . . . . . . . . . . . . . . . . . . . . . . . 25<br />
Properties Window . . . . . . . . . . . . . . . . . . . . . . . . . . . 27<br />
Code window. . . . . . . . . . . . . . . . . . . . . . . . . . . . . 27<br />
Form Designer window. . . . . . . . . . . . . . . . . . . . . . . . . . 31<br />
Object Browser window . . . . . . . . . . . . . . . . . . . . . . . . . 36<br />
<strong>VBA</strong> <strong>Programming</strong> <strong>Guide</strong> <strong>for</strong> <strong>Corel</strong>DRAW <strong>11</strong> 3
Debugging . . . . . . . . . . . . . . . . . . . . . . . . . . . . . 41<br />
About objects and object models . . . . . . . . . . . . . . . . 45<br />
Understanding objects, properties, methods, and events . . . . . . . . . . . . . . . 45<br />
The purpose and benefits of using an object model . . . . . . . . . . . . . . . . . 45<br />
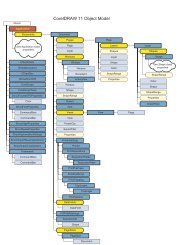
Object hierarchy. . . . . . . . . . . . . . . . . . . . . . . . . . . . . 46<br />
Dot notation . . . . . . . . . . . . . . . . . . . . . . . . . . . . . 46<br />
Creating references <strong>to</strong> objects using ‘Set’ . . . . . . . . . . . . . . . . . . . . 46<br />
Collections of objects . . . . . . . . . . . . . . . . . . . . . . . . . . 47<br />
Using objects in <strong>Corel</strong>DRAW . . . . . . . . . . . . . . . . . 49<br />
Working with basic objects . . . . . . . . . . . . . . . . . . . . . . . . . 49<br />
Application Object . . . . . . . . . . . . . . . . . . . . . . . . . . . 49<br />
Document Structure . . . . . . . . . . . . . . . . . . . . . . . . . . 49<br />
Document objects . . . . . . . . . . . . . . . . . . . . . . . . . . . 49<br />
Creating documents. . . . . . . . . . . . . . . . . . . . . . . . . . . 51<br />
The ActiveDocument property . . . . . . . . . . . . . . . . . . . . . . . 51<br />
Switching between documents . . . . . . . . . . . . . . . . . . . . . . . 52<br />
Changing content in active and inactive documents . . . . . . . . . . . . . . . . . 52<br />
Closing documents . . . . . . . . . . . . . . . . . . . . . . . . . . . 53<br />
Setting the undo string . . . . . . . . . . . . . . . . . . . . . . . . . . 53<br />
Page objects . . . . . . . . . . . . . . . . . . . . . . . . . . . . . . 54<br />
The ActivePage property . . . . . . . . . . . . . . . . . . . . . . . . . 54<br />
Creating pages . . . . . . . . . . . . . . . . . . . . . . . . . . . . 54<br />
Deleting pages . . . . . . . . . . . . . . . . . . . . . . . . . . . . 55<br />
Switching between pages . . . . . . . . . . . . . . . . . . . . . . . . . 55<br />
Reordering pages . . . . . . . . . . . . . . . . . . . . . . . . . . . 56<br />
Resizing pages . . . . . . . . . . . . . . . . . . . . . . . . . . . . 56<br />
Layer objects . . . . . . . . . . . . . . . . . . . . . . . . . . . . . . 57<br />
Creating layers . . . . . . . . . . . . . . . . . . . . . . . . . . . . 57<br />
Moving and renaming layers . . . . . . . . . . . . . . . . . . . . . . . . 57<br />
Deleting layers . . . . . . . . . . . . . . . . . . . . . . . . . . . . 58<br />
Setting a layer as active. . . . . . . . . . . . . . . . . . . . . . . . . . 58<br />
Disabling and hiding layers . . . . . . . . . . . . . . . . . . . . . . . . 58<br />
<strong>VBA</strong> <strong>Programming</strong> <strong>Guide</strong> <strong>for</strong> <strong>Corel</strong>DRAW <strong>11</strong> 4
Shape objects. . . . . . . . . . . . . . . . . . . . . . . . . . . . . . 58<br />
Selections and selecting shapes . . . . . . . . . . . . . . . . . . . . . . . 59<br />
Creating shapes . . . . . . . . . . . . . . . . . . . . . . . . . . . . 59<br />
Text objects . . . . . . . . . . . . . . . . . . . . . . . . . . . . . 62<br />
Changing the properties of shapes . . . . . . . . . . . . . . . . . . . . . . 64<br />
Shortcuts <strong>to</strong> frequently used objects . . . . . . . . . . . . . . . . . . . . . . 72<br />
Document operations . . . . . . . . . . . . . . . . . . . . . . . . . . . 75<br />
Opening and closing documents . . . . . . . . . . . . . . . . . . . . . . . 76<br />
Printing . . . . . . . . . . . . . . . . . . . . . . . . . . . . . . 76<br />
Importing and exporting files . . . . . . . . . . . . . . . . . . . . . . . . 77<br />
Publishing <strong>to</strong> PDF . . . . . . . . . . . . . . . . . . . . . . . . . . . 78<br />
Windows and views . . . . . . . . . . . . . . . . . . . . . . . . . . . 79<br />
Windows . . . . . . . . . . . . . . . . . . . . . . . . . . . . . . 79<br />
Views and ActiveView . . . . . . . . . . . . . . . . . . . . . . . . . . 80<br />
<strong>Corel</strong>DRAW events . . . . . . . . . . . . . . . . . . . . . . . . . . . . 81<br />
Responding <strong>to</strong> events . . . . . . . . . . . . . . . . . . . . . . . . . . 81<br />
Creating user interfaces <strong>for</strong> macros . . . . . . . . . . . . . . . 84<br />
Working with dialog boxes . . . . . . . . . . . . . . . . . . . . . . . . . 84<br />
Creating modal or modeless dialog boxes . . . . . . . . . . . . . . . . . . . . 84<br />
Common dialog box features . . . . . . . . . . . . . . . . . . . . . . . . 85<br />
Working with <strong>to</strong>olbars and but<strong>to</strong>ns . . . . . . . . . . . . . . . . . . . . . . 85<br />
Creating <strong>to</strong>olbars . . . . . . . . . . . . . . . . . . . . . . . . . . . 86<br />
Creating new but<strong>to</strong>ns . . . . . . . . . . . . . . . . . . . . . . . . . . 86<br />
Adding a caption and a <strong>to</strong>oltip <strong>to</strong> macros . . . . . . . . . . . . . . . . . . . . 86<br />
Adding an image or an icon <strong>to</strong> a <strong>com</strong>mand . . . . . . . . . . . . . . . . . . . . 87<br />
Interacting with the user . . . . . . . . . . . . . . . . . . . . . . . . . . 87<br />
Document.GetUserClick . . . . . . . . . . . . . . . . . . . . . . . . . 87<br />
Document.GetUserArea . . . . . . . . . . . . . . . . . . . . . . . . . 88<br />
Window.ScreenToDocument and Window.DocumentToScreen . . . . . . . . . . . . . . 88<br />
Shape.IsOnShape . . . . . . . . . . . . . . . . . . . . . . . . . . . 89<br />
Providing help <strong>to</strong> the user . . . . . . . . . . . . . . . . . . . . . . . . . 89<br />
<strong>VBA</strong> <strong>Programming</strong> <strong>Guide</strong> <strong>for</strong> <strong>Corel</strong>DRAW <strong>11</strong> 5
Organizing, grouping, & deploying <strong>Corel</strong>DRAW macros . . . . . . . . . . . 91<br />
Organizing and grouping macros . . . . . . . . . . . . . . . . . . . . . . . 91<br />
Advantages of distributing macros using a GMS file . . . . . . . . . . . . . . . . . 91<br />
Deploying and installing project files. . . . . . . . . . . . . . . . . . . . . . 91<br />
Distributing workspace features . . . . . . . . . . . . . . . . . . . . . . . 91<br />
Distributing workspaces . . . . . . . . . . . . . . . . . . . . . . . . . 91<br />
Distributing menus, <strong>to</strong>olbars, and shortcut keys . . . . . . . . . . . . . . . . . . 92<br />
Where <strong>to</strong> get more in<strong>for</strong>mation . . . . . . . . . . . . . . . . 93<br />
<strong>Corel</strong> Solution Developers Program . . . . . . . . . . . . . . . . . . . . . . 93<br />
<strong>Corel</strong> Corporate Services . . . . . . . . . . . . . . . . . . . . . . . . . . 93<br />
<strong>Corel</strong> Cus<strong>to</strong>mized Training . . . . . . . . . . . . . . . . . . . . . . . . . 93<br />
Other documentation . . . . . . . . . . . . . . . . . . . . . . . . . . . 93<br />
Web sites . . . . . . . . . . . . . . . . . . . . . . . . . . . . . . . 93<br />
Newsgroups . . . . . . . . . . . . . . . . . . . . . . . . . . . . . . 94<br />
Other support . . . . . . . . . . . . . . . . . . . . . . . . . . . . . 94<br />
Index. . . . . . . . . . . . . . . . . . . . . . . . . . . . . . . . . . . . . . . . . . . . . . . . . 95<br />
<strong>VBA</strong> <strong>Programming</strong> <strong>Guide</strong> <strong>for</strong> <strong>Corel</strong>DRAW <strong>11</strong> 6
Introduction 1<br />
<strong>Wel<strong>com</strong>e</strong> <strong>to</strong> the Visual Basic® <strong>for</strong> Applications <strong>Programming</strong> <strong>Guide</strong> <strong>for</strong> <strong><strong>Corel</strong>DRAW®</strong> <strong>11</strong>.<br />
What’s the purpose of this guide?<br />
The purpose of this document is <strong>to</strong> describe how <strong>to</strong> develop and distribute Visual Basic <strong>for</strong> Applications (<strong>VBA</strong>)<br />
solutions in <strong>Corel</strong>DRAW <strong>11</strong>. It introduces the <strong>VBA</strong> integrated development environment and many of its advanced<br />
features. It also describes the most important <strong>Corel</strong>DRAW functions and how <strong>to</strong> use them. Finally, this guide<br />
describes how <strong>to</strong> package and deploy <strong>VBA</strong> solutions developed <strong>for</strong> <strong>Corel</strong>DRAW.<br />
This guide should be read in conjunction with the <strong>Corel</strong>DRAW object model reference document available in the<br />
<strong>Corel</strong>DRAW application Help.<br />
Who should use this guide?<br />
This guide should be used by anyone who is interested in au<strong>to</strong>mating simple and <strong>com</strong>plex tasks in <strong>Corel</strong>DRAW or<br />
who is developing <strong>com</strong>mercial solutions that integrate with <strong>Corel</strong>DRAW.<br />
It is assumed that the reader already has experience with at least one other procedural programming language, such<br />
as BASIC, Visual Basic, C, C++, Java, Pascal, Cobol, or Fortran. This guide does not describe the basics of<br />
procedural programming, such as functions, conditional branching, and looping. Non-programmers should first<br />
learn the basics of programming in a language such as Visual Basic or <strong>VBA</strong> be<strong>for</strong>e using this document <strong>to</strong> develop<br />
<strong>Corel</strong>DRAW solutions.<br />
How <strong>to</strong> use this guide<br />
This guide is organized in<strong>to</strong> chapters that deal with specific aspects of au<strong>to</strong>mating tasks and building solutions in<br />
<strong>Corel</strong>DRAW.<br />
About <strong>Corel</strong>DRAW<br />
<strong>Corel</strong>DRAW is a <strong>com</strong>prehensive vec<strong>to</strong>r-based drawing program that makes it easy <strong>to</strong> create professional artwork<br />
from simple logos <strong>to</strong> technical illustrations. The <strong>to</strong>ols in <strong>Corel</strong>DRAW are designed <strong>to</strong> meet the demands of the<br />
graphic arts professional.<br />
About <strong>VBA</strong> in <strong>Corel</strong>DRAW<br />
In 1995, <strong>Corel</strong> incorporated au<strong>to</strong>mation in<strong>to</strong> <strong>Corel</strong>DRAW 6 by including its <strong>Corel</strong> SCRIPT language. This<br />
enabled solution developers <strong>to</strong> create intelligent mini-applications within <strong>Corel</strong>DRAW, such as ones that draw<br />
shapes, reposition and resize shapes, open and close documents, set styles, and so on.<br />
<strong>Corel</strong> SCRIPT was included with <strong>Corel</strong>DRAW versions 6 through 9. Although the <strong>Corel</strong> SCRIPT edi<strong>to</strong>r is not<br />
included with <strong>Corel</strong>DRAW in versions after 9, the run-time engine is included, so scripts written <strong>for</strong> earlier versions<br />
of <strong>Corel</strong>DRAW can easily be migrated <strong>to</strong> the latest versions.<br />
In 1998, <strong>Corel</strong> <strong>to</strong>ok the strategic decision <strong>to</strong> augment the <strong>Corel</strong> SCRIPT functionality of <strong>Corel</strong>DRAW 9 by licensing<br />
the Microsoft Visual Basic <strong>for</strong> Applications engine <strong>to</strong> handle its behind-the-scenes au<strong>to</strong>mation. The addition of <strong>VBA</strong><br />
<strong>VBA</strong> <strong>Programming</strong> <strong>Guide</strong> <strong>for</strong> <strong>Corel</strong>DRAW <strong>11</strong> 7
Introduction Chapter 1<br />
made <strong>Corel</strong>DRAW immediately accessible <strong>to</strong> millions of existing <strong>VBA</strong> developers, as well as Visual Basic developers,<br />
around the world.<br />
<strong>VBA</strong> in <strong>Corel</strong>DRAW can be used as a plat<strong>for</strong>m <strong>for</strong> developing powerful corporate graphical solutions, such as<br />
au<strong>to</strong>mated ticket genera<strong>to</strong>rs, cus<strong>to</strong>mized calendars, and batch processing of files. <strong>VBA</strong> can also be used <strong>to</strong> enhance<br />
and optimize the workflow within <strong>Corel</strong>DRAW. For example, you can improve and cus<strong>to</strong>mize some of the built-in<br />
functionality of <strong>Corel</strong>DRAW (alignments, trans<strong>for</strong>mations, object creation), or add page layouts on-the-fly<br />
(<strong>com</strong>pany letterheads).<br />
<strong>VBA</strong> <strong>com</strong>es with a fully integrated development environment that provides contextual pop-up lists, syntax<br />
highlighting, line-by-line debugging, and visual designer windows. These helpful prompts and aids create a<br />
particularly friendly environment <strong>for</strong> inexperienced developers <strong>to</strong> learn in.<br />
About <strong>Corel</strong> Corporation<br />
Founded in 1985, <strong>Corel</strong> Corporation (http://www.corel.<strong>com</strong>) is a leading technology <strong>com</strong>pany that offers software<br />
<strong>for</strong> home and small business users, creative professionals and enterprise cus<strong>to</strong>mers. With its headquarters in Ottawa,<br />
Canada, <strong>Corel</strong>’s <strong>com</strong>mon s<strong>to</strong>ck trades on the Nasdaq S<strong>to</strong>ck Market under the symbol CORL and on the Toron<strong>to</strong><br />
S<strong>to</strong>ck Exchange under the symbol COR.<br />
<strong>VBA</strong> <strong>Programming</strong> <strong>Guide</strong> <strong>for</strong> <strong>Corel</strong>DRAW <strong>11</strong> 8
Writing and running macros in <strong>Corel</strong>DRAW 2<br />
Be<strong>for</strong>e you can develop and run macros in <strong>Corel</strong>DRAW, it may be necessary <strong>to</strong> install the <strong>VBA</strong> <strong>com</strong>ponent.<br />
Installing <strong>VBA</strong> <strong>for</strong> <strong>Corel</strong>DRAW<br />
With <strong>Corel</strong>DRAW <strong>11</strong>, <strong>VBA</strong> is installed as part of the typical install. In <strong>Corel</strong>DRAW 10, <strong>VBA</strong> must be cus<strong>to</strong>m<br />
installed.<br />
To cus<strong>to</strong>m install <strong>VBA</strong>:<br />
1 Insert Disc 1 of the installation CD in<strong>to</strong> your <strong>com</strong>puter’s CD drive. If the installer does not au<strong>to</strong>start,<br />
double-click on the file D:\setup32.exe, where D: is the drive letter of your <strong>com</strong>puter's CD drive.<br />
2 If the installer au<strong>to</strong>starts, click on "Install <strong><strong>Corel</strong>DRAW®</strong> Graphics Suite <strong>11</strong>".<br />
<strong>Corel</strong>DRAW <strong>11</strong> installer<br />
<strong>VBA</strong> <strong>Programming</strong> <strong>Guide</strong> <strong>for</strong> <strong>Corel</strong>DRAW <strong>11</strong> 9
Writing and running macros in <strong>Corel</strong>DRAW Chapter 2<br />
3 Enable the Cus<strong>to</strong>m option and click Next:<br />
The Installation wizard<br />
4 Now navigate down the tree <strong>to</strong> <strong>Corel</strong> Graphics Suite <strong>11</strong>\Main Applications\Utilities\ and enable the Visual Basic<br />
<strong>for</strong> Applications 6.3 & IE 5 check box.<br />
Enable the Visual Basic <strong>for</strong> Applications check box<br />
5 Click Next. Any <strong>com</strong>ponents whose check boxes you disabled will be removed.<br />
<strong>VBA</strong> <strong>Programming</strong> <strong>Guide</strong> <strong>for</strong> <strong>Corel</strong>DRAW <strong>11</strong> 10
Writing and running macros in <strong>Corel</strong>DRAW Chapter 2<br />
The academic versions of <strong>Corel</strong>DRAW 10 and <strong>11</strong> do not include the <strong>VBA</strong> <strong>com</strong>ponents.<br />
The <strong>VBA</strong> <strong>to</strong>olbar in <strong>Corel</strong>DRAW<br />
<strong>Corel</strong>DRAW has a <strong>to</strong>olbar that provides easy access <strong>to</strong> several <strong>VBA</strong> features, and <strong>to</strong> the VB Edi<strong>to</strong>r.<br />
The <strong>to</strong>olbar but<strong>to</strong>ns provide the following functions:<br />
� playing macros<br />
� opening the VB Edi<strong>to</strong>r<br />
� switching the VB Edi<strong>to</strong>r between design and run modes<br />
� recording macros<br />
� pausing the recording of macros<br />
� s<strong>to</strong>pping the recording of macros<br />
These features are described in subsequent sections.<br />
To display the <strong>VBA</strong> <strong>to</strong>olbar, right-click anywhere on an empty <strong>to</strong>olbar area and choose ‘Visual Basic <strong>for</strong><br />
Applications’ from the pop-up menu. Alternatively, choose Tools � Toolbars � Visual Basic <strong>for</strong> Applications.<br />
Writing a macro<br />
The <strong>VBA</strong> <strong>to</strong>olbar in <strong>Corel</strong>DRAW<br />
Macros can only be written inside the VB Edi<strong>to</strong>r. However, you can save time by recording actions within<br />
<strong>Corel</strong>DRAW. Recording creates a new <strong>VBA</strong> macro in the chosen project, which can then be edited and cus<strong>to</strong>mized<br />
in the VB Edi<strong>to</strong>r.<br />
Writing macros in the VB Edi<strong>to</strong>r<br />
Macros that are developed in the VB Edi<strong>to</strong>r can take advantage of full programmatical control, including<br />
conditional execution, looping, and branching. Macros that include this extra functionality are more than mere<br />
‘macros’, but are programs in their own right. However, <strong>for</strong> the purpose of this guide, all <strong>VBA</strong> code is referred <strong>to</strong> as<br />
a ‘macro’, although in some contexts a macro is just those parts of that code that can be ‘launched’ by <strong>Corel</strong>DRAW.<br />
Using the VB Edi<strong>to</strong>r <strong>to</strong> develop macros is described in detail in the chapter ‘Visual Basic Edi<strong>to</strong>r’.<br />
Recording macros<br />
It is often very useful <strong>to</strong> record macros, particularly when you are not familiar with <strong>Corel</strong>DRAW’s object model, or<br />
when you are not sure which objects and methods <strong>to</strong> use. For many simple and repetitive tasks, recorded macros are<br />
a quick, efficient solution. Recorded macros are macros in the truest sense of the word: strictly speaking a macro is a<br />
recorded set of actions within the application that can be repeatedly invoked. This is exactly what is created when<br />
you record a macro – a true copy of your actions within <strong>Corel</strong>DRAW, although this is limited <strong>to</strong> <strong>Corel</strong>DRAW<br />
actions, and does not simply record keystrokes and mouse moves.<br />
<strong>VBA</strong> <strong>Programming</strong> <strong>Guide</strong> <strong>for</strong> <strong>Corel</strong>DRAW <strong>11</strong> <strong>11</strong>
Writing and running macros in <strong>Corel</strong>DRAW Chapter 2<br />
To record a new macro:<br />
1 Click Tools � Visual Basic � Record, or click on the Record but<strong>to</strong>n on the <strong>VBA</strong> <strong>to</strong>olbar.<br />
2 Type a name in the Macro Name box. Macro names must follow <strong>VBA</strong>’s naming rules, which are:<br />
� They must start with a letter.<br />
� They can contain numbers, but not as the first character.<br />
� They cannot contain spaces or any non-alphanumeric characters apart from the underscore (_).<br />
� They must be unique within the chosen project.<br />
3 Choose a <strong>VBA</strong> project (GMS) file or <strong>Corel</strong>DRAW (CDR) file from the S<strong>to</strong>re macro in list. You can type an<br />
optional <strong>com</strong>ment in the Description box. The benefits of selecting a GMS or CDR file are discussed in a later<br />
section.<br />
4 Click OK.<br />
<strong>Corel</strong>DRAW is now recording every action – each creation of a shape, each movement of an object and each change<br />
<strong>to</strong> a property is recorded.<br />
To s<strong>to</strong>p recording a macro, click Tools � Visual Basic � S<strong>to</strong>p. The macro will now be saved.<br />
To pause while recording a macro, click Tools � Visual Basic � Pause.<br />
Running a macro<br />
The Save Macro dialog box when recording<br />
The record, pause, s<strong>to</strong>p, and play controls are also available from the Visual Basic <strong>for</strong> Applications <strong>to</strong>olbar in<br />
<strong>Corel</strong>DRAW.<br />
Not all actions in <strong>Corel</strong>DRAW can be recorded. Some cannot be recorded because of their <strong>com</strong>plexity,<br />
although they can usually be hand-coded in the VB Edi<strong>to</strong>r. When something cannot be recorded, the<br />
following <strong>com</strong>ment is placed in the code: ‘The recording of this <strong>com</strong>mand is not supported’.<br />
You can run a macro from a <strong>Corel</strong>DRAW menu, or directly from the VB Edi<strong>to</strong>r.<br />
<strong>VBA</strong> <strong>Programming</strong> <strong>Guide</strong> <strong>for</strong> <strong>Corel</strong>DRAW <strong>11</strong> 12
Writing and running macros in <strong>Corel</strong>DRAW Chapter 2<br />
To run a macro from a <strong>Corel</strong>DRAW menu:<br />
1 Click Tools � Visual Basic � Play….<br />
The Macros dialog box<br />
Clicking the Run but<strong>to</strong>n on the <strong>VBA</strong> <strong>to</strong>olbar will also bring up the Macros dialog box.<br />
2 From the 'Macros in' list box, select the project (GMS) file that contains the macro you want <strong>to</strong> run. This will<br />
populate the Macro name list.<br />
3 Choose a macro from the Macro name list.<br />
4 Click Run.<br />
To run a macro from inside the VB Edi<strong>to</strong>r:<br />
1 Click anywhere inside the subroutine that <strong>for</strong>ms the macro and click Run � Run Macro.<br />
<strong>VBA</strong> <strong>Programming</strong> <strong>Guide</strong> <strong>for</strong> <strong>Corel</strong>DRAW <strong>11</strong> 13
Introducing au<strong>to</strong>mation and <strong>VBA</strong> 3<br />
Visual Basic <strong>for</strong> Applications, more <strong>com</strong>monly known as ‘<strong>VBA</strong>’, is a built-in programming language that can<br />
au<strong>to</strong>mate repetitive functions and create intelligent solutions in <strong>Corel</strong>DRAW. <strong>Corel</strong> Graphics Suite <strong>11</strong> includes <strong>VBA</strong><br />
version 6.3.<br />
<strong>VBA</strong> is both a language and an edi<strong>to</strong>r. It is not possible <strong>to</strong> have the language without the edi<strong>to</strong>r, nor is it possible <strong>to</strong><br />
edit <strong>VBA</strong> in anything but the VB Edi<strong>to</strong>r. And the VB Edi<strong>to</strong>r is also needed <strong>to</strong> run <strong>VBA</strong> programs.<br />
<strong>VBA</strong> is developed by Microsoft and is built in<strong>to</strong> almost all of its desk<strong>to</strong>p applications, including Microsoft® Office.<br />
<strong>VBA</strong> is licensed by Microsoft <strong>to</strong> other <strong>com</strong>panies, including <strong>Corel</strong> Corporation (in <strong>Corel</strong>DRAW, <strong>Corel</strong><br />
PHOTO-PAINT®, and WordPerfect®), Au<strong>to</strong>desk, Inc. (in Au<strong>to</strong>CAD®), IntelliSoft (IntelliCAD®), and many<br />
others. This enables <strong>Corel</strong>DRAW <strong>to</strong> <strong>com</strong>municate with a wide array of applications that support <strong>VBA</strong>. A <strong>com</strong>plete<br />
list of applications that support <strong>VBA</strong> can be viewed at the Microsoft Web site at<br />
http://www.msdn.microsoft.<strong>com</strong>/vba/<strong>com</strong>panies/<strong>com</strong>pany.asp.<br />
It is not necessary <strong>for</strong> an application <strong>to</strong> support <strong>VBA</strong> in order <strong>for</strong> the <strong>VBA</strong> engine in <strong>Corel</strong>DRAW <strong>to</strong> control that<br />
application. That means you can build solutions in <strong>Corel</strong>DRAW that access databases, word processors, specialized<br />
content edi<strong>to</strong>rs, XML documents, and more.<br />
What is au<strong>to</strong>mation?<br />
Most actions that you can do in <strong>Corel</strong>DRAW can be done programmatically through <strong>VBA</strong>. This programmability of<br />
<strong>Corel</strong>DRAW is called au<strong>to</strong>mation. Au<strong>to</strong>mating repetitive tasks can save time and reduce ef<strong>for</strong>t, while au<strong>to</strong>mating<br />
<strong>com</strong>plex tasks can make possible the otherwise impossible.<br />
In its simplest <strong>for</strong>m, au<strong>to</strong>mation is simply recording a sequence of actions in <strong>Corel</strong>DRAW (a macro) that can be<br />
played back time and again. The term 'macro' has <strong>com</strong>e <strong>to</strong> include any code accessible <strong>to</strong> <strong>VBA</strong> running within the<br />
process, even though some of that code might be far more advanced than a mere set of recorded actions. Thus<br />
wherever 'macro' is used in this guide, it refers <strong>to</strong> <strong>VBA</strong> functions and subroutines<br />
While it is possible <strong>to</strong> record a sequence of actions in <strong>Corel</strong>DRAW, the real power of au<strong>to</strong>mation and <strong>VBA</strong> is that<br />
these recordings can be edited <strong>to</strong> provide conditional and looping execution. For example, a simple macro may set the<br />
selected shape’s fill color <strong>to</strong> red and apply a one-point outline. But, by adding a condition and looping <strong>to</strong> the <strong>VBA</strong><br />
code, the macro could, <strong>for</strong> example, be made <strong>to</strong> visit each selected shape, and apply only the fill <strong>to</strong> text shapes and<br />
the outline <strong>to</strong> all other shape-types.<br />
<strong>VBA</strong> <strong>for</strong> non-programmers<br />
Visual Basic <strong>for</strong> Applications (<strong>VBA</strong>) is based on Microsoft's successful Visual Basic (VB) programming language. The<br />
main difference between <strong>VBA</strong> and VB is that you cannot create stand-alone executable (EXE) files using <strong>VBA</strong>,<br />
which you can with full VB; you can only create programs in <strong>VBA</strong> that run inside the host application, in this case<br />
<strong>Corel</strong>DRAW. In all other respects <strong>VBA</strong> and VB are the same.<br />
Visual Basic is, as the name describes it <strong>to</strong> be, a 'visual' version of the BASIC language. This means that it is a very<br />
easy language <strong>to</strong> learn, and it is helped in this by providing visual cues within the edi<strong>to</strong>r. Microsoft has added a great<br />
deal <strong>to</strong> the original BASIC language, and it is now a powerful and fast language, although not as powerful as Java or<br />
C++, or as quick as C.<br />
The aim of this guide is not <strong>to</strong> teach you how <strong>to</strong> be<strong>com</strong>e a programmer - you must do that on your own. The aim of<br />
this guide is <strong>to</strong> teach experienced programmers how <strong>to</strong> apply their skills <strong>to</strong> developing useful solutions within<br />
<strong>VBA</strong> <strong>Programming</strong> <strong>Guide</strong> <strong>for</strong> <strong>Corel</strong>DRAW <strong>11</strong> 14
Introducing au<strong>to</strong>mation and <strong>VBA</strong> Chapter 3<br />
<strong>Corel</strong>DRAW. Be<strong>for</strong>e continuing reading this guide, you may find it useful <strong>to</strong> refer <strong>to</strong> the many books that have been<br />
written about <strong>VBA</strong> and Visual Basic.<br />
<strong>VBA</strong> <strong>for</strong> programmers<br />
<strong>VBA</strong> is an in-process au<strong>to</strong>mation controller, in other words, it can be used <strong>to</strong> control the functionality of<br />
<strong>Corel</strong>DRAW that can be au<strong>to</strong>mated. And, since it runs 'in-process', it bypasses the interprocess synchronization<br />
mechanisms. This makes it run much more efficiently.<br />
All of the au<strong>to</strong>mation that is available <strong>to</strong> the in-process <strong>VBA</strong> is also available <strong>to</strong> external out-of-process au<strong>to</strong>mation<br />
controllers, or OLE clients. This includes applications developed in programming languages that can be used <strong>to</strong><br />
develop OLE clients, including:<br />
� Microsoft Visual Basic, Visual C++, and Windows® Scripting Host<br />
� Borland® Delphi and C++<br />
� Other applications' <strong>VBA</strong> engines<br />
The rest of this chapter and the next is intended <strong>to</strong> familiarize you with the <strong>VBA</strong> language and the VB Edi<strong>to</strong>r.<br />
The main features of <strong>VBA</strong> structure and syntax<br />
This section describes the main features of the structure and syntax of <strong>VBA</strong> code. This is intended <strong>to</strong> give<br />
experienced developers a quick grounding in <strong>VBA</strong> syntax and structure. Since <strong>VBA</strong> is a procedural language that<br />
shares much in <strong>com</strong>mon with all procedural languages, your current knowledge should help you get off <strong>to</strong> a quick<br />
start using <strong>VBA</strong>.<br />
This section is by no means exhaustive, but it does cover the most <strong>com</strong>mon syntactical nuances in which <strong>VBA</strong> differs<br />
from its peers.<br />
The following language <strong>to</strong>pics are covered:<br />
� variables, structures, enumerated types, arrays, and strings<br />
� functions and subroutines<br />
� line endings<br />
� <strong>com</strong>ments<br />
� memory pointers and allocation<br />
� passing values by reference and by value<br />
� code <strong>for</strong>matting<br />
� scope<br />
� classes<br />
Declaring variables<br />
In <strong>VBA</strong>, the construct <strong>for</strong> declaring variables is:<br />
Dim foobar As Integer<br />
The built-in data types are: Byte, Boolean, Integer, Long, Single, Double, String, Variant, and several other<br />
less-used types including Date, Decimal, and Object.<br />
Variables can be declared anywhere within the body of a function, or at the <strong>to</strong>p of the current module. If the option<br />
‘Require Variable Declaration’ is set in <strong>VBA</strong>’s options dialog, all variables must be declared be<strong>for</strong>e they are used.<br />
This is generally good practice, since it enables the <strong>com</strong>piler <strong>to</strong> use an explicit type efficiently; if variables are simply<br />
used without being declared as a particular type, the <strong>com</strong>piler will create them as variants, which are less efficient at<br />
run time.<br />
<strong>VBA</strong> <strong>Programming</strong> <strong>Guide</strong> <strong>for</strong> <strong>Corel</strong>DRAW <strong>11</strong> 15
Introducing au<strong>to</strong>mation and <strong>VBA</strong> Chapter 3<br />
To get more in<strong>for</strong>mation about one of the built-in data types, type it in<strong>to</strong> the code window, select it, and press F1.<br />
Booleans take False <strong>to</strong> be zero and True <strong>to</strong> be any other value, although converting from a Boolean <strong>to</strong> a<br />
Long will result in True being converted <strong>to</strong> -1.<br />
Data structures<br />
Data structures can be constructed using the following syntax:<br />
Public Type fooType<br />
item1 As Integer<br />
item2 As String<br />
End Type<br />
Dim myTypedItem As fooType<br />
The items within a variable declared as type fooType are accessed using dot notation:<br />
myTypedItem.item1 = 5<br />
Enumerated types<br />
Enumerated types use the following construction:<br />
Public Enum fooEnum<br />
ItemOne<br />
ItemTwo<br />
ItemThree<br />
End Enum<br />
The first item in an enumerated type is assigned a value of zero by default.<br />
Arrays<br />
Arrays are declared using parentheses, not brackets:<br />
Dim barArray (4) As Integer<br />
The value defines the index of the last item in the array. Since array indexes are zero-based by default, this means<br />
that there are five elements in the above array (zero thru four inclusive).<br />
Arrays can be resized using ReDim, <strong>for</strong> example, the following code adds an extra element <strong>to</strong> barArray, but<br />
preserves the existing contents of the original five elements:<br />
ReDim Preserve barArray (6)<br />
Array upper and lower bounds can be determined at run time with the functions UBound() and LBound().<br />
Multi-dimensional arrays can be declared by separating the dimension indexes with <strong>com</strong>mas:<br />
<strong>VBA</strong> <strong>Programming</strong> <strong>Guide</strong> <strong>for</strong> <strong>Corel</strong>DRAW <strong>11</strong> 16
Introducing au<strong>to</strong>mation and <strong>VBA</strong> Chapter 3<br />
Strings<br />
Dim barArray (4, 3)<br />
Strings are simple <strong>to</strong> use in <strong>VBA</strong>. Strings can be added <strong>to</strong>gether, truncated, searched <strong>for</strong>wards and backwards, and<br />
passed as simple arguments <strong>to</strong> functions. Strings in <strong>VBA</strong> are much simpler than strings in C.<br />
To add two strings <strong>to</strong>gether, simply use the concatenation opera<strong>to</strong>r, which is ampersand (&),ortheaddition<br />
opera<strong>to</strong>r (+):<br />
Dim string1 As String, string2 As String<br />
string2 = string1 & " more text" + " even more text"<br />
In <strong>VBA</strong>, there are many functions <strong>for</strong> manipulating strings, including InStr(), Left(), Mid(), Right(),<br />
Len(), and Trim().<br />
Functions and subroutines<br />
<strong>VBA</strong> uses both functions and subroutines (subs) – the difference between the two is that functions can return a<br />
value, whereas subs must not return a value. Typical functions in a language such as Java or C++ may look like the<br />
following:<br />
void foo( string stringItem ) {<br />
// The body of the function goes here<br />
}<br />
double bar( int numItem ) { return 23.2; }<br />
In <strong>VBA</strong> these functions look like the following:<br />
Public Sub foo (stringItem As String)<br />
' The body of the subroutine goes here<br />
End Sub<br />
Public Function bar (numItem As Integer) As Double<br />
bar = 23.2<br />
End Function<br />
To <strong>for</strong>ce a sub or function <strong>to</strong> exit immediately, use ‘Exit Sub’ or ‘Exit Function’, respectively.<br />
Declaring functions<br />
<strong>VBA</strong> functions and subs do not need <strong>to</strong> be declared be<strong>for</strong>e they are used, or be<strong>for</strong>e they are defined. Functions and<br />
subs only need <strong>to</strong> be declared if they actually exist in external, system dynamic-linked libraries (DLLs).<br />
Line endings<br />
<strong>VBA</strong> does not use a line-ending character. Many languages use the semicolon <strong>to</strong> separate individual statements; in<br />
<strong>VBA</strong> each statement must exist on its own line.<br />
To break a long <strong>VBA</strong> statement over two or more lines, each of the lines apart from the last line must end in an<br />
underscore character with at least one space in front of it:<br />
newString = fooFunction ("This is a string", _<br />
5, 10, 2)<br />
It is also possible <strong>to</strong> put several statements on<strong>to</strong> a single line by separating them with colons:<br />
<strong>VBA</strong> <strong>Programming</strong> <strong>Guide</strong> <strong>for</strong> <strong>Corel</strong>DRAW <strong>11</strong> 17
Introducing au<strong>to</strong>mation and <strong>VBA</strong> Chapter 3<br />
a = 1 : b = 2 : c = a + b<br />
A line cannot end with a colon. Lines that end with a colon are labels used by the Go<strong>to</strong> statement.<br />
Comments in the code<br />
Comments in <strong>VBA</strong> can only be created at the end of a line, similar <strong>to</strong> ANSI C++ and Java (but unlike C).<br />
Comments are started with an apostrophe and terminate at the line ending. Comments can occupy <strong>com</strong>plete lines<br />
on their own, although each line of a multi-line <strong>com</strong>ment must begin with its own apostrophe:<br />
a = b ' This is a really interesting piece of code that<br />
' needs so much explanation that I have had <strong>to</strong> break<br />
' the <strong>com</strong>ment over multiple lines.<br />
To <strong>com</strong>ment out large sections of code, use the following code, similar <strong>to</strong> C or C++:<br />
#If 0 Then ' That’s a zero, not the letter ‘oh’.<br />
' All this code will be ignored by<br />
' the <strong>com</strong>piler at run time!<br />
#End If<br />
Memory pointers and memory allocation<br />
<strong>VBA</strong> does not support C-style memory pointers. Memory allocation and garbage collection are au<strong>to</strong>matic and<br />
transparent, just as in Java and JavaScript, and some C++ code.<br />
Passing values ‘by reference’ and ‘by value’<br />
Most languages, including C/C++ and Java, pass arguments <strong>to</strong> functions as a copy of the original. If the original<br />
needs <strong>to</strong> be passed, either a memory pointer is passed that points <strong>to</strong> the original in memory, or a reference <strong>to</strong> the original<br />
is passed. The same is true in Visual Basic, except that passing a copy of the original is called ‘passing by value’ and<br />
passing a reference <strong>to</strong> the original is called ‘passing by reference’.<br />
By default, function and subroutine parameters are passed ‘by reference’. This means that a reference <strong>to</strong> the original<br />
variable is passed in the function’s argument, and changing that argument’s value within the procedure will, in<br />
effect, change the original variable’s value as well. This is a great way of returning more than one value from a<br />
function or sub. To explicitly annotate the code <strong>to</strong> indicate that an argument is being passed by reference, prefix the<br />
argument with ‘ByRef’.<br />
It is possible <strong>to</strong> <strong>for</strong>ce an argument <strong>to</strong> be copied instead of a reference passed, which prevents the function from<br />
changing the original variable’s value. To do this, prefix the argument with ‘ByVal’, as given below. This<br />
ByRef/ByVal functionality is similar <strong>to</strong> C and C++’s ability <strong>to</strong> pass a copy of a variable, or <strong>to</strong> pass a pointer <strong>to</strong> the<br />
original variable.<br />
Private Sub fooFunc (ByVal int1 As Integer, _<br />
ByRef long1 As Long, _<br />
long2 As Long) ' Passed ByRef by default<br />
In the preceding example, both arguments long1 and long2 are passed ByRef, which is the default. Modifying<br />
either argument within the body of the function will modify the original variable; however, modifying int1 will not<br />
affect the original, since it is a copy of the original.<br />
Code <strong>for</strong>matting<br />
The VB Edi<strong>to</strong>r <strong>for</strong>mats all of the code <strong>for</strong> you. The only cus<strong>to</strong>m <strong>for</strong>matting that you can do is <strong>to</strong> change the size of<br />
indentations.<br />
<strong>VBA</strong> <strong>Programming</strong> <strong>Guide</strong> <strong>for</strong> <strong>Corel</strong>DRAW <strong>11</strong> 18
Introducing au<strong>to</strong>mation and <strong>VBA</strong> Chapter 3<br />
Public and private scope<br />
Functions, subs, and types (and members of classes) that are declared as ‘Private’ are only visible within that module<br />
(file). Functions that are declared as ‘Public’ are visible throughout all the modules. However, you may have <strong>to</strong> use<br />
fully qualified referencing if the modules are almost out of scope, <strong>for</strong> example, referencing a function in a different<br />
Project.<br />
Local scope<br />
Unlike C, <strong>VBA</strong> does not use braces ( ‘{’ and ‘}’ ) <strong>to</strong> define local scope. Local scope in <strong>VBA</strong> is defined by an opening<br />
function or sub definition statement and a matching End statement (End Function, End Sub). Any variables<br />
declared within the function are only available within the scope of the function itself.<br />
Object-oriented classes<br />
<strong>VBA</strong> can create object-oriented classes, although these are a feature of the language and are not discussed in detail<br />
in this guide.<br />
Boolean <strong>com</strong>parison and assignment using ‘=’<br />
In Visual Basic, both Boolean <strong>com</strong>parison and assignment are done using a single equals sign:<br />
If a = b Then c = d<br />
This is in contrast <strong>to</strong> many other languages that use a double equals <strong>for</strong> a Boolean <strong>com</strong>parison and a single equals<br />
<strong>for</strong> assignment:<br />
if( a == b ) c = d;<br />
The following code, which is valid in C, C++, Java, and JavaScript, is invalid in <strong>VBA</strong>:<br />
if( ( result = fooBar( ) ) == true )<br />
This would have <strong>to</strong> be written in <strong>VBA</strong> as the following:<br />
result = fooBar( )<br />
If result = True Then<br />
Other Boolean <strong>com</strong>parisons<br />
<strong>VBA</strong> uses the same opera<strong>to</strong>rs as other languages do <strong>for</strong> other Boolean <strong>com</strong>parisons. The only opera<strong>to</strong>rs that are<br />
different are ‘is equal <strong>to</strong>’ and ‘is not equal <strong>to</strong>’. All the Boolean-<strong>com</strong>parison opera<strong>to</strong>rs are given in the following table:<br />
<strong>VBA</strong> <strong>Programming</strong> <strong>Guide</strong> <strong>for</strong> <strong>Corel</strong>DRAW <strong>11</strong> 19
Introducing au<strong>to</strong>mation and <strong>VBA</strong> Chapter 3<br />
Comparison <strong>VBA</strong> opera<strong>to</strong>r C-style opera<strong>to</strong>r<br />
Is equal <strong>to</strong> = ==<br />
Is not equal <strong>to</strong> !=<br />
Is greater than > ><br />
Is less than < <<br />
Is greater than or equal <strong>to</strong> >= >=<br />
Is less than or equal <strong>to</strong>
Introducing au<strong>to</strong>mation and <strong>VBA</strong> Chapter 3<br />
Dim retval As Long<br />
retval = MsgBox("Click OK if you agree.", _<br />
vbOKCancel, "Easy Message")<br />
If retval = vbOK Then<br />
MsgBox "You clicked OK.", vbOK, "Affirmative"<br />
End If<br />
You can also get strings from the user with <strong>VBA</strong>’s InputBox function:<br />
Dim inText As String<br />
inText = InputBox("Input some text:", "type here")<br />
If Len(inText) > 0 Then<br />
MsgBox "You typed the following: " & inText & "."<br />
End If<br />
If the user clicks Cancel, the length of the string returned in inText is zero.<br />
Comparing <strong>VBA</strong> <strong>to</strong> other programming languages<br />
<strong>VBA</strong> has many similarities with most modern, procedural, programming languages, including Java, JavaScript, C,<br />
and C++. However, <strong>VBA</strong> runs as an in-process au<strong>to</strong>mation controller, whereas the other languages are used <strong>to</strong><br />
<strong>com</strong>pile stand-alone applications (apart from JavaScript).<br />
<strong>VBA</strong> <strong>com</strong>pared <strong>to</strong> Java and JavaScript<br />
<strong>VBA</strong> is similar <strong>to</strong> Java and JavaScript in that it is a high-level, procedural programming language that has full<br />
garbage collection and very little memory-pointer support. They are also similar because code developed in <strong>VBA</strong><br />
supports on-demand <strong>com</strong>pilation. In other words, it can be executed without being <strong>com</strong>piled.<br />
<strong>VBA</strong> has another similarity with JavaScript in that it cannot be executed as a standalone application: JavaScript is<br />
almost always embedded within Web pages, and the JavaScript is a mechanism that manipulates the Web browser’s<br />
document object model or DOM. <strong>VBA</strong> is exactly the same: <strong>VBA</strong> programs are always executed inside a host<br />
environment, in this case <strong>Corel</strong>DRAW, and the programs manipulate the <strong>Corel</strong>DRAW ‘DOM’ – although in <strong>VBA</strong>’s<br />
case this is simply called an ‘object model’.<br />
<strong>VBA</strong> applications can usually be <strong>com</strong>piled <strong>to</strong> P-code <strong>to</strong> make them run quicker, although given <strong>to</strong>day’s level of<br />
<strong>com</strong>puter hardware, the difference is hardly noticeable. This is similar <strong>to</strong> Java, but JavaScript cannot be <strong>com</strong>piled.<br />
<strong>VBA</strong> uses a single equals sign, ‘=’, <strong>for</strong> both <strong>com</strong>parison and assignment, whereas Java and JavaScript both use ‘=’<br />
<strong>for</strong> assignment and ‘==’ <strong>for</strong> a Boolean <strong>com</strong>parison.<br />
<strong>VBA</strong> <strong>com</strong>pared <strong>to</strong> C and C++<br />
<strong>VBA</strong> has quite a few similarities with C, C++, and similar languages, but it also has some differences. Visual Basic<br />
uses functions and subroutines, whereas C and C++ use just functions. The difference is that C/C++ functions do not<br />
have <strong>to</strong> return a value, but they can, whereas <strong>VBA</strong> functions can return a value and <strong>VBA</strong> subs must never return a<br />
value.<br />
Also, <strong>VBA</strong> allocates and frees memory transparently, whereas in C and C++, the developer is responsible <strong>for</strong> most<br />
memory management. This makes strings in <strong>VBA</strong> even simpler than using the CString class in C++.<br />
<strong>VBA</strong> uses a single equals sign, ‘=’, <strong>for</strong> both <strong>com</strong>parison and assignment, whereas C and C++ both use ‘=’ <strong>for</strong><br />
assignment and ‘==’ <strong>for</strong> a Boolean <strong>com</strong>parison.<br />
<strong>VBA</strong> <strong>Programming</strong> <strong>Guide</strong> <strong>for</strong> <strong>Corel</strong>DRAW <strong>11</strong> 21
Introducing au<strong>to</strong>mation and <strong>VBA</strong> Chapter 3<br />
<strong>VBA</strong> <strong>com</strong>pared <strong>to</strong> Windows Scripting Host<br />
Windows Scripting Host is a useful addition <strong>to</strong> Windows <strong>for</strong> doing occasional scripting and au<strong>to</strong>mation of Windows<br />
tasks – ‘WSH’ is an out-of-process au<strong>to</strong>mation controller that can be used <strong>to</strong> control <strong>Corel</strong>DRAW. The scripts<br />
cannot be <strong>com</strong>piled, which means that they must be interpreted as they are executed, which is slower, plus the<br />
au<strong>to</strong>mation is being run out of process, which adds <strong>to</strong> the slowness.<br />
WSH is a host <strong>for</strong> a number of scripting languages, each of which has its own syntax. However, the standard<br />
language used by WSH is a Visual Basic-like macro language, so <strong>for</strong> standard scripts, the syntax is the same as<br />
<strong>VBA</strong>.<br />
<strong>VBA</strong> <strong>Programming</strong> <strong>Guide</strong> <strong>for</strong> <strong>Corel</strong>DRAW <strong>11</strong> 22
Visual Basic Edi<strong>to</strong>r 4<br />
The edi<strong>to</strong>r that is included with <strong>VBA</strong> is very similar <strong>to</strong> the edi<strong>to</strong>r included with full Visual Basic. The main<br />
differences between VB and <strong>VBA</strong> are that the VB Edi<strong>to</strong>r (<strong>for</strong> <strong>VBA</strong>) cannot <strong>com</strong>pile executable (EXE) program files,<br />
and some of the implementations of <strong>for</strong>ms and controls are different.<br />
This chapter describes many of the features of the Visual Basic Edi<strong>to</strong>r and how <strong>to</strong> make best use of them.<br />
Starting the Visual Basic Edi<strong>to</strong>r from <strong>Corel</strong>DRAW<br />
To invoke the Visual Basic Edi<strong>to</strong>r from inside <strong>Corel</strong>DRAW, click Tools � Visual Basic � Visual Basic Edi<strong>to</strong>r or<br />
press Alt+F<strong>11</strong> (this is the standard keystroke <strong>for</strong> most <strong>VBA</strong>-enabled applications, including WordPerfect Office<br />
2002). This starts <strong>VBA</strong> as a new application in Windows (although it is running within the <strong>Corel</strong>DRAW process).<br />
To switch between <strong>Corel</strong>DRAW and the VB Edi<strong>to</strong>r without closing the edi<strong>to</strong>r, either use Windows’ Taskbar (the<br />
‘Start-but<strong>to</strong>n bar’), or press Alt+F<strong>11</strong>, orAlt+Tab.<br />
Visual Basic Edi<strong>to</strong>r user interface<br />
There are many aspects <strong>to</strong> the VB Edi<strong>to</strong>r’s user interface: there are several windows <strong>for</strong> developing code and dialog<br />
boxes, and <strong>for</strong> browsing the object tree; there are also quite a few ancillary windows <strong>for</strong> browsing the modules<br />
within each project, windows <strong>for</strong> setting individual properties of objects, and windows <strong>for</strong> debugging.<br />
The VB Edi<strong>to</strong>r has several child windows and several <strong>to</strong>olbars. The child windows that are normally visible are the<br />
main Code window, and <strong>to</strong> the left of that the Project Explorer (upper-left window) and the Properties window<br />
<strong>VBA</strong> <strong>Programming</strong> <strong>Guide</strong> <strong>for</strong> <strong>Corel</strong>DRAW <strong>11</strong> 23
Visual Basic Edi<strong>to</strong>r Chapter 4<br />
(lower-left window). There are four <strong>to</strong>olbars available, of which the Standard and Debug <strong>to</strong>olbars are the most<br />
useful.<br />
The VB Edi<strong>to</strong>r<br />
Project Explorer<br />
The Project Explorer is essential <strong>for</strong> navigating around <strong>VBA</strong> projects and their constituent modules.<br />
The Project Explorer window with an open module list and one of the modules selected.<br />
To show the Project Explorer window, click View � Project Explorer, or press Ctrl+R.<br />
<strong>VBA</strong> <strong>Programming</strong> <strong>Guide</strong> <strong>for</strong> <strong>Corel</strong>DRAW <strong>11</strong> 24
Visual Basic Edi<strong>to</strong>r Chapter 4<br />
Each item in the Project Explorer window is given an icon.<br />
Icon Meaning<br />
Project<br />
project<br />
folder<br />
class module<br />
module<br />
<strong>for</strong>m<br />
document<br />
A Global Macro S<strong>to</strong>rage (GMS) file, also known as a project file, exists in the \<strong>Corel</strong>\<strong>Corel</strong> Graphics<br />
<strong>11</strong>\Draw\GMS\ folder which is typically under C:\Program Files\. The VB Edi<strong>to</strong>r s<strong>to</strong>res all of the modules <strong>for</strong> that<br />
project in the project’s GMS file; one GMS file may contain dozens of modules. The default coreldraw<strong>11</strong>.gms file is<br />
s<strong>to</strong>red in the folder \<strong>Corel</strong>\<strong>Corel</strong> Graphics <strong>11</strong>\Draw\.<br />
Different localized versions of Windows use different names <strong>for</strong> the Program Files folder.<br />
Each project that you create can have many modules within it. There are three types of modules:<br />
� Modules <strong>for</strong> general code and macros<br />
� Forms <strong>for</strong> cus<strong>to</strong>m dialog boxes and user interfaces, including the code <strong>to</strong> control them<br />
� Class Modules <strong>for</strong> object-oriented Visual Basic classes (which are not discussed in this guide)<br />
There is also a fourth item ‘<strong>Corel</strong>DRAW <strong>11</strong> Objects’, which contains a single item, ThisDocument. This<br />
is mostly used <strong>for</strong> event handling, and is discussed in the chapter titled “Using objects in <strong>Corel</strong>DRAW”.<br />
The Project Explorer presents each module type in its own folder. It is not possible <strong>to</strong> move a module from one<br />
folder <strong>to</strong> another within the same project; you can drag a module <strong>to</strong> another project, which makes a copy of it there.<br />
Creating a new, empty project<br />
Creating a new project (GMS) file is done in Windows Explorer.<br />
<strong>VBA</strong> <strong>Programming</strong> <strong>Guide</strong> <strong>for</strong> <strong>Corel</strong>DRAW <strong>11</strong> 25
Visual Basic Edi<strong>to</strong>r Chapter 4<br />
To create a new project<br />
1 In Windows Explorer, navigate <strong>to</strong> the GMS folder inside the <strong>Corel</strong>DRAW programs folder, as given above.<br />
2 Click File � New � Text Document <strong>to</strong> create a new, empty text document in this folder.<br />
3 Rename the file <strong>to</strong> your-name.gms where ‘your-name’ can be any valid Windows file name.<br />
4 Restart <strong>Corel</strong>DRAW.<br />
When you launch the VB Edi<strong>to</strong>r, your new GMS file will be listed in the Project Explorer window as Global<br />
Macros (your-name.gms).<br />
To change the internal name – Global Macros – of the project<br />
1 Click on the project you want <strong>to</strong> rename in the Project Explorer window.<br />
2 In the Properties window edit the ‘(name)’ value <strong>to</strong> what you want it <strong>to</strong> be. Names must follow normal<br />
variable-naming conventions: no spaces, must start with a letter, cannot contain punctuation (except underscore),<br />
etc.<br />
3 Press Enter <strong>to</strong> confirm.<br />
Creating a new module or <strong>for</strong>m<br />
Every new GMS project file contains a single module inside the modules folder called ‘<strong>Corel</strong>DRAW <strong>11</strong> Objects’.<br />
This default module is called ‘ThisDocument’. This module has a special purpose and should not be used <strong>for</strong> normal<br />
code. Instead, code should be developed in a module, class module, or <strong>for</strong>m.<br />
To create a new module<br />
1 In the Project Explorer window, right-click anywhere on the project <strong>to</strong> which you want <strong>to</strong> add a module.<br />
2 Click one of the following<br />
� Insert � Module - inserts a normal code module;<br />
� Insert � UserForm - insert a new <strong>for</strong>m (dialog);<br />
� Insert � Class Module - insert a new class code module.<br />
The new module will be placed in the project’s folder <strong>for</strong> that type of module.<br />
<strong>VBA</strong> <strong>Programming</strong> <strong>Guide</strong> <strong>for</strong> <strong>Corel</strong>DRAW <strong>11</strong> 26
Visual Basic Edi<strong>to</strong>r Chapter 4<br />
Properties Window<br />
The Properties window lists all of the editable properties <strong>for</strong> the currently selected object. Many objects in <strong>VBA</strong><br />
have property sheets that can be modified, including projects, modules, and <strong>for</strong>ms and their controls.<br />
The Properties window updates itself au<strong>to</strong>matically when you change which object is selected, and when you change<br />
properties of that object using other methods, <strong>for</strong> example using the mouse <strong>to</strong> move and resize <strong>for</strong>m controls.<br />
Code window<br />
The Properties window, showing the properties of a <strong>for</strong>m object<br />
To show the Properties window, click View � Properties Window or press F4.<br />
The Code window is where most of the work takes place. This is a standard code edi<strong>to</strong>r, in the style of Microsoft<br />
Visual Studio®, which includes au<strong>to</strong>matic <strong>for</strong>matting, syntax highlighting, au<strong>to</strong>matic syntax checking, au<strong>to</strong>matic<br />
<strong>VBA</strong> <strong>Programming</strong> <strong>Guide</strong> <strong>for</strong> <strong>Corel</strong>DRAW <strong>11</strong> 27
Visual Basic Edi<strong>to</strong>r Chapter 4<br />
<strong>com</strong>pletion, and more. If you are already familiar with any of the Microsoft Visual Studio edi<strong>to</strong>rs, the <strong>VBA</strong> Code<br />
window will be entirely familiar.<br />
Au<strong>to</strong>matic code <strong>for</strong>matting<br />
The VB Edi<strong>to</strong>r does not allow code <strong>to</strong> be cus<strong>to</strong>m-<strong>for</strong>matted. Even the capitalization of keywords, functions,<br />
subroutines, and variables is taken care of by the edi<strong>to</strong>r, irrespective of what you type.<br />
The most <strong>for</strong>matting you can do is <strong>to</strong> decide how much indentation each line has, and where cus<strong>to</strong>m line breaks are<br />
placed.<br />
The one <strong>for</strong>matting issue that catches many developers off guard is calling functions and subs. The rules are:<br />
� If you are calling a function and you are using the returned value, the parentheses around the parameters are<br />
manda<strong>to</strong>ry, just as in most modern programming languages. For example:<br />
a = fooFunc (b, c)<br />
� However, if the returned value from a function call is being thrown away, or if you are calling a sub, the<br />
parentheses must be left out, unlike most other languages:<br />
barFunc d, e<br />
fooBarSub f<br />
� If you prefer <strong>to</strong> see the parentheses every time, use the Call keyword be<strong>for</strong>e the function or sub call:<br />
Call barFunc (d, e)<br />
Call fooBarSub (f)<br />
The <strong>VBA</strong> Code window<br />
Syntax highlighting<br />
When you develop code in the Code window, the edi<strong>to</strong>r colorizes each word according <strong>to</strong> its classification: <strong>VBA</strong><br />
<strong>VBA</strong> <strong>Programming</strong> <strong>Guide</strong> <strong>for</strong> <strong>Corel</strong>DRAW <strong>11</strong> 28
Visual Basic Edi<strong>to</strong>r Chapter 4<br />
keywords and programming statements are usually blue, <strong>com</strong>ments are green, and all other text is black. This<br />
colorization makes the code much easier <strong>to</strong> read.<br />
Syntax highlighting and coloring<br />
Lines of code containing errors are shown in red, selected text is white on blue, the line where execution is paused<br />
when debugging is shown as a yellow highlight.<br />
If you set a breakpoint on a line of code <strong>for</strong> debugging purposes, a red dot is shown in the left-hand margin with the<br />
code in white on a red background. If you set bookmarks in the code so that you can find your place when you have<br />
<strong>to</strong> navigate away from it, a blue dot will be placed in the left-hand margin.<br />
Both breakpoints and bookmarks are lost when you exit <strong>Corel</strong>DRAW.<br />
You can modify the syntax highlighting colors by clicking Tools � Options, clicking the Edi<strong>to</strong>r Format<br />
tab, and making your changes.<br />
Au<strong>to</strong>matic syntax checking<br />
Every time you move the cursor out of a line of code, the edi<strong>to</strong>r checks the syntax of the code in the line you just<br />
left. If there are any syntax errors, the edi<strong>to</strong>r changes the color of the text of that line <strong>to</strong> red and pops up a warning.<br />
<strong>VBA</strong> <strong>Programming</strong> <strong>Guide</strong> <strong>for</strong> <strong>Corel</strong>DRAW <strong>11</strong> 29
Visual Basic Edi<strong>to</strong>r Chapter 4<br />
This real-time checking can be very useful, particularly when you are learning <strong>VBA</strong>, since it indicates many possible<br />
errors in the code without having <strong>to</strong> run the code.<br />
A typical syntax error warning<br />
However, the warning dialog can be quite intrusive <strong>for</strong> the more experienced <strong>VBA</strong> developer, since it is often<br />
expedient <strong>to</strong> copy code snippets from other lines in<strong>to</strong> the current line, or scroll <strong>to</strong> another line <strong>to</strong> check something,<br />
but moving the cursor in<strong>to</strong> the other line <strong>to</strong> copy the code, or moving between modules, will cause the edi<strong>to</strong>r <strong>to</strong><br />
pop-up an error message, even though you will be returning <strong>to</strong> fix it in a moment. It is, there<strong>for</strong>e, nice <strong>to</strong> know that<br />
this message can be suppressed by clicking Tools � Options, selecting the Edi<strong>to</strong>r tab, and clearing the Au<strong>to</strong><br />
Syntax Check check box.<br />
The edi<strong>to</strong>r will still check the syntax and highlight erroneous lines in red, but it will s<strong>to</strong>p popping up an intrusive<br />
dialog each time you go <strong>to</strong> paste text from another line of code.<br />
Jumping <strong>to</strong> variable, function, and object definitions<br />
You can jump directly <strong>to</strong> the definition of a variable, function, or object merely by right-clicking on it in the code<br />
window and choosing Definition from the pop-up menu. This will either take you <strong>to</strong> the definition of the variable<br />
or function in the code, or it will take you <strong>to</strong> the object’s definition in the Object Browser window.<br />
To return <strong>to</strong> the place where you requested the definition, right-click again and click Last Position in the Code<br />
window.<br />
Contextual pop-up lists and au<strong>to</strong>matic <strong>com</strong>pletion<br />
As you write more functions and create more variables, the VB Edi<strong>to</strong>r adds these items <strong>to</strong> an internal list that<br />
already contains all of its built-in keywords and enumerated values. Then, as you are typing, the edi<strong>to</strong>r often<br />
<strong>VBA</strong> <strong>Programming</strong> <strong>Guide</strong> <strong>for</strong> <strong>Corel</strong>DRAW <strong>11</strong> 30
Visual Basic Edi<strong>to</strong>r Chapter 4<br />
presents you with a list of candidate words that you may want <strong>to</strong> insert at the current position. This list is<br />
contextual, so the edi<strong>to</strong>r will usually present only the words that are valid <strong>for</strong> this position.<br />
This list makes code development quicker and more convenient, particularly since you do not have <strong>to</strong> remember<br />
every function and variable name, but can choose one from the list when you cannot remember it. You can help the<br />
menu find the word you want by entering the first few characters of the word; the list will scroll <strong>to</strong> the nearest<br />
candidate that matches the first few characters you entered.<br />
Choose an item from the list and enter the character that will follow the word – typically a space, line feed,<br />
parenthesis, period, or <strong>com</strong>ma – the word is inserted with the following character. To insert without any additional<br />
characters, press Tab,orCtrl+Enter, or click on the word with the mouse.<br />
To <strong>for</strong>ce this menu <strong>to</strong> pop up when occasionally it does not do so au<strong>to</strong>matically, press Ctrl+Space bar. The menu<br />
will scroll <strong>to</strong> the word that most closely matches the characters that you have typed so far. This is also useful <strong>for</strong><br />
filling parameter lists when calling a function or subroutine. If there is only one exact match, the edi<strong>to</strong>r will insert<br />
the word without popping up the list. To pop up the list at any time <strong>for</strong> the selected keyword without au<strong>to</strong>-filling it,<br />
press Ctrl+J.<br />
Form Designer window<br />
Au<strong>to</strong>-<strong>com</strong>pletion pop-up menu<br />
The Form Designer window enables you <strong>to</strong> create cus<strong>to</strong>m dialog boxes <strong>for</strong> use in your solutions. Dialog boxes can be<br />
modal, in which case the user must dismiss the dialog box be<strong>for</strong>e doing anything else in <strong>Corel</strong>DRAW, or they can be<br />
modeless, in which case they are similar <strong>to</strong> the <strong>Corel</strong>DRAW Docker Window.<br />
<strong>VBA</strong> <strong>Programming</strong> <strong>Guide</strong> <strong>for</strong> <strong>Corel</strong>DRAW <strong>11</strong> 31
Visual Basic Edi<strong>to</strong>r Chapter 4<br />
To create a new <strong>for</strong>m, right-click within the project in the Project window and click Insert � UserForm. This<br />
creates a new, blank <strong>for</strong>m.<br />
A blank <strong>for</strong>m in the Form Designer window<br />
The <strong>for</strong>m can be immediately tested by pressing F5 <strong>to</strong> run it – it’s not very interesting, since the only control on the<br />
<strong>for</strong>m is the Close but<strong>to</strong>n in the upper-right corner of the title bar. Click the Close but<strong>to</strong>n <strong>to</strong> dismiss the <strong>for</strong>m.<br />
To change the title of the <strong>for</strong>m, click on the <strong>for</strong>m <strong>to</strong> select it, and then in the Properties window, change the Caption<br />
property. While you are there, it is a good idea <strong>to</strong> give the Form a unique, descriptive name, but remember that this<br />
must follow the rules <strong>for</strong> naming variables in <strong>VBA</strong>.<br />
Most <strong>for</strong>ms have at least one but<strong>to</strong>n – an OK but<strong>to</strong>n – plus a Cancel but<strong>to</strong>n. To add but<strong>to</strong>ns – or any other<br />
controls <strong>to</strong> a <strong>for</strong>m – drag the appropriate control in the <strong>to</strong>olbox <strong>to</strong> the <strong>for</strong>m.<br />
Form Designer <strong>to</strong>olbox<br />
To add a but<strong>to</strong>n, use the CommandBut<strong>to</strong>n control. Click on the <strong>for</strong>m <strong>to</strong> add a default-sized but<strong>to</strong>n, or drag <strong>to</strong><br />
create one <strong>to</strong> your own specifications. Click on the caption <strong>to</strong> edit it, or edit the Caption property in the Properties<br />
<strong>VBA</strong> <strong>Programming</strong> <strong>Guide</strong> <strong>for</strong> <strong>Corel</strong>DRAW <strong>11</strong> 32
Visual Basic Edi<strong>to</strong>r Chapter 4<br />
window with the but<strong>to</strong>n selected. Also, change the name of the but<strong>to</strong>n <strong>to</strong> something more descriptive, like<br />
but<strong>to</strong>nOK or but<strong>to</strong>nCancel.<br />
<strong>VBA</strong> <strong>for</strong>m controls<br />
But<strong>to</strong>ns in a Form Designer window<br />
The standard Toolbox controls include:<br />
� Static text – <strong>for</strong> captions and instructions<br />
� TextBox – <strong>for</strong> the user <strong>to</strong> type text in<strong>to</strong><br />
� ComboBox – a list box which the user can also type text in<strong>to</strong>, although this can be disabled <strong>to</strong> provide a plain list<br />
box<br />
� ListBox – an open list in which multiple items may be selected, although the user cannot type in<strong>to</strong> it;<br />
� Checkbox – can be checked, unchecked, or grayed<br />
� OptionBut<strong>to</strong>n – several of these with the same GroupName property work so that only one can be selected at<br />
once<br />
� ToggleBut<strong>to</strong>n – a but<strong>to</strong>n that’s either in or out<br />
� Frame – groups items <strong>to</strong>gether: items drawn on the frame move with the frame<br />
� CommandBut<strong>to</strong>n – the but<strong>to</strong>n is the most used of all the controls<br />
� TabStrip, MultiPage – useful <strong>for</strong> creating pages of options, or wizards<br />
� ScrollBar – provides immediate access <strong>to</strong> a range of values<br />
� SpinBut<strong>to</strong>n – works with another control, such as a TextBox, <strong>to</strong> provide immediate and fast control of the other<br />
control’s value<br />
� Image – add images <strong>to</strong> the <strong>for</strong>m<br />
Now, start the <strong>for</strong>m by pressing F5. Try clicking the OK and Cancel but<strong>to</strong>ns – nothing happens! This is because the<br />
<strong>for</strong>m does not have any code <strong>for</strong> handling the but<strong>to</strong>ns’ click events.<br />
OK and Cancel but<strong>to</strong>ns<br />
<strong>VBA</strong> <strong>for</strong>ms are event-driven. This means that they respond <strong>to</strong> events. Be<strong>for</strong>e they respond, you must write some<br />
event-handling code. So, the Cancel but<strong>to</strong>n is the simplest control: it must just dismiss the <strong>for</strong>m without doing<br />
<strong>VBA</strong> <strong>Programming</strong> <strong>Guide</strong> <strong>for</strong> <strong>Corel</strong>DRAW <strong>11</strong> 33
Visual Basic Edi<strong>to</strong>r Chapter 4<br />
anything else. Dismiss the dialog, if it is still running, with the Close but<strong>to</strong>n. Then double-click on the Cancel<br />
but<strong>to</strong>n. This displays the <strong>for</strong>m's code in the Code window and creates a new Sub called but<strong>to</strong>nCancel_Click:<br />
Add the following code <strong>to</strong> the Sub:<br />
Private Sub but<strong>to</strong>nCancel_Click()<br />
Unload Me<br />
End Sub<br />
Re-run the <strong>for</strong>m and click the Cancel but<strong>to</strong>n – the <strong>for</strong>m is dismissed. While you are setting up the Cancel but<strong>to</strong>n,<br />
select it in the Form and then set its Cancel property <strong>to</strong> True. Now, when the user presses Escape, the<br />
but<strong>to</strong>nCancel_Click event will be triggered and the above code will unload the Form.<br />
Similarly, select the OK but<strong>to</strong>n and set its Default property <strong>to</strong> True – when the user presses Enter <strong>to</strong> activate the<br />
<strong>for</strong>m, the OK but<strong>to</strong>n’s event handler will be called. The OK but<strong>to</strong>n’s Click-event handler per<strong>for</strong>ms the <strong>for</strong>m's<br />
functionality and then it must unload the <strong>for</strong>m. If the <strong>for</strong>m is used <strong>to</strong> set the size of the selected shapes by setting<br />
their width and height, the OK but<strong>to</strong>n’s click-event handler may look as shown below. This code sample assumes<br />
you have already created two text boxes called txtWidth and txtHeight.<br />
Private Sub but<strong>to</strong>nOK_Click()<br />
Me.Hide<br />
Call SetSize(txtWidth.Text, txtHeight.Text)<br />
Unload Me<br />
End Sub<br />
And the size-setting Sub might look like:<br />
The Code window with code <strong>for</strong> a Cancel but<strong>to</strong>n<br />
Private Sub SetSize(width As String, height As String)<br />
ActiveDocument.Unit = cdrInch<br />
ActiveSelection.SetSize CDbl(width), CDbl(height)<br />
End Sub<br />
<strong>VBA</strong> <strong>Programming</strong> <strong>Guide</strong> <strong>for</strong> <strong>Corel</strong>DRAW <strong>11</strong> 34
Visual Basic Edi<strong>to</strong>r Chapter 4<br />
From inside the Form’s own code module, the Form object is implicit and so all the controls can be simply accessed<br />
by name. From other modules, the controls must be accessed via their full name, which would be<br />
UserForm1.but<strong>to</strong>nOK.<br />
When the <strong>for</strong>m loads<br />
The code <strong>to</strong> load a <strong>for</strong>m is given the chapter titled "Creating User Interfaces <strong>for</strong> Macros". However, as the <strong>for</strong>m is<br />
loading, it triggers its own UserForm_Initialize event. You should initialize all the controls on the <strong>for</strong>m that<br />
need <strong>to</strong> be initialized from this event handler.<br />
TextBoxes<br />
TextBoxes are the mainstay of user input. They are simple <strong>to</strong> use, quick <strong>to</strong> program, and very flexible.<br />
To set the text in a TextBox when initializing it, set the TextBox’s Text property, which is its default or implicit<br />
property:<br />
txtWidth.Text = "3"<br />
txtHeight = "1"<br />
To get the value of the TextBox, get its Text property:<br />
Call SetSize(txtWidth.Text, txtHeight.Text)<br />
Combos and lists<br />
In a ComboBox, the user can either choose an item from the list or type something in<strong>to</strong> the textbox. The editing<br />
functionality can be disabled by setting the ComboBox’s Style property <strong>to</strong> fmStyleDropDownList. List boxes<br />
on the other hand are always open, typically displaying between three and ten items at once.<br />
To populate a list of any type, you must call the list’s member function AddItem. This function takes two<br />
parameters, the string or numerical value, and the position in the list. The position parameter is optional; leaving it<br />
off inserts the item at the last position in the list. For example, the following code populates the list ComboBox1<br />
with four items:<br />
ComboBox1.AddItem 1<br />
ComboBox1.AddItem 2<br />
ComboBox1.AddItem 3<br />
ComboBox1.AddItem 0, 0<br />
To test which item is selected when the OK but<strong>to</strong>n is clicked, test the list’s ListIndex property. To get the value<br />
of a selected item’s caption, test the ComboBox or Listbox’s Text property:<br />
Dim retList As String<br />
retList = ComboBox1.Text<br />
Using images<br />
The Image control is used <strong>to</strong> place graphics on the <strong>for</strong>m. The image, a bitmap, is contained in the Picture<br />
property – you can either load an RGB image from a file, such as a GIF, JPEG, or Windows Bitmap BMP file, or<br />
you can paste one in<strong>to</strong> the property.<br />
At run-time, new images can be loaded in<strong>to</strong> the Image control by changing the Picture property using the <strong>VBA</strong><br />
function LoadPicture and providing a path <strong>to</strong> the new image file:<br />
Image1.Picture = LoadPicture("C:\Images\NewImage.gif")<br />
<strong>VBA</strong> <strong>Programming</strong> <strong>Guide</strong> <strong>for</strong> <strong>Corel</strong>DRAW <strong>11</strong> 35
Visual Basic Edi<strong>to</strong>r Chapter 4<br />
Other controls<br />
To find out about the above controls in more detail, or about the other controls supported by <strong>VBA</strong>, draw one in a<br />
<strong>for</strong>m and then press F1 <strong>for</strong> the <strong>VBA</strong> Help.<br />
Launching a <strong>for</strong>m from a <strong>for</strong>m<br />
It is possible <strong>to</strong> launch other <strong>for</strong>ms from the current <strong>for</strong>m simply using the <strong>for</strong>m’s Show member function:<br />
UserForm2.Show vbModal<br />
You should note, though, that <strong>VBA</strong> will not return control until all open <strong>for</strong>ms have been unloaded.<br />
Object Browser window<br />
The Object Browser is one of the most useful <strong>to</strong>ols provided by the VB Edi<strong>to</strong>r. The Object Browser displays the<br />
entire object model of all referenced <strong>com</strong>ponents (all ActiveX® or OLE objects that are used by the project) – most<br />
importantly, it displays the object model of <strong>Corel</strong>DRAW in an easy-<strong>to</strong>-use, structured <strong>for</strong>mat.<br />
To open the Object Browser window, click View � Object Browser.<br />
The Object Browser window<br />
<strong>VBA</strong> <strong>Programming</strong> <strong>Guide</strong> <strong>for</strong> <strong>Corel</strong>DRAW <strong>11</strong> 36
Visual Basic Edi<strong>to</strong>r Chapter 4<br />
The parts of the Object Browser window<br />
To reference other applications’ object models, click Tools � References. Referenced <strong>com</strong>ponents can be accessed by the <strong>VBA</strong><br />
code.<br />
Browsing an object model<br />
All of the referenced objects – plus the current module – are listed in the Project/Library list box in the upper-left<br />
corner of the Object Browser window. By default all of the referenced objects’ member classes are listed in the Class<br />
list.<br />
It is easier <strong>to</strong> use the Object Browser when only one project or library is selected. Open the Project/Library list and select<br />
‘<strong>Corel</strong>DRAW’. Only <strong>Corel</strong>DRAW classes will be listed.<br />
<strong>VBA</strong> <strong>Programming</strong> <strong>Guide</strong> <strong>for</strong> <strong>Corel</strong>DRAW <strong>11</strong> 37
Visual Basic Edi<strong>to</strong>r Chapter 4<br />
The Class and Member lists<br />
The Class list shows all of the classes in the current project or library. The Member list shows all of the members of<br />
the selected class.<br />
When you select a class in the Class list, the members of that class are shown in the Member list.<br />
The Class list<br />
Every project or library – ‘object model’ – has a number of member classes. The Class list gives an icon next <strong>to</strong> each<br />
item in the list according <strong>to</strong> what type of class it is.<br />
Class icon Type<br />
Global values<br />
Class<br />
Enumerated types<br />
Type<br />
Module<br />
Global values are values that are global within the selected project, and these include individual members from<br />
enumerated types. Member classes of an object have their own members. Enumerated types define the global<br />
enumerated types, such as text paragraph alignments, <strong>Corel</strong>DRAW shape types and import/export filters.<br />
The Member list<br />
The Member list shows all of the properties, methods, and events that are members of the current class. Each<br />
member is given an icon according <strong>to</strong> its type.<br />
Member icon Type<br />
Property, Implied/Default Property<br />
Method<br />
Event<br />
Constant<br />
<strong>VBA</strong> <strong>Programming</strong> <strong>Guide</strong> <strong>for</strong> <strong>Corel</strong>DRAW <strong>11</strong> 38
Visual Basic Edi<strong>to</strong>r Chapter 4<br />
Properties and default properties<br />
Property members may be simple types, such as Booleans, integers, or strings, or they may be a class or enumerated<br />
type from the Class list. A property that is based on a class from the Class list then, obviously, inherits all the<br />
members of that class.<br />
Many classes have a ‘default’ property; this property is indicated with a blue dot in its icon. The default property is<br />
implied if no property name is given when getting or setting the value of the parent object. For example, collection<br />
types have the default property ‘Item’, which can be indexed like an array. However, since ‘Item’ is usually the<br />
default property, in such instances it is not necessary <strong>to</strong> specify the item property:<br />
is the same as the shorter:<br />
ActiveSelection.Shapes.Item(1).Selected = False<br />
ActiveSelection.Shapes(1).Selected = False<br />
since ‘Item’ is the default or implied property of a collection of shapes.<br />
Methods and member functions<br />
Methods are <strong>com</strong>monly known as ‘member functions’ – these are the functions that the class can do <strong>to</strong> itself. A good<br />
example is the Move method of the Shape class, which is used <strong>to</strong> move a <strong>Corel</strong>DRAW shape using an [x, y] vec<strong>to</strong>r;<br />
the following code moves the currently selected shapes two measurement units <strong>to</strong> the right and three measurement<br />
units upwards:<br />
ActiveSelection.Move 2, 3<br />
If the return value of a function is not used, the function call does not take parentheses around the<br />
argument list, unless the Call keyword is used.<br />
More in<strong>for</strong>mation about ActiveSelection is provided the chapter titled Using objects in<br />
<strong>Corel</strong>DRAW.<br />
Events<br />
Some classes have various events associated with them. By setting up an event handler <strong>for</strong> a class’s event, when that<br />
event occurs in <strong>Corel</strong>DRAW, the event’s handler is called. This functionality enables sophisticated applications <strong>to</strong> be<br />
developed that actually respond au<strong>to</strong>matically <strong>to</strong> what is happening within <strong>Corel</strong>DRAW.<br />
Commonly handled events include: Be<strong>for</strong>eClose, Be<strong>for</strong>ePrint, Be<strong>for</strong>eSave, ShapeMoved,<br />
PageSelected, and SelectionChanged of the Document class.<br />
Only the Document, GlobalDocument, and AddinHook classes have events in <strong>Corel</strong>DRAW. The<br />
AddinHook class is not discussed in this guide.<br />
<strong>VBA</strong> <strong>Programming</strong> <strong>Guide</strong> <strong>for</strong> <strong>Corel</strong>DRAW <strong>11</strong> 39
Visual Basic Edi<strong>to</strong>r Chapter 4<br />
Constants<br />
The only constants listed in the Member list are members of enumerated types and those defined as Public in a<br />
module. Enumerated types are used <strong>to</strong> group related items from a closed list, such as <strong>Corel</strong>DRAW shape types,<br />
import/export filters, and alignments. These constants can be used anywhere an integer value is required.<br />
Most <strong>Corel</strong>DRAW constants begin with ‘cdr’, <strong>for</strong> example: cdrLeftAlignment, cdrEPS,<br />
cdrOutlineBevelLineJoin, cdrCurveShape, cdrSymmetricalNode. Some constants may begin with<br />
‘prn’ and ‘pdf’. Visual Basic also has its own constants, including constants <strong>for</strong> keystrokes, such as<br />
vbKeyEnter, and constants <strong>for</strong> dialog box but<strong>to</strong>ns, such as vbOK.<br />
The In<strong>for</strong>mation window<br />
The In<strong>for</strong>mation window gives in<strong>for</strong>mation about the selected class or class member. This in<strong>for</strong>mation includes a<br />
‘pro<strong>to</strong>type’ of the member, its parent (i.e. ‘is a member of parent’), and a short description of the member. If the<br />
member is a read-only property, the phrase ‘read-only’ is given on the status line, otherwise this line is not included.<br />
The In<strong>for</strong>mation window<br />
The types of any function parameters and properties are given as hyperlinks <strong>to</strong> the type definition or class itself, if<br />
the type is defined within the current object model. For example, the Outline property in the preceding figure<br />
belongs <strong>to</strong> <strong>Corel</strong>DRAW’s Shape class; however, Outline is also the property’s type, and it is a <strong>Corel</strong>DRAW class<br />
– <strong>to</strong> view the class and its members, click on the green word ‘Outline’.<br />
To get more detailed in<strong>for</strong>mation about the selected class or member, click the Object Browser’s Help but<strong>to</strong>n.<br />
Sometimes the height of the In<strong>for</strong>mation window is not enough <strong>to</strong> see all of its contents. Drag the <strong>to</strong>p<br />
border of the window upwards <strong>to</strong> reveal its contents, or scroll down using the scrolls bars on the right.<br />
Searching the object model<br />
It is possible <strong>to</strong> search the object model <strong>for</strong> a matching string. This is very useful <strong>for</strong> finding a class or member<br />
<strong>VBA</strong> <strong>Programming</strong> <strong>Guide</strong> <strong>for</strong> <strong>Corel</strong>DRAW <strong>11</strong> 40
Visual Basic Edi<strong>to</strong>r Chapter 4<br />
whose name you can only partly remember, or <strong>for</strong> finding classes and members that have similar names, such as<br />
names based on or containing the word ‘open’.<br />
To search an object model’s classes and members, type a string in<strong>to</strong> the search field and click the Search but<strong>to</strong>n. This<br />
will open the Search results list, which displays all of the found matches, in alphabetical order. Clicking on one of the<br />
found matches will cause the class and member lists <strong>to</strong> move <strong>to</strong> the item that was clicked, and the In<strong>for</strong>mation<br />
window will be updated with this item’s in<strong>for</strong>mation.<br />
Debugging<br />
Searching an object model<br />
To hide the search-results window, click the hide/show but<strong>to</strong>n.<br />
Any matches of class names will have a blank member column in the Search results window.<br />
The VB Edi<strong>to</strong>r provides strong debugging facilities that are <strong>com</strong>mon across language edi<strong>to</strong>rs. It is possible <strong>to</strong> set<br />
breakpoints, <strong>to</strong> step through code, <strong>to</strong> make changes <strong>to</strong> the code while it is running, and <strong>to</strong> watch and change<br />
variables. Some of these are advanced techniques that are not discussed in this guide.<br />
Setting breakpoints<br />
A breakpoint is a marker in the code that causes execution <strong>to</strong> pause at the line with the breakpoint until you either<br />
tell the edi<strong>to</strong>r <strong>to</strong> continue execution, step through the subsequent lines of code, or pause execution.<br />
To set or clear a breakpoint on a line of code, put the cursor in<strong>to</strong> the line and click Debug � Toggle Breakpoint.<br />
By default the line is highlighted in dark red and a red dot is placed in the margin. To clear all breakpoints, click<br />
Debug � Clear All Breakpoints.<br />
To restart the code when it pauses at a breakpoint, click Run � Continue. To pause execution of the code,<br />
immediately exiting from all functions and discarding all return values, click Run � Reset.<br />
It is also possible <strong>to</strong> ‘run <strong>to</strong> cursor’; that is, <strong>to</strong> execute the code until it reaches the line that the cursor is on, and<br />
then pause at that line. To do this, place the cursor on the line where you want execution <strong>to</strong> pause and click Debug<br />
� Run To Cursor.<br />
<strong>VBA</strong> <strong>Programming</strong> <strong>Guide</strong> <strong>for</strong> <strong>Corel</strong>DRAW <strong>11</strong> 41
Visual Basic Edi<strong>to</strong>r Chapter 4<br />
If the line with the breakpoint (or cursor <strong>for</strong> Run To Cursor) is not executed because it is in a conditional<br />
block (if-then-else block), the code will not s<strong>to</strong>p at that line.<br />
Breakpoints are not saved and are lost when you close the VB Edi<strong>to</strong>r.<br />
Stepping through the code<br />
When execution pauses at a breakpoint, it is possible <strong>to</strong> continue through the code one line at a time. This enables<br />
you <strong>to</strong> examine the values of individual variables after each line and determine how the code affects the values and<br />
vice versa. This is called ‘stepping through the code’.<br />
To step through the code, one line at a time, click Debug � Step In<strong>to</strong>. The execution will visit every line in all<br />
called functions and subs.<br />
To step through each line of the current sub or function, but not stepping through the lines of each called sub or<br />
function, click Debug � Step Over. The called subs and functions are executed, but not line-by-line.<br />
To execute the rest of the current sub or function, but pause when the sub or function returns <strong>to</strong> the point where it<br />
was called, click Debug � Step Out. This is a quick way of returning <strong>to</strong> the point of entry of a function in order <strong>to</strong><br />
continue stepping through the calling function’s code.<br />
Debugging windows<br />
There are several additional windows that are used while debugging code. These are the Call Stack window, the<br />
Immediate window, the Locals window, and the Watches window. All of these windows provide important<br />
in<strong>for</strong>mation about the state of functions and variables while an application is running.<br />
Call Stack window<br />
The Call Stack window is a modal dialog box that lists which function called which function. This can be very useful<br />
in long, <strong>com</strong>plicated applications <strong>for</strong> tracing the steps <strong>to</strong> a particular function getting called. To visit a function<br />
listed in the window, select the function name and click Show, or else click Close.<br />
To display the Call Stack Window, click View � Call Stack….<br />
The Call Stack window<br />
<strong>VBA</strong> <strong>Programming</strong> <strong>Guide</strong> <strong>for</strong> <strong>Corel</strong>DRAW <strong>11</strong> 42
Visual Basic Edi<strong>to</strong>r Chapter 4<br />
Immediate window<br />
The Immediate window allows you <strong>to</strong> type-in and run arbitrary lines of code while a macro is paused. This is very<br />
useful <strong>for</strong> getting or setting the property of an object in the document, or <strong>for</strong> setting the value of a variable in the<br />
code. To run a piece of code, type it in<strong>to</strong> the Immediate window and press Enter. The code is executed immediately.<br />
To display the Immediate window, click View � Immediate Window.<br />
The Immediate window<br />
Locals window<br />
The Locals window displays all of the variables and objects that exist within the current scope. Each variable’s type<br />
and value are listed in the columns next <strong>to</strong> the variable’s name. Some variables and objects may have several<br />
children, which can be displayed by clicking the expand tree but<strong>to</strong>n next <strong>to</strong> the parent. The value of many variables<br />
can be changed by clicking on the value and editing it.<br />
To display the Locals window, click View � Locals Window.<br />
The Locals window<br />
<strong>VBA</strong> <strong>Programming</strong> <strong>Guide</strong> <strong>for</strong> <strong>Corel</strong>DRAW <strong>11</strong> 43
Visual Basic Edi<strong>to</strong>r Chapter 4<br />
Watches window<br />
The Watches window is used <strong>to</strong> watch specific variables or object properties. This is very useful <strong>for</strong> selecting just one<br />
or two values <strong>to</strong> watch as opposed <strong>to</strong> having <strong>to</strong> find the value you want in all the values in the Locals window.<br />
The Watches window<br />
To add a value <strong>to</strong> the Watches window, select the variable or object and its property and drag the selection on<strong>to</strong> the<br />
Watches window, or click on it and choose Debug � Quick Watch… which adds the item straight in<strong>to</strong> the Watches<br />
window.<br />
The Add Watch dialog box<br />
Select the item you want <strong>to</strong> watch, select any conditions <strong>for</strong> this watch, and click OK. If the condition be<strong>com</strong>es true,<br />
the application will pause <strong>to</strong> allow you <strong>to</strong> examine the code.<br />
<strong>VBA</strong> <strong>Programming</strong> <strong>Guide</strong> <strong>for</strong> <strong>Corel</strong>DRAW <strong>11</strong> 44
About objects and object models 5<br />
<strong>VBA</strong> relies on an application's object model (OM) in order <strong>to</strong> <strong>com</strong>municate with that application and modify its<br />
documents. HTML developers who use JavaScript will be familiar with a browser's 'document object model', known<br />
as the DOM. Without the DOM it is impossible <strong>to</strong> access any part of the document and test it or change it using<br />
JavaScript. It is exactly the same with <strong>VBA</strong> and <strong>Corel</strong>DRAW - without the <strong>Corel</strong>DRAW OM, it is impossible <strong>for</strong><br />
<strong>VBA</strong> <strong>to</strong> query the document or <strong>to</strong> change it.<br />
Understanding objects, properties, methods, and events<br />
Anyone who is used <strong>to</strong> developing object-oriented code in C++, Delphi, or Java, will be immediately familiar with<br />
the concept of an 'object' (instance of a class), which has 'properties' and 'methods', and other objects that are its<br />
'members'. But <strong>for</strong> those who are not familiar with these concepts here is a summary:<br />
� Objects - An object is an instance of a class. A class is a description of something - <strong>for</strong> example the class 'car' is a<br />
small vehicle with an engine and four wheels. This simple description is the class, however you still have <strong>to</strong> go out<br />
and spend money <strong>to</strong> get an actual object in the class car, in other words, the car that you can drive is an instance<br />
of the class car. In the context of <strong>Corel</strong>DRAW, each open document is an instance of the Document class, each<br />
page in the document is an instance of the Page class, and each layer, and each shape on that layer are more<br />
instances of more classes.<br />
� Properties - Most classes have properties. For example, the car class has the properties that it is small, it has an<br />
engine, and it has four wheels. An instance of the class will also have properties such as color, speed, and number<br />
of seats. Some properties are fixed by the design of the class, <strong>for</strong> example the number of wheels and seats does not<br />
(usually) change - these are said <strong>to</strong> be read-only. However, other properties can be changed after the object has<br />
been created - the speed can go up and down, and, with a bit of help, the color can be changed. In the context of<br />
<strong>Corel</strong>DRAW, Document objects have a name, a resolution, horizontal and vertical ruler units; individual shapes<br />
have outline and fill properties, as well as position and rotation; and text objects have text properties, which may<br />
include the text itself.<br />
� Methods - A method is an operation that the object can do <strong>to</strong> itself. For the example of the car class, the car can<br />
make itself go faster and slower, so the methods would be 'accelerate' and 'decelerate'. In the context of<br />
<strong>Corel</strong>DRAW, documents have methods <strong>for</strong> creating new pages, layers have methods <strong>for</strong> creating new shapes, and<br />
shapes have methods <strong>for</strong> applying trans<strong>for</strong>mations and effects.<br />
But that's not all. It should also be obvious that one large object is often made from many smaller objects. A car<br />
contains four objects of the class 'wheel', two lights of the class 'headlight', and so on. Each of these child objects has<br />
the same properties and methods of its class-type - a document object contains page objects, which contain layer<br />
objects, which contain shape objects, some of which may contain other objects. This parent/child relationship of<br />
objects is important, particularly when referencing an individual object, as will be<strong>com</strong>e clear later in this chapter.<br />
Some classes may also 'inherit' features from their parents - <strong>for</strong> example, the Shape type has many subtypes, or<br />
inherited types, including Rectangle, Ellipse, Curve, and Text. All of these subtypes can make use of the basic<br />
members of the Shape type, including methods <strong>for</strong> moving and trans<strong>for</strong>ming the shape, and <strong>for</strong> setting its color.<br />
However, the subtypes also have their own specialist members, such as a Rectangle can have corner radii, whereas<br />
Text has an associated Font property.<br />
The purpose and benefits of using an object model<br />
Object models in software provide a high level of structure <strong>to</strong> the relationship between objects and their children.<br />
They also allow object types or classes <strong>to</strong> be used repeatedly in different ways – <strong>for</strong> example, a Shape object may be<br />
of type group and may contain other Shape objects, some of which may also be of type group, or rectangle, or curve,<br />
<strong>VBA</strong> <strong>Programming</strong> <strong>Guide</strong> <strong>for</strong> <strong>Corel</strong>DRAW <strong>11</strong> 45
About objects and object models Chapter 5<br />
or text. This high level of organization and re-use makes the OM simple <strong>to</strong> use and also very powerful. It is also very<br />
easy <strong>to</strong> navigate around the OM using <strong>VBA</strong>’s Object Browser, which has already been described.<br />
Remember, though, that the OM is the map that the <strong>VBA</strong> language uses <strong>to</strong> access the different members – objects,<br />
methods, and properties – of a document, and <strong>to</strong> make changes <strong>to</strong> those members. It is not just a convenience, it is a<br />
necessity! Without the object model it is simply impossible <strong>to</strong> gain access <strong>to</strong> the objects in the document.<br />
Object hierarchy<br />
In any object model, each object is a child of another object, which is a child of another object. Also, each object has<br />
child members of its own – properties, objects, and methods. All of this <strong>com</strong>prises an object hierarchy that is the<br />
object model. In Web browsers, the root object of all the objects is the Naviga<strong>to</strong>r object; in <strong>Corel</strong>DRAW it is the<br />
Application object. In <strong>Corel</strong>DRAW, all objects are children or grandchildren of the application.<br />
Dot notation<br />
In order <strong>to</strong> ‘drill down’ through the layers of hierarchy <strong>to</strong> get <strong>to</strong> the object or member that you want, it is necessary<br />
<strong>to</strong> use a standard notation – in <strong>VBA</strong>, as in many object-oriented languages this is a notation that uses the period,<br />
‘full-s<strong>to</strong>p’, or dot (‘.’) <strong>to</strong> indicate that the object on the right is a member (or child) of the object on the left:<br />
Application.Documents(1).Pages(1).Layers(1).Shapes(1).Name _<br />
= "Bob"<br />
It is not usually necessary <strong>to</strong> use the full hierarchical, or fully qualified reference <strong>to</strong> an object or its properties. There<br />
are several ‘shortcuts’ that are described later in this chapter.<br />
Creating references <strong>to</strong> objects using ‘Set’<br />
If you want <strong>to</strong> create a reference <strong>to</strong> an object so that you can treat that reference as if it was any normal variable, use<br />
the Set keyword:<br />
Dim sh As Shape<br />
Set sh = ActiveSelection.Shapes.Item(1)<br />
After creating this reference, it can be treated as if it is the object itself:<br />
sh.Outline.Color.GrayAssign 35<br />
If the selection is changed while sh is still in scope, sh will reference the original shape from the old selection and is<br />
unaffected by the new selection. Simply assigning the object <strong>to</strong> the variable is not good enough – the following code<br />
will not work:<br />
Dim sh As Shape<br />
sh = ActiveSelection.Shapes.Item(1)<br />
To release an object, set its reference value <strong>to</strong> Nothing:<br />
Set sh = Nothing<br />
It is also possible <strong>to</strong> test whether a variable references a valid object by using the Nothing keyword:<br />
If sh Is Nothing Then MsgBox "sh is de-referenced."<br />
<strong>VBA</strong> <strong>Programming</strong> <strong>Guide</strong> <strong>for</strong> <strong>Corel</strong>DRAW <strong>11</strong> 46
About objects and object models Chapter 5<br />
Objects do not have <strong>to</strong> be explicitly released. In most cases, Visual Basic will release the object when it<br />
disposes of the variable when you exit the Sub or Function.<br />
Collections of objects<br />
Many objects are members of collections of objects. A collection is similar <strong>to</strong> an array, except that it contains objects,<br />
not values. Despite this, members of collections can be accessed in the same way as arrays. For example, a collection<br />
that is used frequently in <strong>Corel</strong>DRAW is the collection of shapes on a layer: the object ActiveLayer references the<br />
current layer, or the layer that is selected in the <strong>Corel</strong>DRAW Object Manager Docker window.<br />
<strong>Corel</strong>DRAW contains many collections: a document contains pages, a page contains layers, a layer contains shapes, a<br />
curve contains subpaths, a subpath contains segments and nodes, a text range contains lines and words, a group<br />
contains shapes, the application contains windows. All of these collections are handled in the same way by <strong>VBA</strong>.<br />
Item property<br />
To reference the shapes on that layer, the layer’s collection of shapes is used: ActiveLayer.Shapes. To reference<br />
the individual shapes in the collection, the Item() property is used:<br />
Dim sh As Shape<br />
Set sh = ActiveLayer.Shapes.Item(1)<br />
Most elements of a collection start at 1 and increase. For the collection ActiveLayer.Shapes, Item(1) is the<br />
item at the ‘<strong>to</strong>p’ or ‘front’ of the layer, in other words, the one that is in front of all the other shapes.<br />
Each item in the above collection is an object of type Shape, which means that you can reference the item’s<br />
members merely by appending the appropriate dot-notated member:<br />
ActiveLayer.Shapes.Item(1).Outline.ConvertToObject<br />
Sometimes individual items have names. If the item you are looking <strong>for</strong> has an associated name, and you know what<br />
the name is and which collection the item is in, you can reference the item directly using its name:<br />
Dim sh1 As Shape, sh2 As Shape<br />
Set sh1 = ActiveLayer.CreateRectangle(0, 5, 7, 0)<br />
sh1.Name = "myShape"<br />
Set sh2 = ActiveLayer.Shapes.Item("myShape")<br />
Also, since Item is usually the implied or default member of a collection, it is not strictly required, and the last line<br />
of the above code can be rewritten as:<br />
Set sh2 = ActiveLayer.Shapes("myShape")<br />
Count property<br />
All collections have a property called Count. This read-only property gives the number of members in the<br />
collection:<br />
Dim count As Long<br />
count = ActiveLayer.Shapes.Count<br />
The returned value is not only the number of items in the collection, but since the collection starts from 1, it is also<br />
the index of the last item.<br />
<strong>VBA</strong> <strong>Programming</strong> <strong>Guide</strong> <strong>for</strong> <strong>Corel</strong>DRAW <strong>11</strong> 47
About objects and object models Chapter 5<br />
Parsing members of a collection<br />
It is often necessary <strong>to</strong> parse through the members of a collection in order <strong>to</strong> check or change the items’ properties.<br />
Using the Item() and Count members, it is straight<strong>for</strong>ward <strong>to</strong> step through a collection of items. With each<br />
iteration it is possible <strong>to</strong> test the current item’s properties, or call its methods. The following code restricts all shapes<br />
on the layer <strong>to</strong> no wider than ten units.<br />
Dim i As Long, count As Long<br />
count = ActiveLayer.Shapes.Count<br />
For i = 1 <strong>to</strong> count<br />
If ActiveLayer.Shapes.Item(i).SizeWidth > 10 Then<br />
ActiveLayer.Shapes.Item(i).SizeWidth = 10<br />
End If<br />
Next i<br />
There is, though, a more convenient way of parsing a collection in <strong>VBA</strong>. Instead of using the Count property and a<br />
For-Next loop, this technique uses a For-Each-In loop. The above code can be rewritten as:<br />
Dim sh As Shape<br />
For Each sh In ActiveLayer.Shapes<br />
If sh.SizeWidth > 10 Then<br />
sh.SizeWidth = 10<br />
End If<br />
Next sh<br />
If you want <strong>to</strong> copy the selection and then parse it later when it is no longer selected, copy the selection in<strong>to</strong> a<br />
ShapeRange object:<br />
Dim sr As ShapeRange<br />
Dim sh As Shape<br />
Set sr = ActiveSelectionRange<br />
For Each sh In sr<br />
' Do something with each shape<br />
Next sh<br />
Required and implicit objects<br />
When referencing objects, some of the object-syntax in the fully qualified reference is manda<strong>to</strong>ry or required. Other<br />
syntax is optional and can either be included <strong>for</strong> clarity, or omitted <strong>for</strong> brevity – either by using a ‘shortcut’, or<br />
because the syntax is implicit, or implied. You have already been introduced <strong>to</strong> several <strong>Corel</strong>DRAW shortcut objects<br />
– ActiveLayer, ActiveSelection – as well as <strong>to</strong> one of the most <strong>com</strong>mon implicit properties – Item.<br />
A shortcut object is merely a syntactical replacement <strong>for</strong> the long-hand version. For example, the shortcut object<br />
‘ActiveLayer’ replaces the long-hand version<br />
‘Application.ActiveDocument.ActivePage.ActiveLayer’; the object shortcut ‘ActiveSelection’<br />
replaces the long-hand version ‘Application.ActiveDocument.Selection’.<br />
<strong>VBA</strong> <strong>Programming</strong> <strong>Guide</strong> <strong>for</strong> <strong>Corel</strong>DRAW <strong>11</strong> 48
Using objects in <strong>Corel</strong>DRAW 6<br />
The <strong>VBA</strong> object model in <strong>Corel</strong>DRAW is in its third evolution since it first appeared in <strong>Corel</strong>DRAW 9. It grew<br />
enormously from <strong>Corel</strong>DRAW 9 <strong>to</strong> <strong>Corel</strong>DRAW 10, and with the change from 10 <strong>to</strong> <strong>11</strong>, the object model is now<br />
very mature and fully featured.<br />
This chapter describes many ways of using the large number of objects in the <strong>Corel</strong>DRAW object model.<br />
Working with basic objects<br />
In <strong>Corel</strong>DRAW, the root object is the Application object and all objects stem from this one. There are, though,<br />
several key, basic objects that encapsulate most of the other objects in the object model.<br />
Application Object<br />
The <strong>Corel</strong>DRAW Application object is the root object <strong>for</strong> all other objects. To reference the <strong>Corel</strong>DRAW object<br />
model from an out-of-process controller, use its Application object. For example, in Visual Basic you would use:<br />
Dim cdr As <strong>Corel</strong>DRAW.Application<br />
Set cdr = CreateObject("<strong>Corel</strong>DRAW.Application.<strong>11</strong>")<br />
Although you can use the above code inside <strong>VBA</strong>, there is no point in doing so within the <strong>VBA</strong> <strong>for</strong> <strong>Corel</strong>DRAW,<br />
since the Application object is used by default if no other root object is specified.<br />
The Application object contains all of the open Document objects, as well as all Window objects.<br />
Document Structure<br />
The Application object contains all the Document objects that are created when documents are opened in its<br />
property Documents. Each Document object contains a collection, Pages, of all its Page objects. Individual<br />
Page objects contain Layers collections containing all their Layer objects. Layer objects contain Shapes<br />
collections of all their Shape objects. This is the basic structure of documents.<br />
However, Document objects have many more features than just the shapes that you see in the editing window, and<br />
these are discussed throughout the rest of this chapter.<br />
The object model hierarchy<br />
To view the <strong>Corel</strong>DRAW object model hierarchy, refer <strong>to</strong> the Object Model Diagram in the <strong>VBA</strong> Help <strong>for</strong><br />
<strong>Corel</strong>DRAW.<br />
Document objects<br />
Whenever a <strong>Corel</strong>DRAW (CDR) file is opened, a new Document object is created in the Application object <strong>for</strong><br />
that document. Application contains a collection, Documents, that provides access <strong>to</strong> all of the open<br />
documents. The order of the documents in the collection is set <strong>to</strong> the order that the documents were created and<br />
opened.<br />
Document objects have many member properties and methods, including methods <strong>for</strong> saving, closing, adding<br />
pages, printing, exporting, and getting the selection. There are also properties that can be used <strong>to</strong> get or set the<br />
drawing measurement units, rulers, reference point, the document’s windows and views (including zoom fac<strong>to</strong>rs),<br />
filename, grid, and so on.<br />
<strong>VBA</strong> <strong>Programming</strong> <strong>Guide</strong> <strong>for</strong> <strong>Corel</strong>DRAW <strong>11</strong> 49
Using objects in <strong>Corel</strong>DRAW Chapter 6<br />
Useful document members<br />
Document objects have many members – the full list of which can be browsed in the Object Browser. The most<br />
useful ones are listed in the following table:<br />
Document Member Description<br />
Activate Activates the given document, which brings it <strong>to</strong> the front of the pile in<br />
<strong>Corel</strong>DRAW. ActiveDocument is set <strong>to</strong> reference it.<br />
ActiveLayer Represents the active layer in the document, in other words the layer<br />
that is set as active in the <strong>Corel</strong>DRAW Object Manager.<br />
ActivePage<br />
AddPages<br />
AddPagesEx<br />
Pages<br />
BeginCommandGroup<br />
EndCommandGroup<br />
ClearSelection<br />
Selection<br />
SelectionRange<br />
Represents the active page in the document; in other words, the one that<br />
is being edited in <strong>Corel</strong>DRAW.<br />
Adds pages <strong>to</strong> the document.<br />
Provides access <strong>to</strong> the pages collection.<br />
Close Closes the document.<br />
Export<br />
ExportEx<br />
ExportBitmap<br />
FileName<br />
FilePath<br />
FullFileName<br />
GetUserArea<br />
GetUserClick<br />
InsertPages<br />
InsertPagesEx<br />
PrintOut<br />
PrintSettings<br />
PublishToPDF<br />
PDFSettings<br />
Creates a ‘<strong>com</strong>mand group’ – a series of actions which appear as a single<br />
item on the Undo list.<br />
Clears the document’s selection; in other words, deselects all shapes in<br />
the document.<br />
Gets the selection as a Shape.<br />
Gets the selection as a ShapeRange.<br />
Per<strong>for</strong>ms a simple export from the document.<br />
Per<strong>for</strong>ms a highly configurable export from the document.<br />
Per<strong>for</strong>ms an export <strong>to</strong> a bitmap with full control.<br />
Gets the filename.<br />
Gets the path <strong>to</strong> the file.<br />
Gets the full path and filename of the document.<br />
Allows the user <strong>to</strong> drag an area or give a single click back <strong>to</strong> the macro.<br />
Very useful <strong>for</strong> highly interactive macros.<br />
Inserts pages in the document.<br />
Prints the document using the document’s print settings.<br />
Publishes the document <strong>to</strong> PDF <strong>for</strong>mat.<br />
<strong>VBA</strong> <strong>Programming</strong> <strong>Guide</strong> <strong>for</strong> <strong>Corel</strong>DRAW <strong>11</strong> 50
Using objects in <strong>Corel</strong>DRAW Chapter 6<br />
Document Member Description<br />
ReferencePoint Gets/sets the reference point used by many shape functions, including<br />
ones that trans<strong>for</strong>m the shape, functions <strong>for</strong> getting the shape’s position,<br />
and so on.<br />
Save<br />
SaveAs<br />
Unit<br />
WorldScale<br />
Saves the document using the current filename.<br />
Saves the document <strong>to</strong> a new filename or using new settings <strong>for</strong> the<br />
<strong>Corel</strong>DRAW (CDR) file.<br />
Sets the document units used by functions that take a measurement<br />
value, such as size- and position-related functions; this is independent of<br />
the units that the rulers are set <strong>to</strong> use. Also gets/sets the drawing scale.<br />
This changes the value in the document, however, it must be explicitly<br />
calculated in<strong>to</strong> functions that take a measurement value, which use 1:1<br />
by default.<br />
Some of these members are discussed in the following subsections and chapters.<br />
Creating documents<br />
The Application object has two methods <strong>for</strong> creating new documents:<br />
Application.CreateDocument() As Document<br />
Application.CreateDocumentFromTemplate(Template As String, _<br />
[IncludeGraphics As Boolean = True])As Document<br />
The first function creates a new, empty document based on the <strong>Corel</strong>DRAW default page size, orientation, and<br />
styles. The second function creates a new, untitled document from a specified <strong>Corel</strong>DRAW .CDT template. The<br />
new document be<strong>com</strong>es active immediately and ActiveDocument will reference the new document, not the old<br />
one.<br />
Both of these functions return a reference <strong>to</strong> the new document, and so are typically used in the following manner:<br />
Dim newDoc as Document<br />
Set newDoc = CreateDocument<br />
The Document class does not have a method <strong>for</strong> creating an instance (object) of itself; only the<br />
Application object can create documents.<br />
The ActiveDocument property<br />
The property ActiveDocument provides direct access <strong>to</strong> the document that is in front of all the other documents<br />
in the <strong>Corel</strong>DRAW window. ActiveDocument is an object of type Document and, there<strong>for</strong>e, has all of the same<br />
members – properties, objects, and methods – as the Document class.<br />
If there are no open documents, ActiveDocument returns Nothing. You should test <strong>for</strong> this with the following<br />
code:<br />
<strong>VBA</strong> <strong>Programming</strong> <strong>Guide</strong> <strong>for</strong> <strong>Corel</strong>DRAW <strong>11</strong> 51
Using objects in <strong>Corel</strong>DRAW Chapter 6<br />
If Documents.Count = 0 Then<br />
MsgBox "There aren’t any open documents.", vbOK, "No Docs"<br />
Exit Sub<br />
End If<br />
Switching between documents<br />
The Document class has a method, Activate, which activates the document and brings it <strong>to</strong> the front of all the<br />
open documents in <strong>Corel</strong>DRAW. ActiveDocument will now reference the document that was activated. The<br />
following code sample will activate the third open document, providing that three or more documents are open in<br />
<strong>Corel</strong>DRAW.<br />
Documents(3).Activate<br />
Using the Activate method on the ActiveDocument has no effect.<br />
You can test the FilePath, FileName, and FullFileName properties of the document <strong>to</strong> activate the correct<br />
one:<br />
� FilePath – just the path of the file, <strong>for</strong> example C:\My Documents\.<br />
� FileName – just the name of the file, <strong>for</strong> example Graphic1.cdr.<br />
� FullFileName – the full path and name, C:\My Documents\Graphic1.cdr.<br />
You can test the name using the following code:<br />
Public Function findDocument(filename As String) As Document<br />
Dim doc As Document<br />
For Each doc In Documents<br />
If doc.FileName = filename Then Exit For<br />
Set doc = Nothing<br />
Next doc<br />
Set findDocument = doc<br />
End Function<br />
You can then call the returned document’s Activate method.<br />
The documents in the Documents collection are in the order that they were created and opened; the<br />
order does not reflect the current stacking order of the documents within <strong>Corel</strong>DRAW. You must use<br />
Windows collection <strong>to</strong> achieve this.<br />
Changing content in active and inactive documents<br />
You can modify content in inactive documents as easily as in the active document. For example, if you have a<br />
reference <strong>to</strong> a document, you can add a new layer called ‘fooLayer’ with the following code:<br />
Dim doc As Document<br />
Set doc = Documents(3)<br />
doc.ActivePage.CreateLayer "fooLayer"<br />
<strong>VBA</strong> <strong>Programming</strong> <strong>Guide</strong> <strong>for</strong> <strong>Corel</strong>DRAW <strong>11</strong> 52
Using objects in <strong>Corel</strong>DRAW Chapter 6<br />
If you want <strong>to</strong> create the new layer in an inactive document whose name you know (in the following example it is<br />
barDoc.cdr), you might use the following code, which calls the function findDocument() from the previous<br />
section:<br />
Dim doc As Document<br />
Set doc = findDocument("barDoc.cdr")<br />
If Not doc Is Nothing Then doc.ActivePage.CreateLayer "fooLayer"<br />
Modifying content in an inactive document does not make that document active. To make the<br />
document active, call its Activate method.<br />
Closing documents<br />
To close a document, call its Close method:<br />
ActiveDocument.Close<br />
In the above code, the active document is closed and the document that was behind it in <strong>Corel</strong>DRAW be<strong>com</strong>es the<br />
new active document. If the code closes a document that is not the active document, the document referenced by<br />
ActiveDocument does not change.<br />
In <strong>Corel</strong>DRAW 10, if the document is ‘dirty’ and needs <strong>to</strong> be saved, invoking the Close method<br />
displays the standard <strong>Corel</strong>DRAW message ‘Save changes <strong>to</strong> filename.cdr?’ and execution pauses until<br />
the user selects an option. In <strong>Corel</strong>DRAW <strong>11</strong>, the document will be closed without prompting the user<br />
<strong>to</strong> save changes. In <strong>Corel</strong>DRAW <strong>11</strong>, you must explicitly test the document’s Dirty property and take<br />
appropriate action if the document has changed.<br />
Setting the undo string<br />
Two very useful member functions of the Document object allow any number of programmed <strong>Corel</strong>DRAW actions<br />
<strong>to</strong> appear as a single action on the undo list. These methods are BeginCommandGroup() and<br />
EndCommandGroup():<br />
Dim sh As Shape<br />
ActiveDocument.BeginCommandGroup "CreateCurveEllipse"<br />
Set sh = ActiveLayer.CreateEllipse(0, 1, 1, 0)<br />
sh.ConvertToCurves<br />
ActiveDocument.EndCommandGroup<br />
After running this code, the undo string on the Edit menu will say “Undo CreateCurveEllipse”, and selecting undo<br />
will not only undo the ConvertToCurves operation, but also the CreateEllipse operation.<br />
A <strong>com</strong>mand group can contain many hundreds of <strong>com</strong>mands, if required. They make your macros appear as if they<br />
are truly integrated in<strong>to</strong> <strong>Corel</strong>DRAW.<br />
<strong>VBA</strong> <strong>Programming</strong> <strong>Guide</strong> <strong>for</strong> <strong>Corel</strong>DRAW <strong>11</strong> 53
Page objects<br />
Using objects in <strong>Corel</strong>DRAW Chapter 6<br />
All the pages in a document are members of the Document object’s Pages collection. All of the layers within the<br />
document are contained by the document’s Page objects. All of the shapes in the document are contained by the<br />
document’s Layer objects.<br />
The pages are given in the same order in the Pages collection as they exist in the document, so that page number<br />
5 in the document is the same page as ActiveDocument.Pages.Item(5). If the pages are re-ordered in the<br />
Page Sorter view, or if pages are added or deleted, the Pages collection is immediately updated <strong>to</strong> reflect the new<br />
order of pages in the document.<br />
This section describes how <strong>to</strong> per<strong>for</strong>m the most <strong>com</strong>mon actions with pages.<br />
The ActivePage property<br />
To access the active page of the active document, use Application.ActivePage,<br />
ActiveDocument.ActivePage, or simply ActivePage. This returns a reference <strong>to</strong> the active page in the<br />
active document, of type Page:<br />
Dim pg As Page<br />
Set pg = ActivePage<br />
To access the active page of any document, active or not, use the property Document.ActivePage of the given<br />
document:<br />
Public Function getDocsActivePage(doc As Document) As Page<br />
Set getDocsActivePage = doc.ActivePage<br />
End Function<br />
Creating pages<br />
The member function <strong>for</strong> creating pages is actually a member of the Document class, not of the Page class.<br />
Document Member Description<br />
Document.AddPages() Adds a given number of pages at the default size <strong>to</strong> the end of the<br />
document.<br />
Document.AddPagesEx() Adds a given number of pages at the given size <strong>to</strong> the end of the<br />
document.<br />
Document.InsertPages() Inserts pages at the default size at a given position within the<br />
document.<br />
Document.InsertPagesEx() Inserts pages at the given size at a given position within the<br />
document.<br />
Examples of the first two functions are given below: the first function adds three default-sized pages <strong>to</strong> the end of<br />
the document, the second function adds three US-letter-sized pages <strong>to</strong> the end of the document:<br />
Public Function AddSomeSimplePages() as Page<br />
Set AddSomeSimplePages = ActiveDocument.AddPages(3)<br />
End Function<br />
<strong>VBA</strong> <strong>Programming</strong> <strong>Guide</strong> <strong>for</strong> <strong>Corel</strong>DRAW <strong>11</strong> 54
Using objects in <strong>Corel</strong>DRAW Chapter 6<br />
Public Function AddSomeSpecifiedPages() as Page<br />
Dim doc as Document<br />
Set doc = ActiveDocument<br />
doc.Unit = cdrInch<br />
Set AddSomeSpecifiedPages = doc.AddPagesEx(3, 8.5, <strong>11</strong>)<br />
End Function<br />
Both member functions return the first page that was added: since you know the first page and the number of pages<br />
created, it is possible <strong>to</strong> access all the created pages, since all of the other created pages will be the pages after the<br />
returned page in the document’s Pages collection.<br />
You can use the returned page’s Index property <strong>to</strong> find the right place in the Pages collection, and then increment<br />
that <strong>to</strong> visit the subsequent pages that were added:<br />
Dim firstNewPage As Page, secondNewPage As Page<br />
Set firstNewPage = AddSomeSimplePages<br />
Set secondNewPage = ActiveDocument.Pages(firstNewPage.Index + 1)<br />
If you want <strong>to</strong> use one of the standard page sizes, see the section ‘Resizing Pages’, later in this chapter.<br />
Deleting pages<br />
Pages can be deleted by calling each page’s Delete member function:<br />
ActivePage.Delete<br />
This will delete all of the shapes that exist on that page and will delete the page from the document’s Pages<br />
collection. The collection will be immediately updated <strong>to</strong> reflect the change. Delete must be called individually <strong>for</strong><br />
each page you wish <strong>to</strong> delete.<br />
You cannot delete all of the pages in a document. An error will occur if you try <strong>to</strong> delete the last remaining page<br />
from the document. In order <strong>to</strong> test <strong>for</strong> this condition, use the following code:<br />
If ActiveDocument.Pages.Count > 1 Then ActivePage.Delete<br />
Switching between pages<br />
To switch between pages, find the page you want <strong>to</strong> make visible or active and then invoke its Activate member<br />
function. The following code activates the third page in a <strong>Corel</strong>DRAW document:<br />
ActiveDocument.Pages(3).Activate<br />
It is not necessary <strong>to</strong> activate a page in order <strong>to</strong> make changes <strong>to</strong> it. By explicitly referencing the page you want <strong>to</strong><br />
make changes <strong>to</strong>, you can make those changes without having the page active. The following code deletes all of the<br />
shapes on page three of the active document without activating that page:<br />
Public Sub DeleteShapesFromPage3()<br />
Dim doc As Document<br />
Set doc = ActiveDocument<br />
doc.Pages(3).Shapes.All.Delete<br />
End Sub<br />
<strong>VBA</strong> <strong>Programming</strong> <strong>Guide</strong> <strong>for</strong> <strong>Corel</strong>DRAW <strong>11</strong> 55
Using objects in <strong>Corel</strong>DRAW Chapter 6<br />
Activating a page in an inactive document does not activate that document. Use the<br />
Document.Activate method <strong>to</strong> activate the document.<br />
Reordering pages<br />
Individual pages can be moved around within the document using the MoveTo member function of each of the<br />
pages. The following code moves page two <strong>to</strong> the position of page four:<br />
ActiveDocument.Pages(2).MoveTo 4<br />
Activating a page in an inactive document does not activate that document. Use the<br />
Document.Activate method <strong>to</strong> activate the document.<br />
Resizing pages<br />
This section describes how <strong>to</strong> resize pages, and how <strong>to</strong> set the orientation. It also describes how <strong>to</strong> use the built-in<br />
page sizes.<br />
Resizing pages and setting their orientation<br />
Pages can be individually resized using the SetSize member function of the Page class. This function takes two<br />
size values, width and height, and applies them <strong>to</strong> the page. The following code changes the size of the active page<br />
in the active document <strong>to</strong> A4:<br />
ActiveDocument.Unit = cdrMillimeter<br />
ActivePage.SetSize 210, 297<br />
ActivePage.Orientation = cdrLandscape<br />
For the SetSize method, the first number is always the page width and the second number is always<br />
the page height. Reversing the two numbers will cause <strong>Corel</strong>DRAW <strong>to</strong> switch the page’s orientation.<br />
Setting the default page size<br />
To set the default page size <strong>for</strong> the document, set the value of the item in the document’s Pages collection with<br />
index zero:<br />
Dim doc As Document<br />
Set doc = ActiveDocument<br />
doc.Unit = cdrMillimeter<br />
doc.Pages(0).SetSize 297, 210<br />
Using the defined page sizes<br />
All of the page sizes that are defined by <strong>Corel</strong>DRAW, or cus<strong>to</strong>m defined by users, are s<strong>to</strong>red in the PageSizes<br />
collection of the Document class. You can get all of the names of the page sizes by parsing this collection and<br />
getting each PageSize object’s Name property:<br />
<strong>VBA</strong> <strong>Programming</strong> <strong>Guide</strong> <strong>for</strong> <strong>Corel</strong>DRAW <strong>11</strong> 56
Using objects in <strong>Corel</strong>DRAW Chapter 6<br />
Dim pageSizeName As String<br />
pageSizeName = ActiveDocument.PageSizes(3).Name<br />
Page sizes can be specified using their name, <strong>for</strong> example the following code gets the PageSize called ‘Business<br />
Card’:<br />
Dim thisSize As PageSize<br />
Set thisSize = ActiveDocument.PageSizes("Business Card")<br />
You can get the actual dimensions of each PageSize object using the Width and Height properties. The<br />
following code retrieves the third PageSize’s width and height in millimeters:<br />
Dim pageWidth As Double, pageHeight As Double<br />
Dim doc As Document<br />
Set doc = ActiveDocument<br />
doc.Unit = cdrMillimeter<br />
pageWidth = doc.PageSizes(3).Width<br />
pageHeight = doc.PageSizes(3).Height<br />
PageSize objects have a Delete member function; this can only be used on user-defined page sizes. To test<br />
whether a PageSize is user-defined or not, test its BuiltIn Boolean property:<br />
Layer objects<br />
Public Sub deletePageSize(thisSize As PageSize)<br />
If Not thisSize.BuiltIn Then thisSize.Delete<br />
End Sub<br />
If you need the page size in a particular unit of measurement, always set the document’s units be<strong>for</strong>e<br />
getting the width and height.<br />
In <strong>Corel</strong>DRAW, all visible shapes are held on layers within each page. Although one layer can have different<br />
properties on each page, all pages have the same layers and all those layers have the same names on each page.<br />
If you want <strong>to</strong> create new shapes in <strong>Corel</strong>DRAW using <strong>VBA</strong>, you must use the shape-creation member functions of<br />
the Layer class; these functions are described in the next section, ‘Shape Objects’.<br />
This section describes how <strong>to</strong> manipulate layers in <strong>Corel</strong>DRAW using <strong>VBA</strong>.<br />
Creating layers<br />
To create a new layer, use the Page class’s CreateLayer member function. The following code creates a new layer<br />
called ‘My New Layer’:<br />
ActivePage.CreateLayer "My New Layer"<br />
The new layer is always created at the <strong>to</strong>p of the list of non-master layers.<br />
Moving and renaming layers<br />
Layers can be re-ordered with <strong>VBA</strong>. The Layer class has two member functions MoveAbove and MoveBelow.<br />
Both methods take a Layer object as the only parameter – the layer is moved above or below this layer. The<br />
following code moves the layer called ‘Layer 1’ <strong>to</strong> below the layer ‘<strong>Guide</strong>s’:<br />
<strong>VBA</strong> <strong>Programming</strong> <strong>Guide</strong> <strong>for</strong> <strong>Corel</strong>DRAW <strong>11</strong> 57
Using objects in <strong>Corel</strong>DRAW Chapter 6<br />
Dim pageLayers As Layers<br />
Set pageLayers = ActivePage.Layers<br />
pageLayers("Layer 1").MoveBelow pageLayers("<strong>Guide</strong>s")<br />
The change is immediately reflected in the Object Manager in <strong>Corel</strong>DRAW (sometimes the effects are only apparent<br />
when in Layer Manager view). The layer ‘Layer 1’ is moved so that it is immediately below or behind the layer<br />
‘<strong>Guide</strong>s’.<br />
Layers can be renamed by editing the Name property of the layer. The following code renames ‘Layer 1’:<br />
ActivePage.Layers("Layer 1").Name = "Layer with a New Name"<br />
Deleting layers<br />
Layers can be deleted by calling the Layer class’s Delete function. The Layers collection can only be accessed<br />
from the Page object.<br />
Calling the Delete function removes the layer <strong>com</strong>pletely from the document, deleting all of the shapes on that<br />
layer on all of the pages in the document. The following code removes the layer called ‘Layer 1’:<br />
ActivePage.Layers("Layer 1").Delete<br />
Setting a layer as active<br />
To set a layer as active, call that layer’s Activate member function:<br />
ActivePage.Layers("Layer 1").Activate<br />
This makes the layer active, but does not enable the layer or make it visible if it is already disabled or hidden.<br />
Disabling and hiding layers<br />
Layer objects have the properties Enabled and Visible that control whether you can edit the layer and whether<br />
its contents (shapes) are visible in <strong>Corel</strong>DRAW. Both properties are Boolean. By setting them <strong>to</strong> True, the layers<br />
be<strong>com</strong>e visible and can be edited. By setting either <strong>to</strong> False, the layer cannot be edited. For example, the following<br />
code disables the layer on the active page, but makes its contents visible:<br />
ActivePage.Layers("Layer 1").Visible = True<br />
ActivePage.Layers("Layer 1").Editable = False<br />
The result of any changes <strong>to</strong> these properties are immediately displayed in the Object Manager Docker window in<br />
<strong>Corel</strong>DRAW.<br />
Layers can have different settings on different pages by specifying a page from the Pages collection, or by<br />
referencing the ActivePage. The above code only affects the active page. To make the changes <strong>to</strong> all of the pages<br />
in the document, use page ‘zero’ in the document’s Pages collection:<br />
Shape objects<br />
ActiveDocument.Pages(0).Layers("Layer 1").Visible = True<br />
Objects of type Shape are the actual shapes that exist in the <strong>Corel</strong>DRAW document. If you change a shape’s<br />
properties in the document, such as by moving it, by changing its size, or by giving it a new fill, these changes are<br />
immediately visible <strong>to</strong> the <strong>VBA</strong> Object Model.<br />
<strong>VBA</strong> <strong>Programming</strong> <strong>Guide</strong> <strong>for</strong> <strong>Corel</strong>DRAW <strong>11</strong> 58
Using objects in <strong>Corel</strong>DRAW Chapter 6<br />
Shape objects exist as members of Layer objects. Each Layer object contains a collection, Shapes, which<br />
contains all of the shapes on the layer. The first item of this collection is the shape at the <strong>to</strong>p of the layer (in other<br />
words, the one that is above all the others), and the last item is the shape at the bot<strong>to</strong>m; if you reorder the shapes on<br />
the page, the collection is updated <strong>to</strong> reflect the change.<br />
Each Page object in the document also has a collection, Shapes, which is the <strong>to</strong>tal collection of all the Shapes<br />
collections on all the layers on the page (including any master layers). The first shape in the collection is the shape at<br />
the very <strong>to</strong>p of the page, and the last shape is the shape at the bot<strong>to</strong>m.<br />
Each Shape object has a property Type that returns the shape’s subtype, in other words, what type of shape it is<br />
(rectangle, ellipse, curve, text, group, and so on). This is a read-only property. Since some types of shapes have<br />
member functions and properties that others do not, it is often necessary <strong>to</strong> have <strong>to</strong> test the shape’s type be<strong>for</strong>e<br />
calling a method that might not be there. To test <strong>for</strong> a shape’s type, use the following code:<br />
Dim sh As Shape<br />
Set sh = ActiveShape<br />
If sh.Type = cdrTextShape Then<br />
If sh.Text.IsArtisticText = True Then<br />
sh.Rotate 10<br />
End If<br />
End If<br />
The above code tests the shape’s type. If it is text, it tests whether it is artistic or paragraph text. If it is artistic text,<br />
it rotates it through 10°.<br />
Selections and selecting shapes<br />
To see if a Shape is selected or not, test its Selected Boolean property:<br />
Dim sh As Shape<br />
Set sh = ActivePage.Shapes(1)<br />
If sh.Selected = False Then sh.CreateSelection<br />
You can add a Shape <strong>to</strong> the selection simply by setting its Selected property <strong>to</strong> True – this selects the shape<br />
without deselecting all the other shapes. To select just one shape without any other shapes, use the<br />
CreateSelection method, as in the above code.<br />
To deselect all the shapes, call the document’s ClearSelection method:<br />
ActiveDocument.ClearSelection<br />
To select all the shapes on the page or layer, use the following code:<br />
ActivePage.Shapes.All.CreateSelection<br />
This calls the CreateSelection of the ShapeRange object, which is returned by the All member function of<br />
the Shapes collection on the active page. Only those shapes on locked or hidden layers will not be selected.<br />
Creating shapes<br />
Shape objects represent the actual shapes in the <strong>Corel</strong>DRAW document that you create using the <strong>Corel</strong>DRAW<br />
drawing <strong>to</strong>ols. There are quite a few different shapes that can be created, the most <strong>com</strong>mon being: rectangles,<br />
ellipses, curves, text (artistic and paragraph), and groups.<br />
Since each Shape object is a member of the Shapes collection, which is a member of one of the Layer objects on<br />
the Page, the methods <strong>for</strong> creating new shapes belong <strong>to</strong> the Layer class, and they all begin with ‘Create…’.<br />
<strong>VBA</strong> <strong>Programming</strong> <strong>Guide</strong> <strong>for</strong> <strong>Corel</strong>DRAW <strong>11</strong> 59
Using objects in <strong>Corel</strong>DRAW Chapter 6<br />
Creating rectangles<br />
There are two functions <strong>for</strong> creating new rectangle shapes: CreateRectangle and CreateRectangle2; both<br />
functions return a reference <strong>to</strong> the new Shape object. The two functions differ only in the parameters that they<br />
take. For example, the following code creates a simple two-by-one-inch rectangle positioned six inches up from the<br />
bot<strong>to</strong>m and three inches in from the left of the page:<br />
Dim sh As Shape<br />
ActiveDocument.Unit = cdrInch<br />
Set sh = ActiveLayer.CreateRectangle(3, 7, 6, 5)<br />
The parameters are given as <strong>to</strong>p, left, bot<strong>to</strong>m, right. Each one is in the document’s units, so it is prudent <strong>to</strong> explicitly<br />
set this be<strong>for</strong>e creating the rectangle.<br />
The alternative method, CreateRectangle2, creates the rectangle by specifying the coordinates of its lower-left<br />
corner and its width and height. The following code creates the same rectangle as above:<br />
Dim sh As Shape<br />
ActiveDocument.Unit = cdrInch<br />
Set sh = ActiveLayer.CreateRectangle2(3, 6, 2, 1)<br />
The alternative methods are provided <strong>to</strong> make it simpler <strong>to</strong> develop solutions, they both provide identical<br />
functionality.<br />
Rounding the corners of rectangles<br />
Round-cornered rectangles can also be created using the CreateRectangle and CreateRectangle2 methods:<br />
both functions have four optional parameters that set the roundness of the corners when the rectangle is created.<br />
However, these values have slightly different meanings <strong>for</strong> the two functions.<br />
The four optional parameters of the method CreateRectangle take integer values in the range 0 <strong>to</strong> 100 (zero<br />
being the default). These values define the radius of the four corners as a whole-number percentage of half the<br />
shortest side length. The following code recreates the two-by-one-inch rectangle from earlier, but the four corner<br />
radii are set <strong>to</strong> 100%, 75%, 50%, and 0% of half the shortest side, in other words, the radii will be 0.5 inches,<br />
0.375 inches, 0.25 inches, and a cusp:<br />
Dim sh As Shape<br />
ActiveDocument.Unit = cdrInch<br />
Set sh = ActiveLayer.CreateRectangle(3, 7, 6, 5, 100, 75, 50, 0)<br />
The four parameters define the radii of the corners in the order upper-left, upper-right, lower-left, lower-right.<br />
The method CreateRectangle2 defines the corner radii in exactly the same order, except that it takes double<br />
(floating-point) values that are the radius measurements in the document’s units. The following code creates the<br />
same rectangle with the same corners as above:<br />
Dim sh As Shape<br />
ActiveDocument.Unit = cdrInch<br />
ActiveDocument.ReferencePoint = cdrBot<strong>to</strong>mLeft<br />
Set sh = ActiveLayer.CreateRectangle2(3, 6, 2, 1, _<br />
0.5, 0.375, 0.25, 0)<br />
You must limit the radii passed <strong>to</strong> the method CreateRectangle2 <strong>to</strong> less than half the shorter<br />
dimension of the rectangle, otherwise an error will occur.<br />
<strong>VBA</strong> <strong>Programming</strong> <strong>Guide</strong> <strong>for</strong> <strong>Corel</strong>DRAW <strong>11</strong> 60
Using objects in <strong>Corel</strong>DRAW Chapter 6<br />
Creating ellipses<br />
There are two methods <strong>for</strong> creating ellipses: CreateEllipse and CreateEllipse2. They differ in the<br />
parameters that they take, making it simpler <strong>to</strong> create ellipses, whether you want <strong>to</strong> create one based on its<br />
bounding box, or on its center point and radius. Both functions also create arcs or partial ellipses, or segments or pie<br />
slices.<br />
CreateEllipse method<br />
The CreateEllipse method takes four parameters that define its bounding box in the same way as <strong>for</strong><br />
CreateRectangle, in other words, left, <strong>to</strong>p, right, bot<strong>to</strong>m, in the document’s units. The following code creates a<br />
50mm circle:<br />
Dim sh As Shape<br />
ActiveDocument.Unit = cdrMillimeter<br />
Set sh = ActiveLayer.CreateEllipse(75, 150, 125, 100)<br />
To create an arc or a segment, three additional parameters are required – start angle, end angle, and a Boolean value<br />
that defines whether it is an arc (False) or a segment (True). Angles are measured with zero being horizontally-right<br />
on the page and positive values being degrees from zero moving counterclockwise. The arc or pie is drawn from the<br />
start angle <strong>to</strong> the end angle. The following code creates a letter ‘C’ shape:<br />
Dim sh As Shape<br />
ActiveDocument.Unit = cdrMillimeter<br />
Set sh = ActiveLayer.CreateEllipse(75, 150, 125, 100, _<br />
60, 290, False)<br />
CreateEllipse2 method<br />
The CreateEllipse2 method creates ellipses based on their center points, and horizontal and vertical radii (if only one<br />
radius is given, a circle is created). The following code creates the same 50 millimeter circle as in the preceding<br />
section:<br />
Dim sh As Shape<br />
ActiveDocument.Unit = cdrMillimeter<br />
Set sh = ActiveLayer.CreateEllipse2(100, 125, 25)<br />
To create an ellipse, give a second radius: the first radius is the horizontal radius, the second is the vertical radius:<br />
Dim sh As Shape<br />
ActiveDocument.Unit = cdrMillimeter<br />
Set sh = ActiveLayer.CreateEllipse2(100, 125, 50, 25)<br />
To create an arc or a segment, use exactly the same additional parameters as <strong>for</strong> the CreateEllipse method.<br />
Creating curves<br />
Curves are made from several other objects: each Curve has one or more SubPath member objects; each<br />
SubPath has one or more Segment objects; each Segment has two Node objects as well as two control-point<br />
position/angle properties.<br />
<strong>VBA</strong> <strong>Programming</strong> <strong>Guide</strong> <strong>for</strong> <strong>Corel</strong>DRAW <strong>11</strong> 61
Using objects in <strong>Corel</strong>DRAW Chapter 6<br />
To create a curve shape in <strong>Corel</strong>DRAW:<br />
1 Create a new curve object using the CreateCurve method of the Application object.<br />
2 Create a new SubPath inside the Curve object using the CreateSubPath member function – this creates the<br />
first Node of the curve.<br />
3 Append a new line- or curve-type Segment <strong>to</strong> the SubPath using the AppendLineSegment and<br />
AppendCurveSegment member functions – this adds another Node as well as setting the positions of the<br />
control handles <strong>for</strong> that Segment. Repeat this as often as required <strong>to</strong> build up the Curve.<br />
4 Create the curve shape on the Layer using the CreateCurve member function.<br />
You can add additional SubPaths <strong>to</strong> the Curve and build those up with their own Nodes. You can also close a<br />
Curve by setting its Closed property <strong>to</strong> True.<br />
The following code creates a D-shaped closed curve:<br />
Dim sh As Shape, spath As SubPath, crv As Curve<br />
ActiveDocument.Unit = cdrCentimeter<br />
Set crv = Application.CreateCurve(ActiveDocument) 'Create Curve object<br />
Set spath = crv.CreateSubPath(6, 6) ' Create a SubPath<br />
spath.AppendLineSegment 6, 3 ' Add the short vertical segment<br />
spath.AppendCurveSegment 3, 0, 2, 270, 2, 0 ' Lower curve<br />
spath.AppendLineSegment 0, 0 ' Bot<strong>to</strong>m straight edge<br />
spath.AppendLineSegment 0, 9 ' Left straight edge<br />
spath.AppendLineSegment 3, 9 ' Top straight edge<br />
spath.AppendCurveSegment 6, 6, 2, 0, 2, 90 ' Upper curve<br />
spath.Closed = True ' Close the curve<br />
Set sh = ActiveLayer.CreateCurve(crv) ' Create curve shape<br />
The AppendLineSegment method only requires a single node position <strong>for</strong> the end of the segment. However, the<br />
AppendCurveSegment method requires one Cartesian coordinate and two polar coordinates: the Cartesian<br />
coordinate is <strong>for</strong> the end node; the polar coordinates are <strong>for</strong> the two control handles where the first parameter is the<br />
length of the handle and the second parameter is the control handle’s angle. Alternatively, you can use the<br />
AppendCurveSegment2 method which allows you <strong>to</strong> specify the coordinates of both control handles.<br />
The Layer class has three additional member functions <strong>for</strong> creating curve objects: CreateLineSegment,<br />
CreateCurveSegment, and CreateCurveSegment2. These functions are shortcuts <strong>for</strong> creating a Curve<br />
shape along with its first Segment on the first SubPath, all in a single function.<br />
Text objects<br />
The new Segments are appended <strong>to</strong> the last Node of the SubPath. There is an optional parameter<br />
that causes the Segment <strong>to</strong> be appended <strong>to</strong> the first Node of the SubPath.<br />
Text objects are another type of Shape object. However, handling text is more <strong>com</strong>plicated than handling other<br />
shapes.<br />
In <strong>Corel</strong>DRAW <strong>11</strong>, text is manipulated as a TextRange. Text ranges can be accessed via any of the following<br />
properties of Shape.Text:<br />
� Frames collection - each TextFrame’s default member is a TextRange which is the text within the frame<br />
� S<strong>to</strong>ry - this is a TextRange containing all the text in all of the frames linked <strong>to</strong> the current Shape on all<br />
pages in the document<br />
<strong>VBA</strong> <strong>Programming</strong> <strong>Guide</strong> <strong>for</strong> <strong>Corel</strong>DRAW <strong>11</strong> 62
Using objects in <strong>Corel</strong>DRAW Chapter 6<br />
The text in a TextRange can be manipulated as a single block of text, and its properties, such as font, size, style<br />
and can be set <strong>for</strong> all the text in one go. Alternatively, the TextRange has several properties which are collections<br />
of smaller text ranges: Columns, Paragraphs, Lines, Words, and Characters.<br />
Creating artistic text<br />
To create a new artistic text shape, use the member function CreateArtisticText of the Layer object. The<br />
following code creates an artistic text shape, with the left end of the line at one inch and the baseline at four inches<br />
from the origin, with the words “Hello World”:<br />
Dim sh As Shape<br />
ActiveDocument.Unit = cdrInch<br />
Set sh = ActiveLayer.CreateArtisticText(1, 4, "Hello World")<br />
There are many optional parameters <strong>to</strong> this function <strong>for</strong> setting italic, bold, size, alignment, and so on.<br />
In <strong>Corel</strong>DRAW <strong>11</strong> the Text object has been greatly enhanced over that in <strong>Corel</strong>DRAW 10.<br />
Creating paragraph text<br />
To create a new paragraph text shape, use the member function CreateParagraphText of the Layer object.<br />
Paragraph text differs from artistic text in that it flows within a rectangular container, rather than being as wide as it<br />
needs <strong>to</strong> be be<strong>for</strong>e reaching a line feed. The first four parameters of the function are left, <strong>to</strong>p, right, bot<strong>to</strong>m:<br />
Dim sh As Shape<br />
ActiveDocument.Unit = cdrInch<br />
Set sh = ActiveLayer.CreateParagraphText(1, 4, 5, 2, "Hi There", _<br />
Alignment := cdrCenterAlignment)<br />
Formatting text<br />
To <strong>for</strong>mat text, first get a reference <strong>to</strong> a TextRange and then apply the <strong>for</strong>matting. Frames, columns, paragraphs,<br />
lines, and the s<strong>to</strong>ry can all be used <strong>to</strong> get a reference <strong>to</strong> a TextRange. The following code <strong>for</strong>mats the first<br />
paragraph of the s<strong>to</strong>ry in<strong>to</strong> a heading style and the second and third paragraphs in<strong>to</strong> a body-text style:<br />
Dim txt As TextRange<br />
' Format the first paragraph<br />
Set txt = ActiveShape.Text.S<strong>to</strong>ry.Paragraphs(1)<br />
txt.ChangeCase cdrTextUpperCase<br />
txt.Font = "Verdana"<br />
txt.Size = 18<br />
txt.Bold = True<br />
' Format the second and third paragraphs<br />
Set txt = ActiveShape.Text.S<strong>to</strong>ry.Paragraphs(2, 2)<br />
txt.Font = "Times New Roman"<br />
txt.Size = 12<br />
txt.Style = cdrNormalFontStyle<br />
All of the <strong>for</strong>matting options from the Format Text dialog box in <strong>Corel</strong>DRAW can be applied programmatically<br />
with <strong>VBA</strong>. See the Text object in <strong>VBA</strong>’s Object Browser <strong>for</strong> more in<strong>for</strong>mation.<br />
<strong>VBA</strong> <strong>Programming</strong> <strong>Guide</strong> <strong>for</strong> <strong>Corel</strong>DRAW <strong>11</strong> 63
Using objects in <strong>Corel</strong>DRAW Chapter 6<br />
Fitting text <strong>to</strong> a path<br />
The Text object has a member function FitTextToPath, which simply attaches a text object <strong>to</strong> the outline of a<br />
shape, so that the text flows along the path. The following code creates a new text object and attaches it <strong>to</strong> the<br />
selected shape:<br />
Dim sh As Shape, sPath As Shape<br />
ActiveDocument.Unit = cdrInch<br />
Set sPath = ActiveShape<br />
Set sh = ActiveLayer.CreateArtisticText(1, 4, "Hello World")<br />
sh.Text.FitTextToPath sPath<br />
Fitting text <strong>to</strong> a shape<br />
Paragraph text shapes can be flowed inside closed shapes <strong>to</strong> <strong>for</strong>m non-rectangular frames. This is done by placing<br />
the Text object inside the Shape object using the member function PlaceTextInside of the Shape object.<br />
Given that a text shape – artistic or paragraph – is selected in <strong>Corel</strong>DRAW, the following code creates a 5×2-inch<br />
ellipse and places the selected text inside it:<br />
Dim txt As Shape, sh As Shape<br />
ActiveDocument.Unit = cdrInch<br />
Set txt = ActiveShape<br />
Set sh = ActiveLayer.CreateEllipse(0, 2, 5, 0)<br />
sh.PlaceTextInside txt<br />
Changing the properties of shapes<br />
Now that you have created new shapes with <strong>VBA</strong>, you will want <strong>to</strong> modify those shapes by changing the size,<br />
position, rotation, and colors of the shapes.<br />
Size<br />
To get the width or height of a Shape, test its SizeWidth or SizeHeight properties:<br />
Dim width As Double, height As Double<br />
ActiveDocument.Unit = cdrMillimeter<br />
width = ActiveShape.SizeWidth<br />
height = ActiveShape.SizeHeight<br />
The returned Double value depends on the setting of ActiveDocument.Unit, so if you need the size in a specific<br />
unit, set it first. The same applies <strong>for</strong> all of the size properties and methods in the object model.<br />
To get the width and height in a single <strong>com</strong>mand, use the member function GetSize:<br />
Dim width As Double, height As Double<br />
ActiveDocument.Unit = cdrMillimeter<br />
ActiveShape.GetSize width, height<br />
To set the size of a Shape, set its SizeWidth or SizeHeight properties <strong>to</strong> the new values. The following code<br />
sets the size of the active shape <strong>to</strong> 50 × 70mm:<br />
ActiveDocument.Unit = cdrMillimeter<br />
ActiveShape.SizeWidth = 50<br />
ActiveShape.SizeHeight = 70<br />
Alternatively, use the SetSize method, which sets both in one call:<br />
<strong>VBA</strong> <strong>Programming</strong> <strong>Guide</strong> <strong>for</strong> <strong>Corel</strong>DRAW <strong>11</strong> 64
Using objects in <strong>Corel</strong>DRAW Chapter 6<br />
ActiveDocument.Unit = cdrMillimeter<br />
ActiveShape.SetSize 50, 70<br />
There is an additional method <strong>for</strong> setting the shape size, which is SetSizeEx. This method takes a center point in<br />
addition <strong>to</strong> the width and height – the resize operation will be done relative <strong>to</strong> this point, as opposed <strong>to</strong> using the<br />
shape’s own center point. For example, the following code resizes the selection <strong>to</strong> 10 × 8 inches about the point (6,<br />
5) in the document:<br />
ActiveDocument.Unit = cdrInch<br />
ActiveSelection.SetSizeEx 6, 5, 10, 8<br />
The object ActiveSelection refers <strong>to</strong> a Shape object that contains all of the selected shapes in the<br />
document.<br />
All of the preceding code refers <strong>to</strong> the object’s size in terms of its vec<strong>to</strong>r curves and ignores the fact that any shapes<br />
with an outline may actually extend beyond the rectangle containing the curves. There is one method that can be<br />
used <strong>to</strong> get the size of the bounding box of the shape with the option of including the widths of any outlines. This<br />
method is GetBoundingBox:<br />
Dim width As Double, height As Double<br />
Dim posX As Double, posY As Double<br />
ActiveDocument.Unit = cdrInch<br />
ActiveDocument.ReferencePoint = cdrBot<strong>to</strong>mLeft<br />
ActiveShape.GetBoundingBox posX, posY, width, height, True<br />
The method’s main use is <strong>to</strong> get the shape’s bounding box, including the position of its lower-left corner. The final<br />
parameter is a Boolean value that indicates whether <strong>to</strong> return the bounding box of the shape including its outline<br />
(True), or not including its outline (False). The method <strong>for</strong> setting the shape’s bounding box does not include the<br />
necessary parameter <strong>for</strong> doing so in relation <strong>to</strong> its bounding box, although by using GetBoundingBox twice (once<br />
including the outline and a second time excluding the outline) it is possible <strong>to</strong> calculate the size and position of the<br />
bounding box of the vec<strong>to</strong>r, not including the outline:<br />
<strong>VBA</strong> <strong>Programming</strong> <strong>Guide</strong> <strong>for</strong> <strong>Corel</strong>DRAW <strong>11</strong> 65
Using objects in <strong>Corel</strong>DRAW Chapter 6<br />
Public Sub SetBoundingBoxEx(X As Double, Y As Double, _<br />
Width As Double, Height As Double)<br />
Dim sh As Shape<br />
Dim nowX As Double, nowY As Double<br />
Dim nowWidth As Double, nowHeight As Double<br />
Dim nowXol As Double, nowYol As Double<br />
Dim nowWidthol As Double, nowHeigh<strong>to</strong>l As Double<br />
Dim newX As Double, newY As Double<br />
Dim newWidth As Double, newHeight As Double<br />
Dim ratioWidth As Double, ratioHeight As Double<br />
Set sh = ActiveSelection<br />
sh.GetBoundingBox nowX, nowY, nowWidth, nowHeight, False<br />
sh.GetBoundingBox nowXol, nowYol, nowWidthol, _<br />
nowHeigh<strong>to</strong>l, True<br />
ratioWidth = Width / nowWidthol<br />
ratioHeight = Height / nowHeigh<strong>to</strong>l<br />
newWidth = nowWidth * ratioWidth<br />
newHeight = nowHeight * ratioHeight<br />
newX = X + (nowX - nowXol)<br />
newY = Y + (nowY - nowYol)<br />
sh.SetBoundingBox newX, newY, newWidth, newHeight, _<br />
False, cdrBot<strong>to</strong>mLeft<br />
End Sub<br />
Stretch or scale<br />
As well as setting specific sizes, shapes can also be scaled by a proportional amount. The Shape object has two<br />
member functions Stretch and StretchEx that per<strong>for</strong>m this operation. Both functions take a decimal value <strong>for</strong><br />
horizontal and vertical stretching, where 1 is 100% (or no change). Zero is not allowed - a very small value must be<br />
used instead.<br />
The following code stretches the selection <strong>to</strong> half its current height, but twice its width, about the midpoint of the<br />
bot<strong>to</strong>m edge of its bounding box:<br />
ActiveDocument.ReferencePoint = cdrBot<strong>to</strong>mMiddle<br />
ActiveSelection.Stretch 2, 0.5<br />
The stretch can also be per<strong>for</strong>med about any point on the page using the StretchEx member function. The<br />
following code per<strong>for</strong>ms the same stretch as above, but about the point (4, 5) on the page in inches:<br />
ActiveDocument.Unit = cdrInch<br />
ActiveSelection.StretchEx 4, 5, 2, 0.5<br />
Both of the above functions have an optional Boolean parameter that, when True, stretches paragraph text<br />
characters by the given amount. When it is False, only the bounding box of the text is stretched and the text is<br />
reflowed within the box.<br />
Position<br />
The position of a Shape can be determined with the properties PositionX and PositionY, and with the<br />
methods GetPosition and GetBoundingBox. The position of a Shape can be set by setting the properties<br />
PositionX and PositionY, or using the methods SetPosition, SetSizeEx, and SetBoundingBox. See<br />
the previous section <strong>for</strong> SetSizeEx, GetBoundingBox, and SetBoundingBox.<br />
The following code gets the position of the ActiveSelection shape relative <strong>to</strong> the current ReferencePoint<br />
property of ActiveDocument, which the code explicitly sets <strong>to</strong> the lower-left corner:<br />
<strong>VBA</strong> <strong>Programming</strong> <strong>Guide</strong> <strong>for</strong> <strong>Corel</strong>DRAW <strong>11</strong> 66
Using objects in <strong>Corel</strong>DRAW Chapter 6<br />
Dim posX As Double, posY As Double<br />
ActiveDocument.ReferencePoint = cdrBot<strong>to</strong>mLeft<br />
ActiveSelection.GetPosition posX, posY<br />
The above code returns the position of the reference point of the selection without accounting <strong>for</strong> the<br />
widths of any of the selected shapes’ outlines. To account <strong>for</strong> the widths of the outlines, use the function<br />
GetBoundingBox, as described in the previous section.<br />
The following code sets the position of the lower-right corner of each selected shape in the active document <strong>to</strong> (3, 2)<br />
in inches:<br />
Dim sh As Shape<br />
ActiveDocument.Unit = cdrInch<br />
ActiveDocument.ReferencePoint = cdrBot<strong>to</strong>mRight<br />
For Each sh In ActiveSelection.Shapes<br />
sh.SetPosition 3, 2<br />
Next sh<br />
Rotate<br />
Shapes can be rotated using the member functions Rotate and RotateEx of the Shape object.<br />
The Rotate member function simply rotates the shape by the given angle (in degrees) about the shape’s rotation<br />
center. The following code rotates the selection by 30° about its center of rotation:<br />
ActiveSelection.Rotate 30<br />
Positive rotation angles are always degrees counterclockwise.<br />
To find the center of rotation, get the values of the shape’s properties RotationCenterX and<br />
RotationCenterY. Changing the values of these properties moves the center of rotation <strong>for</strong> the next call <strong>to</strong> this<br />
function.<br />
The function RotateEx takes additional parameters that specify the center of rotation. This is a quicker, simpler<br />
method than setting each of RotationCenterX and RotationCenterY and then calling Rotate. The<br />
following code rotates each of the selected shapes by 15° clockwise about each shape’s lower-right corner:<br />
Dim sh As Shape<br />
ActiveDocument.ReferencePoint = cdrBot<strong>to</strong>mRight<br />
For Each sh In ActiveSelection.Shapes<br />
sh.RotateEx -15, sh.PositionX, sh.PositionY<br />
Next sh<br />
Skew<br />
Shapes can be skewed using the member functions Skew and SkewEx of the Shape object. These two functions are<br />
very similar <strong>to</strong> the Rotate and RotateEx member functions, except that they take two angle parameters: the first<br />
is horizontal skew (positive values move the <strong>to</strong>p edge <strong>to</strong> the left and the bot<strong>to</strong>m edge <strong>to</strong> the right), and the second is<br />
vertical skew (positive values move the right-hand edge upwards and the left-hand edge downwards). The horizontal<br />
skew is applied be<strong>for</strong>e the vertical skew.<br />
<strong>VBA</strong> <strong>Programming</strong> <strong>Guide</strong> <strong>for</strong> <strong>Corel</strong>DRAW <strong>11</strong> 67
Using objects in <strong>Corel</strong>DRAW Chapter 6<br />
The following code skews the selection by 30° horizontally, and by 15° vertically:<br />
Color<br />
ActiveSelection.Skew 30, 15<br />
Skews of angles close <strong>to</strong> or greater than 90° are not allowed and will produce an error.<br />
Color can be applied <strong>to</strong> both the fill and the outline of an object, as well as <strong>to</strong> page backgrounds, lenses, and<br />
gradient fills.<br />
You can copy one color <strong>to</strong> another using the method CopyAssign:<br />
Dim sh As Shape<br />
Set sh = ActiveShape<br />
sh.Outline.Color.CopyAssign sh.Fill.Uni<strong>for</strong>mColor<br />
You can get the color model of a color object by getting its Type property:<br />
Dim colType As cdrColorType<br />
colType = ActiveShape.Outline.Color.Type<br />
When you have the type of the color, usually one of cdrColorRGB, cdrColorCMYK, orcdrColorGray (but<br />
not limited <strong>to</strong> those), you can get the <strong>com</strong>ponents of the color, which are:<br />
� CMYKCyan, CMYKYellow, CMYKMagenta, and CMYKBlack <strong>for</strong> CMYK color;<br />
� RGBRed, RGBGreen, and RGBBlue <strong>for</strong> RGB color;<br />
� and Gray <strong>for</strong> grayscale.<br />
To convert a Color object’s color <strong>to</strong> a different color model, use the member functions ConvertToCMYK,<br />
ConvertToRGB, ConvertToGray, and so on. The color is converted using the <strong>Corel</strong>DRAW color management<br />
settings. For example, the following code converts the fill <strong>to</strong> RGB:<br />
ActiveShape.Fill.Uni<strong>for</strong>mColor.ConvertToRGB<br />
To set a new color, use the methods CMYKAssign, RGBAssign, GrayAssign, and so on. These methods take<br />
different numbers of parameters depending on how many color <strong>com</strong>ponents are required <strong>for</strong> that color model. For<br />
example, the following code assigns a deep-blue RGB color <strong>to</strong> the active shape’s outline:<br />
ActiveShape.Outline.Color.RGBAssign 0, 0, 102<br />
Each <strong>com</strong>ponent’s value range depends on the color model.<br />
Some functions in the <strong>Corel</strong>DRAW Object Model take a Color object as a parameter. To create a new Color<br />
object, use the <strong>VBA</strong> keyword New, as in the following example:<br />
Dim col As New Color<br />
col.RGBAssign 0, 255, 102<br />
ActiveShape.Outline.Color.CopyAssign col<br />
The color ‘none’ does not exist. To set the color ‘none’ <strong>to</strong> an outline or fill, you must actually set the<br />
outline- or fill-type <strong>to</strong> ‘none’.<br />
<strong>VBA</strong> <strong>Programming</strong> <strong>Guide</strong> <strong>for</strong> <strong>Corel</strong>DRAW <strong>11</strong> 68
Using objects in <strong>Corel</strong>DRAW Chapter 6<br />
Outline<br />
Every Shape object has a property Outline, which refers <strong>to</strong> an Outline object. Outline objects have the<br />
properties Type, Width, Color, and Style, as well as many other properties.<br />
Outline type<br />
The property Type sets whether the shape has an outline: if it is set <strong>to</strong> cdrOutline then the shape will have an<br />
outline, and if it is set <strong>to</strong> cdrNoOutline, the shape will not have an outline. Setting this property <strong>to</strong><br />
cdrOutline <strong>for</strong> a shape that does not have an outline will give the shape the document’s default outline. Setting<br />
this property <strong>to</strong> cdrNoOutline will remove the outline from the shape. This is the same as setting Width <strong>to</strong> zero.<br />
Outline width<br />
The property Width sets the width of the outline in the units of the document; <strong>to</strong> set the width in points, <strong>for</strong><br />
example, first set the document’s Unit property <strong>to</strong> cdrPoint. For example, the following code sets the outline of<br />
the selected shapes <strong>to</strong> one millimeter:<br />
ActiveDocument.Unit = cdrMillimeter<br />
ActiveSelection.Outline.Width = 1<br />
Any shapes whose Type property is cdrNoOutline will have that property changed <strong>to</strong> cdrOutline when the<br />
outline color or width is set.<br />
Outline color<br />
The property Color is a color object that defines the color of the outline. For more in<strong>for</strong>mation about using Color<br />
objects, see page 68. Setting the color of the outline au<strong>to</strong>matically sets the Type property of the outline <strong>to</strong><br />
cdrOutline and gives the outline the default width:<br />
ActiveSelection.Outline.Color.GrayAssign 0 ' Set <strong>to</strong> black<br />
Outline style<br />
The Style property of Outline sets the dash properties of the outline. It has four properties, of which only three<br />
can be set:<br />
� DashCount sets the number of dashes in the style.<br />
� DashLength is an array of values that gives the length of each dash – this array is the same size as the value of<br />
DashCount.<br />
� GapLength is an array of values that gives the length of each gap following each dash – as <strong>for</strong> DashLength,<br />
this array is the same size as the value of DashCount.<br />
� Index is a read-only property that gives the index of the outline style in the document’s OutlineStyles<br />
collection, which is presented <strong>to</strong> the user in the Outline dialog box.<br />
The values in the arrays DashLength and DashGap are drawn as multiples of the width of the line; there<strong>for</strong>e, if<br />
DashLength(1) is 5 and the line is 0.2 inches in width, the dash’s length will be 1 inch; if the line’s width is<br />
changed <strong>to</strong> 0.1 inches, the dash’s length will be<strong>com</strong>e 0.5 inches.<br />
To use one of the application’s outline styles, you must reference the style from the OutlineStyles collection by<br />
giving an index of the style you want <strong>to</strong> use. The problem with this is that each user’s installation of <strong>Corel</strong>DRAW<br />
can have a different collection of outline styles, if the user has modified them, so it is not guaranteed that a given<br />
indexed style will be the same <strong>for</strong> all users. To use one of the styles, assign it <strong>to</strong> the outline:<br />
ActiveShape.Outline.Style = Application.OutlineStyles(3)<br />
<strong>VBA</strong> <strong>Programming</strong> <strong>Guide</strong> <strong>for</strong> <strong>Corel</strong>DRAW <strong>11</strong> 69
Using objects in <strong>Corel</strong>DRAW Chapter 6<br />
OutlineStyles.Item(0) is always a solid line; <strong>to</strong> set an outline <strong>to</strong> solid, set it equal <strong>to</strong> this style.<br />
Other properties<br />
Outline objects have many other properties, including:<br />
� StartArrow, EndArrow – sets the arrowhead <strong>to</strong> use on each end of an open Curve<br />
� LineCaps, LineJoin – sets the type of line caps (butt, round, or square) and joins (bevel, mitre, or round);<br />
� NibAngle, NibStretch – sets the shape of the nib used <strong>to</strong> draw the line<br />
� BehindFill, ScaleWithShape – draws the outline behind the fill, and scales the outline with the shape<br />
Outline objects also have two methods:<br />
� ConvertToObject – converts the outline <strong>to</strong> an object;<br />
� SetProperties – a single method that can be used <strong>to</strong> set most of the outline’s properties in a single call,<br />
which is much more efficient and quicker than setting each property individually when setting the properties of<br />
hundreds or thousands of outlines at the same time.<br />
Fill<br />
There are many types of fills in <strong>Corel</strong>DRAW, including uni<strong>for</strong>m fills, fountain fills, PostScript® fills, pattern fills,<br />
and texture fills. Each type needs <strong>to</strong> be handled differently. Only uni<strong>for</strong>m and fountain fills are discussed here.<br />
Fill types<br />
The read-only Type property of a Fill object gives the type of the fill, in other words, whether it is a uni<strong>for</strong>m,<br />
fountain, PostScript, pattern, or texture fill, or whether there is no fill. The following code gets the fill type:<br />
Dim fillType As cdrFillType<br />
fillType = ActiveShape.Fill.Type<br />
The fill type cannot be set with this property. The fill type is set when the fill is created and applied.<br />
To remove any type of fill, use the member function ApplyNoFill of the Fill object.<br />
Uni<strong>for</strong>m fills<br />
Uni<strong>for</strong>m fills consist of a single, solid color. This color is represented by the fill’s property Uni<strong>for</strong>mColor, which is<br />
a Color object. For more in<strong>for</strong>mation on using Color objects, see page 68.<br />
To apply a uni<strong>for</strong>m fill <strong>to</strong> a shape, use the ApplyUni<strong>for</strong>mFill member function of the shape’s Fill property:<br />
ActiveShape.Fill.ApplyUni<strong>for</strong>mFill CreateRGBColor(255, 0, 0)<br />
Unless you are copying the color from an existing Color object, you have <strong>to</strong> create a new Color object first and<br />
then apply the color <strong>to</strong> the shape’s Fill property.<br />
To change the color of a uni<strong>for</strong>m fill, change the Uni<strong>for</strong>mColor property of the Fill object:<br />
ActiveShape.Fill.Uni<strong>for</strong>mColor.RGBAssign 0, 0, 102<br />
Uni<strong>for</strong>m fills have a Type property of cdrUni<strong>for</strong>mFill.<br />
<strong>VBA</strong> <strong>Programming</strong> <strong>Guide</strong> <strong>for</strong> <strong>Corel</strong>DRAW <strong>11</strong> 70
Using objects in <strong>Corel</strong>DRAW Chapter 6<br />
Fountain fills<br />
Fountain fills are defined by the property Fountain, which is a FountainFill object. FountainFill objects<br />
have many properties, including type, angle, and blend type. The most important property, though, is the collection<br />
of colors that <strong>com</strong>prise the fountain.<br />
To create a new fountain fill, use the ApplyFountainFill member function of the Fill object. This creates a<br />
simple two-color fountain with basic properties. The following code creates a simple linear fountain fill, from red <strong>to</strong><br />
yellow, at 30° <strong>to</strong> the horizontal:<br />
Dim startCol As New Color, endCol As New Color<br />
startCol.RGBAssign 255, 0, 0<br />
endCol.RGBAssign 255, 255, 0<br />
ActiveShape.Fill.ApplyFountainFill startCol, endCol, _<br />
cdrLinearFountainFill, 30<br />
All of the parameters <strong>to</strong> the ApplyFountainFill member function are optional and not all have been used in<br />
the preceding code. It is possible <strong>to</strong> set the midpoint, the number of steps, and the color-blend type in the same<br />
function call.<br />
After the fountain fill has been created, you can add more colors <strong>to</strong> the blend by adding new FountainColor<br />
items <strong>to</strong> the Colors collection, which is a property of Fill.Fountain. For example, the following code adds a<br />
yellow color <strong>to</strong> the Colors collection at a position about a third of the way from the red:<br />
Dim fFill As FountainFill<br />
Set fFill = ActiveShape.Fill.Fountain<br />
fFill.Colors.Add CreateRGBColor(0, 102, 0), 33<br />
Individual colors in the fountain can be moved using the FountainColor.Move member function. The following<br />
code moves the yellow color from the previous code <strong>to</strong> a position that is 60% from the red <strong>to</strong>wards the green:<br />
ActiveShape.Fill.Fountain.Colors(1).Move 60<br />
Color positions are integer values in percent, where 0% is the start-color position and 100% is the<br />
end-color position.<br />
The number of colors reported by the Count property of the Colors collection is the number of colors between the<br />
start and end colors. So <strong>for</strong> the fountain fill created above, the value of the Count property is 1. The first color in<br />
the Colors collection is item 0 and is the start color; it cannot be moved, but its color can be changed. The last<br />
color in the Colors collection is item (Count + 1) and is the end color; it also cannot be moved, but its color<br />
can be changed. The following code changes the color of the end color from green <strong>to</strong> blue:<br />
Dim cols As FountainColors<br />
Set cols = ActiveShape.Fill.Fountain.Colors<br />
cols(cols.Count + 1).Color.RGBAssign 0, 0, 102<br />
There are additional properties that define edge padding, center position (<strong>for</strong> conical, radial, and rectangular<br />
fountains), and the number of steps used <strong>to</strong> draw the fill, which are not described here.<br />
Fountain fills have a Type property value of cdrFountainFill.<br />
Duplicating shapes<br />
To duplicate shapes, use the Duplicate member function of the Shape object:<br />
<strong>VBA</strong> <strong>Programming</strong> <strong>Guide</strong> <strong>for</strong> <strong>Corel</strong>DRAW <strong>11</strong> 71
Using objects in <strong>Corel</strong>DRAW Chapter 6<br />
ActiveSelection.Duplicate<br />
This function takes two option values that set the offset <strong>for</strong> the duplicate from the original. The following code<br />
positions the duplicate two inches <strong>to</strong> the right and one inch above the original:<br />
ActiveDocument.Unit = cdrInch<br />
ActiveSelection.Duplicate 2, 1<br />
Applying effects<br />
Effects can be applied directly <strong>to</strong> shapes using the appropriate Create… member function of the Shape object.<br />
Creating blends<br />
The CreateBlend member function of the Shape object creates a blend between the current Shape and the<br />
Shape in the parameter list. The following code creates a ten-step blend:<br />
Dim sh As Shapes, eff As Effect<br />
Set sh = ActiveSelection.Shapes<br />
Set eff = sh(1).CreateBlend(sh(2), 10)<br />
The number of shapes in the blend is 12 – the start and end shapes, plus the ten steps created.<br />
There are several optional parameters <strong>to</strong> the CreateBlend method, which are not shown, that control the<br />
acceleration of the blend, as well as setting the path along which the blend is created.<br />
The Effect object returned by the above code is a reference <strong>to</strong> the blend. By setting the properties of the Blend<br />
property of the Effect object, the blend can be fine-tuned. The Effect object itself has a member function<br />
Separate <strong>for</strong> separating the Blend effect, as well as Clear <strong>for</strong> removing it.<br />
Creating con<strong>to</strong>urs<br />
Con<strong>to</strong>urs can be created with the CreateCon<strong>to</strong>ur member function of the Shape object. The following code<br />
creates a three-step con<strong>to</strong>ur at a five millimeter spacing:<br />
Dim eff As Effect<br />
ActiveDocument.Unit = cdrMillimeter<br />
Set eff = ActiveShape.CreateCon<strong>to</strong>ur(cdrCon<strong>to</strong>urOutside, 5, 3)<br />
There are several optional parameters of the CreateCon<strong>to</strong>ur method, which are not shown, that control the<br />
colors and acceleration of the con<strong>to</strong>ur shapes.<br />
Creating other effects<br />
The Shape object has several other functions <strong>for</strong> creating effects: CreateDropShadow, CreateEnvelope,<br />
CreateExtrude, CreateLens, CreatePerspective, CreatePushPullDis<strong>to</strong>rtion,<br />
CreateTwisterDis<strong>to</strong>rtion, and CreateZipperDis<strong>to</strong>rtion.<br />
Shortcuts <strong>to</strong> frequently used objects<br />
<strong>Corel</strong>DRAW provides several ‘shortcuts’ <strong>to</strong> frequently accessed objects. These shortcuts are easier <strong>to</strong> use than their<br />
longhand versions simply because they require less typing. Also, since the <strong>com</strong>piler does not have <strong>to</strong> determine every<br />
object in a long dot-separated reference, they may be slightly quicker at run-time.<br />
<strong>VBA</strong> <strong>Programming</strong> <strong>Guide</strong> <strong>for</strong> <strong>Corel</strong>DRAW <strong>11</strong> 72
Using objects in <strong>Corel</strong>DRAW Chapter 6<br />
The following table gives the shortcuts, their long <strong>for</strong>ms, and a description of each:<br />
Shortcut Long <strong>for</strong>m Description<br />
ActiveWindow ActiveDocument.ActiveWindow Gets the active window, which the<br />
active document is displayed in<br />
ActiveView ActiveWindow.ActiveView Gets the active view of the document,<br />
which is the representation of the<br />
document within the ActiveWindow<br />
ActivePage ActiveDocument.ActivePage Gets the current page of the active<br />
document<br />
ActiveLayer ActivePage.ActiveLayer Gets the current layer being edited in<br />
the current page of the document<br />
ActiveSelection ActiveDocument.Selection Gets the selection in the active<br />
document, in other words, the shape<br />
that represents the shapes that are<br />
selected<br />
ActiveSelectionRan<br />
ge<br />
ActiveDocument.SelectionRange Gets the selection range in the active<br />
document<br />
ActiveShape ActiveDocument.Selection.Shapes(1) Gets the last-selected shape in the<br />
active document<br />
Each of the shortcuts can be used on its own as a property of the <strong>Corel</strong>DRAW <strong>11</strong> Application object. Several of<br />
them can also be used as members of a given Document object: ActiveLayer, ActivePage, ActiveShape,<br />
and ActiveWindow. The Document object also has the specific properties Selection and SelectionRange<br />
<strong>for</strong> getting either <strong>for</strong> a specific document, whether that document is active or not, rather than using<br />
ActiveSelection or ActiveSelectionRange.<br />
ActiveSelection and ActiveSelectionRange<br />
To get the selection, in other words, <strong>to</strong> access the shapes that are selected in the document, you have a choice: get a<br />
reference <strong>to</strong> a document’s Selection object or get a copy of the document’s SelectionRange property. The<br />
difference between these two selection-type objects is that Selection gets updated whenever the selection<br />
changes in the document, and SelectionRange is a copy of the selection state at the time and does not get<br />
updated.<br />
ActiveSelection<br />
The shortcut <strong>for</strong> ActiveDocument.Selection is ActiveSelection. This returns a Shape object, which is a<br />
reference <strong>to</strong> the document’s Selection object. Because this is a reference, whenever the selection in the document<br />
is changed, either by the user or programmatically, the shapes that this Selection object contains will reflect the<br />
change.<br />
Dim sel As Shape<br />
Set sel = ActiveDocument.Selection<br />
<strong>VBA</strong> <strong>Programming</strong> <strong>Guide</strong> <strong>for</strong> <strong>Corel</strong>DRAW <strong>11</strong> 73
Using objects in <strong>Corel</strong>DRAW Chapter 6<br />
ActiveSelection returns a Shape object of subtype cdrSelectionShape. This Shape subtype has a<br />
member collection called Shapes, which is a collection of all of the selected shapes in the document. The items in<br />
the ActiveSelection.Shapes collection can be accessed in the normal manner:<br />
Dim sh As Shape, shs As Shapes<br />
Set shs = ActiveSelection.Shapes<br />
For Each sh In shs<br />
sh.Rotate 15 'Rotate each shape thru 15° counterclockwise<br />
Next sh<br />
You cannot directly remember and recall the objects that are selected using ActiveSelection. In order <strong>to</strong> copy<br />
the references <strong>to</strong> the selected objects, you would have <strong>to</strong> populate an array of Shape, a collection of type Shapes,<br />
or use a ShapeRange.<br />
ActiveSelectionRange<br />
ActiveSelectionRange is the shortcut <strong>for</strong> ActiveDocument.SelectionRange. This is a property of the<br />
document of type ShapeRange:<br />
Dim selRange As ShapeRange<br />
Set selRange = ActiveDocument.SelectionRange<br />
The ShapeRange object returned by ActiveSelectionRange contains a collection of references <strong>to</strong> the shapes<br />
that were selected at the moment when the property was read. Since these references are <strong>to</strong> the shapes themselves,<br />
and not <strong>to</strong> the selection, if you change the selection, the ShapeRange is not updated.<br />
The shapes referenced by ActiveSelectionRange are held in a ShapeRange object. This collection can be<br />
parsed in the usual way:<br />
Dim sh As Shape, shRange As ShapeRange<br />
Set shRange = ActiveSelectionRange<br />
For Each sh In shRange<br />
sh.Skew 15 ' Rotate each shape thru 15° counterclockwise<br />
Next sh<br />
Since the SelectionRange is a static copy of references <strong>to</strong> the objects selected at the time, it is an ideal way of<br />
remembering and recalling the selection. Also, shapes can be added <strong>to</strong> and removed from a ShapeRange object, so<br />
it is an ideal way of manipulating the selection.<br />
Comparison of ActiveSelection and ActiveSelectionRange<br />
To get the selection, you have a choice: get a reference <strong>to</strong> a document’s Selection object (of type Shape), which<br />
gets updated if the selection changes, or get a reference <strong>to</strong> a new ShapeRange object, which is like a collection of<br />
references <strong>to</strong> the objects in the selection at that moment in time and does not get updated.<br />
The big advantage of ActiveSelectionRange over ActiveSelection is that, even when the selection<br />
changes, the ShapeRange content does not change; whereas the ActiveSelection Shapes collection does<br />
change, although ActiveSelection is generally easier <strong>to</strong> use. Also, ShapeRange can be duplicated, shapes can<br />
be added and removed, trans<strong>for</strong>mations can be applied, all without the ShapeRange being active at the time.<br />
The individual shapes in a ShapeRange can be selected by calling the range’s CreateSelection member<br />
function:<br />
<strong>VBA</strong> <strong>Programming</strong> <strong>Guide</strong> <strong>for</strong> <strong>Corel</strong>DRAW <strong>11</strong> 74
Using objects in <strong>Corel</strong>DRAW Chapter 6<br />
Dim shRange As ShapeRange<br />
Set shRange = ActiveSelectionRange<br />
shRange.Remove 1<br />
shRange.Remove 2<br />
shRange.CreateSelection<br />
The above code creates a ShapeRange from the selection, then removes the first and second (actually the third<br />
shape of the original range, since it be<strong>com</strong>es the second shape when you remove the first) shapes from the range, and<br />
then creates a new selection from those shapes left in the range (in other words, all the shapes of the original<br />
selection, minus the two shapes that were removed from the collection).<br />
If you want <strong>to</strong> add a ShapeRange <strong>to</strong> the current selection rather than replace the selection, use the<br />
AddToSelection member function of ShapeRange.<br />
Parsing selected shapes<br />
Parsing through the selected shapes is done in the same way <strong>for</strong> both selections:<br />
Dim shs As Shapes, sh As Shape<br />
Set shs = ActiveSelection.Shapes<br />
For Each sh In shs<br />
' Do something with the shape, sh<br />
Next sh<br />
And selection ranges:<br />
Dim sRange As ShapeRange, sh As Shape<br />
Set sRange = ActiveSelectionRange<br />
For Each sh In sRange<br />
' Do something with the shape, sh<br />
Next sh<br />
However, selection ranges have the advantage that even if the selection subsequently changes, the range is not<br />
updated and so the ‘memory’ of the selection is not lost. However, getting a reference <strong>to</strong> the ActiveSelection<br />
does not create a copy of the references <strong>to</strong> the shapes in the selection but a reference <strong>to</strong> the intrinsic<br />
ActiveSelection object. This means that if the selection changes, all references <strong>to</strong> the ActiveSelection are<br />
also updated, and so the ‘memory’ of the selection is lost.<br />
Order of selected shapes in a collection<br />
The order of the Shape objects in both the ActiveSelection.Shapes and ActiveSelectionRange<br />
collections is in the reverse order of the order that the shapes were selected by the user. So, the first shape in both<br />
collections is the last shape that the user selected, and the last shape in both collections is the first shape that the<br />
user selected. This property of these collections is useful <strong>for</strong> macros that need <strong>to</strong> know which shape was selected first<br />
or last.<br />
Document operations<br />
This section describes how <strong>to</strong> do various document-related operations from <strong>VBA</strong>, including opening and closing<br />
documents, printing documents, and importing in<strong>to</strong> and exporting from documents.<br />
<strong>VBA</strong> <strong>Programming</strong> <strong>Guide</strong> <strong>for</strong> <strong>Corel</strong>DRAW <strong>11</strong> 75
Using objects in <strong>Corel</strong>DRAW Chapter 6<br />
Opening and closing documents<br />
To open a document, use the OpenDocument member function of the global Application object:<br />
Dim doc As Document<br />
Set doc = OpenDocument("C:\graphic1.cdr")<br />
To close a document, use the Close member function of the Document object itself:<br />
Printing<br />
doc.Close<br />
Printing documents is straight<strong>for</strong>ward with <strong>VBA</strong>: almost all of the settings that are available in the <strong>Corel</strong>DRAW<br />
Print dialog box are available as properties of the Document object’s PrintSettings member. And then, when<br />
the properties are set, <strong>to</strong> actually print the document is simply a case of calling the document’s PrintOut member<br />
function. For example, the following code prints three copies of pages one, three, and four, <strong>to</strong> a level-3 PostScript<br />
printer:<br />
With ActiveDocument.PrintSettings<br />
.Copies = 3<br />
.PrintRange = prnPageRange<br />
.PageRange = "1, 3-4"<br />
.Options.PrintJobInfo = True<br />
With .PostScript<br />
.DownloadType1 = True<br />
.Level = prnPSLevel3<br />
End With<br />
End With<br />
ActiveDocument.PrintOut<br />
For each of the pages of the Print dialog box in <strong>Corel</strong>DRAW, there is a corresponding object in the object model.<br />
The following table gives the objects that correspond <strong>to</strong> each page in the Print dialog:<br />
Options page in dialog box Member of PrintSettings object<br />
General Properties of PrintSettings<br />
Layout Not supported by object model<br />
Separations Separations and Trapping<br />
Prepress Prepress<br />
PostScript PostScript<br />
Misc Options<br />
Each object contains all of the properties from the corresponding page of the Print dialog box. The only print<br />
options that cannot be set in <strong>VBA</strong> are the layout options. However, if it is necessary, it is possible <strong>to</strong> launch the Print<br />
dialog box with the PrintSettings object’s ShowDialog member function.<br />
To reset the print settings, call the PrintSettings object’s Reset member function:<br />
<strong>VBA</strong> <strong>Programming</strong> <strong>Guide</strong> <strong>for</strong> <strong>Corel</strong>DRAW <strong>11</strong> 76
Using objects in <strong>Corel</strong>DRAW Chapter 6<br />
ActiveDocument.PrintSettings.Reset<br />
Your code can also access any printing profiles that have been saved by the user from the Print dialog box using the<br />
PrintSettings object’s Load member function:<br />
ActiveDocument.PrintSettings.Load "C:\<strong>Corel</strong>DRAW Defaults.prs"<br />
This function takes a full path <strong>to</strong> the printing profile, so you have <strong>to</strong> know that path be<strong>for</strong>ehand. It is also possible<br />
<strong>to</strong> save printing profiles using the Save member function.<br />
To just print the selected shapes, set Document.PrintSettings.PrintRange <strong>to</strong> prnSelection. To select a<br />
specific printer, set Document.PrintSettings.Printer <strong>to</strong> refer <strong>to</strong> the appropriate printer in the collection<br />
Application.Printers.<br />
Importing and exporting files<br />
Files of all supported <strong>for</strong>mats can be imported in<strong>to</strong> and exported from <strong>Corel</strong>DRAW.<br />
Importing files<br />
Files are imported on<strong>to</strong> layers, there<strong>for</strong>e the Import and ImportEx functions are members of the Layer object.<br />
The following code imports a file on<strong>to</strong> the active layer:<br />
ActiveLayer.Import "C:\logotype.gif"<br />
The file is imported on<strong>to</strong> the active layer at the center of the page. Any shapes that were previously selected are<br />
deselected, and the contents of the imported file are selected. To reposition or resize the imported shapes, get the<br />
document’s selection:<br />
ActiveDocument.Unit = cdrInch<br />
ActiveSelection.SetSize 3, 2<br />
Some file <strong>for</strong>mats – notably EPS and PDF – can be imported with one of two filters. In the case of EPS, it is possible<br />
<strong>to</strong> import the EPS file as a placeable object that will be printed, but cannot be modified; it is also possible <strong>to</strong><br />
interpret the PS part of the EPS file, importing the actual artwork from within the EPS, rather than just the<br />
low-resolution TIFF or WMF placeable header, which can be subsequently edited by the user. To specify which filter<br />
<strong>to</strong> use, include the optional parameter Filter:<br />
ActiveLayer.Import "C:\map.eps", cdrPSInterpreted<br />
The filter can also be set <strong>to</strong> preserve pages and layers by setting the third parameter <strong>to</strong> True:<br />
ActiveLayer.Import "C:\map.eps", cdrPSInterpreted, True<br />
The ImportEx function provides much better control over the import filter through its optional use of a<br />
StructImportOptions object. The following code imports the file as a linked file:<br />
Dim iFilt As ImportFilter<br />
Dim importProps As New StructImportOptions<br />
importProps.LinkBitmapExternally = True<br />
Set iFilt = ActiveLayer.ImportEx("C:\world-map.tiff", _<br />
cdrAu<strong>to</strong>Sense, importProps)<br />
iFilt.Finish<br />
<strong>VBA</strong> <strong>Programming</strong> <strong>Guide</strong> <strong>for</strong> <strong>Corel</strong>DRAW <strong>11</strong> 77
Using objects in <strong>Corel</strong>DRAW Chapter 6<br />
Exporting files<br />
Files are exported from the Document not Layer objects, since the range of shapes exported often extends over<br />
multiple layers, and even over multiple pages. The Document object has three export functions: Export,<br />
ExportBitmap, and ExportEx. All three methods can be used <strong>to</strong> export <strong>to</strong> both bitmap and vec<strong>to</strong>r <strong>for</strong>mats.<br />
A simple export of a page only requires a filename and a filter type. The following code exports the current page <strong>to</strong> a<br />
TIFF bitmap file:<br />
ActiveDocument.Export "C:\ThisPage.tif", cdrTIFF<br />
However, this gives little control over the output of the image. More control is obtained by including a<br />
StructExportOptions object, as in the following code:<br />
Dim expOpts As New StructExportOptions<br />
expOpts.ImageType = cdrCMYKColorImage<br />
expOpts.AntiAliasingType = cdrNormalAntiAliasing<br />
expOpts.ResolutionX = 72<br />
expOpts.ResolutionY = 72<br />
expOpts.SizeX = 210<br />
expOpts.SizeY = 297<br />
ActiveDocument.Export "C:\ThisPage.tif", cdrTIFF, _<br />
cdrCurrentPage, expOpts<br />
A StructPaletteOptions object can also be included in the function call <strong>for</strong> palette-based image <strong>for</strong>mats,<br />
which gives the settings <strong>for</strong> au<strong>to</strong>-generating the palette.<br />
The function ExportEx is the same as Export, except that it can pop up the filter’s dialog box, retrieve the<br />
settings, and then export the file:<br />
Dim eFilt As ExportFilter<br />
Set eFilt = ActiveDocument.ExportEx("C:\ThisPage.eps", cdrEPS)<br />
If eFilt.HasDialog = True Then<br />
If eFilt.ShowDialog = True Then<br />
eFilt.Finish<br />
End If<br />
Else<br />
eFilt.Finish<br />
End If<br />
The third function, ExportBitmap, is similar <strong>to</strong> ExportEx in that it returns an ExportFilter object that can<br />
be used <strong>to</strong> show the Export dialog box <strong>to</strong> the user. However, this function takes the individual members of the<br />
StructExportOptions object as parameters, thereby simplifying using the function:<br />
Dim eFilt As ExportFilter<br />
Set eFilt = ActiveDocument.ExportBitmap("C:\Selection.tif", _<br />
cdrTIFF, cdrSelection, cdrCMYKColorImage, _<br />
210, 297, 72, 72, cdrNormalAntiAliasing, _<br />
False, True, False, cdrCompressionLZW)<br />
eFilt.Finish<br />
Publishing <strong>to</strong> PDF<br />
Publishing <strong>to</strong> PDF is a two-stage process. The first part is <strong>to</strong> set the PDF settings. If the user has already set the<br />
settings in <strong>Corel</strong>DRAW <strong>for</strong> the document, or chooses <strong>to</strong> use the default settings, this stage does not need <strong>to</strong> be done.<br />
The second part is <strong>to</strong> export the file.<br />
<strong>VBA</strong> <strong>Programming</strong> <strong>Guide</strong> <strong>for</strong> <strong>Corel</strong>DRAW <strong>11</strong> 78
Using objects in <strong>Corel</strong>DRAW Chapter 6<br />
To set the PDF settings, modify the properties of the Document member PDFSettings. This member is an<br />
object of type PDF<strong>VBA</strong>Settings and has properties <strong>for</strong> all the PDF settings that can be set in the <strong>Corel</strong>DRAW<br />
PublishToPDF dialog box. The following code exports pages 2, 3, and 5 <strong>to</strong> a PDF file called MyPDF.pdf:<br />
Dim doc As Document<br />
Set doc = ActiveDocument<br />
With doc.PDFSettings<br />
.Author = "<strong>Corel</strong> Corporation"<br />
.Bookmarks = True<br />
.ColorMode = pdfRGB<br />
.ComplexFillsAsBitmaps = False<br />
.CompressText = True<br />
.CropMarks = False<br />
.DownsampleGray = True<br />
.EmbedBaseFonts = True<br />
.EmbedFonts = True<br />
.FileIn<strong>for</strong>mation = True<br />
.Hyperlinks = True<br />
.Keywords = "Test, Example, <strong>Corel</strong>, <strong>Corel</strong>DRAW, PublishToPDF"<br />
.Linearize = True<br />
.PageRange = "2-3, 5"<br />
.pdfVersion = pdfVersion13<br />
.PublishRange = pdfPageRange<br />
.TrueTypeToType1 = True<br />
End With<br />
doc.PublishToPDF "C:\MyPDF.pdf"<br />
You can give more control <strong>to</strong> the user by popping up the PDF Settings dialog box with the following code:<br />
Dim doc As Document<br />
Set doc = ActiveDocument<br />
If doc.PDFSettings.ShowDialog = True Then<br />
doc.PublishToPDF "C:\MyPDF.pdf"<br />
End If<br />
PDF settings profiles can be saved and loaded using the Save and Load member functions of the PDFSettings<br />
object.<br />
Windows and views<br />
In <strong>Corel</strong>DRAW the user can have several windows on<strong>to</strong> the same document. For a large document, one view might<br />
be zoomed in <strong>to</strong> the upper-right corner, and another zoomed in <strong>to</strong> the lower-right corner. The individual windows<br />
can be zoomed and panned independently, although turning the page in one turns the page in them all.<br />
The user can also save individual zoom settings, including which page, using the View Manager. Selecting a view<br />
re-zooms <strong>Corel</strong>DRAW <strong>to</strong> that location on that page.<br />
In <strong>VBA</strong>, the main differences between the Window object and the View object is that the Window object provides<br />
access <strong>to</strong> the windows that contain each View of the document. The Window is the chrome, title bar, and so on; the<br />
View is the rectangular view of the document just inside the chrome.<br />
Windows<br />
Each Document object has a collection Windows that gives all of the windows on<strong>to</strong> the document. To switch<br />
between windows, use a window’s Activate method:<br />
<strong>VBA</strong> <strong>Programming</strong> <strong>Guide</strong> <strong>for</strong> <strong>Corel</strong>DRAW <strong>11</strong> 79
Using objects in <strong>Corel</strong>DRAW Chapter 6<br />
ActiveDocument.Windows(2).Activate<br />
The next and previous windows <strong>for</strong> the current document are referenced in a window’s Next and Previous<br />
properties:<br />
ActiveWindow.Next.Activate<br />
To create a new window, call the NewWindow member function of a Window object:<br />
ActiveWindow.NewWindow<br />
To close a window, call its Close member function. If it is the document’s last window, the document will be closed<br />
as well:<br />
ActiveWindow.Close<br />
Views and ActiveView<br />
Views and ActiveViews are, literally, views on<strong>to</strong> the document. The difference between an ActiveView and a<br />
View is that each Window object has just one ActiveView, and that is the current view on<strong>to</strong> the document;<br />
whereas a View is just the recorded memory of one particular ActiveView, such that re-activating that View will<br />
zoom and pan the Window object’s ActiveView <strong>to</strong> the location and zoom setting that is s<strong>to</strong>red in the properties<br />
of the View object.<br />
Each Window object has an ActiveView member. Each Document object has a collection of View objects in its<br />
Views member.<br />
The only way <strong>to</strong> access an ActiveView is from a Window object’s ActiveView property.<br />
Zooming with the ActiveView<br />
To zoom in <strong>to</strong> a set amount, set the Zoom property of the ActiveView. The zoom is set as a double value in<br />
percent. For example, the following code sets the zoom <strong>to</strong> 200%:<br />
ActiveWindow.ActiveView.Zoom = 200<br />
You can also zoom the ActiveView with various member functions: ToFitAllObjects, ToFitArea,<br />
ToFitPage, ToFitPageHeight, ToFitPageWidth, ToFitSelection, ToFitShape,<br />
ToFitShapeRange, and SetActualSize.<br />
Panning with the ActiveView<br />
To pan the ActiveView, move its origin. This can easily be done by modifying the OriginX and OriginY<br />
properties of the ActiveView. The following code pans the document five inches left and three inches upwards:<br />
Dim av As ActiveView<br />
ActiveDocument.Unit = cdrInch<br />
Set av = ActiveWindow.ActiveView<br />
av.OriginX = av.OriginX - 5<br />
av.OriginY = av.OriginY + 3<br />
You can also use the member function SetViewPoint:<br />
<strong>VBA</strong> <strong>Programming</strong> <strong>Guide</strong> <strong>for</strong> <strong>Corel</strong>DRAW <strong>11</strong> 80
Using objects in <strong>Corel</strong>DRAW Chapter 6<br />
Dim av As ActiveView<br />
ActiveDocument.Unit = cdrInch<br />
Set av = ActiveWindow.ActiveView<br />
av.SetViewPoint av.OriginX - 5, av.OriginY + 3<br />
Working with views<br />
You can create a new View object and add it <strong>to</strong> the Document’s Views collection from the collection itself. The<br />
following code adds the current ActiveView settings <strong>to</strong> the Views collection:<br />
ActiveDocument.Views.AddActiveView "New View"<br />
You can also create a new view with specific settings using the CreateView member function of the Document<br />
object. The following code creates a new View whose view point is at the position (3, 4) in inches, the zoom is 95%,<br />
and it is on page 6:<br />
ActiveDocument.Unit = cdrInch<br />
ActiveDocument.CreateView "New View 2", 3, 4, 95, 6<br />
To res<strong>to</strong>re a view, call that view’s Activate member function. The document’s active window will be set <strong>to</strong> that<br />
view:<br />
<strong>Corel</strong>DRAW events<br />
ActiveDocument.Views("New View").Activate<br />
<strong>Corel</strong>DRAW raises various events while it is running, <strong>to</strong> which <strong>VBA</strong> can respond through the use of ‘event<br />
handlers’. Event handlers are Subs with specific, defined names, within a ThisDocument module – every <strong>VBA</strong><br />
Project (GMS) file has one ThisDocument module, within its <strong>Corel</strong>DRAW <strong>11</strong> Objects subfolder within the project.<br />
The GlobalDocument object is a virtual object that represents each and all open <strong>Corel</strong>DRAW documents. The<br />
GlobalDocument has several events that are raised at the time of any event, such as opening, printing, saving, or<br />
closing a <strong>Corel</strong>DRAW document – the range of events is actually greater than this, since each one has a ‘be<strong>for</strong>e’ and<br />
‘after’ event.<br />
Responding <strong>to</strong> events<br />
To respond <strong>to</strong> an event, you must provide an event handler. An event handler is simply a Sub in any ThisDocument<br />
module with a specific name – <strong>Corel</strong>DRAW only looks <strong>for</strong> known event-handler names in ThisDocument modules.<br />
However, <strong>Corel</strong>DRAW does check all ThisDocument modules in all installed projects, so you can create an<br />
event-driven solution and distribute it as a single Project (GMS) file just as you would provide any other <strong>for</strong>m of<br />
solution. Each project can only have one ThisDocument module, which is created au<strong>to</strong>matically when the project is<br />
first created.<br />
For example, a solution may need <strong>to</strong> respond <strong>to</strong> a document closing by logging the closure in a file as part of a<br />
workflow-management and recording system. To respond <strong>to</strong> a document opening, you must respond <strong>to</strong> the<br />
GlobalDocument’s OpenDocument event. To do this, open a ThisDocument module <strong>for</strong> editing in the VB Edi<strong>to</strong>r.<br />
In the Object list box at the <strong>to</strong>p of the code window, select GlobalDocument and in the Procedure list box, select<br />
DocumentOpen – the VB Edi<strong>to</strong>r creates a new, empty Sub called GlobalDocument_DocumentOpen(), or, if it<br />
exists already, places the cursor in<strong>to</strong> it. Now all you need <strong>to</strong> do is <strong>to</strong> write some code that adds the name of the<br />
opened file <strong>to</strong> the log. The tidiest way <strong>to</strong> do this is <strong>to</strong> create a Public Sub in a different module that actually does the<br />
work, and the event handler simply calls that Sub when it has <strong>to</strong> – this keeps the size of the ThisDocument module<br />
as small as possible, so the run-time interpreter does not have <strong>to</strong> spend as much time parsing all the ThisDocument<br />
modules each time an event is raised:<br />
<strong>VBA</strong> <strong>Programming</strong> <strong>Guide</strong> <strong>for</strong> <strong>Corel</strong>DRAW <strong>11</strong> 81
Using objects in <strong>Corel</strong>DRAW Chapter 6<br />
Private Sub GlobalDocument_OpenDocument( _<br />
ByVal Document As IDrawDocument)<br />
Call LogFileOpen(Document.FullFileName)<br />
End Sub<br />
The IDrawDocument type in the above code is the internal name <strong>for</strong> a <strong>Corel</strong>DRAW Document<br />
object. This is used because the GlobalDocument is not directly a member of the <strong>Corel</strong>DRAW object<br />
model. However, <strong>VBA</strong> will treat IDrawDocument exactly as a Document object.<br />
<strong>VBA</strong> <strong>Programming</strong> <strong>Guide</strong> <strong>for</strong> <strong>Corel</strong>DRAW <strong>11</strong> 82
Using objects in <strong>Corel</strong>DRAW Chapter6<br />
The full list of <strong>Corel</strong>DRAW<strong>11</strong> events is given in the following table:<br />
Event Description<br />
Start<br />
Quit<br />
NewDocument<br />
OpenDocument<br />
Be<strong>for</strong>ePrint<br />
AfterPrint<br />
Be<strong>for</strong>eSave<br />
AfterSave<br />
Be<strong>for</strong>eSaveAs<br />
AfterSaveAs<br />
These two events are raised whenever the user starts <strong>Corel</strong>DRAW or quits from it.<br />
TheseGlobalDocument events are raised whenever adocument is created or opened; both<br />
events pass areference <strong>to</strong> the document.<br />
TheseDocument events are raised after the Print dialog box is displayed and after the<br />
document is printed; it is not possible <strong>to</strong> cancel auser-initiated print job from the<br />
Be<strong>for</strong>ePrint event handler.<br />
TheseDocument events are raised be<strong>for</strong>e the document is saved or be<strong>for</strong>e theSaveAsdialog<br />
boxis displayed, and after the document is saved; the file name of the document being saved is<br />
passed as aparameter <strong>to</strong>AfterSave andAfterSaveAs; it is not possible <strong>to</strong> cancel aSave<br />
or SaveAsfrom theBe<strong>for</strong>eSave orBe<strong>for</strong>eSaveAs event handlers.<br />
Be<strong>for</strong>eClose ThisDocument event is raised be<strong>for</strong>e the document is closed; however, there is no mechanism<br />
<strong>for</strong> discovering which document is about <strong>to</strong> be closed.<br />
PageCreated<br />
PageSelected<br />
PageDeleted<br />
LayerCreated<br />
LayerSelected<br />
LayerDeleted<br />
ShapeCreated<br />
ShapeSelected<br />
ShapeDeleted<br />
TheseDocument events are raised whenever aPage is created, selected, or deleted; in the<br />
case ofPageDeleted, this event is immediately followed by aPageSelected event if the<br />
layer that was deleted was the active page; areference <strong>to</strong> thePage object is passed as a<br />
parameter <strong>to</strong> each event handler.<br />
TheseDocument events are raised whenever aLayer is created, selected, or deleted; in the<br />
case ofLayerDeleted, this event is immediately followed by aLayerSelected event if<br />
the layer that was deleted was the active layer; areference <strong>to</strong> theLayer object is passed as a<br />
parameter <strong>to</strong> each event handler.<br />
TheseDocument events are raised whenever aShape is created, selected, or deleted; a<br />
reference <strong>to</strong> theShape object is passed as aparameter <strong>to</strong> each event handler<br />
SelectionChanged ThisDocument event is raised whenever the selection changes; it may also be ac<strong>com</strong>panied by<br />
aShapeSelected event, if aShape was added <strong>to</strong> theSelection.<br />
Any event handlers <strong>for</strong> frequent events, such as Shape-related events, should be as efficient as possible,<br />
otherwise <strong>Corel</strong>DRAW will run very slowly because<strong>VBA</strong> will have <strong>to</strong> run the handler so often.<br />
<strong>VBA</strong> <strong>Programming</strong> <strong>Guide</strong> <strong>for</strong> <strong>Corel</strong>DRAW <strong>11</strong> 83
Creating user interfaces <strong>for</strong> macros 7<br />
An important part of many <strong>VBA</strong> solutions is the user interface. A well-designed user interface will make the<br />
solution so easy <strong>to</strong> use – or so powerful – that the user will not think twice about using your macros.<br />
Most user interfaces <strong>for</strong> <strong>com</strong>plex solutions will be based on a dialog box or <strong>for</strong>m of some description. Some simpler<br />
user interfaces can be created using <strong>to</strong>olbars and but<strong>to</strong>ns. Other user interfaces rely on getting a click or drag from<br />
the user. And providing the user with some sort of help always makes a solution easier <strong>to</strong> deploy and support.<br />
This chapter describes all of these aspects of user interfaces.<br />
Working with dialog boxes<br />
There are two <strong>for</strong>ms of dialog boxes - modal and modeless:<br />
� Modal dialog boxes must be acted upon be<strong>for</strong>e continuing with the rest of the macro - the application is locked<br />
until the dialog box is dismissed, either by submitting it, or by cancelling it;<br />
� Modeless dialog boxes do not lock the application, and it can be kept open while the user continues working in<br />
<strong>Corel</strong>DRAW - although they are not Docker windows, they do behave like Docker windows in that they are<br />
visible without locking the application.<br />
Both <strong>for</strong>ms of dialog boxes have their uses when creating solutions and exactly which type you use depends on what<br />
you are trying <strong>to</strong> achieve. For example, if you are creating a solution that enables an effect or action <strong>to</strong> be applied <strong>to</strong><br />
one or more shapes and the user may want <strong>to</strong> apply the same effect or action <strong>to</strong> a different selection of shapes<br />
subsequently, then the modeless dialog box may be better. The user then only has <strong>to</strong> 'create' the effect in the dialog<br />
box once and then apply it many times.<br />
On the other hand, if you are creating a solution that is a one-shot, end-<strong>to</strong>-end solution, such as a replacement Print<br />
or Save dialog box, then a modal dialog box would be more appropriate: the user must enter a filename, or set the<br />
number of copies, be<strong>for</strong>e continuing, and the user is unlikely <strong>to</strong> want <strong>to</strong> do it repeatedly. Opening the dialog box<br />
again will be less convenient than always having <strong>to</strong> manually dismiss the dialog box.<br />
Creating modal or modeless dialog boxes<br />
All dialog boxes are either built-in dialog boxes, or instances of a <strong>for</strong>m that you have designed with the Forms<br />
Edi<strong>to</strong>r. Built-in dialog boxes that you can control with <strong>VBA</strong> are almost always modal. However, cus<strong>to</strong>m dialog<br />
boxes can be either modal or modeless, and this is determined by the optional Modal parameter of the <strong>for</strong>m's Show<br />
method. For example, the <strong>for</strong>m frmFooForm can be displayed with the following code:<br />
frmFooForm.Show<br />
By default, the optional parameter Modal has the value vbModal (or 1), which causes the above <strong>for</strong>m <strong>to</strong> be a<br />
modal dialog box. By setting this parameter <strong>to</strong> vbModeless (or 0), the <strong>for</strong>m will be modeless, as in the following<br />
example:<br />
frmFooForm.Show vbModeless<br />
To open a dialog box from a macro that is available from within <strong>Corel</strong>DRAW itself, you must create a public sub<br />
within a <strong>VBA</strong> module – if the sub exists within a <strong>for</strong>m’s code, or within a class module, it will not be available from<br />
within <strong>Corel</strong>DRAW. The sub cannot take any parameters. For example, the following sub would launch the<br />
frmFooForm <strong>for</strong>m as a modeless <strong>for</strong>m:<br />
<strong>VBA</strong> <strong>Programming</strong> <strong>Guide</strong> <strong>for</strong> <strong>Corel</strong>DRAW <strong>11</strong> 84
Creating user interfaces <strong>for</strong> macros Chapter 7<br />
Public Sub showFooForm()<br />
frmFooForm.Show vbModeless<br />
End Sub<br />
Common dialog box features<br />
Modal and modeless dialog boxes have some features in <strong>com</strong>mon and other features that are more appropriate <strong>for</strong><br />
one method over the other.<br />
Modal dialog <strong>com</strong>mon features<br />
Modal dialog boxes usually have the following features:<br />
� an OK but<strong>to</strong>n (the default but<strong>to</strong>n), which per<strong>for</strong>ms the dialog box's ultimate action and then hides the dialog<br />
box;<br />
� a Cancel but<strong>to</strong>n, which dismisses the dialog box without per<strong>for</strong>ming the dialog box's action; the Close but<strong>to</strong>n in<br />
the upper-right corner of the dialog box also dismisses the dialog box;<br />
� Some dialog boxes have an Apply but<strong>to</strong>n that per<strong>for</strong>ms the dialog box's action without making it permanent -<br />
subsequently cancelling the dialog box undoes the action;<br />
� If the dialog box is a wizard-style dialog box, it should have a Next and a Previous but<strong>to</strong>n, as well as a Cancel<br />
but<strong>to</strong>n. On the last page of the wizard, the Next but<strong>to</strong>n should be<strong>com</strong>e the Finish but<strong>to</strong>n <strong>to</strong> indicate that the<br />
final page has been reached and on the first page the Previous but<strong>to</strong>n should be disabled (its Enabled property set<br />
<strong>to</strong> False).<br />
Modeless dialog box <strong>com</strong>mon features<br />
Modeless dialog boxes usually have the following features:<br />
� an Apply or Create but<strong>to</strong>n, or any other title that describes the dialog box's action; this but<strong>to</strong>n should be the<br />
default<br />
� a Close but<strong>to</strong>n - the user is not cancelling the dialog box, they are closing it after having applied its action<br />
Features <strong>com</strong>mon <strong>to</strong> all dialog boxes<br />
All dialog boxes should have the following features:<br />
� Controls may have a ControlTipText string – this tells the user what the control does when the user hovers<br />
the mouse over it.<br />
� The <strong>for</strong>m should have a meaningful title.<br />
� The <strong>for</strong>m should have an obvious method <strong>to</strong> cancel or close itself.<br />
� The <strong>for</strong>m should be either obvious in the way it is laid out, or it should have a Help but<strong>to</strong>n that activates some<br />
help.<br />
Working with <strong>to</strong>olbars and but<strong>to</strong>ns<br />
Toolbars are the most persistently visible parts of the user interface <strong>for</strong> any <strong>VBA</strong> solution, since they are often always<br />
visible. Toolbars are very useful, because the graphical icons can be very memorable, yet only occupy a small area.<br />
Also, but<strong>to</strong>ns can have meaningful titles that are displayed as part of the face. And but<strong>to</strong>ns can also have helpful<br />
<strong>to</strong>oltips that pop up when the mouse is passed over the but<strong>to</strong>ns.<br />
<strong>VBA</strong> <strong>Programming</strong> <strong>Guide</strong> <strong>for</strong> <strong>Corel</strong>DRAW <strong>11</strong> 85
Creating user interfaces <strong>for</strong> macros Chapter 7<br />
Creating <strong>to</strong>olbars<br />
When creating <strong>to</strong>olbars, you should be organized: it is better <strong>to</strong> have lots of small <strong>to</strong>olbars with a few related<br />
but<strong>to</strong>ns than one big <strong>to</strong>olbar containing all of the but<strong>to</strong>ns <strong>for</strong> all of your macros. By breaking your but<strong>to</strong>ns in<strong>to</strong><br />
small groups, it is much easier later <strong>to</strong> distribute these groups with the projects that they work with.<br />
To create a new Toolbar in <strong>Corel</strong>DRAW<br />
1 Click Tools � Options.<br />
2 Click Workspace � Cus<strong>to</strong>mization � Command Bars.<br />
3 Click New.<br />
4 Type a new name <strong>for</strong> the <strong>to</strong>olbar.<br />
5 Enable the check box next <strong>to</strong> the <strong>to</strong>olbar’s name.<br />
Next you will add some but<strong>to</strong>ns <strong>to</strong> the <strong>to</strong>olbar.<br />
Creating new but<strong>to</strong>ns<br />
To add new but<strong>to</strong>ns <strong>to</strong> a <strong>to</strong>olbar<br />
1 Click Workspace � Cus<strong>to</strong>mization � Commands.<br />
2 Choose Macros from the Commands list box. The list below now displays the fully qualified names of all of the<br />
public, parameter-free subs from all of the installed project (GMS) files.<br />
3 Drag a macro from the list and drop it on the <strong>to</strong>olbar. It will appear on the <strong>to</strong>olbar with the default macro icon.<br />
If the names of the macros are <strong>to</strong>o long <strong>to</strong> fit in the list box, select a macro and review its name in the edit boxes <strong>to</strong> the<br />
right of the list.<br />
Adding a caption and a <strong>to</strong>oltip <strong>to</strong> macros<br />
Each <strong>com</strong>mand in the macros list can have both a caption and a <strong>to</strong>oltip. The caption is displayed whenever the<br />
<strong>com</strong>mand is used on a menu and can be made visible as part of the but<strong>to</strong>n face. The <strong>to</strong>oltip only appears when the<br />
pointer is over the menu item or but<strong>to</strong>n.<br />
To change the default caption <strong>for</strong> a macro<br />
1 Click Workspace � Cus<strong>to</strong>mization � Commands.<br />
2 Choose Macros from the Commands list box. The list below now displays the fully qualified names of all of the<br />
public, parameter-free subs from all of the installed project (GMS) files.<br />
3 Choose a macro from the Command list.<br />
4 Click the Appearance tab.<br />
5 Type a string in the Caption box.<br />
To associate an accelera<strong>to</strong>r key with a <strong>com</strong>mand, which can be activated in <strong>com</strong>bination with the Alt key, place an ampersand<br />
(&) in front of the letter in the caption that will be the accelera<strong>to</strong>r character. This will display as an underline<br />
under the character in the caption. This accelera<strong>to</strong>r key only applies <strong>to</strong> <strong>com</strong>mands on menus.<br />
<strong>VBA</strong> <strong>Programming</strong> <strong>Guide</strong> <strong>for</strong> <strong>Corel</strong>DRAW <strong>11</strong> 86
Creating user interfaces <strong>for</strong> macros Chapter 7<br />
To change the default <strong>to</strong>oltip<br />
1 Click Workspace � Cus<strong>to</strong>mization � Commands.<br />
2 Choose Macros from the Commands list box. The list below now displays the fully qualified names of all of the<br />
public, parameter-free subs from all of the installed project (GMS) files.<br />
3 Choose a macro from the Command list.<br />
4 Click the General tab.<br />
5 Type a string in the Tooltip help box.<br />
Adding an image or an icon <strong>to</strong> a <strong>com</strong>mand<br />
Commands can have a small image or icon associated with them. This icon can be visible or hidden <strong>for</strong> both <strong>to</strong>olbars<br />
and menus. The icon size can be small (16 × 16 pixels), medium (32 × 32 pixels), or large (48 × 48 pixels).<br />
To change the default icon <strong>for</strong> a <strong>com</strong>mand<br />
1 Click Workspace � Cus<strong>to</strong>mization � Commands.<br />
2 Choose Macros from the Commands list box. The list below now displays the fully qualified names of all of the<br />
public, parameter-free subs from all of the installed project (GMS) files.<br />
3 Choose a macro from the Command list.<br />
4 Click the Appearance tab.<br />
5 Edit the icon in the icon edi<strong>to</strong>r.<br />
Alternatively, you can import a Windows bitmap (BMP) file. The image’s colours will be mapped <strong>to</strong> the closest<br />
colour in the colour list <strong>for</strong> icons.<br />
Interacting with the user<br />
One aspect of user interfaces that is a bit harder <strong>to</strong> achieve is that of actually getting some interactive input from the<br />
user within the <strong>Corel</strong>DRAW document. The <strong>Corel</strong>DRAW Object Model provides two functions <strong>for</strong> getting the<br />
positions of either a click, or a drag. These two member functions are Document.GetUserClick and<br />
Document.GetUserArea.<br />
The Object Model also provides methods both <strong>for</strong> converting between screen and document coordinates, and<br />
determining if a set of coordinates is on a shape. These three methods are Window.ScreenToDocument,<br />
Window.DocumentToScreen, and Shape.IsOnShape.<br />
Document.GetUserClick<br />
To get the position of a single click from the user, use the GetUserClick member function of the Document<br />
object. This function pauses the macro <strong>for</strong> a specified period of time or until the user clicks somewhere in the<br />
document, or until the user presses Escape. An example of using this function is given below:<br />
Dim doc As Document, retval As Long<br />
Dim x As Double, y As Double, shift As Long<br />
Set doc = ActiveDocument<br />
doc.Unit = cdrCentimeter<br />
retval = doc.GetUserClick(x, y, shift, 10, True, cdrCursorPick)<br />
The above code gives the user just 10 seconds <strong>to</strong> click somewhere in the document. The position of the click is<br />
returned in the variables x and y. The <strong>com</strong>bination of Shift, Ctrl, and Alt that was selected when the click <strong>to</strong>ok<br />
place is returned in shift: Shift is 1, Ctrl is 2, and Alt is 4, and the values are added <strong>to</strong>gether be<strong>for</strong>e being returned.<br />
<strong>VBA</strong> <strong>Programming</strong> <strong>Guide</strong> <strong>for</strong> <strong>Corel</strong>DRAW <strong>11</strong> 87
Creating user interfaces <strong>for</strong> macros Chapter7<br />
In the above example,SnapToObjects is enabled, in other words, True. The cursor icon <strong>to</strong> use is defined bythelast<br />
parameter,in this case the Pick <strong>to</strong>ol's icon; you cannot use cus<strong>to</strong>m icons.<br />
The returned value is 0, 1, or 2, depending on whether the user <strong>com</strong>pleted the click successfully,the usercancelled<br />
by pressing Escape, or the operation timed out, respectively.<br />
The returned coordinates of the click are relative <strong>to</strong> the origin of the page and are in the document's <strong>VBA</strong>units,soit<br />
is often necessary <strong>to</strong> explicitly set the units in which you want the value returned.<br />
Toget the shapes that are underneath the returned click point, use the function SelectShapesAtPoint,which<br />
is amember of Page:<br />
doc.ActivePage.SelectShapesAtPoint x, y, True<br />
The value indicates whether <strong>to</strong> select unfilled objects (True), or not (False).<br />
Document.GetUserArea<br />
Toget the position of adrag, or an area or rectangle, from the user,use the GetUserArea member functionofthe<br />
Document object. This function pauses the macro <strong>for</strong> aspecified period of time or until the user clicks, drags,and<br />
releases the mouse somewhere in the document, or until the user presses Escape. An example of using thisfunction<br />
is given below:<br />
Dim doc As Document, retval As Long, shift As Long<br />
Dim x1 As Double, y1 As Double, x2 As Double, y2 As Double<br />
Set doc = ActiveDocument<br />
doc.Unit = cdrCentimeter<br />
retval = doc.GetUserArea(x1, y1, x2, y2, shift, 10, True,<br />
cdrCursorExtPick)<br />
ActivePage.SelectShapesFromRectangle x1, y1, x2, y2, False<br />
The above code gives the user just 10 seconds <strong>to</strong> select an area somewhere in the document. The positionofthearea<br />
is returned as two opposite corners of arectangle in the variables x1, y1, x2, and y2. The <strong>com</strong>bination ofSHIFT,<br />
CTRL, and ALTthat was selected when the select <strong>to</strong>ok place is returned in shift: SHIFT is 1, CTRL is 2,andALT<br />
is 4, and the values are added <strong>to</strong>gether be<strong>for</strong>e being returned. In the above example,SnapToObjects is enabled,i.e.<br />
True. The cursor icon <strong>to</strong> use is defined by the last parameter.<br />
The returned value is 0, 1, or 2, depending on whether the user <strong>com</strong>pleted the select area successfully,theuser<br />
cancelled by pressing Escape, or the operation timed out, respectively.<br />
The returned coordinates of the area are relative <strong>to</strong> the origin of the page and are in the document’s <strong>VBA</strong>units,soit<br />
is often necessary <strong>to</strong> explicitly set the units you want the value returned in.<br />
The above code finally selects the shapes that lie <strong>com</strong>pletely within the area with the Page object’s<br />
SelectShapesFromRectangle method.<br />
This method returns two points that are interpreted as the corners of arectangle. However, the two points canalsobeused<br />
as the start and end points of adrag operation by the user.<br />
Window.ScreenToDocument and Window.DocumentToScreen<br />
When using the above‘click’ and ‘area’ methods, or when developing an exotic solution, it is sometimesuseful<strong>to</strong>be<br />
able <strong>to</strong> convert between screen coordinates and document coordinates. This is done with the member functions<br />
ScreenToDocument and DocumentToScreen of the Window object.<br />
<strong>VBA</strong> <strong>Programming</strong> <strong>Guide</strong> <strong>for</strong> <strong>Corel</strong>DRAW <strong>11</strong> 88
Creating user interfaces <strong>for</strong> macros Chapter 7<br />
The following code takes a coordinate from the screen and converts it in<strong>to</strong> a point in the document that is visible in<br />
the active window:<br />
Dim docX As Double, docY As Double<br />
ActiveDocument.Unit = cdrMillimeter<br />
ActiveWindow.ScreenToDocument 440, 500, docX, docY<br />
The following code returns the screen coordinate of a point in the document on the screen:<br />
Dim screenX As Long, screenY As Long<br />
ActiveDocument.Unit = cdrMillimeter<br />
ActiveWindow.DocumentToScreen 40, 60, screenX, screenY<br />
In each case, the converted coordinates are returned in the last two parameters.<br />
Screen coordinates start from the upper-left corner of the screen, so positive Y values are down the<br />
screen, whereas positive Y values in the document are up the page.<br />
Shape.IsOnShape<br />
You can test whether a point is inside, outside, or on the outline of a curve using the shape’s IsOnShape member<br />
function. This function takes a document coordinate and returns cdrInsideShape or cdrOutsideShape if the<br />
coordinate is inside or outside the shape, or it returns cdrOnMarginOfShape if the coordinate is on or near the<br />
outline of the shape.<br />
For example, the following code tests where the point (4, 6) is in relation <strong>to</strong> the ActiveShape:<br />
Dim onShape As Long<br />
ActiveDocument.Unit = cdrInch<br />
onShape = ActiveShape.IsOnShape(4, 6)<br />
Providing help <strong>to</strong> the user<br />
One of the most useful aids you can give the user is some <strong>for</strong>m of help documentation. This may take the <strong>for</strong>m of a<br />
ReadMe.txt file, or a printed manual. However, neither of these solutions is immediate. An alternative is <strong>to</strong> have all<br />
of the instructions built in<strong>to</strong> the dialog box, but this uses valuable screen real estate. Yet another alternative is <strong>to</strong><br />
build proper Windows WinHelp or HTMLHelp help files, but both types require <strong>to</strong>ols and a lot of work.<br />
Possibly the most accessible solution is <strong>to</strong> provide help in the <strong>for</strong>m of plain-text, such as a help.txt file. Given that<br />
you know where the text file is s<strong>to</strong>red – and you can do this by creating a known Registry value when the project is<br />
installed that points <strong>to</strong> the location of the file – you can use the following function <strong>to</strong> open it:<br />
Public Sub launchNotepad(file As String)<br />
Shell "Notepad.exe" & " " & file, vbNormalFocus<br />
End Sub<br />
Pass the full path <strong>to</strong> the text file in the parameter file, such as C:\ReadMe.txt.<br />
A much more powerful, but still easily created, solution <strong>to</strong> the problem of help is <strong>to</strong> use HTML. If you know where<br />
the HTML file is installed, you can use the following function <strong>to</strong> open it:<br />
<strong>VBA</strong> <strong>Programming</strong> <strong>Guide</strong> <strong>for</strong> <strong>Corel</strong>DRAW <strong>11</strong> 89
Creating user interfaces <strong>for</strong> macros Chapter 7<br />
' Put this Declare statement be<strong>for</strong>e all Subs and Functions!<br />
Declare Function ShellExecute Lib "shell32.dll" _<br />
Alias "ShellExecuteA" (ByVal hwnd As Long, _<br />
ByVal lpOperation As String, ByVal lpFile As String, _<br />
ByVal lpParameters As String, ByVal lpDirec<strong>to</strong>ry As String, _<br />
ByVal nShowCmd As Long) As Long<br />
Public Sub launchBrowser(url As String)<br />
ShellExecute 0, vbNullString, url, vbNullString, vbNullString, 5<br />
End Sub<br />
HTML is more powerful since you can include graphics as well as direct the user <strong>to</strong> a specific location in the page<br />
using ‘hash’ references, e.g. index.html#middle. Simply pass the file name or URL in the parameter url, <strong>for</strong><br />
example: C:\Program Files\ReadMe.htm, orhttp://www.designer.<strong>com</strong>.<br />
<strong>VBA</strong> <strong>Programming</strong> <strong>Guide</strong> <strong>for</strong> <strong>Corel</strong>DRAW <strong>11</strong> 90
Organizing, grouping, & deploying <strong>Corel</strong>DRAW macros 8<br />
Now that you have created your macro masterpiece, it’s time <strong>to</strong> start distributing it.<br />
Organizing and grouping macros<br />
The best way <strong>to</strong> organize your macros is <strong>to</strong> use a separate module <strong>for</strong> each macro - it’s not absolutely necessary, but<br />
it does help when trying <strong>to</strong> maintain them in the future. Since it is possible <strong>to</strong> have many modules in a single project<br />
(GMS) file, this makes it very simple <strong>to</strong> group related macros <strong>to</strong>gether in<strong>to</strong> a single project.<br />
To make it easier <strong>for</strong> the user <strong>to</strong> find the entry point <strong>to</strong> your macros, it is useful <strong>to</strong> place all of the public Subs in<strong>to</strong> a<br />
single module and then instruct the user how <strong>to</strong> find them - these are the subs that the user calls from within<br />
<strong>Corel</strong>DRAW.<br />
Advantages of distributing macros using a GMS file<br />
Every <strong>Corel</strong>DRAW document has an intrinsic GMS file. This makes it possible <strong>to</strong> explicitly distribute macros as part<br />
of a document so that, when the user opens the document, they immediately have access <strong>to</strong> the macros, even if they<br />
have not installed them. This has only limited use: <strong>for</strong> tracking how much time has been spent editing the<br />
document perhaps.<br />
Deploying and installing project files<br />
You must devise a mechanism <strong>for</strong> deploying and installing your project (GMS) files. It is possible <strong>to</strong> distribute<br />
modules on their own, but, since this requires the users <strong>to</strong> manually integrate the module in<strong>to</strong> their existing project<br />
file, it is much simpler <strong>for</strong> the user if you distribute project files instead.<br />
To install a project file, simply save it <strong>to</strong> the user’s GMS folder. This folder is typically C:\Program<br />
Files\<strong>Corel</strong>\<strong>Corel</strong> Graphics <strong>11</strong>\Draw\GMS, although different language versions of Windows use different names<br />
<strong>for</strong> the programs folder. The correct method of installing a project file <strong>to</strong> the correct direc<strong>to</strong>ry is <strong>to</strong> get the Registry<br />
value HKEY_LOCAL_MACHINE\Software\<strong>Corel</strong>\<strong>Corel</strong>DRAW\<strong>11</strong>.0\Destination and append the string<br />
‘\Draw\GMS’. Fortunately, most au<strong>to</strong>mated software installers, such as Wise, Microsoft Installer (MSI),<br />
InstallShield®, and InnoSetup enable this in a single <strong>com</strong>mand, making GMS files simple <strong>to</strong> install. However, if you<br />
use WinZip® or something similar <strong>to</strong> create a <strong>com</strong>pressed archive <strong>for</strong> distribution, or if you are going <strong>to</strong> distribute<br />
the files without <strong>com</strong>pression at all, you will have <strong>to</strong> tell the user exactly where <strong>to</strong> install the project files themselves.<br />
Distributing workspace features<br />
When you have developed a cus<strong>to</strong>m workspace that contains cus<strong>to</strong>m <strong>to</strong>olbars, menus, and shortcut keys, these<br />
cus<strong>to</strong>mizations can <strong>for</strong>m an intrinsic part of your solution. You can distribute the entire workspace, which the user<br />
can install and use, or, from <strong>Corel</strong>DRAW <strong>11</strong> it is possible <strong>to</strong> export some features of your workspace so the user can<br />
import those features in<strong>to</strong> their own workspace.<br />
Distributing workspaces<br />
You can distribute a <strong>com</strong>plete, cus<strong>to</strong>mized workspace with your solution. All of the <strong>Corel</strong>DRAW workspaces are<br />
s<strong>to</strong>red on your hard disk in a location that is defined by the Registry value LastWorkspaceUsed in the key<br />
HKEY_CURRENT_USER\Software\<strong>Corel</strong>\<strong>Corel</strong>DRAW\<strong>11</strong>. If you look at this value, you will see that it points<br />
<strong>to</strong> a file with the filename extension .CW_ - this is the current workspace's description file that contains the short<br />
<strong>VBA</strong> <strong>Programming</strong> <strong>Guide</strong> <strong>for</strong> <strong>Corel</strong>DRAW <strong>11</strong> 91
Organizing, grouping, & deploying <strong>Corel</strong>DRAW macros Chapter 8<br />
description of the workspace that you see in the Cus<strong>to</strong>mize dialog box. There is also a subfolder in the same folder as<br />
the workspace description file with exactly the same name as the workspace description file, but without the .CW_<br />
filename extension - this folder contains the workspace files.<br />
To distribute a workspace, you must get the user <strong>to</strong> install both the workspace description (CW_) file, and the<br />
subfolder with the CFG files in it, <strong>to</strong> the correct location on their <strong>com</strong>puter. Only the CFG files are needed; the INI<br />
files are not. The receiver of the workspace must find the correct Registry value and then interpret it in order <strong>to</strong><br />
work out the correct direc<strong>to</strong>ry; and then the receiver must either set it during installation by changing the Registry<br />
key or go <strong>to</strong> the <strong>Corel</strong>DRAW Options dialog box and select your workspace.<br />
Distributing menus, <strong>to</strong>olbars, and shortcut keys<br />
From <strong>Corel</strong>DRAW <strong>11</strong> you can distribute <strong>com</strong>ponents of the user interface without having <strong>to</strong> distribute <strong>com</strong>plete<br />
workspaces. It is possible <strong>to</strong> distribute individual <strong>to</strong>olbars and menus, as well as <strong>com</strong>plete sets of shortcut keys.<br />
To export workspace features<br />
1 Right-click anywhere on the <strong>to</strong>olbars and select Cus<strong>to</strong>mize � Workspace � Export workspaces…<br />
2 In the tree-list, enable the check boxes next <strong>to</strong> those items you want <strong>to</strong> export.<br />
3 Click Save, select a direc<strong>to</strong>ry, and enter a file name. The selected workspace items will be saved in<strong>to</strong> a single <strong>Corel</strong><br />
Workspace (CWF) file.<br />
4 Click Close.<br />
To save each item <strong>to</strong> a separate file, repeat this operation <strong>for</strong> each item in turn, except do not click Close, just change<br />
the selected items and then click Save again <strong>for</strong> each one.<br />
When exporting shortcut keys, all of the shortcut keys are exported. To distribute just a few keys, create a new<br />
workspace and remove all the shortcut keys from it; then create just the keys you want <strong>to</strong> export.<br />
The status bar and sizes and positions of Docker windows can also be exported.<br />
Importing workspace features<br />
To import a workspace, you can use the Application.ImportWorkspace method or the user can import the <strong>Corel</strong><br />
Workspace (CWF) files manually.<br />
To import a <strong>Corel</strong> Workspace file manually<br />
1 Right-click anywhere on a <strong>to</strong>olbar and click Cus<strong>to</strong>mize � Workspace � Import workspaces.<br />
2 Choose a <strong>Corel</strong> Workspace (CWF) file.<br />
3 Choose which items <strong>to</strong> import from the file.<br />
4 Choose which workspace <strong>to</strong> import the items in<strong>to</strong>. If you are creating a new workspace, enter details about the<br />
workspace.<br />
5 Confirm the details and click Finish.<br />
The items will be imported in<strong>to</strong> your workspace. If there are any clashes of names of <strong>to</strong>olbars, the in<strong>com</strong>ing <strong>to</strong>olbar<br />
will be renamed. If the <strong>VBA</strong> macros are not installed, <strong>com</strong>mands that call those macros will not work.<br />
<strong>VBA</strong> <strong>Programming</strong> <strong>Guide</strong> <strong>for</strong> <strong>Corel</strong>DRAW <strong>11</strong> 92
Where <strong>to</strong> get more in<strong>for</strong>mation 9<br />
This document is only meant <strong>to</strong> be a starting point. This chapter gives in<strong>for</strong>mation about and links <strong>to</strong> additional<br />
solutions development resources that will be useful <strong>to</strong> you.<br />
<strong>Corel</strong> Solution Developers Program<br />
The <strong>Corel</strong> Solution Developers (CSD) program is a <strong>com</strong>prehensive resource <strong>for</strong> developers and consultants interested<br />
in providing products, solutions or services <strong>to</strong> their end users. The CSD program provides the necessary <strong>com</strong>ponents<br />
<strong>to</strong> successfully design, develop, test, and market cus<strong>to</strong>m solutions. The solutions can be related <strong>to</strong> any of <strong>Corel</strong>’s<br />
products, including the creative, business application, technical illustration, and XML products.<br />
Membership in the program includes technical documentation, developer/technical support, developer <strong>to</strong>ols,<br />
developer newsletter, <strong>com</strong>plementary software licenses, and marketing opportunities.<br />
For more in<strong>for</strong>mation, visit us online at http://www.corel.<strong>com</strong>/partners_developers/csd or email csd@corel.<strong>com</strong><br />
<strong>Corel</strong> Corporate Services<br />
<strong>Corel</strong> Corporate Services is a group of highly skilled experts from across the <strong>com</strong>pany who are dedicated <strong>to</strong> providing<br />
<strong>to</strong>p-notch solutions. They can assist you with your project by providing personalized end-<strong>to</strong>-end solutions and<br />
support throughout all stages of your project. Our wide range of services include: application development and<br />
support, software systems integration, and training.<br />
For more in<strong>for</strong>mation, visit us online at http://www.corel.<strong>com</strong>/proservices, or email proservices@corel.<strong>com</strong>.<br />
<strong>Corel</strong> Cus<strong>to</strong>mized Training<br />
Do you need high-end technical training, conveniently delivered on-site at your organization? <strong>Corel</strong> will cus<strong>to</strong>mize<br />
and build a training program <strong>for</strong> you and your colleagues, based on your learning needs and tailored <strong>to</strong> your work<br />
environment.<br />
For more in<strong>for</strong>mation, visit us online at http://www.corel.<strong>com</strong>/cus<strong>to</strong>mizedtraining, or email training@corel.<strong>com</strong>.<br />
Other documentation<br />
Web sites<br />
Apart from this document, the online Help files that are accessed through the VB Edi<strong>to</strong>r are a great reference. In<br />
the edi<strong>to</strong>r, type a keyword, class name, or member, select it, and press F1 <strong>for</strong> in<strong>for</strong>mation about that keyword. You<br />
can also select an item in the Object Browser, and press F1 <strong>to</strong> access Help.<br />
Various enthusiasts around the world have set up Web sites <strong>to</strong> provide <strong>VBA</strong> solutions <strong>for</strong> <strong>Corel</strong>DRAW. To locate<br />
them, enter "<strong>Corel</strong>DRAW + <strong>VBA</strong>" in<strong>to</strong> most Internet search engines.<br />
A good place <strong>to</strong> start <strong>for</strong> links <strong>to</strong> Web sites related <strong>to</strong> <strong>Corel</strong>DRAW is at <strong>Corel</strong>'s own Web site,<br />
http://www.designer.<strong>com</strong>, in the links section.<br />
<strong>VBA</strong> <strong>Programming</strong> <strong>Guide</strong> <strong>for</strong> <strong>Corel</strong>DRAW <strong>11</strong> 93
Newsgroups<br />
Where <strong>to</strong> get more in<strong>for</strong>mation Chapter 9<br />
<strong>Corel</strong> runs a number of newsgroups in support of its products and solutions developers <strong>for</strong> those products. <strong>Corel</strong>’s<br />
news server is at cnews.corel.<strong>com</strong>. The support newsgroups <strong>for</strong> <strong>Corel</strong>DRAW 10 and <strong>11</strong> on this server are<br />
corel.graphics_apps.draw10 and corel.graphics_apps.draw<strong>11</strong>. The newsgroup <strong>for</strong> <strong>VBA</strong> (as well as <strong>Corel</strong> SCRIPT) in<br />
<strong>Corel</strong>DRAW is corel.graphics_apps.draw-script. Any standard news reader can be used <strong>to</strong> access the groups and<br />
access is free.<br />
The newsgroups are frequented by thousands of <strong>Corel</strong>DRAW users around the world who help each other with their<br />
problems. There are also about one hundred ‘CTech’ volunteers – volunteers recognized by <strong>Corel</strong> as experts – who<br />
are nominated <strong>to</strong> provide the <strong>com</strong>munication link with <strong>Corel</strong> within the newsgroups. These people are<br />
knowledgeable, helpful, and friendly, and usually the first <strong>to</strong> respond <strong>to</strong> questions. They also act as group<br />
modera<strong>to</strong>rs and maintainers.<br />
The rules of the group are posted on the newsgroups page of the support area on <strong>Corel</strong>’s Web site at<br />
http://www.corel.<strong>com</strong>/support.<br />
Other support<br />
In<strong>for</strong>mation about all of <strong>Corel</strong>’s support programs and services can be found at http://www.corel.<strong>com</strong>/support.<br />
<strong>VBA</strong> <strong>Programming</strong> <strong>Guide</strong> <strong>for</strong> <strong>Corel</strong>DRAW <strong>11</strong> 94
Index<br />
A<br />
arrays· ················16<br />
assigning<br />
variables ··············19<br />
au<strong>to</strong>mation ··············14<br />
B<br />
BASIC ················14<br />
blends<br />
creating ··············72<br />
Borland Delphi ············15<br />
breaking<br />
lines ················17<br />
breakpoints ··············41<br />
but<strong>to</strong>ns ················85<br />
adding <strong>to</strong> a <strong>to</strong>olbar ·········86<br />
adding <strong>to</strong> <strong>for</strong>ms ··········32<br />
ByRef· ················18<br />
ByVal·················18<br />
C<br />
C···················21<br />
C++·················21<br />
calling<br />
functions ············28,46<br />
macros from <strong>Corel</strong>DRAW ·····84<br />
subroutines ·············28<br />
classes ············25,38,45<br />
creating object-oriented ······19<br />
collections ············47,49<br />
color<br />
applying <strong>to</strong> shapes ·········68<br />
<strong>com</strong>bo boxes<br />
adding <strong>to</strong> <strong>for</strong>ms ··········35<br />
<strong>com</strong>ments ··············18<br />
<strong>com</strong>paring<br />
variables ··············19<br />
constants ···············40<br />
con<strong>to</strong>urs<br />
creating ··············72<br />
controls<br />
accessing from other modules· ···35<br />
adding <strong>to</strong> <strong>for</strong>ms ··········32<br />
converting<br />
coordinates between the screen and<br />
document ·············88<br />
copying<br />
<strong>VBA</strong> modules ···········25<br />
<strong>Corel</strong> SCRIPT ·············7<br />
<strong>Corel</strong> Solution Developers Program· · 93<br />
curves<br />
creating ··············61<br />
D<br />
data structures<br />
constructing ············16<br />
debugging ··············41<br />
Call Stack window ·········42<br />
Immediate window ·········43<br />
Locals window ···········43<br />
Watches window ··········44<br />
declaring functions ··········17<br />
definitions<br />
jumping <strong>to</strong> ·············30<br />
developers' program ·········93<br />
dialog boxes ·············84<br />
closing ···············34<br />
creating ············31,84<br />
launching from other ········36<br />
modal ···············84<br />
modeless ··············84<br />
distributing<br />
GMS················91<br />
macros ···············91<br />
workspace features ·········92<br />
workspaces ·············91<br />
document<br />
structure ··············49<br />
Document ··············49<br />
documentation<br />
providing <strong>for</strong> macros ········89<br />
<strong>VBA</strong> <strong>for</strong> <strong>Corel</strong>DRAW ·······93<br />
documents<br />
activating· ·············52<br />
changing content of inactive ····52<br />
closing ·············53,76<br />
creating ··············51<br />
opening ··············76<br />
printing ··············76<br />
E<br />
edi<strong>to</strong>r<br />
Visual Basic (VB) ··········23<br />
effects ················72<br />
ellipses<br />
creating ··············61<br />
enumerated types· ··········16<br />
enumerations ·············40<br />
event-handling ··········33,81<br />
events ··············39,81<br />
exporting<br />
files· ················78<br />
workspace features ·········92<br />
F<br />
files<br />
exporting ··············78<br />
importing ·············77<br />
fills ··················70<br />
<strong>for</strong>matting code ·········18,28<br />
au<strong>to</strong>matic <strong>com</strong>pletion ·······30<br />
syntax highlighting· ········28<br />
<strong>for</strong>ms ···············25,84<br />
closing ···············34<br />
creating ··········26,31,84<br />
launching from other <strong>for</strong>ms· ····36<br />
functions ···············17<br />
calling ···············28<br />
declaring ··············17<br />
member functions ·········39<br />
G<br />
Index<br />
global values ·············38<br />
GlobalDocument ···········81<br />
<strong>VBA</strong> <strong>Programming</strong> <strong>Guide</strong> <strong>for</strong> <strong>Corel</strong>DRAW <strong>11</strong> 95
GMS·················25<br />
changing the internal name· ····26<br />
creating ··············25<br />
installing ··············91<br />
organizing macros ·········91<br />
H<br />
HTML files<br />
opening in a browser from a macro · 89<br />
I<br />
images<br />
adding <strong>to</strong> a <strong>com</strong>mand ·······87<br />
adding <strong>to</strong> <strong>for</strong>ms ··········35<br />
importing<br />
files· ················77<br />
workspace features ·········92<br />
initializing<br />
controls on <strong>for</strong>ms ··········35<br />
in-process· ··············15<br />
InputBox ···············20<br />
installing<br />
GMS················91<br />
<strong>VBA</strong> <strong>for</strong> <strong>Corel</strong>DRAW ········9<br />
items<br />
accessing in a class ·········47<br />
J<br />
Java ·················21<br />
JavaScript ··············21<br />
L<br />
layers ·················57<br />
activating· ·············58<br />
creating ··············57<br />
deleting ··············58<br />
disabling ··············58<br />
hiding ···············58<br />
moving ···············57<br />
renaming ··············57<br />
line endings· ·············17<br />
list boxes<br />
adding <strong>to</strong> <strong>for</strong>ms ··········35<br />
loading<br />
user <strong>for</strong>ms ·············84<br />
M<br />
memory<br />
allocation ··············18<br />
pointers ··············18<br />
methods ·············39,45<br />
modules ···············25<br />
copying· ··············25<br />
creating ··············26<br />
MsgBox ···············20<br />
N<br />
naming<br />
macros ···············12<br />
variables ··············26<br />
newsgroups· ·············94<br />
notation ···············46<br />
O<br />
Object Browser<br />
displaying ·············36<br />
object model ·············45<br />
object hierarchy ··········46<br />
searching ··············40<br />
viewing· ··············36<br />
objects ················45<br />
Application· ············49<br />
collections ·············47<br />
Document ·············49<br />
implicit· ··············48<br />
Layer ················57<br />
Page················54<br />
releasing ··············46<br />
Shape· ···············58<br />
Text ················62<br />
opera<strong>to</strong>rs<br />
bitwise ···············20<br />
Boolean ··············19<br />
logical ···············20<br />
Option Explicit ············15<br />
outlines ················69<br />
P<br />
pages ·················54<br />
creating ··············54<br />
deleting ··············55<br />
referencing ·············55<br />
referencing by name ········56<br />
reordering ·············56<br />
resizing ···············56<br />
setting default size ·········56<br />
parentheses<br />
code <strong>for</strong>matting ··········28<br />
parsing<br />
collections ·············48<br />
selected shapes ···········75<br />
passing values ············18<br />
P-code ················21<br />
PDF<br />
publishing <strong>to</strong> ············78<br />
position<br />
get <strong>for</strong> a marquee selection ·····88<br />
get <strong>for</strong> a mouse click ········87<br />
point on a shape ··········89<br />
printing<br />
documents ·············76<br />
private scope ·············19<br />
Project Explorer ···········24<br />
project files ··············25<br />
changing the internal name· ····26<br />
creating ··············25<br />
installing ··············91<br />
properties· ············39,45<br />
Count ···············47<br />
Item ················47<br />
public scope ·············19<br />
R<br />
Index<br />
recording macros ···········<strong>11</strong><br />
rectangles<br />
creating ··············60<br />
rounding corners ··········60<br />
<strong>VBA</strong> <strong>Programming</strong> <strong>Guide</strong> <strong>for</strong> <strong>Corel</strong>DRAW <strong>11</strong> 96
unning <strong>VBA</strong> macros<br />
from a <strong>Corel</strong>DRAW menu ·····13<br />
from the <strong>to</strong>olbar ··········<strong>11</strong><br />
from the VB Edi<strong>to</strong>r· ········13<br />
S<br />
saving macros· ············12<br />
scope ·················19<br />
local ················19<br />
private ···············19<br />
public ···············19<br />
selections<br />
referencing ·············73<br />
Set··················46<br />
shapes ················58<br />
applying color ···········68<br />
changing positions ·········66<br />
changing sizes ···········64<br />
creating ··············59<br />
creating blends ···········72<br />
creating con<strong>to</strong>urs ··········72<br />
creating curves ···········61<br />
creating ellipses· ··········61<br />
creating rectangles ·········60<br />
duplicating ·············71<br />
effects ···············72<br />
fills ·················70<br />
order of selected shapes in a collection75<br />
outlines· ··············69<br />
rotating ··············67<br />
scaling ···············66<br />
selecting ··············59<br />
skewing ··············67<br />
stretching ·············66<br />
shortcuts<br />
<strong>to</strong> frequently used objects ·····72<br />
solutions<br />
<strong>Corel</strong> Corporate Services ······93<br />
starting<br />
Visual Basic edi<strong>to</strong>r ·········23<br />
stepping through code ········42<br />
s<strong>to</strong>ring<br />
macros ···············25<br />
strings ················17<br />
structure of <strong>VBA</strong> code ········15<br />
subroutines ··············17<br />
calling ···············28<br />
syntax<br />
checking ··············29<br />
dot notation ············46<br />
highlighting ············28<br />
syntax of <strong>VBA</strong> code· ·········15<br />
T<br />
text ··················62<br />
creating artistic· ··········63<br />
creating paragraph ·········63<br />
fitting <strong>to</strong> a path ··········64<br />
fitting <strong>to</strong> a shape ··········64<br />
<strong>for</strong>matting ·············63<br />
text boxes<br />
adding <strong>to</strong> <strong>for</strong>ms ··········35<br />
ThisDocument ··········26,81<br />
<strong>to</strong>olbar<br />
<strong>VBA</strong>················<strong>11</strong><br />
<strong>to</strong>olbars· ···············85<br />
creating ··············86<br />
Visual Basic edi<strong>to</strong>r ·········23<br />
<strong>to</strong>oltips ················85<br />
changing default ··········87<br />
creating ··············86<br />
training· ···············93<br />
U<br />
undo<br />
setting an action ··········53<br />
user action<br />
get position of a marquee selection · 88<br />
get position of a mouse click ····87<br />
user input<br />
getting ···············20<br />
user interface ·············84<br />
user messages<br />
sending· ··············20<br />
V<br />
values<br />
passing by reference ········18<br />
passing by value ··········18<br />
variables<br />
assigning ··············19<br />
<strong>com</strong>paring ·············19<br />
declaring ··············15<br />
referencing ·············46<br />
<strong>VBA</strong><br />
installing· ··············9<br />
views ··············79-80<br />
creating ··············81<br />
panning ··············80<br />
res<strong>to</strong>ring ··············81<br />
zooming ··············80<br />
Visual Basic edi<strong>to</strong>r ··········23<br />
checking syntax ··········29<br />
Code window· ···········27<br />
Form Designer window· ······31<br />
Object Browser· ··········36<br />
Project Explorer ··········24<br />
Properties window ·········27<br />
starting· ··············23<br />
<strong>to</strong>olbars· ··············23<br />
W<br />
windows ···············79<br />
closing ···············80<br />
creating ··············80<br />
switching ··············79<br />
Windows Script Host (WSH)· ····22<br />
workspaces<br />
distributing· ············91<br />
writing macros ············<strong>11</strong><br />
Z<br />
Index<br />
zooming<br />
views ················80<br />
<strong>VBA</strong> <strong>Programming</strong> <strong>Guide</strong> <strong>for</strong> <strong>Corel</strong>DRAW <strong>11</strong> 97