SaxLab Manual - LinPlug Virtual Instruments
SaxLab Manual - LinPlug Virtual Instruments
SaxLab Manual - LinPlug Virtual Instruments

Create successful ePaper yourself
Turn your PDF publications into a flip-book with our unique Google optimized e-Paper software.
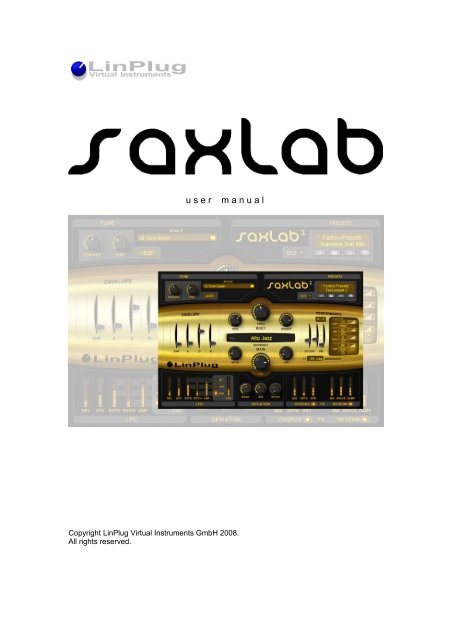
u s e r m a n u a l<br />
Copyright <strong>LinPlug</strong> <strong>Virtual</strong> <strong>Instruments</strong> GmbH 2008.<br />
All rights reserved.
Welcome<br />
Thank you for purchasing a <strong>LinPlug</strong> <strong>SaxLab</strong> 2 license.<br />
<strong>SaxLab</strong> 2 is a professional, flexible and easy-to-use virtual wind instrument<br />
designed for creating music on your computer.<br />
<strong>SaxLab</strong> 2 uses multi-sample playback of wind-instrument samples and<br />
incorporates a specially designed four-voice crossfade system that is capable<br />
of creating highly realistic wind instrument sounds. <strong>SaxLab</strong> 2’s key features<br />
include an easy-to-use interface, a wide range of high-quality samples, an<br />
effects section that includes chorus and reverb, as well as extensive real-time<br />
modulation options. Special attention has been paid to making the<br />
performance controls as rich and responsive as possible, so that the<br />
instrument can be realistically “played”.<br />
This manual describes all aspects of <strong>SaxLab</strong> 2 and is designed so that your<br />
use of this software is as efficient and enjoyable as possible. At <strong>LinPlug</strong> we're<br />
very proud of <strong>SaxLab</strong> 2; it's the result of many years of research and<br />
synthesizer programming experience. We hope you get a lot of pleasure using<br />
<strong>SaxLab</strong> and that it becomes an integral part of your music-making.<br />
Peter Linsener and the <strong>LinPlug</strong> team, January 2008<br />
Concept by Luigi Felici and Peter Linsener<br />
Instrument by Luigi Felici, Peter Linsener and Pavol Markovič<br />
Graphics by Shaun Ellwood and Branislav Pakić<br />
Sounds by Luigi Felici<br />
<strong>Manual</strong> by Chris Share<br />
Special Thanks to Wellington and William<br />
All technical specifications of the product specified in this manual may be subject to change<br />
without notice. The document may not be changed, especially copyright notices may not be<br />
removed or changed. <strong>LinPlug</strong> and all <strong>LinPlug</strong> product names are trademarks of <strong>LinPlug</strong><br />
<strong>Virtual</strong> <strong>Instruments</strong> GmbH. Mac and the Mac logo are trademarks of Apple Computer, Inc.,<br />
registered in the U.S. and other countries. The Built for Mac OS X graphic is a trademark of<br />
Apple Computer, Inc., used under license. The Audio Units logo and the Audio Units symbol<br />
are trademarks of Apple Computer, Inc. Microsoft® and Windows® are trademarks of<br />
Microsoft Corporation, registered in the U.S. and other countries. Cubase and VST are<br />
registered trademarks of Steinberg Media Technologies GmbH. All other trademarks are the<br />
property of their respective owners.<br />
<strong>LinPlug</strong> <strong>SaxLab</strong> User Guide 2.0.3<br />
2
Table of Contents<br />
Welcome............................................................................................................2<br />
Table of Contents...............................................................................................3<br />
Installation..........................................................................................................4<br />
Features.............................................................................................................5<br />
What's New in <strong>SaxLab</strong> 2....................................................................................6<br />
Overview............................................................................................................8<br />
Main.................................................................................................................10<br />
Body.................................................................................................................12<br />
Tune.................................................................................................................13<br />
Presets.............................................................................................................15<br />
ECS..................................................................................................................16<br />
Amplitude Envelope.........................................................................................17<br />
Performance....................................................................................................19<br />
LFO..................................................................................................................27<br />
Deviation..........................................................................................................30<br />
Effects..............................................................................................................32<br />
Chorus..........................................................................................................32<br />
Reverb..........................................................................................................33<br />
Rear Panel.......................................................................................................34<br />
Registration......................................................................................................35<br />
Support.............................................................................................................35<br />
Glossary...........................................................................................................36<br />
MIDI Implementation Chart..............................................................................38<br />
Appendix A: Using TUN Files..........................................................................39<br />
<strong>LinPlug</strong> <strong>SaxLab</strong> User Guide 2.0.3<br />
3
Installation<br />
Installation on PC<br />
<strong>SaxLab</strong> 2 comes with its own Installer. After downloading <strong>SaxLab</strong> 2 you will<br />
find a file named "<strong>SaxLab</strong>InstallerNNN.exe" (where NNN is the respective<br />
version number) located in your web browser’s download folder. Double-click<br />
on this program to begin the installation process. The Installer will guide you<br />
through the installation process.<br />
Make sure you choose the right installation directory, so your host software<br />
finds the <strong>SaxLab</strong> 2 VSTi. Refer to your host software's manual if you are<br />
unsure about where the host software plug-in directory is located.<br />
The instrument file "<strong>SaxLab</strong>2.DLL" will be placed in the chosen directory.<br />
Additional data is installed in your Application Data folder. The <strong>SaxLab</strong> 2<br />
Presets are installed into “My Documents/<strong>LinPlug</strong>/<strong>SaxLab</strong>”. The next time you<br />
start your host software <strong>SaxLab</strong> 2 will be listed in the VST Instrument list.<br />
Installation on Mac<br />
<strong>SaxLab</strong> 2 comes with its own Installer. After downloading <strong>SaxLab</strong> 2 you will<br />
find a file named "<strong>SaxLab</strong>Installer200.dmg" located in your web browser’s<br />
download folder. Double-click this file to decompress and open the image,<br />
then double-click the installer program to begin the installation process.<br />
The installer will guide you through the installation process. The instrument<br />
file "<strong>SaxLab</strong>" and the <strong>SaxLab</strong> 2 Presets will now be placed in the appropriate<br />
directory for virtual instruments on your Mac. The next time you start your host<br />
software <strong>SaxLab</strong> 2 will be listed in the AU and VST instrument list.<br />
Common to Mac and PC<br />
Once <strong>SaxLab</strong> 2 is installed it must be registered using your personal serial<br />
number. This registration process is described in the Registration section of<br />
this manual.<br />
If you have any questions regarding the installation of <strong>SaxLab</strong> 2 please<br />
contact our support team at www.linplug.com/support/support.htm.<br />
<strong>LinPlug</strong> <strong>SaxLab</strong> User Guide 2.0.3<br />
4
Features<br />
<strong>SaxLab</strong> 2 contains a range of features designed to make your music-making<br />
more efficient and enjoyable. These features are listed below:<br />
§ Monophonic multi-sample playback with internal four-voice<br />
crossfade.<br />
§ An adjustable mix of three sound layers for each note: the “Air”<br />
layer, the “Keys” layer and the “Pitched” layer.<br />
§ Air/Keys and Pitched sound layer crossfade point is set by MIDI<br />
velocity.<br />
§ Many different SoundSets for various wind instruments.<br />
§ User-definable, velocity-sensitive amplitude envelope.<br />
§ Tonal characteristics of the instrument’s overall sound can be<br />
defined by the user.<br />
§ Real-time control of the instrument’s brightness, reverberation<br />
amount and “Growl” effect.<br />
§ Three modes of mono performance: Legato, Retrigger, Alternate<br />
§ Control of Pitch Bend and Scoop.<br />
§ Random pitch deviation per note.<br />
§ Random “air” deviation per note.<br />
§ Random body frequency deviation per note.<br />
§ Envelope, LFO and MIDI-controlled vibrato and tremolo.<br />
§ Stereo chorus and stereo reverb effects.<br />
§ Microtuning support.<br />
§ MIDI control available for every instrument parameter.<br />
<strong>LinPlug</strong> <strong>SaxLab</strong> User Guide 2.0.3<br />
5
What's New in <strong>SaxLab</strong> 2<br />
§ The “Velocity to Envelope” control present in the first version of <strong>SaxLab</strong><br />
has been replaced with a new “Enhance” (ENH) control for enhancing the<br />
attack transients of notes. The “Velocity to Envelope” function (resulting<br />
in a quicker attack upon higher velocity) is still present however it is no<br />
longer adjustable by the user. The new control can be used to improve<br />
the sound of attack transients and increases realism in the case of<br />
staccato or funky sax playing.<br />
§ The Volume, Keys and Air controls, which set the respective levels of the<br />
instrument's three sound layers, are now routed in parallel so that the<br />
relative level of each layer can be independently adjusted.<br />
§ A control named CT (Crossfade Time) has been added to <strong>SaxLab</strong>'s<br />
Performance section. The CT (Crossfade Time) control sets the time<br />
between two legato notes when the smooth fade from the current tone to<br />
the next takes place. The actual time taken is determined by the length of<br />
the previous notes that have been played. This means that the used<br />
Crossfade Time increases for notes with a longer duration and decreases<br />
for notes with a shorter duration. The maximum time is set by the CT<br />
control.<br />
§ The Performance section has been completely reworked and now<br />
contains many more control sources and destinations for real-time<br />
control and expression.<br />
The Performance section features a new MIDI Exp subsection which is a<br />
small modulation matrix customised for sax playing. The MIDI Exp<br />
subsection makes Velocity, Breath Controller, and Aftertouch available<br />
as modulation sources.<br />
Amplitude, Brightness Level, Reverb Mix, as well as a new effect called<br />
“Growl”, are available as modulation destinations. Sensitivity and<br />
mapping curve parameters are available for all modulation destinations.<br />
§ The new Growl effect is designed to reproduce the “growl” sound which<br />
is a typical component of the sound of a saxophone. This effect features<br />
controls for depth and Growl tone can be randomized for more variation.<br />
§ The LFO has been improved and now uses a new waveshape. It also<br />
has a better "attack" characteristic so as to create a more natural sound.<br />
§ The Air parameter now has a dedicated control in the Deviation section.<br />
This means that each note's “Air” component can be randomised,<br />
creating more timbral variation from note to note.<br />
§ The reverb algorithm has been improved so that it sounds more natural.<br />
In addition to this, the Reverb Mix parameter is available as a modulation<br />
destination in the MIDI Exp section.<br />
§ The microtuning system has been updated so that the instrument now<br />
uses standard TUN files. This means that the number of microtuning<br />
systems available for use is vastly increased.<br />
<strong>LinPlug</strong> <strong>SaxLab</strong> User Guide 2.0.3<br />
6
§ Instrument Presets are now managed using the standard <strong>LinPlug</strong> system<br />
which is found on all other <strong>LinPlug</strong> instruments.<br />
<strong>LinPlug</strong> <strong>SaxLab</strong> User Guide 2.0.3<br />
7
Overview<br />
<strong>SaxLab</strong> 2 is a monophonic wind instrument synthesizer with some unique<br />
features. The synthesizer is based upon a multi-sample-playback design and<br />
includes a three-layered, four-voice crossfade for each note produced.<br />
The structure of <strong>SaxLab</strong> 2 synthesizer can be divided into nine sections:<br />
Tune, Preset, Envelope, Body, Main, Performance, LFO, Deviation and FX<br />
(Effects).<br />
Audio signals are generated by a sample-playback synthesizer that gets pitch<br />
,velocity and controller information from the instrument's MIDI input. The MIDI<br />
input is automatically connected to MIDI output of the host software. <strong>SaxLab</strong> 2<br />
receives MIDI on all channels simultaneously.<br />
<strong>SaxLab</strong>2’s Sound Set determines the samples that are used by the<br />
instrument. The Sound Set is selected in the Sound Set popup menu located<br />
in the Main section. The particular scale tuning used by the SoundSet is set in<br />
the instrument’s Tune section, along with its overall tuning settings.<br />
In <strong>SaxLab</strong> 2, a note consists of three layers: the Main layer, the Keys layer<br />
and the Air layer. The Main layer contains the pitched component of the<br />
sound. The Keys layer contains the characteristic key “clicks” heard in some<br />
wind instruments (especially in saxophones and clarinets ). The Air layer<br />
contains the breath and “airflow” sounds that are an important part of the<br />
sound of a wind instrument.<br />
<strong>LinPlug</strong> <strong>SaxLab</strong> User Guide 2.0.3<br />
8
The relative levels of the three layers are set using controls in the instrument’s<br />
Main section. The relative levels of the three layers also respond to MIDI note<br />
velocity. For example, when playing soft notes, the volume level of the Air and<br />
Keys layers increases with respect to the Main layer. This replicates the<br />
behaviour of a real wind instrument which becomes relatively “noisier” as it is<br />
played more quietly. When playing louder notes the Main layer becomes<br />
proportionately louder and comes to dominate the sound.<br />
The Main layer of each <strong>SaxLab</strong> 2 note also includes an internal four-voice<br />
crossfade which enables smooth legato transitions from one part of a note’s<br />
envelope to another. This crossfade also enhances note-to-note transitions<br />
which are very important in recreating realistic wind instrument sounds.<br />
The output of the sample-playback oscillator is routed to <strong>SaxLab</strong> 2’s Body<br />
section. The Body section contains a filter which modifies the frequency<br />
spectrum of the oscillator's output. Here the overall tonal characteristics of the<br />
currently loaded SoundSet can be modified.<br />
An important part of the sound of a real acoustic instrument arises from the<br />
real-time modulation of its sound. <strong>SaxLab</strong> 2 enables the user to modulate its<br />
sound using three sources: envelopes, LFOs (Low Frequency Oscillators) and<br />
MIDI controllers.<br />
<strong>SaxLab</strong> 2’s Amplitude Envelope section is used to control the way that the<br />
instrument’s amplitude varies over time and includes controls for Attack Time,<br />
Decay Time and Release Time. A second modulation source is <strong>SaxLab</strong>’s LFO<br />
which can be mapped to either or both of the sound’s amplitude and pitch and<br />
so can be used to create either tremolo or vibrato effects. A third modulation<br />
source is real-time MIDI controllers. These can be mapped to numerous<br />
destinations. Examples include MIDI Velocity to the amplitude envelope<br />
depth, Modulation Wheel to LFO depth and MIDI Breath Control to brightness.<br />
Note that for a realistic emulation often the control of <strong>SaxLab</strong> “Bright” by<br />
Velocity leads to a more realistic performance than using the “Amp” by<br />
Velocity. Actually Velocity should control more of the brightness (“Bright”) and<br />
less of the amplitude (“Amp”).<br />
Another important part of the sound of a real acoustic instrument is that no<br />
two notes are exactly the same. No matter how hard the player may try, each<br />
note is slightly different. Our ears are very sensitive to these differences and<br />
can easily detect when two notes are identical. For this reason, <strong>SaxLab</strong> 2<br />
incorporates Body, Air and Pitch Deviation controls which introduce small<br />
random variations to the Body filter, the “air” component of the sound, and to<br />
the overall pitch of the note each time a note is triggered.<br />
<strong>SaxLab</strong> 2’s Effects section contains two effects: Chorus and Reverb. The<br />
Chorus effect can be used to "thicken" a single sound creating the impression<br />
that it contains multiple voices. The Reverb effect is used to create the<br />
impression that the instrument is being played in a real acoustic space.<br />
The audio outputs of <strong>SaxLab</strong> 2 are automatically connected to the input of<br />
your host software's mixer. Here you can set the pan position of <strong>SaxLab</strong> 2's<br />
output. Hopefully, this section has given you a brief overview of how <strong>SaxLab</strong> 2<br />
works. More detailed information can be found in the following sections.<br />
<strong>LinPlug</strong> <strong>SaxLab</strong> User Guide 2.0.3<br />
9
Main<br />
<strong>SaxLab</strong> 2’s Main section is located in the middle of the instrument’s Front<br />
Panel. It contains controls for selecting the current Sound Set as well as for<br />
setting the relative levels of the instrument’s three sound layers. It also<br />
contains a MIDI indicator that shows when incoming MIDI Note-on messages<br />
are received.<br />
Sound Set: <strong>SaxLab</strong> 2’s Sound Set control is used for selecting the current<br />
Sound Set. Each Sound Set is a collection of samples that the instrument<br />
uses to generate sound. Each Sound Set is made up of three layers: the Main<br />
layer, the Air layer and the Keys layer. These three layers are mixed to<br />
produce the instrument’s overall sound. The Sound Set should not be<br />
confused with a Preset. The former is a collection of samples used by the<br />
instrument, while the latter is a “snapshot” of all the instrument’s current<br />
settings, and an associated Sound Set. As such, many Presets can utilize the<br />
same Sound Set.<br />
Keys: The Keys control sets the volume of the Keys sample layer. This layer<br />
contains the characteristic key “clicks” usually heard in saxophones and<br />
clarinets. Increasing the value of the Keys control makes the Keys layer<br />
louder with respect to the instrument’s other two layers.<br />
VOL (Volume): The VOL (Volume) control sets the volume of the pitched<br />
sample layer. This layer contains the pitched component of the sound.<br />
<strong>LinPlug</strong> <strong>SaxLab</strong> User Guide 2.0.3<br />
10
Increasing the value of the VOL (Volume) control makes the pitched<br />
component of the sound louder with respect to the instrument’s other two<br />
layers.<br />
Air: The Air control sets the volume of the Air sample layer. This layer<br />
contains the breath and “airflow” sounds that are an important part of the<br />
sound of a real wind instrument. Increasing the value of the Air control makes<br />
the Air layer louder with respect to the instrument’s other two layers.<br />
Note: When using “Layered” or “Soft” Sound Sets it is recommended to only<br />
use very low “Air” noise settings since these sets include soft played tones<br />
which are naturally already noisy.<br />
MIDI: The MIDI indicator lights up when any incoming MIDI Note-on<br />
messages are received by <strong>SaxLab</strong> 2. Clicking and holding down a mouse<br />
button while the cursor is over the MIDI indicator automatically plays a C3<br />
note. The note is turned off when releasing the mouse button.<br />
<strong>LinPlug</strong> <strong>SaxLab</strong> User Guide 2.0.3<br />
11
Body<br />
<strong>SaxLab</strong> 2’s Body section is located in the middle of the instrument's Front<br />
Panel above the Main section. The Body section contains a filter with three<br />
controls that allow you to shape the overall timbre of the instrument.<br />
RES (Resonance): The RES control is used to set the amount of emphasis<br />
around the filter’s cutoff frequency. Higher settings create a more pronounced<br />
peak in the signal while lower settings produce a flatter response.<br />
FREQ (Frequency): The FREQ control is used to set the frequency at which<br />
the filter begins to take effect. Higher settings produce brighter sounds while<br />
lower settings result in darker sounds.<br />
Bright (Brightness): The Bright control is used to set the brightness of the<br />
instrument’s sound. Higher settings will produce a more strident tone, while<br />
lower settings will produce a softer, cooler sound.<br />
<strong>LinPlug</strong> <strong>SaxLab</strong> User Guide 2.0.3<br />
12
Tune<br />
<strong>SaxLab</strong> 2’s Tune section is located on the upper left of the instrument’s Front<br />
Panel. This section consists of four controls: Coarse (Tune), Fine (Tune), the<br />
Tuning Display and Scale.<br />
Coarse (Tune): The Coarse (Tune) control is used to set the overall pitch of<br />
the instrument in semitone steps. Control settings range from -11 semitones<br />
to +11 semitones.<br />
Fine (Tune): The Fine (Tune) control is used to set the overall pitch of the<br />
instrument in cents. A cent is 1/100 of a semitone. Control settings range from<br />
-100 cents (-1 semitone) to +100 cents (+1 semitone).<br />
Note that the overall pitch of the instrument can be raised or lowered by one<br />
octave using a combination of the Coarse Tune control and the Fine Tune<br />
control.<br />
Also note that the Coarse Tune control and the Fine Tune control are used to<br />
set the root note of the current scale. The controls transpose the scale’s<br />
starting pitch to the selected pitch. Remember that if you use tunings other<br />
than Equal Temperament, the overall pitch of the instrument must be set to<br />
the root note of the key in which you wish to work. Otherwise, the notes of the<br />
scale will not have the correct pitch.<br />
<strong>LinPlug</strong> <strong>SaxLab</strong> User Guide 2.0.3<br />
13
Tuning Display: The Tuning Display is located to the right to the two tuning<br />
controls. It displays the instrument’s current tuning in semitones and cents.<br />
For example, a setting of “+4.79” means that the instrument is currently tuned<br />
4 semitones and 79 cents sharp of its default setting.<br />
Scale: The Scale control is used to set the Micto Tuning (TUN) file that<br />
<strong>SaxLab</strong> 2 uses. The TUN file is a list of pitches that the instrument uses to<br />
determine the pitch at which it plays back samples. Most Western music uses<br />
a pitch system called Equal Temperament in which the smallest interval<br />
between two adjacent notes is defined by the ratio 1:1.05946. For example,<br />
A4 has a frequency of 440 Hz. In this case, A#4 (the next highest note<br />
available on a keyboard) has a frequency of 440 x 1.05946 which equal 466.2<br />
Hz.<br />
<strong>SaxLab</strong> 2 comes with a wide selection of different TUN files. For more about<br />
TUN files please see Appendix A: Using TUN Files.<br />
<strong>LinPlug</strong> <strong>SaxLab</strong> User Guide 2.0.3<br />
14
Presets<br />
<strong>SaxLab</strong> 2’s Presets section is located on the upper right of the instrument’s<br />
Front Panel. The Preset section contains the Preset Display and File Browser<br />
as well as the MIDI Learn ECS.<br />
Preset Display/File Browser<br />
Preset Display/File Browser: The Preset Display consists of two displays. The<br />
upper one shows the Current Bank and the lower one shows the Current<br />
Preset. Whenever a new Preset is loaded using the file controls found below<br />
these displays, the Current Preset display is updated with the name of the<br />
new Preset and the Current Bank is updated with the name of the directory<br />
that contains the new Preset.<br />
By default the File Browser points to the factory presets installed with <strong>SaxLab</strong><br />
2. Presets can be changed in three different ways. A new Preset can be<br />
loaded using the file controls, which work by clicking the Prev/Next (“arrow”)<br />
buttons located below the Current Preset display. Alternatively, the desired<br />
Preset can be selected directly from the Current Preset display, which turns<br />
into a menu when it is clicked. A Preset can also be changed by sending a<br />
MIDI program change command to the instrument.<br />
The Current Bank can be changed by loading a Preset from a different<br />
directory or by selecting the desired location from the Current Bank display,<br />
which turns into a menu when it is clicked.<br />
<strong>LinPlug</strong> <strong>SaxLab</strong> User Guide 2.0.3<br />
15
The File Controls located to the right of the Prev/Next (“arrow”) buttons are<br />
used for all File-related operations. The Load button opens a dialog that lets a<br />
previously saved Preset be selected for loading. The Save button allows the<br />
current settings to be saved as a new Preset.<br />
The settings of all sections are saved with the Preset. <strong>SaxLab</strong> 2 loads and<br />
saves all of its Presets directly to hard disk so your computer's RAM does not<br />
limit the number of available Presets. Note that when you load a Preset using<br />
the Preset section's controls, the previous Preset is erased so if you want to<br />
keep the previous Preset make sure you save it before loading another one.<br />
ECS<br />
The ECS (Easy Controller Setup) section makes it simple to control <strong>SaxLab</strong> 2<br />
from an external MIDI controller (either hardware or software). All you have to<br />
do is switch on the ECS indicator (click it once), select a <strong>SaxLab</strong> 2 parameter<br />
with the mouse and then send some MIDI messages to the <strong>SaxLab</strong> 2 from<br />
your MIDI source. That's all there is to it! From now on you can change the<br />
parameter with that controller. In addition to this, more than one controller can<br />
be defined to change a particular parameter. In fact, you can define up to 128<br />
parameter-controller-combinations. This does not depend on the type of<br />
controller you have nor the particular MIDI Control Change messages it<br />
sends. Don't forget to switch off ECS after you have finished using it. To do<br />
this, click the indicator again.<br />
Clicking on the ECS label opens the ECS menu. The menu contains the<br />
following functions: Off, Learn, Clear, Clear All, Save, Rest.Fact. (Restore<br />
Factory Settings). These functions are explained below.<br />
Off: The Off menu item turns off ECS. If ECS is already off then selecting this<br />
menu item has no effect.<br />
Learn: The Learn menu item turns on ECS. Once ECS is on, a target control<br />
can be selected with the mouse. Any MIDI Control Change messages sent to<br />
the instrument will then be routed to the selected control.<br />
Clear: The Clear menu item turns on ECS and prepares the instrument for the<br />
disconnection of previously-assigned MIDI Control Change messages from<br />
their destinations. After selecting the Clear menu item, clicking on a <strong>SaxLab</strong> 2<br />
control disconnects the previously assigned MIDI controller from the selected<br />
destination. After clearing a <strong>SaxLab</strong> 2 control, the selected control no longer<br />
receives MIDI Control Change messages.<br />
Clear All: The Clear All menu item disconnects all previously-assigned MIDI<br />
Control Change messages from their destinations. After clearing all <strong>SaxLab</strong> 2<br />
controls, no control receives MIDI Control Change messages.<br />
Load: The Load menu item enables a previously saved MIDI controller routing<br />
configuration to be restored.<br />
Save: The Save menu item enables the current MIDI controller routing<br />
configuration to be saved.<br />
Rest.Fact: The Rest.Fact (Restore Factory Settings) restores <strong>SaxLab</strong> 2's<br />
default ECS settings, which is equivalent to Clear All.<br />
<strong>LinPlug</strong> <strong>SaxLab</strong> User Guide 2.0.3<br />
16
Amplitude Envelope<br />
<strong>SaxLab</strong> 2’s Envelope section is located on the middle left of the instrument’s<br />
Front Panel. Because <strong>SaxLab</strong> 2 uses samples for playback, the envelope of<br />
the sound it produces is determined to a large extent by the envelope of the<br />
sample that is currently being played. This can be limiting, as it precludes<br />
real-time control of the instrument’s amplitude. In order to make the<br />
instrument more responsive to the player, <strong>SaxLab</strong> 2 contains an Envelope<br />
section which incorporates four controls: ENH (Enhance), A (Attack), D<br />
(Decay) and R (Release).<br />
ENH (Enhance): The ENH (Enhance) control setting determines the degree to<br />
which the first few milliseconds of a note's amplitude envelope are amplified.<br />
The ENH (Enhance) control can be used to create a prominent attack<br />
transient, so that the "piff" sound at the beginning of a note is emphasised.<br />
This is very useful for creating rhythmic accents.<br />
A (Attack): The A (Attack) control setting determines the length of time it takes<br />
for the amplitude envelope to reach the full envelope depth. For example, if<br />
the A (Attack) slider is set to 0, the sound’s amplitude will move from zero to<br />
full volume within the shortest possible amount of time.<br />
D (Decay): The D (Decay) control setting determines the length of time that<br />
the amplitude envelope takes to move from the Attack peak level to the<br />
<strong>LinPlug</strong> <strong>SaxLab</strong> User Guide 2.0.3<br />
17
Sustain level. Setting the D (Decay) slider to higher values increases the time<br />
taken for the sound’s amplitude to move from full volume to the sustain level.<br />
R (Release): The R (Release) control is used to set the length of time that the<br />
amplitude envelope takes to move from the current level to silence after the<br />
key is released. Setting the R (Release) slider to higher values increases the<br />
time taken for the sound’s amplitude to decrease to zero.<br />
Note: The Sustain level is is reached at the end of the Decay phase and is<br />
fixed at 50% of the maximum level (that is reached at the end of the Attack<br />
phase).<br />
The time range of A and R are actually useful only for special effects, as a<br />
real sax doesn't have a meaningful release time and the attack time is<br />
controlled in realtime by the player. So for a good emulation these parameters<br />
should stay close to zero (bottom of the fader), but not zero. For a slow attack<br />
the attack time (or the main volume) should be controlled by a MIDI controller<br />
(see section ECS).<br />
<strong>LinPlug</strong> <strong>SaxLab</strong> User Guide 2.0.3<br />
18
Performance<br />
The Performance section is located on the middle right of <strong>SaxLab</strong> 2’s Front<br />
Panel. The Performance section features the following controls:<br />
• Scoop (Amount),<br />
• PB- (Pitch Bend Down Amount) with Display,<br />
• PB+ (Pitch Bend Up Amount) with Display,<br />
• AMP (Amplitude) Depth, Control Source and Control Response Curve,<br />
• BRI (Brightness) Depth, Control Source, and Control Response Curve<br />
• REV (Reverb) Depth, Control Source and Control Response Curve<br />
• GRO (Growl) Depth, Control Source, Control Response Curve,<br />
• Maximum Depth and Deviation,<br />
• CT (Crossfade Time) and<br />
• Monomode.<br />
Scoop (Amount): This control is used to set the amount of time it takes to<br />
move from a lower pitch to the pitch of the note that is actually played.<br />
Increasing the value of the Scoop control increases the time taken for the<br />
pitch to move from the lower pitch to the note that is actually played. Scoop<br />
can be thought of as an auto-bend that is applied at the onset of a note.<br />
Scoop is not applied to notes that are played legato. The scoop is a style<br />
<strong>LinPlug</strong> <strong>SaxLab</strong> User Guide 2.0.3<br />
19
mode used in sax playing and it]s often used in Jazz and Rock since it's easy<br />
with sax and clarinet to initially pitch the note lower than intended.<br />
PB- (Pitch Bend Down Amount): This slider is used to set <strong>SaxLab</strong> 2’s<br />
response to incoming MIDI Pitch Bend messages that are below the midpoint<br />
of the MIDI controller's Pitch Wheel. The slider can be adjusted over a range<br />
of 0 to 12 semitones. The current value of the PB- control is shown in the<br />
Pitch Bend Down Range Display which is located above the slider. Note that<br />
downward Pitch Bend only operates in the lower half of the Pitch Wheel’s<br />
range. Increasing the value of the PB- (Pitch Bend Down Amount) control will<br />
increase the range of the lower half of the instrument’s Pitch Wheel.<br />
PB+ (Pitch Bend Up Amount): This slider is used to set <strong>SaxLab</strong> 2’s response<br />
to incoming MIDI Pitch Bend messages that are above the midpoint of the<br />
MIDI controller's Pitch Wheel. The slider can be adjusted over a range of 0 to<br />
12 semitones. The current value of the PB+ control is shown in the Pitch Bend<br />
Up Range Display which is located above the slider. Note that upward Pitch<br />
Bend only operates in the upper half of the Pitch Wheel’s range. Increasing<br />
the value of the PB+ (Pitch Bend Up Amount) control will increase the range<br />
of the upper half of the instrument’s Pitch Wheel.<br />
Note: Scoop and Pitch bend ranges must not be abused for a realistic Sax<br />
sound, best is to use small values so that the formants of the sax are<br />
preserved.<br />
AMP (Amplitude Control Depth): This control sets the degree to which the<br />
currently selected control source (see below) affects the instrument's<br />
amplitude which is set in the Main section. Increasing the value of this control<br />
makes the instrument more responsive to changes in the incoming MIDI data.<br />
Amplitude Control Source: This control is used to set the type of MIDI control<br />
change message that controls the instrument’s AMP (Amplitude Control<br />
Depth) setting. Three options are available: Velo (Velocity), BC (Breath<br />
Controller) and AT (Aftertouch). Only one type of MIDI Control Change<br />
message can be used at a time .<br />
Amplitude Control Response Curve: This setting determines how the AMP<br />
(Amplitude Control Depth) control responds to incoming MIDI messages<br />
selected with the Amplitude Control Source. The control is continuously<br />
variable and ranges from inverse logarithmic through linear to logarithmic. The<br />
chosen shape works as a “transfer function” which scales the incoming MIDI<br />
messages so that their “effective working range” is changed. This can be used<br />
to make the instrument more sensitive to MIDI control change messages in a<br />
particular portion of the controller's range. For example, in the case of a<br />
logarithmic curve, the effective working range is scaled upwards so that<br />
changes in the upper portion of the controller's range have most effect on the<br />
destination. A linear curve passes the MIDI messages unchanged.<br />
Bright (Brightness Depth): The Bright control sets the degree to which the<br />
currently selected control source (see below) affects the Body section’s Bright<br />
(Brightness Depth) control. This in turn sets the overall brightness of the<br />
instrument’s sound. Increasing the value of this control makes the instrument<br />
more responsive to changes in the incoming MIDI data.<br />
<strong>LinPlug</strong> <strong>SaxLab</strong> User Guide 2.0.3<br />
20
Brightness Control Source: This control is used to set the type of MIDI control<br />
change message that controls the instrument’s Bright (Brightness) setting.<br />
Three options are available: Velo (Velocity), BC (Breath Controller) and AT<br />
(Aftertouch). Only one type of MIDI control change message can be used at a<br />
time.<br />
Brightness Control Response Curve: This setting determines how the Bright<br />
control responds to incoming MIDI messages selected with the Brightness<br />
Control Source. The control is continuously variable and ranges from inverse<br />
logarithmic through linear to logarithmic. The chosen shape works as a<br />
“transfer function” which scales the incoming MIDI messages so that their<br />
“effective working range” is changed. This can be used to make the<br />
instrument more sensitive to MIDI control change messages in a particular<br />
portion of the controller's range. For example, in the case of a logarithmic<br />
curve, the effective working range is scaled upwards so that changes in the<br />
upper portion of the controller's range have most effect on the destination. A<br />
linear curve passes the MIDI messages unchanged.<br />
REV (Reverb Mix): The Rev control sets the degree to which the currently<br />
selected control source (see below) affects the Reverb section’s Mix control.<br />
This in turn sets the overall mix of the instrument’s wet and dry sound.<br />
Increasing the value of this control makes the instrument more responsive to<br />
changes in the incoming MIDI data.<br />
Reverb Mix Control Source: The Reverb Mix Control Source is used to set the<br />
type of MIDI control change message that controls the instrument’s Reverb<br />
Mix setting. Three options are available: Velo (Velocity), BC (Breath<br />
Controller) and AT (Aftertouch). Only one type of MIDI control change<br />
message can be used at a time.<br />
Reverb Control Response Curve: This setting determines how the Reverb Mix<br />
control responds to incoming MIDI messages selected with the Reverb Mix<br />
Control Source. The control is continuously variable and ranges from inverse<br />
logarithmic through linear to logarithmic. The chosen shape works as a<br />
“transfer function” which scales the incoming MIDI messages so that their<br />
“effective working range” is changed. This can be used to make the<br />
instrument more sensitive to MIDI control change messages in a particular<br />
portion of the controller's range. For example, in the case of a logarithmic<br />
curve, the effective working range is scaled upwards so that changes in the<br />
upper portion of the controller's range have most effect on the destination. A<br />
linear curve passes the MIDI messages unchanged.<br />
A characteristic component of a saxophone's sound is the “growl” that is<br />
created when the player sings or hums a note while playing the instrument.<br />
Depending upon the circumstances, the hummed note may be harmonically<br />
related to the note played, or it may be completely unrelated. <strong>SaxLab</strong> 2<br />
enables the user to add “growl” to the instrument's sound via the Growl<br />
controls in the Performance section.<br />
GRO (Growl Depth): This control sets the degree to which the currently<br />
selected control source (see below) effects the presence of the “growl” effect<br />
in the instrument's sound. Increasing the value of this control makes the<br />
instrument more responsive to changes in the incoming MIDI data.<br />
<strong>LinPlug</strong> <strong>SaxLab</strong> User Guide 2.0.3<br />
21
Growl Control Source: The Growl Control Source is used to set the type of<br />
MIDI control change message that controls the “growl” component of the<br />
instrument’s sound. Three options are available: Velo (Velocity), BC (Breath<br />
Controller) and AT (Aftertouch). Only one type of MIDI control change<br />
message can be used at a time.<br />
Growl Control Response Curve: This setting workl just like already described<br />
for the Amp, Brightness and Reverb Control Response Curve.<br />
Growl Maximum Depth: The Growl Maximum Depth control sets the maximum<br />
volume level of the growl component of the instrument's sound. Note that this<br />
control works in conjunction with the Growl Deviation control (described<br />
below). If the Growl Deviation control is set to 0, then the level of the growl<br />
component of the instrument's sound is determined by the setting of the Growl<br />
Maximum Depth control. If the Growl Deviation control is set to a value other<br />
than 0, then the level of the growl component of the instrument's sound will<br />
randomly vary between 0 and the current value of the Growl Deviation control<br />
for each note that is played.<br />
DEV (Growl Deviation): The DEV (Growl Deviation) control is used to set a<br />
degree of randomisation in the “growl” component of the instrument's sound.<br />
Increasing the DEV (Growl Deviation) control will introduce more random<br />
variation in the amount and tone of the growl component of the instrument's<br />
sound from note to note.<br />
Three MIDI controllers are available for modulating <strong>SaxLab</strong> 2’s various<br />
Performance parameters. These are: Velo (Velocity), BC (Breath Controller)<br />
and AT (Aftertouch). Each controller works in a slightly different way. Note<br />
that only one type of MIDI control change message can be used for each<br />
Performance Control at a time.<br />
Velo (Velocity): All MIDI controllers have the ability to trigger a note. This is<br />
usually done by transmitting a MIDI Note-On message. Note-On messages<br />
consist of three bytes: a Status byte and two Data bytes. The second Data<br />
byte contains the velocity at which the key was pressed. In most cases, key<br />
velocity is used to determine the loudness of the synthesized sound. Note that<br />
only one Note-On message is transmitted for each note that is played.<br />
BC (Breath Controller): MIDI Wind controllers typically transmit breath<br />
pressure information as MIDI Breath Control messages. Breath Controller<br />
messages consist of three bytes: a Status byte and two Data bytes. The<br />
message's first Data byte defines the type of Control Change message (in this<br />
case, Breath Control), which has a value of 0x02. The second Data byte<br />
determines the current output value of the Breath Controller.<br />
Note that new Breath Controller messages are transmitted whenever the<br />
controller's input changes, so that Breath Controller messages can vary over<br />
the duration of a note. Also note that MIDI keyboards normally do not transmit<br />
Breath Controller messages, however it is usually possible to reassign the<br />
output of other MIDI controllers (such as the Mod Wheel) so that they transmit<br />
MIDI Breath Controller messages.<br />
<strong>LinPlug</strong> <strong>SaxLab</strong> User Guide 2.0.3<br />
22
AT (Aftertouch): Many types of MIDI keyboard have the ability to detect how<br />
much pressure is applied to a key. This pressure can be varied continuously<br />
as the note is sounding. MIDI messages that transmit the current value of the<br />
key pressure are called Aftertouch messages.<br />
Aftertouch messages consist of a Status byte and two Data bytes. The<br />
message's first Data byte defines the note value while the second Data byte<br />
determines the current Aftertouch value. Aftertouch values can range from 0<br />
to 127. Note that not all MIDI keyboards transmit Aftertouch messages;<br />
however it is usually possible to reassign the output of other controllers so<br />
that they transmit MIDI Aftertouch messages.<br />
In order to produce realistic wind instrument sounds it is important to be able<br />
to control the way that notes are triggered and connected to subsequent<br />
notes. On a real wind instrument the player can choose to play each note<br />
separately, or to connect notes to the ones that follow. If each note is played<br />
separately, then each has its own attack portion. If two or more notes are<br />
played in a “legato” (connected) manner then only the first note will have an<br />
attack portion. This can be imitated on a keyboard by using a combination of<br />
playing technique and <strong>SaxLab</strong> 2’s Monomode setting. Three modes are<br />
available: Leg (Legato), Alt (Alternate) and Ret (Retrigger). With respect to<br />
these three settings, the key point to understand is the difference between<br />
playing keyboard notes that overlap and playing notes that are detached.<br />
First, let’s consider <strong>SaxLab</strong> 2’s Ret (Retrigger) mode. In this mode, no matter<br />
how you play keyboard notes (legato or detached), each note will have an<br />
attack portion. In this case, each note will sound as a complete and separate<br />
note.<br />
Next, let’s consider <strong>SaxLab</strong> 2’s Leg (Legato) mode. In this case, if two or<br />
more notes are played in a “legato” (connected) manner, where the following<br />
note is played before the previous note is released, then only the first note will<br />
have an attack portion. Notes following the initial note will be automatically<br />
connected to the preceding note. However, notes that are played in a<br />
detached manner will still have an attack portion. In this way, the keyboard<br />
playing style that is used determines how notes play back.<br />
Alt (Alternate) mode combines the two modes described above. In this case<br />
every second legato note has its own attack portion regardless of how it is<br />
played. Notes that are played in a detached manner will still have their own<br />
attack portion.<br />
The differences between Leg (Legato) and Ret (Retrigger) modes are<br />
illustrated in the pictures shown below. The main difference between Leg<br />
(Legato) mode and (Ret) Retrigger mode is in the way the samples are<br />
retriggered. In Leg (Legato) mode, the instrument will only play the attack<br />
portion of the sound if the previous key has been released before the next key<br />
is played. In Ret (Retrigger) mode, the instrument starts a new envelope each<br />
time a note is played. In all modes, the envelope retriggers if notes are<br />
separated.<br />
Note: For Alternate and Retrigger a small amount of “ENH” (Enhance) might<br />
be most effective for realistic results.<br />
<strong>LinPlug</strong> <strong>SaxLab</strong> User Guide 2.0.3<br />
23
In <strong>SaxLab</strong> 2’s Alt (Alternate) mode, sample triggering alternates between Leg<br />
(Legato) mode and Ret (Retrigger) mode for each note in a legato sequence.<br />
Shown below is the same sequence of notes played three times, each time<br />
with a different Monomode setting. In each case arrows mark where the<br />
envelopes start for each note.<br />
<strong>LinPlug</strong> <strong>SaxLab</strong> User Guide 2.0.3<br />
24
CT (Crossfade Time): The CT (Crossfade Time) control is used to set the<br />
length of time taken to move from the pitch of the previous note to that of the<br />
note currently being played. However, the CT (Crossfade Time) is more than<br />
just a conventional portamento control. When the CT (Crossfade Time) is set<br />
to zero, the length of the crossfade time is the same for all notes regardless of<br />
their duration. As the value of the CT (Crossfade Time) is increased, the<br />
portamento time becomes adaptive and is determined by the duration of the<br />
previous notes. This means that a note with a long duration will have a<br />
correspondingly long crossfade time. A note with a shorter duration will have a<br />
shorter crossfade time. This is useful for playing passages that contain notes<br />
with a mixture of different durations. For example, say that <strong>SaxLab</strong> 2's<br />
<strong>LinPlug</strong> <strong>SaxLab</strong> User Guide 2.0.3<br />
25
crossfade time was constant and set to a long duration. In the case of notes<br />
with a short duration this could mean that there might not be enough time for<br />
the pitch of the instrument to reach the current note's pitch before the next<br />
note was played. <strong>SaxLab</strong> 2's adaptive crossfade time means that the<br />
crossfade time changes according to the duration of the notes being played.<br />
In effect, it provides adaptive note articulation so that the pitch of the target<br />
note is always reached. Note that the CT (Crossfade Time) only operates<br />
when the instrument is in Legato mode.<br />
Note: Usually a setting of 30 should be a good setting, however, its possible<br />
to customize this value to the playing style and taste.<br />
<strong>LinPlug</strong> <strong>SaxLab</strong> User Guide 2.0.3<br />
26
LFO<br />
<strong>SaxLab</strong> 2’s LFO (Low Frequency Oscillator) section is located on the lower<br />
left of the instrument’s Front Panel. The LFO section contains nine controls for<br />
setting various parameters of the instrument’s LFO. The controls include: DEL<br />
(Delay), ATK (Attack), Rate, Pitch, AMP, CTD (Controller Depth) and<br />
Controller Source. <strong>SaxLab</strong> 2’s LFO works slightly differently to other<br />
synthesizer LFOs so you may want to read the following section carefully.<br />
DEL (Delay Time): The DEL (Delay Time) control is used to set a time delay<br />
between the note onset and when the LFO begins to modulate the<br />
instrument’s output. If this is used in conjunction with the ATK (Attack Time)<br />
control then the LFO's attack envelope will not begin until the delay time has<br />
elapsed.<br />
ATK (Attack Time): The ATK (Attack Time) control is used to set the amount<br />
of time taken for the LFO to move from zero to the current value of the Pitch<br />
and Amp controls.<br />
<strong>LinPlug</strong> <strong>SaxLab</strong> User Guide 2.0.3<br />
27
Rate: The LFO’s Rate control functions differently depending upon whether or<br />
not a MIDI Controller Source (see below) is selected. If a MIDI Controller<br />
Source is not currently selected then the Rate control sets a default oscillator<br />
frequency for the LFO. When a MIDI controller is selected as a Controller<br />
Source the Rate control sets a minimum rate for the LFO. In this case, the<br />
maximum LFO Rate is set by the combined values of the Rate and the CTD<br />
(Controller Depth) controls.<br />
Pitch: The LFO’s Pitch control is used to set the maximum depth to which<br />
<strong>SaxLab</strong>’s overall pitch is modulated by the LFO. This can be used to create<br />
vibrato effects.<br />
AMP (Amplitude): The LFO’s AMP (Amplitude) control is used to set the<br />
maximum depth to which <strong>SaxLab</strong>’s overall amplitude is modulated by the<br />
LFO. This can be used to create tremolo effects.<br />
CTD (Controller Depth): The CTD (Controller Depth) control sets the degree<br />
to which the currently selected MIDI controller (see below) affects the LFO’s<br />
settings. Note that the setting of this control can also influence the LFO rate.<br />
Controller Source: Three MIDI controllers are available for modulating the<br />
LFO’s various parameters. These are: AT (Aftertouch), PW (Pitch Wheel) and<br />
MW (Modulation Wheel). Each works in a slightly different way. Note that only<br />
one controller can be selected at a time.<br />
AT (Aftertouch) increases the LFO’s modulation frequency starting from the<br />
current value of the Rate control up to the combined values of the Rate and<br />
CTD (Controller Depth) controls using MIDI Aftertouch messages. The<br />
maximum available rate is set by a combination of the LFO Rate setting and<br />
the CTD (Controller Depth) setting. Note that Aftertouch can only increase the<br />
LFO rate from the value set in the Rate parameter. It cannot be used to<br />
decrease the LFO rate below the setting of the Rate control.<br />
PW (Pitch Wheel) increases the LFO’s modulation frequency starting from the<br />
current value of the Rate control up to the combined values of the Rate and<br />
CTD (Controller Depth) controls using Pitch Bend Control Change messages.<br />
The maximum available rate is set by a combination of the LFO Rate setting<br />
and the CTD (Controller Depth) setting. Note that the Pitch Bend setting can<br />
only increase the LFO rate from the value set in the Rate parameter. It cannot<br />
be used to decrease the LFO rate below the setting of the Rate control. Also<br />
note that the PW (Pitch Wheel) operates from its default “central” position to<br />
its maximum value. The lower half of its range has no effect on the LFO rate<br />
(but it still affects the instrument's pitch, which is useful since saxophones<br />
usually bend to lower pitches).<br />
MW (Modulation Wheel) increases the LFO’s modulation frequency starting<br />
from the current value of the Rate control up to the combined values of the<br />
Rate and CTD (Controller Depth) controls using Modulation Wheel Control<br />
Change messages. The maximum available rate is set by a combination of<br />
the LFO Rate setting and the CTD (Controller Depth) setting. Note that the<br />
Modulation Wheel setting can only increase the LFO rate starting from the<br />
value set in the Rate parameter. It cannot be used to decrease the LFO rate<br />
below the setting of the Rate control. However, if the MW (Modulation Wheel)<br />
is set to zero, then the Pitch and AMP values will be scaled to zero, effectively<br />
<strong>LinPlug</strong> <strong>SaxLab</strong> User Guide 2.0.3<br />
28
fading out the LFO so that it no longer modulates the instrument’s output.<br />
Even though the LFO Rate has not decreased below the current Rate value,<br />
the effect of the LFO is no longer heard. In most cases, this controller should<br />
be used with the ATK (Attack Time) and the DEL (Delay Time) set to zero.<br />
The LFO’s MIDI controller implementation may at first seem complicated<br />
however its operation has been designed with the following scenario in mind.<br />
The user first sets the balance between the Pitch and AMP controls with the<br />
Pitch and AMP controls. Then the default LFO frequency is set with the Rate<br />
control. If the user then selects the Modulation Wheel as the Controller<br />
Source they can bring in the LFO, increase its modulation depth,<br />
(proportionally for Pitch and AMP), while accelerating the LFO rate from the<br />
setting of the Rate control to the maximum value set by the combination of the<br />
Rate control and the CTD (Controller Depth). This is a more realistic way to<br />
create vibrato, starting from zero, and increasing the rate and depth, until the<br />
intended level of intensity is reached. In this way, the user can quickly move<br />
from different amounts of vibrato at any speed they desire.<br />
<strong>LinPlug</strong> <strong>SaxLab</strong> User Guide 2.0.3<br />
29
Deviation<br />
<strong>SaxLab</strong> 2’s Deviation section is located in the lower middle of the instrument’s<br />
Front Panel. An important part of the sound of a real acoustic instrument is<br />
that no two notes are exactly the same. No matter how hard the player may<br />
try, each note is slightly different. Our ears are very sensitive to these<br />
differences and can usually detect when two notes are identical. For this<br />
reason, <strong>SaxLab</strong> incorporates Body, Air and Pitch Deviation controls which<br />
introduce small random variations to the Body filter, the “air” layer of the<br />
sound, and to the overall pitch of a note each time it is triggered.<br />
Body (Deviation Amount): The Body (Deviation Amount) control is used to set<br />
a degree of randomisation in the instrument’s Body filter for each note that is<br />
played back. Increasing the Body (Deviation Amount) control will introduce<br />
more random timbre variation from note to note in the sound of the<br />
instrument.<br />
Air (Deviation Amount): The Air (Deviation Amount) control is used to set a<br />
degree of randomisation in the instrument’s “air” layer for each note that is<br />
played back. Increasing the Air (Deviation Amount) control will introduce more<br />
random timbre variation from note to note in the sound of the instrument.<br />
<strong>LinPlug</strong> <strong>SaxLab</strong> User Guide 2.0.3<br />
30
Pitch (Deviation Amount): The Pitch (Deviation Amount) control is used to set<br />
a degree of randomisation in the instrument’s overall pitch for each note that<br />
is played back. Increasing the Pitch (Deviation Amount) control will introduce<br />
more random variation from note to note in the instrument’s overall pitch.<br />
<strong>LinPlug</strong> <strong>SaxLab</strong> User Guide 2.0.3<br />
31
Effects<br />
<strong>SaxLab</strong> 2’s FX (Effects) section is located on the lower right of the<br />
instrument’s Front Panel. Two internal effects are available: Chorus and<br />
Reverb.<br />
Chorus<br />
<strong>SaxLab</strong> 2’s Chorus effect can be used to "thicken" the instrument’s<br />
monophonic output creating the impression that it contains multiple voices.<br />
<strong>SaxLab</strong> 2’s Chorus features controls for: Mix, DPTH (Depth) and SPD<br />
(Speed). Also note that the output of the Chorus effect is stereo.<br />
The Chorus effect is switched on and off by clicking on the LED to the right of<br />
the “Chorus” label.<br />
Mix: The Mix control is used to set the balance between the processed "wet"<br />
signal and the original unprocessed "dry" signal.<br />
DPTH (Depth): The DPTH (Depth) control is used to set the amount that the<br />
effect modulates the original signal. By increasing the DPTH (Depth) slider a<br />
more detuned sound is produced.<br />
SPD (Speed): The SPD (Speed) control sets the rate at which the signal is<br />
modulated.<br />
<strong>LinPlug</strong> <strong>SaxLab</strong> User Guide 2.0.3<br />
32
Reverb<br />
The Reverb effect is used to add ambience to sounds. It features controls for<br />
Mix, Space and DAMP (Damping).<br />
The Reverb effect is switched on and off by clicking on the LED to the right of<br />
the “Reverb” label.<br />
Mix: The Mix control allows you to set the balance between the processed<br />
"wet" signal and the original unprocessed "dry" signal.<br />
Space: The Space control is used to set the size of the simulated room. The<br />
size of the “space” varies from a small chamber up to a large hall.<br />
DAMP (Damping): The simulated room's wall materials can be adjusted with<br />
the DAMP (Damping) control. This parameter ranges from practically loss-free<br />
reflecting walls (no damping) up to very absorbent walls (full damping). In<br />
practical terms, the amount of damping determines the amount of high<br />
frequency sound components that are contained in the processed signal; the<br />
higher the DAMP (Damping) setting, the less high frequencies are contained<br />
in the processed signal.<br />
<strong>LinPlug</strong> <strong>SaxLab</strong> User Guide 2.0.3<br />
33
Rear Panel<br />
<strong>SaxLab</strong> 2’s Rear Panel is accessed by clicking on the <strong>SaxLab</strong> 2 logo on the<br />
instrument's Front Panel. The Rear Panel contains a control for the path to the<br />
library, an edit box which is used for registering the instrument and a display<br />
that shows the version of the instrument.<br />
Library: The Library Path is located on the upper left of the instrument's Rear<br />
Panel. Usually it points to where the library have been installed, however, if<br />
you want to move the library to a different location you can do this and use<br />
this control to make the new location available to <strong>SaxLab</strong>. After clicking the<br />
folder icon a file dialog opens and allows you to browse to the library.<br />
Attention: You cannot select the folder directly, you need to locate the library,<br />
then open the “Alto Layers” folder and open the “sax.sxlbsnd” file in it.<br />
After adjusting the path to the library you need to restart <strong>SaxLab</strong>, that is to<br />
unload it completely and load it again.<br />
Serial Number: The Serial Number edit box is located on the upper left of the<br />
instrument's Rear Panel. The Serial Number edit box is used to register the<br />
instrument. Note that before entering a valid serial number, the Serial Number<br />
edit box reads “Enter here”. After a valid serial number has been entered the<br />
Serial Number edit box reads “Valid”.<br />
Version Number: The Version Number display is located on the upper right of<br />
the instrument's Rear Panel. It shows the version of the instrument.<br />
Clicking on the <strong>SaxLab</strong> 2 logo in the middle of the Rear Panel returns you to<br />
the Front Panel.<br />
<strong>LinPlug</strong> <strong>SaxLab</strong> User Guide 2.0.3<br />
34
Registration<br />
After you've installed and opened the full version of <strong>SaxLab</strong> 2, go to the<br />
instrument's Rear Panel (see the Rear Panel section of this manual for more<br />
information about the instrument's Rear Panel). The Serial Number edit box<br />
will read "Enter here". Enter the serial number you have received into the<br />
Serial Number edit box. If the serial number has not been entered or it has<br />
been entered incorrectly, the <strong>SaxLab</strong> 2 will run in demo mode.<br />
After entering the serial number correctly, the Serial Number edit box displays<br />
the word “Valid” indicating that the instrument is registered. Once registered,<br />
the serial number is no longer displayed on the instrument. Make sure to keep<br />
your serial number in a safe place as you might need it again to register<br />
<strong>SaxLab</strong>, in example when you bought a new computer.<br />
If you have any questions regarding <strong>SaxLab</strong> 2's registration process, please<br />
visit our support area at www.linplug.com/support/support.htm.<br />
Support<br />
Should you have any questions or comments regarding the <strong>LinPlug</strong> <strong>SaxLab</strong> 2<br />
please contact us via following website:<br />
http://www.linplug.com/Support/support.htm<br />
<strong>LinPlug</strong> <strong>SaxLab</strong> User Guide 2.0.3<br />
35
Glossary<br />
Amplifier: A signal processing device that changes the amplitude, and<br />
hence the loudness, of a signal.<br />
Amplitude: With respect to sound, the peak amount of variation above and<br />
below atmospheric pressure caused by the compression and<br />
rarefaction components of a sound. Amplitude indicates the<br />
amount of energy in a sound and generally correlates with our<br />
perception of “loudness”. The term can also apply to any signal,<br />
hence the term “Amplitude Envelope” which is used to describe<br />
the way a synthesizer’s loudness varies over time when a note<br />
is played.<br />
Chorus: The creation of the perception of multiple unison voices from a<br />
single voice.<br />
Crossfade: The process of mixing two audio signals together by increasing<br />
the amplitude of one as the amplitude of the other is decreased.<br />
Effect: A signal processing device that changes some aspect of the<br />
input signal. An enormous number of different effect types are<br />
available. These include Chorus (which produces a thickening of<br />
the signal), Delay (adding echoes to the signal) and Distortion<br />
(which changes the shape of the waveform usually adding<br />
overtones).<br />
Envelope: A time-varying signal used to control the development of another<br />
signal after it has been triggered. Envelopes are most often<br />
used for controlling a signal's amplitude. The shape of the<br />
envelope is determined by the number of control parameters.<br />
Usually four parameters are available: Attack Time, Decay Time,<br />
Sustain Level and Release Time.<br />
Filter: A signal processing device that suppresses or "filters" out<br />
specific parts of a signal's frequency spectrum. Numerous types<br />
of filter are used in audio synthesis. These include Low Pass,<br />
High Pass, Band Pass and Notch. The tone controls on a stereo<br />
amplifier are one example of an audio filter.<br />
LFO: An LFO or "Low Frequency Oscillator" is a periodic signal<br />
source (usually below audio frequency range) used to modulate<br />
another signal parameter. An LFO can be used for a variety of<br />
effects including vibrato (by modulating the instrument’s pitch)<br />
and tremolo (by modulating the instrument’s amplitude).<br />
Modulation: The variation of one parameter by another. For example, a<br />
signal’s frequency can be “modulated” by an LFO (Low<br />
Frequency Oscillator) in which case vibrato is produced.<br />
<strong>LinPlug</strong> <strong>SaxLab</strong> User Guide 2.0.3<br />
36
Monophonic: Literally, “one voiced.” A monophonic sound contains one voice.<br />
Any musical instrument that can produce only one note at a time<br />
is classed as monophonic.<br />
Multi-sample:A technique used in sample-playback where two or more<br />
samples are used to simulate the way the timbre of a sound<br />
changes with respect to its amplitude. For example, a piano<br />
could be sampled at two different volume levels (“soft” and<br />
“loud”). When the instrument is triggered by a low amplitude<br />
input signal the “soft” sample is played. When the instrument is<br />
triggered by a high amplitude input signal the “loud” sample is<br />
played.<br />
Polyphonic: Literally, “many voiced.” A polyphonic sound contains two or<br />
more voices. Any musical instrument that can produce two or<br />
more notes at a time is classed as polyphonic.<br />
Reverb: “Reverb” (Reverberation) arises from the way that sound is<br />
reflected by the surfaces found within a room, and causes the<br />
sound to be heard after all sources have ceased. Different<br />
acoustic spaces have different reverberant characteristics, many<br />
of which can be simulated digitally.<br />
Sample: A recording of a short portion of an audio signal.<br />
Timbre: Timbre is notoriously difficult to define. Having said that, timbre<br />
is usually defined as the characteristic tone colour of a sound.<br />
Timbre is what distinguishes two notes played at the same pitch<br />
and amplitude on different musical instruments.<br />
<strong>LinPlug</strong> <strong>SaxLab</strong> User Guide 2.0.3<br />
37
MIDI Implementation Chart<br />
Product: <strong>SaxLab</strong> Version 2.x Date: 18.Jan 2008<br />
Manufacturer <strong>LinPlug</strong> <strong>Virtual</strong> <strong>Instruments</strong> GmbH<br />
Function Transmitted Recognized Remarks<br />
Basic Channel<br />
Default no no<br />
Changed no no<br />
Mode<br />
Default no Omni<br />
Changed no no<br />
Note Number<br />
no yes<br />
True Voice no no<br />
Velocity<br />
Note On no yes<br />
Note Off no no<br />
Aftertouch<br />
Poly (Key) no no<br />
Mono (Channel) no yes<br />
Pitch Bend no yes<br />
Control Change no yes<br />
Program Change no yes<br />
System Exclusive no no<br />
System Common<br />
Song Position no no<br />
Song Select no no<br />
Tune Request no no<br />
System Realtime<br />
Clock no no<br />
Commands no no<br />
Aux Messages<br />
Local On/Off no no<br />
All Notes Off no yes<br />
Active Sensing no no<br />
System Reset no no<br />
<strong>LinPlug</strong> <strong>SaxLab</strong> User Guide 2.0.3<br />
38
Appendix A: Using TUN Files<br />
By Jacky Ligon<br />
About Microtuning<br />
Microtuning, or "microtonality" are methods for tuning musical instruments<br />
whereby musicians may explore and compose with ethnic, historical and<br />
contemporary tuning-systems. Microtuning musical instruments allows one to<br />
use scales which may have pitches lying between the notes of our familiar<br />
Western 12 tone scale. These pitches which are found in the 'cracks' of 12<br />
Tone Equal Temperament are one of the things that give musics of Bali, India,<br />
Africa, Thailand, Turkey and the Middle East (to name but a few) a special<br />
international flavor, but is something that is of immeasurable value to the<br />
contemporary acoustic and electronic composer, who may require a more<br />
broad palette of musical pitches for their music.<br />
The quest for creating beautiful and musically useful tuning-systems has been<br />
an unending process of discovery and debate amongst musical theorists,<br />
mathematicians, physicists and musicians going back to early history. Quite<br />
often the reasons for microtuning instruments may involve improving the<br />
consonant intervals of a tuning-system for sweeter sounding harmonies, as<br />
well as offering wider variety of choices for melody. "Microtuning" an<br />
instrument can sometimes mean there may be less or more than 12 tones in<br />
an octave, or even that the octave itself may be stretched or compressed.<br />
Microtuning is a vast topic, rich with lore, music and infinity of musical<br />
possibilities for the sonic explorer.<br />
Creating TUN Microtuning Files with SCALA<br />
Scala is a freeware utility developed by Manuel Op de Coul in the<br />
Netherlands, which can be used for the creation and analysis of historical,<br />
ethnic and contemporary microtunings. A powerful capability of Scala is that it<br />
enables the user to create the proprietary tuning data required for microtuning<br />
a wide range of hardware and software synthesizers and samplers.<br />
Scala may be used to create the TUN format microtuning-files needed to<br />
explore microtunings with this instrument.<br />
The Scala home page is http://www.xs4all.nl/~huygensf/scala/<br />
Specifying the Reference Frequency of a Microtuning<br />
One of the powerful capabilities of the TUN file format and Scala, is the ability<br />
to specify the pitch and midi note which will be the reference pitch for the<br />
microtuning in use. This becomes a very important consideration when one is<br />
using a number of different synthesizers and wishes to keep them in tune with<br />
a given base frequency. It is very common for one to specify a chosen concert<br />
pitch such as A440 Hz or C261.6256 Hz as a reference for a microtuning,<br />
however, the flexibility of the TUN format and Scala enables one to specify<br />
this frequency arbitrarily. In Scala this reference is called Map Frequency.<br />
<strong>LinPlug</strong> <strong>SaxLab</strong> User Guide 2.0.3<br />
39
As well as being able to specify the Map Frequency, one can also specify a<br />
central midi-note, which will become the starting point for the microtuning in<br />
use. Being able to specify a particular midi-note on the controller, provides a<br />
way to map a microtuning beginning on any desired midi key, making it easier<br />
to navigate the keyboard when there may be more or less than 12 tones per<br />
octave, or where one may desire to have the notes of a tuning fall on certain<br />
physical keys.<br />
Important Note<br />
When one uses a TUN microtuning file with this software synthesizer, the<br />
above specified mapping properties will override the Master Tuning reference.<br />
Normally when one is using the default 12 Tone Equal Tempered Scale, the<br />
Master Tuning will be used to make fine pitch adjustments around the<br />
standard concert pitch of A440 Hz, but when one has specified another pitch<br />
base for a microtuning when the TUN file is created in Scala, such as<br />
C261.6256 Hz, the data in the TUN microtuning-file will provide a new pitch<br />
reference.<br />
<strong>LinPlug</strong> <strong>SaxLab</strong> User Guide 2.0.3<br />
40