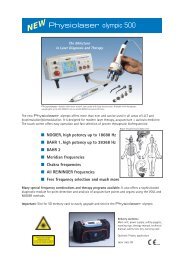
Physiolaser olympic - RJ Laser
Physiolaser olympic - RJ Laser
Physiolaser olympic - RJ Laser

Create successful ePaper yourself
Turn your PDF publications into a flip-book with our unique Google optimized e-Paper software.
<strong>Physiolaser</strong> <strong>olympic</strong><br />
One for all<br />
Operating Instructions
Contents<br />
1 Views ..................................................................................................................... 4<br />
2 Introduction ......................................................................................................... 5<br />
3 Safety information .............................................................................................. 6<br />
General information<br />
Liability disclaimer<br />
Safety standards<br />
Decommissioning<br />
4 Safety precautions .............................................................................................. 7<br />
Emergency shutdown<br />
Treatment area<br />
Personnel<br />
Radiation injuries<br />
Risk of infection<br />
Risk of burns<br />
Prevent unauthorized use<br />
Registration<br />
5 Delivery contents and accessories ................................................................. 9<br />
6 Applications .......................................................................................................10<br />
Treatment range<br />
Intended use / Indications for use<br />
Limitations<br />
7 Startup ................................................................................................................11<br />
Checking for transport damage<br />
Positioning the unit<br />
Disengaging the safety lock<br />
Connecting probes<br />
Safety key<br />
Stand-by/Ready mode<br />
2
8 Working with the <strong>Physiolaser</strong> <strong>olympic</strong> ........................................................13<br />
Therapy programs<br />
Automatic probe detection<br />
Touchscreen operation<br />
Therapy selection<br />
Adapting programs<br />
Editing parameters<br />
Editing programs<br />
Mixing and changing frequencies<br />
Therapy mode<br />
Operation with two probes<br />
9 Service menu .....................................................................................................23<br />
Functions<br />
<strong>Laser</strong> function test<br />
Therapy sets<br />
10 Mobile use ..........................................................................................................30<br />
11 Error messages .................................................................................................32<br />
12 Care and maintenance.....................................................................................34<br />
Cleaning and disinfection<br />
Safety check<br />
13 Technical description .......................................................................................35<br />
Technical data<br />
Operating conditions<br />
Transport and storage<br />
Guidelines and manufacturer's declarations<br />
Position of labels on the device<br />
Explanation of symbols<br />
14 Warranty and disposal ....................................................................................41<br />
15 Manufacturer/Distributor ...............................................................................42<br />
3
Views 1<br />
Power<br />
On<br />
Emergency Stop<br />
Off<br />
Memory Card<br />
Fast and easy touchscreen operation<br />
Daily work has never been easier<br />
Portable thanks to rechargeable battery<br />
Automatic battery charging is displayed<br />
when connected to an outlet<br />
Test sensor for infrared<br />
Practical test of infrared probe function<br />
Clear power indicator<br />
See at a glance whether the unit is on<br />
Ports for two laser probes<br />
Two probes can be used of the same<br />
time<br />
Diagnos<br />
<strong>Physiolaser</strong> olymic<br />
Charge <strong>Laser</strong> Test Power<br />
<strong>Laser</strong><br />
Port for diagnostics unit<br />
For fast diagnostics during repair and<br />
maintenance<br />
Prominent Emergency Stop button<br />
Unit can be shut off immediately in<br />
case of emergency<br />
Safe against misuse<br />
The safety key protects against unauthorized<br />
use<br />
Slot for memory card<br />
Simple software update procedure to<br />
support future applications and probes<br />
4
Introduction 2<br />
Your <strong>Physiolaser</strong> <strong>olympic</strong><br />
Thank you for choosing the <strong>Physiolaser</strong> <strong>olympic</strong> – the latest-generation, high-quality laser<br />
device from Reimers & Janssen GmbH.<br />
Reimers & Janssen has been designing and manufacturing medical devices for laser therapy<br />
since 1982. Our experience and innovations have made us one of Europe's leading manufacturers<br />
in the industry. We have applied our profound knowledge of complimentary therapy<br />
methods to this product as well, which lets you achieve the best results for your patients<br />
with gentle laser therapy across a large range of applications.<br />
The <strong>Physiolaser</strong> <strong>olympic</strong> consists of a base device with a microprocessor that can control all<br />
laser probes available from Reimers & Janssen. The <strong>Physiolaser</strong> is thus the basis of our pioneering<br />
concept: universal usability combined with ease of use.<br />
With the powerful <strong>Physiolaser</strong> <strong>olympic</strong>, you will always have the latest therapy programs<br />
at your disposal, whether you are using surface probes, single probes, or laser needles. The<br />
<strong>Physiolaser</strong> even lets you use two probes at the same time.<br />
With the easy-to-use touchscreen and the built-in basic therapy set, you can immediately<br />
proceed with treatment. Every program can be easily adapted to your individual therapy<br />
needs. Furthermore, you can purchase special therapy sets and easily install them into your<br />
<strong>Physiolaser</strong>.<br />
Thus, the <strong>Physiolaser</strong> <strong>olympic</strong> is suitable for a wide range of treatments in dermatology,<br />
rheumatology, orthopedics, physiotherapy, sports and veterinary medicine as well as<br />
dentistry.<br />
The <strong>Physiolaser</strong> is compact, portable, and can be used without an external power supply.<br />
With its powerful rechargeable battery, it is also ideal for mobile use outside the office, for<br />
laser applications in sports medicine, physiotherapy, and veterinary medicine.<br />
The <strong>Physiolaser</strong> has a built-in SD card slot so it can be updated at any time and expanded<br />
for future laser probes. With your <strong>Physiolaser</strong> <strong>olympic</strong>, you are prepared for the future of<br />
gentle laser therapy.<br />
<strong>Physiolaser</strong> <strong>olympic</strong><br />
One for all<br />
5
Safety information 3<br />
General information<br />
Read these operating instructions thoroughly before operating the device. The <strong>Physiolaser</strong><br />
<strong>olympic</strong> is a control unit that can be operated in combination with laser probes. Therefore,<br />
please also read the operating instructions for all probes that you intend to connect to your<br />
<strong>Physiolaser</strong> <strong>olympic</strong>.<br />
These operating instructions describe the proper use of the <strong>Physiolaser</strong> <strong>olympic</strong> and indicate<br />
hazards associated with its use. All individuals who use, care for, service, or supervise<br />
this device must read and follow the instructions.<br />
These operating instructions must always be kept with the device and must be included with<br />
the <strong>Physiolaser</strong> <strong>olympic</strong> if given to others.<br />
Liability disclaimer<br />
You may use the <strong>Physiolaser</strong> <strong>olympic</strong> only for the purposes described in these operating<br />
instructions and only under supervision!<br />
The <strong>Physiolaser</strong> <strong>olympic</strong> may only be operated with probes manufactured by Reimers &<br />
Janssen GmbH and accessories approved by Reimers & Janssen GmbH. The built-in SD card<br />
reader cannot be used with an adapter.<br />
Repair and maintenance work may only be performed by Reimers & Janssen GmbH or an<br />
authorized <strong>RJ</strong> service station.<br />
Before starting therapy with the <strong>Physiolaser</strong>, make sure that the patient is not connected at<br />
the same time to any other electrically operated device.<br />
The manufacturer is not liable for the device and the consequences resulting from operation<br />
or applications that are not described within these operating instructions. The manufacturer<br />
reserves the right to make changes based on technological improvements.<br />
Functions and safety standards<br />
The <strong>Physiolaser</strong> <strong>olympic</strong> conforms to the following international safety standards:<br />
• IEC 60601-1: 2006 (Safety of medical electrical devices)<br />
• IEC 60601-1-2: 2007 (Electromagnetic compatibility)<br />
• IEC 60601-1-6: 2010 (Usability)<br />
• IEC 60601-2-22: 2007 (Safety of diagnostic and therapeutic laser devices)<br />
• IEC 60825-1: 2007 (Safety of laser products)<br />
6
Safety precautions 4<br />
Emergency shutdown<br />
Press the red "Emergency Stop" button in firmly, turn the safety key to "off", and remove the<br />
remote control plug on the backside of the housing.<br />
Press the "Emergency Stop" button to shut off the laser quickly in case of emergency.<br />
Press the button in firmly until the stop. To release the button, turn it gently to the<br />
left or right until the button springs several millimeters upward to the stand-by<br />
position.<br />
Treatment area<br />
Operate the laser only indoors. The room in which<br />
laser therapy is performed must meet the requirements of national accident prevention<br />
regulations. All entrances must display a laser warning sign in compliance with IEC 60825-1.<br />
Reflective objects, mirrors and chrome surfaces must be removed. Children may enter the<br />
room only as patients and must be under constant supervision.<br />
To improve the safety, the operator is obligated to connect a door switch to the<br />
<strong>Physiolaser</strong> <strong>olympic</strong>. Such a system will automatically shut off the laser in case the<br />
door of the treatment room is opened during therapy. Have the cable to the door<br />
switch attached properly to the remote control plug on your <strong>Physiolaser</strong>.<br />
Personnel<br />
The laser may be operated only by trained medical professionals. Personnel must be instructed<br />
in the handling of the device and in the dangers associated with laser radiation. The<br />
operator of a Class 3B laser device should have access to a laser safety officer who has professional<br />
experience assessing and controlling the hazards associated with lasers, and who<br />
will be responsible for the supervision of the protective measures against laser hazards.<br />
Radiation injuries<br />
Avoid direct or scattered radiation to the eyes. Do not look directly into the laser radiation<br />
output area, since visible and invisible laser radiation can cause injury to the eye. SPERIAN<br />
3199-21160<strong>RJ</strong> laser protective eyewear conforming to the European standard EN 207 must<br />
always be worn within the treatment room during treatment. Exercise caution when performing<br />
therapy on the head region!<br />
7
When treating patients with darkly pigmented skin, birthmarks, tattoos, etc. be aware of the<br />
risk of burning because melanin or color in the skin tissue absorbs the light.<br />
Reduce the power or energy output if the patient has darkly pigmented skin.<br />
Risk of infection<br />
While performing therapy, keep the probe approx. 1 cm from the skin to avoid direct contact<br />
with damaged skin and prevent bacterial contamination.<br />
After each treatment, disinfect your probe as described in the operating instructions for<br />
your probe. If you use an applicator, disinfect the applicator after each treatment in order to<br />
minimize the risk of patient infection.<br />
Risk of burns<br />
The probe tip may become very hot at high power output and an extended treatment time.<br />
In this case, avoid direct skin contact by using a cap or applicator. Otherwise, burns may occur.<br />
Alternately, reduce the power output and/or treatment time. Therefore, please read the<br />
operating instructions for your probe as well.<br />
Prevent unauthorized use<br />
Your <strong>Physiolaser</strong> <strong>olympic</strong> is equipped with a safety key to prevent unauthorized use. The<br />
laser can be operated only with the key inserted.<br />
When the laser is not in use, the key should always be removed and stored separate from<br />
the unit in order to prevent unauthorized use.<br />
Registration<br />
Operators of the <strong>Physiolaser</strong> must be registered as an operator of a Class 3B laser device<br />
prior to the first commissioning of the device. Observe the applicable national regulations<br />
and rules.<br />
Decommissioning in the event of a hazard<br />
If you believe that the device can no longer be operated safely, it should be decommissioned<br />
to prevent against further use and to send it to the distributor for repair.<br />
Such cases include:<br />
• the power adapter, housing components, or the probe cable have visible damage<br />
• the device no longer functions properly<br />
• the device has been stored or transported for a long period under adverse<br />
conditions<br />
• the display fails or is illegible.<br />
8
Delivery contents<br />
and accessories<br />
Delivery contents<br />
• <strong>Physiolaser</strong> <strong>olympic</strong> with 2 keys<br />
• One remote control plug<br />
• Carry bag (soft case)<br />
• Power adapter FRIWO FW7362M/12<br />
• Warning sign "<strong>Laser</strong> Radiation" acc. to<br />
IEC 60825-1<br />
• 2 pairs of laser protective eyewear,<br />
model SPERIAN 3199-21160<strong>RJ</strong>, 604 +<br />
635-904 nm<br />
Accessories<br />
• In addition to the pre-installed "Therapy<br />
Base" set, various other therapy programs<br />
are available for a custom configuration.<br />
Please inquire about the latest<br />
developments with your distributor.<br />
• Reimers & Janssen offers a variety of<br />
lasers for point application and larger<br />
areas that can be used with the <strong>Physiolaser</strong><br />
<strong>olympic</strong>. Please contact your distributor<br />
for further information about<br />
their functions and applications.<br />
• Reimers & Janssen also offers a suitable<br />
device cart for the <strong>Physiolaser</strong> including<br />
probes. This cart can be equipped with<br />
a practical swivel arm specially designed<br />
for the LightNeedle probe. The arm can<br />
also be installed on your existing carts<br />
by using a universal adapter. Please contact<br />
your distributor to determine the<br />
best configuration.<br />
5<br />
Fuego device cart with LightNeedle swivel<br />
arm You can store the <strong>Physiolaser</strong> and the<br />
LightNeedle perfectly together on the<br />
device cart. The adjustable swivel arm, which<br />
can be easily fitted on a holder in the card,<br />
allows for comfortable operation.<br />
9
Applications 6<br />
Treatment range<br />
The <strong>Physiolaser</strong> <strong>olympic</strong> can be used together with various Reimers & Janssen laser probes<br />
for a wide range of treatments in rheumatology, orthopedics, physiotherapy, sports medicine<br />
and veterinary medicine as well as dentistry.<br />
A variety of individually adjustable therapy programs are available for your <strong>Physiolaser</strong> control<br />
unit. If you would like an overview of all therapy programs and frequencies currently<br />
available for your control unit, please contact your distributor.<br />
Intended use / Indications for use<br />
Your <strong>Physiolaser</strong> <strong>olympic</strong> is an electrical device that is intended exclusively for use in medical<br />
practices and clinics and may only be operated under constant supervision.<br />
This laser device may only be operated by trained medical professionals who have been<br />
instructed in the handling of the device, the dangers associated with laser radiation, and<br />
compliance with applicable national accident prevention regulations and IEC 60825-1 (Safety<br />
of laser products).<br />
The indications for which treatment is effective depend on the laser probe used. Therefore,<br />
please read the operating instructions for all probes that you connect to your <strong>Physiolaser</strong><br />
<strong>olympic</strong>.<br />
Limitations<br />
We advise against the irradiation of the following organs and areas:<br />
• Eyes<br />
• Areas near the thyroid gland and other endocrine glands<br />
• Testicular region<br />
• Epiphyseal region in children<br />
• Open fontanel<br />
• Fetuses or in the area above the uterus of pregnant women<br />
• Dark, pigmented or colored skin, regions with dark hair<br />
• No irradiation of the head area in patients with (a tendency to) epilepsy<br />
In addition, we advise against treatment of patients with the following indications:<br />
• Cytostatic immunosuppression<br />
• Tumor/cancer patients<br />
10
Startup 7<br />
Checking for transport damage<br />
Inspect your <strong>Physiolaser</strong> for damage that may have occurred during transport, i.e., whether<br />
the housing components or the probe cable have visible damage. If you discover any damage,<br />
do not operate your probe. Instead, contact your distributor.<br />
Positioning the unit<br />
Select a stable, level surface or table and turn the feet to the front. Connect the device to<br />
the mains current via the power adapter.<br />
Temporarily disengaging safety lock<br />
On the back of your <strong>Physiolaser</strong> <strong>olympic</strong>, please check that the "Remote control plug" socket<br />
is sealed with a plug. If it is not, please insert the supplied connecting plug for door switch<br />
fuse into this socket. This temporarily disengages the safety lock so that you can restore<br />
your device's functionality without a connection to a door switch.<br />
To improve the safety, the operator is obligated to connect a door switch to the<br />
<strong>Physiolaser</strong> <strong>olympic</strong>. Such a system will automatically shut off the laser in case<br />
the door of the treatment room is opened during therapy. Have the cable to the<br />
door switch attached properly to the remote control plug on the backside of your<br />
<strong>Physiolaser</strong>.<br />
11
Power<br />
On<br />
Emergency Stop<br />
Off<br />
Connecting probes<br />
If you have purchased your <strong>Physiolaser</strong> along with a new probe, please read the accompanying<br />
operating instructions. Activate your probe accordingly, and connect it with the appropriate<br />
probe cable to one of the laser sockets on your <strong>Physiolaser</strong>. You can connect another<br />
probe to the other socket accordingly.<br />
Memory Card<br />
<strong>Physiolaser</strong> olymic<br />
Charge <strong>Laser</strong> Test Power<br />
Diagnosis<br />
Safety key<br />
Your <strong>Physiolaser</strong> <strong>olympic</strong> is equipped with a safety key to prevent unauthorized use. Put the<br />
key into the lock and turn it to ON. The power indicator illuminates and the touchscreen<br />
briefly shows the “Power on self-test” message. The <strong>Physiolaser</strong> software then proceeds to<br />
boot automatically.<br />
If the power indicator does not illuminate and the touchscreen remains dark, the<br />
“Emergency Stop” button may have been pressed. If that is the case, please unlock<br />
the emergency button by turning it gently to the left or right until the button<br />
spring several millimeters upwards to the stand-by position. If the device remains<br />
unresponsive, please determine whether the power adapter has been connected<br />
correctly.<br />
STAND-BY / READY Mode<br />
The software changes to stand-by mode at the end of the boot routine. Your <strong>Physiolaser</strong><br />
<strong>olympic</strong> is now ready to start.<br />
<strong>Laser</strong><br />
12
Working with the <strong>Physiolaser</strong> 8<br />
Therapy programs<br />
These operating instructions describe the<br />
basic functions and safe practices of the<br />
<strong>Physiolaser</strong> <strong>olympic</strong> with respect to the preset<br />
program groups “Therapy Base” and "My<br />
Protocols".<br />
Other available therapy sets are operated<br />
in essentially the same way. However, please<br />
note that some probes, for example the<br />
LightNeedle probe, offer additional configuration<br />
options. Therefore, please read the<br />
operating instructions for your probe as<br />
well.<br />
Automatic probe detection<br />
The <strong>Physiolaser</strong> will detect the connected<br />
probe automatically without any special installation<br />
by the user. If you purchase a new<br />
probe, you maybe have to update the <strong>Physiolaser</strong><br />
software. You can install this update<br />
easily using an SD card accompanying the<br />
probe. Instructions are supplied with the<br />
probe.<br />
Each probe type is indicated by<br />
a special symbol in the therapy<br />
programs to simplify identification<br />
(especially when using two probes).<br />
The symbol for your probe can be<br />
found in the accompanying operating<br />
instructions.<br />
Reimers & Janssen has a wide selection of<br />
laser probes available for use with your<br />
<strong>Physiolaser</strong> <strong>olympic</strong>.<br />
13
Touchscreen operation<br />
After you have initiated your <strong>Physiolaser</strong><br />
with your probe as described in the previous<br />
chapter, all functions and configuration<br />
options are available on the easy-to-use<br />
touchscreen.<br />
Pressing the “Ready” button takes you to<br />
the therapy programs. Pressing the “Service”<br />
button takes you to the basic settings<br />
(see page 23). If you want to correct the<br />
time, press the time display. The "Set Clock"<br />
screen will open.<br />
Touch the screen only with your<br />
fingers or a special stylus. Never use<br />
hard or sharp objects!<br />
Even if you use several probes or purchase<br />
additional ones, the touchscreen<br />
operation of your <strong>Physiolaser</strong> <strong>olympic</strong><br />
remains essentially the same.<br />
A variety of Reimers & Janssen probes are<br />
available for different applications using this<br />
simple operational concept. Your <strong>Physiolaser</strong><br />
<strong>olympic</strong> software can be easily updated, so<br />
you are well equipped for future possibilities<br />
in laser therapy.<br />
The “Stand-by” screen always appears first<br />
when the device is turned on.<br />
You can set the time in the "Set Clock"<br />
screen using the "-" and "+" buttons. Pressing<br />
“Stand-by” returns you to the Stand-by<br />
screen.<br />
14
Therapy selection screen<br />
Pressing “Ready” in “Stand-by” mode takes<br />
you to the "Therapy selection" screen,<br />
where you may choose your therapy programs.<br />
The program groups "Therapy Base"<br />
and "My Protocols" are displayed here by<br />
default in the standard configuration.<br />
You can press the arrow buttons to scroll<br />
through the program groups and series of<br />
programs within a group. The structure and<br />
function of the various program groups are<br />
always the same.<br />
If you have connected your probe correctly,<br />
a corresponding symbol will appear on the<br />
button "<strong>Laser</strong> 1" or "<strong>Laser</strong> 2" on the Therapy<br />
selection screen. "<strong>Laser</strong> 1" corresponds<br />
to the your <strong>Physiolaser</strong>'s left laser socket<br />
and "<strong>Laser</strong> 2" corresponds to the socket on<br />
the right.<br />
Adapting programs<br />
You may customize the pre-set therapy programs<br />
on your <strong>Physiolaser</strong> <strong>olympic</strong> for your<br />
own needs.<br />
The power, energy output, and time parameters<br />
can be adjusted. Except in continuous<br />
wave mode, you can also change the frequency<br />
of the laser beam or combine with a<br />
second frequency using “Edit". For improved<br />
ease of use, you can also rename the program<br />
buttons.<br />
The exact procedure is described in the following<br />
pages.<br />
Most probes offer the possibility to<br />
begin the therapy immediately with<br />
the pre-set values. However, do not<br />
forget to protect yourself and your<br />
patient with laser protective eyewear.<br />
Therapy selection screen with symbol for<br />
a single probe; functions that are active or<br />
can be activated are shown in yellow on all<br />
screens.<br />
You can press the arrow buttons to scroll<br />
through the program groups and series of<br />
programs.<br />
The therapy time for the attached 150 mW<br />
probe as set in program "Protocol 2" is<br />
5 minutes at an energy output of 22 joules.<br />
15
Editing parameters<br />
The screen to the right shows “continuous<br />
wave” mode and the “power/energy/time”<br />
button with total power output of 150 mW,<br />
energy output of 45 joules, and a treatment<br />
time of 5 minutes.<br />
Press this button if you wish to change<br />
these parameters. The “Setup <strong>Laser</strong>” screen<br />
will appear and here you can edit the individual<br />
parameters and the pitch of the signal<br />
tones.<br />
The power cannot be changed on<br />
pulsed lasers.<br />
Entering changes<br />
In this example, if you wish to increase the<br />
energy output to 90 joules, press the “Energy”<br />
button and enter “90” on the keypad.<br />
The therapy time is automatically adjusted<br />
to 10 minutes. Confirm your selection by<br />
pressing "Enter".<br />
It's easier to make entries using the<br />
tip of a ballpoint pen instead of your<br />
finger. Always make sure the tip is<br />
retracted.<br />
Parameter button (circled) on the therapy<br />
selection screen<br />
“Setup <strong>Laser</strong>” screen<br />
"Setup <strong>Laser</strong>" screen with numeric keypad<br />
16
Automatic changes<br />
The other parameters can be changed in the<br />
“Setup <strong>Laser</strong>” screen in the same way.<br />
If you change the power, the therapy time<br />
adapts automatically. Likewise, changing the<br />
therapy time causes the energy output to be<br />
calculated automatically and displayed.<br />
Saving your changes<br />
The software gives you the option of permanently<br />
saving your changes.<br />
You can use the "single store" option to<br />
save changes only for the current selected<br />
therapy program or “store for all” to save<br />
the changes permanently for all programs in<br />
your therapy set.<br />
Pressing the “clear defaults” button resets<br />
all parameters in the therapy set to default<br />
settings.<br />
You are returned to the therapy selection<br />
screen after saving or resetting the<br />
parameters.<br />
A confirmation prompt always appears<br />
to prevent overwriting changes<br />
in other therapy programs if you<br />
have inadvertently selected “store for<br />
all” or “clear defaults”.<br />
Therapy time entry: to enter seconds, place<br />
a colon (circled) following the minutes.<br />
The changes for the currently selected<br />
therapy program are saved permanently by<br />
pressing the “store single” button (circled).<br />
Confirmation screen to protect from inadvertent<br />
changes.<br />
17
Return to therapy selection<br />
Some probes have their own display indicating<br />
the settings for the therapy program. If<br />
the display is difficult to read (e.g., in bright<br />
sunlight), you can change the contrast of the<br />
display using the “Contrast” button.<br />
If you are finished with the settings and do<br />
not wish to save them, return to the therapy<br />
programs directly using the “Therapy”<br />
button.<br />
From there, you can begin a therapy with<br />
the adjusted parameters. The settings are<br />
automatically reset after the treatment.<br />
The settings will be lost if you wish to edit<br />
the program or switch to a different program<br />
before starting the therapy.<br />
Editing programs<br />
Except in continuous wave mode, you can<br />
also change the frequency of the laser beam<br />
or combine with a second frequency.<br />
For a blank template, you have the option of<br />
assigning different names to these programs,<br />
for example based on different indications,<br />
therapy times, or special frequencies.<br />
All these functions can be accessed using<br />
the “Edit” button.<br />
Mixing and changing frequencies<br />
This takes you to the “Edit frequencies”<br />
mode. In this example, only a pre-set frequency<br />
of 1000 Hz is active at first.<br />
Pressing “Therapy” (circled) returns you<br />
directly to the therapy programs.<br />
Therapy selection screen with the "Edit"<br />
button<br />
"Edit frequencies" screen<br />
18
2. Combining a frequency<br />
Pressing the “2nd frequency on/off” button<br />
adds a second frequency.<br />
The powerful <strong>Physiolaser</strong> <strong>olympic</strong><br />
offers a frequency range of 1-99,999<br />
Hz for continuous wave probes.<br />
Pulsed probes allow up to 40,000 Hz.<br />
Changing the frequency<br />
If you wish to change the frequencies, simply<br />
press the corresponding frequency button<br />
and enter the desired Hertz value on the<br />
numeric keypad.<br />
If you increase the frequency for a<br />
pulsed probe, the energy output will<br />
automatically increase for the same<br />
treatment time. Lower the frequency<br />
reduces the energy output.<br />
Designating a name<br />
To change the name of a program, press<br />
"Label 1" for the upper line and "Label 2" for<br />
the lower line. A pop-up will appear to enter<br />
each name.<br />
The input field works like a typical<br />
cell phone keypad. You can switch<br />
between upper case, lower case, and<br />
numbers. This gives you flexibility in<br />
naming your therapy programs.<br />
The 2nd frequency is activated.<br />
“Edit frequencies” screen with the numeric<br />
keypad.<br />
Label field with a button (circled) for<br />
switching to lower-case letters or numbers.<br />
A space is entered using the "0"<br />
button.<br />
19
Return to therapy selection<br />
In this example, two individually set frequencies<br />
are combined for the treatment<br />
of acute carpal tunnel syndrome and the<br />
program is given the name of the indication<br />
being treated.<br />
You can return to the therapy selection<br />
screen using the “Therapy” button.<br />
Starting a therapy<br />
Probes equipped with their own “start/stop”<br />
button allow you to begin treatment directly<br />
from your probe.<br />
A two-second tone sounds before therapy<br />
mode begins.<br />
During this time, you can still press “stop”<br />
to end the program, for example if you have<br />
forgotten to put on protective eyewear.<br />
Pressing “Therapy” returns you to the therapy<br />
selection screen.<br />
The “Therapy selection” screen with a customized<br />
therapy program name.<br />
20
Therapy mode<br />
Put on laser protective eyewear<br />
before starting therapy mode!<br />
After the signal tone, the therapy screen appears<br />
with the selected program and all set<br />
parameters.<br />
During therapy, a short signal tone sounds<br />
every fifteen seconds by default. The time<br />
counts down to zero from the selected<br />
duration, while the administered energy<br />
increases.<br />
The automatic end is indicated by a long<br />
signal tone once zero is reached. The current<br />
therapy program can be stopped at any<br />
time by pressing "STOP" or directly using<br />
the probe.<br />
You do not need to specifically shut<br />
down the operating software on your<br />
<strong>Physiolaser</strong> <strong>olympic</strong>. You can simply<br />
turn of the device, but avoid doing<br />
this while a therapy is running.<br />
During treatment, the patient and<br />
personnel must wear SPERIAN<br />
3199-21160<strong>RJ</strong> laser protective<br />
eyewear conforming to European<br />
standard EN 207.<br />
The upper half of the therapy screen with<br />
the active probe is highlighted in yellow. The<br />
therapy program is shown together with all<br />
set parameters. The lower half of the screen<br />
is highlighted in blue because the second<br />
probe is inactive (not connected).<br />
If a program with two frequencies is active,<br />
the display alternates between the two frequencies<br />
(circled).<br />
21
Operation with two probes<br />
The <strong>Physiolaser</strong> <strong>olympic</strong> even lets you work<br />
with two probes at the same time. You can<br />
of course select and configure your therapy<br />
programs independently for each probe.<br />
Your <strong>Physiolaser</strong> will "remember" the settings<br />
for each probe if you use other probes<br />
afterwards.<br />
You can even connect a second probe while<br />
the device is operating. The probe is ready<br />
to use as soon as a second probe symbol<br />
appears in the therapy selection.<br />
The basic configuration options are essentially<br />
the same for the various probes<br />
on the <strong>Physiolaser</strong>, though changes can only<br />
be made to the current active probe (highlighted<br />
in yellow).<br />
Therapy selection screen with active point<br />
probe and attached LightNeedle probe.<br />
22
Service menu 9<br />
Functions<br />
The software architecture of your <strong>Physiolaser</strong><br />
<strong>olympic</strong> is so simple that you are immediately<br />
ready to begin working with it as<br />
soon as the device is turned on by selecting<br />
the “Ready” button.<br />
You should need to access the functions<br />
of the service menu only if you wish to<br />
change the basic settings of your <strong>Physiolaser</strong><br />
<strong>olympic</strong> (e.g. language, energy saving mode,<br />
or key clicks) to your particular needs, to<br />
do special test functions, or to update the<br />
software with a new probe.<br />
In the following pages, the functions of the<br />
service menu are briefly explained step-bystep.<br />
The menu is always accessed by pressing<br />
the “Service” button on the “Stand-by”<br />
screen.<br />
From the therapy selection screen, pressing<br />
the “Stand-by” button (circled) takes you to<br />
the “Stand-by” screen.<br />
The "Stand-by" screen with the "Service"<br />
button.<br />
23
Setup Set 1<br />
On the "Setup" screen you will find all basic<br />
settings and functions divided into three<br />
sets.<br />
Set 1 with language selection, the version<br />
indicator, the key click setting, and the laser<br />
test is initially selected by default.<br />
Version indicator<br />
Under "Version" you can view information<br />
on the current version of the hardware and<br />
software on your <strong>Physiolaser</strong> and any connected<br />
probes.<br />
This information can be important for the<br />
service technician. For example, problems<br />
can occur if operating new probes with outdated<br />
operating software.<br />
Reimers & Janssen is constantly working<br />
on new developments in hardware and<br />
software so that your devices are always<br />
up-to-date.<br />
Key clicks<br />
The intuitive touchscreen operation is supported<br />
by an acoustic feedback feature.<br />
However, you can deselect this accessibility<br />
option.<br />
You can change the language of the software<br />
on your <strong>Physiolaser</strong> here.<br />
The sequence of the software version is<br />
indicated numerically, so in this example<br />
the <strong>Laser</strong> 2 software is “PN290110A” from<br />
Friday, January 29, 2010. "Program" indicates<br />
the operating software.<br />
Key clicking is set to "On" by default.<br />
24
<strong>Laser</strong> function test<br />
The “<strong>Laser</strong> Test” assists users who wish to<br />
operate an infrared laser probe on their<br />
<strong>Physiolaser</strong> <strong>olympic</strong>, by testing for proper<br />
function.<br />
Please select the “<strong>Laser</strong> Test” and then "On".<br />
Then start your probe via the therapy selection<br />
screen and hold the laser radiation output<br />
area directly in front of the "<strong>Laser</strong> Test"<br />
sensor on the front of your <strong>Physiolaser</strong>.<br />
A signal (beep) indicates that the laser is<br />
functioning properly. If this is not the case,<br />
increase the sensitivity of the sensor in the<br />
Service menu and repeat the test.<br />
Power<br />
On<br />
Emergency Stop<br />
Off<br />
Memory Card<br />
If a signal sounds before the laser<br />
beam is held in front of the sensor,<br />
please reduce the sensitivity. It is<br />
possible that too much sunlight is<br />
hitting the sensor, in which case you<br />
should move your device or darken<br />
the room.<br />
The sensitivity of the sensor can be modified<br />
using "-" and "+" for a laser test.<br />
<strong>Physiolaser</strong> olymic<br />
Charge <strong>Laser</strong> Test Power<br />
Diagnose<br />
<strong>Laser</strong><br />
"<strong>Laser</strong> Test" sensor on the front of the device<br />
25
Setup Set 2<br />
Your <strong>Physiolaser</strong> <strong>olympic</strong> has a built-in<br />
rechargeable battery so you can easily perform<br />
therapy in the field (see “Mobile use”<br />
on page 30).<br />
In order to extend the operating time, you<br />
can save energy by setting the screensaver<br />
to activate sooner.<br />
Power indicator<br />
The power indicator indicates how long the<br />
<strong>Physiolaser</strong> has been operated in therapy<br />
mode.<br />
By default, the screensaver activates after 10<br />
minutes of inactivity.<br />
The power indicator screen<br />
26
Error log<br />
You can use the “Logging” function to save<br />
the protocol data to an SD card while the<br />
device is operating.<br />
This can help a service technician detect<br />
errors that arise during operation that have<br />
no obvious cause.<br />
Before activating the “Logging” function,<br />
you must insert an SD card into<br />
your <strong>Physiolaser</strong>. Ensure that the contact<br />
tabs are aligned from below and<br />
that the tapered edge points inward.<br />
A correctly inserted card will be indicated<br />
by a corresponding symbol in<br />
the Stand-by screen.<br />
Software update<br />
When you connect a new probe or purchase<br />
new therapy sets you may need to<br />
perform a software update.<br />
Existing therapy sets are overwritten<br />
during a software update. If you have<br />
entered changes which you wish to<br />
retain, save your therapy programs<br />
beforehand (see page 29).<br />
You will automatically receive detailed<br />
instructions for a software update with<br />
a new SD card. If you already have an<br />
SD card, you can also receive this update<br />
conveniently by e-mail.<br />
You must set the "Logging" function to "On"<br />
in order to read an error log.<br />
Insert the SD card into the memory card<br />
slot on your control unit until it clicks.<br />
Diagnosis<br />
Please contact the manufacturer or distributor<br />
for a software update.<br />
27<br />
Charge
Setup Set 3<br />
With the open software architecture of<br />
your <strong>Physiolaser</strong> <strong>olympic</strong>, you can always<br />
work with the therapy programs that are<br />
best suited for your applications and which<br />
are based on cutting-edge research.<br />
In addition to the “Therapy Base” set,<br />
you can obtain additional therapy programs<br />
for your particular configuration<br />
from your distributor. Please inquire<br />
about the latest developments with<br />
your distributor.<br />
Activating therapy sets<br />
You can of course also use multiple program<br />
sets at the same time. In “Set 3,” all the<br />
therapy sets available on your <strong>Physiolaser</strong><br />
are indicated, from which you can select or<br />
deselect for the given situation.<br />
In the “Set 3” screen, you can select and<br />
deselect therapy sets, save them externally,<br />
or restore them from an SD card.<br />
In this example, only the “Therapy Base” set<br />
is activated. If you wish to add additional<br />
sets, these will be carried over into the<br />
therapy selection screen.<br />
28
Saving therapy sets<br />
Your <strong>Physiolaser</strong> gives you the option of<br />
saving complete therapy sets on a SD card<br />
or transferring them from a SD card to<br />
the control unit. This may be important, for<br />
example, if you have customized your programs<br />
and do not want to lose these modifications<br />
during a software update.<br />
Existing therapy sets with the same<br />
name are overwritten without requesting<br />
confirmation during saving<br />
or restoring. Therefore, back up your<br />
therapy sets prior to a software update,<br />
since an update will overwrite<br />
existing therapy sets.<br />
It is best to use an extra SD card without<br />
program software and insert this into your<br />
<strong>Physiolaser</strong> as described on page 27.<br />
Then select “Therapy sets – save” and select<br />
the sets that you wish to save. As soon as<br />
you press “save,” the selected sets are automatically<br />
saved to the SD card.<br />
Restoring therapy sets<br />
If you want to restore sets onto your control<br />
unit, select "Therapy sets - restore".<br />
Sets available on the SD card will be shown.<br />
Activate the sets that you wish to install and<br />
then press “restore”. The selected sets will<br />
now be installed automatically.<br />
Please note that existing therapy<br />
sets with the same name will be<br />
overwritten without requesting confirmation<br />
during saving and restoring.<br />
Pressing “save” (circled) stores the selected<br />
therapy set on an SD card.<br />
Pressing “restore” loads the selected<br />
therapy set from the SD card onto the<br />
<strong>Physiolaser</strong>.<br />
29
Mobile use 10<br />
Battery operation<br />
Your <strong>Physiolaser</strong> <strong>olympic</strong> is ideal for mobile<br />
use, since it is equipped with a built-in<br />
rechargeable battery and has a compact<br />
design.<br />
Operation in battery mode does not change<br />
the handling. You start up the device in the<br />
usual manner and begin work. You can easily<br />
check the charge status of the battery by<br />
looking at the bar in the “Stand-by” button<br />
on the therapy selection screen.<br />
If the color changes from green to yellow,<br />
you will need to recharge the battery soon<br />
because it may not be possible to complete<br />
a new therapy if started.<br />
The maximum operating time of the<br />
rechargeable battery depends on the<br />
probe configuration and usage. For<br />
exact operating times, please refer to<br />
the instructions for your probe.<br />
Charge status indicator (circled) in the<br />
therapy selection screen<br />
Yellow charge status indicator: battery must<br />
be recharged soon.<br />
30
Recharging the battery<br />
You can easily recharge the battery of your<br />
<strong>Physiolaser</strong> <strong>olympic</strong> using the power adapter<br />
supplied with your device. As soon as the<br />
charge status indicator is green again, you<br />
can continue to work right away, even as the<br />
recharging continues.<br />
The <strong>Physiolaser</strong> recharging procedure is<br />
monitored by a microcomputer, so there is<br />
no danger of overcharging. In addition, the<br />
rechargeable battery has no memory effect,<br />
so your <strong>Physiolaser</strong> can remain constantly<br />
connected to the adapter.<br />
You can extend the operating time in<br />
battery mode by setting the screensaver<br />
to activate sooner (see page 26).<br />
Use only the supplied power adapter<br />
for power supply and battery<br />
recharging.<br />
This message appears if you begin a therapy<br />
despite a yellow charge status indicator.<br />
The orange bars show the recharging<br />
process.<br />
31
Error messages 11<br />
Restart after error message<br />
Your <strong>Physiolaser</strong> <strong>olympic</strong> uses a sophisticated<br />
and stable software design so that error<br />
messages should occur only very rarely.<br />
In some circumstances an error can be corrected<br />
by a simple restart.<br />
If the error message reappears, please contact<br />
your distributor.<br />
Safety lock open<br />
If the remote control plug has loosened or<br />
is unplugged, a corresponding error message<br />
will appear and all probes will be disabled.<br />
Confirm the message with “OK” and turn<br />
off your <strong>Physiolaser</strong>. Wait a moment and<br />
then turn the device back on.<br />
In order to continue working, you must<br />
reinsert the plug.<br />
32
Defective battery<br />
Your <strong>Physiolaser</strong> software is able to distinguish<br />
between an empty and a defective<br />
battery.<br />
A defective battery is indicated with an error<br />
message and operating the device in<br />
battery mode is no longer possible.<br />
In order to continue working temporarily,<br />
you must connect your device to mains<br />
current.<br />
Critical errors<br />
If the error messages about critical system<br />
errors appear, please turn off the device and<br />
contact your distributor.<br />
If repair work is required, your distributor<br />
can provide you with a replacement<br />
device if necessary.<br />
Please contact your distributor if you have a<br />
defective battery.<br />
Critical error: Please disconnect all<br />
laser probes and turn off the device.<br />
33
Care and maintenance 12<br />
Cleaning and disinfection<br />
Unplug the power cord before beginning any cleaning or maintenance.<br />
Note that harsh or caustic agents (e.g., acetone) must not be used for regular cleaning of<br />
the plastic components. Prevent moisture from entering the housing. It is best to use a damp<br />
cloth for cleaning.<br />
To disinfect the device, use a soft cloth that has been dampened with a mild disinfectant.<br />
Always use a damp cloth for cleaning and disinfection. Never flush water over the<br />
device. Do not use solvents!<br />
Calibration and safety check<br />
Your <strong>Physiolaser</strong> <strong>olympic</strong> does not contain any user-serviceable internal parts or components.<br />
There is thus no reason to open the device's housing.<br />
To comply with IEC 60825-1 (Safety of laser products), your <strong>Physiolaser</strong>, along with<br />
all probes and accessories, must be inspected and recalibrated by the manufacturer at<br />
least once annually. Please contact your distributor.<br />
34
Technical description 13<br />
Technical data<br />
Class 3B laser therapy device <strong>Physiolaser</strong> <strong>olympic</strong><br />
Protection class IPXO<br />
Absolute uncertainty of laser power<br />
measurement<br />
Modulation frequency<br />
Accuracy of the electric conductance<br />
measurement<br />
Power supply with battery charging<br />
20%<br />
1 Hz to 99999 Hz CW laser<br />
1 Hz to 40000 Hz pulse laser<br />
+/- 10%<br />
Weight 2 kg<br />
Power adapter FRIWO FW7362M/12<br />
100-240 V~ / 50-60 Hz / 700 mA<br />
Dimensions (L x D x H) 25 cm x 13 cm x 11 cm<br />
Operating conditions<br />
Ambient temperature + 10°C to +30°C<br />
Relative humidity 30% to 75%<br />
Air pressure 700 hPa to 1060 hPa<br />
35
Transport and storage<br />
Ambient temperature -20° C to +40 C<br />
Relative humidity 30% to 75%<br />
Air pressure 700 hPa to 1060 hPa<br />
LEDs<br />
Quantity<br />
1 green diode, 1 yellow diode, 1<br />
photodiode<br />
Guidelines and manufacturer’s declaration – Electromagnetic emissions<br />
Radiated disturbance<br />
measurements<br />
RF radiation per<br />
CICPR 11<br />
RF radiation per<br />
CICPR 11<br />
Emission of harmonics<br />
per IEC 61000-3-2<br />
Emission of voltage<br />
fluctuations/flicker per<br />
IEC 61000-3-3<br />
Conformity<br />
Group 1<br />
Class B<br />
Conforms<br />
Conforms<br />
Electromagnetic environment<br />
Guideline<br />
The <strong>Physiolaser</strong> <strong>olympic</strong> uses RF energy<br />
solely for its internal operation. Its RF emissions<br />
are thus very low and unlikely to interfere<br />
with nearby electronic equipment.<br />
The <strong>Physiolaser</strong> <strong>olympic</strong> is suitable for use<br />
in all types of buildings, including residential<br />
buildings and those directly connected to a<br />
public power grid that also supplies buildings<br />
used for residential purposes.<br />
36
Guidelines and manufacturer’s declaration – Electromagnetic immunity<br />
Immunity tests IEC 60601 level<br />
Electrostatic<br />
discharge<br />
(ESD)<br />
per IEC<br />
61000-4-2<br />
Electrical fast<br />
transients/<br />
bursts<br />
per IEC<br />
61000-4-4<br />
Surges per IEC<br />
61000-4-5<br />
Voltage dips,<br />
short interruptions,<br />
and<br />
voltage variations<br />
per IEC<br />
61000-4-11<br />
Power frequencymagnetic<br />
field<br />
(50/60 Hz)<br />
per IEC<br />
61000-4-8<br />
± 6 kV contact<br />
discharge<br />
± 8 kV air discharge<br />
± 2kV<br />
for power lines<br />
± 1 kV<br />
for input and<br />
output leads<br />
± 1 kV<br />
normal-mode<br />
voltage<br />
± 2 kV<br />
common-mode<br />
voltage<br />
< 5% UT<br />
(> 95% dip in<br />
UT) for ½ cycle<br />
40% UT<br />
(60% dip in UT)<br />
for 5 cycles<br />
70% UT<br />
(30% dip in UT)<br />
for 25 cycles<br />
< 5% UT<br />
(> 95% dip in<br />
UT) for 5 s<br />
Conformity<br />
level<br />
Electromagnetic environment -<br />
Guidelines<br />
Conforms Floors should be covered with<br />
ceramic tiles. If the floor is covered<br />
with synthetic material, the<br />
relative humidity must be at least<br />
30%.<br />
Conforms The quality of the supply voltage<br />
should be typical for business or<br />
hospital environments.<br />
Conforms The quality of the supply voltage<br />
should be typical for business or<br />
hospital environments.<br />
Conforms The quality of the supply voltage<br />
should be typical for business or<br />
hospital environments. If the user<br />
wants to continue operation in<br />
case of an interrupted energy<br />
supply, it is recommended that the<br />
laser therapy device be fed from<br />
an uninterruptible power supply<br />
or a battery.<br />
3 A/m Conforms Power frequency magnetic fields<br />
should have the typical values for<br />
business and hospital environments.<br />
Note: UT is the AC mains voltage before applying test levels.<br />
37
Guidelines and manufacturer’s declaration – Electromagnetic immunity – for<br />
a laser therapy device without life support function<br />
Immunity tests<br />
Conducted<br />
RF interference<br />
per IEC<br />
61000-4-3<br />
Radiated<br />
RF interference<br />
per IEC<br />
61000-4-3<br />
IEC 60601<br />
level<br />
3 Veff<br />
150 kHz to<br />
80 MH<br />
3 V/m<br />
80 MHz to<br />
2.5 GHz<br />
Conformity<br />
level<br />
Conforms<br />
Conforms<br />
Electromagnetic environment - Guidelines<br />
Portable and mobile radio devices<br />
should not be operated at a distance<br />
to the laser therapy devices (including<br />
leads) of less than the recommended<br />
protection distance as calculated according<br />
to the equation for transmission<br />
frequency.<br />
Recommended protection distance: d<br />
= 1.2 √ P<br />
d = 1.2 √ P for 80 MHz to 800 MHz<br />
d = 2.3 √ P for 800 MHz to 2.5 GHz<br />
where P is the rated power of the<br />
transmitter in watts (W) as specified by<br />
the transmitter manufacturer and d is<br />
the recommended protection distance<br />
in meters (m)<br />
The field strength of stationary radio<br />
transmitters should be lower at all frequencies<br />
than the compliance level (b)<br />
based on a local inspection (a).<br />
Interference may occur in the vicinity<br />
of devices bearing the following symbol:<br />
Note 1: The higher frequency range applies at 80 MHz and 800 MHz.<br />
Note 2: These guidelines are not applicable in all cases. Electromagnetic propagation is influenced by absorption and reflection<br />
by buildings, objects, and human beings.<br />
It is not possible to predict theoretically the field strength of stationary transmitters such as base stations of cellular phones<br />
and mobile land radio sets, amateur radio stations and AM and FM radio and television stations. A site survey should be considered<br />
to assess the electromagnetic environment in terms of stationary transmitters.<br />
If the field strength measured in the place where the laser device is operated exceeds the conformity levels mentioned above,<br />
the laser therapy device should be observed to verify that it functions properly. Abnormal performance may necessitate additional<br />
measures such as changing the orientation of the laser therapy device or moving it to a different location.<br />
b) Above the frequency range of 150 kHz to 80 MHz, field strength should be less than 3 V/m.<br />
38
Recommended protection distances between portable and mobile RF<br />
telecommunication devices and laser therapy device without life support<br />
function<br />
Recommended protection distances between portable and mobile<br />
RF telecommunication devices and the <strong>Physiolaser</strong> <strong>olympic</strong><br />
The <strong>Physiolaser</strong> <strong>olympic</strong> is designed for operation in electromagnetic environments in<br />
which RF interference is controlled. The customer or user of the laser therapy device can<br />
help prevent electromagnetic interference by maintaining the minimum distance between<br />
portable and mobile RF telecommunication devices (transmitters) and the laser therapy<br />
device as indicated below, dependent on the power output of the communication device.<br />
Rated power of<br />
transmitter in W<br />
Protection distance dependent on transmission frequency in m<br />
150 kHz to 80 MHz<br />
d = 1.2 √ P<br />
80 MHz to 800<br />
MHz<br />
d = 1.2 √ P<br />
800 MHz to 2.5<br />
GHz<br />
d = 2.3 √ P<br />
0.01 0.12 0.12 0.23<br />
0.1 0.38 0.38 0.73<br />
1 1.2 1.2 2.3<br />
10 3.8 3.8 7.3<br />
100 12 12 23<br />
If the maximum rated power for certain transmitters is not given in the above table, the recommended<br />
protection distance d in meters (m) can be determined by using the equation indicated in the respective<br />
column, where P is the maximum rated power of the transmitter in watts (W) as specified by the transmitter<br />
manufacturer.<br />
Note 1 The higher frequency range applies at 80 MHz and 800 MHz.<br />
Note 2 These guidelines are not applicable in all cases. Electromagnetic propagation<br />
is influenced by buildings, objects, and human beings.<br />
39
Position of labels on the device<br />
2 4<br />
2<br />
1. <strong>Laser</strong> warning label on top<br />
2. <strong>Laser</strong> warning triangle on both sides<br />
3. Remote control plug label<br />
Explanation of symbols and labels on the device<br />
Type label<br />
Type label with technical specifications,<br />
manufacturer address, and serial number<br />
Power supply label<br />
Remote control plug label<br />
5<br />
1<br />
4. Power supply label<br />
5. Type label with power supply<br />
specifications<br />
Signs on the type label<br />
0123<br />
3<br />
Warning Labels<br />
The device complies with<br />
European directives applicable<br />
to the product.<br />
IPX0 04-2011 No rating against harmful<br />
ingress of water<br />
0123 Observe Pmax: 1 x 500 the mW accompanying<br />
/ 810 nm<br />
1 x 150 mW / 638 nm<br />
documentation<br />
SN:10509-02<br />
04-2011 Type B applied part<br />
12-2010<br />
04-2011<br />
0123<br />
0123<br />
Probe type 509 Photonic satellite<br />
Reimers & Janssen GmbH Fabrikstraße 22 D-79183 Waldkirch<br />
Pmax 5 x 30 W<br />
500 mW 810 nm cw<br />
Date of production<br />
150 mW 638 nm cw<br />
Month EN 60825-1:2007<br />
- Year<br />
<strong>Laser</strong> beam exit aperture for visible<br />
and invisible laser radiation<br />
Avoid direct exposure to beam<br />
VISIBLE AND INVISIBLE<br />
LASER RADIATION<br />
AVOID DIRECT EXPOSURE<br />
LASER CATEGORY 3B<br />
40<br />
IPX0<br />
12-201<br />
IPX0
Warranty and disposal 14<br />
Warranty<br />
The manufacturer’s warranty is valid for 24 months. The manufacturer is only responsible for<br />
the features of the <strong>Physiolaser</strong> <strong>olympic</strong> as warranted by the operating instructions if the<br />
device has been operated carefully and in accordance with the operating instructions.<br />
Readjustment, calibration, and maintenance or repairs may only be performed by the<br />
distributor, otherwise the warranty is void. Any alterations to the device by unauthorized<br />
third parties void the warranty. The manufacturer guarantees spare parts availability for a<br />
period of ten years after the date of purchase.<br />
Disposal<br />
Due to the hazards of laser radiation, the <strong>Physiolaser</strong> <strong>olympic</strong> may not be disposed of as<br />
normal electronic waste. The devices must be sent to the manufacturer for decommissioning<br />
and disposal.<br />
41
Distributor<br />
Manufacturer/Distributor 15<br />
Publisher<br />
Reimers & Janssen GmbH<br />
Medical <strong>Laser</strong> Technology<br />
REIMERS & JANSSEN GmbH<br />
Medical <strong>Laser</strong> Technology<br />
Fabrikstraße 22<br />
79183 Waldkirch, Germany<br />
Tel. +49 (0) 7681 - 493 4149<br />
Fax +49 (0) 7681 - 493 4150<br />
Quality management<br />
EN ISO 13485: 2003 + AC: 2009<br />
Editor<br />
Ulrich Sackenreuter<br />
Design & Illustrations<br />
Eike Otto<br />
service@rj-laser.com<br />
www.rj-laser.com<br />
Photographs<br />
Volker Weinhold<br />
Version 4.51 4-Dec-2012<br />
42