The Next Generation Garage Door Installation & Maintenance - Clopay
The Next Generation Garage Door Installation & Maintenance - Clopay
The Next Generation Garage Door Installation & Maintenance - Clopay

You also want an ePaper? Increase the reach of your titles
YUMPU automatically turns print PDFs into web optimized ePapers that Google loves.
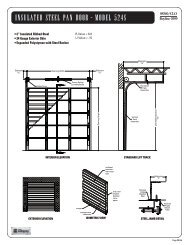
STEP 11 - Assembling and Installing the<br />
Track (Continued)<br />
NOTE: Pressure-treated lumber purchased after January 2004<br />
is treated with chemicals that have highly corrosive effects on<br />
metal fasteners. <strong>The</strong> fasteners provided with your door are<br />
intended for use with standard lumber (not pressure-treated)<br />
only. If you are installing your door into an opening framed with<br />
pressure-treated lumber, it is highly recommended that 5/16” x<br />
1-5/8” lag screws with a minimum galvanization equivalent of<br />
G185 be purchased for this application.<br />
Step 11- 4: Fasten the horizontal angle to the horizontal<br />
(curved) track with two 1/4" x 5/8" track bolts and 1/4" fl ange<br />
nuts so that the heads of the track bolts are on the inside of<br />
the track. On some doors this angle may be 82" long and will<br />
require three additional fasteners per side. If the angle has<br />
been preassembled, skip Step 11-4 and proceed with<br />
Step 11-5. (FIG. 11-E)<br />
Step 11-5: Temporarily support the rear end of the track with<br />
a rope from the trusses overhead in the garage or on a tall<br />
ladder. (FIG. 11-F)<br />
Step 11-6: Place the track over the roller in the top bracket.<br />
Attach the curved end of the horizontal track to the fl ag<br />
bracket with two 1/4" x 5/8" track bolts and 1/4" fl ange nuts<br />
so that the heads of the screws are on the inside of the track.<br />
<strong>The</strong> horizontal and vertical track must join together to form<br />
a continuous channel for the rollers. Attach the end of the<br />
horizontal angle to the top of the fl ag bracket with a 3/8” x 3/4”<br />
carriage bolt and 3/8” hex nut. Use the top set of slots for 15”<br />
radius track, the middle set of slots for 12” radius track, and the<br />
bottom set of slots for Low Headroom track. (FIG. 11-G)<br />
Step 11-7: Rear track hangers need to be made at this time.<br />
Use 1-1/4" x 1-1/4" punched angle, 13 gauge or 3/32" steel.<br />
<strong>The</strong>se are not provided with the standard hardware. <strong>The</strong>y<br />
are used to attach the rear of the horizontal track to the<br />
ceiling joist.<br />
Enough angle iron or punched angle should be purchased to<br />
make two rear track hangers. <strong>The</strong>se hangers must be strong<br />
enough to hold the full weight of the door. Attach a bolt at least<br />
1" long through the end of each track to stop the door at the<br />
end of its travel. (FIG. 11-H)<br />
WARNING<br />
Sway braces must be used to prevent tracks from<br />
spreading and allowing door to fall, which could cause<br />
serious injury. Bolts placed in the end of each track<br />
(FIG. 11-H) must be at least 1" long to prevent the top<br />
section from exiting the track.<br />
NOTE: Rear track hangers should not be mounted any farther<br />
than 6" from the end of horizontal track.<br />
Step 11- 8: Placement of rear track hangers is critical for the<br />
door to operate properly. <strong>The</strong> rear track hangers should hold<br />
the horizontal track level and square to the door. Squareness<br />
should be measured by comparing two diagonal distances: 1)<br />
the distance from the top left-hand corner of the door to the<br />
rear of the right-hand horizontal track and 2) the distance from<br />
the top right-hand corner of the door to the rear of the left-hand<br />
horizontal track. (FIG. 11-I, opposite page)<br />
16<br />
G01-R01-0704<br />
FIG. 11-E<br />
Flag Bracket<br />
FIG. 11-F<br />
3/8" x 3/4"<br />
Carriage<br />
Bolt<br />
FIG. 11-G<br />
3/8" x 1"<br />
Bolts & Nuts<br />
(4 places)<br />
FIG. 11-H<br />
Horizontal Track<br />
Horizontal Angle Bracket<br />
Horizontal<br />
Track<br />
Vertical<br />
Track<br />
Horizontal Angle<br />
Horizontal<br />
Angle<br />
Rope<br />
Horizontal<br />
Track<br />
Sway Brace<br />
Bolt Blocks<br />
<strong>Door</strong> Travel