The Next Generation Garage Door Installation & Maintenance - Clopay
The Next Generation Garage Door Installation & Maintenance - Clopay
The Next Generation Garage Door Installation & Maintenance - Clopay

Create successful ePaper yourself
Turn your PDF publications into a flip-book with our unique Google optimized e-Paper software.
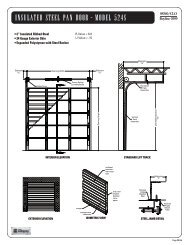
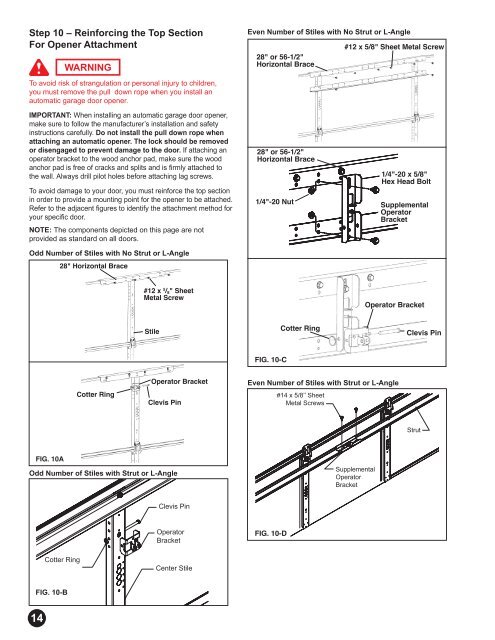
Step 10 – Reinforcing the Top Section<br />
For Opener Attachment<br />
14<br />
Cotter Ring<br />
WARNING<br />
To avoid risk of strangulation or personal injury to children,<br />
you must remove the pull down rope when you install an<br />
automatic garage door opener.<br />
IMPORTANT: When installing an automatic garage door opener,<br />
make sure to follow the manufacturer’s installation and safety<br />
instructions carefully. Do not install the pull down rope when<br />
attaching an automatic opener. <strong>The</strong> lock should be removed<br />
or disengaged to prevent damage to the door. If attaching an<br />
operator bracket to the wood anchor pad, make sure the wood<br />
anchor pad is free of cracks and splits and is fi rmly attached to<br />
the wall. Always drill pilot holes before attaching lag screws.<br />
To avoid damage to your door, you must reinforce the top section<br />
in order to provide a mounting point for the opener to be attached.<br />
Refer to the adjacent fi gures to identify the attachment method for<br />
your specifi c door.<br />
NOTE: <strong>The</strong> components depicted on this page are not<br />
provided as standard on all doors.<br />
Odd Number of Stiles with No Strut or L-Angle<br />
FIG. 10A<br />
Odd Number of Stiles with Strut or L-Angle<br />
FIG. 10-B<br />
28" Horizontal Brace<br />
Cotter Ring<br />
P04-R01-0704<br />
#12 x 5 /8" Sheet<br />
Metal Screw<br />
Stile<br />
Operator Bracket<br />
Clevis Pin<br />
Clevis Pin<br />
Operator<br />
Bracket<br />
Center Stile<br />
Even Number of Stiles with No Strut or L-Angle<br />
28" or 56-1/2"<br />
Horizontal Brace<br />
28" or 56-1/2"<br />
Horizontal Brace<br />
1/4"-20 Nut<br />
FIG. 10-C<br />
Cotter Ring<br />
#12 x 5/8" Sheet Metal Screw<br />
1/4"-20 x 5/8"<br />
Hex Head Bolt<br />
Supplemental<br />
Operator<br />
Bracket<br />
Operator Bracket<br />
Even Number of Stiles with Strut or L-Angle<br />
FIG. 10-D<br />
Clevis Pin