Chapter 9: Using the Apache Log Tag Library - BeKnowledge
Chapter 9: Using the Apache Log Tag Library - BeKnowledge
Chapter 9: Using the Apache Log Tag Library - BeKnowledge
Create successful ePaper yourself
Turn your PDF publications into a flip-book with our unique Google optimized e-Paper software.
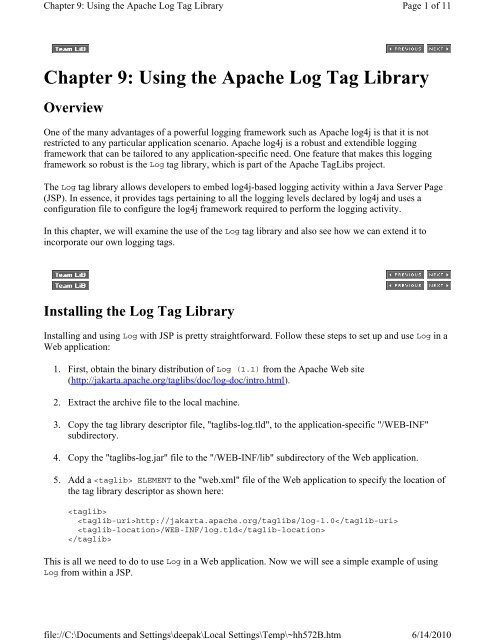
<strong>Chapter</strong> 9: <strong>Using</strong> <strong>the</strong> <strong>Apache</strong> <strong>Log</strong> <strong>Tag</strong> <strong>Library</strong><br />
<strong>Chapter</strong> 9: <strong>Using</strong> <strong>the</strong> <strong>Apache</strong> <strong>Log</strong> <strong>Tag</strong> <strong>Library</strong><br />
Overview<br />
One of <strong>the</strong> many advantages of a powerful logging framework such as <strong>Apache</strong> log4j is that it is not<br />
restricted to any particular application scenario. <strong>Apache</strong> log4j is a robust and extendible logging<br />
framework that can be tailored to any application-specific need. One feature that makes this logging<br />
framework so robust is <strong>the</strong> <strong>Log</strong> tag library, which is part of <strong>the</strong> <strong>Apache</strong> <strong>Tag</strong>Libs project.<br />
The <strong>Log</strong> tag library allows developers to embed log4j-based logging activity within a Java Server Page<br />
(JSP). In essence, it provides tags pertaining to all <strong>the</strong> logging levels declared by log4j and uses a<br />
configuration file to configure <strong>the</strong> log4j framework required to perform <strong>the</strong> logging activity.<br />
In this chapter, we will examine <strong>the</strong> use of <strong>the</strong> <strong>Log</strong> tag library and also see how we can extend it to<br />
incorporate our own logging tags.<br />
Installing <strong>the</strong> <strong>Log</strong> <strong>Tag</strong> <strong>Library</strong><br />
Installing and using <strong>Log</strong> with JSP is pretty straightforward. Follow <strong>the</strong>se steps to set up and use <strong>Log</strong> in a<br />
Web application:<br />
1. First, obtain <strong>the</strong> binary distribution of <strong>Log</strong> (1.1) from <strong>the</strong> <strong>Apache</strong> Web site<br />
(http://jakarta.apache.org/taglibs/doc/log-doc/intro.html).<br />
2. Extract <strong>the</strong> archive file to <strong>the</strong> local machine.<br />
3. Copy <strong>the</strong> tag library descriptor file, "taglibs-log.tld", to <strong>the</strong> application-specific "/WEB-INF"<br />
subdirectory.<br />
4. Copy <strong>the</strong> "taglibs-log.jar" file to <strong>the</strong> "/WEB-INF/lib" subdirectory of <strong>the</strong> Web application.<br />
5. Add a ELEMENT to <strong>the</strong> "web.xml" file of <strong>the</strong> Web application to specify <strong>the</strong> location of<br />
<strong>the</strong> tag library descriptor as shown here:<br />
<br />
http://jakarta.apache.org/taglibs/log-1.0<br />
/WEB-INF/log.tld<br />
<br />
Page 1 of 11<br />
This is all we need to do to use <strong>Log</strong> in a Web application. Now we will see a simple example of using<br />
<strong>Log</strong> from within a JSP.<br />
file://C:\Documents and Settings\deepak\Local Settings\Temp\~hh572B.htm<br />
6/14/2010
<strong>Chapter</strong> 9: <strong>Using</strong> <strong>the</strong> <strong>Apache</strong> <strong>Log</strong> <strong>Tag</strong> <strong>Library</strong><br />
Note The installation procedure described in this section is specific to <strong>the</strong> <strong>Apache</strong> Tomcat Web server<br />
environment. For using <strong>Log</strong> (1.1) with o<strong>the</strong>r Web servers, you need to configure it to work<br />
specifically with <strong>the</strong> Web server you are using.<br />
A Simple Example of <strong>Using</strong> <strong>the</strong> <strong>Log</strong> <strong>Tag</strong> <strong>Library</strong><br />
First, let's see a simple example of how we can use <strong>the</strong> <strong>Log</strong> tag library within a JSP to perform logging<br />
through log4j. Listing 9-1, Simple<strong>Log</strong>.jsp, is a straightforward JSP that uses <strong>the</strong> <strong>Log</strong> tag library to print<br />
logging information to <strong>the</strong> console of a Web server. This example is demonstrated using Tomcat 3.2.1.<br />
Listing 9-1: Simple<strong>Log</strong>.jsp<br />
<br />
<br />
<br />
Test <strong>Log</strong> <strong>Tag</strong> <strong>Library</strong><br />
Message embedded within open and close tags.<br />
<br />
<strong>Using</strong> category attribute.<br />
You should see output in <strong>the</strong> debug logs now.<br />
<br />
<br />
As you can see, this JSP, although very simple, is enough to show how <strong>the</strong> <strong>Log</strong> tag libraries work. In this<br />
example, we are using <strong>the</strong> and tags to print logging information. The <strong>Log</strong> tag library<br />
provides tags related to all <strong>the</strong> levels of logging defined in log4j. We will see all <strong>the</strong> tags available with<br />
<strong>Log</strong> later in this chapter. For <strong>the</strong> time being, let's explore <strong>the</strong> basics of using <strong>Log</strong> from within a JSP:<br />
� First, we need to import <strong>the</strong> <strong>Log</strong> tag library in our JSP to make <strong>the</strong> tags available to <strong>the</strong> page<br />
context. This is achieved by <strong>the</strong> following line of code within <strong>the</strong> JSP:<br />
<br />
This line of code imports <strong>the</strong> tag library from <strong>the</strong> specified location and sets log as <strong>the</strong> tag name<br />
prefix for <strong>the</strong> tags in <strong>the</strong> library. In reality, this prefix can be any unique text.<br />
� The tags from <strong>the</strong> <strong>Log</strong> tag library need to begin with <strong>the</strong> prefix that is defined while importing <strong>the</strong><br />
tag library to <strong>the</strong> page. In this example, <strong>the</strong> tags are prefixed by log.<br />
� The tags accept optional attributes and require open and close tags for each of <strong>the</strong>m.<br />
With this simple understanding of using <strong>the</strong> <strong>Log</strong> tag library, let's take a look at <strong>the</strong> configuration<br />
requirements for this example.<br />
Configuration File for <strong>the</strong> <strong>Log</strong> <strong>Tag</strong> <strong>Library</strong><br />
file://C:\Documents and Settings\deepak\Local Settings\Temp\~hh572B.htm<br />
Page 2 of 11<br />
6/14/2010
<strong>Chapter</strong> 9: <strong>Using</strong> <strong>the</strong> <strong>Apache</strong> <strong>Log</strong> <strong>Tag</strong> <strong>Library</strong><br />
The <strong>Log</strong> tag library uses log4j to print logging information to a desired location. As mentioned in<br />
<strong>Chapter</strong> 5, log4j does not make any assumptions about <strong>the</strong> application environment. In order to obtain<br />
logging information in a desired format and at a desired location, log4j needs a configuration file<br />
specifying all <strong>the</strong> information about <strong>the</strong> formatting and <strong>the</strong> destination of <strong>the</strong> logging information.<br />
<strong>Log</strong> supplies a default configuration file named "log4j.properties". Listing 9-2 describes <strong>the</strong> default log4j<br />
configuration file that is shipped with <strong>the</strong> <strong>Log</strong> distribution.<br />
Listing 9-2: log4j.properties, <strong>the</strong> Default Configuration File for <strong>Log</strong><br />
# Sample properties to initialize log4j<br />
log4j.rootCategory=debug, stdout<br />
log4j.appender.stdout=org.apache.log4j.ConsoleAppender<br />
log4j.appender.stdout.layout=org.apache.log4j.PatternLayout<br />
# Pattern to output <strong>the</strong> caller's file name and line number.<br />
log4j.appender.stdout.layout.ConversionPattern=%5p [%t] (%F:%L) - %m%n<br />
log4j.appender.R=org.apache.log4j.RollingFileAppender<br />
log4j.appender.R.File=logtags.log<br />
log4j.appender.R.MaxFileSize=100KB<br />
# Keep one backup file<br />
log4j.appender.R.MaxBackupIndex=2<br />
log4j.appender.R.layout=org.apache.log4j.PatternLayout<br />
log4j.appender.R.layout.ConversionPattern=%p %t %c - %m%n<br />
Page 3 of 11<br />
This configuration file is quite simple. It uses ConsoleAppender and RollingFileAppender objects to<br />
output logging information to a Web server console and to a file. It also uses PatternLayout to format<br />
<strong>the</strong> logging information. The pattern specified for <strong>the</strong> logging information to be printed to <strong>the</strong> console<br />
includes <strong>the</strong> level, thread name, filename, location information, and message followed by a newline<br />
character.<br />
The pattern for writing to a file is slightly different and includes <strong>the</strong> level, thread name, logger name,<br />
and message followed by a newline character. Although this configuration file looks simple, it<br />
highlights <strong>the</strong> following important points as to how <strong>Log</strong> works:<br />
� <strong>Log</strong> uses <strong>the</strong> log4j root logger (synonymous to Category in <strong>the</strong> preceding example) to publish <strong>the</strong><br />
logging information. The root logger has <strong>the</strong> threshold level DEBUG.<br />
� <strong>Log</strong> by default writes logging information to <strong>the</strong> Web server console. In <strong>the</strong>ory, <strong>Log</strong> can be<br />
configured to send logging information to any preferred destination by changing <strong>the</strong> configuration<br />
file. It provides a sample configuration for redirecting logging information to a rolling file by<br />
using <strong>the</strong> RollingFileAppender object.<br />
� If we want to use a logger o<strong>the</strong>r than <strong>the</strong> root logger, <strong>the</strong>n we need to configure <strong>the</strong> <strong>Log</strong>ger object<br />
in <strong>the</strong> configuration file. Forgetting to do that may result in no logging information printing to any<br />
of <strong>the</strong> specified destinations.<br />
file://C:\Documents and Settings\deepak\Local Settings\Temp\~hh572B.htm<br />
6/14/2010
<strong>Chapter</strong> 9: <strong>Using</strong> <strong>the</strong> <strong>Apache</strong> <strong>Log</strong> <strong>Tag</strong> <strong>Library</strong><br />
� Changing <strong>the</strong> threshold level for <strong>the</strong> root logger or o<strong>the</strong>r custom loggers used with any of <strong>the</strong> tags<br />
can cause changes in <strong>the</strong> logging output.<br />
Note If no separate logger (Category) is explicitly specified as an attribute of any of <strong>the</strong> <strong>Log</strong> tags, <strong>the</strong><br />
tags rely on <strong>the</strong> root logger of log4j to publish logging information. Hence, it is always safe to keep<br />
<strong>the</strong> root logger configuration even though we may specify custom logger (Category) names within<br />
<strong>the</strong> tag attributes and configure <strong>the</strong>m separately in <strong>the</strong> same configuration file.<br />
Setting <strong>the</strong> Environment<br />
Having followed <strong>the</strong> instructions in <strong>the</strong> "Installing <strong>the</strong> <strong>Log</strong> <strong>Tag</strong> <strong>Library</strong>" section, we are all ready to use<br />
<strong>the</strong> <strong>Log</strong> tag library from within a JSP. Before we can see <strong>the</strong> example JSP in Listing 9-1 in action, we<br />
need to configure <strong>the</strong> Web server to use <strong>the</strong> JSP and <strong>the</strong> log4j configuration file as described in next few<br />
steps:<br />
1. First, put <strong>the</strong> JPS described in Listing 9-1 into a folder named "Test<strong>Log</strong><strong>Tag</strong>s" (or any folder of<br />
your choice) under <strong>the</strong> "webapps" directory of <strong>the</strong> Tomcat installation.<br />
2. In Tomcat, any Web application typically contains a "WEB-INF" directory and one "WEB-<br />
INF/classes" directory. Place <strong>the</strong> "log4j.properties" file in one of <strong>the</strong>se locations. For example,<br />
you may decide to put it in <strong>the</strong> "WEB-INF/classes" directory.<br />
3. Specify where Tomcat can find <strong>the</strong> configuration file shown in <strong>the</strong> preceding section for log4j.<br />
4. Pass <strong>the</strong> "log4j.properties" file as a system variable to <strong>the</strong> execution environment of Tomcat.<br />
5. Go to <strong>the</strong> "tomcat.bat" file in "%TOMCAT_HOME%\bin".<br />
6. Add an entry to set <strong>the</strong> classpath variable to point to <strong>the</strong> directory containing <strong>the</strong> "log4j.properties"<br />
file. For this example, <strong>the</strong> entry may read as follows:<br />
set CP=%CP%;C:\Jakarta-tomcat-3.2.1\webapps\<br />
Test<strong>Log</strong><strong>Tag</strong>s\WEB-INF\classes<br />
7. Add <strong>the</strong> following entry to <strong>the</strong> "tomcat.bat" file:<br />
set TOMCAT_OPTS=-Dlog4j.configuration=log4j.properties<br />
Note We can also configure log4j through an initialization servlet. Consult <strong>Chapter</strong> 5 for more on this<br />
topic.<br />
This is all we need to do before we can run <strong>the</strong> example, which we will see how to do next.<br />
The <strong>Log</strong> Example in Action<br />
Now start up Tomcat and access <strong>the</strong> JSP page, as shown in Figure 9-1. Tomcat will load <strong>the</strong><br />
"log4j.properties" file, and <strong>Log</strong> will use this configuration file to print <strong>the</strong> logging information.<br />
file://C:\Documents and Settings\deepak\Local Settings\Temp\~hh572B.htm<br />
Page 4 of 11<br />
6/14/2010
<strong>Chapter</strong> 9: <strong>Using</strong> <strong>the</strong> <strong>Apache</strong> <strong>Log</strong> <strong>Tag</strong> <strong>Library</strong><br />
Figure 9-1: The Simple<strong>Log</strong>.jsp page<br />
If we now look at <strong>the</strong> Tomcat console, we will see <strong>the</strong> following logging information printed:<br />
DEBUG [Thread-11] (<strong>Log</strong>ger<strong>Tag</strong>.java:109) - Message embedded within open and<br />
close tags.<br />
DEBUG [Thread-11] (<strong>Log</strong>ger<strong>Tag</strong>.java:97) - Message passed as an attribute to<br />
<strong>the</strong> tag<br />
INFO [Thread-11] (<strong>Log</strong>ger<strong>Tag</strong>.java:109) - <strong>Using</strong> category attribute.<br />
<strong>Using</strong> a Custom <strong>Log</strong>ger with <strong>the</strong> <strong>Log</strong> <strong>Tag</strong> <strong>Library</strong><br />
In <strong>the</strong> JSP listed in Listing 9-1, we use <strong>the</strong> tag with <strong>the</strong> category attribute specified as<br />
test. This is <strong>the</strong> name of <strong>the</strong> logger to be produced as part of <strong>the</strong> logging information. If we change <strong>the</strong><br />
output pattern for <strong>the</strong> logging information to include information about <strong>the</strong> logger, we will see <strong>the</strong><br />
category test appearing as part of <strong>the</strong> logging output. The whole point of specifying <strong>the</strong> category<br />
attribute is to be able to include a different set of configuration parameters for <strong>the</strong> category or logger.<br />
Listing 9-3 presents a modified "log4j.properties" file that includes configuration for <strong>the</strong> category named<br />
test.<br />
Listing 9-3: Modified log4j.properties File<br />
# Sample properties to initialize log4j<br />
log4j.rootCategory=debug, stdout<br />
log4j.logger.test=debug, R<br />
log4j.appender.stdout=org.apache.log4j.ConsoleAppender<br />
log4j.appender.stdout.layout=org.apache.log4j.PatternLayout<br />
# Pattern to output <strong>the</strong> caller's file name and line number.<br />
log4j.appender.stdout.layout.ConversionPattern=%5p [%t] (%F:%L) - %m%n<br />
log4j.appender.R=org.apache.log4j.RollingFileAppender<br />
log4j.appender.R.File=logtags.log<br />
log4j.appender.R.MaxFileSize=100KB<br />
# Keep one backup file<br />
log4j.appender.R.MaxBackupIndex=2<br />
log4j.appender.R.layout=org.apache.log4j.PatternLayout<br />
log4j.appender.R.layout.ConversionPattern=%p %t %c - %m%n<br />
file://C:\Documents and Settings\deepak\Local Settings\Temp\~hh572B.htm<br />
Page 5 of 11<br />
6/14/2010
<strong>Chapter</strong> 9: <strong>Using</strong> <strong>the</strong> <strong>Apache</strong> <strong>Log</strong> <strong>Tag</strong> <strong>Library</strong><br />
This configuration file defines <strong>the</strong> configuration for <strong>the</strong> logger test. The test logger has a threshold<br />
level of DEBUG and uses a RollingFileAppender object to print logging information to a file named<br />
"logtags.log". Notice that <strong>the</strong> conversionPattern to format <strong>the</strong> logging information includes <strong>the</strong> name<br />
of <strong>the</strong> logger (%c).<br />
<strong>Using</strong> this configuration file for <strong>Log</strong> will write information to <strong>the</strong> "logtags.log" file in <strong>the</strong> "%<br />
TOMCAT_HOME%\bin" directory. If we execute <strong>the</strong> example JSP with this modified configuration<br />
file, we will see <strong>the</strong> following output in <strong>the</strong> "logtags.log" file:<br />
DEBUG Thread-11 root - Message embedded within open and close tags.<br />
DEBUG Thread-11 root - Message passed as an attribute to <strong>the</strong> tag<br />
INFO Thread-11 test - Hello how are you?<br />
This is how we can use different loggers with custom configuration to handle logging information. If we<br />
specify <strong>the</strong> category attribute in <strong>the</strong> JSP but do not specify a configuration for it, <strong>Log</strong> will use <strong>the</strong> root<br />
logger configuration to handle <strong>the</strong> logging request.<br />
Description of <strong>Log</strong> <strong>Tag</strong>s<br />
The <strong>Log</strong> tag library provides tags corresponding to <strong>the</strong> levels declared in log4j. Table 9-1 summarizes all<br />
<strong>the</strong> <strong>Log</strong> tag library tags and <strong>the</strong>ir attributes.<br />
Table 9-1: Summary of <strong>Log</strong> <strong>Tag</strong>s<br />
<strong>Tag</strong> Name <strong>Tag</strong> Description Attribute Name Required<br />
debug Displays a DEBUG-level message category message No<br />
No<br />
info Displays an INFO-level message category message No<br />
No<br />
warn Displays a WARN-level message category message No<br />
No<br />
error Displays a ERROR-level message category message No~<br />
No<br />
fatal Displays a FATAL-level message category message No<br />
No<br />
dump Displays all <strong>the</strong> variables in a specified scope scope Yes<br />
Page 6 of 11<br />
As you can see, <strong>the</strong> use of <strong>the</strong>se <strong>Log</strong> tags is very simple. All <strong>the</strong> tags except dump have two optional<br />
attributes, category and message. It is possible to specify <strong>the</strong> logging information as a value of <strong>the</strong><br />
message attribute or by enclosing it within <strong>the</strong> tag. For example, we can use <strong>the</strong> error tag in following<br />
two ways:<br />
file://C:\Documents and Settings\deepak\Local Settings\Temp\~hh572B.htm<br />
6/14/2010
<strong>Chapter</strong> 9: <strong>Using</strong> <strong>the</strong> <strong>Apache</strong> <strong>Log</strong> <strong>Tag</strong> <strong>Library</strong><br />
<br />
This is an error message<br />
The dump tag mentioned in Table 9-1 is designed to print all variables within <strong>the</strong> scope specified through<br />
<strong>the</strong> scope attribute. Listing 9-4, Simple<strong>Log</strong>Dump.jsp, is a modified version of <strong>the</strong> JSP in Listing 9-1<br />
and adds a dump tag within <strong>the</strong> page.<br />
Listing 9-4: Simple<strong>Log</strong>Dump.jsp<br />
<br />
<br />
<br />
Test <strong>Log</strong> <strong>Tag</strong> <strong>Library</strong><br />
Message embedded within open and close tags.<br />
<br />
<strong>Using</strong> category attribute.<br />
You should see output in <strong>the</strong> debug logs now.<br />
request<br />
<br />
page<br />
<br />
session<br />
<br />
application<br />
<br />
<br />
<br />
Page 7 of 11<br />
In this JSP, we are displaying <strong>the</strong> output of <strong>the</strong> dump tag with all <strong>the</strong> possible scope attribute values.<br />
Figure 9-2 shows what is displayed on <strong>the</strong> page.<br />
file://C:\Documents and Settings\deepak\Local Settings\Temp\~hh572B.htm<br />
6/14/2010
<strong>Chapter</strong> 9: <strong>Using</strong> <strong>the</strong> <strong>Apache</strong> <strong>Log</strong> <strong>Tag</strong> <strong>Library</strong><br />
Figure 9-2: The Simple<strong>Log</strong>Dump.jsp page<br />
Creating Custom <strong>Tag</strong>s with <strong>the</strong> <strong>Log</strong> <strong>Tag</strong> <strong>Library</strong> to Use a<br />
Custom Level<br />
In <strong>Chapter</strong> 8, we saw how to write a custom Level class, TRACE, and use it with log4j. If we want to<br />
use <strong>the</strong> TRACE custom level along with <strong>the</strong> <strong>Log</strong> tag library, we have to extend <strong>the</strong> <strong>Log</strong> tag library<br />
framework. Typically, we can do so by performing <strong>the</strong>se tasks:<br />
� Write a new <strong>Tag</strong> class to represent <strong>the</strong> custom level TRACE.<br />
� Make <strong>the</strong> new <strong>Tag</strong> and Level classes available to <strong>the</strong> application.<br />
� Modify <strong>the</strong> "taglib-descriptor" file to describe <strong>the</strong> new tag.<br />
In <strong>the</strong> next sections, we will examine how we can achieve <strong>the</strong>se tasks to use <strong>the</strong> TRACE level with <strong>the</strong><br />
<strong>Log</strong> tag library.<br />
Creating a New <strong>Tag</strong><br />
In <strong>the</strong> <strong>Log</strong> tag library world, all tag classes subclass from <strong>the</strong> abstract class <strong>Log</strong>ger<strong>Tag</strong>. The<br />
<strong>Log</strong>ger<strong>Tag</strong> class itself is a subclass of <strong>the</strong> Body<strong>Tag</strong>Support class and does <strong>the</strong> entire job of handling<br />
tag-related operations. It also defines an abstract method, getPriority(), that is implemented in all<br />
o<strong>the</strong>r subclasses of <strong>the</strong> <strong>Log</strong>ger<strong>Tag</strong> class. All o<strong>the</strong>r tag classes such as Error<strong>Tag</strong>, Info<strong>Tag</strong>, etc., are<br />
subclasses of <strong>Log</strong>ger<strong>Tag</strong> and provide implementations for <strong>the</strong> getPriority() method. Thus, to define<br />
a new tag, we simply need to extend <strong>the</strong> <strong>Log</strong>ger<strong>Tag</strong> class and provide an implementation of <strong>the</strong><br />
getPriority() method that returns <strong>the</strong> custom level TRACE. Listing 9-5, Trace<strong>Tag</strong>.java,<br />
demonstrates how to write a custom tag using <strong>the</strong> custom level TRACE.<br />
Listing 9-5: Trace<strong>Tag</strong>.java<br />
package com.apress.logging.log4j.customtag;<br />
import org.apache.taglibs.log.<strong>Log</strong>ger<strong>Tag</strong>;<br />
import org.apache.log4j.Priority;<br />
import com.apress.logging.log4j.CustomLevel;<br />
public class Trace<strong>Tag</strong> extends <strong>Log</strong>ger<strong>Tag</strong><br />
{<br />
protected Priority getPriority()<br />
{<br />
return CustomLevel.TRACE;<br />
}<br />
}<br />
file://C:\Documents and Settings\deepak\Local Settings\Temp\~hh572B.htm<br />
Page 8 of 11<br />
6/14/2010
<strong>Chapter</strong> 9: <strong>Using</strong> <strong>the</strong> <strong>Apache</strong> <strong>Log</strong> <strong>Tag</strong> <strong>Library</strong><br />
To develop this custom tag, we reuse <strong>the</strong> custom level TRACE developed in <strong>Chapter</strong> 8 (refer to Listing<br />
8-9). As you can see, creating a new tag to use a new level is straightforward. Listing 9-6 shows <strong>the</strong> tag<br />
library description that needs to be added to <strong>the</strong> existing "taglibs-log.tld" file. (This file is shipped with<br />
<strong>the</strong> <strong>Log</strong> distribution.)<br />
Listing 9-6: <strong>Tag</strong> Description for <strong>the</strong> Custom Trace <strong>Tag</strong><br />
<br />
trace<br />
com.apress.logging.log4j.customtag.Trace<strong>Tag</strong><br />
<br />
category<br />
false<br />
true<br />
<br />
<br />
message<br />
false<br />
true<br />
<br />
<br />
Note The name of <strong>the</strong> tag is specified as trace. Therefore, within a JSP, we need to use <strong>the</strong> name trace<br />
to access this tag.<br />
Custom Trace <strong>Tag</strong> in Action<br />
Once we have <strong>the</strong> tag class for <strong>the</strong> level TRACE ready and also modify <strong>the</strong> "taglibs-log.tld" file to<br />
incorporate <strong>the</strong> definition of <strong>the</strong> new trace tag, we can start using it in a JSP. In order to set up Tomcat<br />
to use this new tag, we will need to go through <strong>the</strong> following steps:<br />
1. Copy <strong>the</strong> required new Trace<strong>Tag</strong> and CustomLevel class in <strong>the</strong> appropriate directory structure<br />
within <strong>the</strong> Web application. For example, if <strong>the</strong> Web application directory is "Test<strong>Log</strong><strong>Tag</strong>s", <strong>the</strong>n<br />
<strong>the</strong> appropriate package structure for <strong>the</strong> classes will need to be created under <strong>the</strong><br />
"Test<strong>Log</strong><strong>Tag</strong>s\WEB-INF\classes directory".<br />
2. Edit <strong>the</strong> "Tomcat.bat" file to include <strong>the</strong> "taglibs-log.jar" file in <strong>the</strong> classpath.<br />
3. Modify <strong>the</strong> "log4j.properties" file to set <strong>the</strong> threshold level to TRACE. The default threshold level<br />
set for <strong>the</strong> root logger is DEBUG, which is above <strong>the</strong> level of TRACE. So with default<br />
configuration, TRACE-level messages will not be published. Listing 9-7 presents <strong>the</strong> modified<br />
"log4j.properties" file for using <strong>the</strong> TRACE level.<br />
Listing 9-7: Modified log4j.properties File for <strong>Using</strong> <strong>the</strong> TRACE Level<br />
log4j.rootCategory=trace#com.apress.logging.log4j.CustomLevel, stdout<br />
log4j.appender.stdout=org.apache.log4j.ConsoleAppender<br />
log4j.appender.stdout.layout=org.apache.log4j.PatternLayout<br />
# Pattern to output <strong>the</strong> caller's file name and line number.<br />
file://C:\Documents and Settings\deepak\Local Settings\Temp\~hh572B.htm<br />
Page 9 of 11<br />
6/14/2010
<strong>Chapter</strong> 9: <strong>Using</strong> <strong>the</strong> <strong>Apache</strong> <strong>Log</strong> <strong>Tag</strong> <strong>Library</strong><br />
log4j.appender.stdout.layout.ConversionPattern=%5p [%t] (%F:%L) - %m%n<br />
log4j.appender.R=org.apache.log4j.RollingFileAppender<br />
log4j.appender.R.File=logtags.log<br />
log4j.appender.R.MaxFileSize=100KB<br />
# Keep one backup file<br />
log4j.appender.R.MaxBackupIndex=2<br />
log4j.appender.R.layout=org.apache.log4j.PatternLayout<br />
log4j.appender.R.layout.ConversionPattern=%p %t %c - %m%n<br />
With <strong>the</strong>se settings in place, execute <strong>the</strong> JSP presented in Listing 9-8. This JSP includes a TRACE-level<br />
message.<br />
Listing 9-8: Simple<strong>Log</strong>Trace.jsp<br />
<br />
<br />
<br />
Test <strong>Log</strong> <strong>Tag</strong> <strong>Library</strong><br />
Trace level message.<br />
You should see output in <strong>the</strong> debug logs now.<br />
<br />
<br />
Executing this JSP will produce <strong>the</strong> following message with <strong>the</strong> TRACE level in <strong>the</strong> Web server<br />
console:<br />
TRACE [Thread-11] (<strong>Log</strong>ger<strong>Tag</strong>.java:109) - Trace level message.<br />
Conclusion<br />
Page 10 of 11<br />
In this chapter, we discussed a newly released tag library, <strong>Log</strong>, from <strong>Apache</strong>, for using log4j within a<br />
JSP to perform logging. This solves <strong>the</strong> age-old problem of having controlled logging from within a<br />
JSP. By changing <strong>the</strong> configuration, it is possible to redirect logging information to any preferred<br />
destination in any desired format. But careful consideration is required before you include in your Web<br />
application CPU-intensive logging operations such as writing logging data to a database, as it might<br />
affect <strong>the</strong> performance of that application.<br />
This brings us to <strong>the</strong> end of <strong>the</strong> log4j discussion. All <strong>the</strong> topics explained in <strong>Chapter</strong>s 5 through 9 should<br />
help you understand <strong>the</strong> internals of log4j and how to use it in practical applications. The smaller<br />
examples provided should enable you to grasp <strong>the</strong> concepts presented and see quick results to better<br />
understand <strong>the</strong> use of log4j. The more extensive examples should help you to correlate <strong>the</strong> use of log4j<br />
file://C:\Documents and Settings\deepak\Local Settings\Temp\~hh572B.htm<br />
6/14/2010
<strong>Chapter</strong> 9: <strong>Using</strong> <strong>the</strong> <strong>Apache</strong> <strong>Log</strong> <strong>Tag</strong> <strong>Library</strong><br />
with real-life applications.<br />
Page 11 of 11<br />
There is always one more thing to learn about any topic. But we have created a skeleton and given it a<br />
shape, and now you are in a position to build on it. But before we finish, we will definitely need to look<br />
at some of <strong>the</strong> best practices involved in using different logging APIs in <strong>the</strong> next chapter.<br />
file://C:\Documents and Settings\deepak\Local Settings\Temp\~hh572B.htm<br />
6/14/2010


