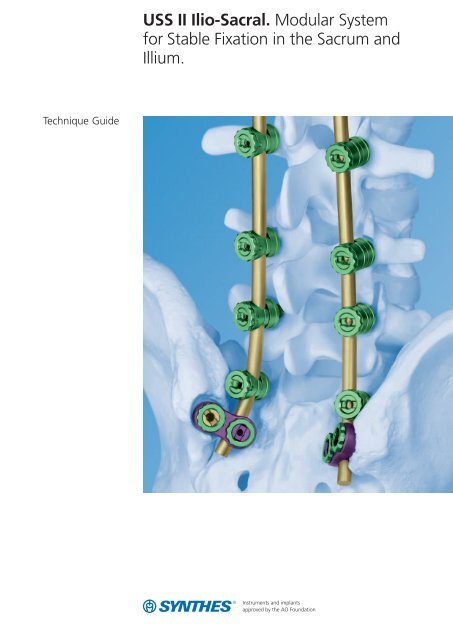
USS II Ilio-Sacral. Modular System for Stable Fixation in ... - Synthes
USS II Ilio-Sacral. Modular System for Stable Fixation in ... - Synthes
USS II Ilio-Sacral. Modular System for Stable Fixation in ... - Synthes

Create successful ePaper yourself
Turn your PDF publications into a flip-book with our unique Google optimized e-Paper software.
Technique Guide<br />
<strong>USS</strong> <strong>II</strong> <strong>Ilio</strong>-<strong>Sacral</strong>. <strong>Modular</strong> <strong>System</strong><br />
<strong>for</strong> <strong>Stable</strong> <strong>Fixation</strong> <strong>in</strong> the Sacrum and<br />
Illium.
Table of Contents<br />
Introduction<br />
Product In<strong>for</strong>mation<br />
Surgical Technique<br />
Warn<strong>in</strong>g<br />
This description alone does not provide sufficient background <strong>for</strong> direct use of<br />
the <strong>in</strong>strument set. Instruction by a surgeon experienced <strong>in</strong> handl<strong>in</strong>g these<br />
<strong>in</strong>struments is highly recommended.<br />
Reprocess<strong>in</strong>g, Care and Ma<strong>in</strong>tenance of<br />
<strong>Synthes</strong> Instruments<br />
For general guidel<strong>in</strong>es, function control and dismantl<strong>in</strong>g of multi-part <strong>in</strong>struments,<br />
please refer to: www.synthes.com/reprocess<strong>in</strong>g<br />
Indications and Contra<strong>in</strong>dications 5<br />
Implants 6<br />
Instruments 8<br />
Iliac <strong>Fixation</strong> with Iliac Connector 10<br />
S2 <strong>Fixation</strong> with S2 connector 19<br />
a Insertion S2 connector left/right 22<br />
b Insertion S2 connector <strong>for</strong> rod end 24<br />
Remobilisation of the Polyaxial Connection<br />
<strong>for</strong> Implant Removal 27<br />
<strong>Synthes</strong> 1
<strong>USS</strong> <strong>II</strong> <strong>Ilio</strong>-<strong>Sacral</strong>. <strong>Modular</strong> <strong>System</strong> <strong>for</strong><br />
<strong>Stable</strong> <strong>Fixation</strong> <strong>in</strong> the Sacrum and Ilium.<br />
<strong>USS</strong> <strong>II</strong> <strong>Ilio</strong>-<strong>Sacral</strong> is <strong>in</strong>tended <strong>for</strong> an additional<br />
rod fixation <strong>in</strong> the ilium and <strong>in</strong> S2.<br />
It is an add-on to <strong>USS</strong> <strong>II</strong> Polyaxial and<br />
comb<strong>in</strong>ed with the <strong>USS</strong> systems enables<br />
a construct from the thoracolumbar<br />
sp<strong>in</strong>e to the pelvis.<br />
<strong>USS</strong> <strong>II</strong> <strong>Ilio</strong>-<strong>Sacral</strong><br />
– Add-on to <strong>USS</strong> <strong>II</strong> Polyaxial<br />
– Uses the same bone screws<br />
(extra long up to 140 mm)<br />
– Low profile<br />
There are different connectors available<br />
<strong>for</strong> the l<strong>in</strong>kage to the ilium and to the<br />
S2 pedicle. All connectors are comb<strong>in</strong>ed<br />
with the <strong>USS</strong> <strong>II</strong> Polyaxial bone<br />
screws.<br />
<strong>USS</strong> <strong>II</strong> nut<br />
Fixed length iliac connector (1)<br />
Telescopic iliac connector (2)<br />
Clamp <strong>for</strong> fixed length/<br />
telescopic iliac connector<br />
Collet<br />
2 <strong>Synthes</strong> <strong>USS</strong> <strong>II</strong> <strong>Ilio</strong>-<strong>Sacral</strong> Technique Guide<br />
Dual-core cancellous bone<br />
screws<br />
S2 connector, left/right<br />
S2 connector, <strong>for</strong> rod end<br />
Pelvic connectors<br />
Pelvic rod<br />
Secure work<strong>in</strong>g over sticks,<br />
<strong>for</strong> both <strong>USS</strong> <strong>II</strong> <strong>Ilio</strong>-<strong>Sacral</strong> and<br />
<strong>USS</strong> <strong>II</strong> Polyaxial.<br />
1<br />
6.2 7.0 8.0<br />
S2 fixation<br />
2
4 <strong>Synthes</strong> <strong>USS</strong> <strong>II</strong> <strong>Ilio</strong>-<strong>Sacral</strong> Technique Guide
Indications and Contra<strong>in</strong>dications<br />
Notes<br />
– The iliac connectors provide additional stabilization <strong>for</strong> an<br />
S1 screw fixation. It is recommended to always comb<strong>in</strong>e an<br />
iliac connector with an S1 screw.<br />
– For degenerative diseases, it is recommended to use an S2<br />
fixation where possible <strong>in</strong> addition to the S1 screw.<br />
Indications<br />
<strong>USS</strong> <strong>II</strong> <strong>Ilio</strong>-<strong>Sacral</strong> is <strong>in</strong>dicated <strong>for</strong> fixation of long posterior rod<br />
constructs <strong>in</strong> the ilium and <strong>in</strong> S2, both <strong>in</strong> comb<strong>in</strong>ation with<br />
an S1 fixation.<br />
S1 fixation comb<strong>in</strong>ed with iliac fixation:<br />
– Severe scoliosis (e.g. neuromuscular)<br />
S1 fixation comb<strong>in</strong>ed with S2 fixation:<br />
– Degenerative diseases (e.g. spondylolisthesis)<br />
Contra<strong>in</strong>dications<br />
– Fractures and tumours with <strong>in</strong>sufficient anterior support<br />
– <strong>USS</strong> <strong>II</strong> <strong>Ilio</strong>-<strong>Sacral</strong> should not be used where no fixation <strong>in</strong><br />
S1 is possible.<br />
<strong>Synthes</strong> 5
Implants<br />
Iliac connectors, fixed length<br />
04.621.112–145* Iliac connectors <strong>in</strong> fixed lengths from<br />
12 to 45 mm (<strong>in</strong> 3 mm steps)<br />
04.621.275* Clamp <strong>for</strong> iliac connector with fixed length<br />
Iliac connector, telescopic<br />
04.621.171* Iliac connector, telescopic, neutral,<br />
length 17–27 mm<br />
04.621.270* Clamp <strong>for</strong> telescopic iliac connector<br />
S2 connectors<br />
04.621.260/261* S2 connector, left/right,<br />
<strong>for</strong> rods � 6.0 mm<br />
04.621.262* S2 connector <strong>for</strong> rod end,<br />
<strong>for</strong> rods � 6 mm<br />
Collet <strong>for</strong> iliac connector and S2 connector<br />
04.621.190* Collet <strong>for</strong> iliac connector and S2 connector,<br />
<strong>for</strong> all sizes<br />
*All implants are also available sterile packed. Add suffix “S” to article number.<br />
6 <strong>Synthes</strong> <strong>USS</strong> <strong>II</strong> <strong>Ilio</strong>-<strong>Sacral</strong> Technique Guide
<strong>USS</strong> <strong>II</strong> nut<br />
499.294** <strong>USS</strong> <strong>II</strong> nut<br />
<strong>USS</strong> <strong>II</strong> Polyaxial cancellous bone screws with dual core<br />
Art. Nos. � Lengths Colour<br />
04.607.232–239** 6.2 mm 30– 65 mm light blue<br />
04.607.252–269** 7.0 mm 30–140 mm turquoise<br />
04.607.272–289** 8.0 mm 30–140 mm blue<br />
Optionally <strong>USS</strong> <strong>II</strong> Polyaxial pedicle screws can be used.<br />
Pelvic connectors*<br />
0X.300.000** L-connector<br />
0X.300.001** Claw-connector<br />
0X.300.002** T-connector, small<br />
0X.300.003** T-connector, large<br />
Pelvic rods*<br />
0X.306.010** Pelvic rod, left<br />
0X.306.012** Pelvic rod, right<br />
*X=4 Titanium Alloy (TAN)<br />
X=2 Sta<strong>in</strong>less Steel<br />
**All implants are also available sterile packed. Add suffix “S” to article number.<br />
<strong>Synthes</strong> 7
Instruments<br />
The <strong>USS</strong> General Instruments (187.200) are recommended<br />
<strong>for</strong> use as basic <strong>in</strong>strument set.<br />
<strong>USS</strong> <strong>II</strong> Polyaxial <strong>in</strong>struments needed <strong>for</strong><br />
<strong>USS</strong> <strong>II</strong> <strong>Ilio</strong>-<strong>Sacral</strong><br />
03.607.001 Screwdriver, bihexagonal, � 3.0 mm,<br />
with T-Handle<br />
03.607.003 <strong>USS</strong> <strong>II</strong> Polyaxial Hold<strong>in</strong>g Sleeve <strong>for</strong><br />
No. 03.607.001<br />
03.607.002 Screwdriver Shaft <strong>for</strong> <strong>USS</strong> <strong>II</strong> Polyaxial<br />
cancellous bone screws with<br />
lengths �70 mm<br />
388.622 Handle <strong>for</strong> Screw Holder<br />
or<br />
03.607.006 <strong>USS</strong> <strong>II</strong> Polyaxial Handle <strong>for</strong> Screw Holder<br />
03.607.055<br />
03.607.000 <strong>USS</strong> <strong>II</strong> Polyaxial Reamer<br />
8 <strong>Synthes</strong> <strong>USS</strong> <strong>II</strong> <strong>Ilio</strong>-<strong>Sacral</strong> Technique Guide
03.607.005 <strong>USS</strong> <strong>II</strong> Polyaxial Screw Holder<br />
388.584 Socket Wrench <strong>for</strong> twelve po<strong>in</strong>t nut,<br />
with L-Handle<br />
<strong>USS</strong> <strong>II</strong> <strong>Ilio</strong>-<strong>Sacral</strong> <strong>in</strong>struments<br />
03.621.011 Clamp Holder<br />
(<strong>for</strong> clamps 04.621.270 and 275)<br />
03.621.031-33 Templates <strong>for</strong> Iliac Connectors<br />
(short, medium, long)<br />
03.621.012 Socket Wrench, cannulated, with Straight<br />
Handle <strong>for</strong> <strong>USS</strong>-<strong>II</strong> Nut<br />
Additional <strong>in</strong>struments<br />
319.011 Depth Gauge <strong>for</strong> Pedicle Screws,<br />
measur<strong>in</strong>g range up to 110 mm<br />
388.143 Socket Wrench � 5.0 mm, with T-Handle<br />
314.070 Screwdriver, hexagonal, small, � 2.5 mm,<br />
with Groove<br />
<strong>Synthes</strong> 9
Iliac <strong>Fixation</strong> with Iliac Connector<br />
1<br />
Instrument sp<strong>in</strong>e down to S1<br />
Instrument the sp<strong>in</strong>e with a rod construct down to S1 accord<strong>in</strong>g<br />
to the surgical technique of the implant system used<br />
(e.g. <strong>USS</strong> <strong>II</strong> Polyaxial). In S1, it is recommended to use a<br />
<strong>USS</strong> <strong>II</strong> Polyaxial cancellous bone screw <strong>for</strong> easy rod <strong>in</strong>troduction.<br />
Note: Leave at least 3 cm excess rod caudally to the S1<br />
screw <strong>for</strong> later placement of the iliac connector.<br />
Alternative<br />
Instead of apply<strong>in</strong>g the iliac connectors to the rod as the last<br />
step <strong>in</strong> the surgery, it is also possible to <strong>in</strong>sert all screws and<br />
iliac connectors first, and then apply the rod.<br />
2<br />
Determ<strong>in</strong>e size of iliac connector<br />
Required <strong>in</strong>struments<br />
03.621.031–33 Templates (short, medium, long)<br />
Use the templates to determ<strong>in</strong>e the proper implant size.<br />
Either the telescopic or the fixed-length iliac connector may<br />
be used.<br />
Notes<br />
– Fixed length connector: The distances <strong>in</strong>dicated on the<br />
template correspond to the implant size (mm).<br />
– Telescopic connector: The distance varies between<br />
17 and 27 mm.<br />
10 <strong>Synthes</strong> <strong>USS</strong> <strong>II</strong> <strong>Ilio</strong>-<strong>Sacral</strong> Technique Guide
3<br />
Attach clamp<br />
Required <strong>in</strong>struments<br />
03.621.011 Clamp Holder<br />
Pick up the correspond<strong>in</strong>g clamp <strong>for</strong> the telescopic or<br />
fixed-length connector from the tray us<strong>in</strong>g the Clamp<br />
Holder.<br />
Note: The Clamp Holder is approx. twice as long as the<br />
<strong>USS</strong> <strong>II</strong> Polyaxial Screw Holder.<br />
Attach the clamp to the rod from the midl<strong>in</strong>e. If necessary,<br />
remove excessive bone below the rod to create enough<br />
space <strong>for</strong> the clamp.<br />
Clamp <strong>for</strong> fixed-length iliac connector<br />
Clamp <strong>for</strong> telescopic iliac connector<br />
Note: To prevent possible tissue irritation remove enough<br />
bone on the ilium so that the iliac connector will be seated<br />
below the orig<strong>in</strong>al iliac crest.<br />
<strong>Synthes</strong> 11
Iliac <strong>Fixation</strong> with Iliac Connector<br />
4<br />
Place iliac connector and create screw entry po<strong>in</strong>t<br />
Required <strong>in</strong>struments<br />
03.621.011 Clamp Holder<br />
Drop the iliac connector over the Clamp Holder. With the implant<br />
<strong>in</strong> place, verify that the correct implant size has been<br />
chosen.<br />
Use a pedicle probe to drill the screw hole <strong>in</strong> the center of<br />
the open<strong>in</strong>g of the iliac connector. This ensures that<br />
the screw will be placed at the correct distance to the rod.<br />
After drill<strong>in</strong>g the screw hole, remove the iliac connector.<br />
Alternative screw placement <strong>in</strong> the ilium: The screw may be<br />
placed from the <strong>in</strong>ner side of the iliac crest <strong>in</strong> order to reduce<br />
the extent of soft tissue exposure.<br />
12 <strong>Synthes</strong> <strong>USS</strong> <strong>II</strong> <strong>Ilio</strong>-<strong>Sacral</strong> Technique Guide
5<br />
Insert bone screw<br />
Required <strong>in</strong>struments<br />
03.607.001 Screwdriver, bihexagonal, � 3.0 mm,<br />
with T-Handle<br />
03.607.003 <strong>USS</strong> <strong>II</strong> Polyaxial Hold<strong>in</strong>g Sleeve<br />
Optional <strong>in</strong>struments<br />
03.607.002 Screwdriver Shaft <strong>for</strong> screws �70 mm<br />
03.607.006 <strong>USS</strong> <strong>II</strong> Polyaxial Handle<br />
Pick up the appropriate screw from the screw rack us<strong>in</strong>g the<br />
Screwdriver and the Hold<strong>in</strong>g Sleeve. Insert the screw <strong>in</strong>to the<br />
prepared ilium until the screw is well seated.<br />
Note: For cancellous bone screws with a length of 70 mm or<br />
longer, use the Screwdriver Shaft 03.607.002 attached to<br />
the <strong>USS</strong> <strong>II</strong> Polyaxial Handle.<br />
<strong>Synthes</strong> 13
Iliac <strong>Fixation</strong> with Iliac Connector<br />
6<br />
Expose screw head<br />
Required <strong>in</strong>struments<br />
03.607.000 <strong>USS</strong> <strong>II</strong> Polyaxial Reamer<br />
03.607.001 Screwdriver, bihexagonal, � 3.0 mm,<br />
with T-Handle<br />
Place the Reamer guided by the Screwdriver over the screw<br />
head. Ream away excessive bone by mov<strong>in</strong>g the reamer back<br />
and <strong>for</strong>th until the red mark on the screwdriver shaft becomes<br />
visible.<br />
Note: If more bone that may block the connector has to be<br />
removed, use a chisel or gauge pliers.<br />
14 <strong>Synthes</strong> <strong>USS</strong> <strong>II</strong> <strong>Ilio</strong>-<strong>Sacral</strong> Technique Guide
7<br />
Click on the collet<br />
Required <strong>in</strong>struments<br />
03.607.005 <strong>USS</strong> <strong>II</strong> Polyaxial Screw Holder<br />
03.607.006 <strong>USS</strong> <strong>II</strong> Polyaxial Handle<br />
(388.622) (Handle <strong>for</strong> Screw Holder)<br />
Use the <strong>USS</strong> <strong>II</strong> Polyaxial Screw Holder to pick up a collet from<br />
the tray. Optionally, attach the Handle <strong>for</strong> a better hold.<br />
Click on the collet and orient the notch on the collet <strong>in</strong> direction<br />
of the screw angulation to achieve larger angles. Afterwards<br />
release the Handle leav<strong>in</strong>g the Screw Holder attached<br />
to the collet.<br />
Note: Make sure that no tissue is stuck between the screw<br />
head and the collet.<br />
<strong>Synthes</strong> 15
Iliac <strong>Fixation</strong> with Iliac Connector<br />
8<br />
Insert iliac connector<br />
Required <strong>in</strong>struments<br />
03.621.011 Clamp Holder<br />
Attach the clamp to the rod from the midl<strong>in</strong>e.<br />
Slide the iliac connector over both the Clamp Holder and the<br />
Screw Holder.<br />
16 <strong>Synthes</strong> <strong>USS</strong> <strong>II</strong> <strong>Ilio</strong>-<strong>Sacral</strong> Technique Guide
9<br />
Lock iliac connector<br />
Required <strong>in</strong>struments<br />
03.621.012 Socket Wrench, cannulated, with Straight<br />
Handle <strong>for</strong> <strong>USS</strong>-<strong>II</strong> Nut<br />
388.584 Socket Wrench <strong>for</strong> twelve po<strong>in</strong>t nut,<br />
with L-Handle<br />
388.143 Socket Wrench � 5,0 mm, with T-Handle<br />
Pick up a nut us<strong>in</strong>g the Socket Wrench with Straight Handle<br />
(black), place it over the collet of the iliac screw and tighten<br />
it slightly. (1)<br />
Notes<br />
– Always first place a nut on the collet (iliac screw)<br />
and then one on the clamp (rod).<br />
– Pre-tighten the nut on the iliac screw at least<br />
2 revolutions. This is how the iliac connector is firmly<br />
attached to the bone screw while the polyaxiality is still<br />
ma<strong>in</strong>ta<strong>in</strong>ed. Pull on the Screw Holder to check if the<br />
collet has been attached correctly.<br />
Secondly, apply a nut on the clamp, and tighten it slightly. (2)<br />
For f<strong>in</strong>al tighten<strong>in</strong>g, change the Socket Wrench with black<br />
handle to the one with L-Handle. Use the Socket Wrench<br />
with T-Handle as counter-torque.<br />
1<br />
2<br />
<strong>Synthes</strong> 17
Iliac <strong>Fixation</strong> with Iliac Connector<br />
Optional: Lock the clamp of the connector with the<br />
Spreader Forceps<br />
Required <strong>in</strong>struments<br />
388.410 Spreader Forceps<br />
388.615 Support <strong>for</strong> Rod Introduction Pliers<br />
(Clip <strong>for</strong> Persuader)<br />
In some cases, the iliac connector may not be properly<br />
seated on the rod, and the nut cannot be tightened. In this<br />
case, use the technique described below.<br />
With the Socket Wrench with L-Handle <strong>in</strong> place, attach the<br />
Clip <strong>for</strong> Persuader at the distal end of the Clamp Holder.<br />
Press the Spreader Forceps. This will pull up the clamp. At<br />
the same time, turn the Socket Wrench until the nut engages.<br />
18 <strong>Synthes</strong> <strong>USS</strong> <strong>II</strong> <strong>Ilio</strong>-<strong>Sacral</strong> Technique Guide
S2 <strong>Fixation</strong> with S2 Connector<br />
1<br />
Instrument sp<strong>in</strong>e down to S1<br />
Place the pedicle screws accord<strong>in</strong>g to the surgical technique<br />
of the system used (e.g. <strong>USS</strong> <strong>II</strong> Polyaxial)<br />
2<br />
Prepare hole <strong>for</strong> the S2 pedicle screw<br />
Required <strong>in</strong>struments<br />
388.540 Pedicle probe � 3,8 mm<br />
with Canevasit Handle<br />
388.539 Pedicle probe � 4,8 mm<br />
with Canevasit Handle<br />
Open the pedicle us<strong>in</strong>g a pedicle probe.<br />
<strong>Synthes</strong> 19
S2 <strong>Fixation</strong> with S2 Connector<br />
3<br />
Insert S2 screw<br />
Required <strong>in</strong>struments<br />
03.607.001 Screwdriver, bihexagonal, � 3.0 mm,<br />
with T-Handle<br />
03.607.003 <strong>USS</strong> <strong>II</strong> Polyaxial Hold<strong>in</strong>g Sleeve<br />
Pick up the appropriate screw from the screw rack us<strong>in</strong>g the<br />
Screwdriver and the Hold<strong>in</strong>g Sleeve. Insert the screw <strong>in</strong>to<br />
the prepared pedicle until the screw is well seated. Ideally,<br />
the screw is placed bicortically.<br />
4<br />
Expose screw head<br />
Required <strong>in</strong>struments<br />
03.607.001 Screwdriver, bihexagonal,<br />
� 3.0 mm, with T-Handle<br />
03.607.000 <strong>USS</strong> <strong>II</strong> Polyaxial Reamer<br />
Place the Reamer guided by the Screwdriver over the screw<br />
head. Ream away excessive bone by mov<strong>in</strong>g the reamer<br />
back and <strong>for</strong>th until the red mark on the screwdriver shaft<br />
becomes visible.<br />
20 <strong>Synthes</strong> <strong>USS</strong> <strong>II</strong> <strong>Ilio</strong>-<strong>Sacral</strong> Technique Guide
5<br />
Click on the collet<br />
Required <strong>in</strong>struments<br />
03.607.005 <strong>USS</strong> <strong>II</strong> Polyaxial Screw Holder<br />
388.622 Handle <strong>for</strong> Screw Holder<br />
(03.607.006) (<strong>USS</strong> <strong>II</strong> Polyaxial Handle)<br />
Use the <strong>USS</strong> <strong>II</strong> Polyaxial Screw Holder to pick up a collet from<br />
the tray. Optionally, attach the Handle <strong>for</strong> a better hold.<br />
Click on the collet and orient the notch on the collet <strong>in</strong> direction<br />
of the screw angulation to achieve larger angles. Afterwards<br />
release the Handle leav<strong>in</strong>g the Screw Holder attached<br />
to the collet.<br />
Notes<br />
– Make sure that no tissue is stuck between the screw head<br />
and the collet.<br />
– Alternately a <strong>USS</strong> <strong>II</strong> Polyaxial 3-D head may be clicked on<br />
the screw <strong>in</strong>stead of us<strong>in</strong>g the S2 connector.<br />
<strong>Synthes</strong> 21
S2 <strong>Fixation</strong> with S2 Connector<br />
a Insertion S2 connector left/right<br />
6a<br />
Insert S2 connector (left or right)<br />
Required <strong>in</strong>struments<br />
388.584 Socket Wrench <strong>for</strong> twelve po<strong>in</strong>t nut,<br />
with L-Handle<br />
03.607.005 <strong>USS</strong> <strong>II</strong> Polyaxial Screw Holder<br />
Slide the connector over the Screw Holder onto the collet.<br />
Pick up a nut us<strong>in</strong>g the Socket Wrench with L-Handle, and<br />
place it over the collet of the S2 screw.<br />
Pre-tighten the nut on the S2 screw at least 2 revolutions.<br />
This is how the S2 connector is firmly attached to the bone<br />
screw while the polyaxiality is still ma<strong>in</strong>ta<strong>in</strong>ed. Check <strong>for</strong> a<br />
secure seat by pull<strong>in</strong>g on the Screw Holder.<br />
22 <strong>Synthes</strong> <strong>USS</strong> <strong>II</strong> <strong>Ilio</strong>-<strong>Sacral</strong> Technique Guide
7a<br />
Insert rod and lock nuts<br />
Required <strong>in</strong>struments<br />
03.607.005 <strong>USS</strong> <strong>II</strong> Polyaxial Screw Holder<br />
388.584 Socket Wrench <strong>for</strong> twelve po<strong>in</strong>t nut,<br />
with L-Handle<br />
388.143 Socket Wrench � 5.0 mm with T-Handle<br />
03.607.001 Screwdriver, bihexagonal, � 3.0 mm,<br />
with T-Handle<br />
Insert the rod <strong>in</strong>to the connector.<br />
Connect the rod to the rema<strong>in</strong><strong>in</strong>g screws accord<strong>in</strong>g to the<br />
surgical technique of the implant system used (e.g. <strong>USS</strong> <strong>II</strong><br />
Polyaxial).<br />
Use the Screwdriver to lock the set screw on the<br />
S2 connector.<br />
Use the Socket Wrench with T-Handle as counter-torque <strong>for</strong><br />
f<strong>in</strong>al tighten<strong>in</strong>g.<br />
<strong>Synthes</strong> 23
S2 <strong>Fixation</strong> with S2 Connector<br />
b Insertion S2 connector <strong>for</strong> rod end<br />
6b<br />
Insert connector <strong>for</strong> rod end<br />
Required <strong>in</strong>struments<br />
314.070 Screwdriver, hexagonal, small, � 2.5 mm,<br />
with Groove<br />
Insert contoured rod <strong>in</strong>to the connector and lock the set<br />
screw with the 2.5 mm Screwdriver. Slide the connector over<br />
the Screw Holder onto the collet.<br />
Pick up a nut us<strong>in</strong>g the Socket Wrench with L-Handle and<br />
place it over the collet of the S2 screw.<br />
Pre-tighten the nut on the S2 screw at least 2 revolutions.<br />
This is how the S2 connector is firmly attached to the bone<br />
screw while the polyaxiality is still ma<strong>in</strong>ta<strong>in</strong>ed. Check <strong>for</strong> a<br />
secure seat by pull<strong>in</strong>g on the Screw Holder.<br />
24 <strong>Synthes</strong> <strong>USS</strong> <strong>II</strong> <strong>Ilio</strong>-<strong>Sacral</strong> Technique Guide
7b<br />
Connect rod to rema<strong>in</strong><strong>in</strong>g screws and lock nuts<br />
Required <strong>in</strong>struments<br />
03.607.005 <strong>USS</strong> <strong>II</strong> Polyaxial Screw Holder<br />
388.584 Socket Wrench <strong>for</strong> twelve po<strong>in</strong>t nut,<br />
with L-Handle<br />
388.143 Socket Wrench � 5.0 mm with T-Handle<br />
Connect the rod to the rema<strong>in</strong><strong>in</strong>g screws accord<strong>in</strong>g to the<br />
surgical technique of the implant system used (e.g. <strong>USS</strong> <strong>II</strong><br />
Polyaxial).<br />
Use the Socket Wrench with T-Handle as counter-torque <strong>for</strong><br />
f<strong>in</strong>al tighten<strong>in</strong>g.<br />
<strong>Synthes</strong> 25
26 <strong>Synthes</strong> <strong>USS</strong> <strong>II</strong> <strong>Ilio</strong>-<strong>Sacral</strong> Technique Guide
Remobilisation of the Polyaxial<br />
Connection <strong>for</strong> Implant Removal<br />
Required <strong>in</strong>struments<br />
388.584 Socket Wrench <strong>for</strong> twelve po<strong>in</strong>t nut,<br />
with L-Handle<br />
03.607.005 <strong>USS</strong> <strong>II</strong> Polyaxial Screw Holder<br />
03.607.006 <strong>USS</strong> <strong>II</strong> Polyaxial Handle<br />
After remov<strong>in</strong>g the nuts, move the collet back and <strong>for</strong>th us<strong>in</strong>g<br />
the Screw Holder. The collet will come loose.<br />
<strong>Synthes</strong> 27
28 <strong>Synthes</strong> <strong>USS</strong> <strong>II</strong> <strong>Ilio</strong>-<strong>Sacral</strong> Technique Guide
Ö036.000.791öACpä<br />
AC<br />
<strong>Synthes</strong> GmbH<br />
Eimattstrasse 3<br />
CH-4436 Oberdorf All technique guides are available as PDF files at<br />
www.synthes.com www.synthes.com/lit<br />
036.000.791<br />
0123<br />
50147192 © 04/2010 <strong>Synthes</strong>, Inc. or its affiliates All rights reserved <strong>Synthes</strong> is a trademark of <strong>Synthes</strong>, Inc. or its affiliates