How to Create a Fill In Form with Microsoft Word
How to Create a Fill In Form with Microsoft Word
How to Create a Fill In Form with Microsoft Word

Create successful ePaper yourself
Turn your PDF publications into a flip-book with our unique Google optimized e-Paper software.
<strong>Microsoft</strong> <strong>Word</strong> 2003: <strong>Create</strong> a <strong>Fill</strong>-<strong>In</strong> <strong>Form</strong><br />
Creating <strong>Word</strong> documents as forms allows you <strong>to</strong> make only certain parts of a document editable by others. <strong>Form</strong>s can be<br />
such items as text the user types in or drop down menus where the user selects a choice.<br />
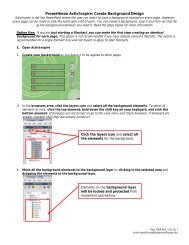
Beginning <strong>to</strong> <strong>Create</strong> a <strong>Form</strong>:<br />
1. Turn on the <strong>Form</strong>s <strong>to</strong>olbar by going <strong>to</strong> the View menu then selecting <strong>to</strong>olbars and checking<br />
forms.<br />
View and select Toolbars<br />
and then check forms.<br />
2. Type all the information you want <strong>to</strong> be locked.<br />
Type in the information<br />
you would like <strong>to</strong> be locked.<br />
3. Place the cursor in the location you want the fill-in field <strong>to</strong> be.<br />
4. Click the but<strong>to</strong>n on the <strong>to</strong>olbar for the form field type you desire <strong>to</strong> use.<br />
The ab|but<strong>to</strong>n is for inserting text fields.<br />
The checkbox but<strong>to</strong>n is for checkbox fill-in fields.<br />
The list but<strong>to</strong>n is for creating a drop down fill-in field list.<br />
May 2009 Rev. 2 BL Pg 1<br />
<strong>Microsoft</strong><strong>Word</strong><strong>Create</strong><strong>Fill</strong><strong>In</strong><strong>Form</strong>.doc
Creating a Text <strong>Fill</strong>-<strong>In</strong> Field:<br />
1. Click the ab| but<strong>to</strong>n on the forms <strong>to</strong>olbar<br />
The ab| but<strong>to</strong>n will insert a grey<br />
box; that will be the area that can<br />
be filled in by the user.<br />
2. Place the cursor in the fill-in form field and click the hand but<strong>to</strong>n <strong>to</strong> work <strong>with</strong> the properties<br />
of that area.<br />
The hand but<strong>to</strong>n accesses the<br />
properties for each type of form field.<br />
3. Set the properties as you desire for the entry. Be sure <strong>to</strong> leave the fill-in enabled check box<br />
checked.<br />
4. The completed text field will appear like the picture below.<br />
The hand but<strong>to</strong>n will allow<br />
you <strong>to</strong> edit the text<br />
formatting and the<br />
maximum number of<br />
characters the user can<br />
type. After editing the<br />
options, click OK.<br />
Text field <strong>with</strong> the<br />
properties set.<br />
May 2009 Rev. 2 BL Pg 2<br />
<strong>Microsoft</strong><strong>Word</strong><strong>Create</strong><strong>Fill</strong><strong>In</strong><strong>Form</strong>.doc
Creating a Check Box <strong>Fill</strong>-<strong>In</strong> Field:<br />
1. Click the checkbox but<strong>to</strong>n on the forms <strong>to</strong>olbar<br />
The checkbox but<strong>to</strong>n will insert a<br />
grey checkbox; that will be the area<br />
that can be checked by the user.<br />
2. Place the cursor in the fill-in form field and click the hand but<strong>to</strong>n <strong>to</strong> work <strong>with</strong> the properties<br />
of that area.<br />
The hand but<strong>to</strong>n accesses the<br />
properties for each type of form field.<br />
3. Set the properties as you desire for the entry. Be sure <strong>to</strong> leave the fill-in enabled check box<br />
checked.<br />
The hand but<strong>to</strong>n will allow<br />
you <strong>to</strong> edit the text size of<br />
the checkbox and the<br />
default value. After editing<br />
the options, click OK.<br />
May 2009 Rev. 2 BL Pg 3<br />
<strong>Microsoft</strong><strong>Word</strong><strong>Create</strong><strong>Fill</strong><strong>In</strong><strong>Form</strong>.doc
Creating a Drop Down <strong>Fill</strong>-<strong>In</strong> Field:<br />
1. Click the list but<strong>to</strong>n on the forms <strong>to</strong>olbar<br />
The list but<strong>to</strong>n will insert a grey box;<br />
that will be the area that can be<br />
selected by the user.<br />
2. Place the cursor in the fill-in form field and click the hand but<strong>to</strong>n <strong>to</strong> work <strong>with</strong> the properties<br />
of that area.<br />
The hand but<strong>to</strong>n accesses the<br />
properties for each type of form field.<br />
3. Set the properties as you desire for the entry. Be sure <strong>to</strong> leave the fill-in enabled check box<br />
checked.<br />
You can change the order the drop down<br />
list will appear <strong>to</strong> the user by using the<br />
move arrows after you have added all the<br />
items. Note: if you want the selection <strong>to</strong> be<br />
blank as default, add a blank item by adding a<br />
space.<br />
Add an item by typing<br />
it in the drop-down<br />
item box and clicking<br />
the add but<strong>to</strong>n.<br />
May 2009 Rev. 2 BL Pg 4<br />
<strong>Microsoft</strong><strong>Word</strong><strong>Create</strong><strong>Fill</strong><strong>In</strong><strong>Form</strong>.doc
Locking the Document:<br />
1. <strong>In</strong> the Tools menu select Protect Document<br />
Tools > Protect Document<br />
2. Check the box under editing restrictions and change the drop down <strong>to</strong> ‘filling in forms’ <strong>to</strong> allow<br />
users <strong>to</strong> only edit the forms areas. Click the Yes, Start Enforcing Protection but<strong>to</strong>n when you are<br />
done.<br />
Use the editing restrictions area <strong>to</strong><br />
set what users can edit. Click the<br />
Yes, Start Enforcing Protection<br />
but<strong>to</strong>n when you are done.<br />
3. Enter a password <strong>to</strong> protect the document and click OK.<br />
Enter a password you<br />
will remember later.<br />
4. If you ever need <strong>to</strong> unlock the document in the Tools menu select Unprotect Document and<br />
enter your password.<br />
May 2009 Rev. 2 BL Pg 5<br />
<strong>Microsoft</strong><strong>Word</strong><strong>Create</strong><strong>Fill</strong><strong>In</strong><strong>Form</strong>.doc