Instructions de montage - EAW
Instructions de montage - EAW
Instructions de montage - EAW

Create successful ePaper yourself
Turn your PDF publications into a flip-book with our unique Google optimized e-Paper software.
Schwenk<strong>montage</strong>n<br />
Pivot Mounts<br />
Montages pivotants<br />
Montageanleitung<br />
Mounting <strong>Instructions</strong><br />
<strong>Instructions</strong> <strong>de</strong> <strong>montage</strong><br />
for pivot mounts with the adjustable<br />
<strong>EAW</strong> systems – for scopes with<br />
mounting rail<br />
General Information<br />
A Carefully remove all residues of<br />
blueing from all mounting parts. Remove<br />
blueing from the plane contact surface<br />
of the pivot pin (our polisher, <strong>EAW</strong> ref.<br />
No. 22300, is i<strong>de</strong>al for this purpose), and<br />
equally from contact surfaces of bases<br />
and weapon. Degrease contact faces,<br />
mount bases provisionally (if necessary,<br />
turn front base by 180°) and adjust them.<br />
B Furnish the contact surfaces with a<br />
highly viscous oil before inserting the<br />
pivot pin into the front base. (Repeat<br />
this procedure regularly during use of the<br />
mount.) Insert front foot into 6. Adjust the<br />
fit of the front foot by turning adjusting<br />
screw 7 and secure it by tightening lock<br />
screw 71. In case of a bolt action rifle, the<br />
plane contact surface of the pivot has to<br />
be abra<strong>de</strong>d carefully. Take out swing bolts<br />
14, remove blueing from contact faces of<br />
the bolt heads and grease swing bolts<br />
with sliding oil or grease, e. g. molykote.<br />
Tighten them slightly.<br />
C Remove both bases again, <strong>de</strong>grease<br />
contact faces thoroughly and screw<br />
bases on again. Relieve screws No. 1 by<br />
additional pasting or sol<strong>de</strong>ring of the<br />
plates. Do not paste or sol<strong>de</strong>r surface “X“<br />
of the front base (see hatched surface in<br />
the drawing)!<br />
24<br />
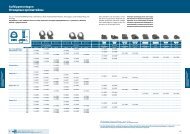
adjustable front bases<br />
7<br />
type A X<br />
type B<br />
6<br />
rear base with adjustable breechblock<br />
11 12<br />
1<br />
10<br />
8<br />
1<br />
71<br />
20<br />
6<br />
Standard Prism<br />
D Take out prism cross screws 9, fit<br />
mounting rail of the scope into prism<br />
of the front foot. Insert front foot into<br />
front base and adjust scope to the best<br />
possible eye relief. Drill mounting rail at<br />
the locations of screw holes 9 by means<br />
of a Ø 3.5 mm twist drill (do not drill<br />
through to the mounting prism thread),<br />
put screws 9 back in and tighten them.<br />
For an easy drilling, we recommend<br />
our drilling rack, <strong>EAW</strong> ref. No. 22000.<br />
E Fit rear foot onto middle tube rail<br />
and move it to a position that the T-pin<br />
comes axially into the middle of slot 8.<br />
In this position drill mounting rail and<br />
insert screw 9 as <strong>de</strong>scribed un<strong>de</strong>r D.<br />
Ensure that the bottom si<strong>de</strong> of the rear<br />
foot comes parallel to the upper si<strong>de</strong> of<br />
the rear base (lock).<br />
front foot<br />
14<br />
9<br />
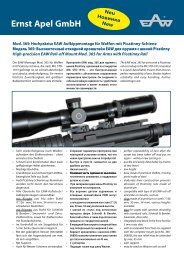
Zeiss VM/ZM, Docter<br />
with straight front foot:<br />
D Take out swing bolts 14 and disassemble<br />
front foot. Insert clamping<br />
blocks 16 into rail of scope and fix top<br />
of front foot by means of screws 19 in a<br />
way that it can still be moved. Assemble<br />
front foot again and tighten swing bolts<br />
14 slightly.<br />
with exten<strong>de</strong>d front foot:<br />
D Insert clamping blocks 16 into rail<br />
of scope and fix front foot by means of<br />
screws 19 in a way that it can still be<br />
moved.<br />
Insert front foot into front base and<br />
adjust scope to the best possible eye<br />
relief. Take off scope together with the<br />
front foot without shifting it. Tighten<br />
screws 19 with 10 Nm (for this purpose,<br />
a straight front foot has to be disassembled<br />
again).<br />
E Move rear foot to a position that the<br />
T-pin comes axially into the middle of<br />
slot 8. Take off scope without shifting<br />
rear foot, and tighten screw 19. Ensure<br />
that the bottom si<strong>de</strong> of the rear foot<br />
comes parallel to the upper si<strong>de</strong> of the<br />
rear base (lock).<br />
front foot<br />
14<br />
16<br />
19
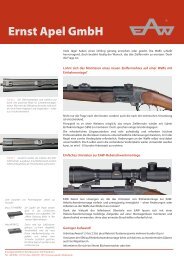
Swarovski SR<br />
with straight front foot:<br />
D Take out swing bolts 14 and disassemble<br />
front foot. Insert clamping<br />
blocks 17 into rail of scope.<br />
Mount front foot by means of one<br />
swing bolt 14, insert it into front base<br />
and adjust scope to the best possible<br />
eye relief. The toothed plate must have<br />
been inserted into the front foot. Take<br />
off scope together with the front foot<br />
without shifting it, and tighten rear<br />
clamping block. Remove top of front<br />
foot and tighten second clamping block.<br />
Assemble front foot again and tighten<br />
swing bolts 14 slightly.<br />
with exten<strong>de</strong>d front foot:<br />
D Insert clamping blocks 17 into rail<br />
of scope and adjust scope to the best<br />
possible eye relief. The toothed plate<br />
must have been inserted into the front<br />
foot. Take off scope together with the<br />
front foot without shifting it, and tighten<br />
both clamping blocks with 10 Nm.<br />
E Move rear foot to a position that the<br />
T-pin comes axially into the middle of<br />
slot 8. Take off scope without shifting<br />
rear foot, and tighten screw 19. Ensure<br />
that the bottom si<strong>de</strong> of the rear foot<br />
comes parallel to the upper si<strong>de</strong> of the<br />
rear base (lock).<br />
front foot<br />
14<br />
17<br />
19<br />
Schmidt & Ben<strong>de</strong>r Convex<br />
Please note: The feather key which has<br />
been inserted into the front foot can be<br />
removed for the purpose of aligning the<br />
scope, if necessary.<br />
with straight front foot:<br />
D Take out swing bolts 14 and<br />
disassemble front foot. Insert clamping<br />
blocks 18 into rail of scope and fix top<br />
of front foot by means of screws 19 in<br />
a way that it can still be moved.<br />
Mount front foot by means of one<br />
swing bolt 14, insert it into the front base<br />
and adjust scope to the best possible eye<br />
relief. Take off scope together with the<br />
front foot without shifting it. Remove<br />
top of front foot and tighten screws 19<br />
with 10 Nm. Assemble front foot again<br />
and tighten swing bolts 14 slightly.<br />
with exten<strong>de</strong>d front foot:<br />
D Insert clamping blocks 18 into rail<br />
of scope and fix front foot by means of<br />
screws 19 in a way that it can still be<br />
moved. Insert front foot into front base<br />
and adjust scope to the best possible<br />
eye relief. Take off scope together with<br />
front foot without shifting it. Tighten<br />
screws 19 with 10 Nm.<br />
E Move rear foot to a position that the<br />
T-pin comes axially into the middle of<br />
slot 8. Take off scope without shifting<br />
rear foot, and tighten screw 19. Ensure<br />
that the bottom si<strong>de</strong> of the rear foot<br />
comes parallel to the upper si<strong>de</strong> of the<br />
rear base (lock).<br />
front foot<br />
14<br />
18<br />
19<br />
F Set up scope again, turn breechblock<br />
lever 12 by approx. 70° upwards and<br />
clamp it tightly by turning set bolt<br />
10 to the left (counter-clockwise).<br />
Tighten swing bolts 14 (pasting is not<br />
necessary!). Carefully turn set bolt 10<br />
to the right until breechblock lever 12,<br />
which meanwhile is sliding downwards,<br />
stops approx. 1 mm before its final<br />
position. In this position secure set bolt<br />
10 by tightening lock screw 11.<br />
G Align scope by means of support<br />
screws 20 and tighten both of them.<br />
Train and examine the fit of the feet by<br />
pivoting the scope several times; on<br />
this occasion once again check the fit<br />
of the pin of the front foot, resp. adjust<br />
it exactly by means of adjusting screw 7<br />
and secure it with lock screw 71.<br />
The scope must be movable tensionfree<br />
without any force, and for the purpose<br />
of pivoting, it must be possible<br />
to open the breechblock with the right<br />
forefinger. When the rear foot clicks into<br />
place, the breechblock must open and<br />
close automatically. Should lever 12<br />
sli<strong>de</strong> completely downwards, once again<br />
adjust set bolt 10 counter-clockwise.<br />
Examine if all screws fit tightly. Lightly<br />
lubricate the moving parts. Adhesive<br />
must be well-har<strong>de</strong>ned. After the first<br />
trial shots check whether lever 12 still<br />
stops approx. 0.5 to 1 mm before its final<br />
position. If necessary, adjust it again.<br />
Please Note: To guarantee a faultless<br />
functioning of the <strong>EAW</strong> mount, it must<br />
be possible to swivel the scope without<br />
exerting any force. The rear foot should<br />
be pivoted easily into the breechblock.<br />
Due to the technical features of the <strong>EAW</strong><br />
breechblock, there is a small light gap<br />
between the rear foot and the upper<br />
surface of the rear base (lock) – contrary<br />
to the claw mount. The mount must fit<br />
absolutely tensionfree! Pressing down<br />
lever 12 manually might have a negative<br />
effect on the shooting performance.<br />
25<br />
Schwenk<strong>montage</strong>n<br />
Pivot Mounts<br />
Montages pivotants