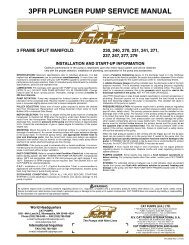
Pump service manual for 1DX, 2DX, 3DX, 3DNX, 3SP ... - Cat Pumps
Pump service manual for 1DX, 2DX, 3DX, 3DNX, 3SP ... - Cat Pumps
Pump service manual for 1DX, 2DX, 3DX, 3DNX, 3SP ... - Cat Pumps

You also want an ePaper? Increase the reach of your titles
YUMPU automatically turns print PDFs into web optimized ePapers that Google loves.
All <strong>1DX</strong>.MIST, <strong>2DX</strong>, <strong>2DX</strong>.MIST and <strong>3DX</strong> Models<br />
Discharge and Inlet Valve Assembly - Stacked Valve design<br />
SERVICING THE VALVES<br />
Disassembly<br />
NOTE: All pump models require one (1) stacked valve<br />
kit to repair pump. Models <strong>2DX</strong>, <strong>2DX</strong>.MIST, <strong>3DX</strong>, <strong>3DNX</strong>,<br />
<strong>3SP</strong> and <strong>3SP</strong>X contain three complete valve assemblies<br />
(inlet and discharge). Whereas, model <strong>1DX</strong>03ELS.MIST<br />
contains two complete valve assemblies and model<br />
<strong>1DX</strong>015ELS.MIST contains one complete valve assembly.<br />
NOTE: Discharge and inlet valve assemblies may stay<br />
together or separate during removal.<br />
NOTE: Spring retainer may also separate from the seat<br />
during removal.<br />
1. Models <strong>1DX</strong>.MIST, <strong>2DX</strong>, <strong>2DX</strong>.MIST and <strong>3DX</strong>: Use a M19<br />
Hex tool to remove valve plugs on top of manifold.<br />
Models <strong>3DNX</strong>, <strong>3SP</strong> and <strong>3SP</strong>X: Use a M24 Hex tool to<br />
remove valve plugs on top of manifold.<br />
2. Use a reverse pliers to remove stacked valve assemblies<br />
from the valve chamber.<br />
3. If the discharge valve assembly separates from the inlet<br />
valve assembly, use a reverse pliers to remove it from the<br />
valve chamber.<br />
CAUTION: Exercise caution as the reverse pliers may<br />
damage the threads in valve chamber or spring retainer.<br />
4. Models <strong>1DX</strong>.MIST, <strong>2DX</strong>, <strong>2DX</strong>.MIST and <strong>3DX</strong>: The spring<br />
retainer may separate from the seat. Remove the spring<br />
and valve from the valve chamber. Thread an M8 screw<br />
into the seat and remove from valve chamber.<br />
5. Models <strong>1DX</strong>.MIST, <strong>2DX</strong>, <strong>2DX</strong>.MIST and <strong>3DX</strong>: Separate<br />
valve assembly by using the same M8 screw and thread<br />
into bottom of seat until screw contacts bottom of valve.<br />
Continue threading in screw until spring retainer separates<br />
from seat.<br />
Models <strong>3DNX</strong>, <strong>3SP</strong> and <strong>3SP</strong>X: Separate valve assembly<br />
by inserting screwdriver into spring retainer and press the<br />
backside of valve until seat separates from the spring<br />
retainer.<br />
6. Remove o-ring from each seat and valve plug.<br />
<strong>3SP</strong>30G1I, <strong>3SP</strong>35GEI, <strong>3SP</strong>X30G1I, <strong>3SP</strong>X35GEI<br />
Discharge and Inlet Valve Assembly - Stacked Valve design<br />
CAUTION: Be<strong>for</strong>e commencing with <strong>service</strong>, shut off drive (electric motor, gas or diesel engine) and turn off water supply to pump. Relieve all discharge<br />
line pressure by triggering gun or opening valve in discharge line.<br />
After servicing is completed, turn on water supply to pump, start drive, reset pressure regulating device and secondary valve, read system pressure on<br />
the gauge at the pump head. Check <strong>for</strong> any leaks, vibration or pressure fluctuations and resume operation.<br />
Inspect and <strong>service</strong> all system accessories on the same schedule as your pump.<br />
Reassembly<br />
1. Examine spring retainers <strong>for</strong> internal wear or breaks in the<br />
structure and replace as needed.<br />
2. Examine springs <strong>for</strong> fatigue or breaks and replace as needed.<br />
3. Examine valves and seats <strong>for</strong> grooves, pitting or wear and<br />
replace as needed.<br />
4. Examine seat and valve plug o-rings <strong>for</strong> cuts or wear and<br />
replace as needed.<br />
NOTE: Inlet valve seat and o-ring are different from discharge<br />
valve seat and o-ring. One valve kit required per<br />
pump.<br />
5. Models <strong>1DX</strong>.MIST, <strong>2DX</strong>, <strong>2DX</strong>.MIST and <strong>3DX</strong>: Lubricate<br />
and install new o-ring onto large outside diameter of discharge<br />
seat.<br />
Models <strong>3DNX</strong>, <strong>3SP</strong> and <strong>3SP</strong>X: Lubricate and install backup-ring,<br />
and then o-ring onto large outside diameter of discharge<br />
seat.<br />
6. Place seat on work surface with small diameter side up.<br />
7. Place valve onto seat with concave side down.<br />
8. Place spring on valve.<br />
9. Install spring retainer with deep stepped end over spring<br />
and snap onto seat.<br />
NOTE: Repeat steps 6-9 <strong>for</strong> inlet valve assembly.<br />
10. Snap discharge valve assembly onto the inlet valve<br />
assembly and press into valve chamber until completely<br />
seated.<br />
11. Lubricate and install new o-ring onto each valve plug.<br />
12. Apply Loctite® 242® to threads of each valve plug and<br />
thread in hand tight. Torque to specifications per chart.