Melges MC Scow Rigging and Tuning Guide - North Sails - One ...
Melges MC Scow Rigging and Tuning Guide - North Sails - One ...
Melges MC Scow Rigging and Tuning Guide - North Sails - One ...

Create successful ePaper yourself
Turn your PDF publications into a flip-book with our unique Google optimized e-Paper software.
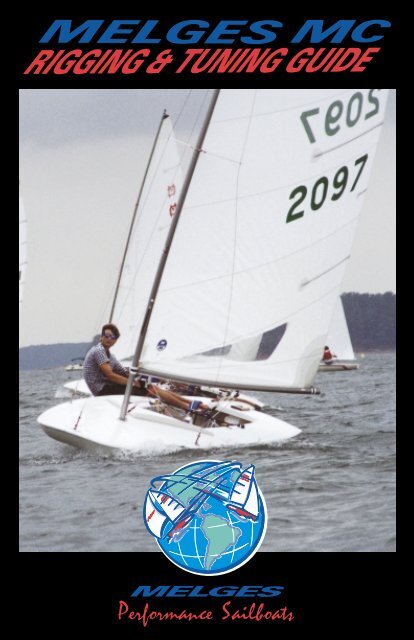
RIGGING & TUNING GUIDE
Zenda, Wisconsin USA<br />
Team Zenda<br />
Andy Burdick<br />
Andy has been with <strong>Melges</strong> since 1986.<br />
He focuses on scow development, <strong>Melges</strong> 24 class<br />
growth <strong>and</strong> customer relations. Andy is one of your first<br />
contacts when buying a new or used <strong>Melges</strong> Boat.<br />
<strong>and</strong>y@melges.com<br />
Eric Hood<br />
Eric has been with <strong>Melges</strong> since 1989. Eric's primary dedication<br />
is to our <strong>North</strong> <strong>Sails</strong> operation. Sailing this year took Eric to 27<br />
events total <strong>and</strong> 17 <strong>MC</strong> events, a class record. He is focused on<br />
class growth <strong>and</strong> customer service.<br />
eric@od.northsails.com<br />
Charlie Harrett<br />
Charlie oversees the manufacturing portion of our organization. He<br />
sails in <strong>and</strong> supports all the classes that we build.<br />
charlie@melges.com<br />
From the President<br />
My gr<strong>and</strong>father, Harry <strong>Melges</strong> Sr., started <strong>Melges</strong> Boat Works back in<br />
1948, building wooden C <strong>Scow</strong>s. The company was built around his<br />
passion for sailing, designing, <strong>and</strong> building high quality racing sailboats.<br />
His crafts quickly became the fastest, highest quality sailboats on the<br />
market, positioning <strong>Melges</strong> Boat Works for a long history of innovation<br />
<strong>and</strong> industry leading advancements.<br />
Much has changed since those early days of boatbuilding in Zenda.<br />
The days of wood are long gone, <strong>and</strong> the age of fiberglass has solidly<br />
taken hold. <strong>One</strong> thing still remains the same however-our passion for<br />
sailing. We remain committed to supplying our sailing friends with the<br />
most advanced, highest quality products available.<br />
Many great advancements have been made in boat building<br />
technology over the past eight years. Our <strong>Melges</strong> “M-preg” one step<br />
lamination process continues to lead the industry. Our customers can rest<br />
assured that when they take delivery of their new <strong>Melges</strong> boat they are<br />
purchasing the most advanced production sailboat technology available.<br />
The “M-preg” system also insures the most cost-effective method<br />
available for laminating large racing hulls.<br />
Continuing our long tradition of innovation <strong>and</strong> advancements, we<br />
have developed a new process that is sure to take our products to the next<br />
level of technology. “M-Fusion” is a process that we are now using to<br />
laminate our smaller parts. This process utilizes a reusable silicone bag,<br />
loading the glass on the mold dry, pulling a vacuum on the bag <strong>and</strong><br />
injecting the resin into the glass through a series of injection ports. This<br />
new process will not only help maintain low costs by eliminating waste,<br />
but it will also dramatically improve the cleanliness of our work<br />
environment. Look for the new “M-Fusion” label of quality on your new<br />
<strong>MC</strong> or X.<br />
Servicing our customer base is a major focus at <strong>Melges</strong> Performance<br />
Sailboats. In addition to attending regattas, running race clinics, <strong>and</strong><br />
supplying spare parts to our clientele, we are very committed to our youth<br />
sailors <strong>and</strong> to exp<strong>and</strong>ing their sailing experiences. This fall, recognizing<br />
the enthusiasm among our young sailors toward the Laser <strong>and</strong> 420, we<br />
decided to take on the Vanguard Boats dealership. Our focus here is to<br />
support our youth sailors from Optis to A <strong>Scow</strong>s. We recognize the need<br />
to keep our youth sailing, no matter what the boat.<br />
<strong>Melges</strong> Performance Sailboats is your complete sailing source. From<br />
Optis to A <strong>Scow</strong>s, we offer a complete line of <strong>Melges</strong> made sailboats,<br />
Vanguard made sailboats, <strong>and</strong> sails produced by the world’s leading<br />
sailmaker, <strong>North</strong> <strong>Sails</strong>. We also offer a complete line of spare parts,<br />
trailers, <strong>and</strong> covers for all of the boats that we sell.<br />
Log on to melges.com to see all of the great things that we do, or stop<br />
by Zenda anytime to see first h<strong>and</strong> all of the great products that we<br />
promote. We thank you for your continued support, <strong>and</strong> in these<br />
changing times we call on you to keep your freedoms alive. Sailing is<br />
one of our greatest freedoms, <strong>and</strong> no one can take that away from us.<br />
Sail fast, <strong>and</strong> most importantly, have fun!
S ECTION O NE<br />
Quick <strong>Guide</strong> to <strong>MC</strong> Sailing<br />
Section <strong>One</strong> - <strong>Rigging</strong> The <strong>MC</strong> <strong>Scow</strong><br />
Section Two - <strong>Tuning</strong> The <strong>MC</strong> <strong>Scow</strong><br />
<strong>Melges</strong> Performance Sailboats<br />
<strong>MC</strong> <strong>Scow</strong> <strong>Rigging</strong> <strong>Guide</strong><br />
Congratulations on the purchase your <strong>Melges</strong> <strong>MC</strong> <strong>Scow</strong>. The following information will help you<br />
prepare, care for <strong>and</strong> rig your <strong>Melges</strong> <strong>MC</strong> <strong>Scow</strong>. For sailing tips <strong>and</strong> tuning information please<br />
request a tuning guide from <strong>Melges</strong> Performance Sailboats or you can download it at our <strong>North</strong><br />
<strong>Sails</strong> website www.onedesign.com.<br />
If you are traveling to regattas away from your home club we recommend that you use our<br />
envelope traveling covers, mast bag along with our rudder <strong>and</strong> tiller covers. This will not only<br />
protect your hull from debris when traveling down the road but will also allow you to carry<br />
your sails <strong>and</strong> other related sailing gear inside the boat when traveling.<br />
After removing your covers you should do a quick check to insure you have everything you<br />
need to rig <strong>and</strong> race your <strong>Melges</strong> <strong>MC</strong> <strong>Scow</strong>. The great thing about the <strong>MC</strong> group of sailors is<br />
that many carry spare parts in case you ever come up short on parts. Having some spare<br />
parts though is a good idea. These parts include clevis pins <strong>and</strong> shackles for your blocks,<br />
boom vang <strong>and</strong> outhaul systems. Having spare o-rings for the rudder is good as you never<br />
want to sail without the rudder safety o-ring not in place. Having spare side-stay bolts <strong>and</strong> a<br />
spare custom forestay shackle is important. The same nuts that work on your sidestay bolts<br />
also work on your tiller bolts. All of these items are always in stock <strong>and</strong> are available at<br />
<strong>Melges</strong> Performance Sailboats.<br />
Tools needed are two 7/16” open end wrenches. These wrenches work on your sidestay<br />
bolts <strong>and</strong> your tiller bolts. Pliers are needed for your shackles on the boom vang, outhaul,<br />
Figure 1-The <strong>MC</strong> <strong>Scow</strong> with galvanized steel welded trailer, trailing cover <strong>and</strong> aluminum holddowns that also<br />
carry the mast <strong>and</strong> boom.<br />
hiking strap <strong>and</strong> block connections. If you have older Harken blocks you need a small<br />
screwdriver so you can set your blocks so they do not spin. If you have 2001 <strong>and</strong> newer<br />
Harken blocks you need to keep the Allen-wrench provided by Harken in your tool kit for block<br />
adjustment. A roll of white electrical tape should be in your tool bag taping up sidestay cotter<br />
2<br />
Figure 1
pins, shackles on your blocks,<br />
attaching sidestay telltales <strong>and</strong><br />
can also be used to cover up<br />
any dings or chips in your hull<br />
received from dock or boat<br />
contact during that weekend<br />
of racing.<br />
Figure 2<br />
Figure 2 includes some<br />
important items for sailing.<br />
Two lifejackets, a throwable<br />
which is required by class rules<br />
<strong>and</strong> the Coast Guard. A<br />
paddle, sailing gloves, two<br />
7/16” wrenches, pliers,<br />
electrical tape, tape measure<br />
for measuring mast rake, Sharpie permanent marker for marking your mainsheet, bottled<br />
water <strong>and</strong> sunscreen.<br />
3<br />
Figure 3<br />
Stepping The Mast<br />
Figure 3 includes some<br />
important boat parts.<br />
Rudder <strong>and</strong> tiller with a<br />
rudder <strong>and</strong> tiller travel bag.<br />
Mainsheet, bowline, two<br />
single Harken blocks for<br />
your boom, one Harken<br />
single block with<br />
mainsheet becket, 3-point<br />
lifting bridle <strong>and</strong> dry bag<br />
for miscellaneous items<br />
you want to carry on the<br />
boat.<br />
There are two ways to step the <strong>MC</strong> mast. You can step it by yourself or easier yet with a<br />
second person helping. First, before you step the mast you must make sure that the boat is<br />
still secured to the trailer with either the aft trailing hold down or a strap. This will keep the<br />
boat from tilting forward on the trailer when you step forward towards the bow when raising<br />
the mast. Also, leave your trailer attached to the car if possible so that the trailer does not<br />
move during this process.<br />
Next you need to make sure that your rope halyard tail is attached to the wire portion of your<br />
main halyard <strong>and</strong> is secured at the base area of your mast either to the shock cord loop on the<br />
front of your mast or to the boom vang bale at the base of the mast. Adjust your Sta-Master turn<br />
buckles to #5 so that the shrouds <strong>and</strong> forestay are not too tight, when you go to raise the mast.<br />
Next with the mast laying on the deck with the groove or backside of the mast in the down<br />
position you will attach your two sidestays. This is done with your two 7/16” wrenches. You<br />
do not need to over tighten these bolts, just make sure the bolt comes all the way through the<br />
nylok nut <strong>and</strong> has at least a thread or two showing through the nylok nut. This will allow the<br />
Sta-Master turnbuckles to move fore <strong>and</strong> aft. You are now ready to put your mast up.
Sidestay goes in the forward of the two holes<br />
in your sidestay chainplate (figure 4). The aft<br />
hole is for part of your 3-point lifting bridle.<br />
Notice that the sidestay clevis pin <strong>and</strong> cotter<br />
pin have been wrapped with 3M #35 tape at<br />
that attachment point. This will prevent this<br />
pin from ever coming out.<br />
St<strong>and</strong>ing in the middle of the boat usually<br />
on the side deck is a good starting place<br />
for the person who will actually raise the<br />
mast. The second person will hold with<br />
the both h<strong>and</strong>s the base of the mast as<br />
you start to raise the mast (figure 5).<br />
As you walk the mast up the person<br />
holding the mast base walks the mast<br />
base to the mast step (figure 6).<br />
closed you should wrap the oring<br />
with a few wraps of<br />
electrical tape so it cannot<br />
accidentally come out later.<br />
Now we are ready to attach the<br />
boom, blocks, Cunningham,<br />
boom vang <strong>and</strong> outhaul<br />
systems to their appropriate<br />
attachment points.<br />
Figure 5<br />
Figure 8<br />
Figure 7<br />
4<br />
Bow<br />
Lifting<br />
Sling<br />
Figure 4<br />
Figure 6<br />
Once the mast base plug is set in the<br />
mast step (figure 7) then the person<br />
who held the mast base will secure the<br />
forestay turnbuckle to the custom<br />
shackle provided by <strong>Melges</strong><br />
Performance Sailboats. This shackle<br />
fits in the aft hole of the bow (figure 8)<br />
plate as the forward hole is meant for<br />
your bowline. Once the o-ring is put into<br />
the clevis pin securing the shackle
Slide the boom onto the gooseneck pin as shown below in<br />
figure 9. Make sure the boom is all the way on the pin as<br />
the boom can fall off the pin easily until the mainsheet <strong>and</strong><br />
boom vang are attached.<br />
Next you are ready to attach the boom vang above deck<br />
purchase system to the base of the mast <strong>and</strong> to the boom<br />
bale which is a couple feet aft of the forward end of the<br />
boom. You can only hook this up one way correctly. You<br />
will have twists in the system if you hook up either the mast<br />
bale or boom bale shackle <strong>and</strong> blocks. See figure 10 to see<br />
the correct attachment of these blocks <strong>and</strong> shackles. Also,<br />
at this time hook up the single Spectra rope (white or grey<br />
in color) coming out of the mast step to the single wire<br />
coming out of the boom. This is the outhaul connection.<br />
The Cunningham or luff adjustment is the single white or yellow Spectra line that is offset to<br />
the starboard side of the mast step. The Cunningham will have a s-hook that you will insert<br />
into the Cunningham grommet approximately 10” above the tack grommet in the sail.<br />
For the two shackles on the boom vang<br />
system <strong>and</strong> the one shackle for the outhaul<br />
system you should tighten these shackles with<br />
your pliers because they will come undone<br />
while sailing if you don’t tighten them.<br />
Now we are ready to attach our boom <strong>and</strong><br />
traveler blocks. Old style blocks have shackles<br />
with clevis pins <strong>and</strong> o-rings while the new<br />
style Harken blocks have shackles with screw<br />
Figure 10<br />
pins. Also, the old style Harken blocks have<br />
set-screws that require a screwdriver <strong>and</strong> the<br />
new style Harken blocks require an Allen-wrench to keep them from spinning. Tape the orings<br />
on the old style blocks <strong>and</strong> use a pair of pliers on the new style shackles after you attach<br />
the blocks. Remember the st<strong>and</strong>ard mainsheet system requires to single blocks on the boom<br />
<strong>and</strong> one single block with a mainsheet tie-off becket on the traveler as shown in Figure 11.<br />
Lead your mainsheet through the floor ratchet block up to the single boom block, then down<br />
to the traveler block, then up to the forward single block <strong>and</strong> back to the tie-off becket block<br />
on the traveler. This mainsheet hook-up much like the boom vang hook-up can only be done<br />
one way correctly. You will have a twist in the system if you do not string it up correctly. Make<br />
sure that when you pull on the mainsheet that you hear the ratchet clicking. That will tell you<br />
that you have led the mainsheet through the floor ratchet block correctly. Be sure to tie a knot<br />
at the end of your mainsheet. Set your blocks from spinning so that they are in-line with the<br />
boom running for <strong>and</strong> aft as shown in figure 11. This is done with the screwdriver or Allenwrenches.<br />
These set screws are located on<br />
the shackle end of the blocks.<br />
Operation of your bilge boards is very simple.<br />
You have a trip line crossing the cockpit that<br />
uncleats the board <strong>and</strong> allows it to be lowered.<br />
As it is a continuous line it may be adjusted on<br />
either side of the boat. To pull the boards up<br />
there is also a larger line at the front of your<br />
control line console that allows you to pull the<br />
boards up. There are two knots in the board<br />
5<br />
Figure 11<br />
Figure 9<br />
Attaching the boom to the mast. This<br />
is commonly referred to as the<br />
gooseneck area.
uplines that allow you to set the<br />
height of the bilge boards when they<br />
are in the down position. The<br />
factory setting is usually about 1” of<br />
boardhead showing above the deck<br />
when the board is in the down<br />
position.<br />
Now we are ready to attach the<br />
rudder <strong>and</strong> tiller as shown in figure<br />
12. Make sure you put the large oring<br />
into the top pintle after hanging<br />
the rudder onto the boat. When<br />
Figure 13<br />
Now we are ready to put the sail on the<br />
boom. Carefully feed the bolt rope sewn on<br />
the foot of the sail into the groove of the<br />
boom. This is done easiest with two people<br />
but can be done by one person without any<br />
problems. Once the sail is on the boom<br />
attach the tack shackle (shown in figure 13)<br />
to the corner tack grommet in the sail. Use<br />
your pliers to tighten this shackle before<br />
sailing. Attach the outhaul shackle at the<br />
end of the boom (shown in figure 14).<br />
Always relax the outhaul purchase system<br />
Figure 15<br />
Figure 14<br />
6<br />
Figure 12<br />
putting the bolts through the tiller <strong>and</strong><br />
rudder make sure the bolt comes<br />
through the nylok nuts. Tighten to the<br />
point that you are comfortable with the<br />
up/down movement of the tiller. We<br />
prefer a tight connection so that the<br />
tiller remains at the max down position<br />
when sailing. We usually tighten to this<br />
tighter position but not so much that it<br />
would prevent us from moving the tiller<br />
up <strong>and</strong> down.<br />
when not sailing so as to not put<br />
unnecessary pressure on the sail.<br />
Rolling your sail is the best way to store<br />
your sail. Starting at the head (or top) of<br />
the sail as shown in figure 15, you will<br />
roll the sail towards the foot (or bottom)<br />
of the sail. The leech which is the trailing<br />
edge should be rolled down upon itself<br />
(figure 16) as you roll the sail. This is<br />
because the battens are perpendicular to<br />
the leech of the sail <strong>and</strong> this allows the<br />
battens to roll up without being twisted
on the sail as you roll it up. The sail<br />
can be rolled up easily by one but is<br />
even easier with two. During long<br />
periods where the sail will not be used<br />
you should remove your battens to<br />
preserve the elastic sewn within the<br />
pocket. Do not forget the battens are<br />
tapered <strong>and</strong> the thick end of the<br />
batten is always at the outboard end<br />
of the pocket.<br />
Figure 16<br />
The last thing to do is launch the boat<br />
either off your trailer or using your 3-point lifting bridle. When using the bridle always make<br />
sure that the shackle at each connection point is closed tightly. Your attachment points for<br />
two of the legs (same length legs) are the aft sidestay chainplate holes. The third attachment<br />
point is the large stainless steel eye that is mounted to the backbone <strong>and</strong> also is a turning<br />
point for your hiking strap (backside<br />
on new boats, front side on older<br />
boats). We always set our booms on<br />
the deck when using a hoist so as not<br />
to put pressure on the boom from the<br />
3rd leg of the lifting bridle which is<br />
mounted on the centerline of the<br />
boat. Always keep your boat 90<br />
degrees to the lifting arm of the hoist.<br />
This will prevent your mast from<br />
hitting the hoist arm. When<br />
launching with your car be careful Figure 17<br />
that your rudder does not hit the<br />
ground. This can happen on uneven parking lots <strong>and</strong> sharp entry ramps. Make sure your<br />
bailers are closed when launching.<br />
We hope this guide has been of help. We want all of our <strong>MC</strong> customers to have easy, safe<br />
<strong>and</strong> fun sailing experiences. Please feel free to call or write any of our experts anytime for<br />
further assistance.<br />
P.O. Box 1 Zenda, WI 53195<br />
Office: 262.275.1110 Fax: 262.275.8012<br />
Official Website: www.melges.com<br />
EMail Addresses:<br />
Harry <strong>Melges</strong>: harry@melges.com Eric Hood: eric@od.northsails.com<br />
Andy Burdick: <strong>and</strong>y@melges.com Charlie Harrett: Charlie@melges.com<br />
7
S ECTION T WO<br />
<strong>MC</strong> <strong>Scow</strong> Mainsail <strong>Tuning</strong> <strong>Guide</strong><br />
For The Z Designs including the<br />
ZMax <strong>and</strong> ZAP Mainsails<br />
Thank you very much for your purchase of a new <strong>MC</strong> <strong>Scow</strong> Mainsail from <strong>North</strong> <strong>Sails</strong>.<br />
The new Z Max has proven to be a fantastic all around sail for all sailors. Simple to set up, easy<br />
to use <strong>and</strong> trim. This new sail has won every major regatta on the very competitive <strong>MC</strong> regatta<br />
circuit. Now we have a new sail the ZAP. Another breakthrough sail from <strong>North</strong> that utilizes our<br />
fast AP design with the panel <strong>and</strong> cloth selections used in our very successful Z Max. Also, our<br />
hard cloth Masters <strong>and</strong> AP mainsails are still the sail of choice for many <strong>MC</strong> sailors. You can be<br />
confident that this tuning guide will specifically help you with your <strong>MC</strong> performance.<br />
Thank you!<br />
Review Your Equipment:<br />
Take the time to check all of your pins <strong>and</strong> stays for wear. Clean your mast <strong>and</strong> spreaders with soap<br />
<strong>and</strong> water or Acetone. Also, please check your halyard. Clean <strong>and</strong> lubricate your turnbuckles. Tape<br />
your turnbuckles so that they stay in the set position.<br />
Setting Up Your Mast:<br />
Please install your sidestay turnbuckles in the forward hole of your chainplates. Tighten the bolts<br />
with a 7/16” wrench. Have the bottom of the spar held down on the mast step plate while you<br />
walk the spar up. Hook up the forestay in the aft cut out of the bow plate.<br />
Once your mast is stepped into position take a 50ft. steel tape measure <strong>and</strong> attach it to the shackle<br />
on the wire main halyard. Pull your rope halyard so that the tape goes all the way to the top of the<br />
spar. Be sure you latch the ball into the halyard latch at the top of the spar. Pull down on your<br />
halyard so that you know it is in place.<br />
Measure down to the center portion of the deck at the stern. This measurement must be taken<br />
from the point where the hull <strong>and</strong> deck meet. The fast measurement for your Z MAX <strong>and</strong> or ZAP<br />
Mainsail is 28’ 3”. Now you are ready to set your sidestays.<br />
Sidestay Adjustment:<br />
After you have set your mast rake at 28’ 3” you will be ready to adjust your sidestay tension. You<br />
want your sidestays to be taught. You want to just finger tighten your stays. If you use a wrench<br />
to further tighten them the rig is too tight.<br />
Racing with your new Z MAX or ZAP Mainsail:<br />
Upwind Racing<br />
Your new Z MAX <strong>and</strong> or ZAP Mainsail is going to excel upwind. By following the guidelines noted<br />
below you will optimize your chances for a distinct speed advantage over your competition. The<br />
Z MAX <strong>and</strong> or ZAP are two sails in one. You can make the sail full <strong>and</strong> powerful or you can flatten<br />
the sail so that your <strong>MC</strong> is easy to h<strong>and</strong>le in the breeze. Please practice the following techniques<br />
<strong>and</strong> watch your <strong>MC</strong> sailing improve!<br />
<strong>One</strong> thing to mention is that the helmsman will want to always sit forward in the boat (right next<br />
to your mainsheet cleat) in all conditions, upwind or downwind. This is very important.<br />
The order in which to adjust your sail controls will be in the order described below. Please<br />
follow this sequence in order to achieve the ultimate speed with your Z MAX or ZAP.<br />
Power Up<br />
0-8 knots<br />
The Z design mainsails will be the fullest sail on the racecourse. So, going for extreme power will<br />
be easy. Please follow the set up described below.<br />
Boards<br />
Be sure that your leeward board is all the way down so that the head of the board is flush with<br />
the deck.<br />
8
Heel<br />
Never allow water to run over the edge of the leeward side rail. You are overheeled then. You do<br />
want to heel the boat to reduce wetted surface area. Use the leeward rail as your guideline in all<br />
wind conditions.<br />
Technique<br />
In the light air most <strong>MC</strong> racers choose to trim <strong>and</strong> head up the moment they get new pressure.<br />
The exact opposite is the case if you want to go fast. When you get hit with a puff you want to<br />
ease a bit, head down <strong>and</strong> go for speed <strong>and</strong> then trim. After this you can head up a bit <strong>and</strong> point<br />
the boat. The #1 goal is to achieve boat speed in this light air condition. The Z design mainsails<br />
will really respond to this type of technique.<br />
Mainsheet Trim<br />
The mainsheet is your accelerator. Never cleat your mainsail. Always have the mainsheet in your<br />
h<strong>and</strong> so that you can trim in the pressure <strong>and</strong> ease in the light spots.<br />
In the very light air a great reference for mainsheet trim is to have the back of the boom over the<br />
back leeward corner of the boat. As you get more wind trim from there <strong>and</strong> feel the sail <strong>and</strong> boat<br />
respond. If the boat does not respond then ease your sail back out.<br />
Outhaul<br />
Your outhaul should be tight along the boom. Yes, you should have a shelf in the sail even in these<br />
light conditions. Pull the sail to the inboard edge of the white b<strong>and</strong> on your boom end. This<br />
creates a small wrinkle free shelf foot <strong>and</strong> is very fast. This will help you with speed <strong>and</strong> pointing.<br />
Vang<br />
Do not have any vang tension on at all. In fact, be sure your vang is uncleated so that when you<br />
ease your mainsail your vang does not tension up. This is very important while working your<br />
mainsail upwind. Vang should never be applied in such light conditions.<br />
Cunningham<br />
Be sure this sail control is off so that there are horizontal wrinkles in the luff of the sail. You want<br />
these wrinkles in this type of wind condition.<br />
Traveler<br />
Keep your traveler on centerline at all times. The only time you drop the traveler down is when<br />
you are fully hiked out <strong>and</strong> you cannot hold the boat down.<br />
Downwind Racing<br />
The Z design mainsails will out perform other shapes due to its fullness downwind. The sail is full<br />
away from the mast (more draft aft) so this translates into exceptional speed downwind. This is by<br />
far our fastest sail ever downwind. Practice the following tips so that you can achieve ultimate speed.<br />
Once you have rounded your weather mark be sure to pull your leeward board up 75% of the way<br />
up. Begin to look for wind behind you. Speed is king downwind <strong>and</strong> the only way to have speed<br />
is to be in the breeze. Set yourself up so that you have clear air <strong>and</strong> that you are in line for more<br />
breeze moving down the lake. This is very important.<br />
Technique<br />
You must heel your boat to leeward in order to reduce the wetted surface area in these conditions.<br />
The end of the boom should be kissing the water. If this is not happening you are not maximizing<br />
your speed.<br />
Your mainsheet trim is critical as well. Just like upwind, you absolutely must work your mainsheet<br />
downwind. Grab your mainsheet directly from the aft block on the boom. This eliminates the<br />
ratchet <strong>and</strong> it gives you quick <strong>and</strong> direct pull.<br />
In the very light air you must reach the boat more so that the boat picks up speed. Heel <strong>and</strong> head<br />
up to generate speed while trimming in your main. As the boat builds speed begin to head down,<br />
continue to heel the boat <strong>and</strong> begin to ease your main back out. The second the boat feels like it<br />
is going to slow down repeat the process. In order to go fast downwind in the <strong>MC</strong> you must work<br />
just as hard downwind as you do upwind. Stay prepared to keep the boat moving <strong>and</strong> always be<br />
looking for fresh wind.<br />
9
Traveler is centered, vang off, Cunningham off for maximum power.<br />
Outhaul must be eased so that the shelf is gone. Do not ease to the point that the foot of the sail<br />
has vertical wrinkles.<br />
Powerboat waves: Always trim in <strong>and</strong> build up speed so that you can blast through waves. If they<br />
are very large you can pull on some boom vang so that the rig stays snug <strong>and</strong> so that the boom<br />
stays in place. Be sure to uncleat the vang after the waves have passed.<br />
Ultimate Speed<br />
8-15 knots<br />
Upwind Racing<br />
The Z design mainsails are very versatile in these conditions. As you know once you get over 10<br />
knots the <strong>MC</strong> can be overpowering (difficult to hold down upwind) for some sailors. By following<br />
the set up described below you will begin to see major speed improvements in your <strong>MC</strong> sailing.<br />
Practice these things so that you are smooth <strong>and</strong> prepared for the change in velocity.<br />
Boards<br />
Please be sure that the head of your boards are flush with your deck or 1” up as the wind<br />
increases. Putting them higher is not needed.<br />
Heel<br />
Again, the benchmark is your leeward rail. Never allow this to get wet while sailing upwind. As<br />
the wind begins to build, you must hike harder, use your sail controls to flatten the main <strong>and</strong> then<br />
feather the boat lightly into the wind with your steering technique.<br />
Technique<br />
For maximum speed you need to really work the boat. Hike in the puffs in order to hold the boat<br />
down. However, always keep your back vertical to the water or just aft of vertical so that you can<br />
see your horizon line. The horizon tells you just how much heel is indeed on your <strong>MC</strong>. Also, by<br />
being vertical you can trim <strong>and</strong> ease your mainsheet helping you to balance your boat.<br />
Mainsheet Trim<br />
You can trim harder in these conditions so long as you can hold your boat down. Once you<br />
become overpowered in this wind range you must begin to ease your mainsheet in the puffs. You<br />
never want the boat to overheel. When the boat does heel up you must have boom vang on so<br />
that the sail remains flat as you ease the sail. In this condition you should sail off the angle of heel.<br />
Meaning, if you have to ease your mainsheet a foot in order to help hold the boat down then do<br />
this. The worst thing you can do is trim hard, overheel <strong>and</strong> then stuff the boat into the wind. By<br />
easing the mainsail you are able to sail at a ‘fast angle’ -not stuffed into the breeze. The boat will<br />
accelerate <strong>and</strong> begin to build speed. Never cleat your mainsail. Constant angle of heel translates<br />
into constant fast speed.<br />
Outhaul<br />
The foot of your sail should have a shelf in it. Even in the lighter air. So, in this medium condition<br />
you should pull your outhaul maximum outboard. This helps to flatten the bottom portion of the<br />
main, which is quite full. Make sure you pull on this hard taking the sail to the inboard edge of<br />
the black b<strong>and</strong> on your boom end. Do this before your leeward buoy roundings too.<br />
Vang<br />
Due to different weight ranges we will all become overpowered at different times. Overpowered<br />
again meaning that it is difficult to hold the boat down. So, someone weighing 150 pounds will<br />
become overpowered in 10 knots of wind where someone weighing 200 pounds will become<br />
overpowered in 15 knots of wind.<br />
As soon as you become overpowered you need to apply your vang so that the mast will bend <strong>and</strong><br />
the sail will flatten. Also, now you can ease your mainsheet so that you can keep the boat from<br />
overhealing in the puffs. The more wind the more vang you will need to apply going upwind.<br />
Cunningham<br />
With the new Z design mainsails you can apply much more Cunningham in order to flatten the<br />
sail. By applying the Cunningham you will move the draft of the sail forward <strong>and</strong> the sail will<br />
10
ecome much flatter along the mast. This too will bend the mast when pulled on hard - helping<br />
you to point. When it becomes very windy you must crank this on hard.<br />
Traveler<br />
As the wind builds you can drop your mainsheet traveler as much as 6” with the new Z design<br />
mainsails. Mark your traveler track so that you know the distance. Once you have dropped the<br />
traveler, pulled on your vang <strong>and</strong> Cunningham then you need to work your mainsheet in the puffs,<br />
easing when the boat wants to heal too much.<br />
Downwind Racing<br />
With the breeze up now it is time to sit on the high side going downwind. This is also called<br />
reverse heeling the boat. You do this to eliminate helm on the rudder. When sailing downwind<br />
in these conditions you want the weather board to be down 1/4 of the way. The leeward board<br />
is all the way up.<br />
Upon rounding your weather mark or offset you will want to adjust the board first <strong>and</strong> then ease<br />
your outhaul so that the shelf in the foot is gone. When sailing straight downwind be sure to ease<br />
your mainsail so that it is all the way out. Your boom will actually rub against the sidestay.<br />
As the wind builds apply more <strong>and</strong> more vang. Downwind this becomes the stabilizer for the<br />
boat. When the boat feels very jumpy or tippy apply more vang in order to stabilize your boat.<br />
Vang is crucial to downwind speed <strong>and</strong> acceleration. Please work your vang in the puffs.<br />
Applying more as the wind hits <strong>and</strong> the boat speeds up. In the lulls, ease the vang. Working the<br />
boat like this is very fast.<br />
Always keep your weight forward <strong>and</strong> outboard. Lean out as much as possible so that the boat<br />
rocks up downwind. This helps to reduce the wetted surface area <strong>and</strong> it prevents you from ever<br />
nose-diving in large waves or chop. Even lean out when adjusting your boards after a gybe. The<br />
board lines are tied together so that you can sit on the high side, lean out <strong>and</strong> pull the leeward<br />
board up. Doing these types of things make a big difference over a long race.<br />
Most important, always look behind you for the next available wind. Staying in the wind makes<br />
all the difference. With the new Z design mainsails you will go fast downwind for sure. However,<br />
being in the breeze will help even more. Be aware of the new wind coming down the lake.<br />
Performance <strong>and</strong> Control<br />
15-25 knots<br />
Upwind Racing<br />
The Z Max <strong>and</strong> ZAP mainsails are truly the best all around sail because it can be flattened in these<br />
conditions. You can bend your mast <strong>and</strong> flatten your sail for great upwind speed <strong>and</strong> control.<br />
With the custom material we have chosen for the body of this sail you really can have 2 sails in<br />
one. You can flatten this sail to be just like a heavy air sail. Follow along <strong>and</strong> see what you can<br />
do to reach better performance <strong>and</strong> have more control in this type of wind condition. <strong>One</strong> of the<br />
very best things that you can do of course is go out <strong>and</strong> practice in this wind range so that you<br />
feel comfortable in the boat. Your boat h<strong>and</strong>ling will improve for all conditions as well.<br />
Boards<br />
Raising the board in this breeze can be advantageous. Especially if you are sailing alone. Please<br />
try moving the head of the board 2” above the board box. We feel that you will experience less<br />
helm <strong>and</strong> more maneuverability.<br />
Heel<br />
Over-heeling is the biggest mistake made when it is very windy. When you have all your sail<br />
controls on hard you must “feather” the boat into the wind. Do not stuff the boat - you must keep<br />
the boat moving fast through the water. Easing your mainsheet as much as 2 feet may be needed<br />
in order to keep your boat on the proper angle of heel. Do not be afraid to ease the sail this much<br />
when it is windy.<br />
11
Technique<br />
The mainsheet is your accelerator in light air <strong>and</strong> the controller of your angle of heel in the heavy<br />
air. Practice not cleating your mainsheet. Have the mainsheet in your h<strong>and</strong> <strong>and</strong> be able to ease<br />
the sail in the puffs <strong>and</strong> trim back in as the puff leaves. This will de-power your boat. The Z<br />
designed mainsails are a flat sail when all of your sail controls are pulled on so now it is up to your<br />
mainsheet tension <strong>and</strong> steering to keep the boat on its lines. Hiking out is important as well. If<br />
you have a crew in these conditions make sure to call out the puffs early so that the crew is fully<br />
hiked before the breeze is on.<br />
Mainsheet Trim<br />
There is no set trim guideline in this much breeze. You do not need to trim hard that is for sure.<br />
With a lot of vang on you can ease the sail as much as 2 feet <strong>and</strong> not loose any speed at all. The<br />
mainsheet just controls your heel in this much wind. So, if you are over-heeled then ease until the<br />
boat settles down. While easing keep the boat on its lines - a normal course. Do not stuff the<br />
boat into the wind because then you will stop. Sail the boat fast by easing the main. Always<br />
feather the boat into the wind.<br />
Outhaul<br />
Pull hard out to the black b<strong>and</strong> on the boom. Never ease in from this point with this much velocity.<br />
Vang<br />
When you are trimmed in going upwind you need to pull the vang hard. This will bend the mast,<br />
flatten your Z design mainsail <strong>and</strong> then open the leech. The boat will become very controllable.<br />
You may need to ease this a bit on the tacks <strong>and</strong> always be sure to ease the vang at least an arms<br />
length before rounding the weather mark. Otherwise you could bend your mast.<br />
Vang Continued:<br />
Vang tension is very critical in this much wind. Apply plenty when racing upwind. At the start it<br />
does hurt your pointing ability so, you may want it eased a bit, but not completely eased off.<br />
Cunningham<br />
Pull this as hard as you can. The sail will flatten right out, especially along the front of the spar.<br />
You could never pull too hard on this control in this much wind.<br />
Traveler<br />
You can drop this up to 9” if it is this windy <strong>and</strong> you do not have the weight on the boat to hold it<br />
down. If you have a crew I still would not drop the traveler more than 6”. When sailing alone you<br />
could go 3” further. Set this control, leave it, <strong>and</strong> then work your mainsheet.<br />
Downwind Racing<br />
Certainly, in this much wind you must reverse heel the boat. Your board should be dropped just<br />
1/4 of the way down. Do not sail downwind with both boards down. It is slow <strong>and</strong> it could cause<br />
you to tip over upon maneuvering.<br />
Apply vang downwind so that the boat is more stable. However, be sure to not over-steer on your<br />
gybes. The boom could catch the water <strong>and</strong> take you for a swim. To be safe, ease the vang a bit<br />
before a gybe in big air. Leaving the outhaul on when it is windy will not hurt your downwind<br />
speed. So, do not worry about this control. Worry about being in the wind, sailing safe <strong>and</strong> going<br />
fast.<br />
When you are sailing in waves keep your weight in your normal position. To avoid nose-diving<br />
just lean out so the boat is heeled. This will help to prevent nose-diving. If you see a big set of<br />
waves do not be afraid to trim in <strong>and</strong> head up 10-15 degrees to reach around them. Trim your<br />
sail, accelerate <strong>and</strong> then head down with your extra speed after the set of waves.<br />
Please enjoy your new <strong>North</strong> 2002 Z Design Mainsail. It is the fastest sail in all conditions you<br />
can be assured of this. If you have questions please call or email us here at <strong>North</strong> <strong>Sails</strong> Zenda.<br />
12
Specifications:<br />
Size: Length 16’, Beam 5’8”<br />
Hull: Fiberglass<br />
Spars: Aluminum<br />
Sail Area: 135 sq. ft.<br />
Hull Wgt.: 420 lbs.<br />
The <strong>Melges</strong> <strong>MC</strong> with its custom <strong>Melges</strong> Trailing Package<br />
provides simplicity when towing, launching or retrieving.<br />
Our <strong>MC</strong> features a large cockpit, sail controls<br />
on each side of the boat <strong>and</strong> a clean, simple layout.<br />
Important <strong>MC</strong> Contacts<br />
<strong>Melges</strong> Performance Sailboats - melges.com<br />
<strong>MC</strong> <strong>Scow</strong>s - mcscow.org<br />
<strong>North</strong> <strong>Sails</strong> - onedesign.com<br />
Harry <strong>Melges</strong> - harry@melges.com<br />
Andy Burdick - <strong>and</strong>y@melges.com<br />
Eric Hood - eric@od.northsails.com<br />
Charlie Harrett - charlie@melges.com<br />
Ted Keller, <strong>MC</strong> Class Commodore - tedkeller@aol.com<br />
Herman van Beek, <strong>MC</strong> Class Webmaster - hvb@dallas.net<br />
Curt Bradley, <strong>MC</strong> Class Secretary - gcurtb@iserv.net<br />
Jim Smith, ILYA Class Secretary - scowslants@aol.com<br />
WASHINGTON<br />
Fleet/State Locations:<br />
<strong>MC</strong> Class Video/Newsletter Available<br />
Class Website: mcscow.org • Official <strong>Melges</strong> Website: melges.com<br />
2002 <strong>MC</strong> Regattas & Clinics<br />
March<br />
12-13 Zenda University Course Eustis, FL<br />
14-16 <strong>MC</strong> Midwinters Eustis, FL<br />
23 Zenda University Alameda, CA<br />
29-30<br />
April<br />
Easter Regatta Charleston, SC<br />
19-21 Black Tie Regatta Dallas, TX<br />
27-28 Holiday in Dixie Shreveport, LA<br />
27-28<br />
May<br />
Cow Town Classic Hoover, OH<br />
4-5 Arlington Regatta Arlington, TX<br />
4-5 <strong>MC</strong> <strong>North</strong> American Pewaukee, WI<br />
11-12 Lake Harriet Spring Regatta Lake Harriet, MN<br />
11-12 Cedar Lake Spring Regatta Cedar Lake, WI<br />
18-19 Gr<strong>and</strong> Rapids Spring Regatta Gr<strong>and</strong> Rapids, MI<br />
18-19 Third Annual Spring Fever <strong>MC</strong> Regatta Okauchee Lake, WI<br />
31<br />
June<br />
Zenda University Lake Lotawana, MO<br />
1-2 Midwest <strong>MC</strong> Championship Lake Lotawana, MO<br />
8-9<br />
July<br />
Texas Invitational Dallas, TX<br />
11 Zenda University Clear Lake, IA<br />
12-14 ILYA <strong>MC</strong> Invitational Clear Lake, IA<br />
27-28 Michigan State Championship Diamond Lake, MI<br />
August<br />
7-10 WMYA Regatta Lake Cadillac, MI<br />
10-13 ILYA <strong>MC</strong> Championship Oshkosh, WI<br />
September<br />
9-12 <strong>MC</strong> National Championship<br />
Lake Geneva, WI<br />
9 Registration • 10-12 Racing<br />
14-15 Fall Regatta Spring Lake, MI<br />
21-22 Texas Championship Dallas, TX<br />
21-22 <strong>MC</strong> Blue Chip Regatta Spring Lake, MI<br />
28-29 Southwest Regional Championship Windycrest, OK<br />
October<br />
19-20 Fall Dinghyfest Dallas, TX<br />
November<br />
9-10 <strong>MC</strong> Southern Regatta Charleston, SC<br />
P.O. Box 1 • Zenda, WI 53195<br />
Phone: 262.275.1110 • Fax: 262.275.8012<br />
Official Website: melges.com<br />
OREGON<br />
CALIFORNIA<br />
COLORADO<br />
NEBRASKA<br />
KANSAS<br />
OKLAHOMA<br />
TEXAS<br />
MINNESOTA<br />
WISCONSIN<br />
NEW YORK<br />
MICHIGAN<br />
PENNSYLVANIA<br />
IOWA<br />
OHIO<br />
MARYLAND<br />
ILLINOIS<br />
MISSOURI<br />
LOUISIANA<br />
INDIANA<br />
NORTH CAROLINA<br />
SOUTH<br />
CAROLINA<br />
GEORGIA<br />
ALABAMA<br />
FLORIDA<br />
MAINE