You also want an ePaper? Increase the reach of your titles
YUMPU automatically turns print PDFs into web optimized ePapers that Google loves.
TTP-248M<br />
THERMAL TRANSFER / DIRECT THERMAL<br />
BAR CODE PRINTER<br />
USER’S<br />
MANUAL
Copyright Declaration<br />
Information in this subject to change without notice and does not represent a<br />
commitment on the part of <strong>TSC</strong> Auto ID Technology Co., Ltd.. No part of this manual<br />
may be reproduced or transmitted in any form by any means, for any purpose other<br />
than the purchaser’s personal use, without the expressed written permission of <strong>TSC</strong><br />
Auto ID Technology Co., Ltd..<br />
i
The FreeType Project LICENSE<br />
2000-Feb-08<br />
Copyright 1996-2000 by<br />
David Turner, Robert Wilhelm, and Werner Lemberg<br />
Introduction<br />
The FreeType Project is distributed in several archive packages; some of them may contain,<br />
in addition to the FreeType font engine, various tools and contributions which rely on, or<br />
relate to, the FreeType Project.<br />
This license applies to all files found in such packages, and which do not fall under their own<br />
explicit license. The license affects thus the FreeType font engine, the test programs,<br />
documentation and make files, at the very least.<br />
This license was inspired by the BSD, Artistic, and IJG(Independent JPEG Group) licenses,<br />
which all encourage inclusion and use of free software in commercial and freeware products<br />
alike. As a consequence, its main points are that:<br />
� We don't promise that this software works. However, we will be interested in any kind<br />
of bug reports. (`as is' distribution)<br />
� You can use this software for whatever you want, in parts or full form, without having<br />
to pay us. (`royalty-free' usage)<br />
� You may not pretend that you wrote this software. If you use it, or only parts of it, in a<br />
program, you must acknowledge somewhere in your documentation that you have<br />
used the FreeType code. (`credits')<br />
We specifically permit and encourage the inclusion of this software, with or without<br />
modifications, in commercial products. We disclaim all warranties covering The FreeType<br />
Project and assume no liability related to The FreeType Project.<br />
Legal Terms<br />
Definitions<br />
Throughout this license, the terms `package', `FreeType Project', and `FreeType archive'<br />
refer to the set of files originally distributed by the authors (David Turner, Robert Wilhelm,<br />
and Werner Lemberg) as the `FreeType Project', be they named as alpha, beta or final<br />
release.<br />
`You' refers to the licensee, or person <strong>using</strong> the project, where `<strong>using</strong>' is a generic term<br />
including compiling the project's source code as well as linking it to form a `program' or<br />
`executable'. This program is referred to as `a program <strong>using</strong> the FreeType engine'.<br />
This license applies to all files distributed in the original FreeType Project, including all<br />
source code, binaries and documentation, unless otherwise stated in the file in its original,<br />
unmodified form as distributed in the original archive.<br />
If you are unsure whether or not a particular file is covered by this license, you must<br />
contact us to verify this.<br />
The FreeType Project is copyright (C) 1996-2000 by David Turner, Robert Wilhelm, and<br />
Werner Lemberg. All rights reserved except as specified below.<br />
1. No Warranty<br />
THE FREETYPE PROJECT IS PROVIDED `AS IS' WITHOUT WARRANTY OF ANY<br />
KIND, EITHER EXPRESS OR IMPLIED, INCLUDING, BUT NOT LIMITED TO,<br />
WARRANTIES OF MERCHANTABILITY AND FITNESS FOR A PARTICULAR<br />
PURPOSE.IN NO EVENT WILL ANY OF THE AUTHORS OR COPYRIGHT HOLDERS<br />
BE LIABLE FOR ANY DAMAGES CAUSED BY THE USE OR THE INABILITY TO USE,<br />
OF THE FREETYPE PROJECT.<br />
ii
2. Redistribution<br />
This license grants a worldwide, royalty-free, perpetual and irrevocable right and license<br />
to use, execute, perform, compile, display, copy, create derivative works of, distribute<br />
and sublicense the FreeType Project (in both source and object code forms) and<br />
derivative works thereof for any purpose; and to authorize others to exercise some or all<br />
of the rights granted herein, subject to the following conditions:<br />
� Redistribution of source code must retain this license file (`LICENSE.TXT')<br />
unaltered; any additions, deletions or changes to the original files must be clearly<br />
indicated in accompanying documentation. The copyright notices of the unaltered,<br />
original files must be preserved in all copies of source files.<br />
� Redistribution in binary form must provide a disclaimer that states that the software<br />
is based in part of the work of the FreeType Team, in the distribution documentation.<br />
We also encourage you to put an URL to the FreeType web page in your<br />
documentation, though this isn't mandatory.<br />
These conditions apply to any software derived from or based on the FreeType Project,<br />
not just the unmodified files. If you use our work, you must acknowledge us. However,<br />
no fee need be paid to us.<br />
3. Advertising<br />
Neither the FreeType authors and contributors nor you shall use the name of the other<br />
for commercial, advertising, or promotional purposes without specific prior written<br />
permission.<br />
We suggest, but do not require, that you use one or more of the following phrases to<br />
refer to this software in your documentationor advertising materials: `FreeType Project',<br />
`FreeType Engine',`FreeType library', or `FreeType Distribution'.<br />
As you have not signed this license, you are not required to accept it. However, as the<br />
FreeType Project is copyrighted material, only this license, or another one contracted<br />
with the authors, grants you the right to use, distribute, and modify it.<br />
Therefore, by <strong>using</strong>, distributing, or modifying the FreeType Project, you indicate that<br />
you understand and accept all the terms of this license.<br />
<strong>4.</strong> Contacts<br />
There are two mailing lists related to FreeType:<br />
� freetype@freetype.org<br />
Discusses general use and applications of FreeType, as well as future and wanted<br />
additions to the library and distribution. If you are looking for support, start in this list<br />
if you haven't found anything to help you in the documentation.<br />
� devel@freetype.org<br />
Discusses bugs, as well as engine internals, design issues, specific licenses,<br />
porting, etc.<br />
� h<strong>ttp</strong>://www.freetype.org<br />
Holds the current FreeType web page, which will allow you to download our latest<br />
development version and read online documentation.<br />
iii
CONTENTS<br />
Copyright Declaration ................................................................................................... i<br />
1. PRODUCT INTRODUCTION ................................................................................ 1<br />
1.1 Compliances .................................................................................................. 1<br />
2. GETTING STARTED ............................................................................................. 3<br />
2.1 Unpacking and Inspection ............................................................................. 3<br />
2.2 Equipment Checklist ...................................................................................... 3<br />
2.3 Printer Parts .................................................................................................... 4<br />
2.4 Buttons and Indicators ................................................................................... 5<br />
3. Set Up ................................................................................................................... 7<br />
3.1 Setting Up the Printer .................................................................................... 7<br />
3.2 Ribbon Installation ......................................................................................... 7<br />
3.3 Label Roll Installation ..................................................................................... 8<br />
3.4 Self-peeling Function...................................................................................... 9<br />
3.5 Cutter Module Installation ............................................................................. 10<br />
3.6 Self-test ........................................................................................................ 11<br />
3.7 Dump Mode ................................................................................................. 11<br />
<strong>4.</strong> USING TTP-248M ............................................................................................... 13<br />
<strong>4.</strong>1 Power-on Utilities ......................................................................................... 13<br />
<strong>4.</strong>1.1 Gap/Black Mark Sensor Calibration Utility ............................................. 13<br />
<strong>4.</strong>1.2 Printer Initialization ................................................................................ 14<br />
<strong>4.</strong>2 Troubleshooting Guide ................................................................................ 16<br />
5. PRINTER CLEANING ......................................................................................... 18<br />
5.1 Print Head Cleaning ..................................................................................... 18<br />
5.2 Printer Cover Cleaning ................................................................................. 18<br />
5.3 Internal Parts Cleaning ................................................................................. 18<br />
APPENDIX LCD Control Panel Operation Map ........................................................ 20<br />
i
1. PRODUCT INTRODUCTION<br />
Thank you very much for purchasing <strong>TSC</strong> TTP-248M bar code printer. TTP-<br />
248M comes with rugged steel construction and durable metal mechanism<br />
ensuring the ability to work under extreme industrial applications.<br />
TTP-248M is equipped with a 32-bit RISC processor, which offers up to 203.2<br />
mm/sec (8”/sec) print speed. With back-lit LCD display, printer status can be<br />
managed easier and operated more user friendly. The moveable sensor design<br />
can meet wide range of label media.<br />
All of the most frequently used bar code formats are available in TTP-248M.<br />
Fonts and bar codes can be printed in any one of the four directions. This printer<br />
provides a choice of five different sizes of alphanumeric font, OCR-A, OCR-B<br />
and one true type font.<br />
TTP-248M is the most cost-effective and high performance in its class!<br />
1.1 Compliances<br />
FCC Class A<br />
FCC Part 15: 2002/08/20<br />
ANSI.C63.4: 1992<br />
This equipment has been tested and found to comply with the limits for a Class A<br />
digital device, pursuant to Part 15 of the FCC Rules. These limits are designed to<br />
provide reason-able protection against harmful interference when the equipment is<br />
operated in a commercial environment. This equipment generates, uses and can<br />
radiate radio frequency energy, and if not installed and used in ac-cordance with<br />
the instruction manual, may cause harmful interference to radio communications.<br />
Operation of this equipment in a residential area is likely to cause harmful<br />
interference in which the user will be required to correct the interference at his or<br />
her own expense.<br />
CE<br />
EN55022 :1998 class A<br />
EN61000-3-2 :1995 class A<br />
EN61000-3-3 :1995<br />
EN55024 : 1998<br />
1
UL/CUL<br />
TÜ V/Safety<br />
EN 60950/A11: 1997<br />
Wichtige Sicherheits-Hinweise<br />
1. Bitte lesen Sie Diese Hinweis sorgfältig durch<br />
2. Heben Sie diese Anleitung fűr den späteren Gebrauch auf.<br />
3. Vor jedem Reinigen ist das Gerät vom Stromentz zu trennen. Verwenden Sie<br />
Keine Flűssig-oder Aerosolreiniger. Am besten eignet sich ein angefeuchtetes<br />
Tuch zur Reinigung.<br />
<strong>4.</strong> Die Netzanschlußsteckdose soll nahe dem Gerät angebraucht und leicht<br />
zugänglich sein.<br />
5. Das Gerät ist vor Feuchtigkeit zu schűtzen.<br />
6. Bei der Aufstellung des Gerätes ist auf sicheren Stand zu achten. Ein Kippen<br />
oder Fallen könnte Beschädigungen hervorrufen.<br />
7. Beáchten Sie beim Anschluß an das stromnetz die Anschlußwerte.<br />
8. Dieses das Gerät kann bis zu einer Außentemperatur von maximal 40℃<br />
betieben werden.<br />
BSMI<br />
2
2. GETTING STARTED<br />
2.1 Unpacking and Inspection<br />
After receiving the bar code printer, carefully inspect the device and its<br />
packaging. The printer is specially packaged to withstand damage in shipping. In<br />
case of evident damage, contact the carrier directly to specify the nature and<br />
extent of damage. Please retain the packaging materials in case you need to<br />
reship the printer.<br />
2.2 Equipment Checklist<br />
� One TTP-248M printer unit<br />
� One ribbon paper core<br />
� One quick installation guide<br />
� One power cord<br />
� One centronics interface cable<br />
� One 3” paper core adapter<br />
� One Windows software/driver CD disk<br />
� One internal rewinder<br />
Separately purchased items may also be included. These additional items may<br />
include:<br />
� Cutter module<br />
� Peel-off sensor<br />
� Programmable Stand-alone keyboard KU-007 Plus<br />
� Memory module<br />
� Internal print server<br />
� External 802.11b/g print server<br />
If any part is missing, please contact the Customer Service Department of your<br />
purchased reseller or distributor.<br />
3
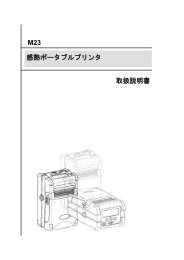
2.3 Printer Parts<br />
LED Indicator<br />
LCD Display<br />
Buttons<br />
External Label<br />
Feed Opening<br />
Figure 1. Top front view<br />
Figure 2. Printer rear view<br />
4<br />
Printer Cover<br />
Laud Buzzer<br />
Centronics Port<br />
RS-232C Port<br />
Power Switch<br />
Power Supply<br />
Connector
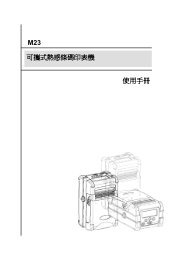
Ribbon Supply Spindle<br />
Ribbon Rewind Spindle<br />
Ribbon Tension Knob<br />
Print Head Pressure<br />
Adjustment Knob<br />
Carriage Release Lever<br />
2.4 Buttons and Indicators<br />
Power Indicator<br />
Figure 3. Printer interior view<br />
When the printer is in the power-on condition, the Power indicator is lit on.<br />
On-Line Indicator<br />
This green On-Line indicator is lit on when the printer is ready; the On-Line<br />
indicator blinks when pressing PAUSE button.<br />
Error Indicator<br />
The red Error indicator illuminates in the event of a printer error, such as<br />
memory full, carriage open, cutter error and so forth.<br />
MENU/SELECT Button<br />
Provided with a built-in menu, the printer allows the user to directly set printing<br />
parameters or view printer status on the LCD display.<br />
Press the MENU button to enter printer setup mode. Press the MENU button<br />
again to proceed the cursor to the next item.<br />
The setup is comprised of these major items: Printer Setup, Sensor Setup,<br />
System Setup, File Setup and Printer Test. For more information, please refer to<br />
Appendix for the structure and operation logic of the menu.<br />
PAUSE/EXE/INC Button<br />
5<br />
Label Spindle<br />
Rewind Spindle<br />
Paper Clamp<br />
Label Rewind Spindle<br />
Label Guide<br />
Media Guide Bar
This button combines three functions:<br />
1. PAUSE button if the printer is in the Ready status. By pressing the PAUSE<br />
button: (1) the printer stops at the completion of printing of the current<br />
label,(2) the On-Line LED flashes, and (3) the printer holds all data in<br />
memory. This allows for trouble-free replacement of label stock and thermal<br />
transfer ribbon. A second depression of the PAUSE button will restart the<br />
printer.<br />
2. EXE/INC button if in the setup mode. Press EXE/INC button to increase the<br />
value of parameters, or execute the selected item.<br />
FEED/DEC Button<br />
This button also has dual functions: Feed one label and decrease the value of<br />
parameters.<br />
Press the FEED button, the printer will advance one label.<br />
Press the DEC button to change parameter settings or exit the submenu.<br />
Stripper/Rewind Plate<br />
The stripper/rewind plate can be used for strip and label rewind mode. Please<br />
refer to the instruction of the sticker on the stripper/rewind plate to install this<br />
plate.<br />
Carriage Release Lever<br />
When opening the Carriage Release Lever, On-Line LED is lit off, the LCD<br />
display shows “Carriage Open”. After engage the carriage release lever, press<br />
the FEED button, printer will re-register the label and then shows READY on the<br />
LCD display, and the screen will return to ready condition.<br />
Print Head Pressure Adjustment Knob<br />
The print head pressure adjustment knob has 5 levels of adjustment. Because<br />
the printer’s paper alignment is to the left side of mechanism, different media<br />
widths require different pressure to print correctly. Therefore it may be necessary<br />
to adjust the pressure knob to get your best printout quality. For example, if the<br />
label width is 4”, adjust both print head pressure adjustment knobs to the same<br />
level. If the label is less than 2” wide, increase the left print head pressure<br />
adjustment knob and decrease the right side pressure to level 1.<br />
Ribbon tension adjustment knob<br />
The ribbon tension adjustment knob offers 6 levels of tension to apply to<br />
6
different width of ribbon. Turn the ribbon tension knob clockwise and you will hear<br />
a light click sound as the gear changes. The level of rewind ribbon is from loose to<br />
tight, level 0 to level 5. You will hear a louder click for level 0.<br />
3. Set Up<br />
3.1 Setting Up the Printer<br />
Place the printer on a flat, secure surface and make sure the POWER switch is<br />
off.<br />
Connect the printer to the computer with the provided RS-232C or Centronics<br />
cable.<br />
Plug the power cord into the power supply connector at the rear of the printer,<br />
and then plug the power cord into a properly grounded power outlet.<br />
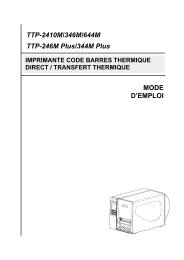
3.2 Ribbon Installation<br />
1. Open the printer right side cover.<br />
2. Disengage the printer carriage lever.<br />
3. Install a new ribbon roll onto the ribbon supply spindle.<br />
※ It is to be noticed that ribbon should be placed to the left end of spindle.<br />
Figure <strong>4.</strong> Ribbon installation<br />
7
<strong>4.</strong> Place an empty paper core onto the ribbon rewind roll. (The diameter of<br />
empty paper core must be larger then 34 mm)<br />
5. Pull the ribbon roll leading edge forward through the ribbon sensor. Attach<br />
the ribbon leading edge (with a tape) to the empty paper core.<br />
6. Manually rotate the ribbon rewind roll until the ribbon overlaps the ribbon<br />
leading edge and stretches tight.<br />
3.3 Label Roll Installation<br />
Figure 5. Installation of ribbon.<br />
1. Insert the label supply roll into the label spindle.<br />
2. Pull the label roll leading edge forward through the black media guide bar,<br />
gap/black mark sensor and place the label leading edge onto the platen<br />
roller.<br />
3. Adjust the label guide to meet the width of the label, and buckle it onto the<br />
black media guide bar.<br />
8
<strong>4.</strong> Engage the carriage release lever.<br />
5. Close the printer cover.<br />
6. Switch on the power. Now, the printer is ready to print.<br />
Figure 6. Insert label supply roll into label spindle.<br />
3.4 Self-peeling Function<br />
1. Remove the cutter module (if installed) and the stripper/rewind plate.<br />
2. Install the stripper/rewind plate in the direction with the sticker “The side of<br />
plate is used with tear-off mode, cutter mode and peel-off mode” faced<br />
outside.<br />
3. Wind back the label leading edge.<br />
<strong>4.</strong> Clip the label on the label rewind spindle by the paper clamp.<br />
9
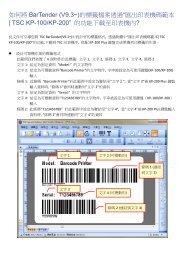
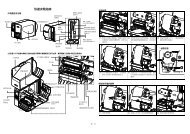
3.5 Cutter Module Installation<br />
Figure 7. Feed path for the printer media.<br />
1. Uninstall the peel-off sensor and stripper/rewind plate.<br />
2. Plug the mini DIN cable into the socket under the platen.<br />
3. Install the stripper/rewind plate.<br />
<strong>4.</strong> It is to be noted that the cutter module bracket should be mounted into the<br />
slots, which are on the base of the printer.<br />
5. Fix the cutter module on the printer with a screw.<br />
Cutter Module<br />
Figure 8. Cutter module installation<br />
10
3.6 Self-test<br />
To initiate the self-test mode, depress the MENU button. Press MENU button to<br />
scroll the cursor to Printer test. Press EXE button to enter the submenu and<br />
press MENU button to “Printer Config”. item. Press EXE button to print printer<br />
internal setting. In self-test, a check pattern is used to check the performance of<br />
the thermal printhead. Following the check pattern, the printer prints internal<br />
settings as listed below:<br />
1. Printer model and firmware version<br />
2. Check sum<br />
3. Serial port setting<br />
<strong>4.</strong> Code page setting<br />
5. Country code setting<br />
6. Print speed setting<br />
7. Print density setting<br />
8. Label size setting<br />
9. Gap (Bline) width and offset setting<br />
10. Backing paper transparence<br />
11. File list<br />
12. Memory available<br />
3.7 Dump Mode<br />
Figure 9. Printout of self-test<br />
To enter dump mode, please press MENU button to scroll the cursor to “Printer<br />
Test” then Press EXE button to enter the submenu. Press MENU button to scroll<br />
dump mode. Press EXE button to select line dump mode or page dump mode.<br />
Press MENU button to select EXIT to enter dump mode. In this mode, any<br />
11
characters sent from the host computer will be printed in two columns, as shown<br />
in Figure 11. The characters received will be printed in two columns as below: on<br />
the left side of the paper are the characters received and on the right side are the<br />
corresponding hexadecimal values. This is very helpful to users for the<br />
verification of programming commands or debugging of printer programs. Reset<br />
the printer by pressing the FEED button.<br />
Figure 10. Printout of dump mode<br />
12
<strong>4.</strong> USING TTP-248M<br />
<strong>4.</strong>1 Power-on Utilities<br />
There are two power-on utilities to calibrate sensor and initialize TTP-248M<br />
hardware. These utilities are activated by pressing the PAUSE button, PAUSE<br />
and FEED buttons and turning on the printer power simultaneously. The utilities<br />
are listed as below:<br />
1. Gap/black mark sensor calibration<br />
2. Printer initialization<br />
<strong>4.</strong>1.1 Gap/Black Mark Sensor Calibration Utility<br />
This utility is used to calibrate the sensitivity of the gap/black mark sensor. The<br />
gap/black mark sensor must be calibrated whenever changing the label media<br />
or executing printer initialization.<br />
Please follow the steps below to calibrate the gap sensor.<br />
1. Install the ribbon and label roll as the above-mentioned procedures, and<br />
engage the carriage release lever.<br />
2. Turn off printer power.<br />
3. Press PAUSE key and then turning on printer power. Release the PAUSE<br />
key when “GAP/BLINE sensor calibrating….” Message is shown on the LCD<br />
display. The printer will calibrate the gap/black mark sensor automatically.<br />
13
<strong>4.</strong>1.2 Printer Initialization<br />
Printer Initialization will restore printer settings to defaults.<br />
Default settings are listed as below.<br />
Item Default Value<br />
14<br />
Cleared by<br />
Initialization<br />
Property Saved<br />
when Turning off<br />
Power<br />
Mileage N/A No Yes<br />
Check Sum N/A No Yes<br />
Serial Port 19200,n,8,1 Yes Yes<br />
Code Page 437 Yes Yes<br />
Country Code 001 Yes Yes<br />
Tear Mode On Yes Yes<br />
Peel Mode Off Yes Yes<br />
Cutter Mode Off Yes Yes<br />
Offset 0 Yes Yes<br />
Reference Point 0,0 Yes Yes<br />
Print Direction 1 Yes Yes<br />
Speed 6”/sec Yes Yes<br />
Density 07 Yes Yes<br />
Label Size 4 x 2.5” Yes Yes<br />
Gap/Bline Sensor Gap Sensor Yes Yes<br />
Gap(Bline) 0.12” (3 mm) Yes Yes<br />
Transparency<br />
Ribbon Sensor<br />
Sensitivity<br />
Will be reset. Need<br />
to re-calibrate the<br />
gap sensor<br />
Yes Yes<br />
5 Yes Yes<br />
LCD Language English Yes Yes<br />
Aux. LED Off Yes Yes<br />
Aux. Buzzer Off Yes Yes<br />
Download Files N/A No Yes<br />
RTC N/A No No<br />
Please follow the steps below to initialize the printer:<br />
1. Turn off the printer power.
2. Hold down the PAUSE and FEED buttons and turn on the printer power.<br />
3. Do not release the buttons until the three LEDs flash in turn.<br />
Note 1 : Printing method (thermal transfer or thermal direct printing ) will be<br />
set automatically at the activation of printer power.<br />
Note 2 : When printer initialization is done, please calibrate the gap sensor<br />
again.<br />
15
<strong>4.</strong>2 Troubleshooting Guide<br />
The following guide lists the most common problems that may be encountered<br />
when operating this bar code printer. If the printer still does not function after all<br />
suggested solutions have been invoked, please contact the Customer Service<br />
Department of your purchased reseller or distributor for assistance<br />
Phenomenon Reasons Solutions<br />
No ribbon<br />
No paper<br />
Poor printing quality<br />
Power indicator does<br />
not illuminate<br />
Paper jam<br />
1. Running out of ribbon<br />
2. The ribbon is installed<br />
incorrectly.<br />
3. The ribbon sensor is not<br />
been well calibrated.<br />
1. Running out of label<br />
2. The label is installed<br />
incorrectly.<br />
3. The moveable gap/black<br />
mark sensor is not placed<br />
in the proper location.<br />
16<br />
1. Supply a new ribbon roll.<br />
2. Please refer to the steps in<br />
section 3.2 Ribbon<br />
Installation to reinstall the<br />
ribbon.<br />
3. Please calibrate the ribbon<br />
sensor<br />
1. Supply a new label roll.<br />
2. Please refer to the steps in<br />
section 3.3 Label Roll<br />
Installation to reinstall the<br />
label roll.<br />
3. Please move the sensor to<br />
the proper location.<br />
1. Dirt is accumulated on the 1. Please refer to the steps in<br />
print head.<br />
the section 5.1 Print Head<br />
2. The density setting is not Cleaning to clear the print<br />
set properly<br />
head.<br />
3. Ribbon and media are 2. Adjust the print density and<br />
incompatible.<br />
speed.<br />
<strong>4.</strong> The pressure of print head 3. Change proper ribbon or<br />
is not set properly<br />
proper label roll.<br />
<strong>4.</strong> Adjust the print head<br />
1. The power cord is not<br />
properly connected.<br />
2. The voltage setting of<br />
power supply in the rear of<br />
printer is set incorrectly.<br />
1. The label size is not set<br />
properly.<br />
2. Labels may be stuck in<br />
side print mechanism.<br />
Carriage open The printer carriage is open.<br />
pressure adjustment knob.<br />
1. Please check whether the<br />
power cord is well<br />
connected between printer<br />
and outlet.<br />
2. Please set the voltage<br />
setting of power supply at<br />
the rear of printer to the<br />
proper voltage.<br />
1. a. Reset the label size.<br />
b. Re-calibrate the<br />
gap/black mark sensor.<br />
2. Remove the stuck label.<br />
Please close the print<br />
carriage.
Memory full ( FLASH / The space of FLASH/DRAM Delete unused files in the<br />
DRAM )<br />
is full.<br />
FLASH/DRAM.<br />
1. The serial port setting is 1. Please reset the serial port<br />
not consistent between setting.<br />
No printout printing host and printer.<br />
2. Please replace the cable<br />
through serial port 2. The serial port cable pin<br />
configuration is not pin to<br />
pin assignment.<br />
with pin to pin assignment<br />
1. Out of paper or out of 1. (1) Please check the feed<br />
ribbon.<br />
path of label or ribbon.<br />
2. The gap/black mark (2) Please supply a new<br />
sensor or ribbon sensor label roll or ribbon roll.<br />
are not calibrated. 2. (1) Calibrate gap/black<br />
3. The ribbon rewind spindle mark sensor.<br />
On-Line indicator is paper core is not been (2) Calibrate ribbon sensor.<br />
off, error indicator is installed.<br />
3. Install a paper core onto<br />
on<br />
<strong>4.</strong> The diameter of rewind the ribbon rewind spindle.<br />
spindle paper core is less (The diameter of the paper<br />
than 34 mm.<br />
core should be larger than<br />
34 mm)<br />
<strong>4.</strong> Please change the paper<br />
core which diameter is<br />
larger than 34 mm.<br />
17
5. PRINTER CLEANING<br />
The printer should be cleaned regularly to retain high quality and optimum<br />
performance.<br />
5.1 Print Head Cleaning<br />
1. Always turn off the printer before cleaning the print head. Allow the<br />
printhead to cool for a minimum of one minute.<br />
2. Open the printer cover.<br />
3. Remove the screw by the side of the carriage release lever.<br />
<strong>4.</strong> Open the printer carriage release lever.<br />
5. Remove the media and ribbon (If loaded).<br />
6. Clean the print head element with a head cleaner pen or use a cotton swab<br />
and 100% ethanol to clean the print head surface.<br />
7. Do not close the printhead until the alcohol volatilizing.<br />
8. Close the printer cover.<br />
Note:<br />
*Do not touch printer head by hand. If you touch it careless, please use ethanol to clean it.<br />
*It’s industry alcohol. Please do not use regular alcohol, which may damage the printer head.<br />
5.2 Printer Cover Cleaning<br />
1. Switch off and unplug the printer.<br />
2. Using a lint-free cloth soaked in the water or mild detergent, wipe the printer<br />
cover light.<br />
※ Do not use harsh or abrasive cloth and solvent.<br />
5.3 Internal Parts Cleaning<br />
1. Switch off and unplug the printer.<br />
2. Open the printer cover.<br />
3. Remove the media and ribbon (If loaded).<br />
<strong>4.</strong> Open the printer carriage release lever.<br />
5. Using a soft cloth soaked in the alcohol or mild detergent to wipe the internal<br />
parts.<br />
6. The rubber roller should be clean by cloth soaked in water.<br />
7. Install the ribbon and label, close the carriage release lever.<br />
8. Close the printer cover.<br />
18
APPENDIX LCD Control Panel Operation Map<br />
1. Print Setup * Tear On<br />
Tear Off<br />
2. Sensor Calib.<br />
3. System Setup<br />
Speed<br />
Density<br />
Direction<br />
* Tear Mode Peel On<br />
Offset<br />
Reference X<br />
Reference Y<br />
Exit<br />
Auto. Gap<br />
Manual Gap<br />
Auto Bline<br />
Manual Bline<br />
Auto. Ribbon<br />
Manual Ribbon<br />
Exit<br />
Lang.<br />
Code Page<br />
4 "/sec * 6"/sec 8"/sec<br />
0~15 (*7)<br />
0 * 1<br />
0~999 (*0)<br />
0~999 (*0)<br />
0~999 (*0)<br />
20<br />
Cutter On<br />
Cutter Batch<br />
* English 繁體中文<br />
簡體中文<br />
日本語<br />
USA<br />
SWE<br />
SWI<br />
Reserved<br />
BRI<br />
GER<br />
FRE<br />
SPA ITA DAN<br />
* 437 850<br />
852<br />
Note:<br />
1. Defaults are marked with asterisk (*)<br />
2. The parameter of shaded area can be accessed by<br />
pressing the INC. or DEC. key to set the value.<br />
865<br />
863<br />
10"/sec<br />
860
3. System Setup<br />
<strong>4.</strong> File Mngment<br />
5. Printer Test<br />
Country<br />
Parity<br />
Data Bit<br />
Stop Bit(s)<br />
Baud<br />
Aux. LED<br />
Aux. Buzzer<br />
Restore Defaults<br />
Exit<br />
File List<br />
Available Memory<br />
Delete File(s)<br />
Exit<br />
Self Test<br />
* None<br />
7<br />
* 1<br />
2400<br />
128000<br />
21<br />
Even<br />
* 8<br />
2<br />
4800<br />
Odd<br />
9600<br />
* 19200<br />
115200 57600 56000 38400<br />
* Off<br />
* Off, 1~99<br />
DRAM:<br />
512KB free<br />
FLASH:<br />
1000KB free<br />
PAUSE: Del. All<br />
FEED: Exit<br />
* 001 002 003 031 032<br />
039<br />
* Dump Mode Off Dump Mode On<br />
Rotate Cutter<br />
Exit<br />
038<br />
On<br />
036<br />
041 042 044<br />
045<br />
046<br />
061 055 049<br />
048<br />
047<br />
351 358<br />
Cutter Pos. OK/NG<br />
MENU: Fw d.<br />
PAUSE: Rev.<br />
FEED: Exit<br />
034<br />
033
<strong>TSC</strong> Auto ID Technology Co., Ltd.<br />
Corporate Headquarters Li Ze Plant<br />
9F., No.95, Minquan Rd., Xindian Dist., No.35, Sec. 2, Ligong 1st Rd., Wujie Township,<br />
New Taipei City 23141, Taiwan (R.O.C.) Yilan County 26841, Taiwan (R.O.C.)<br />
TEL: +886-2-2218-6789 TEL: +886-3-990-6677<br />
FAX: +886-2-2218-5678 FAX: +886-3-990-5577<br />
Web site: www.tscprinters.com<br />
E-mail: printer_sales@tscprinters.com<br />
tech_support@tscprinters.com