Operating Instructions Dishwasher – ASKO D5223 - AJ Madison
Operating Instructions Dishwasher – ASKO D5223 - AJ Madison
Operating Instructions Dishwasher – ASKO D5223 - AJ Madison

Create successful ePaper yourself
Turn your PDF publications into a flip-book with our unique Google optimized e-Paper software.
Dear <strong>ASKO</strong> customer!<br />
<strong>Operating</strong> <strong>Instructions</strong><br />
<strong>Dishwasher</strong><br />
Save these instructions for future reference<br />
Thank you for choosing this quality product from Scandinavia, which was made in Sweden.<br />
We want you to feel assured that the inside of your new machine is just as good as the outside and that the<br />
ethics and standards that went into the production of this machine are just as high as the quality and performance<br />
that you will receive from it. We hope that this product will give you many years of pleasure.<br />
To ensure that you get the most out of your new machine, we recommend that you read the operating instructions<br />
before using the machine. The operating instructions also contain information on how to avoid damaging<br />
the environment.<br />
<strong>ASKO</strong> <strong>D5223</strong>
Contents<br />
Before doing your first wash 3<br />
Important safety instructions 4<br />
Child safety 5<br />
Parts of the dishwasher 6<br />
Technical data 6<br />
Baskets 7<br />
Control panel 8<br />
Detergent Dispenser 8<br />
Basic Course 9<br />
Programs 12<br />
Program Description 13<br />
Options 14<br />
Eco-dishwashing 15<br />
Fragile dishes 16<br />
Cleaning 17<br />
Rinse aid 20<br />
Settings 21<br />
Fault indications 22<br />
Troubleshooting 23<br />
Performance information 26<br />
Installation instructions 27<br />
Customer Care Center<br />
1-800-898-1879<br />
www.askousa.com<br />
Service and guarantee 43<br />
Own comments 46<br />
Quick Guide 48
Before doing your first wash:<br />
Read through the directions for use<br />
Read through the directions for use before starting<br />
to use your machine, especially the Safety,<br />
Child Safety, and Basic Course sections.<br />
Take care with certain materials<br />
Read the Fragile Dishes section before washing<br />
china with unglazed decoration or other household<br />
goods made of plastic, wood, or crystal<br />
requiring careful treatment.<br />
Check the door fitting<br />
Check that the door of the dishwasher fits properly:<br />
open the door a little and let it go. Does it<br />
stay exactly where you released it? If not, you<br />
should check the installation instructions or consult<br />
the installer.<br />
Note!<br />
Do you need this Use&Care Guide in spanish? Log onto www.askousa.com/customer-care to download.<br />
¿ Necesita esta Instrucciones de uso y cuidado en español? Entre en www.askousa.com/customercare<br />
y descárguesela.<br />
Customer Care Center<br />
1-800-898-1879<br />
www.askousa.com
Important safety instructions<br />
This manual does not cover all possible conditions<br />
and situations that may occur. Common<br />
sense and caution should always be used when<br />
installing, operating, and maintaining any appliance.<br />
• Read all instructions before using the dishwasher.<br />
• <strong>Dishwasher</strong>s must be electrically grounded.<br />
Read the Installation <strong>Instructions</strong> for details.<br />
• Use the dishwasher only for its intended purpose.<br />
• Do not run the dishwasher while you are out of<br />
the home.<br />
• Use only automatic dishwasher detergents<br />
and rinse agents.<br />
• To reduce the risk of injury, keep detergents<br />
and rinse aids out of the reach of children.<br />
• Do not load sharp items near the door; you<br />
could damage the door seal.<br />
• Place sharp knives in the cutlery basket with<br />
the sharp ends down to avoid the risk of cuttype<br />
injuries.<br />
• Do not wash plastic items unless they are marked<br />
“dishwasher safe” or the equivalent. For<br />
items not marked, check the manufacturer’s<br />
recommendations. Items not dishwasher safe<br />
could become deformed or melt and create a<br />
potential fire hazard.<br />
• Do not touch the heating element during or<br />
imediately after use.<br />
• Do not operate the dishwasher unless all<br />
enclosure panels are properly in place (i.e.,<br />
guard plate, access panel, toe kick, etc.)<br />
• Do not tamper with controls by removing or<br />
changing.<br />
• Do not abuse, sit on, or stand on the dishwasher<br />
door or baskets.<br />
To reduce the risk of injury, do not allow<br />
children to play in or on a dishwasher.<br />
• Under certain conditions, hydrogen gas may<br />
be produced in a hot water system that has<br />
not been used for two weeks or more. HYD-<br />
ROGEN GAS IS EXPLOSIVE. If the hot water<br />
system has not been used for two weeks, before<br />
using the dishwasher turn on all hot water<br />
faucets and let the water flow from each for<br />
several minutes. This will release any accumulated<br />
hydrogen gas. As the gas is flammable,<br />
Customer Care Center<br />
1-800-898-1879<br />
www.askousa.com<br />
do not smoke or use an open flame during this<br />
time.<br />
• When removing an old dishwasher from service<br />
or discarding it, remove the door to the<br />
washing compartment.<br />
• Do not store or use combustible materials, gasoline,<br />
or other flammable vapors and liquids<br />
in the vicinity of this or any other appliance.<br />
• Disconnect electrical power to dishwasher<br />
before servicing.<br />
• Repairs should be done by a qualified technician.
Child safety!<br />
Child safety tips<br />
<strong>Dishwasher</strong> detergents and rinse aids are corrosive,<br />
so always keep them out of reach of<br />
children.<br />
• Should a child swallow dishwasher detergent or<br />
rinse aid, give plenty to drink immediately, i.e.,<br />
one or two glasses of milk or water. Do not try to<br />
induce vomiting. Seek medical advice immediately:<br />
Call the National Capital Poison Center at<br />
1-800- -1<br />
• Always close the door and start the dishwasher<br />
as soon as you put in the detergent.<br />
• Always keep small children away from the<br />
machine when it is open. There may be some<br />
detergent residue left inside the machine.<br />
• If dishwasher detergent gets in someone’s<br />
eyes, rinse them with plenty of water for at<br />
least 1 minutes.<br />
• Do not allow children to use or play in or on the<br />
dishwasher.<br />
• Load all long and sharp items in the knife/utensil<br />
basket. If this is not possible, load sharp<br />
objects with the pointed end facing the back<br />
of the dishwasher. Sharp items loaded in the<br />
cutlery basket should be loaded with pointed<br />
ends down.<br />
• Engage the child safety lock.<br />
Customer Care Center<br />
1-800-898-1879<br />
www.askousa.com
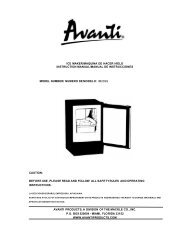
Parts of the dishwasher*<br />
1. Upper basket<br />
. Spray arms<br />
. Cutlery basket<br />
. Lower basket<br />
. <strong>Dishwasher</strong> detergent compartment<br />
. Main power switch<br />
7. Rinse Aid Compartment<br />
8. Filter<br />
9. Serial tag and rating plate<br />
*Details may differ depending on the model<br />
and market!<br />
Technical data<br />
Height - /8” - -1/ ” 870-9 0mm<br />
Width ” ( 10)mm<br />
Depth ” ( 10mm)<br />
Weight 10 .8 lbs ( 8 kg)<br />
Water pressure . - 1 0 psi<br />
0.0 - 1.0 MPa<br />
0. -10 Bar<br />
Connection Single phase, 1 0 V, 0 Hz, 10 A<br />
Max output 1 00 W<br />
4<br />
5<br />
3<br />
3<br />
6<br />
1<br />
Customer Care Center<br />
1-800-898-1879<br />
www.askousa.com<br />
2<br />
7<br />
8<br />
9
The baskets*<br />
Upper basket 1. Wine glass shelf<br />
. Cup rack<br />
1<br />
Lower basket<br />
Cutlery basket<br />
*Details may differ depending on the<br />
model and market!<br />
2<br />
Customer Care Center<br />
1-800-898-1879<br />
www.askousa.com<br />
7
8<br />
Control panel<br />
1<br />
P R O G<br />
1. Program selector<br />
. Daily<br />
. Heavy<br />
. Normal<br />
. Delicate<br />
Detergent Dispenser<br />
1<br />
7<br />
8<br />
Customer Care Center<br />
1-800-898-1879<br />
www.askousa.com<br />
. Quick<br />
7. Rinse & Hold<br />
8. Temperature<br />
9. Drying<br />
10. Start/stop<br />
9 10<br />
S TA R T<br />
S T O P<br />
1. Compartment for main wash dishwasher detergent<br />
. Compartment for pre-wash detergent<br />
. Refill indicator for rinse aid (not all models)<br />
. Rinse aid cover<br />
. Detergent compartment cover
Basic Course<br />
Below are step-by-step instructions to help you<br />
achieve the best possible dishwashing results.<br />
Load the baskets correctly!<br />
Thanks to Self Cleaning System, you<br />
do not need to rinse the dishes under<br />
running water. Simply remove large food particles<br />
and debris. Convenient and environmentallyfriendly!<br />
Place glasses, cups, bowls, side plates, and<br />
saucers in the upper basket. Wine glasses should<br />
be hung from or leaned against the wine glass<br />
shelf and knives placed in the knife stand if present.<br />
Note!<br />
Ensure that all soiled surfaces face inwards or<br />
downwards!<br />
Place dinner plates, side plates, serving dishes,<br />
saucepans, and cutlery (in the cutlery basket)<br />
in the lower basket. The folding plate tines can<br />
placed in three different positions or can be removed<br />
to provide room for large plates, saucepans<br />
and pots.<br />
Stand the cutlery with handles downward and as<br />
spread out as possible. Ensure that spoons are<br />
not resting inside each other.<br />
Do not put cutlery made of different materials<br />
- such as silver and stainless steel - in the same<br />
compartment (risk of stains).<br />
Customer Care Center<br />
1-800-898-1879<br />
www.askousa.com<br />
The cutlery basket has a folding flap in the<br />
middle for small items or narrow shafts, such<br />
as electric whisks.<br />
Place long cutlery and carving knives in the<br />
special knife box (if present) or in the upper<br />
basket.<br />
Check that the spray arms are able to move<br />
freely. See the section entitled Fragile Dishes if<br />
you want to wash objects that may be fragile.<br />
Dishwashing detergent<br />
We recommend that you use<br />
only unscented, granular automatic dishwashing<br />
detergent. Using the wrong detergent could<br />
cause flooding and/or damage your dishwasher.<br />
Do not use detergent that has been wet and<br />
is clumped. Also, check the expiration date on<br />
the container.<br />
The amount of detergent needed can vary due<br />
to differences in water hardness. To determine<br />
the water hardness in your area, contact<br />
your local water utility or area water softening<br />
company. The harder the water, the more<br />
detergent you may need. Refer to the chart on<br />
the next page for the recommended detergent<br />
amounts based on water hardness. Remember,<br />
you should adjust the amount of detergent<br />
you use by small amounts until you find the<br />
correct amount.<br />
Twelve grains and higher is extremely hard<br />
water and detergent alone may not be enough.<br />
You may need to use a water softener to<br />
maximize the performance of your dishwasher.<br />
Also, in areas with hard water (9+) you may<br />
need to wash at lower temperatures to prevent<br />
hard water deposits from forming in tank and<br />
wash system.<br />
In hard water areas, both the dishes and the<br />
machine can develop a white or gray film after<br />
a while. This can be removed by replacing the<br />
prewash detergent with two tablespoons of<br />
citric acid. If the water is very hard, use a rinse<br />
aid that contains citric acid.<br />
Different brands of dishwasher detergent have<br />
different amounts of phosphorous for softening<br />
water. If you have hard water and use a detergent<br />
with less than 8.7% phosphorous content,<br />
9
10<br />
you may need to use more detergent or use a<br />
detergent with more than 8.7% phosphorous<br />
content.<br />
NOTE:<br />
We recommend that you do not add prewash<br />
detergent for the Quick wash programs.<br />
NOTE:<br />
If you use a dishwashing detergent with a rinse<br />
aid additive, you should not fill the rinse aid dispenser.<br />
This could cause a film on your dishes.<br />
<strong>Dishwasher</strong> tablets<br />
Halve the tablet if it is difficult to close the dispenser<br />
cover. There is a risk that the dishwasher<br />
detergent will not break down properly to give<br />
the correct dosage if the cover is tight and cannot<br />
be opened correctly.<br />
3-in-1/ Multi-purpose detergent<br />
Note!<br />
Read the directions for use for such products<br />
carefully. If anything is unclear, contact the detergent<br />
manufacturer.<br />
Customer Care Center<br />
1-800-898-1879<br />
www.askousa.com<br />
Switch on the main switch<br />
Select program<br />
For help in choosing the appropriate<br />
progam, see the section of this book<br />
titled Programs.<br />
Select option<br />
If you wish to use additional options<br />
continue to the section of this book<br />
titled Options. Otherwise you can now<br />
start the machine, see point 6.<br />
Recommended detergent amounts based on water hardness<br />
Water hardness Detergent amounts<br />
Soft<br />
(0- grains per gallon)<br />
Medium<br />
( -8 grains per gallon)<br />
hard<br />
(9+ grains*)<br />
* 1 grains and higher is extremely hard water.<br />
Prewash 1 teaspoon<br />
Main wash 1 to 1-1/ tablespoons<br />
Prewash 1 teaspoon<br />
Main wash 1 to tablespoons<br />
Prewash 1 teaspoon<br />
Main wash to tablespoons
Press start<br />
The dishwasher will now start. It manages<br />
the entire wash automatically.<br />
Ensure that the door is properly closed or the<br />
machine will not start.<br />
Changing program<br />
If you want to change program after having<br />
started the machine, press the Start/Stop button<br />
for three seconds. Then select a new program<br />
and press the Start/Stop button.<br />
Make sure there is detergent in the dispenser.<br />
Do you want to load more dishes?<br />
Carefully open the door; the machine will stops<br />
automatically, put in the dishes, close the door<br />
and the dishwasher will continue from where it<br />
left off.<br />
If the machine is switched off at the<br />
main switch<br />
(or in the event of a power cut) before the washing<br />
program has been completed, the interrupted<br />
program will continue when the power comes<br />
back on.<br />
Note!<br />
If the power is switched off, or if the door is open<br />
during drying, the program is interrupted.<br />
7<br />
Customer Care Center<br />
1-800-898-1879<br />
www.askousa.com<br />
Standby mode<br />
Once the machine has finished, it only<br />
draws standby current. Should you wish to disconnect<br />
the power completely, just switch off at<br />
the main power switch. Turn off the water faucet<br />
if the machine is not to be used for an extended<br />
period, such as during vacations, for example.<br />
11
1<br />
Programs<br />
Select a program by pressing the program<br />
selector one or more times until the required<br />
program symbol lights up. See the Program<br />
guide below.<br />
Daily wash<br />
A program suitable for daily dishes.<br />
The program can also deal with dried<br />
food, though the short prewashes are not<br />
designed for dishes with burned on foods.<br />
For a short daily program use Daily wash<br />
with economy temperature and economy<br />
dry.<br />
Heavy wash<br />
The Heavy Wash program should be used for<br />
heavily soiled dishes, e.g. saucepans, pots<br />
and gratin dishes. If there is still space in the<br />
machine after loading such items, you can add<br />
plates etc.<br />
Normal wash<br />
Used for washing normally soiled dishes such<br />
as plates, serving dishes, cups and glasses, etc.<br />
Note!<br />
For normally soiled dishes, use the Normal<br />
Wash program with Normal temperature<br />
and Normal dry .<br />
To save more water and energy use Economy<br />
temperature and Economy dry.<br />
Delicate wash<br />
If the dishes are not heavily soiled, you can<br />
select Delicate wash. This program is intended<br />
for glass and china which has just been used<br />
and therefore does not need such a powerful<br />
program.<br />
Customer Care Center<br />
1-800-898-1879<br />
www.askousa.com<br />
Quick wash<br />
Select Quick Wash if the dishes are very lightly<br />
soiled. This program is used for very lightly<br />
soiled glass and china, e.g. coffee cups.<br />
Rinse & Hold<br />
For rinsing the dishes while waiting for the machine<br />
to be filled.
Program Description<br />
Programview<br />
Programs Daily Heavy Normal Delicate Quick Rinse &<br />
Hold<br />
Program<br />
info<br />
A program<br />
suitable for daily<br />
dishes.<br />
The program<br />
can also deal<br />
with dried food,<br />
though the short<br />
prewashes are<br />
not designed<br />
for dishes with<br />
burned on food.<br />
For heavily<br />
soiled loads,<br />
such as pots,<br />
pans, casseroles,<br />
etc.<br />
Options -- --<br />
Prewashes<br />
with SCS*<br />
For normally<br />
soiled<br />
loads such<br />
as plates,<br />
glasses,<br />
bowls, and<br />
lightly soiled<br />
pans.<br />
Customer Care Center<br />
1-800-898-1879<br />
www.askousa.com<br />
For glass<br />
and china<br />
which has<br />
just been<br />
used and<br />
therefore<br />
does not<br />
need such<br />
a powerful<br />
program.<br />
prewashes 1 prewash prewashes -- --<br />
For lightly<br />
soiled loads<br />
that are<br />
washed<br />
immediately<br />
after<br />
use. This<br />
program<br />
can also<br />
be used<br />
for delicate<br />
items.<br />
Mainwash *** 1 0°F 1 0°F 1 0°F 1 0°F 1 0°F --<br />
Number of<br />
rinses<br />
, last rinse<br />
1 0°F<br />
Consumption values<br />
1. Wash time<br />
hot water /<br />
min. **<br />
Energy approx.<br />
kWh<br />
.Wash time<br />
cold water /<br />
min.**<br />
Energy approx.<br />
kWh<br />
Water consumption<br />
(gallon)<br />
, last<br />
rinse 1 0°F<br />
, last<br />
rinse 1 0°F<br />
, last<br />
rinse 1 0°F<br />
, last<br />
rinse 1 0°F<br />
190 10 1 0 10 0<br />
To rinse<br />
dishes that<br />
you plan to<br />
wash later<br />
that day.<br />
--<br />
1 rinse<br />
0.8 0.8 1.0 0. 0.7 0.01<br />
0 1 0 180 1 80<br />
1. 1. 1.7 0.8 1.0 0.01<br />
.<br />
( 0 l)<br />
.7<br />
(1 l)<br />
.8<br />
( l)<br />
.7<br />
(10 l)<br />
.<br />
(10 l)<br />
* SCS = Self Cleaning System.<br />
** All quoted times are approximate. Cycle time fluctuations may occur due to water temperature, water pressure,<br />
variations in voltage etc.<br />
1. Hot water connection approx. 1 0°F ( 0°C).<br />
. Cold water connection approx. 0°F (10°C).<br />
*** The listed temperatures are set as the default from the factory. You can alter the program temperature by<br />
choosing the temperature options in the chart on page 1 .<br />
0.9<br />
( l)<br />
1
1<br />
Options<br />
Select options<br />
To select an option, press one of the option buttons.<br />
Temperature<br />
With the temperature option button you can<br />
select the wash temperature yourself. You can<br />
vary the temperatures as follows:<br />
Normal Economy<br />
Daily: 1 0°F ( °C) 1 0°F ( 0°C)<br />
Heavy: 1 0°F (70°C) 1 0°F ( °C)<br />
Normal: 1 0°F ( °C) 1 0°F ( °C)<br />
Delicate: 1 0°F ( 0°C) 90°F ( 0°C)<br />
Quick: 1 0°F ( 0°C) 8 °F ( 0°C)<br />
The temperature symbol will light up if you have<br />
chosen the high temperature. This selection will<br />
remain in force until a change is made.<br />
Drying<br />
If you desire a better drying result, press the<br />
Drying options button (Normal) and a symbol<br />
showing three wavy lines will light. If you want<br />
a program without Drying options (Economy),<br />
press the button again and the symbol will go<br />
out.<br />
Customer Care Center<br />
1-800-898-1879<br />
www.askousa.com
Eco-dishwashing<br />
Only wash full loads<br />
Waiting to run the wash until the machine is full<br />
saves energy.<br />
Wash at a lower temperature<br />
If the dishes are only lightly soiled you can run a<br />
Quick wash program and reduce the temperature<br />
to 8 °F ( 0°C).<br />
Select a program with Economy dry<br />
To save energy, select Economy dry. You will get<br />
a better drying result if you leave the door slightly<br />
open after the end of the program.<br />
Do not rinse before dishwashing<br />
Thanks to the dishwasher’s Self Cleaning System<br />
(SCS) you do not need to rinse the dishes<br />
under running water before loading them into the<br />
machine.<br />
Choose environmentally-friendly<br />
dishwasher detergent<br />
Read environmental declarations on the package!<br />
Connect to cold water supply<br />
For best performance it is recommended that<br />
connection is to cold water.<br />
Customer Care Center<br />
1-800-898-1879<br />
www.askousa.com<br />
1
1<br />
Fragile dishes<br />
A number of household goods are not suitable<br />
for machine washing. This can be due to<br />
a variety of reasons. Certain materials cannot<br />
withstand intense heat; others can be damaged<br />
by the dishwasher detergent.<br />
Fragile decoration<br />
China with decoration on top of the glaze (the<br />
goods have a rough feel) should not be machine<br />
washed.<br />
Crystal/ glass<br />
Place the goods so that they do not knock together<br />
during the wash. Use the lowest possible<br />
wash temperature and the shortest possible program.<br />
Do not heat dry! Antique and very fragile<br />
items should not be machine washed.<br />
Glass which is machine washed at high temperatures<br />
can in time develop a grey film which<br />
cannot be removed. Wash fine glass at the lowest<br />
temperature and with a low dosage of dishwasher<br />
detergent.<br />
Silver<br />
Silver and stainless steel items should not come<br />
into contact with each other as the silver can<br />
discolor.<br />
Cutlery with glued handles<br />
Certain types of adhesive cannot withstand machine<br />
washing. In such cases the handles can<br />
come loose.<br />
Wood<br />
Wooden items should only be machine washed<br />
if they are labeled as dishwasher safe.<br />
Aluminum<br />
Aluminum can be dulled by machine washing.<br />
However, good quality aluminum saucepans<br />
can be machine washed, although a reduction in<br />
luster should be expected.<br />
Plastic<br />
Certain types of plastic cannot withstand the<br />
high temperature generated in machine dishwashing.<br />
Protect plastic goods<br />
Select a program with a low temperature.<br />
Customer Care Center<br />
1-800-898-1879<br />
www.askousa.com
Cleaning<br />
The dishwasher tub is made of stainless steel<br />
and is kept clean through normal use.<br />
However, if you have hard water, limescale deposits<br />
may form in the machine.<br />
If this happens, run an empty machine with a<br />
normal wash program with two tablespoons of<br />
citric acid in the dishwasher detergent compartment.<br />
Fine filter<br />
Spray arm<br />
Coarse filter<br />
Tubular<br />
strainer<br />
Coarse filter<br />
The coarse filter traps larger food particles,<br />
which cannot get past the drain pump.<br />
Empty the coarse filter as necessary.<br />
1. Lift the coarse filter by the handle.<br />
. Empty the coarse filter. Don’t forget to replace<br />
it!<br />
Fine filter<br />
Debris that collects on the fine filter is automatically<br />
rinsed away during each wash.<br />
However, the fine filter and its pipe section<br />
should be cleaned once or twice a year.<br />
1. Turn the handle once counter-clockwise.<br />
. Lift the pipe section straight up by the handle.<br />
Free the coarse filter to clean the pipe section.<br />
Customer Care Center<br />
1-800-898-1879<br />
www.askousa.com<br />
1x<br />
. Remove and clean the fine filter.<br />
. Replace in reverse order. Ensure that the<br />
edges are properly sealed when replacing the<br />
fine filter.<br />
. Lock the filter in place by turning the handle<br />
clockwise to the stop position: the handle<br />
should point out from the dishwasher.<br />
1x<br />
NOTE:<br />
The dishwasher must not be used without the<br />
filter in place!<br />
An improperly fitted coarse filter may affect the<br />
dishwashing result!<br />
17
18<br />
Drain pump<br />
The pump can be accessed from inside the<br />
machine.<br />
1. Cut the power to the machine by pulling out<br />
the plug!<br />
. Remove the coarse filter and pipe section.<br />
. Remove the small fitted piece at the left of the<br />
bottom drain (see the image below).<br />
. You can release and turn the pump blade by<br />
inserting your finger into the hole and release<br />
anything blocking it.<br />
. Reinstall the fitted piece and filters.<br />
. Plug the plug into the wall socket.<br />
If the machine still does not start and a buzzing<br />
sound is heard, the overflow guard has been<br />
activated.<br />
• Shut off the water.<br />
• Pull the plug out from the wall socket.<br />
• Call the Customer Care Center.<br />
Customer Care Center<br />
1-800-898-1879<br />
www.askousa.com<br />
NOTE!<br />
Do not forget to reinstall the fitted piece.<br />
The spray arms<br />
Holes and bearings can sometimes become<br />
blocked.<br />
1. Pull the lower washer arm straight up to release<br />
it.<br />
. Remove any deposits using a needle or similar.<br />
The washer arms also have holes under neath.
To release the upper spray arm, the upper basket<br />
must be removed.<br />
1. Pull out the basket and turn the basket stop<br />
outwards on both rails (see picture). The basket<br />
can now be removed.<br />
. Remove the upper spray arm in the same<br />
way as the lower arm and clean it.<br />
Door<br />
When cleaning the edge around the door, use<br />
only a slightly damp cloth, possibly with a little<br />
detergent. Do not use a spray bottle or similar<br />
around the door catch. This is to ensure that<br />
water does not penetrate into the door catch<br />
and come into contact with the electrical components.<br />
CAUTION!<br />
Do not use a spray bottle or similar around the<br />
door catch.<br />
Tip!<br />
In order to prevent bad odours in the dishwasher,<br />
clean any residue from the door seal<br />
area and the corners with a dish brush and lowlather<br />
detergent.<br />
Customer Care Center<br />
1-800-898-1879<br />
www.askousa.com<br />
19
0<br />
Rinse aid<br />
Adding rinse aid<br />
In some cases, drying can be made more efficient<br />
by using rinse aid.<br />
Machines with indicator on the panel<br />
When the rinse aid has run out and more is<br />
needed, the rinse aid symbol on the panel<br />
lights up*.<br />
To fill with rinse aid:<br />
1. Turn and lift up the cover of the rinse aid compartment<br />
to the right of the dispenser. This is<br />
where you top up and set the amount of rinse aid<br />
to be dispensed in each wash.<br />
. Carefully pour in rinse aid up to the dosage<br />
setting knob.<br />
Alter dosage if required. Do not forget to close<br />
the cover.<br />
*Note!<br />
After filling there may be a short delay before the<br />
signal light goes out.<br />
Machines with refill indicator in<br />
detegrent dispenser<br />
There is a refill indicator in the middle of the<br />
dispenser (see illustration). If the refill indicator<br />
is totally black, there is sufficient rinse aid.<br />
However, if the indicator has a more transparent<br />
appearance, you need to top up with rinse aid<br />
(see above).<br />
Refill indicator<br />
Open<br />
Closed<br />
Cover for rinse aid<br />
Open by turning and lifting the cover!<br />
Customer Care Center<br />
1-800-898-1879<br />
www.askousa.com<br />
Select dosage<br />
The dispenser is usually set at 1= soft water.<br />
However, depending on the water hardness,<br />
you may need to change the dosage.<br />
Open the rinse aid cover. Here you will find the<br />
dispenser’s adjustment dial. Settings 1- : the<br />
harder the water, the higher the dosage.<br />
When the water hardness exceeds grains, you<br />
should use rinse aid with citric acid (acid rinse<br />
aid).<br />
Too much rinse aid can lead to the build-up of<br />
foam. If your water is particularly soft, you can<br />
dilute the rinse aid (1 part rinse aid, 1 part water).<br />
Too much rinse aid can cause streaks on the<br />
dishes, while too little can result in water stains.
Settings<br />
Reprogramming<br />
Some of the machine’s functions can be reprogrammed. Please reade below. The selection will be<br />
retained until the next time you reset this function.<br />
Even if the machine is turned off at the main switch or loses power for any other reason, all selections<br />
registered before the interruption of power will be retained.<br />
Child-safe button lock<br />
You can prevent a child starting the machine by accident or changing the settings by programming<br />
the machine with a button lock, which requires the Temperature and Drying buttons to be pressed<br />
simultaneously to start up the machine. The button lock will automatically be reactivated after three<br />
minutes.<br />
1. Switch off the dishwasher with the main switch.<br />
+ . Hold in the Temperature and Drying buttons while pressing the main<br />
switch. The Temperature, Drying and start symbols will flash. Release<br />
the Temperature and Drying buttons.<br />
PROG . Press the Program button <strong>–</strong> when the Daily wash symbol is lit,<br />
the button lock has been activated<br />
START<br />
STOP<br />
. Then press the Start/Stop button to store the setting.<br />
or Reset:<br />
1. Switch off the dishwasher with the main switc.<br />
+ . Hold in the Temperature and Drying buttons at the same time as<br />
pressing the main switch<br />
PROG<br />
START<br />
STOP<br />
. Press the Program button <strong>–</strong> when the Daily wash symbol goes out,<br />
the button lock has been deactivated<br />
. Then press the Start/Stop button to confirm the setting.<br />
Customer Care Center<br />
1-800-898-1879<br />
www.askousa.com<br />
1
Fault indications<br />
Display Type of fault Action<br />
flashes Too much water Phone service<br />
in the dishwasher<br />
flashes Fault with water inlet Check that the water<br />
supply valve is open<br />
flashes Valve leakage Shut off the water sup-<br />
ply valve and contact<br />
service<br />
flashes Blocked drain See ‘Possible causes’<br />
in chapter Trouble<br />
shooting<br />
flashes Clogged filter Clean the filters, see<br />
chapter Cleaning<br />
To remove the fault indications from the display, turn off the main switch and then turn it back on<br />
again.<br />
Customer Care Center<br />
1-800-898-1879<br />
www.askousa.com
Troubleshooting<br />
Problems Possible causes Action<br />
The dishes are not clean<br />
Stains or a film on the<br />
china<br />
The china has a whitishblue<br />
sticky film<br />
• The spray arms are not<br />
rotating<br />
• Old dishwasher detergent.<br />
Note! Detergent is perishable<br />
• Incorrect dosage of detergent<br />
• Wrong wash program selected<br />
• Incorrect loading of the dishwasher<br />
• Glasses and cups have tipped<br />
over during the wash<br />
• Incorrectly set rinse aid<br />
dispenser<br />
• Phosphate-free detergent in<br />
combination with hard water<br />
• Too high a temperature and/or<br />
too much detergent can cause<br />
etching on(crystal) glass.<br />
Unfortunately this cannot be<br />
remedied, only prevented!<br />
• Too high dosage of rinse aid<br />
Customer Care Center<br />
1-800-898-1879<br />
www.askousa.com<br />
• Lift off the arms and clean<br />
• Purchase smaller boxes of<br />
detergent.<br />
• Dispense according to the<br />
level of water hardness<br />
• Heavier programs are longer,<br />
and use higher temperatures<br />
for dirtier loads. Use a heavier<br />
program better suited for<br />
the load<br />
• Do not cover china with large<br />
bowls or the like<br />
• Try not to place too much tall<br />
glassware in the corners of<br />
the baskets<br />
• Load the china securely<br />
• See the chapter on rinse aid<br />
• Change detergent<br />
• Wash (crystal) glass at a<br />
low temperature and use<br />
dishwasher detergent sparingly.<br />
Contact the dishwasher<br />
detergent manufacturer<br />
• Reduce dosage. See the<br />
chapter on rinse aid. If the<br />
water is very soft, you could<br />
try diluting the rinse aid with<br />
water (1 part rinse aid, 1 part<br />
water)
Problems Possible causes Action<br />
Stains on stainless steel or<br />
silver<br />
Stains which remain after<br />
dishwashing<br />
Rattling sound during<br />
dishwashing<br />
The machine will not start<br />
• Certain food remnants such<br />
as mustard, mayonnaise,<br />
lemon, vinegar, salt, and<br />
dressings can cause stains<br />
on stainless steel if allowed<br />
to remain for any length of<br />
time. All stainless steel can<br />
mark silver if allowed to come<br />
into contact during the dishwashing<br />
process. Aluminum<br />
can also cause stains on<br />
dishes<br />
• Lipstick and tea can be difficult<br />
to remove<br />
• The dishes are not properly<br />
loaded or the spray arms are<br />
not rotating<br />
• You have forgotten to switch<br />
on the main switch<br />
• The door is not closed properly<br />
• The home’s circuit breaker<br />
has tripped<br />
• The plug is not plugged in<br />
• The water supply valve is off<br />
• Overfilling/leakage<br />
• A whirring sound (the drain<br />
pump) is heard from the<br />
machine, which ceases when<br />
the power is turned off at the<br />
main power switch<br />
Customer Care Center<br />
1-800-898-1879<br />
www.askousa.com<br />
• Rinse off food residue of this<br />
type if you do not intend to<br />
start the dishwasher immediately<br />
• Seperate your cutlery into<br />
various compartments in<br />
the basket. Make sure silver<br />
and stainless steel are not<br />
together<br />
• Heavier programs are longer,<br />
and use higher temperatures<br />
for dirtier loads. Use a heavier<br />
program better suited for<br />
the load<br />
• Check that the china is<br />
loaded securely. Spin the<br />
spray arms to make sure they<br />
rotate<br />
• Check<br />
• Check<br />
• Check<br />
• Check<br />
• Check<br />
• Contact our Customer Care<br />
Center<br />
1. Shut off the water tap<br />
. Unplug the electrical plug<br />
from the outlet<br />
. Contact our Customer Care<br />
Center at the number at the<br />
bottom of the page
Problems Possible causes Action<br />
Water remains in the<br />
machine<br />
Bad odor in the machine<br />
Dishes do not get<br />
sufficiently dry<br />
Door will not close<br />
• Obstruction in the drain hose<br />
• Kinks in the drain hose<br />
• The filters are clogged<br />
• Objects in the drain pump<br />
• Dirt around edges and corners<br />
• Dirt along the door seal area<br />
and the corners<br />
• The Economy dry option has<br />
been selected<br />
• The machine is not fully<br />
loaded<br />
• Rinse aid is out or set for too<br />
small a dosage<br />
• The baskets are not correctly<br />
placed<br />
Customer Care Center<br />
1-800-898-1879<br />
www.askousa.com<br />
• Disconnect the drain hose<br />
where it is connected to the<br />
sink’s water trap. Check that<br />
no debris has become stuck.<br />
Is the cone-shaped part of the<br />
pipe cut so that the diameter<br />
is at least 1 mm?<br />
.• Check that the hose is free<br />
from kinks or sharp bends<br />
• Clean out the coarse filter, the<br />
fine filter and the filter<br />
• Clean out the drain pump.<br />
See the chapter on cleaning<br />
• Clean with a dishwashing<br />
brush and low-foaming detergent<br />
• Clean with a dish brush and<br />
low-lather detergent<br />
• Activate the Normal drying<br />
option<br />
• Load the machine full<br />
• Fill or increase the amount of<br />
rinse aid<br />
• Open the door slightly once<br />
the program has finished<br />
• Make sure the baskets are in<br />
a horizontal position. Check<br />
that the basket water connector<br />
is aligned with the spray<br />
pipe. No on all models.
Performance information<br />
Energy standard<br />
USA: ANSI/AHAM DW-1- 00<br />
Technical data<br />
Height: - /8” - -1/ ” 870-9 0mm<br />
Width: ” ( 10mm)<br />
Depth: ” ( 10mm)<br />
Weight: 10 .8 lbs ( 8 kg)*<br />
Water pressure . - 1 0 psi<br />
0.0 - 1.0 MPa<br />
0. -10(Bar)<br />
Electrical connection: See serial tag/rating plate<br />
Rated power: See serial tag/rating plate<br />
*The weight can vary due to varying specifications.<br />
Loading of performance test<br />
Upper basket with 10 place settings AHAM DW-1 Lower basket with 10 place settings AHAM DW-1<br />
Customer Care Center<br />
1-800-898-1879<br />
www.askousa.com
Installation instructions<br />
SAFETY INSTRUCTIONS:<br />
1. It is important that you closely follow the instructions<br />
provided here.<br />
. An incorrect or defective installation can lead<br />
to higher consumption of energy, water and<br />
dishwashing detergent, which can lead to<br />
higher costs and poorer cleaning results.<br />
. Plumbing and electrical installations must be<br />
carried out by qualified professionals.<br />
. Exercise caution during the installation! Wear<br />
protective gloves! Always work in pairs!<br />
. The power socket must be fitted outside the<br />
cavity for the dishwasher to enable easy access<br />
after installing the machine.<br />
. Always follow the applicable regulations for<br />
water, drain and electrical connection.<br />
7. A dishwasher fitted with a wired plug must be<br />
connected to an earthed socket.<br />
Caution!<br />
Turn off the water supply when installing the<br />
dishwasher!<br />
Customer Care Center<br />
1-800-898-1879<br />
www.askousa.com<br />
7
8<br />
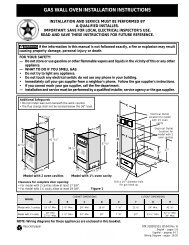
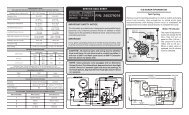
Installation and connection information<br />
dIShwAShER CAvITY mEASUREmENTS<br />
2-4"<br />
50-105 mm<br />
24"<br />
610 mm<br />
Cable hole<br />
1-3/4"<br />
44 mm<br />
W = 24"<br />
W = 610 mm<br />
H = 34-1/4" to 36-3/8"<br />
H = 870-920 mm<br />
DISHWASHER MEASUREMENTS *<br />
2 to 4”<br />
50-105<br />
23-3/4”<br />
600mm<br />
28-3/8 to 31-1/2”<br />
720-800mm<br />
24”<br />
610mm<br />
34-1/4 to 36-1/8”<br />
870-920mm<br />
With fill strips** Without fill strips<br />
H minimum ** H maximum H minimum *** H maximum<br />
With toe kick<br />
(see Steep 7)<br />
-1/ ”, 870 mm ”, 890 mm - / ”, 8 0 mm - /8”, 880 mm<br />
Without toe kick -1/ ”, 870 mm -1/8”, 9 0 mm - / ”, 8 0 mm - / ”, 910 mm<br />
* With fill strips and without plastic feet.<br />
** <strong>ASKO</strong> XLFI dishwashers can be installed either with or without accessory fill strips depending on the type<br />
of installation. If the dishwasher cutout has been cut to European widths of 23-5/8” (600 mm), the unit won’t<br />
require fill strips. If the dishwasher cutout is a standard 24” wide, we have fill strips that make the unit 24”<br />
(610 mm) wide.<br />
*** Without plastic feet.<br />
Customer Care Center<br />
1-800-898-1879<br />
www.askousa.com<br />
H - see table below<br />
Make sure the edges of the cable<br />
hole are even to avoid damage to<br />
the drain and supply hoses and<br />
the electric cable.
Installation and connection information<br />
wATER CONNECTION<br />
• The machine can be connected to a cold or<br />
hot water supply (maximum 1 0°F, 8 °C).<br />
However, we recommend connection to a<br />
cold water supply.<br />
• The inlet pipe has a connector with either a<br />
9/1 ” internal thread.<br />
ElECTRICAl CONNECTION<br />
• 1 0VAC mains voltage, minimum 1 A.<br />
dRAINAgE<br />
• The supplied cone-shaped connector fits a<br />
drain connection with an internal diameter of<br />
1/ , /8, / and 7/8 inches (1 , 1 , 18 and<br />
mm).<br />
• Use a hose clamp if connecting to a fixed drain<br />
(sink).<br />
The connector is ready to cut to the desired<br />
drain connection size. Only a clamp is required.<br />
CAblE/hOSE lENgThS<br />
Drain hose: 9 inches (19 0 mm)<br />
Supply hose: inches (1 70 mm)<br />
Power cable: inches (1770 mm)<br />
TOOLS<br />
1) Flathead screwdriver<br />
) Open-ended wrench<br />
/8 inches (1 mm)<br />
) Tape measure<br />
) Spirit level<br />
Customer Care Center<br />
1-800-898-1879<br />
www.askousa.com<br />
9
0<br />
Step 1. Fitting the dishwasher in place<br />
1. Loosen the mounting screws on the dishwasher’s<br />
two front steel feet using a /8 inch<br />
(1 mm) open-ended wrench. Screw the<br />
mounting screws down as close to the floor as<br />
possible.<br />
. Adjust the height of the dishwasher by turning<br />
the front steel feet with your hands. Leave<br />
enough space to adjust them later.<br />
. Screw in the back foot completely by turning<br />
the adjustment screw at the front counterclockwise.<br />
Use a flat-bladed or a 1/ inch nut<br />
driver.<br />
Customer Care Center<br />
1-800-898-1879<br />
www.askousa.com
Fitting the dishwasher in place<br />
. Push the plastic feet into place on all three<br />
steel feet (included in document bag).<br />
Note:<br />
Do not attach the plastic feet if the installation<br />
space is of minimum height.<br />
. Push the dishwasher into the cavity. At the<br />
same time, pull the electric cable and drainage<br />
and supply hoses through the cable hole.<br />
. Lift the dishwasher a little at the front and<br />
turn the front feet to lower them.<br />
Customer Care Center<br />
1-800-898-1879<br />
www.askousa.com<br />
1
Fitting the dishwasher in place<br />
7. Check that there is a 1/8 inch ( mm) space<br />
between the top of the dishwasher door and<br />
the underside of the counter.<br />
Do not attach the mounting screws. This will<br />
be done later.<br />
8. Adjust the back foot by turning the adjustment<br />
screw at the front clockwise.<br />
9. Place the spirit level on the dishwasher door<br />
to check that the machine is level and adjust if<br />
necessary. The door must be fully closed!<br />
Note:<br />
The dishwasher must be level!<br />
A machine that is not level can affect the<br />
amount of water taken in and make the door difficult<br />
to close, and the baskets difficult to place<br />
securely.<br />
Customer Care Center<br />
1-800-898-1879<br />
www.askousa.com<br />
1/8<br />
3 mm<br />
”
Step 2. Attaching cover or wooden door<br />
Follow the separate instructions supplied with the<br />
dishwasher to attach the chosen cover or wooden<br />
door to the front of the machine.<br />
Note:<br />
Once you have fitted the cover or wooden door<br />
to the dishwasher, the door springs may need<br />
adjusting. Check that the door stays in the position<br />
in which it is placed. If the door drops down<br />
when you open it, the springs need tightening. If<br />
the door shuts on its own, the springs need loosening.<br />
See step for further instructions.<br />
MEASUREMENTS OVERVIEW <strong>–</strong> WOODEN DOOR<br />
FULLY INTEGRATED MODELS<br />
Width: -1/ inches ( 9 mm) minimum to cabinet width minus 1/ inch reveal<br />
Height: 8-1/ inches (7 0 mm) to 1-1/ inches (800 mm)<br />
Customer Care Center<br />
1-800-898-1879<br />
www.askousa.com
Step 3. Adjusting the door springs<br />
The door springs are on the sides of the dishwasher.<br />
If necessary, pull out the dishwasher<br />
and adjust the tension of the door springs. A<br />
good idea is to try adjusting one side only first.<br />
1. Be sure the door is closed.<br />
. Grab the front end of the spring and pull it<br />
up and forward to release it from the forward<br />
mount.<br />
. Loosen the spring from the rear mount by<br />
turning it outwards.<br />
Customer Care Center<br />
1-800-898-1879<br />
www.askousa.com
Adjusting the door springs<br />
. Adjust the spring tension using one of the<br />
following methods depending on how much<br />
adjustment is needed.<br />
If you need to adjust the spring a lot, place the<br />
rear mount in another hole. Place the spring<br />
further forward to reduce the tension and further<br />
back to increase the tension.<br />
If you want to make small adjustments to the<br />
spring, hold the back end with one hand and<br />
turn the forward mount clockwise or counterclockwise<br />
one or more times. Turn the mount<br />
clockwise to increase spring tension and counterclockwise<br />
to reduce spring tension.<br />
. Replace the back end of the spring by holding<br />
the spring at a right angle to the side of the<br />
dishwasher and pushing the end of the spring<br />
into the hole, then turning the spring in toward<br />
the dishwasher.<br />
. Reattach the front end of the spring by pulling<br />
it up and forward to fasten it in the mount.<br />
7. Open the door and check the spring tension<br />
again. If necessary, make further adjustments<br />
as above.<br />
Stronger door springs are available for purchase<br />
for dishwashers fitted with a cover door. Springs<br />
are available for various weights and sizes of<br />
door. Door springs can be purchased from the<br />
retailer who sold you the dishwasher.<br />
Customer Care Center<br />
1-800-898-1879<br />
www.askousa.com<br />
Reduce spring tension<br />
Increase spring tension<br />
6<br />
Increase spring tension<br />
Reduce spring tension<br />
5
Step 4. Connecting electricity, water and drain<br />
1. Connect drain hose<br />
The drain hose is routed to an inlet plug on the<br />
sink unit’s water trap.<br />
Cut the drain hose adapter to the appro priate<br />
size for connection to the undersink drain or<br />
garbage disposer. The overall length of the<br />
drain hose must not exceed 1 feet 9 inches.<br />
No part of the drainage hose may be more<br />
than 7-1/ inches (9 0 mm) above the bottom<br />
of the dishwasher. The hose must not be run<br />
directly to the floor drain or similar.<br />
The hose must always discharge at least 1 -<br />
/ inches ( 0 mm) above the bottom of the<br />
dishwasher.<br />
. Connect water supply hose<br />
Use the supplied O ring and tighten the connection<br />
by hand plus a quarter turn with a<br />
wrench. Open the shutoff valve and let the<br />
pressure settle for a while. Check the connections<br />
again to make sure they are not leaking.<br />
. Connect the plug<br />
Ensure that the power outlet is within the range<br />
of the power cable. Do not use an extension<br />
cord!<br />
The dishwasher must be connected to a<br />
grounded outlet.<br />
Customer Care Center<br />
1-800-898-1879<br />
www.askousa.com<br />
37-1/2”<br />
Max 950mm<br />
13-3/4”<br />
Min- 350mm<br />
Shutoff<br />
valve<br />
Grounded<br />
outlet<br />
Grounded<br />
outlet<br />
Clamp<br />
Hose barb<br />
coupling<br />
Water connection<br />
Plug
Step 5. Checking dishwasher function and fit<br />
Test the dishwasher with the rinse program. Check that the dishwasher takes in water and drains.<br />
Also check that none of the connections leak.<br />
Also check that adjacent drawers and cupboards<br />
can be opened when the dishwasher<br />
door is open.<br />
Customer Care Center<br />
1-800-898-1879<br />
www.askousa.com<br />
7
8<br />
Step 6. Securing the dishwasher<br />
1. Pull out the upper basket, and the centre basket<br />
if present, and turn the basket stop on the<br />
runner outwards.<br />
. Remove the upper basket, and the centre<br />
basket if present, by pulling the basket(s) out<br />
as far as possible. This is to make more space<br />
available during installation.<br />
. Remove the lower basket. Otherwise it easily<br />
rolls out if you need to adjust the dishwasher<br />
during installation.<br />
. Screw the dishwasher to the counter from the<br />
inside or to the cabinets on either side. If the<br />
counter is a hard material, such as marble,<br />
screw the dishwasher to the side cabinets. Use<br />
the supplied plastic spacers when screwing the<br />
dishwasher into place!<br />
Customer Care Center<br />
1-800-898-1879<br />
www.askousa.com<br />
Securing to counter<br />
Securing to side cabinets
Securing the dishwasher<br />
. Cover the screw holes on the sides with the<br />
supplied plastic plugs. Push in the plugs diagonally<br />
to fit them in place.<br />
. Check that the dishwasher’s two front steel<br />
feet are solidly placed on the floor, that is, the<br />
dishwasher is not hanging in the air. Otherwise<br />
turn the front feet to lower them.<br />
Customer Care Center<br />
1-800-898-1879<br />
www.askousa.com<br />
9
0<br />
Securing the dishwasher<br />
Also adjust the rear foot if necessary so that the<br />
dishwasher is level.<br />
7. Tighten the mounting screws on the front feet<br />
with a /8 inch (1 mm) open-ended wrench.<br />
Customer Care Center<br />
1-800-898-1879<br />
www.askousa.com
Step 7. Attaching the toe kick (if applicable)<br />
1. Attach the supplied sound insulation material<br />
to the back of the toe kick. Adjust the height of the insulation material<br />
. Loosen the holders for the toe kick by moving<br />
the gray catches to the side.<br />
. Adjust the holders (pull out or push in) until<br />
they are on a level with the surrounding kitchen<br />
toe kick.<br />
Customer Care Center<br />
1-800-898-1879<br />
www.askousa.com<br />
3<br />
2<br />
1
Attaching the toe kick (if applicable)<br />
. Lock the holders in place by pushing each<br />
catch into a suitable notch in the holder.<br />
. Hang the toe kick on the holders.<br />
. Check that the toe kick is in line with the surrounding<br />
kitchen toe kick, that is, at the same<br />
depth. Loosen and adjust the holders as necessary<br />
until satisfied.<br />
Customer Care Center<br />
1-800-898-1879<br />
www.askousa.com
Service and guarantee<br />
Asko Appliances Inc. will not pay<br />
for:<br />
1. Service calls to:<br />
• Correct the installation of the appliance.<br />
• Repair damage due to shipment, delivery,<br />
installation, misuse or abuse.<br />
• Instruct how to use the appliance.<br />
• Replace house fuses or correct house wiring.<br />
• Correct house plumbing, including drainage<br />
problems related to improper installation.<br />
• Clean or service air device in drain line.<br />
. Repair and/or replacement parts for failure<br />
of product if appliance is used for other than<br />
home/residential use.<br />
. Damage resulting from accident, fire, floods,<br />
acts of God, alteration, misuse, abuse, improper<br />
installation, or installation not in accordance<br />
with local electrical or plumbing codes.<br />
Customer Care Center<br />
1-800-898-1879<br />
www.askousa.com<br />
. Any shipping costs for parts during the limited<br />
warranty period.<br />
. Replacement parts or repair labor costs for<br />
units operated outside the continental United<br />
States.<br />
. Pickup and delivery. <strong>ASKO</strong> washers are<br />
designed to be repaired in the home.<br />
In no event shall Asko Appliances<br />
Inc. be responsible for any<br />
incidental or consequential damages.<br />
Some states will not allow the exclusion or<br />
limitation of incidental or consequential damages,<br />
so this exclusion or limitation may not<br />
apply to you. This warranty gives you specific<br />
legal rights and you may also have other rights<br />
which vary from state to state.<br />
It is important to register your product warranty by logging onto<br />
www.askousa.com/customer-care/registration and filling out all required fields within 90 days from<br />
the date of purchase. After doing so, you will be e-mailed a certificate that will extend the original<br />
warranty for one additional year. If you do not have access to the in ternet, complete the warranty<br />
card included with the product and mail it to the address on the warranty card within 90 days of the<br />
date of purchase. Cosmetic damage must be reported to your dealer within five days from the date<br />
of purchase. After unpacking the washer, thoroughly check the unit for cosmetic damage.<br />
For residential installations only Asko Appliances Inc. will pay for:<br />
Length of warranty Two-Year Full From date of<br />
purchase.<br />
Third year full<br />
Complete your product warranty registration<br />
online at www.askousa.com/customercare/<br />
registration within 90 days from the date of<br />
purchase to extend the original warranty one<br />
additional year. If you do not have access<br />
to the internet, complete the warranty card<br />
included with the product and mail it to the<br />
address on the warranty card within 90 days of<br />
the date of purchase.<br />
<strong>ASKO</strong> replacement parts and/or repair labor<br />
to correct defect in materials or workmanship.<br />
Service must be provided by an authorized<br />
<strong>ASKO</strong> service agent.<br />
<strong>ASKO</strong> replacement parts and/or repair labor<br />
to correct defect in materials or workmanship.<br />
Service must be performed by an authorized<br />
<strong>ASKO</strong> service agent.
For residential installations only Asko Appliances Inc. will pay for:<br />
Lifetime <strong>ASKO</strong> replacement parts (labor cost not<br />
included) for the stainless steel tank if it<br />
exhibits a manufacturing defect such as<br />
cracking or rusting through. Service must<br />
be provided by an authorized <strong>ASKO</strong> service<br />
agent.<br />
For non-residential installations One-year Full<br />
Warranty from date of purchase.<br />
For warranty service, contact our Customer Care Center at the number listed below.<br />
Before calling for service or contacting Asko Appliances Inc. regarding a warranty issue, make a<br />
note of the model, type name, and serial number.<br />
Write to us at:<br />
Asko Appliances Inc.<br />
P.O. Box 940609<br />
Plano, TX 75094-0609<br />
Or contact our Customer Care Center at<br />
1-800-898-1879<br />
www.askousa.com<br />
Customer Care Center<br />
1-800-898-1879<br />
www.askousa.com<br />
<strong>ASKO</strong> replacement parts and/or repair labor to<br />
correct defect in materials or workmanship. Service<br />
must be provided by an authorized <strong>ASKO</strong><br />
service agent.
Installation checklist<br />
Asko - DishwAsher<br />
Appliance Installation Checklist<br />
• Remove packaging and check for cosmetic damages.<br />
• Remove the information packets from inside the dishwasher.<br />
• Attach any accessories as required by the installation. Fill strips,<br />
wooden door panels, accessory door panels...<br />
• Attach the drain line using the largest section of the disposer boot<br />
allowable. Leave the high loop in place.<br />
• Attach the PEX fill hose. Don’t forget to use the O-ring.<br />
• Plug the dishwasher into the wall.<br />
• Turn on the water and check the fill line connections for leaks.<br />
• Slide the unit into the cabinet and level the machine front to rear,<br />
and left to right.<br />
• Mount the unit to the cabinet.<br />
• Turn the power to the unit on and start a cycle. Make sure there are<br />
no drain leaks.<br />
• Show the customer their warranty card, and help them locate the<br />
model and serial number on the unit.<br />
• Leave all user books for consumer.<br />
Customer Care Center<br />
1-800-898-1879<br />
www.askousa.com
Own comments<br />
Customer Care Center<br />
1-800-898-1879<br />
www.askousa.com
Own comments<br />
Customer Care Center<br />
1-800-898-1879<br />
www.askousa.com<br />
7
8<br />
Quick Guide<br />
1. Load the baskets correctly!<br />
Thanks to the Self Cleaning System you don’t need to rinse the dishes, simply scrape large food<br />
particles and debris.<br />
. Dispensing dishwasher detergent<br />
The detergent compartment has a small compartment for pre-wash and one for main wash.<br />
. Ensure that the spray arms can rotate freely<br />
. Turn on the main power switch<br />
. Close the door<br />
. Select the program and press start<br />
For normally soiled dishes, use the Normal Wash program with Normal temperature and<br />
Normal drying .<br />
To save more water an d energy use Economy temperature and Economy dry.<br />
Mini Program Guide<br />
Programview<br />
Programs Daily Heavy Normal Delicate Quick Rinse &<br />
Hold<br />
Program<br />
info<br />
A program<br />
suitable for<br />
daily dishes.<br />
The program<br />
can also deal<br />
with dried<br />
food, though<br />
the short<br />
prewashes<br />
are not<br />
designed for<br />
burnt food.<br />
Options -- --<br />
Prewashes<br />
with SCS*<br />
For heavily<br />
soiled loads,<br />
such as pots,<br />
pans, casseroles,<br />
etc.<br />
For normally<br />
soiled<br />
loads such<br />
as plates,<br />
glasses,<br />
bowls, and<br />
lightly soiled<br />
pans.<br />
Item No.: 80 8 Rev. 01 We reserve the right to make changes.<br />
Printed on environmentally-friendly paper that meets the demands of Friends of the Earth and the<br />
Swedish Society for Nature Conservation.<br />
Customer Care Center<br />
1-800-898-1879<br />
www.askousa.com<br />
For glass<br />
and china<br />
which has<br />
just been<br />
used and<br />
therefore<br />
does not<br />
need such<br />
a powerful<br />
program.<br />
For lightly<br />
soiled loads<br />
that are<br />
washed<br />
immediately<br />
after<br />
use. This<br />
program<br />
can also<br />
be used<br />
for delicate<br />
items.<br />
prewashes 1 prewash prewashes -- -- --<br />
Mainwash *** 1 0°F 1 0°F 1 0°F 1 0°F 1 0°F --<br />
Number of<br />
rinses<br />
, last rinse<br />
1 0°F<br />
, last<br />
rinse 1 0°F<br />
, last<br />
rinse 1 0°F<br />
, last<br />
rinse 1 0°F<br />
, last<br />
rinse 1 0°F<br />
To rinse<br />
dishes that<br />
you plan to<br />
wash later<br />
that day.<br />
--<br />
1 rinse