
Create successful ePaper yourself
Turn your PDF publications into a flip-book with our unique Google optimized e-Paper software.
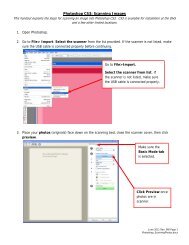
<strong>GIMP</strong>: <strong>Gif</strong> <strong>Animation</strong><br />
Animating images to create a cartoon-like effect can be performed in <strong>GIMP</strong>. The <strong>GIMP</strong> program will only<br />
animate .gi f files, so the animation will appear more like a cartoon than like a movie. Before you beginning, be<br />
sure that all the images you will use are saved as .gif files. Also, it is recommended that all files be the same<br />
size and resolution (see the <strong>GIMP</strong> handout for file resolution and image size); the ideal resolution is 320x240.<br />
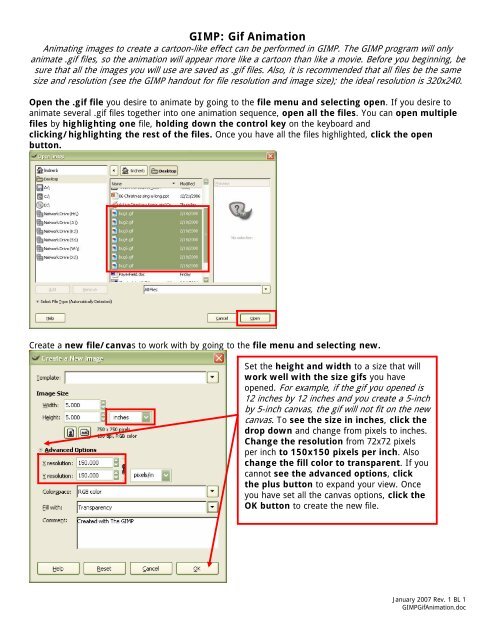
Open the .gif file you desire to animate by going to the file menu and selecting open. If you desire to<br />
animate several .gif files together into one animation sequence, open all the files. You can open multiple<br />
files by highlighting one file, holding down the control key on the keyboard and<br />
clicking/highlighting the rest of the files. Once you have all the files highlighted, click the open<br />
button.<br />
Create a new file/canvas to work with by going to the file menu and selecting new.<br />
Set the height and width to a size that will<br />
work well with the size gifs you have<br />
opened. For example, if the gif you opened is<br />
12 inches by 12 inches and you create a 5-inch by 5-inch canvas, the gif will not fit on the new<br />
canvas. To see the size in inches, click the<br />
drop down and change from pixels to inches.<br />
Change the resolution from 72x72 pixels<br />
per inch to 150x150 pixels per inch. Also<br />
change the fill color to transparent. If you<br />
cannot see the advanced options, click<br />
the plus button to expand your view. Once<br />
you have set all the canvas options, click the<br />
OK button to create the new file.<br />
January 2007 Rev. 1 BL 1<br />
<strong>GIMP</strong><strong>Gif</strong><strong>Animation</strong>.doc
Click on the first gif you want to animate, go to the select menu and click all. Then go to the edit menu<br />
and select copy.<br />
To locate the gif you want to<br />
animate, refer to the name of<br />
the file, which will appear on<br />
the top of the window.<br />
Navigate to the new canvas recently created; go to the edit menu and select paste.<br />
To locate the canvas you want to<br />
paste on, refer to the name of the<br />
file, which will appear on the top of<br />
the window as untitled until the file<br />
is saved and named.<br />
To use the same image to create the animated gif, you will need to create multiple layers of the<br />
same image. To do this, go to the layers dialogue box (if you cannot see the layers dialogue box go to the<br />
dialogs menu and select layers), highlight the copied layer, right click it and select new layer. Then<br />
right click the layer and select duplicate layer. If you want to create the gif out of multiple images,<br />
continue to copy and paste all images until you have every image added to the new canvas.<br />
January 2007 Rev. 1 BL 2<br />
<strong>GIMP</strong><strong>Gif</strong><strong>Animation</strong>.doc
To use the same image to create the animated gif: Click, drag, rotate and edit the images to give<br />
the animated impression, using the move, rotate and other editing tools. To test the sequence of the<br />
images for the animation, turn on and off the view of each layer. The bottom layer will be the first<br />
image shown in the animation. Turn the layers on in order to view how the animation will appear using<br />
the eye icon next to each layer. If the layers are out of sequence, highlight the layer and use the up<br />
and down move arrows to adjust the sequence.<br />
Bottom layer<br />
Second layer Third layer<br />
To create the gif out of multiple images: Copy and paste all the images to be used in the sequence<br />
onto the new canvas in the order of motion. Be sure to right click each pasted layer and select new<br />
layer. To test the sequence of the images for the animation, turn on and off the view of each layer.<br />
The bottom layer will be the first image shown in the animation. Turn the layers on in order to view<br />
how the animation will appear using the eye icon next to each layer. If the layers are out of sequence,<br />
highlight the layer and use the up and down move arrows to adjust the sequence.<br />
Bottom layer<br />
Second layer<br />
Third layer<br />
January 2007 Rev. 1 BL 3<br />
<strong>GIMP</strong><strong>Gif</strong><strong>Animation</strong>.doc
After you have all the images on the canvas and have tested the animation order, go to the file menu and<br />
select save as.<br />
Name the file and select the<br />
folder/area you desire to save the<br />
animated gif to. If you cannot see the<br />
select file type area, expand it using the<br />
plus button. Scroll to find the GIF<br />
image file format and highlight it.<br />
Then click the save button.<br />
Change the radio button to save as animation and leave the convert to indexed radio button<br />
selected. Then click the export button.<br />
January 2007 Rev. 1 BL 4<br />
<strong>GIMP</strong><strong>Gif</strong><strong>Animation</strong>.doc
If you get the warning below, click OK if you are sure each image layer is not ‘falling off’ the canvas.<br />
This warning lets you know the program will crop anything that is ‘falling off’ the canvas.<br />
Use the gif options below as you desire. If you only want the gif to go through the animation sequence<br />
once, uncheck the loop forever box. Once you have the options selected, click the OK button. If you<br />
want each frame to appear by itself in the animated sequence, change frame disposal to one frame<br />
per layer/replace and the gif layers will replace each other in the animation sequence. If you want the<br />
layers to build on top of each other in the animation sequence, leave the frame disposal to I don’t<br />
care.<br />
January 2007 Rev. 1 BL 5<br />
<strong>GIMP</strong><strong>Gif</strong><strong>Animation</strong>.doc
To preview the saved animated gif, navigate to the location the gif was saved to. Right click the gif,<br />
select open with and click Internet explorer. If you want to adjust how fast the frames are<br />
transitioning from one to another, go back to the layers dialog box and double click in the 100ms<br />
area. Then type in the number of milliseconds for the transitions in each layer and go through the<br />
save as process again to see the new timing.<br />
Options for presenting/using animated gifs:<br />
1. View each gif using internet explorer<br />
2. Create a PowerPoint and insert the animated gif on a slide, it will play during the slideshow<br />
3. Insert the animated gif into Windows Movie Maker (this is not highly recommended as it will distort<br />
the images)<br />
4. Open the file in QuickTime Player<br />
5. Open the file in Real Alternative<br />
January 2007 Rev. 1 BL 6<br />
<strong>GIMP</strong><strong>Gif</strong><strong>Animation</strong>.doc