PLATON-Locking-Nail-System - tantum AG
PLATON-Locking-Nail-System - tantum AG
PLATON-Locking-Nail-System - tantum AG

You also want an ePaper? Increase the reach of your titles
YUMPU automatically turns print PDFs into web optimized ePapers that Google loves.
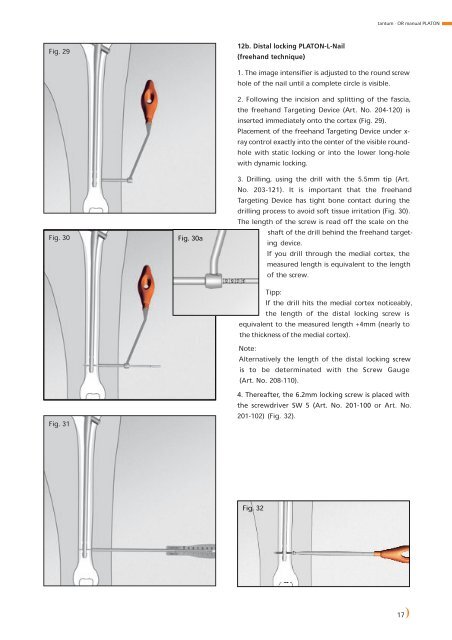
Fig.29<br />
Fig.30<br />
Fig.31<br />
Fig. 30a<br />
12b. Distal locking <strong>PLATON</strong>-L-<strong>Nail</strong><br />
<strong>tantum</strong> · OR manual <strong>PLATON</strong><br />
(freehand technique)<br />
1. The image intensifier is adjusted to the round screw<br />
hole of the nail until a complete circle is visible.<br />
2. Following the incision and splitting of the fascia,<br />
the freehand Targeting Device (Art. No. 204-120) is<br />
inserted immediately onto the cortex (Fig. 29).<br />
Placement of the freehand Targeting Device under xray<br />
control exactly into the center of the visible roundhole<br />
with static locking or into the lower long-hole<br />
with dynamic locking.<br />
3. Drilling, using the drill with the 5.5mm tip (Art.<br />
No. 203-121). It is important that the freehand<br />
Targeting Device has tight bone contact during the<br />
drilling process to avoid soft tissue irritation (Fig. 30).<br />
The length of the screw is read off the scale on the<br />
shaft of the drill behind the freehand targeting<br />
device.<br />
If you drill through the medial cortex, the<br />
measured length is equivalent to the length<br />
of the screw.<br />
Tipp:<br />
If the drill hits the medial cortex noticeably,<br />
the length of the distal locking screw is<br />
equivalent to the measured length +4mm (nearly to<br />
the thickness of the medial cortex).<br />
Note:<br />
Alternatively the length of the distal locking screw<br />
is to be determinated with the Screw Gauge<br />
(Art. No. 208-110).<br />
4. Thereafter, the 6.2mm locking screw is placed with<br />
the screwdriver SW 5 (Art. No. 201-100 or Art. No.<br />
201-102) (Fig. 32).<br />
Fig. 32<br />
17