PLATON-Locking-Nail-System - tantum AG
PLATON-Locking-Nail-System - tantum AG PLATON-Locking-Nail-System - tantum AG
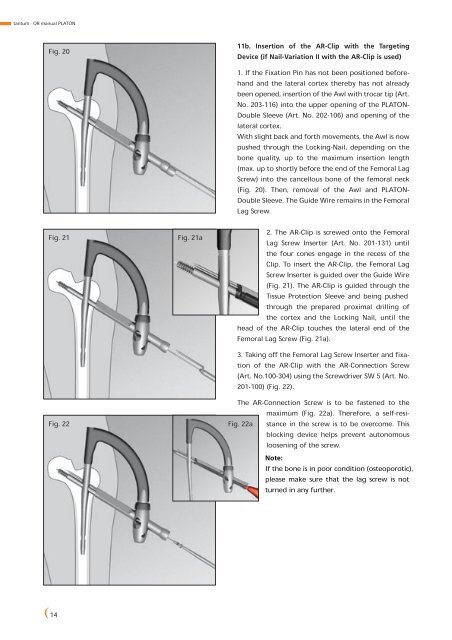
tantum · OR manual PLATON Fig.20 Fig.21 Fig.22 14 Fig.21a 11b. Insertion of the AR-Clip with the Targeting Device (if Nail-Variation II with the AR-Clip is used) 1. If the Fixation Pin has not been positioned beforehand and the lateral cortex thereby has not already been opened, insertion of the Awl with trocar tip (Art. No. 203-116) into the upper opening of the PLATON- Double Sleeve (Art. No. 202-106) and opening of the lateral cortex. With slight back and forth movements, the Awl is now pushed through the Locking-Nail, depending on the bone quality, up to the maximum insertion length (max. up to shortly before the end of the Femoral Lag Screw) into the cancellous bone of the femoral neck (Fig. 20). Then, removal of the Awl and PLATON- Double Sleeve. The Guide Wire remains in the Femoral Lag Screw. 2. The AR-Clip is screwed onto the Femoral Lag Screw Inserter (Art. No. 201-131) until the four cones engage in the recess of the Clip. To insert the AR-Clip, the Femoral Lag Screw Inserter is guided over the Guide Wire (Fig. 21). The AR-Clip is guided through the Tissue Protection Sleeve and being pushed through the prepared proximal drilling of the cortex and the Locking Nail, until the head of the AR-Clip touches the lateral end of the Femoral Lag Screw (Fig. 21a). 3. Taking off the Femoral Lag Screw Inserter and fixation of the AR-Clip with the AR-Connection Screw (Art. No.100-304) using the Screwdriver SW 5 (Art. No. 201-100) (Fig. 22). The AR-Connection Screw is to be fastened to the maximum (Fig. 22a). Therefore, a self-resi- Fig.22a stance in the screw is to be overcome. This blocking device helps prevent autonomous loosening of the screw. Note: If the bone is in poor condition (osteoporotic), please make sure that the lag screw is not turned in any further.
Fig.23 Fig.24 Fig.25 Fig. 25a tantum · OR manual PLATON At this point, the head-neck fragments are rotationsafe. Afterwards, removal of the Tissue Protection Sleeve (Art. No. 202-108). Using a PLATON-S-Nail, the distallocking of the nail is done by using the Targeting Device (Art. No. 204-106). Therefore, the Targeting Device is to remain at the implant at this time (Fig. 23). PLATON-L-Nailsare locked distally using the freehand technique (Chapter 12b), thus the Targeting Device is to be removed. 12a. Distal locking of the PLATON-S-Nail 1. Positioning of the Targeting head for the desired distal locking (dynamic or static locking of the nail): For adjustment of the Targeting head, the locking ring is loosened and the Targeting head is pulled and turned into the desired position. Following the engagement of the Targeting head and checking the correct position according to the inscriptions on the Targeting head and Targeting arm, the locking ring is tightened again. 2. Insertion of the distal Tissue Protection Sleeve (Art. No. 202-103) with Obturator (Art. No. 203-100) at the desired preset position by the Targeting head of the Targeting Device. Locking of Tissue Protection Sleeve and Obturator with a half twist. After incision and splitting the fascia, the instruments are guided onto the cortex (Fig. 24). Removal of the Obturator. 3. Insertion of the Guide Sleeve Ø 9.0/ 5.5mm (Art. No. 202-104, Color Code: blue) into the Tissue Protection Sleeve, fixation with a half twist and guidance towards the cortex. Check if the locking ring on the Targeting arm of the Targeting Device is tightened and thereby ensure exact drilling. Afterwards, insert the drill Ø=5.5mm (Art. No. 203-120) (Fig. 15a) with blue color code and drilling of the lateral and medial cortex (Fig. 25). To avoid soft tissue damage it is crucial that Tissue Protection Sleeve and Guide Sleeve have tight bone contact during the drilling process. After drilling, removal of the drill Guide Sleeve. 15
- Page 1 and 2: OR manual PLAT O N
- Page 3 and 4: PLATON-Locking-Nail-System The intr
- Page 5 and 6: The PLATON-Locking-Nail Variation I
- Page 7 and 8: PLATON OR manual Fig.1 Fig. 2 Fig.3
- Page 9 and 10: Fig.7 Fig.8 tantum · OR manual PLA
- Page 11 and 12: Fig.11 Fig.12 Fig.13 tantum · OR m
- Page 13: Fig.17 Fig.18 Fig.18a tantum · OR
- Page 17 and 18: Fig.29 Fig.30 Fig.31 Fig. 30a 12b.
- Page 19 and 20: 14. Removal of the Implants 1. Remo
- Page 21 and 22: PLATON-Femoral Lag Screw, smooth Ar
<strong>tantum</strong> · OR manual <strong>PLATON</strong><br />
Fig.20<br />
Fig.21<br />
Fig.22<br />
14<br />
Fig.21a<br />
11b. Insertion of the AR-Clip with the Targeting<br />
Device (if <strong>Nail</strong>-Variation II with the AR-Clip is used)<br />
1. If the Fixation Pin has not been positioned beforehand<br />
and the lateral cortex thereby has not already<br />
been opened, insertion of the Awl with trocar tip (Art.<br />
No. 203-116) into the upper opening of the <strong>PLATON</strong>-<br />
Double Sleeve (Art. No. 202-106) and opening of the<br />
lateral cortex.<br />
With slight back and forth movements, the Awl is now<br />
pushed through the <strong>Locking</strong>-<strong>Nail</strong>, depending on the<br />
bone quality, up to the maximum insertion length<br />
(max. up to shortly before the end of the Femoral Lag<br />
Screw) into the cancellous bone of the femoral neck<br />
(Fig. 20). Then, removal of the Awl and <strong>PLATON</strong>-<br />
Double Sleeve. The Guide Wire remains in the Femoral<br />
Lag Screw.<br />
2. The AR-Clip is screwed onto the Femoral<br />
Lag Screw Inserter (Art. No. 201-131) until<br />
the four cones engage in the recess of the<br />
Clip. To insert the AR-Clip, the Femoral Lag<br />
Screw Inserter is guided over the Guide Wire<br />
(Fig. 21). The AR-Clip is guided through the<br />
Tissue Protection Sleeve and being pushed<br />
through the prepared proximal drilling of<br />
the cortex and the <strong>Locking</strong> <strong>Nail</strong>, until the<br />
head of the AR-Clip touches the lateral end of the<br />
Femoral Lag Screw (Fig. 21a).<br />
3. Taking off the Femoral Lag Screw Inserter and fixation<br />
of the AR-Clip with the AR-Connection Screw<br />
(Art. No.100-304) using the Screwdriver SW 5 (Art. No.<br />
201-100) (Fig. 22).<br />
The AR-Connection Screw is to be fastened to the<br />
maximum (Fig. 22a). Therefore, a self-resi-<br />
Fig.22a stance in the screw is to be overcome. This<br />
blocking device helps prevent autonomous<br />
loosening of the screw.<br />
Note:<br />
If the bone is in poor condition (osteoporotic),<br />
please make sure that the lag screw is not<br />
turned in any further.


