Bonus Legend Bonus Legend - Legenden von Andor
Bonus Legend Bonus Legend - Legenden von Andor
Bonus Legend Bonus Legend - Legenden von Andor

Create successful ePaper yourself
Turn your PDF publications into a flip-book with our unique Google optimized e-Paper software.
LEGENDS<br />
oF<br />
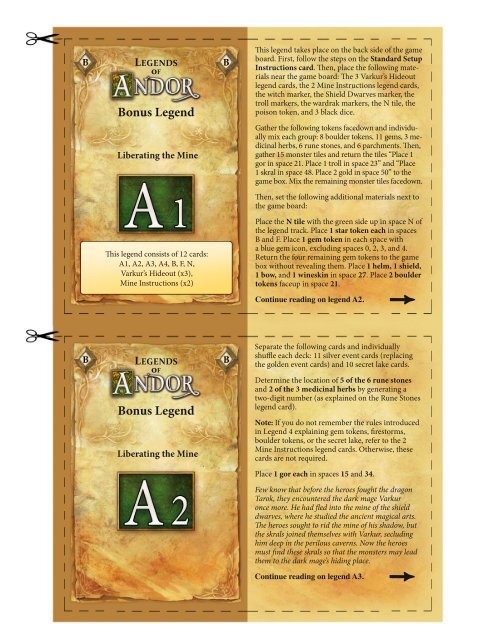
<strong>Bonus</strong> <strong>Legend</strong><br />
Liberating the Mine<br />
This legend consists of 12 cards:<br />
A1, A2, A3, A4, B, F, N,<br />
Varkur’s Hideout (x3),<br />
Mine Instructions (x2)<br />
LEGENDS<br />
oF<br />
<strong>Bonus</strong> <strong>Legend</strong><br />
Liberating the Mine<br />
This legend takes place on the back side of the game<br />
board. First, follow the steps on the Standard Setup<br />
Instructions card. Then, place the following materials<br />
near the game board: The 3 Varkur’s Hideout<br />
legend cards, the 2 Mine Instructions legend cards,<br />
the witch marker, the Shield Dwarves marker, the<br />
troll markers, the wardrak markers, the N tile, the<br />
poison token, and 3 black dice.<br />
Gather the following tokens facedown and individually<br />
mix each group: 8 boulder tokens, 11 gems, 3 medicinal<br />
herbs, 6 rune stones, and 6 parchments. Then,<br />
gather 15 monster tiles and return the tiles “Place 1<br />
gor in space 21. Place 1 troll in space 23” and “Place<br />
1 skral in space 48. Place 2 gold in space 50” to the<br />
game box. Mix the remaining monster tiles facedown.<br />
Then, set the following additional materials next to<br />
the game board:<br />
Place the N tile with the green side up in space N of<br />
the legend track. Place 1 star token each in spaces<br />
B and F. Place 1 gem token in each space with<br />
a blue gem icon, excluding spaces 0, 2, 3, and 4.<br />
Return the four remaining gem tokens to the game<br />
box without revealing them. Place 1 helm, 1 shield,<br />
1 bow, and 1 wineskin in space 27. Place 2 boulder<br />
tokens faceup in space 21.<br />
Continue reading on legend A2.<br />
Separate the following cards and individually<br />
shuffle each deck: 11 silver event cards (replacing<br />
the golden event cards) and 10 secret lake cards.<br />
Determine the location of 5 of the 6 rune stones<br />
and 2 of the 3 medicinal herbs by generating a<br />
two-digit number (as explained on the Rune Stones<br />
legend card).<br />
Note: If you do not remember the rules introduced<br />
in <strong>Legend</strong> 4 explaining gem tokens, firestorms,<br />
boulder tokens, or the secret lake, refer to the 2<br />
Mine Instructions legend cards. Otherwise, these<br />
cards are not required.<br />
Place 1 gor each in spaces 15 and 34.<br />
Few know that before the heroes fought the dragon<br />
Tarok, they encountered the dark mage Varkur<br />
once more. He had fled into the mine of the shield<br />
dwarves, where he studied the ancient magical arts.<br />
The heroes sought to rid the mine of his shadow, but<br />
the skrals joined themselves with Varkur, secluding<br />
him deep in the perilous caverns. Now the heroes<br />
must find these skrals so that the monsters may lead<br />
them to the dark mage’s hiding place.<br />
Continue reading on legend A3.
LEGENDS<br />
oF<br />
<strong>Bonus</strong> <strong>Legend</strong><br />
Liberating the Mine<br />
LEGENDS<br />
oF<br />
<strong>Bonus</strong> <strong>Legend</strong><br />
Liberating the Mine<br />
Skrals are placed on the game board when the<br />
heroes reveal and resolve monster tiles. When the<br />
third skral is placed on the game board, roll 1 hero<br />
die and read the Varkur’s Hideout legend card with<br />
the dice icon that matches the die result.<br />
<strong>Legend</strong> Objective: The party wins the legend if<br />
they defeat 3 skrals and the dark mage.<br />
Place 2 monster tiles facedown in spaces 10, 28,<br />
35, 41, and 43.<br />
When a hero enters one of these spaces, he must<br />
end his move action. Then, he immediately reveals<br />
and resolves both tiles, beginning with the top tile.<br />
Place 3 monster tiles facedown and 1 troll in space<br />
6. Heroes cannot resolve these 3 monster tiles until<br />
they defeat the troll.<br />
Note: Heroes may use the telescope to reveal<br />
monster tiles in adjacent spaces without resolving<br />
the monster tiles, including the monster tiles<br />
guarded by the troll. Monster tiles revealed in this<br />
way remain faceup on the board, stacked in their<br />
original order.<br />
Continue reading on legend A4.<br />
Place the Shield Dwarves marker in space 40.<br />
Shield Dwarves follow the standard rules for allies.<br />
Each time a monster enters space 0 (the southern<br />
mine), move the N tile 1 space on the legend track<br />
closer to space A. Then, immediately return that<br />
monster to the game box.<br />
Important: If a skral enters space 0, the party immediately<br />
loses the legend.<br />
In this legend, a hero whose willpower falls to “0” is<br />
returned to the game box. He places his gems, gold,<br />
and items in the space he last occupied.<br />
Place all heroes in space 60. Each hero starts with<br />
2 strength points. The party receives 5 gold, and 2<br />
damaged shields.<br />
One of the heroes stares into the dark entrance of<br />
the mine. “The sooner we know where Varkur is<br />
hidden, the better,” he exclaimed. “Let’s hunt some<br />
skral!”<br />
The hero who downloaded this legend takes the<br />
first turn.
LEGENDS<br />
oF<br />
<strong>Bonus</strong> <strong>Legend</strong><br />
Liberating the Mine<br />
LEGENDS<br />
oF<br />
<strong>Bonus</strong> <strong>Legend</strong><br />
Liberating the Mine<br />
A message from the Keepers of the Tree of Songs<br />
reaches the heroes: “We fear an attack at any moment,<br />
and we urgently request aid from you and the dwarves.<br />
Please assist us in our hour of need.”<br />
Place 1 parchment token facedown in space 63. The<br />
first time a monster enters this space, reveal the parchment<br />
token. Each hero who has willpower points<br />
greater than the number on the parchment token<br />
must reduce his willpower points to the revealed number.<br />
Then, return the Shield Dwarves to the game box.<br />
The Keepers close by alluding to a powerful item…<br />
Determine the location of the poison token by<br />
generating a two-digit number (as explained on the<br />
Rune Stones legend card).<br />
A hero uses the poison in a battle after the hero<br />
strikes, but before the monster strikes. If the hero<br />
wins the round of battle in which the poison was<br />
used, he immediately defeats the monster. A monster<br />
defeated in this way yields no rewards. Do not<br />
place this monster on space 80, but instead return it<br />
to the game box. Do not advance the legend marker<br />
along the legend track. Much like a wineskin or<br />
witch’s brew, a hero may use the poison twice.<br />
Note: A hero cannot use the poison in battle against<br />
the dark mage.<br />
Magic lightning zips through the mine’s corridors, causing<br />
boulders to come crashing down and destroy the arched<br />
vault. Varkur must be very close.<br />
Randomly determine the location of 6 boulder tokens.<br />
To do this, roll 1 red die and 1 black die, then add the<br />
results together. Place 1 random boulder token in the<br />
space that matches the sum of the dice results. Repeat this<br />
process for each boulder token. For example, if the black<br />
die produces a result of “12” and the red die produces a<br />
result of “5,” place 1 boulder token in space 17. Reveal<br />
each boulder token immediately after placing it.<br />
If a boulder token is placed in a space containing a<br />
marker, follow the steps below:<br />
1. If a monster (including skrals) is in that space, return<br />
it to the game box. The heroes do not receive a<br />
reward, and the legend marker does not advance on<br />
the legend track.<br />
2. If a one or more heroes are in that space, each hero<br />
in that space loses willpower points equal to the<br />
boulder token’s value. Then, return the boulder<br />
token to the game box.<br />
3. If the Shield Dwarves or the dark mage are in that<br />
space, return the boulder token to the game box.<br />
If a monster enters a space containing a boulder token,<br />
the monster continues moving to the next adjacent space,<br />
following the direction of the arrow.
LEGENDS<br />
oF<br />
<strong>Bonus</strong> <strong>Legend</strong><br />
Liberating the Mine<br />
LEGENDS<br />
oF<br />
<strong>Bonus</strong> <strong>Legend</strong><br />
Varkur’s Hideout<br />
When the third skral is placed,<br />
roll 1 hero die. On a result of<br />
OR<br />
reveal and read this card.<br />
The party wins the legend if:<br />
• the heroes defeat the 3 skrals or return<br />
them to the game box, and<br />
• the heroes defeat the dark mage.<br />
Success! The heroes have freed the mine from the<br />
dark mage’s shadow. But Varkur’s role in <strong>Andor</strong>’s<br />
history was far from over. Years later, when <strong>Andor</strong><br />
enjoyed peace after the fall of the dragon, the dark<br />
mage returned. His transformation was dramatic,<br />
and only the heroes of <strong>Andor</strong> would recognize<br />
the hideous monster named Qurun as their old<br />
adversary. But that legend is for another time…<br />
Tips for next time: The party should attempt to<br />
resolve as few monster tiles as possible. To accomplish<br />
this, the telescope is especially useful.<br />
• the heroes do not defeat 3 skrals and the<br />
dark mage.<br />
• a skral enters space 0, or<br />
The party loses the legend if:<br />
The dark mage Vakur emerges from the secret lake, the<br />
water boiling forth.<br />
Place the dark mage in space 11. Return all items, boulders,<br />
and monsters in space 11 to the game box.<br />
<strong>Legend</strong> Objective: Heroes must defeat the dark mage<br />
before the legend marker reaches the N tile. The heroes<br />
cannot attack the dark mage until they defeat all 3 skrals.<br />
When the dark mage is defeated, immediately place the<br />
legend marker on the N tile.<br />
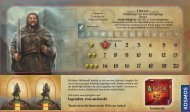
The dark mage has 12 willpower points and the following<br />
strength points: 2 heroes = 20, 3 heroes = 30, 4<br />
heroes = 40.<br />
During battle, the dark mage rolls 2 black dice and adds<br />
identical dice results. The dark mage always rolls two<br />
dice, regardless of his remaining willpower points.<br />
Special Defense: A hero must have at least 14 willpower<br />
points to battle the dark mage. During a battle against the<br />
dark mage, if any hero falls below 14 willpower points,<br />
that hero cannot continue participating in the battle.<br />
At sunrise, the dark mage does not move.<br />
If a monster enters the space that the dark mage currently<br />
occupies, the monster continues moving to the next<br />
adjacent space in the direction of the arrow.
LEGENDS<br />
oF<br />
<strong>Bonus</strong> <strong>Legend</strong><br />
Varkur’s Hideout<br />
When the third skral is placed,<br />
roll 1 hero die. On a result of<br />
OR<br />
reveal and read this card.<br />
LEGENDS<br />
oF<br />
<strong>Bonus</strong> <strong>Legend</strong><br />
Varkur’s Hideout<br />
When the third skral is placed,<br />
roll 1 hero die. On a result of<br />
OR<br />
reveal and read this card.<br />
The dark mage Varkur appears in the armory. A<br />
caustic haze fills the room, and a shrill sound like<br />
scraping metal echoes through the mine.<br />
Place the dark mage in space 27. Return all items,<br />
boulders, and monsters in space 27 to the game box.<br />
<strong>Legend</strong> Objective: Heroes must defeat the dark<br />
mage before the legend marker reaches the N tile.<br />
The heroes cannot attack the dark mage until they<br />
defeat all 3 skrals. When the dark mage is defeated,<br />
immediately place the legend marker on the N tile.<br />
The dark mage has 12 willpower points and the<br />
following strength points: 2 heroes = 14, 3 heroes =<br />
20, 4 heroes = 30.<br />
During battle, the dark mage rolls 2 black dice and<br />
adds identical dice results. The dark mage always<br />
rolls two dice, regardless of his remaining willpower<br />
points.<br />
Special Defense: Heroes cannot use any items<br />
during a battle against the dark mage, including<br />
shields, helms, witch’s brews, bows, herbs, and rune<br />
stones. The archer must be in the space that the<br />
dark mage occupies to participate in the battle.<br />
At sunrise, the dark mage does not move.<br />
The dark mage Varkur hides in the treasury. Dark clouds<br />
of smoke escape the chamber, and the stench of burning oil<br />
fills the air.<br />
Place the dark mage in space 6. Return all items, boulders,<br />
and monsters in space 6 to the game box.<br />
<strong>Legend</strong> Objective: Heroes must defeat the dark mage<br />
before the legend marker reaches the N tile. The heroes<br />
cannot attack the dark mage until they defeat all 3 skrals.<br />
When the dark mage is defeated, immediately place the<br />
legend marker on the N tile.<br />
The dark mage has 12 willpower points and the following<br />
strength points: 2 heroes = 20, 3 heroes = 30, 4 heroes = 40.<br />
During battle, the dark mage rolls 2 black dice and adds<br />
identical dice results. The dark mage always rolls two<br />
dice, regardless of his remaining willpower points.<br />
Special Defense: When each hero adds his strength<br />
points to determine his battle value, treat each hero as<br />
having as many strength points as the hero with the<br />
fewest strength points. For example, if the party consists<br />
of 3 heroes with 14, 12 and 6 strength points, each hero<br />
can only add 6 strength points during a battle against the<br />
dark mage. If the heroes participate in the battle together,<br />
they add (6 + 6 + 6 =) 18 points to their final battle value.<br />
At sunrise, the dark mage does not move.
LEGENDS<br />
oF<br />
<strong>Bonus</strong> <strong>Legend</strong><br />
Liberating the Mine<br />
Mine Instructions<br />
Firestorms & Shield Dwarves<br />
LEGENDS<br />
oF<br />
<strong>Bonus</strong> <strong>Legend</strong><br />
Liberating the Mine<br />
Mine Instructions<br />
Boulders, Gems,<br />
and the Secret Lake<br />
Firestorms<br />
To resolve a firestorm, a hero rolls 3 red dice in succession<br />
and places the first die in the frame near space 10,<br />
the second die in the frame near space 20, and the third<br />
die in the frame near space 30.<br />
Each firestorm begins in the space that corresponds to<br />
the frame (10, 20, or 30) and extends a number of spaces<br />
equal to the die result in the direction of the arrows. If<br />
a hero occupies one of those spaces, he loses willpower<br />
points equal to the die result.<br />
Remember: If a hero is reduced to “0” willpower points,<br />
return him to the game box.<br />
A hero may use a shield to prevent the effects of a firestorm.<br />
Monsters are not affected by a firestorm. Boulders<br />
block all firestorms. A firestorm occurs each time a hero<br />
collects a gem and at the start of each new day (as indicated<br />
by the fire symbol on the sunrise box).<br />
Shield Dwarves<br />
The Shield Dwarves follow the standard rules for allies<br />
described in the Reference Booklet. They cannot reveal<br />
or collect any tokens, and they cannot reveal or resolve<br />
monster tiles. They cannot end their movement in space<br />
11 (the secret lake), and they do not cause secret lake<br />
event cards to be drawn. They cannot enter or move<br />
through spaces containing boulder tokens, but if they<br />
are adjacent to the boulders, they add 4 to the final battle<br />
value against the boulders.<br />
Boulders<br />
Boulders block the way. Heroes and monsters cannot enter<br />
a space containing a boulder token, and the falcon cannot<br />
fly through spaces containing a boulder token. To remove<br />
one or more boulder tokens from an adjacent space, a hero<br />
performs a fight action against the boulders. Treat this as a<br />
standard battle (i.e., use items, invite other heroes to a team<br />
battle, etc.), except that the boulders do not roll dice, and<br />
heroes do not lose willpower if they lose the round of battle.<br />
If the hero’s battle value is greater than the value on one<br />
of the boulder tokens, he may return that boulder token<br />
to the game box. If the hero’s battle value is greater than<br />
the sum of two or more boulder tokens, he may return<br />
those boulder tokens to the game box.<br />
Gems<br />
Heroes can collect gems in the mine, and they carry collected<br />
gems in the coin purse on their hero boards. The number<br />
on a gem token indicates that gem’s value in gold (2, 4, or<br />
6). Revealing a gem with a telescope poses no threat to the<br />
heroes, but collecting a gem causes a firestorm to occur.<br />
If a monster enters a space with a gem, immediately return<br />
that gem to the game box. Unlike in <strong>Legend</strong> 5, gems<br />
do not change the direction in which monsters move.<br />
The Secret Lake<br />
Each time a hero enters space 11 (the secret lake), he<br />
immediately ends his movement, draws the top card from<br />
the secret lake deck, and reads it aloud.