

Receipt Printer - Orient Technologies
Receipt Printer - Orient Technologies
Receipt Printer - Orient Technologies

You also want an ePaper? Increase the reach of your titles
YUMPU automatically turns print PDFs into web optimized ePapers that Google loves.
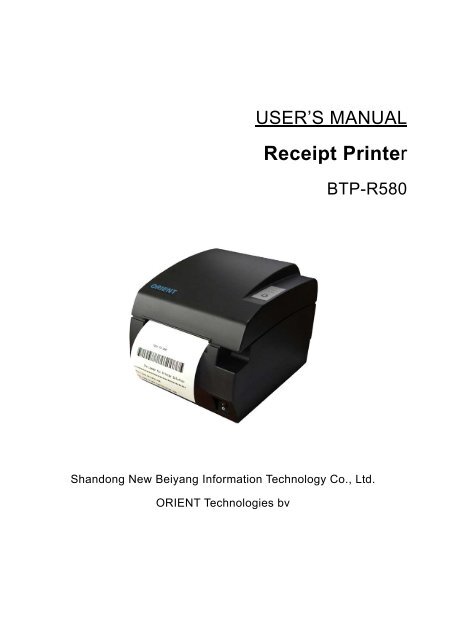
USER’S MANUAL<br />
<strong>Receipt</strong> <strong>Printer</strong><br />
BTP-R580<br />
Shandong New Beiyang Information Technology Co., Ltd.<br />
ORIENT <strong>Technologies</strong> bv
Content<br />
1<br />
BTP-R580 User’s Manual<br />
GENERAL SAFETY INSTRUCTION ........................................................................................... 3<br />
1 INTRODUCTION ..................................................................................................................... 4<br />
1.1 OUTLINE............................................................................................................................. 4<br />
1.2 MAIN FEATURES .................................................................................................................. 4<br />
2 MAIN SPECIFICATION............................................................................................................ 5<br />
2.1 TECHNICAL SPECIFICATION ................................................................................................... 5<br />
2.2 CUTTER SPECIFICATION ....................................................................................................... 5<br />
2.3 PAPER SPECIFICATION ......................................................................................................... 6<br />
2.3.1 Continuous paper ........................................................................................................ 6<br />
2.3.2 Marked paper .............................................................................................................. 6<br />
2.4 PRINT AND CUT POSITION...................................................................................................... 7<br />
2.4.1 Print position ............................................................................................................... 7<br />
2.4.2 Cut position................................................................................................................. 7<br />
3 OUTLINE AND PARTS ............................................................................................................ 8<br />
3.1 OUTLINE AND PARTS ............................................................................................................ 8<br />
3.2 ERROR LED AND BUZZERS ................................................................................................... 9<br />
4 INSTALLATION......................................................................................................................10<br />
4.1 UNPACKING........................................................................................................................10<br />
4.2 PRINTER INSTALLATION........................................................................................................10<br />
4.3 CONNECTING THE POWER ADAPTER .....................................................................................10<br />
4.4 CONNECTING INTERFACE CABLE ...........................................................................................11<br />
4.5 CONNECTING THE CASH DRAWER.........................................................................................11<br />
4.6 PAPER ROLL LOADING..........................................................................................................11<br />
4.6.1 Confirm the paper type ...............................................................................................11<br />
4.6.2 Load/replace a paper roll............................................................................................12<br />
4.7 PAPER NEAR END POSITION ADJUSTMENT ..............................................................................12<br />
4.8 SWITCHING ON THE PRINTER AND PRINTING OF SELF-TEST.......................................................13<br />
4.8.1 Switching on the printer..............................................................................................13<br />
4.8.2 Printing a self-test page..............................................................................................13<br />
4.9 SETTING OF PRINTER PARAMETERS AND CONFIGURATION ........................................................13<br />
5 PRINTER ROUTINE MAINTENANCE .....................................................................................15<br />
5.1 CLEANING THE PLATEN ........................................................................................................15<br />
5.2 CLEANING THE MARK SENSORS ............................................................................................15<br />
5.3 CLEARING OF A PAPER JAM ..................................................................................................15<br />
6 INTERFACE SIGNAL .............................................................................................................16<br />
6.1 PARALLEL INTERFACE..........................................................................................................16<br />
6.2 SERIAL INTERFACE..............................................................................................................17<br />
6.3 USB INTERFACE .................................................................................................................17
2<br />
BTP-R580 User’s Manual<br />
6.4 ETHERNET INTERFACE.........................................................................................................17<br />
6.5 WLAN INTERFACE ..............................................................................................................18<br />
6.6 SIGNAL DEFINITION OF POWER CONNECTOR...........................................................................19<br />
6.7 SIGNAL DEFINITION OF CASH DRAWER INTERFACE...................................................................19<br />
7 TROUBLESHOOTING ............................................................................................................20<br />
7.1 PRINTER DOESN’T WORK .....................................................................................................20<br />
7.2 ALARM LED AND BUZZER SOUND ..........................................................................................20<br />
7.3 PROBLEMS WITH PRINTING...................................................................................................20<br />
7.4 CUTTER RESETTING ............................................................................................................20<br />
8. ACCESSORIES.....................................................................................................................21<br />
8.1HERALD – KITCHEN ALARM SYSTEM .....................................................................................21<br />
APPENDIX A: FEED BUTTON CONFIGURATION .....................................................................21
Declarations<br />
1<br />
BTP-R580 User’s Manual<br />
If you need this manual, please comply with the Clause as below.<br />
If you disagree with it, please return this manual immediately.<br />
This manual contains the private confidential information belonging to ORIENT <strong>Technologies</strong> bv<br />
(hereinafter referred to as “ORIENT <strong>Technologies</strong>”) and Shandong New Beiyang Info-Tech Co.,<br />
Ltd. (hereinafter referred to as SNBC). You must keep its relative content as the confidential<br />
information. If the users are commercial customers or entities, you should be aware to disclose<br />
it to those people with the confidential responsibility including your employees, agencies and<br />
partners. When you terminate the cooperation with ORIENT <strong>Technologies</strong> and SNBC or bring<br />
about your request, you have to stop using this manual and return it to ORIENT <strong>Technologies</strong> or<br />
SNBC, or destroy the confidential information.<br />
If any relative organ such as court, arbitrator or government authority requests you to disclose<br />
any confidential information of this manual, you must inform ORIENT <strong>Technologies</strong> or SNBC<br />
quickly and also agree that you shall cooperate or assist with ORIENT <strong>Technologies</strong> or SNBC<br />
reasonably during the negotiation.<br />
ORIENT <strong>Technologies</strong> or SNBC has the right to disclose its confidential information and does<br />
not be responsible for the loss or damages caused from the wrong usage or reference of this<br />
manual by users.<br />
Information in this document is subject to change without notice, which is only used for product<br />
maintenance or service relative to this manual. ORIENT <strong>Technologies</strong> and SNBC reserves the<br />
right to improve products as new technology, components, software, and firmware become<br />
available. If users need further data about the products, please feel free to contact ORIENT<br />
<strong>Technologies</strong> or SNBC.<br />
No part of this document may be reproduced or transmitted in any form or by any means,<br />
electronic or mechanical, for any purpose without the express written permission of ORIENT<br />
<strong>Technologies</strong> or SNBC.<br />
Copyright<br />
Copyright© 2008 by SNBC<br />
Printed in China<br />
Trademarks<br />
Our registered trademarks are
Warnings and Cautions in this manual<br />
Certifications<br />
2<br />
BTP-R580 User’s Manual<br />
Warning: Items shall be strictly followed to avoid damages to body and equipment.<br />
Caution: Items with important information and prompts for operating the printer.<br />
The quality control system of SNBC has been approved of the following certification.<br />
(DNV)ISO9001:2000<br />
The environmental control system of SNBC has been approved of the following certification.<br />
Contact us<br />
(DNV)ISO14001:2004<br />
In CHINA:<br />
Address: No.169 Huoju Rd, Weihai, Shandong, China. 264209<br />
Hot line: +86-631-5673777<br />
Fax: +86-631-5673778<br />
E-mail: sales@newbeiyang.com<br />
Website: www.newbeiyang.com (via Contact button)<br />
In EUROPE: ORIENT <strong>Technologies</strong> bv<br />
Address: Meerheide 115, 5521 DX Eersel, The Netherlands<br />
Hot line: +31-497-331080<br />
Fax: +31-497-386430<br />
Website: www.orient-technologies.com (via Contact button)
General Safety Instruction<br />
Before installing and using the printer, please read the following items carefully:<br />
1. Safety Instructions<br />
2. Caution<br />
Caution: Do not touch the cutter of the printer.<br />
3<br />
BTP-R580 User’s Manual<br />
Heating: The print head is at a high temperature during printing or just after<br />
operation. Do not touch it and its peripherals for reasons of safety.<br />
Warning: The print head is an ESD-sensitive device. To avoid damage, do not touch<br />
either its printing parts or connecting parts.<br />
1) Install the printer on a flat and stable surface.<br />
2) Reserve adequate space around the printer so that convenient operation and maintenance<br />
can be performed.<br />
3) Keep the printer away from water source, direct sunlight, strong light and heat.<br />
4) Do not use or store the printer in a place exposed to heat or fire, moisture or other pollution.<br />
5) Do not place the printer in a place exposed to vibration or impact.<br />
6) No dew condensation is allowed to the printer. In case of such condensation, do not turn on<br />
the power until it has completely gone away.<br />
7) Connect the power cord to an appropriate grounding outlet. Avoid sharing a single electrical<br />
outlet with large power motors and other devices that may cause the fluctuation in voltage.<br />
8) Disconnect the power cord if the printer is idle for a long time.<br />
9) Do not spill water or other electric substances (like metal) on the printer. If this happens, turn<br />
off the power immediately.<br />
10) Do not allow the printer to start printing when there is no recording paper installed, otherwise<br />
the print head and platen roller will be damaged.<br />
11) To ensure quality print and normal lifetime, use recommended or good quality paper.<br />
12) Shut down the printer when connecting or disconnecting interface connectors to avoid<br />
damage to the control board.<br />
13) Set the print darkness to a lower grade as long as the print quality is acceptable. This will<br />
help to keep the Printhead durable.<br />
14) The printer should only be disassembled or repaired by a technician, who is certified by<br />
ORIENT <strong>Technologies</strong>.<br />
15) Keep this manual safe and at hand for reference purpose.
1 Introduction<br />
1.1 Outline<br />
4<br />
BTP-R580 User’s Manual<br />
The BTP-R580 is a high performance, high speed thermal printer. It can be widely used for<br />
real-time receipt printing applications, such as for POS systems, restaurant, bars, ATM etc.<br />
The BTP-R580 can be connected to host computers via a parallel interface, serial interface,<br />
USB interface, Ethernet interface or WLAN interface. The printer can also be connected with<br />
cash-drawers and the Herald kitchen alarm system.<br />
The BTP-R580 offers drivers under WINDOWS98/NT4.0/2000/XP/VISTA and special utility<br />
software to handle amongst others downloading of logos and fonts.<br />
1.2 Main Features<br />
◇ Full spill proof design (meets IPX1 standard)<br />
◇ Low noise, high printing speed up to 230mm/s<br />
◇ Easy paper loading<br />
◇ Paper front exit and straight paper path for reliable printing<br />
◇ Internal power supply<br />
◇ Easy operation and maintenance<br />
◇ Simple paper jam clearing<br />
◇ Continuous paper or marked paper can be used<br />
◇ Three different paper width<br />
◇ Auto paper cutting<br />
◇ Cash drawer control connector<br />
◇ Choice from several interfaces (“daughter boards”)<br />
◇ Optional HERALD kitchen alarm system
2 Main Specification<br />
2.1 Technical Specification<br />
Item Parameter<br />
Print Method Direct Thermal<br />
Resolution 203DPI (H) ×203DPI (V)<br />
Print Width 80mm (Max.)<br />
Print Speed 230mm/s (Max.)<br />
Memory RAM: 2MB FLASH: 2MB/4MB<br />
Drivers Windows drivers (WIN98/NT/2000/XP/Vista)<br />
5<br />
BTP-R580 User’s Manual<br />
Interface Optional Parallel(IEEE1248), Serial (RS232C/RS485), USB, Ethernet, WLAN<br />
Cash drawer 1~2 drives<br />
Barcode Supported<br />
UPC-A, UPC-E, EAN8, EAN13, CODABAR, CODE39, ITF, CODE128,CODE93,<br />
PDF417<br />
Fonts<br />
Font A: 12×24; Font B:9×17; GB2312; GB18030, Korean, Japanese, Traditional<br />
Chinese<br />
Character Modification<br />
Rotate (0°, 90°, 180°, 270°), enlarges(1-6X), emphasize, underline, white/black<br />
reverse<br />
RAM bitmap download: buffer size is 12KB<br />
Image process<br />
FLASH bitmap download: buffer size is 256KB<br />
Direct bitmap print: support bitmap and execute quick print<br />
Paper near end Optical sensor<br />
Paper end Optical sensor<br />
Label Optical sensor<br />
Top cover position Microswitch<br />
Print head temperature Thermistor<br />
Paper type Continuous paper, marked paper<br />
Paper width 82.5 ± 0.5mm, 80 ± 0.5mm, 57.5 ± 0.5mm<br />
Paper roll OD Ø100 mm (Max.)<br />
Paper cut Tear off, Full cut, Partial cut<br />
Input 100~240VAC, 50~60HZ<br />
Output 24V±5% DC, 2.3A<br />
<strong>Printer</strong> head lifetime ≥150Km(with reference paper)<br />
Cutter lifetime 2,000,000 cuts (Paper type:F240AC/F220-VP)<br />
Operation condition 5 ℃ ~45 ℃ , 20%~90% RH (40 ℃ )<br />
Storage condition -40 ℃ ~60 ℃ , 20%~93%RH ( 40 ℃ )<br />
Dimensions 147 (W) × 205 (D) × 147 (H) mm<br />
Weight Approx.1.6Kg<br />
2.2 Cutter Specification<br />
Item parameter Note<br />
Cutter type Slide cutter (Guillotine type)
6<br />
BTP-R580 User’s Manual<br />
Cutting time 600ms The time that one cut takes<br />
Cutting interval 2s 30 times/min. (Max.)<br />
Paper type 0.06~0.1mm<br />
Thermal paper or paper with the<br />
same thickness<br />
Operation voltage 24VDC<br />
Max. static curren 1.2A 24VDC<br />
Cutter lifetime<br />
2,000,000 cuts (reference paper<br />
thickness of 0.06 mm)<br />
with<br />
Full or partial cuts<br />
� Full cut: Cut off the paper completely;<br />
� Partial cut: 2 mm paper left in middle<br />
2.3 Paper Specification<br />
2.3.1 Continuous paper<br />
� Paper type: Continuous thermal paper<br />
� Paper supply method: Paper roll<br />
� Paper width: 82.5±0.5mm,80±0.5mm, 57.5±0.5 mm<br />
� Paper thickness: 0.06mm-0.1mm<br />
� Thermal senstive layer: Outside<br />
� Paper roll specifications<br />
OD(MAX): ф100 mm<br />
ID(Min): ф15mm<br />
Caution:<br />
� Do not paste the paper to the core.<br />
� If the paper is contaminated by a chemical or oil, it may discolor or lose heat sensitivity<br />
at the polluted spot.<br />
� Do not rub the paper surface strongly against hard objects, otherwise it may discolor.<br />
� When the temperature goes up to 70 degrees centigrade, paper will discolor.<br />
� Don’t use or store paper under high temperature, high humidity and strong light<br />
conditions.<br />
2.3.2 Marked paper<br />
In marked paper mode, BTP-R580 determines the cut position and the initial printing position by<br />
referencing the position of the black mark. Black marked paper should meet the following<br />
requirement besides that of standard paper.<br />
� L1 Mark length: 3mm≤L1≤10mm.<br />
� L2 Mark length: L2≥12mm.<br />
� L3 Distance between marks: 20mm≤L3
7<br />
BTP-R580 User’s Manual<br />
Caution:<br />
� The printer will measure the marks during the printing or feeding process. If the lengths of<br />
the mark (L1) is larger than the default value (default: 13mm), the printer will give a<br />
paper-end alarm.<br />
2.4 Print and cut position<br />
2.4.1 Print position<br />
� L1 Paper holder width: 83.5+0/-0.5mm<br />
� L2 Max Print width: 80mm<br />
� L3: Distance between left end of printhead and left side of paper holder(Fixed) 1.8±0.3mm<br />
� L4: Distance between right end of printhead and right side of paper holder(Fixed) 1.8±0.3mm<br />
� L5: Left margin (default:7mm)<br />
� L6: Print area width. Can set by command (See Programming manual), default is 64mm.<br />
� L7: Right margin (default: 9mm)<br />
2.4.2 Cut position<br />
L1: about: 30mm L2: about: 11mm
3 Outline and Parts<br />
3.1 Outline and Parts<br />
1—Paper near end sensor adjusting lever<br />
2 —Paper holder<br />
3 —Platen roller<br />
4—Middle cover<br />
5—Bottom cover<br />
6 — Power switch<br />
7—Paper guide<br />
8—Top cover<br />
9 — Cover spanner<br />
10—Printhead<br />
11—Paper roll shaft<br />
12—Printhead support plate<br />
13 —Power connector<br />
14 —Communicate interface<br />
15 —Cash drawer connector<br />
8<br />
BTP-R580 User’s Manual<br />
Functions of parts:<br />
a) Paper guide<br />
Removing the paper guide or putting it in a different slot will allow the printer to use different<br />
paper widths listed as follows: 82.5±0.5 mm, 80.5±0.5 mm, 57.5±0.5 mm.<br />
b) Power switch<br />
Switching the power of the printer on or off. “O” power is turned off. “—” power is turned on.<br />
c) Feed button (See Fig 3.1-3)<br />
Switching on the printer while pressing the FEED button will start the printing<br />
of the configuration table。<br />
� In normal status:<br />
Continuous paper mode:<br />
� The printer will feed one line when pressing the FEED button for a<br />
short time.<br />
� The printer will feed continuously when pressing the FEED button for a longer time<br />
Marked paper mode:<br />
� The printer will feed one line when pressing the FEED button for a short time.<br />
� The printer will locate the marks when pressing the FEED button for a longer time.<br />
� In error status, the printer will have no activity when the FEED button is pressed.<br />
d) Power Indicator<br />
Indicating power status (ON/OFF).
9<br />
BTP-R580 User’s Manual<br />
e) Error indicator<br />
Indicating some error status. Under normal conditions, ERROR LED is always off. Under<br />
some error conditions(Cover Open、Cutter Error、Print head is overheating、Input voltage is<br />
abnormal), ERROR LED will flash.<br />
f) Paper indicator<br />
Indicating paper status. Under normal conditions, PAPER LED is always off. When the paper<br />
status changes (paper end or paper near end), PAPER LED will flash.<br />
g) Paper end sensor<br />
The paper-end sensor is used to detect whether the paper roll is out of paper.<br />
Notices:<br />
� The paper guide is an indispensable part of the printer and should be kept with the printer.<br />
3.2 Error LED and Buzzers<br />
1) Error LED<br />
Led Status Description<br />
Power Indicator (Green) (POWER)<br />
Error Indicator (Red) (ERROR)<br />
Paper Indicator (Red) (PAPER)<br />
2) Description of LED and Error Status<br />
On <strong>Printer</strong> is powered on<br />
Off <strong>Printer</strong> is powered off<br />
Off<br />
<strong>Printer</strong> is in normal status<br />
(except paper end or paper near end)<br />
Flash <strong>Printer</strong> is in error status<br />
On <strong>Printer</strong> Paper is normal<br />
Flash Macro definition is running<br />
Off <strong>Printer</strong> is in normal status<br />
Error information ERROR LED PAPER LED Buzzer<br />
Print head is overheating Six times Off Long-Short-Long<br />
Input voltage is abnormal Five times Off Short-Short-Long<br />
Cutter Error Four times Off Long-Short-Long<br />
Cover Is Open Three times Off Short-Long-Short<br />
Paper End Twice On Short-Short-Short<br />
Paper near end Off On<br />
Finding mark error or verify failed Flashing continuously Off<br />
Caution:<br />
� The temperature of the print-head is detected by means of a thermistor sensor. If the<br />
temperature of the printhead becomes higher than 65 0 C, the protection circuit of the<br />
printer will force the printer to stop printing.
4 Installation<br />
4.1 Unpacking<br />
10<br />
BTP-R580 User’s Manual<br />
Check whether all items, that are listed on the packing list are present and in a good condition.<br />
If any items are damaged or missing, please contact your dealer.<br />
4.2 <strong>Printer</strong> installation<br />
1) The printer should be installed on a flat and stable horizontal surface.<br />
2) The printers should be away from any water source.<br />
3) Do not place the printer on a surface exposed to vibration or risk from impact.<br />
4) Ensure that the printers can be grounded safely.<br />
5) During operation and maintenance of the printer there should be sufficient space around the<br />
printer in accordance with the dimensions as shown in fig. 4.2-1.<br />
4.3 Connecting the Power Adapter<br />
1) Ensure the printer power is turned off.<br />
2)Insert the power cord into the power socket on the backside of the printer.<br />
3)Fix the power cable cord in the printer with a clip as shown in Fig. 4.3-1.<br />
Caution:<br />
� When connecting or disconnecting the power cord, always hold the plug and avoid dragging<br />
it by force.<br />
� Do not pull on the power cord, otherwise the cord may be damaged or broken, causing a risk
of fire or electric shock.<br />
11<br />
BTP-R580 User’s Manual<br />
� Do not place the power cord near a heating device, otherwise, the cover of the cord may<br />
melt, causing a risk of fire or electric shock.<br />
� If the printer is not in use for a long period, disconnect the power cord from the wall outlet<br />
for safety.<br />
4.4 Connecting interface cable<br />
1) Ensure the printer power is turned off.<br />
2) Connect the suitable interface cable with the correct connector to the connector of the<br />
interface board of the printer plug screws (Serial interface) or clip springs (Parallel interface).<br />
3) Connect the other end of the interface cable to the host.<br />
4.5 Connecting the Cash Drawer<br />
1)Ensure the printer power is turned off.<br />
2) Insert the cash drawer cable into the cash drawer connector on the back of the printer.<br />
Caution:<br />
� Cash drawer interface can be connected only with a cash drawer device (Do not connect<br />
a telephone line and so on).<br />
4.6 Paper roll loading<br />
4.6.1 Confirm the paper type<br />
After connecting of the printer to the mains voltage, with the host and, if applicable, to the cash<br />
drawer, the paper can be loaded and printed.
4.6.2 Load/replace a paper roll<br />
1) Press the latch of the top cover and open it.<br />
2) Place a paper roll in the paper holder.<br />
12<br />
BTP-R580 User’s Manual<br />
3) Close the printer top cover.<br />
Caution:<br />
� If needed remove the paper guide. Choose the suitable paper guide position according to the<br />
width of the paper roll and mount the paper guide. When inserting the paper roll pay attention<br />
to the paper path direction.<br />
Note: Without paper guide: 82.5±0.5mm.<br />
Paper guide in the slot A: 80±0.5mm<br />
Paper guide in the slot B: 57.5±0.5mm<br />
� Ensure that the paper is rolled tightly onto the paper roll, otherwise a paper jam or other fault<br />
could happen.<br />
� The paper roll should be placed straight in the paper holder and not at an angle. The paper<br />
roll should be able to move freely.<br />
4.7 Paper near end position adjustment<br />
Through adjustment of the latch of the paper near end sensor to a corresponding level, different
13<br />
BTP-R580 User’s Manual<br />
paper roll cores can be accommodated and also the remaining paper-end length can be<br />
approximated.<br />
Caution:<br />
The factory setting of the paper near end sensor is level 1.<br />
1) When using different Diameter core shaft, C diameter may be different with the length of the<br />
remaining paper at the same level.<br />
4.8 Switching on the printer and printing of self-test<br />
4.8.1 Switching on the printer<br />
1) Ensure that the printer is connected to the mains voltage and, if applicable, that the mains<br />
voltage is switched on.<br />
2) Switch on the power of the printer.<br />
4.8.2 Printing a self-test page<br />
1) Confirm that the printer is connected to the mains voltage and that a paper roll is in the<br />
printer.<br />
2) Confirm that the printer is switched off.<br />
3) Press down the FEED button while switching on the printer, the printer will start printing the<br />
configuration sheet. At the end of the configuration sheet the followings text will appear:<br />
“Press feed key to continue” The printer is holding and waiting for the input while the PAPER<br />
LED is flashing.<br />
4) Press down the FEED button shortly, the printer will print a character test page which is part<br />
of the self-test.<br />
4.9 Setting of printer parameters and configuration<br />
The parameters of the printer can be set (configuring) in a detailed way by means of the utility<br />
software that is available from the reseller or from ORIENT <strong>Technologies</strong> by special request
14<br />
BTP-R580 User’s Manual<br />
(website: www.orient-technologies.com. press button “Contact”). However, the majority of the<br />
parameters can also be set by using the special key-stroke procedures of the printer. These<br />
procedures are simple, do not involve a laptop but only the FEED button on the key-pad of the<br />
printer. The parameters that can be set by pressing the Feed button include:<br />
� For the serial interface only: setting of baud rate, parity, data bits, stop bits, handshaking,<br />
buffer size and data receive error.<br />
� For all interfaces:<br />
� setting of mechanism (mark sensor, cutter, buzzer, power adapter)<br />
� print setting (darkness, paper roll width, left margin, right margin, CR command,<br />
code page)<br />
� Paper sensor setting (paper low alarm, paper end stop)<br />
� Set default configuration<br />
To start the key-stroke procedure start the self-test procedure as described in chapter 4.8 steps<br />
1 through 3. After the printer has stopped printing the configuration sheet, press and hold the<br />
FEED button until the printer starts printing. The printer will print first the Main Menu of the<br />
key-stroke procedure.<br />
A more detailed overview of all parameters can be found in Appendix A of this manual.
5 <strong>Printer</strong> routine maintenance<br />
15<br />
BTP-R580 User’s Manual<br />
Caution:<br />
� Before starting routine maintenance, ensure that the printer is switched off.<br />
� Do not use solvents like gasoline or acetone.<br />
� When cleaning sensors, the printer should not be switched on until the pure alcohol has<br />
totally evaporated.<br />
� It is recommended that the maintenance cycle should not be longer than one month.<br />
5.1 Cleaning the platen<br />
The steps for cleaning the platen are as given below:<br />
1) Switch off the printer.<br />
2) Open the top cover of the printer.<br />
3) When the top cover is opened, wipe off stain such as dust on the platen by using a soft cotton<br />
cloth with neutral cleaning agent.<br />
4) Close the top cover after the alcohol has evaporated completely.<br />
5.2 Cleaning the mark sensors<br />
The black mark sensors need to be cleaned if the printer has trouble identifying the black marks.<br />
The steps for cleaning sensors are as below:<br />
1) Switch off the printer.<br />
2) Open the top cover of the printer.<br />
3) Wipe off stain or dust from the surface of sensors by using a soft cotton swipe impregnated<br />
with pure alcohol.<br />
4) Close the top cover of the printer after the alcohol has evaporated completely.<br />
5.3 Clearing of a paper jam<br />
Remove the paper, if one of the following phenomena occurs:<br />
� The printer fails to feed out paper normally.<br />
� Paper is feeding with load noise.<br />
The steps for removing paper are as below:<br />
1) Switch off the printer.<br />
2) Open the top cover of the printer.<br />
3) If the paper is jammed in the paper path, remove the wrinkled or wasted part of the paper roll.<br />
4) Close the printer top cover.
6 Interface signal<br />
6.1 Parallel interface<br />
16<br />
BTP-R580 User’s Manual<br />
Parallel interface can work in IEEE 1284 compatible mode or half-byte mode, which is a 36 pin<br />
socket.<br />
The Interface is defined as below:<br />
Pin# Signal source Signal definition<br />
1 H NStrobe<br />
2 H Data 0 (Least Significant Bit)<br />
3 H Data 1<br />
4 H Data 2<br />
5 H Data 3<br />
6 H Data 4<br />
7 H Data 5<br />
8 H Data 6<br />
9 H Data 7 (Most Significant Bit)<br />
10 P NAck<br />
11 P Busy<br />
12 P Perror<br />
13 P Select<br />
14 H nAutoFd<br />
15 Not defined<br />
16 Logic Gnd<br />
17 Chassis Gnd<br />
18 P Peripheral Logic High<br />
19 Signal Ground (nStrobe)<br />
20 Signal Ground (Data 1)<br />
21 Signal Ground (Data 2)<br />
22 Signal Ground (Data 3)<br />
23 Signal Ground (Data 4)<br />
24 Signal Ground (Data 5)<br />
25 Signal Ground (Data 6)<br />
26 Signal Ground (Data 7)<br />
27 Signal Ground (Data 8)<br />
28 Signal Ground (PError, Select, and nAck)<br />
29 Signal Ground (Busy and nFault)<br />
30 Signal Ground (nAutoFd, nSelctIn, and nInit)<br />
31 H NInit<br />
32 P NFault<br />
33 Not defined<br />
34 Not defined<br />
35 Not defined<br />
36 H nSelectIn
6.2 Serial interface<br />
17<br />
BTP-R580 User’s Manual<br />
The serial interface of the printer is compatible with RS-232 and is equipped with a 25-pin female<br />
D type connector.<br />
PIN No. Signal definition<br />
PIN1 Frame Ground<br />
PIN2 TXD<br />
PIN 3 RXD<br />
PIN 4 DTR<br />
PIN 5 Not connected<br />
PIN6 DSR<br />
PIN 7 Signal Ground<br />
PIN 8~19 Not connected<br />
PIN 20 DTR<br />
PIN 21~25 Not connected<br />
The user may check the current setting status of the interface by printing a configuration table.<br />
The default setting is as follows:<br />
Baud rate: 19200bps, 8 data bit, none Parity, 1 stop bit<br />
Handshake: DTR/DSR<br />
6.3 USB interface<br />
� Parameters<br />
Data transmission: Support USB1.1 protocol<br />
Connector (<strong>Printer</strong> side): USB B type socket. Support and pass USB HUB<br />
� Interface signal definition and functions<br />
� Interface connector<br />
6.4 Ethernet interface<br />
Pin No. Signal Description<br />
1 VBUS +5V<br />
2 DATA- <strong>Printer</strong> data transmit line minus<br />
3 DATA+ <strong>Printer</strong> data transmit line plus<br />
4 GND Ground<br />
� Feature<br />
� Supports 10BASE-T communication<br />
� Compatible with Ethernet II standard frame type<br />
� LEDs indicate network connecting status and data transmission status.
18<br />
BTP-R580 User’s Manual<br />
� Supports 9100 port print<br />
� Supports ASB(Auto status back)<br />
� Supports parameter configuration<br />
� Supports firmware program updated online<br />
� Supports printer status query and interface module maintenance based on HTTP.<br />
� Interface signal definition<br />
The parameters of Ethernet interface socket match 10BASE-T standard of IEEE802.3. The<br />
interface signal is defined as below:<br />
6.5 WLAN interface<br />
Pin Signal name Description<br />
1 TX+ Data sending+<br />
2 TX- Data sending-<br />
3 RX+ Data reception+<br />
4 NC<br />
Reserve<br />
5 NC Reserve<br />
6 RX- Data reception-<br />
7 NC Reserve<br />
8 NC Reserve<br />
� Features<br />
� Supports 802.11b、802.11g communication<br />
� Supports 9100 port print and LPR print<br />
� Supports ASB (Auto Status Back)<br />
� Supports parameter configuration<br />
� Supports firmware program upgraded online<br />
� Supports HTTP<br />
� Protocols are supported as below<br />
� IP<br />
� ARP<br />
� ICMP<br />
� TCP<br />
� UDP<br />
� DHCP<br />
� TFTP<br />
� HTTP<br />
WLAN interface uses wireless USB network card of which the main specification should be<br />
requested from the local distributor or manufacture.
6.6 Signal definition of power connector<br />
Internal signal definition of power<br />
Pin<br />
Signal name<br />
1 E<br />
2 L<br />
3 N<br />
6.7 Signal definition of cash drawer interface<br />
1) Electric characteristics<br />
� Driving voltage: DC 24 V<br />
� Driving current: Max. current is 1 A<br />
� The signal for checking cash drawer status:<br />
“L” = 0~0.5 V “H” = 3.3 V<br />
2) Cash drawer interface socket uses RJ-11 6P connector.<br />
3) Interface signal definition<br />
No. Signal Functions<br />
1 FG Frame<br />
2 DRAWER 1 Driving signal of cash drawer1<br />
3<br />
DRSW<br />
Check signal for cash drawer<br />
status<br />
4 VDR Cash drawer driving power<br />
5 - NC<br />
6 GND Common port with circuit<br />
19<br />
BTP-R580 User’s Manual<br />
Caution:<br />
� Do not allow disconnection or connection of the interface cable plug when the printer and<br />
the host are switched on.<br />
� Avoid the presence of devices like motors with large power as these may cause voltage<br />
fluctuations.<br />
� Always use shielded interface cables.
7 Troubleshooting<br />
Refer to this section if the printer has any problems.<br />
20<br />
BTP-R580 User’s Manual<br />
If the problem cannot be solved, please consult with ORIENT <strong>Technologies</strong> or your supplier..<br />
7.1 <strong>Printer</strong> doesn’t work<br />
Faults Possible reasons Solution<br />
<strong>Printer</strong> is off Connect the printer power<br />
Power LED is off and the printer doesn’t work <strong>Printer</strong> is off Turn on the printer<br />
Circuit board is damaged<br />
Contact<br />
supplier<br />
ORIENT or your<br />
7.2 Alarm LED and buzzer sound<br />
Faults Possible reasons Solution<br />
Paper LED on and buzzer sounds Paper end Replace with new paper roll<br />
Paper LED on Paper near end Replace with new paper roll<br />
Alarm LED flashes and buzzer<br />
sounds<br />
7.3 Problems with printing<br />
Input voltage is abnormal<br />
Print head is overheated<br />
Turn off the printer power and check<br />
The input voltage<br />
Turn off the printer power and wait for the<br />
print head temperature recovered normally<br />
Cutter Error Cutter resetting(reference 7.4)<br />
Cover is Open Close the cover again<br />
Serious fault occurs Contact your dealer<br />
Faults Possible reasons Solution<br />
Printout is light Print head is damaged Replace print head<br />
Printout is not clear or has dirt Print head or platen is dirty Clean print head or platen<br />
Paper cannot be fed out properly Paper jam<br />
7.4 Cutter resetting<br />
Open top cover and check paper path to<br />
remove paper jam<br />
If the moving blade of the cutter does not return to its home-position, then the top cover should<br />
be opened and the printer should be switched on. This will force the moving blade to reset and<br />
return to its home-position. Please contact ORIENT <strong>Technologies</strong> or your supplier if the problem<br />
persists.
8. Accessories<br />
8.1HERALD – kitchen alarm system<br />
21<br />
BTP-R580 User’s Manual<br />
1) Functions<br />
The Herald is connected to the cash drawer connector of the printer. When the printer sends<br />
Cash drawer signal, the Herald will give sound and light signals.<br />
2) Light and sound signal mode<br />
� There are three levels of light signals:<br />
First level: flash;<br />
Second level: always light;<br />
Third level: not light.<br />
� There are three levels of sound signals:<br />
First level: sound 1;<br />
Second level: sound 2;<br />
Third level: sound 3.<br />
3)Supported firmware<br />
The firmware version supporting the Herald should be above FV1.000. All interfaces support this<br />
function.<br />
4)External connection sketch map.<br />
Herald<br />
Fig 8.1-1 External connection sketch map<br />
APPENDIX A: FEED button Configuration<br />
Parameter setting (configuring) by Feed button<br />
1) Hold the FEED button pressed while switching the printer on.<br />
2) After the printer has printed the configuration sheet, press and hold the FEED button to<br />
configure the printer. The main menu for the key-stroke setting procedure is printed.<br />
3) The procedure consists of several sub-menus and step-by-step working is needed.<br />
4) With every choice is a number. This number indicates the number of times the FEED button<br />
has to be shortly pressed. After this, the choice is validated by an additional, but longer press<br />
of the FEED button (1 sec).<br />
5) After all settings have been done, they are stored in the printer by stepping back through<br />
the submenus to the main menu by using the number “1” plus additional press for validation.
� Parameter setting by Feed button<br />
� Setting configuration of the printer<br />
Exit<br />
without<br />
Save<br />
> 1<br />
Exit<br />
> 1<br />
Exit with<br />
Save<br />
> 2<br />
Print Self Test<br />
> 2<br />
Communic<br />
ation<br />
>3<br />
22<br />
Main Menu<br />
Select submenu<br />
Configuration<br />
> 3<br />
Configuration<br />
Mech. &<br />
Hardware<br />
>4<br />
Print<br />
Settings<br />
> 5<br />
Cutter Test<br />
>4<br />
BTP-R580 User’s Manual<br />
Paper<br />
Sensor<br />
Setting<br />
> 6<br />
Sensor Test<br />
> 5<br />
Set<br />
Default<br />
Config<br />
>7
� Configuration of the serial interface<br />
Back<br />
to last<br />
menu<br />
>1<br />
Baud<br />
Rates<br />
(default:<br />
19200 bps)<br />
>2<br />
Choices:<br />
9600 bps<br />
19200 bps<br />
38400 bps<br />
57600 bps<br />
4800 bps<br />
2400 bps<br />
1200 bps<br />
115200 bps<br />
Parity<br />
(default:<br />
none)<br />
�3<br />
Choices<br />
:<br />
None<br />
Odd<br />
Even<br />
Data<br />
Bits<br />
(default:<br />
8 bits)<br />
�4<br />
Choices<br />
:<br />
7 Bits<br />
8 Bits<br />
Communication<br />
Stop<br />
Bit(s)<br />
(default:<br />
1 Bit)<br />
�5<br />
Choices<br />
:<br />
1 Bit<br />
2 Bits<br />
23<br />
Handshak<br />
ing<br />
(default:<br />
DTR/DSR)<br />
�6<br />
Choices:<br />
DTR/DSR<br />
XON/XOFF<br />
BTP-R580 User’s Manual<br />
Rx Buffer<br />
Size<br />
(default:<br />
4k bytes)<br />
�7<br />
Choice:<br />
4k bytes<br />
45 bytes<br />
Data<br />
Receive<br />
Error<br />
(default:<br />
ignored)<br />
�8<br />
Choices<br />
:<br />
Ignored<br />
Print “?”
� Setting Mechanism and Hardware<br />
Back to<br />
last menu<br />
>1<br />
Mark<br />
Sensor<br />
(default:<br />
disabled)<br />
>2<br />
Choices:<br />
Enabled<br />
Disabled<br />
Mech. &<br />
Hardware<br />
Cutter<br />
(default:<br />
enabled)<br />
>3<br />
Choices:<br />
Enabled<br />
Disabled<br />
24<br />
Buzzer<br />
(default:<br />
enabled)<br />
>4<br />
Choices:<br />
Enabled<br />
Disabled<br />
BTP-R580 User’s Manual<br />
Power<br />
Supply<br />
(default:<br />
normal)<br />
>5<br />
Choices:<br />
Normal<br />
Low power<br />
mode
� Print Setting<br />
Back to<br />
last<br />
menu<br />
>1<br />
Darkness<br />
(default:<br />
normal)<br />
>2<br />
Choices:<br />
Low<br />
Normal<br />
High<br />
Extra high<br />
Paper<br />
Roll<br />
Width<br />
(default:<br />
80 mm)<br />
>3<br />
Choices:<br />
57.5 mm<br />
80.0 mm<br />
82.5 mm<br />
Print Setting<br />
Left<br />
Margin<br />
(default:<br />
7 mm)<br />
>4<br />
Choices:<br />
0 mm<br />
1 mm<br />
3 mm<br />
5 mm<br />
7 mm<br />
9 mm<br />
25<br />
Right<br />
Margin<br />
(default:<br />
9 mm)<br />
>5<br />
Choices<br />
:<br />
0 mm<br />
1 mm<br />
3 mm<br />
5 mm<br />
7 mm<br />
9 mm<br />
CR<br />
Comman<br />
d<br />
(default:<br />
disabled)<br />
>6<br />
Choices:<br />
Enabled<br />
Disabled<br />
BTP-R580 User’s Manual<br />
Code<br />
Page<br />
(default:<br />
PC 437)<br />
>7<br />
Choices:<br />
PC 437<br />
PC 850<br />
PC 852<br />
PC857<br />
PC 858<br />
PC 860<br />
PC 863<br />
PC 865<br />
PC 866<br />
PC1251<br />
PC 1252<br />
PC1257<br />
Katakana
� Paper Near-end Sensor setting<br />
Back to last menu<br />
>1<br />
Paper sensor settings<br />
Paper Low Alarm<br />
(default: enabled)<br />
>2<br />
Choices:<br />
Enabled<br />
Disabled<br />
26<br />
Stop print when paper low<br />
(default: disabled)<br />
>3<br />
Choices:<br />
Enabled<br />
Disabled<br />
BTP-R580 User’s Manual
� Set Default Configuration<br />
Back to last Menu<br />
>1<br />
Set default config<br />
27<br />
Set printer to default config<br />
>2<br />
Choices:<br />
Enabled<br />
Disabled<br />
BTP-R580 User’s Manual
