
You also want an ePaper? Increase the reach of your titles
YUMPU automatically turns print PDFs into web optimized ePapers that Google loves.
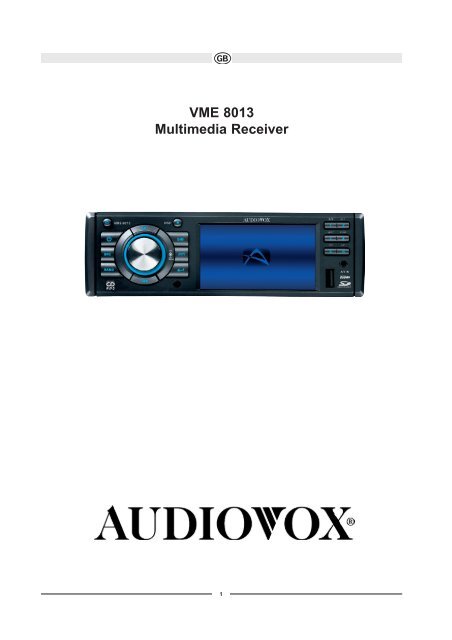
VME 8013<br />
Multimedia Receiver<br />
1
Thank you for choosing a Audiovox product. We hope you will find the instructions in this owner’s manual clear and easy to follow. If you take a few<br />
minutes to look through it, you’ll learn how to use all the features of your new Audiovox VME 8013 Mobile Multimedia Receiver for maximum<br />
enjoyment.<br />
TABLE OF CONTENTS<br />
Introduction 2<br />
Installation 3<br />
Wiring 5<br />
Front Panel Release 6<br />
Remote Control 7<br />
Operation 9<br />
Radio Operation 10<br />
DISC/MP3/WMA Playback 12<br />
Setup Menu 16<br />
Care and Maintenance 17<br />
Troubleshooting 18<br />
Specifications 20<br />
2<br />
Subject to technical changes
Introduction<br />
Congratulations on your purchase of the Audiovox VME 8013 Mobile Multimedia Receiver. It’s a good idea to read all of the instructions before<br />
beginning the installation. We recommend having your Audiovox VME 8013 installed by a reputable installation shop.<br />
Installation<br />
This unit is designed for installation in cars, trucks and vans with an existing radio opening. In many cases, a special installation kit will be required<br />
to mount the radio to the dashboard. These kits are available at electronics supply stores and car stereo specialty shops. Always check the kit<br />
application before purchasing to make sure the kit works with your vehicle.<br />
Tools and Supplies<br />
The following tools and supplies are needed to install the radio:<br />
• Torx type, flathead and Philips screwdrivers<br />
• Wire cutters and strippers<br />
• Tools to remove existing radio (screwdriver, socket wrench set or other tools)<br />
• Electrical tape<br />
• Crimping tool<br />
• Volt meter/test light<br />
• Crimp connections<br />
• 18 gauge wire for power connections<br />
• 16-18 gauge speaker wire<br />
Preparation<br />
Disconnect Battery<br />
Before you begin, always disconnect the battery negative terminal.<br />
NOTE:<br />
If the VME 8013 is to be installed in a car equipped with an onboard<br />
drive or navigation computer, do not disconnect the battery cable. If the cable is disconnected, the computer memory may be lost.<br />
Under these conditions, use extra caution during installation to avoid causing a short circuit.<br />
Remove Radio from Sleeve<br />
Lift latches on both sides of sleeve to remove half-sleeve from radio.<br />
Mounting Sleeve Installation<br />
1. Slide the mounting sleeve off the chassis. If it is locked into position,<br />
use the removal tools (supplied) to disengage it.<br />
2. Check the dashboard opening size by sliding the mounting sleeve into it. If the opening is too small, carefully cut or file as necessary until the<br />
sleeve easily slides into the opening. Do not force the sleeve into the opening or cause it to bend or bow. Check for sufficient space behind<br />
the dashboard for the radio chassis.<br />
3. Locate the series of bend tabs along the top, bottom, and sides of the mounting sleeve. With the sleeve fully inserted into the dashboard<br />
opening, bend as many of the tabs outward as necessary to firmly secure the sleeve to the dashboard.<br />
CAUTION: For proper operation of the DVD player, the chassis must be mounted within 20° of horizontal. Make sure the unit is mounted<br />
within this limitation.<br />
4. Place the radio in front of the dashboard opening so the wiring can be brought through the mounting sleeve. Follow the wiring diagram carefully<br />
and make certain all connections are secure and insulated with wire nuts or electrical tape. See “Wiring” on page 5. After completing the wiring<br />
connections, turn the unit on to confirm operation (vehicle ignition must be on). If the unit does not operate, re-check all wiring until the problem is<br />
corrected.<br />
5. Make sure the radio is right-side up, then carefully slide the radio into the mounting sleeve until it is fully seated and the spring clips<br />
lock it into place.<br />
3<br />
Subject to technical changes
6. Secure the rear of the unit to the car body<br />
7. Test the radio using the “Operation” instructions that follow.<br />
Kit Installation<br />
If your vehicle requires the use of an installation kit to mount this radio, follow the instructions included with the<br />
installation kit to attach the radio to the mounting plate supplied with the kit.<br />
1. Wire and test the radio as outlined in the Mounting Sleeve Installation instructions.<br />
2. Install the radio/mounting plate assembly to the sub-dashboard according to the instructions in the installation kit.<br />
Trim Ring<br />
Radio<br />
3. Replace the dashboard trim panel.<br />
ISO Installation<br />
This unit has threaded holes in the chassis side panels which may be used with the original factory mounting brackets of some<br />
vehicles to mount the radio to the dashboard. Please consult with your local car stereo shop for assistance on this type of installation.<br />
1. Remove the existing factory radio from the dashboard or center console mounting. Save all hardware and brackets as they will be used to mount<br />
the new radio.<br />
2. Carefully unsnap the plastic frame from the front of the new radio chassis. Remove and dis<strong>card</strong> the frame.<br />
3. Remove the factory mounting brackets and hardware from the existing radio and attach them to the new radio. Do not exceed M5 x 9mm maximum<br />
screw size. Longer screws may damage components inside the chassis.<br />
4. Wire the new radio as outlined in the Mounting Sleeve Installation instructions.<br />
5. Mount the new radio assembly to the dashboard or center console using the reverse procedure of step 1.<br />
Fuses<br />
When replacing a fuse, make sure the new fuse is the correct type and amperage. Using an incorrect fuse could damage the radio.<br />
Reconnect Battery<br />
When wiring is complete, reconnect the battery negative terminal.<br />
Removing the Radio<br />
To remove the radio after installation, first remove the face plate. Next, remove the trim ring by firmly grasping one side and pulling. Insert the removal<br />
keys straight back until they lock, then pull the radio out. If the removal keys are inserted at an angle, they will not lock properly and will not release<br />
the unit.<br />
4<br />
Spring Clip<br />
Mounting sleeve<br />
Subject to technical changes
Wiring Diagramm<br />
The connector cable is manufactured with<br />
a ISO connector. Only for older cars this<br />
connector need to be removed.<br />
5<br />
Subject to technical changes
FRONT PANEL RELEASE<br />
The front panel release button (4) releases the mechanism that holds the front panel to the chassis.<br />
Detaching the Front Panel<br />
To detach the front panel, perform the following steps:<br />
1. Press the power button (1) to turn the unit off.<br />
2. Press the front panel release button to flip the panel down.<br />
3. Grasp the right side to release the front panel and then pull it at an<br />
angle to remove the right side from the chassis.<br />
4. Store the front panel it in the supplied carrying case to protect it from dirt<br />
and damage and take it with you to prevent theft.<br />
Re-attaching the Front Panel<br />
Before re-attaching the front panel, make sure the electrical terminals on the back of the panel are free of dust and dirt, as debris could cause<br />
intermittent operation or other malfunctions.<br />
To re-attach the front panel:<br />
1. With the panel laying flat (in the “open” position), insert the left side of the panel in place until correctly engaged.<br />
2. Gently press the right side of the panel until the mechanism locks it into place.<br />
3. Lift upward to close the panel.<br />
REMOTE CONTROL<br />
The remote control will allow you to control the advanced functions of the VME 8013.<br />
CLEAR<br />
Operating Range<br />
The remote control sensor (19) is located near the bottom of the front panel, left of the LCD<br />
screen. The remote control can operate within a distance of 3~5m.<br />
Replacing the Battery<br />
When the range of operation of the remote control becomes short or stops functioning,replace the battery with a new lithium battery.<br />
Be sure to observe the proper polarity, as indicated below.<br />
GOTO<br />
RDM<br />
6<br />
Remote Sensor<br />
Subject to technical changes
# Button Tuner CD DVD<br />
1 ZOOM Magnify Image<br />
2 TITLE Vi ew DVD Title Screen<br />
3 Power Power On<br />
Press and hold to Power<br />
Off<br />
7<br />
Power On<br />
Press and hold to Power<br />
Off<br />
Power On<br />
Press and hold to Power<br />
Off<br />
4 SETUP Display Setup Menu Display Setup Menu Display Setup Menu<br />
5 Navigation Arrows Down/Up (Left returns to<br />
previous<br />
menu screen)<br />
Down/Up (Left returns to<br />
previous<br />
menu screen)<br />
Left/Rig ht: Fast<br />
Reverse/Fast<br />
Forward<br />
Up/Down: Slow Reverse/<br />
Slow Forward<br />
6 ENTER Confirm Entry Confirm Entry Confirm Entry<br />
7<br />
CLEAR<br />
8 Direct Entry<br />
9 SEL Audio Mode: Select BAS,<br />
TRE, BAL, FAD.<br />
Press and hold for System<br />
Menu<br />
Audio Mode: Select BAS,<br />
TRE, BAL, FAD.<br />
Press and hold for System<br />
Menu<br />
Audio Mo de: Select BAS,<br />
TRE, BAL, FAD.<br />
Press and hold for System<br />
Menu<br />
10 VOL (Volume Control) Volume up/down Volume up/down Volume up/down<br />
11 MUTE Silence Audio Output Silence Audio Output Silence Audio Output<br />
12 SEEK Search Next/Prev ious<br />
Channel<br />
Press and hold to Scan<br />
Channels up/down<br />
Next/Previous Track<br />
Press and hold to Fast<br />
Forward/<br />
Reverse<br />
Next/Previous Track<br />
Press and hold to Fast<br />
Forward/<br />
Reverse<br />
13 SUB.T View/Change Subtitle<br />
Language<br />
14 SRC (Source) Select Playing Mode Select Playing Mode Select Playing Mode<br />
15 REPEAT Repeat Current Track Repeat Current Chapter<br />
16 A-B Repea t Repeat Sectio n Repeat Section<br />
17 Stop/Return Stop/Return<br />
Stop/Return<br />
18 Play/Pause Pl ay/Pause Play/Pause<br />
19 GOTO Search GOTO Specific Area of<br />
Disc<br />
GOTO Specific Area of<br />
Di sc<br />
20 MENU Vi ew DVD Setup Menu<br />
PBC for VCD 2 .0 and up<br />
21 RDM Play all Tracks in<br />
Random<br />
Order<br />
Play all Chapters in<br />
Rand om<br />
Order<br />
22 AUDIO View/Change disc Aud io<br />
Language<br />
23 DISP Press and hold to set<br />
clock<br />
Press and hold to set<br />
clock<br />
Press and hold to set<br />
clock<br />
24 ANGLE Show alternate angles, if<br />
available<br />
25 BAND Select Band (AM1, AM2,<br />
FM1, FM2, FM3)<br />
Select PAL, NTSC,<br />
AUTO<br />
Subject to technical changes
OPERATION<br />
Power<br />
Press the (power) button to turn the unit on. Press and hold the power button again to turn the unit off.<br />
DIM<br />
NOTE: LCD panels may take longer to respond when subjected to cold temperatures for an extended period of time. In addition, the visibility of the<br />
numbers on the LCD may decrease slightly. The LCD display will return to normal when the temperature increases to a normal range.<br />
Source<br />
Press the SRC button repeatedly to scan the various sources. A source is only displayed when accessible (optional equipment required for some<br />
sources). Available modes include Radio (FM1, FM2, FM3, AM1, AM2), DISC, SD, USB, and auxiliary (AUX IN).<br />
External Devices<br />
External peripheral devices, including a game console, camcorder, navigation unit, iPod, Zune, etc. can be connected to the AUX IN connector<br />
on the front of this unit using the 3.5mm A/V Media Cable (included) Select “SOURCE >> AUX IN” to access auxiliary devices. You cannot<br />
directly control external devices connected to the AUX IN input.<br />
Audio Mute<br />
Press the power button to silence the audio volume appears on the display. Press (power) again to restore volume to the previous<br />
setting.<br />
Volume Control<br />
To increase the volume, turn the VOL/SEL/MENU (rotary encoder) clockwise. To decrease the volume, turn the rotary encoder counterclockwise.<br />
When volume is adjusted, the volume level will be shown on the display panel as a number ranging from “0” (lowest) to “40” (highest).<br />
Audio Menu<br />
Press the VOL/SEL/MENU button to access the audio menu. Press the VOL/SEL/MENU button repeatedly to move through the list of menu<br />
options.<br />
NOTE: Audio settings only apply to the current source (Source Tone Memory). You must make audio adjustments for another source when that<br />
source is active.<br />
• Sub_w: When the Low Pass Filter is activated (see “Menu Operation” on page 9), you can use the VOL/SEL/MENU rotary encoder to adjust<br />
the subwoofer volume from “-14” to “0”.<br />
• BASS: Turn the VOL/SEL/MENU rotary encoder (2) to adjust the bass level from “+7” to “-7”.<br />
• TREBLE: Turn the VOL/SEL/MENU rotary encoder to adjust the treble level from “+7” to “-7”.<br />
• BALANCE: Turn the VOL/SEL/MENU rotary encoder to adjust the balance from “R7” (full right) to “L7” (full left).<br />
• FADER: Turn the VOL/SEL/MENU rotary encoder to adjust the fader from “F7” (full front) to “R7” (full rear)<br />
8<br />
DN UP<br />
Subject to technical changes
Menu Operation<br />
Press and hold the VOL/SEL/MENU button for more than two seconds to access the menu. Press the VOL/SEL/MENU button to move through the<br />
following menu options: Equalizer, Loud Set, Beep Set, 12/24 Mode (clock), AF, TA, Region, TA Set, Retune, Mirror Image, Vol Mode, A-VOL, Sub<br />
LPF and Area Set. The following procedures assume you have already accessed the menu.<br />
Equalizer<br />
The Equalizer function applies preset sound effects to the unit’s audio output signal. Turn the rotary encoder to select from the following equalizer<br />
options: “Off”, “Rock”, “Hip Hop”, “Dance” and “Acoustic”. With the equalizer function activated, if bass or treble is adjusted, the EQ Mode will revert<br />
to“Off”.<br />
When the equalizer function is activated, the most recently selected bass/ treble levels cannot be adjusted. When the equalizer function is not<br />
active, the unit will return to the most recently selected bass and treble levels.<br />
Loud Set<br />
When listening to music at low volumes, this feature will selectively boost certain bass and treble frequencies. “Off” is the default setting. Turn the<br />
rotary encoder to select “On”.<br />
Beep Set<br />
The beep tone feature allows the selection of an audible beep tone to be heard each time the menu is accessed. “On” is the default setting. Turn the<br />
rotary encoder to select “Off”.<br />
12/24 Mode<br />
This option allows selection of a 12 hour or 24 hour clock format. “12 Hours” is the default setting. Turn the rotary encoder to change to the 24 hour<br />
clock format.<br />
AF / Region<br />
See on page 11<br />
TA mode<br />
Rotate the knob to choose TA ALARM or TA SEEK mode. If the TA (Traffic Announcement) is turned on and there is no traffic program identification<br />
code received in the specified time, no TA/ TP will display and either TA ALARM or TA SEEK will be activated. TA ALARM mode : Alarm is turned<br />
on. TA SEEK mode: TA SEEK is automatically activated.<br />
RETUNE mode<br />
Rotate the control to choose RETUNE-S or RETUNE- L. RETUNE-S or RETUNE-L is time length selection of TA SEEK retune interval.<br />
RETUNE-S: Short, TA SEEK Retune interval is 45 seconds RETUNE-L: Long, TA SEEK Retune interval is 180<br />
seconds. REMARK: RETUNE mode functions for TA during TA SEEK mode only.<br />
TA-VOL<br />
Rotate the knob to choose TA-VOL (TA=Traffic Announcement) level.<br />
VOL - MODE<br />
Rotate knob to choose VOL LAST, the turn-on volume level is the volume level of latest power off. Rotate knob to choose VOL ADJ, then rotate the<br />
knob to set the turn-on volume level .<br />
Mirror Image<br />
This option allows for selection of a mirror image view when a rear view backup camera (sold separately) is connected to the CAMERA IN input on<br />
the back of the radio. Turn the rotary encoder to select “On” or “Off”.<br />
Vol Mode<br />
Turn the rotary encoder to select “Last” or “Adjust”.<br />
• Last: When the unit is turned on, the volume will resume at the level selected when last turned off.<br />
• Adjust: If choosing “Adjust”, use the A-VOL setting to specify a turn-on volume.<br />
Turn-On Volume (A-VOL)<br />
After selecting “Adjust” for Vol Mode, press the VOL/SEL/MENU button to access the A-VOL setting and then turn the rotary encoder to select the<br />
desired turn-on volume level. When this option is selected, the unit will revert to the adjusted volume each time the unit is turned on.<br />
Sub LPF (Low Pass Frequency)<br />
After connecting a subwoofer to the back of the unit, turn the rotary encoder to select a crossover frequency: OFF, 80, 120 or 160Hz.<br />
Area Set<br />
This option allows you to select the appropriate frequency spacing for your area. “U.S.A.” is the default setting. Turn the rotary encoder to select<br />
“EUROPE”. The unit will turn off and reset when the Area is changed.<br />
Clock Set<br />
1. Press and hold the DISP button until the clock blinks.<br />
2. Turn the VOL/SEL/MENU rotary encoder to set the minutes.<br />
3. Press the VOL/SEL/MENU button to confirm and move to the hour field.<br />
4. Turn the VOL/SEL/MENU rotary encoder to set the hour.<br />
5. Press the DISP button to set the clock and exit the clock set function.<br />
9<br />
Subject to technical changes
Reset Button<br />
The RESET button is located behind the front panel and can only be accessed with the front panel opened. Resetting the unit will erase the time and<br />
preset memories. It should only be activated upon initial installation<br />
after all wiring is complete, or if there is a malfunction of any of the switches on the unit. In these circumstances, pressing the RESET button will clear<br />
the system and return the unit to default operation.<br />
RADIO OPERATION<br />
Accessing Radio Mode<br />
Press the SRC button on the front panel or remote control to switch to the RADIO source.<br />
The following pictures discribe the Radio surface and her indicators.<br />
1. Stereo Reception Indicator<br />
2. Radio Station Frequency<br />
3. AM/FM Band<br />
4. Time/Clock<br />
5. RDS Information<br />
6. Current Preset Channels<br />
DIM<br />
EON ST AF TA TP PTY<br />
PTY : none<br />
Select a Band<br />
Press the BAND button to change between three FM and two AM bands. Each band stores up to six preset stations.<br />
Tuning<br />
Seek Tuning<br />
Press the TUNE/TRACK >>| or |>| or |>| or |
Preset Stations<br />
Up to six stations on each band can be stored as presets, which can then be instantly recalled by pressing the associated preset button. To<br />
store a station, turn the radio on and select the desired band and station. Press and hold the desired preset button (numbered one through six on<br />
the face of the radio or remote control) for more than two seconds. When stored, the preset number will appear in the display. The station is now<br />
stored and can be recalled by pressing the corresponding preset button. Repeat for the remaining five presets on the current band and for presets<br />
on the other four bands.<br />
Preview Scan<br />
Press the button to scan and play all strong stations for 5 seconds each. Press again to stop scanning and play the current station.<br />
Automatic Store (AS)<br />
Press and hold the button to select six strong stations and store them in the current band using the Auto Store feature. After entering the<br />
stations into memory, the unit will automatically stop at each station for five seconds, allowing you to preview each selection. When using the Auto<br />
Store feature, the new stations replace any stations already stored in preset memory.<br />
NOTE: You can stop the Auto Store function at any time by pressing the button again.<br />
RDS INFORMATION<br />
Within the Menu Operation (page 9) you will find the following setup possibilities.<br />
OVERVIEW OF THE RDS FUNCTION<br />
Notes:<br />
- RDS is only available for FM receiption<br />
- The PS function allows station names to be displayed in clear letters.<br />
- Network Tracking receiption uses the PI and AF codes. The PI code identifies the country, area and broadcast system. AF lists up which reception<br />
frequencies at the area are broadcasting the same program and automatically changes to the best reception quality offering frequency without<br />
the need to interrupt the program by a seek function.<br />
- Traffic programmes and announcements can be automatically received using the TA features.<br />
- The station name is displayed automatically when a RDS station is received. RDS service availability varies with areas. Please understand if<br />
RDS service is not available in you area, the following service is not available.<br />
EON ( Enhanced Other Networks )<br />
When EON data is received, the EON indicator lights and the TA and AF functions are enhanced.<br />
TA: Traffic information can be received from the current station or stations in other<br />
network.<br />
AF: The frequency list of preset RDS stations is updated by EON data. EON enables the radio to make fuller use of RDS information. It constantly<br />
updates the AF list of preset stations, including the one that currently tuned into. If you preset a station around the area at your home, you will later<br />
be able to receive the same station at an alternative frequency, or any other station serving the same program, EON also keeps track of locally<br />
available TP stations for quick reception.<br />
11<br />
Subject to technical changes
DISC/MP3/WMA PLAYBACK<br />
Inserting and Ejecting a Disc<br />
Press the button (4) to flip the front panel down. Insert a disc, label side up, into the disc slot (20).<br />
To stop disc play and eject the disc, press the button to flip the front panel down and then press the eject button (21).<br />
NOTE: The unit is designed for play of standard 5” (12 cm.) discs only. Do not attempt to use 3” (8 cm.) CD singles in this unit, either with or without<br />
an adaptor, as damage to the player and/or the disc may occur. Such damage will not be covered by the <strong>warranty</strong> on this product.<br />
Loading an SD Card<br />
Open the panel and insert the SD <strong>card</strong> into the SD Card slot (23). Close the panel and the unit will read the files on the <strong>card</strong> automatically.<br />
To remove the <strong>card</strong>, first press the SRC button to switch to another mode and stop SD playback. Press the SD <strong>card</strong> to pop it out,<br />
then remove the <strong>card</strong>.<br />
Loading a USB Device<br />
Insert the USB device into the USB connector on the front of the unit. The unit will read the files on the USB device automatically.<br />
To remove the USB device, press the SRC button to switch to another mode and then remove the USB device from the USB<br />
connector.<br />
Notes on MP3/WMA Play<br />
MP3 and WMA (Windows Media Audio) music files are digital audio files that are compressed to allow more files to be stored. This unit can play<br />
MP3/WMA and video directly from files contained on a CD-R/RW, DVDROM, DVD+RW, DVD-RW, DVD+R, DVD-R and DVD-VIDEO, or an SD<br />
<strong>card</strong> or USB Device using the buttons on the receiver (or remote control) as described below.<br />
Many types of software are available for converting audio files into MP3/WMA formats. This unit can play MP3 (MPEG1, 2, 2.5 Audio Layer 3).<br />
However, the MP3 recording media and accepted formats are limited. When writing MP3/<br />
WMA, pay attention to the following restrictions.<br />
Acceptable Media<br />
The MP3/WMA recording media acceptable to this unit are CD-ROM, CDR, CD-RW, and DVD. The unit will also play MP3, WMA, or photo files<br />
written to SD Cards, USB Devices. Depending on the media type and recording method, some CD-R/RWs may be incompatible with this unit.<br />
When using CD-RW, use full format rather than quick format to prevent malfunction. This unit supports playback of MP3/WMA and CDDA (CDA),<br />
Mixed-Mode CDs and CD-Extra (including multi-session discs). Discs on which the session has not been closed will not play.<br />
NOTE: This unit supports FAT 16 and FAT 32 file systems. The unit supports USB 1.1 only, but will play USB 2.0 devices at USB 1.1 speed.<br />
12<br />
Subject to technical changes
Acceptable Medium Formats<br />
The following formats are available for the media used in this unit. The maximum number of characters used for file name, including the delimiter<br />
(".") and three-character extension, are indicated in parentheses.<br />
• ISO 9660 Level 1 (11 characters)<br />
• ISO 9660 Level 2 (31 characters)<br />
• Joliet (31 characters)<br />
• Romeo (31 characters)<br />
Up to 200 characters can be displayed in the long file name format. For a list of available characters, see the instruction manual of the writing<br />
software and the section “Entering File and Folder Names” that follows. The media reproducible on this unit has the following limitations:<br />
• Maximum number of nested folders: 8<br />
• Maximum number of files per disc: 1500<br />
• Maximum number of folders per disc: 255<br />
MP3/WMA files written in formats other than those listed above will not play successfully and their file or folder names will not display properly.<br />
MP3/WMA Encoder and CD Writer Settings Use the following settings when compressing audio data with the MP3<br />
encoder.<br />
• Transfer bit rate: 8 - 320 kbps<br />
• Sampling frequency: 8, 11.025, 12, 16, 22.05, 24, 32, 44.1, 48 kHz<br />
When using a CD writer to record MP3/WMA up to the maximum disc capacity, disable additional writing. To record an empty disc up to the<br />
maximum capacity at once, select the “disc at once” option.<br />
Entering ID3 Tag<br />
This unit supports ID3 tag version 2.0.<br />
For character codes, refer to the table to the right.<br />
Entering File and Folder Names<br />
Names using the code list characters are the only file names and folder<br />
names that can be entered and displayed. Using any other character will cause the file and folder names<br />
to be displayed incorrectly. The unit recognizes and plays only files with the MP3/WMA extension.<br />
NOTE: A file name entered with characters not on the code list may not play correctly.<br />
Electronic Shock Protection<br />
• 10 seconds for CD-DA (CDA)<br />
• >45 seconds for MP3 recorded at 44.1kHz, 128kbps<br />
• >90 seconds for WMA recorded at 44.1kHz, 128kbps<br />
Bit Rates<br />
The unit supports bit rates from 32 - 320 kbps.<br />
MP3 Playing Order<br />
When selected for play, files and folders (Folder Search, File Search or Folder Select) are accessed in the order in which they were written to the<br />
media. As a result, the order in which they are expected to be played may not match the order in which they are actually played. You may be able<br />
to set the order in which MP3/WMA files are to be played by assigning file names beginning with play sequence numbers such as "01" to "99". For<br />
example, a medium with the following folder/file hierarchy is subject to Folder Search, File Search or Folder Select as shown below.<br />
The VME 8013 player will only recognize three folder levels and does not display folders containing only other folders. In the example above, the<br />
unit will display folders 3, 4, 6, and 8, but not 2 and 7 since they do not contain any tracks directly. Folder 5 is not recognized at all since it is at the<br />
fourth level.<br />
13<br />
Subject to technical changes
DIM<br />
Changing the Source<br />
If a disc is already in the disc slot but is not playing, press the SRC button on the front panel or remote control (14) to switch to the DISC source.<br />
To play files from an SD or USB that is already inserted, choose the CARD or USB source. The MP3 playback screen is indicated below:<br />
1<br />
Controlling Disc or File Playback<br />
Pause<br />
Press the 1/>/|| button to suspend playback. Press the 1/>/|| button again to resume playback.<br />
Track Select<br />
Press the TUNE/TRACK >>| or |>| or |/|| button (8) to end fast forward or reverse and resume<br />
normal playback.<br />
Intro Scan (INT)<br />
During playback, press the 2/INT button to select “INTRO” and play the first 10 seconds of each track/file, as indicated by the symbol. When the<br />
desired track is reached, press 2/INT again to end the scan and play the selected track.<br />
Repeat (RPT)<br />
Press the 3/RPT button multiple times during playback to select from the following repeat play options:<br />
• VCD/CD: RPT ONE (track), RPT ALL (disc), RPT OFF<br />
• DVD: RPT CHAPTER, RPT TITLE, RPT OFF<br />
• MP3/WMA: Repeat File, Repeat Directory/Folder, Repeat All (disc),<br />
Repeat Off<br />
Random (RDM)<br />
Press the 4/RDM button during playback to select “RANDOM” and play all tracks/files in random, shuffled order. Press 4/RDM again to stop random<br />
play.<br />
14<br />
DN UP<br />
1. Current Track Title<br />
2. ID3 Artist and Title Information (MP3/WMA only)<br />
2<br />
Subject to technical changes
Section Repeat (A-B)<br />
To repeat a specified section of a track, perform the following steps:<br />
1. Press the A->B button (16) on the remote control to select the starting point. The display will show “REPEAT A-”.<br />
2. Press A->B when you reach the desired ending point. The display shows “REPEAT A-B” and the selected section will play repeatedly.<br />
To cancel section repeat, press the A->B button again. “A-B CANCEL” appears on the display.<br />
GOTO Track Time Access<br />
Use the GOTO function to access a specific position on a track directly.<br />
1. Press the GOTO button (19) on the remote control. The Searc (Time --:--:--) window will appear.<br />
2. Use the number keys (8) on the remote control to enter the exact time on the current track from which you would like playback to begin.<br />
3. Press the ENTER button to confirm and begin playback from the selected track time.<br />
VCD PlayBack Control (VCD Only)<br />
If you insert a VCD with playback control, playback automatically starts at the beginning of the first track. Press the MENU button (20) on the remote<br />
control to to turn playback control on/off.<br />
Additional DVD/Video Playback Features<br />
NOTE: You cannot view video while driving the car. When attempting to view video while the parking break is not engaged, the following<br />
message will appear on the screen: WARNING !! Engage Parking Brake to View Video.<br />
The following remote control features are available during DVD playback:<br />
• AUDIO: Press to choose an alternate audio language, if available. This button may also show different surround sound options encoded<br />
on th DVD.<br />
• SUB-T: Press to select an alternate subtitle language, if available.<br />
• TITLE: Press to display the title or chapter list. Use the �,�,� or � cursor buttons or the numeric buttons to enter a title or chapter number,<br />
and then press ENTER to play.<br />
• ANGLE: Press to select an alternate viewing angle, if available.<br />
• ZOOM: Press to zoom the picture at X2, X3, X4, X1/4, X1/2, or select OFF to return to normal view.<br />
• Slow Forward/Slow Reverse: Press the / buttons on the remote control or the 5/6 buttons (10, 13) on the control panel to slow rewind/<br />
slow reverse. Press once for 1/2 speed. Press additional times for 1/4, 1/6, or 1/8 speed. Press the play/pause >/|| button (8) to end fast forward or<br />
reverse and resume normal playback.<br />
NOTE: Feature availability is dependent on DVD embedded information.<br />
NOTE: The VME 8013 does not support Surround Sound decoding.<br />
15<br />
Subject to technical changes
SETUP MENU<br />
During disc play, press the SETUP button (4) on the remote control to<br />
access the SYSTEM SETUP menu.<br />
Use the 56,43 , or cursor buttons to choose between LANGUAGE, VIDEO, AUDIO, RATING or MISC setup options.<br />
Table 1: System Setup Menu<br />
OSD language English<br />
German<br />
Spanis h<br />
Italian<br />
French<br />
Subtitle English<br />
German<br />
Spanis h<br />
Italian<br />
French<br />
Off<br />
DVD menu English<br />
German<br />
Spanis h<br />
Italian<br />
French<br />
As pect Ratio 4:3<br />
16:9<br />
Video Format NTSC<br />
PAL<br />
AUTO<br />
Smart Picture Standard<br />
Bright<br />
Soft<br />
16<br />
Select the appropriate onscreen<br />
language for the<br />
DV D<br />
Choose the language you<br />
would like subtitles to<br />
appear in (if available)<br />
Turn subtitles off<br />
Choose the language you<br />
would like DV D menu to<br />
appear in (if available)<br />
Image is presented with 4:3<br />
Image is presented in wide<br />
view wit h a 16:9 aspect<br />
ratio.<br />
Thecolorsignals areoutput<br />
inthestandardNTSC format.<br />
Thecolorsignals areoutput<br />
in the standard PAL for mat .<br />
Th e color signa l outp ut is<br />
switched automatically<br />
based onthe current video<br />
input signal - NTSC or PAL.<br />
Subject to technical changes
Audio Menu English<br />
German<br />
Spanis h<br />
Italian<br />
French<br />
17<br />
Selec t the appropriate audio<br />
language for the DVD.<br />
Set Password _ _ _ _ Enter a 4-digit password to activate the<br />
“Rating” feature. The originalpassword is<br />
“0000” and must be entered<br />
before you can change the<br />
password to a different 4- digit code.<br />
Parental CTR 1 KID SAFE<br />
2 G<br />
3 PG<br />
4 PG13<br />
5 PG-R<br />
6 R<br />
7 NC-17<br />
8 ADULT<br />
Select the appropriate rating<br />
level for the intended audience.<br />
You may override higher ratings<br />
by us ing your password.<br />
Use Default Settings Yes/No Selec t “Yes” to restore the<br />
factor y default settings for<br />
the Rating system only.<br />
Subject to technical changes
CARE AND MAINTENANCE<br />
DVD Player<br />
The following guidelines will help you extend the life of your DVD player:<br />
1. When cleaning the vehicle interior, do not get water or cleaning fluids on the unit.<br />
2. The DVD player will not operate properly in extreme hot/cold or under damp conditions. In case of such conditions, wait until the vehicle<br />
interior reaches a normal temperature or any condensation on the disc player lens has evaporated before using the player.<br />
3. Always remove the disc when the player is not in use.<br />
4. The unit is designed with a vibration dampening disc mechanism to minimize interruption of disc play due to normal vibration in a moving<br />
vehicle. However, occasional sound skips may occur when driving on very rough roads. This will not scratch or damage the disc, and normal<br />
play will resume when the rough conditions cease.<br />
CD-R and CD-RW Capability<br />
Depending on media type and method of "recording/burning", some CD-R/ RWs may be incompatible with this unit. After "recording/burning", the<br />
session must be closed. Please refer to your software's recommended procedures for closing a disc/session. Review your recording software to<br />
familiarize yourself with the correct "recording/burning" procedures. We recommend using the latest versions of ROXIOTM or NEROTM burning<br />
software.<br />
In addition, this unit will only recognize the CDDA (Compact Disc Digital Audio), .MP3 and .WMA formats "recorded / burned" onto a CD-R/RW.<br />
This unit does not support .WAV, .OGG or other formats.<br />
Disc Care and Handling<br />
Dirt, dust, scratches and warpage can cause skips in the playback and deterioration of sound quality. Please follow these guidelines to take care of<br />
your compact discs.<br />
1. Do not touch the disc surface.<br />
2. Never use chemicals such as record sprays or household cleaners to clean discs, as they can irreparably damage the disc’s surface.<br />
3. Discs should be kept in their storage cases when not in use.<br />
4. Do not expose discs to direct sunlight, high temperatures or high humidity for long periods.<br />
5. Carefully wipe fingerprints, dust and dirt from the disc’s playing surface with a soft cloth. Wipe in a straight motion from the inside to the outside<br />
of the disc.<br />
6. Do not stick paper, tape or disc labels on disc surfaces, as internal damage may occur.<br />
18<br />
Subject to technical changes
TROUBLESCHOOTING<br />
Problem Cause Corrective Action<br />
GENERAL<br />
Does not operate (display No power to yellow wire; no power Check connection with test light; check vehicle<br />
does not light) to red wire fuse with test light<br />
Fuse blown Replace fuse<br />
No power on unit Fuse blown Check/replace fuse<br />
No/low audio output Improper audio output connection Check wiring and correct<br />
Volume set too low Increase volume level<br />
Improper “MUTE” connection Review wiring diagram and check<br />
“MUTE” connection<br />
Speakers damaged Replace speakers<br />
Heavily biased volume balance Adjust the channel balance to the center<br />
position<br />
Speaker wiring is in contact with metal<br />
part of car Insulate all speaker wiring connections<br />
Blow fuses Power wire shorting to ground Make sure wire is not pinched<br />
Speaker wires shorting to ground Make sure wire is not pinched<br />
Incorrect fuse; fuse too small Install fuse of correct rating<br />
No image Incorrect connection to parking brake wire Check wiring and correct<br />
PRK SW is activated, parking brake is not engaged Stop vehicle in safe place and apply parking brake<br />
Flashing image or interference DVD is not compatible with current TV system settingsChange setup to accommodate disc<br />
appears on screen Improper video signal connections Check wiring and correct<br />
Prolonged image or improper Improper aspect ratio setup Use correct aspect ratio setting<br />
height/width ratio display<br />
Disc does not play back Disc is warped or scratched Use disc in good condition<br />
Disc is dirty or wet Clean disc with soft cloth<br />
Laser pickup is dirty Clean laser pickup with cleaning disc<br />
Incompatible disc is used Use compatiible disc<br />
Disc rating exceeds RATING Change Rating settings<br />
Disc region code is not compatible with unit Use disc with proper code<br />
Disc is inserted upside down Insert disc with label side up<br />
Image blurred, distored or dark Disc is illeegally copied Use original disc<br />
19<br />
Subject to technical changes
SPECIFICATIONS<br />
Power Output.............................................................................................................13 watts RMS X 4 channels into 4-ohms @ < 1% THD+N<br />
Signal to Noise Ratio.................................................................................................70dBA below reference (reference: 1 watt, 4-ohms)<br />
Frequency Response.................................................................................................20Hz to 20kHz (-3dB), Auxiliary input used as source reference<br />
Reference Supply Voltage.........................................................................................14.4VDC<br />
DVD/CD Player<br />
Compatible Disc Media..............................................................................................DVD + R / RW and CD-R / RW<br />
Compatible Media Formats ......................................................................................CD-DA, MP3, WMA, VCD, SVCD, AVI,<br />
. MPEG1 / 2, XviD and Kodak picture CD (JPEG)<br />
Signal to Noise Ratio.................................................................................................>95dBA<br />
Dynamic Range..........................................................................................................>95dB<br />
Frequency Response................................................................................................20Hz to 20 kHz, -3dB<br />
Channel Separation .................................................................................................> 60dB @ 1 kHz<br />
Video<br />
Format......................................................................................................................NTSC, PAL (auto-detection)<br />
Output......................................................................................................................1Vp-p (75-ohm)<br />
Input.........................................................................................................................1Vp-p (75-ohm)<br />
FM / RDS Analog Tuner<br />
Tuning Range............................................................................................................87.5MHz - 107.9MHz<br />
Mono Sensitivity (-30dB)...........................................................................................9dBf<br />
Quieting Sensitivity (-50dB)......................................................................................15dBf<br />
Alternate Channel Selectivity....................................................................................70dB<br />
Signal to Noise Ratio @ 1 kHz..................................................................................58dB<br />
Image Rejection........................................................................................................ 80dB<br />
Stereo Separation @ 1 kHz......................................................................................>30dB<br />
Frequency Response ...............................................................................................30Hz - 15 kHz, -3dB<br />
AM Tuner<br />
Tuning Range............................................................................................................530 kHz – 1710 kHz<br />
Sensitivity (-20dB).....................................................................................................12uV<br />
Signal to Noise Ratio @ 1 kHz..................................................................................50dB<br />
Image Rejection.........................................................................................................60dB<br />
Frequency Response ...............................................................................................50Hz – 2 kHz, -3dB<br />
20<br />
Subject to technical changes
D<br />
Wir gratulieren Ihnen! Durch Ihre kluge Wahl sind Sie Besitzer eines Audiovox Mobile Video-Produktes geworden. Audiovox Mobile<br />
Video-Produkte erfreuen sich aufgrund der hohen Qualität eines ausgezeichneten Rufes weltweit. Dieser hohe Qualitätsstandard ermöglicht<br />
es für Audiovox Mobile Video-Produkte 2 Jahre Garantie zu gewähren.<br />
Die Produkte werden während des gesamten Fertigungsvorganges laufend kontrolliert und geprüft. Im Servicefall beachten Sie bitte folgendes:<br />
1. Die 2-jährige Garantiezeit beginnt mit dem Kauf des Produktes und gilt nur für den Erstbesitzer.<br />
2. Während der Garantiezeit beseitigen wir etwaige Mängel, die nachweislich auf Material- oder Fabrikationsfehler beruhen, nach<br />
unserer Wahl durch Austausch oder Nachbesserung der defekten Teile. Weitergehende Ansprüche, insbesondere auf Minderung,<br />
Wandlung, Schadenersatz oder Folgeschäden sind ausgeschlossen. Die Garantiezeit wird von einer Garantieleistung durch uns nicht berührt.<br />
3. Am Produkt dürfen keine unsachgemäßen Eingriffe vorgenommen worden sein.<br />
4. Bei Inanspruchnahme der Garantie wenden Sie sich bitte zunächst an Ihren Fachhändler. Sollte es sich als notwendig erweisen,<br />
das Produkt an uns einzuschicken, so sorgen Sie bitte dafür, daß • das Produkt in einwandfreier Originalverpackung verschickt wird,<br />
• die Kontrollkarte ausgefüllt dem Produkt beiliegt, • die Kaufquittung beigefügt ist.<br />
5. Von der Garantie ausgenommen sind: • Leuchtmittel • Verschleißteile • Transportschäden, sichtbar oder unsichtbar (Reklamationen für solche<br />
Schäden müssen umgehend bei der Transportfirma, Bahn oder Post eingereicht werden.) • Kratzer in Metallteilen, Frontabdeckungen u.s.w.<br />
(Diese Defekte müssen innerhalb von 5 Tagen nach Kauf direkt bei Ihrem Händler reklamiert werden.) • Fehler, die durch fehlerhafte Aufstellung,<br />
falschen Anschluß, unsachgemäße Bedienung (siehe Bedienungsanleitung), Beanspruchung oder äußere gewaltsame Einwirkung entstanden<br />
sind. • Unsachgemäß reparierte oder geänderte Geräte, die von anderer Seite als von uns geöffnet wurden. • Folgeschäden an fremden<br />
Geräten • Kostenerstattung bei Schadensbehebung durch Dritte ohne unser vorheriges Einverständnis • Batterien und Akkus.<br />
GB<br />
Congratulations! You have made a wise selection in becoming the owner of a Audiovox Mobile Video equipment. Due to high<br />
quality Audiovox products have earned an excellent reputation through the western world. And this high quality standard enables us to grant<br />
a 2-years <strong>warranty</strong> for Audiovox Mobile Video products.<br />
The equipments are checked and tested continously during the entire production process. In case you have problems with your<br />
Audiovox Mobile Video equipment, kindly observe the following:<br />
1. The 2-years guarantee period commences with the purchase of the component and is applicable only to the original owner.<br />
2. During the guarantee period we will rectify any defects due to faulty material or workmanship by replacing or repairing the defective part at<br />
our discretion. Further claims, and in particular those for price reduction, cancellation of sale, compensation for damages or<br />
subsequential damages, are excluded. The guarantee period is not altered by the fact that we have carried out guarantee work.<br />
3. Unauthorized tampering with the equipment will invalidate this guarantee.<br />
4. Consult your authorized dealer first, if guarantee service is needed. Should it prove necessary to return the component to the factory, please<br />
insure that • the component is packed in original factory packing in good condition • the quality control <strong>card</strong> has been filled out and enclosed<br />
with the component, • your enclose your receipt as proof of purchase.<br />
5. Excluded from the guarantee are: • Illuminates • Wear parts • Shipping damages, either readily apparent or concealed (claims for such damages<br />
must be lodged immediately with forwarding agent, the railway express office or post office). • Scratches in cases, metal components,<br />
front panels, etc. (You must notify your dealer directly of such defects within three days of purchase.) • Defects caused by incorrect installation<br />
or connection, by operation errors (see operating instructions), by overloading or by external force. • Equipments which have beenrepaired<br />
incorrectly or modified or where the case has been opened by persons other than us. • Consoquential damages to other equipments. • Reimbursement<br />
of cools, without our prior consent, when repairing damages by third parties • batteries and battery packs.<br />
F<br />
Toutes nos félicitations! Vouz avez bien choisi et êtes le propriétaire heureux d’un produit Audiovox. Les produits Audiovox ont<br />
une excellente réputation pour leur bonne qualité. Pour cette raison, nous accordons 2 ans de garantie sur tous les produits Audiovox.<br />
Les appareils sont soumis pendant toutes les opérations de fabrications à des contrôles et vérifications constants. Si, pourtant, vous<br />
rencontrez des difficulés avec votre appareil Audiovox veuillez tenir compte de ce qui suit:<br />
1. La garantie débute avec l’achat de l’appareil et est valable uniquement pour le premier propriétaire.<br />
2. Pendant la période de garantie nous réparons les dommages provenant des défauts de matériel ou de fabrication et nous procédons, à<br />
notre guise, à l’échange ou à la réparation des pièces défectueuses.<br />
3. Aucune réparation impropre ne doit avoir été effectuée à l’appareil.<br />
4. Lors d’une demande de garantie, veuillez vous adresser en premier lieu à votre distributeur. Si ce dernier décide que l’appareil doit nous être<br />
retourné, veuillez tenir compte que: • l’appareil soit expédié dans son ermballage d’origine, • la carte de contrôle dûment remplie soit jointe, •<br />
le bon d’achat soit joint.<br />
5. Ne sont pas compris dans la garantie: • Matériel d’éclairage • Pièces d’usure • Avaries de transport, visibles ou non (de telles réclamations<br />
doivent être faites immédiatement auprès du transporteur, du chermin de fer ou de la poste). • Des rayures sur le boîtier, pièces métalliques,<br />
couvercles etc. (ces dommages doivent être signalés directement à votre distributeur dans les trois jours suivant l’achat). • Dommages<br />
résultant d’un raccordement incorrect, maniement incorrect (voir instructions de service), surcharge ou application de force extérieure. • Appareils<br />
réparés non conformément ou modifiés et qui ont été ouverts par une personne autre que nous. • Dommages ultérieurs à d’autres appareils.<br />
• Remboursement des frais à des tiers ayant effectué les réparations sans notre accord préalable • Accus et batteries.
Typ/Type<br />
Serien-Nr./Serial-No.<br />
GARANTIEKARTE<br />
WARRANTY CARD<br />
Name und Anschrift des Händlers/Stempel<br />
Name and address of the dealer/stamp<br />
Käufer/Customer<br />
Name/Name<br />
Straße/Street<br />
PLZ, Ort/City<br />
Land/Country<br />
Kaufdatum/buying date<br />
Nur gültig in Verbindung mit Ihrer Kaufquittung!<br />
No <strong>warranty</strong> without receipt!
Audiovox Audio Produkte GmbH<br />
Lise-Meitner-Str. 9 · 50259 Pulheim<br />
Tel.: +49 2234/807-0 · Fax: + 49 2234/807-399<br />
www.audiovox-germany.de