Opti1sw-f r Pdf-Be
Opti1sw-f r Pdf-Be
Opti1sw-f r Pdf-Be

Create successful ePaper yourself
Turn your PDF publications into a flip-book with our unique Google optimized e-Paper software.
OPTI1sw
OPTI 1sw Page 2<br />
Table of Contents<br />
1. INTRODUCING THE ALGE OPTI 1sw ...................................................................................... 6<br />
1.1. The parts of the OPTI system............................................................................................ 6<br />
1.2. Functions........................................................................................................................... 6<br />
1.3. Components of the System and its Functions ................................................................... 8<br />
1.4 For which Sports do you use the OPTI .............................................................................. 9<br />
2. INSTALLING THE SYSTEM .................................................................................................... 10<br />
2.1. How to built the OPTI Computer-Board OCB1 into your PC ............................................ 10<br />
2.2. Power Supply .................................................................................................................. 10<br />
2.3. Installation of the Software .............................................................................................. 11<br />
2.4. Adjustment of the OPTI.INI file ........................................................................................ 14<br />
2.5. Setup of the devices ........................................................................................................ 17<br />
2.6. Setup of the OPTI Line Scan Camera OLC1sw ............................................................... 18<br />
3. SOFTWARE ............................................................................................................................ 24<br />
3.1. Function symbols ............................................................................................................. 25<br />
3.2. Menu List ......................................................................................................................... 26<br />
3.3. Menu ............................................................................................................................. 26<br />
3.4. Orders of the menu ......................................................................................................... 28<br />
Activate ................................ F4 ..................................................................................... 28<br />
Bib time transfer .............................................................................................................. 28<br />
Brightness / Contrast ....................................................................................................... 28<br />
Camera settings .............................................................................................................. 28<br />
Color of time line ............................................................................................................. 28<br />
Coming from left .............................................................................................................. 29<br />
Coming from right ............................................................................................................ 29<br />
Competition ..................................................................................................................... 29<br />
Competitor list ................................................................................................................. 29<br />
Complete picture ............................................................................................................. 30<br />
Data service .................................................................................................................... 30<br />
Direct image selection ..................................................................................................... 30<br />
Exit ............................................................................................................................. 30<br />
Evaluation to the COMM port .......................................................................................... 30<br />
Export competitor list ....................................................................................................... 30<br />
Image cropping................................................................................................................ 30<br />
Import competitor list ....................................................................................................... 31<br />
Info ............................................................................................................................. 31<br />
Lane identification............................................................................................................ 31<br />
Lane time transfer ........................................................................................................... 31<br />
Load ............................................................................................................................. 31<br />
Manual time transfer ........................................................................................................ 32<br />
Mirror ............................................................................................................................. 32<br />
New ............................................................................................................................. 32<br />
Precision ......................................................................................................................... 32<br />
Print ............................................................................................................................. 33<br />
Race information ............................................................................................................. 33<br />
Result board on/off .......................................................................................................... 34<br />
Save ............................................................................................................................. 34<br />
Sending the competitor list .............................................................................................. 34<br />
Show logo ....................................................................................................................... 34<br />
Start .................................. F2 ..................................................................................... 35<br />
Start 3 Races ....................... F3 ..................................................................................... 36<br />
Stretch to client................................................................................................................ 36<br />
Version:E-96-01-03A Page 2
OPTI 1sw Page 3<br />
Time line .......................................................................................................................... 37<br />
Test start ......................................................................................................................... 37<br />
Timing window on/off ....................................................................................................... 37<br />
Zoom ............................................................................................................................. 37<br />
4. PREPARE A RACE ................................................................................................................. 38<br />
4.1. File Name of the Race ..................................................................................................... 38<br />
4.2. Race Information ............................................................................................................. 38<br />
4.3. Competitor List ................................................................................................................ 38<br />
5. RECORD A RACE .................................................................................................................. 39<br />
5.1. Start F2 ........................................................................................................................... 39<br />
5.1.1. Status ................................................................................................................... 39<br />
5.1.2. Run Time ............................................................................................................. 39<br />
5.1.3. Rest Recording Time............................................................................................ 39<br />
5.1.4. Gain ..................................................................................................................... 40<br />
5.1.5. Difference ............................................................................................................. 40<br />
5.1.6. Time offset ........................................................................................................... 40<br />
5.1.7. Manual Start ......................................................................................................... 40<br />
5.1.8. False Start ............................................................................................................ 40<br />
5.1.9. Running GAZ ....................................................................................................... 40<br />
5.1.10.Activate ................................................................................................................ 40<br />
5.1.11.Recording ............................................................................................................. 41<br />
5.1.12.Evaluation ............................................................................................................ 41<br />
5.2. Start 3 Races .................................................................................................................. 42<br />
5.2.1. Races ................................................................................................................... 43<br />
5.2.2. Rest recording time .............................................................................................. 43<br />
5.2.3. Gain ..................................................................................................................... 43<br />
5.2.4. Difference ............................................................................................................. 44<br />
5.2.5. Status ................................................................................................................... 44<br />
5.2.6. Reload .................................................................................................................. 44<br />
5.2.7. Prepare ................................................................................................................ 44<br />
5.2.8. Manual start ......................................................................................................... 44<br />
5.2.9. Running GAZ ....................................................................................................... 44<br />
5.2.10.Start Time ............................................................................................................ 44<br />
5.2.11.Close .................................................................................................................... 44<br />
5.2.12.False Start ............................................................................................................ 45<br />
5.2.13.Cancel .................................................................................................................. 45<br />
5.2.14.Recording ............................................................................................................. 45<br />
5.2.15.Evaluation ............................................................................................................ 45<br />
6. EVALUATION.......................................................................................................................... 46<br />
6.1. How do I show the different pictures on the screen ......................................................... 46<br />
6.2. Time line on the Screen................................................................................................... 46<br />
6.3. Timing Window ................................................................................................................ 46<br />
6.4. Transfer run times into the Competitor List ...................................................................... 47<br />
6.4.1. Manual time transfer............................................................................................. 47<br />
6.4.2. Lane time transfer ................................................................................................ 47<br />
6.4.3. Bib time transfer ................................................................................................... 48<br />
6.5. Returning to the F3 Window ............................................................................................ 49<br />
6.6. Hints for the Evaluation in the F3-Mode........................................................................... 49<br />
7. OPTI SYSTEM COMPONENTS .............................................................................................. 50<br />
7.1. OPTI Line Camera .......................................................................................................... 50<br />
7.1.1. OPTI Line Camera OLC1sw ................................................................................. 50<br />
7.1.2. OPTI Line Camera OLC2sw ................................................................................. 50<br />
Version: E-96-01-03A Page 3
OPTI 1sw Page 4<br />
7.2. OPTI Camera Interface OCI1sw...................................................................................... 50<br />
7.3. OPTI Distribution Box ODB1 ........................................................................................... 50<br />
7.4. Startmicrophone SM7, Speech Amplifier SV3/SM and Headset Q34 .............................. 52<br />
7.5. Photocell ......................................................................................................................... 53<br />
7.5.1. Reflection Photocell RLS1c .................................................................................. 53<br />
7.5.2. Three-Fould-Photocell RLS3c .............................................................................. 55<br />
7.6. Power Supply NLG4 ........................................................................................................ 55<br />
7.7. Net-Battery-Device NBO1 ............................................................................................... 55<br />
8. TECHNICAL DATA ................................................................................................................. 56<br />
8.1. OPTI-Computer-Board OCB1sw ..................................................................................... 58<br />
8.2. Distribution Box ODB1sw ................................................................................................ 58<br />
8.3. OPTI Line Scan Camera OLC1sw ................................................................................... 58<br />
8.4. Cable ............................................................................................................................. 58<br />
9. EXAMPLE OF PRINTED LISTS AND PICTURES ................................................................... 60<br />
9.1. Start List .......................................................................................................................... 60<br />
9.2. Results List ...................................................................................................................... 62<br />
9.3. Results List by Lane ........................................................................................................ 64<br />
9.4. Times by Photocell .......................................................................................................... 66<br />
9.5. Image ............................................................................................................................. 68<br />
ALGE OPTI 1sw manual copyright by: ALGE TIMING<br />
AUSTRIA<br />
Version:E-96-01-03A Page 4
OPTI 1sw Page 5<br />
Version: E-96-01-03A Page 5
OPTI 1sw Page 6<br />
1. INTRODUCING THE ALGE OPTI 1sw<br />
1.1. The parts of the OPTI system:<br />
You need the following components:<br />
• PC 486/DX2-66, 4 MB RAM (for pictures with 1024 pixel it is better to have 8 MB RAM)<br />
• Windows 3.11 or Windows 95 (for Windows 95 you need 8 MB RAM)<br />
• ALGE Computer-Board OCB1sw built into PC<br />
• Super-VGA color monitor for PC (minimum 800 x 600 pixel resolution)<br />
• Mouse for PC<br />
• OPTI Distribution Box ODB1sw<br />
• OPTI Line Camera OLC1sw<br />
• OPTI Camera Interface OCI1sw<br />
• Zoom Lens for Camera<br />
• Power Supply NLG4 (charger for ODB1)<br />
• Net-Battery-Device NBO1 (charger for OCI1sw and OLC1sw)<br />
• Startmicrophone SM7<br />
• Speech Amplifier SV3/SM<br />
• 2 x Headset Q34<br />
• Cabling for the system<br />
• Photocell RLS1c with tripod to control the Camera and Display-Board<br />
Additional Components:<br />
• Printer to print the competitor lists and finish pictures (laser printer or ink jet)<br />
• Three-Fold-Photocell RLS3c with tripod<br />
• Handswitch 020-02<br />
• Display Board GAZ4<br />
• Cable real KT 300<br />
1.2. Functions:<br />
ALGE OPTI 1sw is a fully electronic timing system that records the arrival of the competitors. It has<br />
also an integrated result service. The system accuracy is most precise because of its temperature<br />
compensated crystal oscillator (TCXO). The system runs on a PC compatible computer with Windows.<br />
The operation of the system is very easy because of the Windows surface.<br />
A line scan camera (CCD image sensor) scans the movements at the finish line and records the<br />
data on the hard disk of the computer. Recording is possible up to 1000 lines (scans) per second.<br />
After the race you can show the image on the monitor of the computer and read the time of each<br />
competitor up to 1/1000 of a second and store the time in the result list. If you have a tight race, it is<br />
possible to zoom any part of the picture. Also stretch to client and complete picture function is<br />
possible.<br />
Version:E-96-01-03A Page 6
OPTI 1sw Page 7<br />
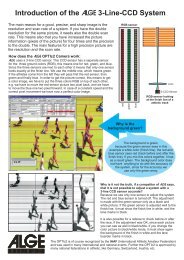
This camera takes lines of image rather than a 2 dimensional frame picture. The lines of an image<br />
are collected over the time and then combined to store a still image. The image has time in horizontal<br />
dimension and space in the vertical.<br />
The picture below shows you how the system produces a image. If you use a sample time of<br />
1/1000 seconds, it means that it makes 1000 scans (shots) per second.<br />
The next picture shows the same object passing the finish line (camera) with a slower speed.<br />
Therefore the object is for a longer time in front of the camera and the camera scans it more often.<br />
The still image includes now more shots of the object and is therefore longer.<br />
You need not to develop a negative with the ALGE OPTI 1sw system. This saves money (film and<br />
development costs) and working with aggressive chemicals. The still image of the OPTI is stored on<br />
the hard disk in bitmap format. You can print it at any time with a laser - or ink jet-printer.<br />
Version: E-96-01-03A Page 7
1.3. Components of the System and its Functions:<br />
OPTI 1sw Page 8<br />
Personal Computer (PC):<br />
PC to process and store data, the hard disk must have 32 Bit access. If you run Windows<br />
95 you need 8 MB RAM.<br />
Color Monitor:<br />
S-VGA color monitor (minimum 14", resolution must be 800 x 600 pixel or higher)<br />
Key Board:<br />
for PC operation<br />
Mouse:<br />
for PC operation<br />
OPTI Computer Board OCB1sw built into PC:<br />
Used for real time processing of the image data. A temperature compensated crystal<br />
oscillator (TCXO) guarantees highest timing precision.<br />
OPTI Distribution Box ODB1sw:<br />
To connect all external devices.<br />
OPTI Line Scan Camera OLC1sw:<br />
To scan the image.<br />
OPTI Camera Interface OCI1sw:<br />
To scan the image<br />
Lens for Camera:<br />
Depending on how you use the system take a zoom or fix lens.<br />
Power Supply NLG4:<br />
Power supply for distribution box ODB1sw.<br />
Net-Battery-Device NBO1:<br />
Power supply for OPTI camera interface OCI1sw and camera OLC1sw.<br />
Speech amplifier SV3/SM:<br />
Speech amplifier for speech connection form start to timer. At the speech amplifier you<br />
connect as well the Startmicrophone SM7<br />
Headset Q34:<br />
You need a headset at the start and timer. You can talk now through the 2-wire impulse<br />
cable from the start to the timer.<br />
Startmicrophone SM7:<br />
Starts the timer by shooting a gun (start impulse).<br />
Three-Fold Photocell RLS3c:<br />
Photocell to control the line scan camera and to stop the unofficial time for the display<br />
board (track).<br />
Version:E-96-01-03A Page 8
OPTI 1sw Page 9<br />
Photocell RLS1c:<br />
Photocell to control the line scan camera and to stop the unofficial time for the display<br />
board (track). For track you should use the RLS3c. It prevents you from impulses made by<br />
arms of the athlete.<br />
Handswitch 020-02:<br />
To control manually the camera.<br />
Display Board GAZ4:<br />
To show the running time as well as the unofficial run time.<br />
Printer for PC:<br />
Prints start list, ranking list, and finish image. The printer should be a laser printer. In order<br />
to have good pictures it should have 600 dpi. The printing speed depends on the printer<br />
speed. The printer must have enough RAM to print the image.<br />
Cable Reel KT300:<br />
2-wire cable form start to the timer or form the display board to the time.<br />
1.4. For which Sports do you use the OPTI:<br />
Athletics: • Sprint<br />
• Long distance races<br />
Cycling: • Track<br />
• Road races<br />
Rowing:<br />
Canoe / Kayak:<br />
Horse Races: • Gallop<br />
• Trotting Races<br />
Greyhound Races:<br />
Car Races: • Road Races<br />
• Autocross<br />
Motorcycle Races: • Road Races<br />
• Motocross<br />
• Speedway<br />
Short Truck Skating:<br />
Cross Country Skiing:<br />
Biathlon:<br />
Roller Skating:<br />
Roller Blade:<br />
Version: E-96-01-03A Page 9
OPTI 1sw Page 10<br />
2. INSTALLING THE SYSTEM<br />
2.1. How to built the OPTI Computer-Board OCB1sw into your PC:<br />
It is of advantage, if your ALGE or computer dealer installs the OCB1sw into your PC. This guarantees<br />
you, that you will not lose the warrantee of the PC.<br />
- Turn the PC off<br />
- Open the case of the PC<br />
- Unscrew and remove the cover of a free 16 bit slot<br />
- Check the Dip-switches of the OCB1sw (see below)<br />
- Put board into free slot<br />
- Screw board in PC<br />
- Close the case of the PC<br />
- Turn the PC on<br />
- Install software in PC<br />
- Reset the PC<br />
Adjustment of Dip-Switches on ALGE OPTI-Computer Board OCB1:<br />
The OPTI-Computer Board OCB1 needs Interrupt 5 of the PC.<br />
The OPTI-Computer Board OCB1 needs the following I/O addresses:<br />
150 Hex, 160 Hex, 162 Hex, 163 Hex<br />
2.2. Power Supply:<br />
1 = off 4 = off 7 = on<br />
2 = off 5 = on 8 = on<br />
3 = off 6 = off 9 = on<br />
We recommend to use a UPS for the complete system (except printer). This guarantees you in case<br />
of a power failure that the system continues to work.<br />
PC, Monitor and Printer:<br />
Power supply like described in the manual of each device.<br />
OPTI Distribution Box ODB1sw:<br />
Use power supply NLG4 to supply the Distribution Box ODB1sw. Connect the NLG4 at outlet.<br />
OPTI Camera Interface OCI1sw and Line Camera OLC1sw:<br />
Use power supply NBO1 to supply the Camera Interface OCI1sw and Line Camera OLC1sw.<br />
Connect the NLG4 at outlet or through Amphenol plug at 12 V battery.<br />
Version:E-96-01-03A Page 10
2.3. Installation of the Software:<br />
OPTI 1sw Page 11<br />
The ALGE-Computer-Board should be installed from your ALGE or Computer dealer. The PC must<br />
meet the following details to work without problems:<br />
PC necessities:<br />
System with a 514 pixel camera:<br />
Processor: 486/DX2-66 or faster processor<br />
DOS-Version: MS DOS version 5.0 or higher and Windows 3.11<br />
or Windows 95<br />
Hard Disk: Minimum 240 MB, maximum 14 ms regress time, 32-bit access<br />
RAM: Minimum 4 MB, better 8 MB (for Windows 95 you need 8 MB RAM)<br />
Floppy Disk: 1 floppy disk 3 1 / 2 "<br />
Computer Board OCB1: one complete ISA/AT slot (16 bit slot) must be free for the ALGE<br />
OPTI Computer Board OCB1sw<br />
Graphic board: S-VGA, minimum 1 MB RAM,<br />
Resolution: minimal 800 x 600, 256 colors<br />
better 1024 x 768, 256 colors<br />
Internal bus: PCI bus or local bus<br />
System with a 1024 pixel camera:<br />
Processor: 486/DX2-66 or faster processor<br />
DOS-Version: MS DOS version 5.0 or higher and Windows 3.11<br />
or Windows 95<br />
Hard Disk: Minimum 420 MB, maximum 14 ms regress time, 32-bit access<br />
RAM: Minimum 8 MB, better 16 MB<br />
Floppy Disk: 1 floppy disk 3 1 / 2 "<br />
Computer Board OCB1: one complete ISA/AT slot (16 bit slot) must be free for the ALGE<br />
OPTI Computer Board OCB1sw<br />
Graphic board: S-VGA, minimum 1 MB RAM, 1024 x 768, 256 colors<br />
Internal bus: PCI bus or local bus<br />
Version: E-96-01-03A Page 11
Installation of the OPTI software on Windows 3.11:<br />
OPTI 1sw Page 12<br />
To install the OPTI software is very easy. If you use the following instruction you should have no<br />
problems.<br />
- start the PC<br />
- start Windows<br />
- insert the floppy disk into drive A: or B:<br />
- click on FILE in the menu list<br />
- click on EXECUTE<br />
- input: A:\CSETUP or B:\CSETUP (depending on the floppy disk that you use)<br />
- click on OK<br />
- the installation program starts<br />
- click on CONTINUE when the installation stops<br />
- input another directory if you want to use another directory than the suggested e.g. C:\AGLE<br />
- click CONTINUE<br />
- wait until it shows the text: "The application is successfully loaded on your hard disk".<br />
- Click with the mouse on OK<br />
Installation of the OPTI software on Windows 95:<br />
ALGE can not give a warrantee that the OPTI runs 100% well under Windows 95. Windows 95 does<br />
take the task of the additional processor on the OCB1. That means, during that time the hard disk is<br />
not available to store the data.<br />
- start the PC, Windows 95 start automatically<br />
- start the program EXPLORER<br />
- double click the hard disk were WINDOWS 95 is installed<br />
- double click the directory of WINDOWS 95 (mostly called WINDOWS)<br />
- double click the file PROGMAN.EXE<br />
- insert the floppy disk into drive A: or B:<br />
- click on FILE in the menu list<br />
- click on EXECUTE<br />
- input: A:\CSETUP or B:\CSETUP (depending on the floppy disk that you use)<br />
- click on OK<br />
- the installation program starts<br />
- click on CONTINUE when the installation stops<br />
- input another directory if you want to use another directory than the suggested e.g. C:\AGLE<br />
- click CONTINUE<br />
- wait until it shows the text: "The application is successfully loaded on your hard disk".<br />
- Click with the mouse on OK<br />
If the setup program shows a error message during the installation try to install the OPTI software<br />
again.<br />
Version:E-96-01-03A Page 12
Adjustment of the interface for data output:<br />
OPTI 1sw Page 13<br />
You need the data output when using a separate evaluation software on another PC. The ALGE<br />
OPTI system can transmit the results through the RS 232 interface (COM1 or COM2).<br />
You must adjust the interface for your PC. This should be done by the dealer of the evaluation<br />
software or by your ALGE representative.<br />
Open the FILE MANAGER of Windows and go into the OPTI directory<br />
- click on OPTI.INI<br />
- the editor of Windows shows now the OPTI.INI file<br />
- at the end of the first paragraph it says:<br />
bCommActive=0<br />
- change this to "bCommActive=1"<br />
- click with the mouse on FILE<br />
- click with the mouse on EXIT<br />
- click with the mouse on OK<br />
- click with the mouse on COMM.INI in the FILE MANAGER<br />
- the editor of Windows shows now the COMM.INI file<br />
- input the serial interface that you want to use (COM1 or COM2)<br />
- adjust the correct baud rate<br />
- adjust the correct data format<br />
- click with the mouse on FILE<br />
- click with the mouse on EXIT<br />
- click with the mouse on OK<br />
- adjust baud rate<br />
- adjust output format<br />
Adjustment for different cameras:<br />
We use two types of cameras. The camera with 512 pixel is standard.<br />
Adjustment for a camera with 512 pixel in the OPTI.INI file:<br />
bLC1912=0 adjustment for a 512 pixel camera<br />
nCableLength=30 cable 098 is allowed to be as long as 30 meter<br />
Adjustment for 1024 pixel camera:<br />
bLC1912=1 adjustment for 1024 pixel camera<br />
nCableLength=5 cable 098 is not allowed to be longer than 5 meter<br />
Version: E-96-01-03A Page 13
2.4. Adjustment of the OPTI.INI file:<br />
OPTI 1sw Page 14<br />
You can make different adjustments in the file OPTI.INI of the ALGE directory. For normal use it is<br />
not necessary to make any changes. If you want to make changes it is necessary to read this<br />
section very careful. Wrong changes in this file can cause problems.<br />
In order to edit the OPTI.INI file you must open the FILE MANAGER of WINDOWS. Now doubleclick<br />
OPTI.INI. in the ALGE root.<br />
OPTI.INI has the following factory adjustment:<br />
1 [System]<br />
2 sWindow=3,7,0,828,762<br />
3 bColor=0 ; 0 means black and white system<br />
4 bTra=1 ; set to 1 if opti full system set 0 for demo version<br />
5 nMaxRec=100 ; entries in competitor list<br />
6 bWarnIfNoWind=1 ; Activate the warning message before printing<br />
7 bCommActivate=0 ; 1 means activate 0 means deactivate the comm port<br />
8 bShowLogo=0 ; set to 1 if evaluation by start number should be default<br />
9 bEvalByStartNumber=0 ; set to 1 if evaluation by start number should be default<br />
10 bActivateMoreRaces=1 ; set to 1 for recording more races HINT: read the opti.txt<br />
11 szFilter=Race (*.RAC)|*.rac|<br />
12 szFilterTxt=List (*.TXT)|*.txt|<br />
13 szBootFile=c:\OPTI2_7\b_w4m_27.ace 14<br />
15<br />
16 [WFS 3.1]<br />
17 Board0=336,352,352,353,354,355<br />
18 Camera0=6800,1300,1300,1000,1000<br />
19 bFastLink=1<br />
20 nDMAChannel=0<br />
21 bLC1912=0 ; Set 1 if a LC1912 camera is used and 0 for a LC1911<br />
22 bCamInterface1995=1 ; Set 1 if the camera interface release in 1995<br />
23 nLines<strong>Be</strong>fore=160 ; Recorded lines before finish event: 48 is minimum<br />
24 nLinesAfter=120 ; Recorded lines after finish event: 48 is minimum<br />
25<br />
26 ;The width of an image in lines for 512 Pixel: range is 1400 min - 4000 max<br />
27 ;The width of an image in lines for 768 Pixel: range is 1400 min - 3000 max<br />
28 ;The width of an image in lines for 1024 Pixel: range is 1400 min - 2000 max<br />
29 nMaxImageLines=2000<br />
30 nCableLength=30 ; The camera cable length in meter [ 5, 10, 15, 20 ,30 ]<br />
31 nRecFactor=1 ; Range is 1 .. 10<br />
32 nDefaultPixel=512 ; Set the startup default pixel resolution<br />
33 bWindMeter=0 ; 1 means activate 0 means deactivate the wind meter<br />
34<br />
35 [ListHeader]<br />
36 bLoadListHeader=0 ; Set 0 for loading default and 1 for this list<br />
37 szRank=RANK ; 4 character max<br />
38 szTime=TIME ; 4 character max<br />
39 szStNr=StNo ; 4 character max<br />
40 szLane=WGT ; 4 character max<br />
41 szLastName=HORSE ; 12 character max<br />
42 szSurName=JOCKEY ; 12 character max<br />
43 szClub=OWNER ; 12 character max<br />
44 szYear=AGE ; 4 character max<br />
Version:E-96-01-03A Page 14
OPTI 1sw Page 15<br />
The number at the beginning of each line is made for explanation. You wont see this number in the<br />
editor.<br />
Line 1: info line<br />
Line 2: no changes are allowed<br />
Line 3: no changes are allowed<br />
Line 4: bTra =1 complete OPTI system is installed<br />
bTra=0 demo system (no OPTI-computer-board is in the PC)<br />
Line 5: maximum amount of entry in the competitor list<br />
Line 6: warning if the wind speed has no input<br />
bWarnIfNoWind=1 warning is active<br />
bWarnIfNoWind=0 no warning<br />
Line 7: Activate or deactivate the serial interface for output of data<br />
bCommActivate=0 COM is off<br />
bCommActivate=1 COM is on (more adjustments in COMM.INI)<br />
Line 8: showing Logo in the bitmap or not<br />
bShowLogo=1 Logo is shown on the screen<br />
bShowLogo=0 Logo is not shown on the screen<br />
Line 9: adjustment for evaluation:<br />
bEvalByStartNumber=0 pre adjustment for manual evaluation<br />
bEvalByStartNumber=1 pre adjustment for start number evaluation<br />
Line 10: To activate the F3-Button to start three races parallel<br />
bActivateMoreRaces=0 Button is not activated. You can start only one race<br />
bActivateMoreRaces=1 You can start up to three races in parallel: Button <br />
bActivateMoreRaces is only allowed on 1 if you use a PC with 486/DX2-66 or higher. The<br />
hard disk needs a 32 bit file access (PCI bus or Local bus). If you do not have this configuration<br />
it may cause problems during recording if you set on 1.<br />
Line 12: no changes are allowed<br />
Line 13: path for this file (szBootFile) must be correct (adjustment automatically through installation)<br />
Line 14: empty<br />
Line 15: empty<br />
Line 16: info line<br />
Line 17: no changes are allowed<br />
Line 18: no changes are allowed<br />
Line 19: no changes are allowed<br />
Line 20: no changes are allowed<br />
Line 21: Adjustment of the camera type:<br />
bLC1912=0 camera type LC1911 with 512 pixel<br />
bLC1912=1 camera type LC1912 with 1024 pixel<br />
Line 22: Camera Interface OCI1sw adjustment<br />
bCamInterface1995=1 type starting 1995<br />
bCamInterface1995=0 type before 1995<br />
Line 23: recorded lines before the competitor triggers the photocell<br />
nLines<strong>Be</strong>fore=160 Company adjustment is 160 lines. You can adjust this value between<br />
48 and 500 lines)<br />
Line 24: recorded lines after the competitor leaves the photocell<br />
nLinesAfter=120 Company adjustment is 120 lines. You can adjust this value between<br />
48 and 500 lines)<br />
Line 25: empty<br />
Line 26: info line<br />
Line 27: info line<br />
Line 28: info line<br />
Version: E-96-01-03A Page 15
OPTI 1sw Page 16<br />
Line 29: Adjustment of the maximum bitmap length: As longer as you make the bitmap, as longer it<br />
takes to load a picture.<br />
picture with 514 pixel: 1400 to 4000 lines per bitmap<br />
picture with 768 pixel: 1400 to 3000 lines per bitmap<br />
picture with 1024 pixel: 1400 to 2000 lines per bitmap<br />
nMaxImage=2000 company adjustment<br />
Line 30: the cable length for cable 098 (between ODB1 and OCI1) must be correct:<br />
nCableLength=30 cable length is 30 m<br />
nCableLength=20 cable length is 20 m<br />
nCableLength=15 cable length is 15 m<br />
nCableLength=10 cable length is 10 m<br />
nCableLength=5 cable length is 5 m<br />
Line 31: total recording time of a race, adjustable from 1 to 10<br />
nRecFactor=1 for 512 pixel and 1/1000 sample time you can record 30 seconds<br />
nRecFactor=0 for 412 pixel and 1/1000 sample time you can record 5 minutes<br />
(30 sec x 10 = 300 sec = 5 min)<br />
Line 32: default setup for the amount of pixel read from the camera:<br />
nDefaultPixel=512 for OPTI systems with camera OLC1sw and OLC2sw<br />
nDefaultPixel=1024 for OPTI systems with camera OLC2sw<br />
Line 33: to activate the RS232 interface of the ODB1 to read data from a wind aneometer<br />
bWindMeter=0 you will not receive data through the ODB1 RS232 interface<br />
bWindMeter=1 you can receive wind-data through the ODB1 RS232 interface. For<br />
the aneometer of Nordic and Gill Instruments we need to modify the<br />
ODB1.<br />
Line 34: empty<br />
Line 35: info line<br />
Line 36: Adjustment if the program uses the programmed list head or if you use your own list head:<br />
bLoadListHead=0 programmed list head is used<br />
bLoadListHead=1 list head from line 24 to 31 is used<br />
Line 37: szRank=XXXX You can input a name instead of the X (max. 4 characters)<br />
Line 38: szTime=XXXX You can input a name instead of the X (max. 4 characters)<br />
Line 39: szStNr=XXXX You can input a name instead of the X (max. 4 characters)<br />
Line 40: szLane=XXXX You can input a name instead of the X (max. 4 characters)<br />
Line 41: szLastName=XXXXXXXXXXXX You can input a name instead of the X (max. 12<br />
characters)<br />
Line 42: szSurName=XXXXXXXXXXXX You can input a name instead of the X (max. 12<br />
characters)<br />
Line 43: szClub=XXXXXXXXXXXX You can input a name instead of the X (max. 12 characters)<br />
Line 44: szYear=XXXX You can input a name instead of the X (max. 4 characters)<br />
Version:E-96-01-03A Page 16
2.5. Setup of the devices:<br />
The maximum distance between PC and camera is 30 Meter.<br />
OPTI 1sw Page 17<br />
Version: E-96-01-03A Page 17
2.6. Setup of the OPTI Line Scan Camera OLC1sw:<br />
Positioning of the camera:<br />
OPTI 1sw Page 18<br />
The camera must be placed exact in the plane of the finish line. The distance between the camera<br />
and the track depends on the amount of lanes and the overall width of the track. The camera should<br />
have an angle of 20 o to the track with the furthest distance.<br />
Version:E-96-01-03A Page 18
OPTI 1sw Page 19<br />
The following table tells you witch distance the camera needs for a track stadium with 6 or 8 tracks.<br />
For a good camera position, this means a good angle to see the athletes you need to follow the<br />
instructions below.<br />
- never use a lower angle than 20 o from the track with the most distance to the camera<br />
(see picture on the page before).<br />
- all tracks must be covered by the lens (you must see all tracks and a athlete on the outside<br />
track on the picture).<br />
The following graphs are only valid for the objective supplied by ALGE (12,5 -75 mm, 1:1,2).<br />
"yes" in the graph means that the camera position with the shown horizontal and vertical distance is<br />
good.<br />
"no" in the graph means that the camera is not in a good horizontal or vertical distance. You cannot<br />
show all tracks or you have a very flat angle.<br />
A "?" in the graph means that it will be difficult to show all 6 or 8 tracks in the picture (the angle of<br />
25 o might be too small).<br />
A "W" in the graph means, that you will be a little bit bellow the recommended angle of 20 o from the<br />
outside track to the camera.<br />
Stadium with 6 lanes:<br />
vertical b<br />
Stadium with 8 lanes:<br />
vertical b<br />
horithontal a<br />
6 tracks 5 m 6 m 7 m 8 m 9 m<br />
5 m yes (?) yes yes (W) no no<br />
6 m yes (?) yes yes yes yes<br />
7 m yes (??) yes (?) yes yes yes<br />
8 m yes (?) yes (?) yes yes yes<br />
horithontal a<br />
8 tracks 6 m 7 m 8 m 9 m 9 m<br />
6 m yes (??) yes(?/W) no no no<br />
7 m no yes (?) yes yes yes (W)<br />
8 m no yes (?) yes yes yes<br />
9 m no yes (?) yes yes yes<br />
Version: E-96-01-03A Page 19
Alignment of the Camera for an athletic track:<br />
OPTI 1sw Page 20<br />
The finish line must be painted correct on the track. The intersection between finish line and track<br />
borders must be black (see drawing below). This black mark is absolutely necessary, in order to see<br />
the border between the lanes on the monitor and print out. On the monitor you see the line white<br />
and the border black. If this is not the case, you do not record the finish line and you have to adjust<br />
the camera again.<br />
If you have the camera correct adjusted it must show the following picture in the mode "camera<br />
settings".<br />
track border<br />
border track 1 and 2<br />
border track 2 and 3<br />
border track 3 and 4<br />
border track 4 and 5<br />
border track 5 and 6<br />
background<br />
track 1<br />
track 2<br />
track 3<br />
track 4<br />
track 5<br />
track 6<br />
The background must have a white (bright)<br />
color in order to have a good contrast to the<br />
athletes. You must make sure that you can see<br />
a athlete as well on the track 1<br />
At the monitor you see the track white and the<br />
lane borders black.<br />
Version:E-96-01-03A Page 20
Camera adjustments:<br />
OPTI 1sw Page 21<br />
- setup camera (e.g. on a tripod)<br />
- setup all components of the OPTI system (PC, ODB1sw, OCI1sw, OLC1sw, NLG4, NBO1)<br />
- connect all components with the proper cable<br />
- supply all components with power<br />
- turn PC on and start WINDOWS<br />
- start program ALGE OPTI<br />
- click with the mouse on "OPTIONS"<br />
- click with the mouse on "camera settings"<br />
- the monitor shows the picture shown below<br />
You can adjust the following at the camera lens:<br />
Zoom Lens Cosmicar<br />
12.5-75 mm, 1:1.2<br />
iris<br />
zoom<br />
focus<br />
Version: E-96-01-03A Page 21
OPTI 1sw Page 22<br />
In order to make a sharp pictures you must make the following adjustments in the software and at<br />
the camera lens.<br />
Adjustment of the sample time:<br />
You can adjust the sample time of the camera between 100 and 1500 lines per second.<br />
Adjustable sample times:<br />
1/1500 ........ 1500 lines per second (only with 512 pixel)<br />
1/1400 ........ 1400 lines per second (only with 512 pixel)<br />
1/1300 ........ 1300 lines per second (only with 512 pixel)<br />
1/1200 ........ 1200 lines per second (only with 512 and 768 pixel)<br />
1/1100 ........ 1100 lines per second (only with 512 and 768 pixel)<br />
1/1000 ........ 1000 lines per second<br />
1/900 .......... 900 lines per second<br />
1/800 .......... 800 lines per second<br />
1/700 .......... 700 lines per second<br />
1/600 .......... 600 lines per second<br />
1/500 .......... 500 lines per second<br />
1/250 .......... 250 lines per second<br />
1/100 .......... 100 lines per second<br />
To receive a good picture for athletic sprints you should use 1/1000 lines per second. For<br />
long distance races it is good to about 1/800. If you want to save space on your hard disk use<br />
a longer sample time.<br />
With 1/1500 and 1/1400 it is only possible to work with a shorter cable 098-05. The cable with<br />
30 meter does not work with this transmission speed. The correct cable length must be<br />
adjusted in the OPTI.INI (see point 2.4.).<br />
If you use 1024 pixel from the camera it is not possible to use a faster sample time than<br />
1/1000.<br />
Adjustment of the Pixel-Amount:<br />
When using a camera with 1024 pixel, it is possible to<br />
choose between a resolution of 1024 or 512 pixel.<br />
1024 Pixel: High resolution, high memory use<br />
maximum 1/1000 sample time with 5 m cable 098-05<br />
maximum 1/700 sample time with 30 m cable 098-30<br />
768 Pixel: Medium resolution, medium memory use<br />
maximum 1/2000 sample time with 5 m cable 098-05<br />
maximum 1/900 sample time with 30 m cable 098-30<br />
512 Pixel: Low resolution, low memory use<br />
maximum 1/1500 sample time with 5 m cable 098-05<br />
maximum 1/1300 sample time with 30 m cable 098-30<br />
Version:E-96-01-03A Page 22
Adjustment of the Iris:<br />
OPTI 1sw Page 23<br />
Adjust the iris of the lens until the picture in the bar has enough light. It is also possible to<br />
increase the brightness by using the gain.<br />
Adjustment of the Gain:<br />
You can increase the brightens electronically, it you have not enough light.<br />
Adjustment of the gray level:<br />
1 ....... gain 1 (no electronically gain)<br />
2 ....... gain 2 (few electronically gain)<br />
3 ....... gain 3 (medium electronically gain)<br />
4 ....... gain 4 (maximum electronically gain)<br />
If you adjust the iris and gain correct it should show the<br />
following picture.<br />
maximal gray level: at the far end of the field<br />
medium gray level: middle position of the field<br />
minimum gray level: at the beginning of the field<br />
If it shows a red bar, it means it is too much light. You<br />
must reduce the iris or gain.<br />
Adjustment of the focus:<br />
You must adjust the focus that it shows you a sharp picture. This means you should see now<br />
the lanes sharp and clear.<br />
Adjustment of the Zoom:<br />
Adjust the zoom that you can see all lanes and all athletes running on the lanes.<br />
If you finished your camera adjustment, it is necessary to make a test and record a finish arrival with<br />
athletes on all tracks (especially the inside and outside track). Develop the picture and make an<br />
evaluation. Check if you can see all athletes on the picture and if the picture is sharp.<br />
Version: E-96-01-03A Page 23
OPTI 1sw Page 24<br />
3. SOFTWARE<br />
The software of the OPTI 1sw runs only with Windows 3.1 or higher. Knowledge about Windows is<br />
necessary to run the OPTI-software. You need a mouse to operate the software.<br />
5<br />
6<br />
7<br />
1 2 3 4<br />
1 ..... menu list<br />
2 ..... Information list<br />
3 ..... File name of the race<br />
4 ..... Competitor list (you can open it to its full size)<br />
5 ..... Race information<br />
6 ..... Function symbols<br />
7 ..... Area for the finish image<br />
Version:E-96-01-03A Page 24
3.1. Function symbols:<br />
OPTI 1sw Page 25<br />
The most important functions are available as function symbols. You activate this when you click on<br />
the symbol. All of this functions are also available in the menu list.<br />
neutral setup<br />
manual or automatic time transfer<br />
time by start number<br />
Lane identification (evaluation with tracks)<br />
Load (open a file)<br />
Save<br />
Zoom<br />
Start<br />
Activate (activate or deactivate recording)<br />
Print<br />
Competitor list<br />
Race Information<br />
Show next image<br />
Show previous image<br />
Version: E-96-01-03A Page 25
3.2. Menu List:<br />
OPTI 1sw Page 26<br />
When you click on a word in the menu list it opens the menu. You can choose between the following<br />
themes in the menu list:<br />
3.3. Menu:<br />
If you click on a name in the menu list, it opens the menu. Each point of the menu you can click with<br />
the mouse , if this point is active and written in black. If it is written in grey, it is not active at this<br />
time.<br />
File<br />
New make a new race<br />
Load load a evaluated race or a prepared race<br />
Save store a race file<br />
Export competitor list ... store the competitor list<br />
Import competitor list ... load the competitor list<br />
Start ... F2 makes the system ready for a start<br />
Start F3 makes the system ready for 3 starts<br />
Activate ... F4 activate or deactivate the camera<br />
Print print competitor lists or images<br />
Exit Exit the program<br />
Info ... Information about the program ALGE OPTI 1sw<br />
Work<br />
Race-Information... input or correct the race information<br />
Competitor list... input of the competitor list<br />
Lane identification input for lane identification<br />
Image<br />
Zoom zoom image<br />
Brightness/Contrast... adjustment of brightness and contrast<br />
Direct image selection... direct selection of an image of the actual race<br />
Mirror mirror of an image<br />
Stretch to client it shows the complete image (bitmap) on the screen<br />
Complete picture it shows the image with all pixel in the height<br />
Image cropping to mark a part of the image to print it<br />
Version:E-96-01-03A Page 26
Screen<br />
OPTI 1sw Page 27<br />
Time line Time line is active<br />
Data service Lowest line shows system data for maintenance<br />
Timing window Window that shows the time of the time line digital<br />
Results board Window that shows the competitor list<br />
Show logo shows logo in the picture of the screen<br />
Options<br />
Manual time transfer manual time transfer to the competitor list<br />
Lane time transfer automatic time transfer to the competitor list by lanes<br />
Bib time transfer evaluation with bib number<br />
Arrival from right competitors arrive from the right side<br />
Arrival from left competitors arrive from the left side<br />
Evaluation to COMM port when making the result list it transmits the data to the COM port<br />
Sending competitor list all data form the competitor list are transmitted through the COM port<br />
Color of time line... color setup for time line<br />
Precision adjustment of the precision used in the competitor list<br />
Camera settings... adjustment of the camera<br />
Start options<br />
Competition used for competitions<br />
Test start used for test of the system before a competition<br />
Version: E-96-01-03A Page 27
3.4. Orders of the Menu:<br />
Activate ... F4 File<br />
OPTI 1sw Page 28<br />
You can deactivate the recording before the start, this means an impulse of the photocell<br />
will not record a image. The system will start to record an image until you activate<br />
the system.<br />
Use the deactivation if the competitors pass the finish line, but you do not want to<br />
record them.<br />
e.g.: 800 m in track: each competitor must run two laps, this means the first arrival at<br />
the finish line you do not want to record, but the second (finish arrival) you want to<br />
record.<br />
Bib time transfer Options<br />
See chapter 6.4.3. on page 48<br />
Brightness/Contrast Image<br />
Camera settings Options<br />
see page 18 to 23<br />
Color of time line Options<br />
When you load a picture and the<br />
brightness and the contrast is not<br />
good enough, try to correct it by<br />
moving the bar. On the screen you<br />
see at once the corrected picture.<br />
You can choose between the following colors for<br />
the time line:<br />
- red - purple<br />
- blue - turquoise<br />
- green - white<br />
- yellow - black<br />
Version:E-96-01-03A Page 28
Coming from left Options<br />
OPTI 1sw Page 29<br />
Adjustment for the arrival direction. You must adjust the correct arrival direction when it is<br />
necessary to read e.g. start numbers.<br />
Coming from right Options<br />
Adjustment for the arrival direction. You must adjust the correct arrival direction when it is<br />
necessary to read e.g. start numbers.<br />
Competition Start options<br />
You can choose between "Competition" and "Test start". Competition is automatically active.<br />
This is what you need to time and record a race.<br />
Competitor list... Work<br />
Click on the competitor list button to input the competitor list :<br />
Start number: numeric input,<br />
max. four digits<br />
Lane: numeric input,<br />
max. four digits<br />
Name: alphanumeric input,<br />
max. 14 characters,<br />
printed always with<br />
capital letters<br />
Surname: alphanumeric input,<br />
max. 11 characters,<br />
printed always with a capital letters at the beginning<br />
Club/Nation: alphanumeric input, max. 14 characters,<br />
printed always with a capital letters at the beginning<br />
Age: numeric input, max. 4 characters<br />
- with the tab-key you move to the next field<br />
- with the return-key you input the data on the screen to the competitor list<br />
- the cursor jumps in the first field<br />
- you can write over the fields for the next competitor<br />
- click on "New" when you have input all competitors<br />
Correct or Delete Competitor Data:<br />
If you want to change the competitor data, you must double-click in the competitor list at the<br />
left side of the competitor. The input field of the concerning competitor opens and you can<br />
write over the wrong data or delete the competitor.<br />
Version: E-96-01-03A Page 29
Complete picture Image<br />
OPTI 1sw Page 30<br />
"Complete picture" makes it possible to show the complete picture (bitmap) in vertical direction<br />
on the screen. In the standard mode you have to move the picture with the scroll bar in<br />
vertical direction.<br />
Each picture (bitmap has 512 pixel vertically. The percentage that it shows on the monitor<br />
depends on the graphic board of the PC and the "Microsoft Windows Setup".<br />
Data service Screen<br />
The "data service" is used only for testing in the ALGE factory. If you activate the data service<br />
it shows on the bottom line different system data instead of information.<br />
Direct image selection... Image<br />
If you record longer than 2 seconds, it will put the image on more bitmap (pictures). The<br />
actual picture number it shows always in the information list at the right side.<br />
e.g.: Picture: 1/5 there are five pictures (bitmap) and it shows right now the first picture.<br />
If you input the picture number you can jump direct e.g. from the first picture to the fifth.<br />
Exit File<br />
Exit from the OPTI program back to Windows.<br />
Evaluation to COMM port Options<br />
Every time when you transfer a time with the right mouse button to the competitor list it<br />
transmits the data to the COM1 or COM2 of the PC. You can adjust the interface in the<br />
COMM.INI file. The output must be activated in the OPTI.INI file (see page 13).<br />
Export competitor list... File<br />
You can input, save, and export the competitor list in advance. If you input it in advance, it<br />
prevents you from creating the list during the race. When you export the competitor list you<br />
must input a name.<br />
Image cropping Image<br />
You can select a detail of an image to print it.<br />
Click with mouse on "Image cropping". Move mouse to a corner of the detail that you want to<br />
print and press the left mouse button. Move the mouse to the opposite side of the detail and<br />
release the left mouse button. The detail is now marked. It shows the measurements in the<br />
middle of the detail. Store the detail by pressing the right mouse button.<br />
In the menu "Print" you can print the cropped image.<br />
Version:E-96-01-03A Page 30
Import competitor list... File<br />
OPTI 1sw Page 31<br />
You can import a competitor list into a race that you prepared before. It is also possible to<br />
create the competitor list on Microsoft Excel and import it.<br />
<strong>Be</strong>fore you start the race or after you evaluate the picture you can import a competitor list.<br />
This prevents you from making the competitor list during the race.<br />
It is also possible to import competitor lists from a old race into a new race.<br />
Info File<br />
Information about the ALGE OPTI software (program version).<br />
Lane identification Work<br />
Input the lane number for an automatic evaluation. This means you input the lanes<br />
from the top to the bottom. With the mouse you go to the border of the furthest lane<br />
and press the right mouse button. A window opens and you must input the lane<br />
number. Click on "OK" or press the "Return"-key.<br />
See as well point 6.4. on page 47.<br />
Lane time transfer Options<br />
See chapter 6.4.2 on page 47.<br />
Load File<br />
To load a stored race from the hard disk or a floppy (old race, prepared race with start list)<br />
The work directory that you installed during the<br />
installation c:\ALGE\WORK is shown automatically.<br />
If you want to load a file form another<br />
drive or file you must adjust it here. All files<br />
which you can load in the active directory are<br />
shown on the left side (it must be a RAC file).<br />
All info files made by the OPTI have as extension RAC. You need to start this file to load a<br />
race. A complete race has a minimum of four files:<br />
*.RAC ................... info file for the complete race<br />
*.BMP ................... image file(s)<br />
*.TXT .................... text file, that includes the competitor list. You can import or export this file<br />
with Microsoft EXCEL.<br />
*.TF ...................... file with stores the time.<br />
This files will be stored in the directory C:\ALGE\WORK (if you have the standard setup).<br />
Version: E-96-01-03A Page 31
Manual time transfer Options<br />
See chapter 6.4.1. on page 47.<br />
Mirror Image<br />
OPTI 1sw Page 32<br />
You can mirror each picture. A mirror picture has the time line (x-direction) into the opposite<br />
direction.<br />
original picture mirror picture<br />
New File<br />
If you want to start a new race, you must click on "New".<br />
This opens a window and you must input the name for the<br />
race (max 6 digits).<br />
Precision Options<br />
You can adjust the precision to 1/10, 1/100 or 1/1000<br />
seconds. You make the adjustment by clicking on the<br />
circle next to the value that you want to adjust.<br />
If you have a sample time of 1/100 you can only<br />
choose between a precision of 1/10 or 1/100.<br />
If you have a manual start (manual start with mouse or keyboard) it takes automatically a<br />
precision of 1/10 seconds. In this case it is impossible to change to a higher precision (law of<br />
the IAAF, International Amateur Athletic Federation).<br />
Version:E-96-01-03A Page 32
Print File<br />
You can print the following lists or<br />
pictures:<br />
o Start list:<br />
Start list which you print before<br />
the race (example on page 60)<br />
o Results list: Ranking list with<br />
competitors of the race<br />
(example on page 62)<br />
o Results list by lane: Ranking list<br />
of race sorted by lane<br />
(example on page 64)<br />
o Times taken by photocell:<br />
Prints all photocell times<br />
(example on page 66)<br />
OPTI 1sw Page 33<br />
o Image:<br />
Prints the image. It is possible to print the image with time line and time or without.<br />
- Image with time:<br />
all times which are listed in the competitor list are shown on the printed image<br />
(example on page 68)<br />
- Image without time:<br />
it prints just the image without time (example on page 69)<br />
- Cropped image with time:<br />
A cropped picture (see page 30) will be printed (example on page 70).<br />
- Cropped image without time:<br />
A cropped picture (see page 30) will be printed (example on page 71).<br />
Race-Information... Work<br />
The race information describes a race. The race information is also printed in the head of<br />
each list. You can input the race information for each separate race or leave it for all races<br />
the same.<br />
Event:<br />
max. 47 alphanumeric characters<br />
City of event:<br />
max. 27 alphanumeric characters<br />
Discipline:<br />
max. 47 alphanumeric characters<br />
Competition Number:<br />
max. 3 numeric characters<br />
Version: E-96-01-03A Page 33
OPTI 1sw Page 34<br />
Race Number:<br />
max. 3 numeric characters, the number will be increased automatically by one as soon<br />
as you input a new name for a race.<br />
Wind (m/s):<br />
You can input the wind data after the race. The wind data needs a (+) or (-) before the<br />
numeric value. The value consists always of two digits, separated by a decimal point.<br />
Results board on/off Screen<br />
If you use the function "Complete picture" it is possible to move the competitor list all over the<br />
screen. You move the competitor list by moving with the mouse into the middle of the window.<br />
Now press the left mouse button and move the window to the position you like.<br />
You can fade out the competitor list, if the "Complete picture" is active. To fade out the competitor<br />
list press on "Result board on/off". To fade in the competitor list click on "Result board<br />
on/off" again or click on "Complete picture".<br />
Save File<br />
It is possible to store the actual data of the race any time. As file name it takes always the<br />
name that you must input to prepare a race. If you have not input a name by now it will ask<br />
you automatic to input the file name (e.g. when you prepare a competitor list).<br />
The file name can have a maximum of 6 alphanumeric figures.<br />
Sending the competitor list Options<br />
The transmission of the complete result list through COM1 or 2. You can adjust the interface<br />
in the COMM.INI file. The output must be activated in the OPTI.INI file (see page 14 and 17).<br />
Show logo Screen<br />
You can show the ALGE logo in the centre of the picture at the monitor. In order to show the<br />
logo you must activate the logo in the OPTI.INI file (bShowLogo=1). If you have it on zero, it<br />
deactivate the logo. The logo is shown as soon as you have the mouse in the picture area.<br />
Version:E-96-01-03A Page 34
Start ... F2 File<br />
OPTI 1sw Page 35<br />
<strong>Be</strong>fore you start a new race, you must activate the start dialogue. You can activate the<br />
"Start...F2" by pressing the F2 key, clicking with the mouse on the "F2"-button", or use the<br />
menu.<br />
Status: Tells if the time is already started or not.<br />
Run time: Shows the run time. Each stop impulse (photocell) stops the run time.<br />
It is possible to show the running time again, by clicking on "Running<br />
GAZ" with the mouse (e.g. after an intermediate time).<br />
Rest recording time: Shows the time remaining in seconds that you can record.<br />
Gain: You can increase the brightness electronically (see page 23)<br />
Difference: Difference of the brightness in % to the previous camera adjustment. If the<br />
difference is higher than 30% the frame of the window starts to blink. The<br />
actual picture is shown on the left side of the window.<br />
Evaluation: Click on this button to show the picture after the last competitor arrived at<br />
the finish. When you press this button, you cannot record another athlete.<br />
Manual start: Click on this button to make a manual start. If you make a manual start<br />
it takes automatically the precision of 1/10 seconds.<br />
Running GAZ: Click on this button to show the running time again (screen and display<br />
board). You need this option e.g. for long distance races with intermediate<br />
time.<br />
Time offset: You can input any time (hours, minutes, seconds) and start the clock<br />
form this time (instead of zero). You can use it to synchronize the<br />
OPTI with other timing devices.<br />
Activate: If you deactivate the recording, you can click on this button to activate<br />
the recording again (see on page 28, Activate F4).<br />
False start: Click on this button after a false start. The clock goes on 00:00.000<br />
and the system is ready for the start.<br />
Cancel: Cancel the Start mode by clicking on this button. Cancel is only possible,<br />
if you have not recorded a image.<br />
Version: E-96-01-03A Page 35
Start 3 Races F3 File<br />
OPTI 1sw Page 36<br />
If you press the key you can start up to three different races before you evaluate.<br />
This is very important for rowing and canoeing competitions. This mode can also increase the<br />
evaluation and start procedure for athletic.<br />
Up to three races are started:<br />
<strong>Be</strong>fore one race ends you can start two other races. It is also possible to evaluate races<br />
when other races are running.<br />
Evaluation while an other race starts:<br />
You can evaluate a race, and during the evaluation another race will start. This function may<br />
increase breaks between the end of one race and the start of the next race (manly used for<br />
long distance races in athletic).<br />
If you press the key it shows the following picture on the screen:<br />
The OPTI is now ready for the start:<br />
The different functions you can see in chapter 5.2. on page 42.<br />
Stretch to client Image<br />
You have to input or load the first three race<br />
names (file names). Click the button "OK" after the<br />
input.<br />
If you click on "stretch to client" it shows the complete picture (bitmap) on the screen (Attention:<br />
the image may consist of more than on picture). This function is for orientation only. It is<br />
not possible to take a time in this mode.<br />
Version:E-96-01-03A Page 36
Time line Screen<br />
OPTI 1sw Page 37<br />
For the evaluation you need to have this mode active. This mode shows you the time line and<br />
the time (digital) on the screen, as soon as you click on the image.<br />
Test start Start options<br />
You can choose between "Competition" and "Test start". Pre adjusted is always "Competition".<br />
If you activate "Test start" it switches automatically after the evaluation of the test start<br />
back on "Competition".<br />
Use "Test start" to proof the system before the competitors start.<br />
Timing window on/off Screen<br />
The time is shown at the left side of the information list. If you want<br />
to show the time in a separate movable window activate the timing<br />
window. Now you see a window with the time on the screen. This<br />
window you can move all over the screen.<br />
Attention: The time window shows no time until you move the time line. The precision of the<br />
timing window depends of the adjustment of the "Precision" in the menu "Options".<br />
Zoom Image<br />
It is possible to zoom any picture. The zoom factor is 2, 4 or 8. It is possible to show the time<br />
line and time as well in the zoom mode.<br />
- Click on the magnifier glass (Zoom, function symbol)<br />
- Move the mouse to the position that you want to zoom<br />
- Press the left mouse button to enlarge<br />
- Press the right mouse button to reduce (smallest picture is original)<br />
- To show the time line in an enlarged picture you need to return into the "time line" mode.<br />
Version: E-96-01-03A Page 37
OPTI 1sw Page 38<br />
4. PREPARE A RACE<br />
<strong>Be</strong>fore you start to record a race it is useful to prepare the race. You should input the file name, race<br />
information, and competitor list. If you input this data, you will have it easy to make evaluation quick<br />
and print the complete result lists.<br />
4.1. File Name of the Race:<br />
You need input a name for each race. This name is allowed to have a maximum of 6 characters.<br />
The program asks automatically to input the file name, when you click on "New" in the menu "File",<br />
when you load the first time the "Race information", or when you click on the "Start F2" button. It<br />
shows the file name always in the top line next to ALGE OPTI.<br />
4.2. Race Information:<br />
Input the race information. You can input everything in advance, except the wind data (see page 33).<br />
4.3. Competitor List:<br />
You should input the competitor list before the race. All necessary information about each competitor<br />
you must input (see page 29).<br />
Version:E-96-01-03A Page 38
You can record races in two ways:<br />
OPTI 1sw Page 39<br />
5. RECORD A RACE<br />
- Start F2: you can record each race complete independent<br />
- Start 3 Races F3: You can make up to three races at the same time. The evaluation is<br />
possible when other races are running.<br />
5.1. Start F2:<br />
If you have the race prepared in advance, you must load it (see Load on page 31).<br />
To record a race you need to click on the "F2" button (function symbol) or press the F2-key. Now it<br />
opens the following window:<br />
5.1.1. Status:<br />
It may show the following text:<br />
<strong>Be</strong>fore the start: Wait for start impulse...<br />
After the start: Start detected<br />
After a stop impulse: Display board is stopped!<br />
After you click on the button "Running GAZ": Display board is running!<br />
After you click on the button "False start": False start confirmed<br />
5.1.2. Run Time:<br />
Here it shows the running time. The precision shown depends on the adjusted precision (see page 32).<br />
<strong>Be</strong>fore the start it shows the time zero. After the start impulse you see a running time. After the first<br />
stop impulse (photocell or hand switch) it stops the time and shows the run time. If you want to<br />
show the running time again click on "Running GAZ".<br />
5.1.3. Rest Recording Time:<br />
This shows you how long you can record a race. You can record up to 30 seconds (maximum 10<br />
seconds continues operation (without recording interruption)).<br />
Version: E-96-01-03A Page 39
5.1.4. Gain:<br />
OPTI 1sw Page 40<br />
After the start you can change the gain to adjust the brightens. Preferable you should you the iris to<br />
control the brightness. If possible use gain only on position 1 or 2. The actual picture is shown on<br />
the left side of the window. As soon as the system starts recording it locks the gain.<br />
5.1.5. Difference:<br />
It shows the difference of the actual brightness conditions compared to the camera setup conditions.<br />
The shows the value in percent. Darker conditions it shows negative, brighter positive. If the<br />
chance of the brightness is more than 20% it beeps and the window starts to blink. The picture at<br />
the left side of the window shows the actual picture form the camera. This allows you to adjust the<br />
camera even after the start.<br />
5.1.6. Start Time:<br />
You can start a race from zero or from any time that you input. To input<br />
a start time click with the mouse on "Time offset". It opens a new<br />
window where you input the time:<br />
- input the time with the keyboard<br />
- change from hours to minutes or seconds with <br />
- if you have set the correct time click with the mouse on OK.<br />
5.1.7. Manual Start:<br />
It starts the time, If you click on the button "Manual start". Since a manual start is never very precise,<br />
it has always a precision of 1/10 seconds. This is a IAAF rule.<br />
5.1.8. False Start:<br />
If there is a false start, you can reset the clock to zero by clicking on "false start". The system asks if<br />
you want to confirm the false start and sets the clock to zero for a new start.<br />
5.1.9. Running GAZ:<br />
If you click on the button "Running GAZ" when the time stops, it shows the running time again. The<br />
time shown in the "F2" menu is always shown on the display board.<br />
5.1.10. Activate:<br />
If the field "Activate" is active, the recording was deactivated with the "F4" key before the race. As<br />
long as the recording is deactivated it will not record with a stop impulse. As soon as you click on<br />
"Activate" it is ready to record and will record a finish arrival controlled by the next stop impulse.<br />
The condition of the recording "Activate" or "Deactivate" is always shown in the race information on<br />
the screen.<br />
Version:E-96-01-03A Page 40
5.1.11. Recording:<br />
OPTI 1sw Page 41<br />
The recording is controlled by a stop impulse. As device controlling the recording you can use a<br />
photocell or hand switch.<br />
The photocell has the advantage of a precise recording. It records only if somebody interrupt the<br />
photocell. This guarantees short recording times, which means that it does not need much space on<br />
the hard disk. The evaluation is also faster if you have short files.<br />
The recording starts automatically 0.160 seconds before the beginning of an stop impulse (pre<br />
recording time) and ends 0.09 seconds after the end of an stop impulse (after recording time)<br />
(sample time is 1/1000). It records every stop impulse until you click on the "Evaluation" button or 30<br />
seconds of the rest recording time are full.<br />
After the 2nd photocell impulse it continues to record, because the recording break is shorter than<br />
the pre recording time and the after recording time.<br />
5.12. Evaluation:<br />
stop impulse<br />
recording on<br />
the hard disk<br />
See page 46, chapter 6. Evaluation<br />
no photocell impulse<br />
photocell impulse<br />
recording<br />
no recording<br />
time<br />
Version: E-96-01-03A Page 41
5.2. Start 3 Races:<br />
OPTI 1sw Page 42<br />
If you press the key you can start up to three different races before you evaluate.<br />
This is very important for rowing and canoeing competitions. This mode can also increase the<br />
evaluation and start procedure for athletic.<br />
Up to three races are started:<br />
<strong>Be</strong>fore one race ends you can start two other races. It is also possible to evaluate races when other<br />
races are running.<br />
Evaluation while an other race starts:<br />
You can evaluate a race, and during the evaluation another race will start. This function may increase<br />
breakes between the end of one race and the start of the next race (manly used for long<br />
distance races in athletic).<br />
If you press the key it shows the following picture on the screen:<br />
The OPTI is now ready for the start:<br />
You have to input or load the first three race<br />
names (file names). Click the button "OK" after the<br />
input.<br />
Using the F3-Window<br />
is always very complex.<br />
You must always<br />
control very careful<br />
that its starts and<br />
records the correct<br />
race. If it is possible<br />
use the F2-window,<br />
because it is much<br />
easier to operate and<br />
not has not so many<br />
possibilities to make<br />
mistakes.<br />
Version:E-96-01-03A Page 42
5.2.1. Races:<br />
OPTI 1sw Page 43<br />
This is the control field for the start and finish. You must set, which race starts next (S1, S2, or S3),<br />
and the race that you want to record (F1, F2, or F3). Each race has a clock which starts with the<br />
start of the race. Next to the finish pointer it has a field showing the status of the race and the race<br />
name (file name).<br />
Status of races:<br />
is ready: Race is loaded, but not started. Start pointer is set for another race.<br />
is waiting for start impulse: Race is loaded, but not started. Start pointer is set for this race.<br />
is started: Race is started, but not recorded.<br />
has recorded: Race has a recorded finish arrival.<br />
Race name: It shows the race name (file name) at the left side of each status line<br />
(see picture above e.g. Race1, Race2, Race3).<br />
Start pointer (S1, S2, S3): The start pointer shows, which race starts next. If you have a false<br />
start, you need to set the start pointer on the race with the false<br />
start. The start pointer jumps after each start to the next race that is<br />
not started.<br />
Record pointer (Z1, Z2, Z3): The record pointer shows for which race it records. After it records, it<br />
is not possible to move the record pointer to another race, until you<br />
press "Evaluation". You can select only started races.<br />
Running time: It shows the running time for each race in the three field below<br />
"Races". After each photocell impulse it stops the time. If you press<br />
the button "Running GAZ" it shows again the actual running time.<br />
5.2.2. Rest recording time:<br />
Shows the time remaining in seconds that<br />
you can record.<br />
You can record with 512 pixel and 1000 lines per second between 30 and 300 seconds (depending<br />
on the adjustment of the OPTI.INI file). The continuous recording time (without recording interruption)<br />
is about 24 seconds.<br />
5.2.3. Gain:<br />
You can adjust the brightness electronically, but is possible use the iris of the lens to adjust the<br />
brightness. If possible use the gain never on three or four (poorer picture quality). It always shows the<br />
actual picture on the left side.<br />
Version: E-96-01-03A Page 43
5.2.4. Difference:<br />
OPTI 1sw Page 44<br />
Difference of the brightness in % to the previous camera adjustment. If the difference is higher than 30%<br />
the frame of the window starts to blink. The actual picture is shown on the left side of the window.<br />
5.2.5. Status:<br />
<strong>Be</strong>fore the start: Wait for start impulse...<br />
After the start: Start detected<br />
After a stop impulse: Display board is stopped!<br />
After you click on the button "Running GAZ": Display board is running!<br />
After you click on the button "False start": False start confirmed<br />
5.2.6. Reload:<br />
If it shows an X in this field you must load a new file for every evaluation. If you click on this field the X<br />
will disappear. This means that it does not reload races when you make the evaluation.<br />
5.2.7. Prepare:<br />
If you click on evaluation you have to input or load the file name for a new race. You can input this file<br />
name in advance by clicking on prepare.<br />
5.2.8. Manual start:<br />
Click on this button to make a manual start. If you make a manual start it takes automatically the<br />
precision of 1/10 seconds (IAAF rule).<br />
5.2.9. Running GAZ:<br />
Click on this button to show the running time again (screen and display board). You need this option<br />
e.g. for long distance races with intermediate time.<br />
5.2.10. Start Time:<br />
You can input any time (hours, minutes, seconds) and start the clock<br />
form this time (instead of zero). You can use it to synchronize the<br />
OPTI with other timing devices.<br />
5.2.11. Close:<br />
If you evaluate a race, you can see in the lower left corner the F3 button with the file name and time<br />
of the next active race. If you make a double click on this button, you will come back to the F3-<br />
Window.<br />
If you want to leave the F3-Window click on "Close". To go back into the F3-Window double click<br />
the F3-button.<br />
Version:E-96-01-03A Page 44
5.2.12. False start:<br />
OPTI 1sw Page 45<br />
If you have a false start you must activate the correct race with the start pointer. Reset the clock to<br />
zero by clicking on "false start". The system asks if you want to confirm the false start and sets the<br />
clock to zero for a new start.<br />
5.2.13. Cancel:<br />
Cancel the F3-mode by clicking on this button. You can cancel the F3 mode at any time. If you<br />
have already a recorded race it will make this evaluation. It will quit a started race.<br />
5.2.14. Recording:<br />
It records always the race that you have set with the record pointer (see page 41, chapter 5.1.11.)<br />
5.2.15. Evaluation:<br />
Click on this button to show the picture, after the last competitor arrived at the finish. When you press<br />
this button, you cannot record another athlete for this race (see next page, chapter 6).<br />
Version: E-96-01-03A Page 45
OPTI 1sw Page 46<br />
6. EVALUATION<br />
If a race is recorded you can show it on the screen by clicking on "Evaluation". Depending on the<br />
type of computer it takes between 2 and 20 seconds to develop and load the picture.<br />
6.1. How do I show the different pictures on the screen:<br />
During the recording it writes all data on the hard disk (IF-file). When the race is stored on the hard<br />
disk you must develop the picture (transfer to bitmap format).<br />
If you record longer than 2 seconds it splits the image in different bitmap. Each picture (bitmap)<br />
contains about 2 second recording time.<br />
If you click on "Evaluation" in the "F2" menu it will show you the first picture on the screen. Now you<br />
can use the scroll bar to move the picture horizontally and vertically. If you want to go to the 2nd<br />
picture you click on the ¤ button. Now it loads the second picture.<br />
With the button ¥ you jump to the previous picture.<br />
In the menu "Image" you find "Direct image selection". With this function it is possible to input the<br />
picture direct. The picture number of the bitmap shown on the screen is always in the right upper<br />
corner.<br />
6.2. Time line on the Screen:<br />
If you move the mouse into the picture and press the left button of the mouse it shows the time line.<br />
You can move the time line as long as you press the left mouse button. If you want to move the time<br />
line pixel by pixel (line by line) you your the arrows of the keyboard.<br />
6.3. Timing Window:<br />
You have the possibility to choose between two was to show the time of the time line. Either it<br />
shows the time on the left side of the information list, or you open a separate window.<br />
If you want to open a separate window for the time click on<br />
"Screen" and "Timing window on/off". This timing window you can<br />
move to any position of the screen. If you have the timing window<br />
active, it will show you in the information list no time.<br />
Version:E-96-01-03A Page 46
6.4. Transfer run times into the Competitor List:<br />
OPTI 1sw Page 47<br />
There are two possibilities to transfer the run times to the competitor list:<br />
- Manual time transfer<br />
- Lane time transfer<br />
- Bib time transfer<br />
Choose the "manual time transfer" if you evaluate neither with lane, nor with bib<br />
Choose the "lane time transfer" if every competitor has its own lane (e.g. track sprint, rowing)<br />
Choose the "bib time transfer" if you evaluate with bib (e.g. cycling, horse races)<br />
6.4.1. Manual time transfer:<br />
Mark the competitor in the competitor list which you evaluate (click with mouse on left side of<br />
the competitor listing the empty field before rank; the competitor must be marked with a green<br />
point). Move the time line to the position that it shows the time of the competitor. Press the<br />
right mouse button to transfer the time to the competitor list.<br />
6.4.2. Lane time transfer:<br />
Input the lane number for auto time transfer. Input the lane number from the top to the button.<br />
Move with the mouse to the position where the top lane ends and press the right mouse<br />
button (see picture). It opens a window and you have to input the lane number. Press the<br />
"Return"-key or click on "OK". You can input a maximum of 10 lanes. It does not matter if lane<br />
1 is at the top or bottom.<br />
Click with the right mouse button on the<br />
border of the lane. It opens a window<br />
lane 1<br />
where you can input the lane number.<br />
lane 2<br />
lane 3<br />
lane 4<br />
lane 5<br />
Evaluation with auto time transfer:<br />
Move the mouse into the picture. If you press the left mouse button it moves the time lane<br />
and shows the lane number. Move the time line to the correct position. Move to the correct<br />
lane (up or down with the mouse). Press the right mouse button to transfer the time into the<br />
competitor list.<br />
Version: E-96-01-03A Page 47
6.4.3. Bib time transfer:<br />
OPTI 1sw Page 48<br />
You use "bib time transfer" if you input can read the bib numbers of each competitor (e.g. cycling,<br />
horse races, track long distance races, etc.) This mode is active if you press the third button of the<br />
function symbols.<br />
- press the left mouse button and move the time line to the first<br />
competitor<br />
- click the right mouse button<br />
- it opens a window<br />
o input bib with keyboard<br />
o click with mouse on OK<br />
- press left mouse button and move the time line to the next<br />
competitor<br />
- etc.<br />
If you cannot read a bib number:<br />
- press the left mouse button and move the time line to the competitor<br />
- click the right mouse button<br />
- it opens a window<br />
o input X with keyboard<br />
o click with mouse on OK<br />
- for this time it made now a new entry for the competitor list. This entry has only rank and bib<br />
(see picture below, last lane)<br />
- If you know the start number of the competitor at a later time, double click with the left mouse<br />
key (as shown above) to open the competitor list.<br />
- If you input the correct bib number it shown the following window if you have already a competitor<br />
in the list with the same bib.<br />
- If you click YES, it gives the time to the existing bib, and clears the new entry.<br />
Version:E-96-01-03A Page 48
Group time for cycling:<br />
OPTI 1sw Page 49<br />
You must always evaluate the first cyclist of a group first. The time of the first entry of a group goes<br />
to the rest of the group as well.<br />
- press the left mouse button and move the time line to the first competitor of the group<br />
- click the right mouse button<br />
- it opens a window<br />
o input bib with keyboard<br />
o click with left mouse button on "Group time"<br />
o click with mouse on OK<br />
- each additional competitor of the same group has the same time. The ranking goes by the real<br />
time.<br />
- for the first competitor that is not in the same group you must click on "Group time" (it must show<br />
no X).<br />
If two groups are behind each other, you must click with the mouse two times on "Group time" when<br />
inputting the time for the first competitor of the second group .<br />
6.5. Returning to the F3 Window:<br />
If you record a race in the F3-Window, it will show in the evaluation the F3-button with the actual<br />
race name and running time of the next race.<br />
When you finish the evaluation you can return to the F3-Window by double click the F3 button.<br />
6.6. Hints for the Evaluation in the F3-Mode:<br />
You are not allowed to load pictures short before racers of another race arrive at the finish. During<br />
the finish arrival you need the hard disk 100 % for the recording.<br />
It is possible to have a start during the evaluation of a race. The time of the new started race starts<br />
to run in the background (or under the F3-button) and you can continue as usual with the evaluation.<br />
If you have a finish arrival while you evaluate a race, it will stop the evaluation and jumps to the F3-<br />
Window. The evaluation you can continue at a later point.<br />
Version: E-96-01-03A Page 49
7.1. OPTI Line Camera:<br />
OPTI 1sw Page 50<br />
7. OPTI SYSTEM COMPONENTS<br />
The Line Camera is delivered with a hood that protects the camera form rain. If you have wind and<br />
rain additional protection for the camera, lens and its plugs are necessary.<br />
7.1.1. OPTI Line Camera OLC1sw:<br />
Line Camera with 512 pixel resolution. This is the standard camera. Connect the camera with<br />
cable 099-01 with the Camera Interface OCI1sw. With this camera you receive the cable 098-<br />
30 (30 m cable).<br />
7.1.2. OPTI Line Camera OLC2sw:<br />
Line Camera with 1024 pixel resolution. This camera we deliver on request. Connect the<br />
camera with cable 099-01 with the Camera Interface OCI1sw. With this camera you receive<br />
the cable 098-05 (5 m cable).<br />
7.2. OPTI Camera Interface OCI1sw:<br />
Connect the Camera Interface OCI1sw and the Camera with cable 099-01. Connect with cable 098-<br />
30 or 098-05 (see above) the Camera Interface OCI1sw and the Distribution Box ODB1. Connect as<br />
well the Net-Battery-Device NBO1 with the Camera Interface OCI1.<br />
You must protect the OCI1sw from rain.<br />
7.3. OPTI Distribution Box ODB1:<br />
1 .... Banana socket (start)<br />
2 .... socket for headset Q34<br />
3 .... socket for photocell and<br />
power supply NLG4<br />
4 .... RS232 interface for wind<br />
aneometer<br />
5 .... socket for display board<br />
6 .... socket for PC connection<br />
with cable 097-01<br />
7 .... socket for Camera Interface<br />
OCI1sw connection with<br />
cable 098-30<br />
8 .... Push button to test the start<br />
cable<br />
9 .... Meter to test the start cable<br />
and control the photocell<br />
Version:E-96-01-03A Page 50
OPTI 1sw Page 51<br />
The Distribution Box ODB1 connects the PC with all other timing components. You need to connect<br />
the following devices to record a race:<br />
Power Supply NLG4: use one of the four sockets (3) to connect the power supply<br />
PC: use socket (6) with cable 097-01<br />
OPTI Camera Interface ODB1sw: use socket (7) with cable 098-30<br />
1 ...... Banana socket:<br />
2-wire connection to the start. This wire is used to transmit the start impulse as well as the<br />
speech connection.<br />
2 ...... Socket for headset Q34:<br />
Connect here the headset Q34. The headset allows the operator of the OPTI to talk with the<br />
starter.<br />
3 ...... Socket for Photocell and Power Supply NLG4:<br />
Four identical sockets to connect the photocell and power supply NLG4.<br />
4 ...... RS 232 interface to connect a wind aneometer:<br />
You can connect the following wind aneometers:<br />
- Sports Aneometer from Nordic or Gill Instruments<br />
(from Version OPTI 2.6; the ODB1 must be adapted for 300 Baud)<br />
5 ...... Socket to connect the Display Board GAZ4:<br />
Socket to connect the ALGE Display Board with cable 010-10<br />
6 ...... Socket for PC connection (ALGE Computer Board OCB1):<br />
Socket for PC connection with cable 097-01 (connect at the plug of the OPTI Computer<br />
Board OCB1)<br />
7 ...... Socket to connect the Camera Interface OCI1sw:<br />
Socket for the Camera Interface OCI1sw connection with cable 098-30 (or 098-05).<br />
8 ...... Push button to test the start cable:<br />
To test the start cable arriving at the banana socket (1). To make this test you need to supply<br />
the ODB1 with the NLG4.<br />
Short-circuit-test: - cable is open (unplugged) on the start side<br />
- press push button (8)<br />
- needle of meter (9) must stay in the middle of the green area<br />
(otherwise short-circuit)<br />
Resistance test: - short the cable pair on the start side (press banana plugs together)<br />
- press push button (8)<br />
- needle of meter (9) must go to the far right side (otherwise is the<br />
resistance too high; maximum 2000 W loop resistance). The needle<br />
is about 1 mm from the right edge with 2000 W.<br />
9 ...... Meter:<br />
- to test the start cable (see above)<br />
- to check the supply (voltage check)<br />
- photocell check: The adjusted photocell must show the meter in the green field. If the<br />
photocell is not adjusted or interrupted the needle starts to swing.<br />
Version: E-96-01-03A Page 51
OPTI 1sw Page 52<br />
7.4. Startmicrophone SM7, Speech Amplifier SV3/SM and Headset Q34:<br />
Startmicrophone SM7:<br />
The Startmicrophone SM7 is needed to change the sound of the startgun into an electrical impulse,<br />
which starts the OPTI timer. The soft part of the SM7 must be as close as possible to the point<br />
where the startgun makes the most noise. With the screw you can fasten the SM7 at the barrel of<br />
the startgun. <strong>Be</strong> aware that the cable does not pass the area where the flame of the shoot burns it.<br />
You need to keep the startgun always clean. Dirt may prevent the noise to trigger the SM7. The<br />
ammunition of the startgun must be stored on a dry place.<br />
The ammunition should not be older than one year.<br />
Speech Amplifier SV3/SM and Headset Q34:<br />
The Speech Amplifier SV3/SM and Headset Q34 is used to have a speech connection between the<br />
starter and the operator of the OPTI-timing-device. Built into the SV3/SM is a 9 Volt battery. If this<br />
battery becomes empty you can hear a ticking in your head set. If you change the battery you need<br />
to open the four screws on the backside.<br />
Attention: At the end of an event you need to unplug the Headset and Startmicrophone. This turns<br />
the Speech Amplifier automatically off.<br />
Connect the SV3/SM with a 2-core cable (e.g. KT300) at the Distribution Box ODB1 (1). Take care<br />
of the polarity of the cable. The polarity is right, when the LED of the SM7 blinks.<br />
Socket to connect the Startmicrophone SM7:<br />
1...... signal-output, open collector; max. 12 V / 50 mA<br />
impulse duration: low = ca. 100 ms<br />
2...... empty<br />
3...... ground<br />
4...... +6 to 15 Volt; 0,6 mA (from SV3/SM)<br />
5...... +5 Volt stabilized; 0,4 mA (from ODB1)<br />
Socket to connect the Headset Q34:<br />
1...... microphone of headset<br />
2...... common ground<br />
3...... earphones of headset<br />
4...... empty<br />
5...... empty<br />
Version:E-96-01-03A Page 52
7.5. Photocell:<br />
The photocell of the OPTI has two main functions:<br />
OPTI 1sw Page 53<br />
- It controls the recording of the Camera OLC1sw or OLC2sw:<br />
Through the impulse of the photocell it starts to record. In the OPTI.INI file you can adjust<br />
how many lines you want to record before and after the photocell impulse. You can also<br />
control the recording with the software button "Activate F4" (see page 28) or with a On/Offswitch<br />
for the photocell.<br />
If you use the software button "Activate" the photocell is still functioning for the display board.<br />
If you use a On/Off-switch you can switch the photocell manually on or off.<br />
- It stops the unofficial time for the display board:<br />
Through the impulse of the photocell it stops the time and shows the time on the display<br />
board (unofficial winner time).<br />
If you press the Software Button "Running GAZ" it shows on the display board the actual<br />
running time. If you deactivate the recording it will still show you the time from the photocell<br />
on the display board.<br />
If you use a On/Off-switch you will have only the running time on the display board until you<br />
turn the switch on and somebody interrupt the photocell.<br />
7.5.1. Reflection Photocell RLS1c:<br />
The ALGE photocell RLS1c is made with most advanced electronic. You can use the reflection<br />
photocell RLS1c for a distance from 1 to 25 Meter. If you need a longer distance than 25<br />
Meters you have to use the type RLS1cd, which consist of a transmitter and receiver.<br />
Principal:<br />
The transmitter of the photocell sends a modulated infrared beam. The receiver controls the<br />
infrared beam and makes an impulse for each interruption<br />
If transmitter and receiver is built into one case we call it reflection photocell. The infrared<br />
beam is sent to a reflector. The function of the reflector is like a mirror, which reflexes the<br />
beam to the receiver.<br />
The other type of photocell (RLS1cd) has on one side a transmitter and on the other the<br />
receiver. The infrared beam goes direct form the transmitter to the receiver.<br />
Types of Photocells:<br />
RLS1c Infrared reflection photocell<br />
RLS1cd Infrared photocell with separate transmitter and receiver<br />
RLS3c Three-fold-photocell for track and field<br />
Power Supply for the Photocell RLS1c:<br />
The photocell is supplied by a 3-core cable from the Distribution Box ODB1, or by the internal<br />
battery. As internal battery you can use a Alkaline Baby Battery or a NiCd Baby Rechargeable<br />
Battery. If you work with the internal battery you can use a 2-core cable between the<br />
timing device and the photocell (e.g. ALGE cable reel KT300 with 300 m fieldtelephoneline)<br />
The internal battery supplies the RLS1c for:<br />
Alkaline Baby Battery: about 40 hours<br />
NiCd Baby Rechargeable Battery: about 18 hours<br />
The internal battery of the RLS1c is automatically turned on by plugging cable 027-02 (the<br />
case of the plug is connected with ground). If you do not use the photocell, unplug the cable.<br />
Otherwise the photocell is not turned off.<br />
Version: E-96-01-03A Page 53
OPTI 1sw Page 54<br />
Input of the battery: Press down to open battery compartment<br />
Insert the battery:<br />
Input the battery as far as possible into the battery<br />
compartment. When closing the cover press the battery<br />
into the compartment.<br />
Alkaline 1,5V Baby Battery or NiCd 1,2V Baby Rechargeable Battery<br />
Adjustment of the Photocell RLS1c:<br />
- Fasten the fastening-bracket for the photocell and reflector at a pole<br />
- Screw the photocell and reflector on the fastening-bracket<br />
- Twist the reflector toward the photocell<br />
- Connect the cable (e.g. 001-10) at the photocell and timing device<br />
- Turn the timing device on<br />
- Open the socket joint of the photocell (turn the yellow knob<br />
counter-clockwise)<br />
- Aim at the reflector by using the sight on top of the photocell<br />
- The needle of the level meter has to move as far as possible<br />
into the green field<br />
- Close the socket joint of the photocell (turn the yellow knob<br />
clockwise)<br />
- If you interrupt the infrared beam of the photocell you hear a<br />
beep of the timing device. The needle of the lever moves into<br />
the white area.<br />
Weather Cover:<br />
You can move the weather cover in order to protect the lens from<br />
snow and rain. The lens should be protected during timing.<br />
Technical Data of the Photocell RLS1c:<br />
Power Supply: 5 VDC / 25 mA max. or internal battery (baby)<br />
Max. Distance: 0,5 to 25 Meter<br />
Output: NPN transistor, open collector, active low<br />
Reaction Time: 300 µs, 2 ms adjusted<br />
Impulse length: 20 to 1400 ms adjustable<br />
Measurements: 160 x 135 x 58 mm<br />
Weight: 0,6 kg<br />
Plug Pin Connection:<br />
1 ............................... Signal output<br />
2 ............................... Signal output<br />
3 ............................... 0 Volt<br />
4 ............................... empty<br />
5 ............................... +5V stabilized<br />
Case Ground ............ negative pole of battery<br />
Photocell RLS1c with internal battery:<br />
Working time: about 40 hours with alkaline battery<br />
about 18 hours with rechargeable battery<br />
Version:E-96-01-03A Page 54
7.5.2. Three-Fold-Photocell RLS3c:<br />
OPTI 1sw Page 55<br />
This photocell is specially developed for athletic. It consists of three reflection photocells mounted<br />
above each other. When all three photocells are interrupted at the same time, makes the photocell<br />
an stop impulse. This guarantees you that the arms or legs of an athlete cannot produce an photocell<br />
impulse. The photocell controls the OPTI recording and the stops the time of the display board.<br />
Adjustment:<br />
- Mount the photocell and reflector on the tripods and set the upper end of both at chest level.<br />
- Set the photocell and reflector on both sides of the finish line. The photocell should be placed on<br />
the side of the OPTI (this means you do not have to cross the track with the cable).<br />
- The photocell is not allowed to cover parts of the picture. Therefore you might have to place the<br />
photocell one or two meters away from the edge of the lane or place it a little bit before the finish<br />
line.<br />
- Plug red cable 001-30 into photocell and Distribution Box ODB1 (photocell 3).<br />
- Make the OPTI system work (turn the computer on and supply the ODB1 and OCI1sw)<br />
- Open the ball-and-socket-joint and adjust the photocell to the reflector. Use for the adjustment<br />
the sight hole in the upper part of the photocell. All three instruments must be in the green field.<br />
- Fasten the ball-and-socket-joint. The photocell is ready.<br />
Attention:<br />
If the photocell is out of focus the meter (9) of the Distribution Box ODB1 starts to swing.<br />
The photocell and the reflector should be blocked off, so that no one can knock it during the race.<br />
The RLS3c has two identical sockets for connection to the OPTI. They have the same like of the<br />
RLS1c.<br />
7.6. Power Supply NLG4:<br />
The NLG4 supplies the Distribution Box ODB1. Plug the NLG4 at the mains, and at ODB1 (power<br />
supply 3). If the supply for the ODB1 is all right, the meter (9) must be in the green area (do not<br />
connect a photocell for this test).<br />
There is a version of the NLG4 with 230V/50Hz and one with 120V/60Hz.<br />
7.7. Net-Battery-Device NBO1:<br />
The Net-battery-Device NBO1 supplies the camera interface OCI1sw and the camera. You can plug<br />
the NBO1 to the mains or with cable 032-05 to a 12V car battery. Plug the other cable of the NBO1<br />
to the Camera Interface OCI1sw.<br />
Version: E-96-01-03A Page 55
OPTI 1sw Page 56<br />
8 TECHNICAL DATA<br />
Measuring range: 23 hours, 59 minutes, 59,999 seconds<br />
Crystal frequency: TCXO 10.000 MHz (Temperature compensated Crystal Oscillator)<br />
Accuracy:<br />
at changeable temperature: +/- 2,5 ppm at -30 to + 75 o C (+/- 0,009 sec/h)<br />
Aging: +/- 1 ppm per year<br />
Frequency adjustment: +/- 0,1 ppm at 25 o C<br />
Operative timing range: 0 to 50 o C<br />
Memory: minimum 4 MB RAM in the PC<br />
minimum 150 MB hard disk in the PC<br />
Recording of the image: on the hard disk of the PC<br />
Storage of recorded pictures: - floppy disk<br />
- Changeable hard disk<br />
- streamer<br />
- rewritten CD´s<br />
Impulse input: input resistance 10 kW against +5V<br />
impulse with less than 1 Volt (falling signal)<br />
hysteresis about 2 Volt<br />
Output 5V DC stabilized: total maximum of 120 mA<br />
Speech amplifier: communication through standard start cable<br />
Operating elements: keyboard<br />
mouse<br />
Version:E-96-01-03A Page 56
Display board interface:<br />
OPTI 1sw Page 57<br />
Transfer format: 1 start bit, 8 ASCII bit, no parity bit, 1 stop bit<br />
Transfer speed: 2400 baud<br />
Pin connection: The OPTI ODB1 has two identical sockets for the display<br />
board (and Videogenerator).<br />
Data format:<br />
1 common ground<br />
2 output supply (6 to 15 VDC)<br />
3 output data channel<br />
4 output supply (6 to 15 VDC)<br />
5 output data channel<br />
The data format consists of 24 ASCII characters. The 24th character is always the carriage return. If<br />
you have a running time it sends on the fourth character a point. If you have a run time (intermediate<br />
time) it sends a blank as fourth character. Depending on the adjusted precision it sends 1/10, 1/100,<br />
or 1/100.<br />
1 2<br />
123456789012345678901234 Amount of ASCII-characters<br />
. HH MM SS.z (CR) running time<br />
HH MM SS.zht (CR) run time<br />
. the fourth character is a point if you have a running time, the seventeenth<br />
character is a point to indicate where the seconds end.<br />
HH hours<br />
MM minutes<br />
SS seconds<br />
z 1/10 seconds<br />
h 1/100 seconds (depending on adjusted precision)<br />
t 1/1000 seconds (depending on adjusted precision)<br />
(CR) the 24th character is always a carriage return<br />
Version: E-96-01-03A Page 57
8.1. OPTI-Computer-Board OCB1sw:<br />
OPTI 1sw Page 58<br />
The OCB1sw must be built into the PC. It needs a free ISA/AT slot (16 bit slot) in the PC.<br />
8.2. Distribution Box ODB1sw:<br />
The Distribution box ODB1sw has all external outlets:<br />
Computer: Connection from the distribution box to the PC<br />
Camera 1: Connection form to the Camera 1 (Camera interface)<br />
Head set: Connection for head set<br />
Photocell / Power Supply: Connection for photocell and power supply (four connectors)<br />
RS 232: no function<br />
Display Board: connection for display board<br />
8.3. OPTI Line Scan Camera OLC1sw:<br />
Camera type: CCD line scan camera<br />
Pixel per line: 512<br />
Lens: C-Mount<br />
8.4. Cable:<br />
PC - Distribution Box ODB1sw: cable 097-01 (1m)<br />
Distribution Box ODB1sw - Camera Interface OCI1sw: cable 098-30 (30 m)<br />
camera Interface OCI1sw - Camera OLC1sw: cable 099-01<br />
Distribution Box OCI1sw - Photocell RLS1c or RLS3c: cable 001-30<br />
Distribution Box OCI1sw - Speech amplifier SV3/SM: cable 000-05 (optional cable reel KT 300)<br />
Version:E-96-01-03A Page 58
OPTI 1sw Page 59<br />
Version: E-96-01-03A Page 59
9.1. Start List:<br />
OPTI 1sw Page 60<br />
9. EXAMPLE OF PRINTED LISTS AND PICTURES<br />
The start list includes the following:<br />
Headline of the List:<br />
The headline tells what kind of list it is and the name of the competition.<br />
Race information:<br />
The race information includes the data about the race:<br />
discipline, competition number, race number, date, start time, and city of event<br />
Start list:<br />
The start list includes the data about each competitor in a race:<br />
bib, lane, name and surname, age, and club<br />
Bottom line:<br />
The bottom line shows the directory and file name of the race.<br />
Responsible Referee:<br />
The responsible referee must check the list and sign it. This signature is always on the last<br />
page of the list.<br />
9.2. Results List:<br />
The results list includes the following:<br />
Headline of the List:<br />
The headline tells what kind of list it is and the name of the competition.<br />
Race information:<br />
The race information includes the data about the race:<br />
discipline, competition number, race number, date, start time, city of event, and wind speed.<br />
Ranking list:<br />
The start list includes the data about each competitor in a race:<br />
rank, bib, lane, name and surname, age, club, and time<br />
Bottom line:<br />
The bottom line shows the directory and file name of the race.<br />
Responsible Referee:<br />
The responsible referee must check the list and sign it. This signature is always on the last<br />
page of the list.<br />
Version:E-96-01-03A Page 60
9.3. Results List by Lane:<br />
The results list by lane includes the following:<br />
OPTI 1sw Page 61<br />
Headline of the List:<br />
The headline tells what kind of list it is and the name of the competition.<br />
Race information:<br />
The race information includes the data about the race:<br />
discipline, competition number, race number, date, start time, city of event, and wind speed.<br />
Ranking list:<br />
The start list includes the data about each competitor in a race:<br />
lane, name and surname, age, club, bib, time, and rank<br />
Bottom line:<br />
The bottom line shows the directory and file name of the race.<br />
Responsible Referee:<br />
The responsible referee must check the list and sign it. This signature is always on the last<br />
page of the list.<br />
9.4. Times by Photocell:<br />
You can print as well the times taken with the photocell. The photocell times are the times who<br />
control the recording and stop the time on the screen and display board. Next to the photocell time it<br />
shows the image number of image where the time is stored).<br />
Headline of the List:<br />
The headline tells what kind of list it is and the name of the competition.<br />
Race information:<br />
The race information includes the data about the race:<br />
discipline, competition number, race number, date, start time, city of event, and wind speed.<br />
Photocell time:<br />
Each photocell time is printed with the image number.<br />
Bottom line:<br />
The bottom line shows the directory and file name of the race.<br />
Version: E-96-01-03A Page 61
9.5. Image:<br />
Image with Time:<br />
OPTI 1sw Page 62<br />
It prints the image that it is shown on the screen. All times that you have transferred form the image<br />
to the competitor list are shown on the printout under the time line.<br />
If you have a time jump in a picture, it shows a dashed black and white line.<br />
Over the picture it shows a information line. There it prints the race information, as well as the file<br />
name of the race.<br />
Image without Time:<br />
It prints the picture that it shows on the screen. <strong>Be</strong>low the graphic it prints a time scale.<br />
If you have a time jump in a picture, it shows a dashed black and white line.<br />
Over the picture it shows a information line. There it prints the race information, as well as the file<br />
name of the race.<br />
Cropped Image with Time:<br />
It prints the detail that you select (see page 30). The times that you have transferred to the competitor<br />
list from this detail are shown on the printout under the time line.<br />
If you have a time jump in a picture, it shows a dashed black and white line.<br />
Over the picture it shows a information line. There it prints the race information, as well as the file<br />
name of the race.<br />
Cropped Image without Time:<br />
It prints the detail that you select (see page 30). <strong>Be</strong>low the graphic it prints a time scale.<br />
If you have a time jump in a picture, it shows a dashed black and white line.<br />
Over the picture it shows a information line. There it prints the race information, as well as the file<br />
name of the race.<br />
Version:E-96-01-03A Page 62
Teststart:<br />
OPTI 1sw Page 63<br />
You can check the start of the<br />
OPTI1sw very easy. All you<br />
have to do is to go into the<br />
mode "TESTSTART" and shoot<br />
the gun on the finish lane. The<br />
recorded shoot (you can see<br />
the flame of the gun) must start<br />
exactly at 0.000 s. If this happens<br />
it guarantees a proper<br />
synchronization between<br />
startshoot and system start<br />
(time).<br />
✔ adjust OPTI1sw for the<br />
event<br />
✔ adjust camera correct on the<br />
finish lane<br />
✔ Adjust contrast and brightness<br />
of the OPTI camera<br />
✔ connect Strartmicrophne<br />
SM7 with the OPTI<br />
✔ mount the Startmicrophone<br />
SM7 on the startgun<br />
✔ set the startgun on the finish<br />
lane<br />
✔ make the background of the<br />
startgun dark (maybe a dark<br />
paper)<br />
✔ click on <br />
✔ click on <br />
✔ press key <br />
✔ trigger startgun<br />
✔ check the recorded picture<br />
✔ the time must start to run<br />
with the flash of the shoot<br />
Version: E-96-01-03A Page 63