Product description - Huka
Product description - Huka
Product description - Huka

Create successful ePaper yourself
Turn your PDF publications into a flip-book with our unique Google optimized e-Paper software.
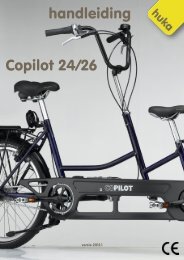
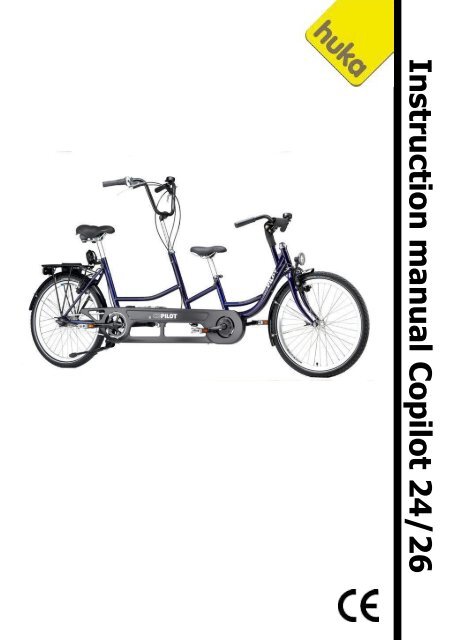
Instruction manual Copilot 24/26
Introduction<br />
Pg. 1<br />
<strong>Product</strong> <strong>description</strong><br />
Pg. 2 – 6<br />
Commissioning<br />
Pg. 7 – 10<br />
Usage<br />
Pg. 11 – 13<br />
Maintenance<br />
Pg. 14 - 15
Contents<br />
1. Introduction 1<br />
2. <strong>Product</strong> <strong>description</strong> 2<br />
2.1 Purpose of use 2<br />
2.2 Safety and driving behaviour 3<br />
2.3 Prevention of theft 3<br />
2.4 The drive 4<br />
2.4.1 Tandem Standard 4<br />
2.4.2 Freewheel system in the front 4<br />
2.4.3 Idle motion in the front, shiftable 4<br />
2.4.4 'e-bike' (power assisted) 4<br />
2.5 Requirements of Operation 5<br />
2.6 Technical 5<br />
2.7 Dimensions and Weight 5<br />
2.8 Accessories 6<br />
2.8.1 Back- and Lumbar support 6<br />
2.8.2 Foot rests / mounting 6<br />
3. Commissioning 7<br />
3.1 Saddle height 7<br />
3.1.2 Position of the saddle 7<br />
3.2 Gears 7<br />
3.3 Double steering/ Fixing of front handlebar 7<br />
3.4 Installation of pedals 7<br />
3.5 The position of the handle bar 8<br />
3.5.1 Adjust handle bar 8<br />
3.6 The wheels 8<br />
3.6.1 Pressure and valve 8<br />
3.6.2 Spokes 9<br />
3.6.3 Hubs 9<br />
3.7 The drive 9<br />
3.7.1 Crankshafts, crank and pedal 9<br />
3.7.2 The chain 10<br />
4. Usage 11<br />
4.1 Riding the Copilot 24/26 11<br />
4.2 Users environment 11<br />
4.3 Familiar user errors 11<br />
4.4 Brakes 12<br />
4.4.1 Parking brake 12<br />
4.5 The lighting 12<br />
4.6 Safety lock 12<br />
4.7 Lifting 12<br />
4.8 Safety 13<br />
5. Maintenance 14<br />
5.1 Cleaning 14<br />
5.2 Controle 14<br />
5.3 Tires 14<br />
5.3.1 Tire pressure 14<br />
5.4 Repair 15<br />
5.4.1 Authorized dealers for repair 15<br />
5.4.2 Spare parts 15<br />
5.4.3 Self-execution of repairs 15<br />
5.4.4 Disposal of the product 15
Guarantee<br />
<strong>Huka</strong> BV gives two years of guarantee on the tandem.<br />
Your supplier will carry out this guarantee.<br />
The guarantee does not apply to damage or faults of the tandem caused by wrong or<br />
improper use. The evaluation of it is the privilege of <strong>Huka</strong> or a representative to be<br />
appointed by <strong>Huka</strong>.<br />
N.B. This guarantee does not apply to components susceptible to wear.<br />
Type/Type/Typ :<br />
Datum/Date/Datum : 2004-06<br />
SN : 406012<br />
<strong>Huka</strong> BV Max gewicht/Max weight/Max Gewicht: KG<br />
Postbus 194, 7570 AD Oldenzaal<br />
The Netherlands ,<br />
Tel: +31 (0) 541 572472<br />
• lees de gebruiksaanwijzing/read the manual/Bedienungsanleitung lesen<br />
<strong>Huka</strong> BV<br />
<strong>Huka</strong> is a Dutch company that manufactures appliances for the handicapped.<br />
If you have any queries about our products or their applications please contact your dealer.<br />
Modifications<br />
<strong>Huka</strong> reserves the right to make modifications to the product described in this users manual<br />
without incurring liability.
1. INTRODUCTION<br />
Cycling should be a pleasant activity. That is clear. Every day millions of Dutchmen mount<br />
their bicycles with pleasure. The bicycle is more than just of mean of transport. Cycling<br />
radiates freedom and adventure. By means of cycling we save our environment, we obtain<br />
somewhat more of the green feeling.<br />
But not everybody can make use of the ordinary bicycle. <strong>Huka</strong> has developed a series of<br />
tandems in order that everybody can enjoy all pleasant aspects of cycling. Aspects like<br />
ergonomics, sizes, quality and styling have all played an important role in the design.<br />
In general<br />
Your <strong>Huka</strong> tandem is a quality product. Every component of your <strong>Huka</strong> tandem has been<br />
tested and checked extensively. The finishing of the frame and the mounted components are<br />
of high quality.<br />
There for you are assured of an excellent product a careless cycle pleasure. When supplying<br />
your new <strong>Huka</strong> tandem, in principle all described components are adjusted well and / or are<br />
turned to you wishes. But no matter how modern, even a <strong>Huka</strong> tandem is not completely<br />
free of maintenance.<br />
There are some things that require attention from time to time.<br />
This small manual provides instructions for maintenance that you possible can do yourself<br />
and provides information about activities of your (<strong>Huka</strong>) dealer. To do a little maintenance<br />
can be quite fun, because it contributes to a greater cycle pleasure.<br />
Please pay particular attention to texts<br />
printed fat and in italics.<br />
1
Survey<br />
1. saddle of "copilot"<br />
2. saddle of "captain"<br />
3. front handlebar<br />
4. tube for front handlebar fixing<br />
5. rear handlebar<br />
6. front and rear handlebar assemblies<br />
a adjustment screw for handlebar<br />
b adjustment screw for handlebar stem<br />
7. seat post<br />
8. seat tube with quick release<br />
9. stand<br />
10. chain<br />
11. hydraulic brake<br />
12. chain guard<br />
13. chain tensioner<br />
14. handlebar connector<br />
Please take notice of the attached manuals for the gear system, braking system,<br />
optional motor units and accessories!<br />
2. PRODUCT DESCRIPTION<br />
2.1 Purpose of use<br />
The <strong>Huka</strong>-tandem is a cycle for handicapped children and adults.<br />
The range of sizes of the <strong>Huka</strong>-tandems includes a great overlapping area of successive sizes<br />
(see figure 1). In this way it is easier to choose a cycle with the right size for the user, which<br />
can be used for a maximum length of time in the case of growing children.<br />
2
2.2 Safety and driving behaviour<br />
Before you take delivery of your new ready-to-drive tandem your dealer will have checked<br />
all components himself and, if necessary, will have adjusted these in order that you can<br />
cycle. If it is the first time that you are sitting on a tandem this will be somewhat uneasy.<br />
No matter how sporty your tandem is, never<br />
get tempted into too much enthusiastic<br />
behaviour on the roadway or riding on and<br />
off pavements. Your tandem can sustain<br />
visible or invisible damage, which involves<br />
additional risks.<br />
In order to use your tandem safely we advise you to (let) replace worn components like<br />
inner tubes, outer tubes, and brake block immediately.<br />
These components are obtained from every cycle shop or from your dealer.<br />
1. The "captain" must be at least 16 years old.<br />
2. The COPILOT 24/26 has to be checked for roadworthy condition before use. Particularly,<br />
check the front handle bar for stiffness.<br />
3. The road traffic act and all traffic laws are to be obeyed on all journeys on public roads.<br />
Every road user must act in such a way that no other person can be endangered, damaged<br />
or hindered.<br />
4. Seats and steering barshave to be adjusted correctly.<br />
5. Always wear ANSI or BSI or GS approved safety helmets - both riders!<br />
6. Take care on wet, slanting, uneven and slippery road surfaces or on tram rails.<br />
7. For journeys in darkness a lighting system has to be mounted on the COPILOT. At night<br />
switch on the lights. Be visible; wear brightly colored clothing.<br />
8. Warning: Do not ride downhill too fast. The tandem may skip to the front.<br />
2.3 Prevention of theft<br />
A safety lock is mounted on most versions of the tandem. If you want additional measures<br />
against theft than an additional cable lock is convenient to anchor you tandem rock-solid.<br />
These locks are available in many cycle shops.<br />
Always lock your tandem, also when you<br />
leave it just for a short moment.<br />
3
2.4 Drive<br />
2.4.1 Tandem Standard<br />
Parallel cranks, "copilot" has to pedal<br />
2.4.2 Freewheel system in the front<br />
"Copilot" can freewheel (like regular bike)<br />
2.4.3 Idle motion in the front, shiftable<br />
"Captain" determines via a shifter whether the "copilot" pedals or not.<br />
Warning: Do not switch under load!<br />
2.4.4 'e-bike' (power assisted)<br />
Motor 24 V hub motor, 250 W<br />
Battery 24 V lead-gel 22 Ah<br />
Motor is control automatically by measurement of the pedaling force. The engine adds<br />
50% to total power.<br />
Vehicles driven as such (EPAC, Electric Power Assisted Cycles) are legally treated as bicycles.<br />
Please wear helmets!<br />
4
2.5 Requirements of Operation<br />
• The COPILOT 24/26 is a tandem with dual steering that is designed for the common use<br />
of a disabled and able-bodied person.<br />
• The maximum overall load is 180 kg (CP26: 200 kg), with a maximum of 80 kg (CP26: 100<br />
kg) in the front and 100 kg in the rear. The carrier may be loaded with max.20 kg.<br />
• Every operation not described in this manual is forbidden.<br />
• COPILOT may not be ridden from the front seat alone. From the rear seat it may be<br />
operated by one person if the handbrakes are mounted on the rear handlebar.<br />
• Structural changes must not be detrimental to traffic safety.<br />
2.6 Technical<br />
� Steel frame, welded, 3 times lacquered or double powder coated, alloy-rims, composite<br />
mudguards, stainless steel spokes,<br />
�7-gearbox with back pedal brake<br />
� Front chain ring with 48 teeth<br />
� Rear sprocket with 21 teeth (CP24), 22 teeth (CP26)<br />
� 2 MAGURA hydraulic rim brakes<br />
� Lighting system with generator<br />
� Two bells, carrier, pump, lock, tool kit<br />
� CP 26: Suspension tandem fork<br />
2.7 Dimensions and Weight:<br />
COPILOT 24 COPILOT 26<br />
� Length 250 cm 258 cm<br />
� Width (w. pedals) 30 cm 30cm<br />
� Height 80-105 cm 94-109 cm<br />
� Tires 24x1.75” 26x1.75”<br />
� Gearbox SRAM SHIMANO<br />
Spectro S7 Nexus<br />
� Weight 28 kg 31 kg<br />
5
2.8 Accessories<br />
A series of accessories can be supplied for the range of the <strong>Huka</strong>-tandems.<br />
The possibilities are listed in the overview.<br />
Almost all accessories can be provided for each type of tandem.<br />
Ask your dealer if the respective accessory can also be supplied for your type of tandem.<br />
The accessories have colours matching the colours of the tandem; thus the accessories<br />
and the tandem form a unit.<br />
2.8.1 Back- and Lumbar support<br />
The back and lumbar support is to be mounted with the<br />
T-saddle adapter on the saddle post.<br />
Afterwards, adjust the saddle height and the position<br />
to the handle bar and Mount the saddle. To increase the<br />
variability of the saddle height, turn the saddle clamp.<br />
The position of the back- and lumbar support can be<br />
varied by releasing the allen bolt (1).<br />
The position and the angle of the support(s) can be<br />
adjusted by shifting and turning the fixation clamp (2).<br />
After adjusting the back- and lumbar support, the pole (3)<br />
should be shortened accordingly.<br />
2.8.2 Foot rests / mounting<br />
Illustrated with straps and leg support.<br />
6<br />
1.<br />
3.<br />
2.
3. COMMISSIONING<br />
3.1 Saddle height<br />
The optimum saddle height depends on the body size and the eventually existing handicap.<br />
Adjust a height, where you can reach the ground with your toes while sitting on the saddle.<br />
Please note the eventually existing mark on the seat post, which should be inserted at least<br />
7 cm in the frame tube !<br />
3.1.2 The position of the saddle<br />
The saddle is mounted on the seat post. Place the seat post in the seat tube and adjust<br />
the height by pushing and turning. After finding the right position, fix the seat post with the<br />
quick release (1).<br />
On the T-Bike mini the seat post is fixed by a nut in the size 13mm. The saddle angle can be<br />
adjusted with the same tool.<br />
3.2 Gears<br />
For adjusting the 7-speed hub, see the SRAM Spectro manual which is enclosed separately.<br />
3.3 Double steering/ Fixing of front handlebar<br />
Release screw (6b) on front handlebar stem with Allen wrench size 5; if necessary apply a<br />
light hammer blow from above, then pull out the assembly . Change plastic hood and insert<br />
the assembly into handlebar the tube (front)/fixation tube (rear).<br />
Then adjust the handlebar as described above and tighten all screws carefully.<br />
The handlebar is now fixed!<br />
3.4. Installation of pedals<br />
During installation of pedals take notice of marking L-(left) and R-(right).<br />
Tighten with spanner Size 15.<br />
7
3.5 The position of the handle bar<br />
Adjustment in height and tilt angle is by means of Allen screws (size 5) on the handlebar<br />
assemblies (6a and 6b).<br />
Handlebar grips should be readily accessible for both the "copilot" and the "captain", Make<br />
sure that your knees – even in narrow turns – do not touch the handlebar.<br />
Both handlebars are to be positioned straight ahead. Hold or wedge the front wheel firmly<br />
and align the handlebar with the screws slackened.<br />
Tighten all screws!<br />
3.5.1 Adjust handle bar<br />
The position of the handle bar depends on the body size and the eventually existing<br />
handicap. The handle bar grips should have the same height as the drivers hip. To enhance<br />
the horizontal stability, the handle bar grips should be mounted as forward as possible<br />
without losing comfort by an unfavorable seating position.<br />
The handle bar can be adjusted after loosening the adjustment screw (2) under the handle<br />
bar assembly (black). An allen bolt tool (size 6) is included in the tool set.<br />
Don’t forget to tighten the screw after adjusting.<br />
Before riding the T-Bike, be sure that<br />
all adjustments are correct.<br />
Please make sure that all screws are<br />
tightened. Please notice that the<br />
handle bar and the saddle must no be<br />
removed after fixing.<br />
3.6 The wheels<br />
The wheel is the most important component of the cycle, which is responsible for a light ride<br />
and a high cycle comfort. Many matters are important thereby, like well-inflated tyres, tightly<br />
tensioned spokes and a light running with absence of play.<br />
3.6.1 Pressure and valve<br />
The correct tyre pressure is obtained for most tyres when you can still push the tyre in a little bit.<br />
When your tyres are too soft they will wear down faster. You will ride much more comfortable on<br />
quite hard tyres and your tandem listens better to the brake and movements of the handlebars.<br />
The inner tubes of the tandem are equipped with a common bicycle valve.<br />
8
3.6.2 Spokes<br />
The spokes take care of the stability of the wheel and thus of the tandem. Therefore a<br />
correct pressure is important. Because new spokes always have to stabilise to some<br />
extent, the wheels of your tandem have to be checked after a couple of weeks.<br />
Then your <strong>Huka</strong>-dealer adjusts the spokes tot the correct tension.<br />
In case it happens that a spoke breaks or is sitting loose then your <strong>Huka</strong>- dealer will<br />
of course put this right.<br />
3.6.3 Hubs<br />
The hubs of the wheels should be adjusted accurately. Actually there should not be any<br />
noticeable play. If you notice an excessive play or the wheel is running heavily then ask your<br />
<strong>Huka</strong>-dealer to put this right.<br />
3.7 The drive<br />
The drive system takes care that your pedalling force is converted optimally into movement.<br />
The system consists of many moving components: the chain, the gear (option), the<br />
crankshaft, the crank and the pedals. Of these, many components are free of maintenance.<br />
3.7.1 Crankshaft, crank and pedals<br />
Most crankshaft bearings mounted by <strong>Huka</strong> are completely free of maintenance and cannot<br />
be re-adjusted. If it does happen that play develops in the bearing then it is necessary to<br />
contact you <strong>Huka</strong>- dealer immediately.<br />
If play develops between the crank and the crankshafts then you can take off the dust cap<br />
and retighten the underlying bolt with a socket spanner.<br />
Most pedals are also free of maintenance. If the play is too large you can consult your <strong>Huka</strong>dealer.<br />
When you are mounting the pedals yourself watch for the indications L (left) and R (right on<br />
the pedal axes. The left pedal is screwed in anti-clockwise, the right pedal clockwise.<br />
You can use an open-end spanner or a special (narrow) pedal spanner. Specially adapted<br />
pedals can also be provided as an option.<br />
See paragraph 2.5 Accessories for this purpose.<br />
9
3.7.2 The chain<br />
When the chain pressure is correct your tandem pedals lightly and you will not hear the<br />
chain. When your tandem is delivered the chain will be well adjusted by your <strong>Huka</strong>-dealer.<br />
Your tandem is provided with a gear and two chains.<br />
If you notice that one or the other chain is too slack have it re-adjusted by your<br />
<strong>Huka</strong>- dealer.<br />
This is very specialistic work that can be<br />
best left to your dealer.<br />
A plastic chain cover protects both the<br />
chain and the drive system.<br />
Avoid risks!<br />
Both Handlebars tight ?<br />
No narrow winding !<br />
Be cautious while turning !<br />
Control your speed downhill !<br />
Drive with care !<br />
Go around obstacles widely !<br />
Keep children awake !<br />
CP 24: max. 180 kg total load !<br />
CP 26: max. 200 kg total load !<br />
Max. 20 kg on carrier !<br />
Wear a helmet !<br />
10
4. USAGE<br />
4.1 Riding the Copilot 24/26<br />
• Make sure that the COPILOT is in roadworthy condition! Before any ride be sure that the<br />
handlebars are aligned straight and that all screws are tight.<br />
• Mounting the COPILOT: Unloaded, the COPILOT rests safely on the bipod stand. In most<br />
cases it will keep its position after the "copilot" has mounted and is possibly fixed.<br />
However, the "captain" must not rely on the COPILOT's stability! It is essential for the<br />
captain to hold the vehicle firmly thus ensuring the "copilot's " safety!<br />
• Due to its length, the COPILOT handles differently from a normal bicycle. Therefore it is<br />
important that both users/riders adjust to the new riding experience at a slow pace. Soon<br />
they will get used to communicate across the handlebars where to go and how to cope<br />
with balance problems. In narrow windings do not come too close to obstacles!<br />
4.2 User environment<br />
The <strong>Huka</strong> tandems are suitable for use on roads with firm underground.<br />
The tandem can be used into all weather, but avoid when possible contact with salt water<br />
because of the influence of the metal parts.<br />
4.3 Familiar user errors<br />
The following user errors are possible and should be avoided.<br />
These errors can cause personal injuries or damage to the product.<br />
Respect the following situations:<br />
� Always provide for the correct pressure of the tires.<br />
� Avoid persons near the tandem, particularly with the wheels, dangerous<br />
situations can occur.<br />
� Check regularly the good functioning of the brakes and make sure the function<br />
perfect.<br />
� Check regularly the good functioning of the lights and make sure the function<br />
perfect.<br />
� Respect the traffic rules and regulations seriously and take caution in traffic.<br />
11
4.4 Brakes<br />
4.4.1 Parking brake<br />
All tandems are equipped with a parking brake. This brake takes care that the tandem stays<br />
firmly at its position when mounting or dismounting the tandem. The operation of the<br />
parking brake takes place by means of a lever that is present on the handlebar axle, closely<br />
underneath the handlebars themselves. You put your tandem on the parking brake by<br />
turning this lever upwards as far as possible. To unlock the parking brake you can turn the<br />
lever downwards until the stop.<br />
4.5 The lighting<br />
Your tandem is provided with a safe and reliable lighting. Always check that all lights are<br />
working when you have the lighting on. It is highly dangerous when you ride in the dark, in<br />
the twilight or in the mist without lights. Check the following points if (part of) your lighting<br />
does not function:<br />
� Check that the electric wires are connected to both lights and the dynamo and there is no<br />
formation of rust.<br />
� Follow the electric wires and check that the insulation layer of the wires is still intact<br />
everywhere (check that there is no short circuit because of naked wires).<br />
� Check that the lights in their fittings are free of oxidation, that contact is made and that<br />
the filaments are not broken.<br />
� Check that the dynamo is adjusted well and is running on the middle of the tyre.<br />
� Check that the electric wires are not broken and / or are not jammed anywhere.<br />
4.6 Safety lock<br />
If you want to lock your tandem you should first turn the key<br />
clockwise and hold it before you can push the handle downward.<br />
If the lock is bolted the key jumps back and can be taken away.<br />
4.7 Lifting<br />
It is because of the weight, not possible to lift your tandem alone. Lifting with two persons is<br />
possible.<br />
Pay attention to lift the tandem only at firmest parts and not for example the accessories.<br />
12
4.8 Safety<br />
1. The Copilot has to be checked for roadworthy condition before use.<br />
2. The road traffic act and all traffic laws are to be obeyed on all trips on public roads.<br />
Every user must act in such a way that no other person can be jeopardized, damaged or<br />
hindered.<br />
3. Please wear a helmet every time using the Copilot 24/26.<br />
4. Caution on journeys on wet, slanting, uneven and slippery road surfaces or on tram rails.<br />
5. For journeys in darkness a lighting system has te be mounted on the Copilot. At night<br />
switch on the lights. Be visible; wear brightly colored clothing.<br />
6. Always ride with reasonable speed and adjust your speed when going through curves.<br />
7. When parking the Copilot, make sure that the parking brake is locked.<br />
13
5. MAINTENANCE<br />
5.1 Cleaning<br />
The metal parts, the plastic parts and the soft parts, like saddle, can be best cleaned with<br />
a soft, moisten cloth.<br />
Here you can use soap. Use never aggressive or scratching cleaning agents.<br />
The different mechanisms should regularly controlled on impurities such as grain of sand<br />
etc. and when necessary be clean-brushed.<br />
Cleaning regularly aids the preservation of your tandem.<br />
Never use a high-pressure sprayer for cleaning your cycle. This is because the<br />
pressure of the water is so forceful that you will spray the grease from the bearings.<br />
It is advisable to regularly lubricate or to grease all moving parts or to have this done by<br />
somebody.<br />
5.2 Controle<br />
� Derailleur and chain have to be regularly lubricated with oil.<br />
� Check regularly if tires are stuck.<br />
� Check brakes on activity.<br />
� A bicycle shop must check regularly the spoke tension - the first time after approx. 300 km.<br />
5.3 Tires<br />
Tire size and maximum tire pressure are written on the tire<br />
wall. We recommend to use the maximum tire pressure written on the tire wall.<br />
Check the tire pressure at the fuel station. In case of<br />
emergency, use the inflator attached to the frame. The tires<br />
are available at a local bicycle dealer. In case of pressure loss, the inner tube of the front<br />
wheels can be changed without removing the whole wheel.<br />
The tire walls are fitted with reflector strips.<br />
5.3.1 Tire pressure<br />
The tires have car valves. You can check the tire pressure<br />
(3.5 bar max) at every petrol station. In case of emergency<br />
use the pump attached to the frame.<br />
14
5.4 Repair<br />
5.4.1 Authorized dealers for repair<br />
The dealer, which sold or delivered you the tandem, is authorized by <strong>Huka</strong> BV to execute<br />
necessary repairs.<br />
If you desire another dealer, you can contact us:<br />
<strong>Huka</strong> BV<br />
Tel: +31 (0)541 572 472<br />
Fax: +31 (0)541 520 415<br />
e-mail: sales@huka.nl<br />
5.4.2 Spare parts<br />
Each spare part of the <strong>Huka</strong> tandem is separately available by your authorized dealer.<br />
<strong>Huka</strong> BV can supply these parts on request of your dealer.<br />
5.4.3 Self-execution of repairs<br />
It is not allowed to execute repairs yourself. By doing so your warranty claim and the<br />
guarantee at the product will expire. Repairs must be accomplished at any time by an<br />
authorized dealer.<br />
5.4.4 Disposal of the product<br />
At the end of the life span of the product, as well as the accessories and the packing, these<br />
can be disposed of as normal waste. You should separate the product to the disposal into the<br />
different materials and hand these over to a garbage waste disposal facility.<br />
Safety<br />
This product meets the requirements for the European<br />
guideline 93/42/EWG on medical products<br />
In the interest of maximum safety the Copilot was approved by<br />
the Rheinisch-Westfälischen TÜV, Germany.<br />
15
Your dealer:<br />
<strong>Huka</strong> BV<br />
P.O. Box 194, 7570 AD Oldenzaal<br />
Tel.: +31 (0)541 572 472 . e-mail: sales@huka.nl<br />
www.huka.nl