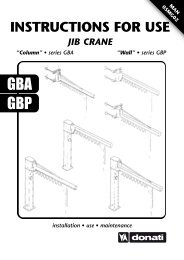
JIB CRANES WITH AN ARTICULATED ARM MANUALLY ROTATED
JIB CRANES WITH AN ARTICULATED ARM MANUALLY ROTATED
JIB CRANES WITH AN ARTICULATED ARM MANUALLY ROTATED

You also want an ePaper? Increase the reach of your titles
YUMPU automatically turns print PDFs into web optimized ePapers that Google loves.
DONATI SOLLEVAMENTI S.r.l. - Via Roma, 55 - 21020 Daverio (VA) - Tel. 0332 942611 - Fax. 0332 948597<br />
4. Block, with the camping couplet shown in the table, the pivots 5 with their related screws 6 in the three<br />
holes at 120 on the pivot’s flange .<br />
5. Insert threaded bar 13 in the pins 5, lock it with relevant washers 4 and self-locking nuts 3-16 taking<br />
care of plates parallelism 4( fig.40 ).<br />
6. Insert in the remaining holes of pins caps keep 5, the springs 7 and the screws 6 verifying with<br />
attention that screws shank buck with special seats obtained on pressure disks 8 ( fig.40 ).<br />
7. Regulate the slid ability of the rotation of the arm, by acting on the braking system using<br />
register/adjuster screws 6, until the traverse sensitivity required is obtained.<br />
8. Carry out the check of the planarity of the arm 9 with the help of a level L. Do this check by rotating<br />
the arm by 90° to the left and to the right ( fig.41 ).<br />
fig.39<br />
fig.41<br />
29<br />
fig.40<br />
The user or installer assigned by the user must:<br />
• install, in the immediate vicinity of the crane, a line switch, protected against<br />
short circuits, showing its function with the appropriate label.<br />
• have earthing connected, to the structure of the crane, corresponding to the<br />
handling points for this purpose<br />
N.B.<br />
The sequence of installation of the second arm is the same as per above mentioned instruction.