JIB CRANES WITH AN ARTICULATED ARM MANUALLY ROTATED
JIB CRANES WITH AN ARTICULATED ARM MANUALLY ROTATED
JIB CRANES WITH AN ARTICULATED ARM MANUALLY ROTATED
You also want an ePaper? Increase the reach of your titles
YUMPU automatically turns print PDFs into web optimized ePapers that Google loves.
DONATI SOLLEVAMENTI S.r.l. - Via Roma, 55 - 21020 Daverio (VA) - Tel. 0332 942611 - Fax. 0332 948597<br />
4.3.3 Assembly of the column – For CBB column-mounted cranes<br />
• The fixing of the column to the ground can be done in the following ways:<br />
• using a foundation frame with log bolts sunk into a plinth made of reinforced<br />
concrete<br />
• using bolts and screw anchors or dowelling.<br />
• The fixing of the column using bolts and screw anchors or dowelling<br />
requires a scrupulous check of suitability in relation to the type of support<br />
flooring.<br />
• The technical data, so that the user can choose the right size for the the<br />
foundation plinth, are shown in the table in paragraph 2.2.7 (“Fixing<br />
systems”p.12).The plinth size must be in relation to the real consistency of<br />
the ground and the specific maximum pressure that it can bear.<br />
• The suitability checks of the foundation are the responsibility of the user<br />
and must be carried out by technical experts who judge the feasibility and<br />
take responsibility for this.<br />
Positioning of the foundation frame in the plinth:<br />
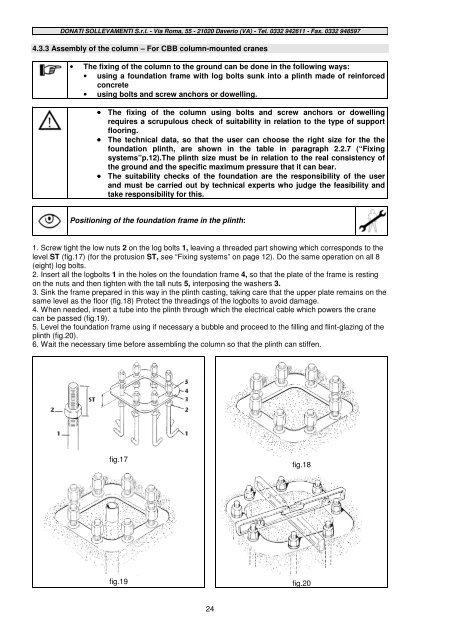
1. Screw tight the low nuts 2 on the log bolts 1, leaving a threaded part showing which corresponds to the<br />
level ST (fig.17) (for the protusion ST, see “Fixing systems” on page 12). Do the same operation on all 8<br />
(eight) log bolts.<br />
2. Insert all the logbolts 1 in the holes on the foundation frame 4, so that the plate of the frame is resting<br />
on the nuts and then tighten with the tall nuts 5, interposing the washers 3.<br />
3. Sink the frame prepared in this way in the plinth casting, taking care that the upper plate remains on the<br />
same level as the floor (fig.18) Protect the threadings of the logbolts to avoid damage.<br />
4. When needed, insert a tube into the plinth through which the electrical cable which powers the crane<br />
can be passed (fig.19).<br />
5. Level the foundation frame using if necessary a bubble and proceed to the filling and flint-glazing of the<br />
plinth (fig.20).<br />
6. Wait the necessary time before assembling the column so that the plinth can stiffen.<br />
fig.17<br />
fig.19<br />
24<br />
fig.18<br />
fig.20


