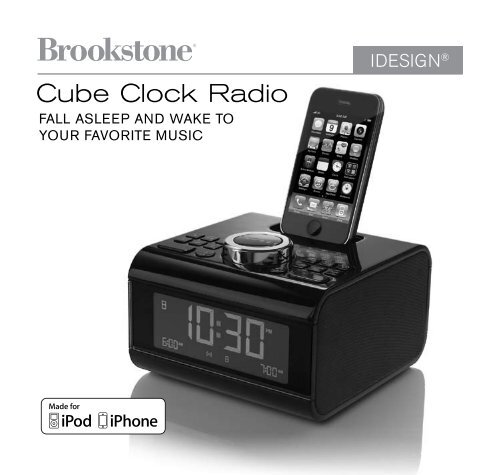
Cube Clock Radio - Brookstone
Cube Clock Radio - Brookstone
Cube Clock Radio - Brookstone

You also want an ePaper? Increase the reach of your titles
YUMPU automatically turns print PDFs into web optimized ePapers that Google loves.
<strong>Cube</strong> <strong>Clock</strong> <strong>Radio</strong><br />
Fall asleep and wake to<br />
your Favorite music<br />
iDesign ®
1<br />
Table of conTenTs<br />
Cautions, Warnings & FCC information . . . . . . . . . . . . . . . . . . . . . . . . . . . . . . . . . . . . . . . . . . . . . . . .2<br />
Location of Controls, icons, Accessories & Compatible iPod ® Models . . . . . . . . . . . . . . . . . . . 6<br />
Compatible iPod/iPhone ® Models . . . . . . . . . . . . . . . . . . . . . . . . . . . . . . . . . . . . . . . . . . . . . . . . . . . .9<br />
Back-up Battery . . . . . . . . . . . . . . . . . . . . . . . . . . . . . . . . . . . . . . . . . . . . . . . . . . . . . . . . . . . . . . . . . . . 10<br />
Button Backlight Operation . . . . . . . . . . . . . . . . . . . . . . . . . . . . . . . . . . . . . . . . . . . . . . . . . . . . . . . . 10<br />
setting the <strong>Clock</strong> . . . . . . . . . . . . . . . . . . . . . . . . . . . . . . . . . . . . . . . . . . . . . . . . . . . . . . . . . . . . . . . . . . 10<br />
Adjusting the Display Backlight . . . . . . . . . . . . . . . . . . . . . . . . . . . . . . . . . . . . . . . . . . . . . . . . . . . . . 11<br />
setting and Activating Alarm 1 . . . . . . . . . . . . . . . . . . . . . . . . . . . . . . . . . . . . . . . . . . . . . . . . . . . . . 11<br />
setting and Activating Alarm 2 . . . . . . . . . . . . . . . . . . . . . . . . . . . . . . . . . . . . . . . . . . . . . . . . . . . . . 12<br />
Deactivating the Alarms . . . . . . . . . . . . . . . . . . . . . . . . . . . . . . . . . . . . . . . . . . . . . . . . . . . . . . . . . . . . 13<br />
Using snooze . . . . . . . . . . . . . . . . . . . . . . . . . . . . . . . . . . . . . . . . . . . . . . . . . . . . . . . . . . . . . . . . . . . . . 13<br />
Using the sleep Function . . . . . . . . . . . . . . . . . . . . . . . . . . . . . . . . . . . . . . . . . . . . . . . . . . . . . . . . . . 14<br />
Power . . . . . . . . . . . . . . . . . . . . . . . . . . . . . . . . . . . . . . . . . . . . . . . . . . . . . . . . . . . . . . . . . . . . . . . . . . . . 14<br />
Listening to the <strong>Radio</strong> . . . . . . . . . . . . . . . . . . . . . . . . . . . . . . . . . . . . . . . . . . . . . . . . . . . . . . . . . . . . . 14<br />
Connecting your iPod/iPhone . . . . . . . . . . . . . . . . . . . . . . . . . . . . . . . . . . . . . . . . . . . . . . . . . . . . . . 15<br />
Playing and Pausing iPod/iPhone Music . . . . . . . . . . . . . . . . . . . . . . . . . . . . . . . . . . . . . . . . . . . . 17<br />
Fast-Forwarding and Rewinding songs . . . . . . . . . . . . . . . . . . . . . . . . . . . . . . . . . . . . . . . . . . . . . 17<br />
skipping Forward and Backward to a song . . . . . . . . . . . . . . . . . . . . . . . . . . . . . . . . . . . . . . . . . . 17<br />
Adjusting the Volume . . . . . . . . . . . . . . . . . . . . . . . . . . . . . . . . . . . . . . . . . . . . . . . . . . . . . . . . . . . . . . 17<br />
Listening to an external source . . . . . . . . . . . . . . . . . . . . . . . . . . . . . . . . . . . . . . . . . . . . . . . . . . . . 17<br />
Using AUX Out . . . . . . . . . . . . . . . . . . . . . . . . . . . . . . . . . . . . . . . . . . . . . . . . . . . . . . . . . . . . . . . . . . . 17<br />
specifications . . . . . . . . . . . . . . . . . . . . . . . . . . . . . . . . . . . . . . . . . . . . . . . . . . . . . . . . . . . . . . . . . . . . . 18<br />
Troubleshooting . . . . . . . . . . . . . . . . . . . . . . . . . . . . . . . . . . . . . . . . . . . . . . . . . . . . . . . . . . . . . . . . . . . 19<br />
Warranty . . . . . . . . . . . . . . . . . . . . . . . . . . . . . . . . . . . . . . . . . . . . . . . . . . . . . . . . . . . . . . . . . . . . . . . . . 21
caUTIon<br />
•<br />
TO ReDUCe THe RisK OF eLeCTRiC sHOCK, DO nOT ReMOVe COVeR .<br />
THeRe ARe nO seRViCeABLe PARTs insiDe .<br />
•<br />
TO ReDUCe THe RisK OF FiRe OR eLeCTRiC sHOCK, DO nOT eXPOse<br />
THis UniT TO RAin OR MOisTURe .<br />
The lightning flash with arrow-head symbol within an equilateral triangle<br />
is intended to alert the user to the presence of uninsulated “dangerous<br />
voltage” within the unit’s enclosure that may be of sufficient magnitude<br />
to constitute a risk of electric shock .<br />
The exclamation point within an equilateral triangle is intended to alert<br />
the user to the presence of important operating and maintenance<br />
(servicing) instructions in the literature accompanying the unit .<br />
IMPoRTanT safeTY InsTRUcTIons<br />
All of the safety and operating instructions should be read, adhered to and followed<br />
before the unit is operated .<br />
save These InsTRUcTIons<br />
2
3<br />
DanGeR<br />
To reduce the risk of electric shock, burns, fire or injury:<br />
1 . Do not use while bathing or in a shower .<br />
2 . Do not place or store unit where it can fall or be pulled into a tub or sink .<br />
3 . Do not place in or drop into water or other liquid .<br />
4 . Do not reach for unit that has fallen into water . Unplug it immediately .<br />
5 .<br />
Care should be taken so that objects do not fall and liquids are not<br />
spilled onto the unit .<br />
WaRnInG<br />
1 .<br />
2 .<br />
3 .<br />
4 .<br />
5 .<br />
6 .<br />
7 .<br />
Close supervision is necessary when this unit is used by or near children .<br />
Use this unit only for its intended use as described in this manual .<br />
Unplug this unit during lightning storms or when unused for long periods<br />
of time .<br />
never drop or insert an object into any opening .<br />
Protect the power cord from being walked on or pinched, particularly at plug<br />
outlets, convenience receptacles and the point where it exits the unit .<br />
Do not allow the cord to touch hot surfaces . Wrap the cord loosely around<br />
the unit when storing .<br />
The unit should be situated away from direct sunlight or heat sources such<br />
as radiators, electric heaters, heat registers, stoves or other units (including<br />
amplifiers) that produce heat . Avoid placing on top of stereo equipment that<br />
radiates heat .
8 .<br />
9 .<br />
never block the air openings of the unit with materials such as clothing,<br />
plastic bags or papers, or place it on a soft surface such as a bed or couch,<br />
where the air openings may be blocked .<br />
Do not overload electrical outlet . Use only the power source as indicated .<br />
10 . Do not carry this unit by its cord or use the cord as a handle .<br />
11 .<br />
12 .<br />
never operate this unit if it has a damaged cord or plug, if it is not working<br />
properly, or if it has been dropped or damaged, or dropped into water . if the<br />
unit’s power supply cord or plug is damaged, do not attempt to fix it yourself .<br />
To avoid the risk of electric shock, do not disassemble or attempt to repair<br />
the unit . incorrect repair can cause risk of electric shock or injury to persons<br />
when the unit is used .<br />
13 .<br />
Do not operate in the presence of explosive and/or flammable fumes .<br />
fcc InfoRMaTIon<br />
This equipment has been tested and found to comply with the limits for a Class B<br />
Digital Device, pursuant to part 15 of the FCC Rules . These limits are designed<br />
to provide reasonable protection against harmful interference in a residential<br />
installation . This equipment generates, uses, and can radiate radio frequency<br />
energy and, if not installed and used in accordance with the instructions, may cause<br />
harmful interference to radio communications . However, there is no guarantee that<br />
interference will not occur in a particular installation .<br />
if this equipment does cause harmful interference to radio or television reception,<br />
which can be determined by turning the equipment off and on, the user is<br />
encouraged to try to correct the interference by one or more of the following measures:<br />
4
5<br />
• Reorient or relocate the receiving antenna .<br />
• increase the distance between the equipment and receiver .<br />
Connect the equipment to an outlet on a circuit different from that<br />
to which the receiver is connected .<br />
• Consult the dealer or an experienced radio/TV technician for help .<br />
This equipment complies with part 15 of the FCC Rules . Operation is subject<br />
to the following two conditions:<br />
1 .<br />
2 .<br />
•<br />
This equipment may not cause harmful interference .<br />
This equipment must accept any interference received, including interference<br />
that may cause undesired operation .<br />
Modifications not authorized by the manufacturer may void the user’s authority<br />
to operate this device .<br />
baTTeRY PRecaUTIons<br />
• Dispose of the old battery properly . Do not dispose of the old battery in a fire .<br />
•<br />
•<br />
Do not leave the battery where a child or pet could play with or swallow it .<br />
if the battery is swallowed, contact a physician immediately .<br />
The battery may explode if mistreated . Do not attempt to recharge<br />
or disassemble the battery .<br />
•<br />
Use only a fresh battery of the required size and type . Do not mix old and<br />
new batteries, different types of batteries, or rechargeable batteries of<br />
different capacities .
locaTIon of PaRTs anD conTRols<br />
1 .<br />
2 .<br />
3 .<br />
4 .<br />
5 .<br />
6 .<br />
7 .<br />
8 .<br />
9 .<br />
10 .<br />
11 .<br />
12 .<br />
13 .<br />
14 .<br />
15 .<br />
Power Button<br />
AUX Mode Button<br />
Alarm 2 On/Off Button<br />
<strong>Clock</strong> set Button<br />
sleep Button<br />
Alarm 2 set Button<br />
Volume/set Dial<br />
snooze Button<br />
Alarm 1 set Button<br />
Alarm 1 On/Off Button<br />
3 <strong>Radio</strong> Preset Buttons<br />
Back Button<br />
iPod/iPhone<br />
Play/Pause Button<br />
Forward Button<br />
iPod/iPhone Dock<br />
12<br />
13 14<br />
16 17<br />
16 . iPod/iPhone Mode Button<br />
17 . <strong>Radio</strong> Mode<br />
AM/FM Button<br />
11 10 9 8 7 6 5 4 3<br />
15<br />
1<br />
2<br />
6
7<br />
locaTIon of Icons on lcD scReen<br />
1 .<br />
2 .<br />
3 .<br />
4 .<br />
5 .<br />
6 .<br />
11<br />
10<br />
9<br />
<strong>Clock</strong><br />
AM/PM icons<br />
<strong>Radio</strong> Band<br />
<strong>Radio</strong> Presets<br />
Alarm 2 Time<br />
Alarm 2 Wake-to icons<br />
8<br />
7 . Alarm 1 Wake-to icons<br />
8 . Alarm 1 Time<br />
9 . <strong>Radio</strong> Mode icon<br />
10 . iPod/iPhone Auto Play icon<br />
11 . iPod/iPhone Mode icon<br />
1 2<br />
7 6 5<br />
3<br />
4
locaTIon of PaRTs anD conTRols<br />
1 .<br />
2 .<br />
3 .<br />
4 .<br />
5 .<br />
6 .<br />
Auxiliary Output<br />
Auxiliary input<br />
FM Antenna Connection<br />
AM Antenna Connection<br />
DC input<br />
Back-up Battery Compartment (on bottom)<br />
1<br />
2<br />
3 4<br />
5<br />
6<br />
8
9<br />
InclUDeD accessoRIes<br />
AM Antenna FM Pigtail<br />
Antenna<br />
DC Adapter<br />
coMPaTIble iPod/iPhone MoDels<br />
iPod touch (2nd generation)*<br />
iPod touch (1st generation)*<br />
iPod classic*<br />
iPod nano (5th generation)*<br />
iPod nano (4th generation)*<br />
iPhone 3gs*<br />
iPhone 3g*<br />
iPhone*<br />
3.5mm to<br />
3.5mm Cable<br />
iPod/iPhone<br />
Dock Adapters<br />
(7 Included)<br />
*Dock adapter included
acK-UP baTTeRY<br />
1 .<br />
2 .<br />
Remove the pull tab from the BATTeRY COMPARTMenT to activate back-up<br />
battery for first use .<br />
To replace the battery, remove the screw on the door of the BATTeRY<br />
COMPARTMenT and lift the cover .<br />
3 . slide 1 CR-2032 button cell battery into the BATTeRY COMPARTMenT,<br />
making sure that the positive side “+” is up and the edge of the battery slides<br />
under the positive contact .<br />
4 . Replace the BATTeRY COMPARTMenT door and secure the screw .<br />
note: the back-up battery is used only to maintain the clock time, alarm time<br />
and radio presets during a power failure. all other features run off of dc power.<br />
bUTTon bacKlIGhT oPeRaTIon<br />
Press any button to illuminate button backlights for 5 seconds .<br />
seTTInG The clocK<br />
1 .<br />
2 .<br />
3 .<br />
4 .<br />
5 .<br />
6 .<br />
Plug the ADAPTeR into a power outlet . <strong>Clock</strong> graphics appear on the display .<br />
Press and hold the CLOCK/seT button for 2 seconds and the hour will flash .<br />
Turn the VOLUMe/seT dial to choose the hour .<br />
Press the CLOCK/seT button to save the hour . The minutes will flash .<br />
Turn the VOLUMe/seT dial to choose the minutes .<br />
Press the TiMe/seT button to save the minutes . The minutes will stop<br />
flashing and the current time will be saved and will show on the display .<br />
note: if the clock/set button is not pressed while the hour or minutes<br />
are flashing, the unit will automatically save the settings after 5 seconds.<br />
10
11<br />
aDjUsTInG The DIsPlaY bacKlIGhT<br />
There are 5 backlight settings for the display: HigH, MeDiUM, LOW, DiM and OFF .<br />
Press the snOOZe button for 3 seconds and continue holding to toggle through<br />
each of the backlight settings . The backlight setting will change every 3 seconds<br />
while the snOOZe button is being pressed and held .<br />
if the backlight is set to OFF, you may press the snOOZe bar once to turn<br />
the backlight to LOW for 5 seconds .<br />
note: if the backlight is set to oFF when the alarm sounds or during<br />
snooze, the backlight will automatically illuminate on low. Backlight<br />
will remain on during snooze.<br />
seTTInG anD acTIvaTInG alaRM 1<br />
1 .<br />
2 .<br />
3 .<br />
4 .<br />
5 .<br />
Press and hold the ALARM 1 seT button for 2 seconds . The clock will<br />
go into Alarm 1 set mode . Alarm 1 hour will flash .<br />
Use the VOLUMe/seT dial to choose the hour . Press the ALARM 1<br />
seT button to save the hour . The minutes will flash .<br />
Use the VOLUMe/seT dial to choose the minutes . Press the ALARM 1<br />
seT button to save the minutes . The Alarm 1 time is saved . The Wake-to<br />
choice icon will flash .<br />
Use the VOLUMe/seT dial to select your wake-to choice from iPod,<br />
<strong>Radio</strong> or Buzzer .<br />
Press the ALARM 1 seT button to save all settings . if the ALARM 1 seT button<br />
is not pressed while the hours, minutes or wake-to choice is flashing, the alarm<br />
information will be saved and the clock will display after 5 seconds .
6 .<br />
Activate Alarm 1 by pressing the ALARM 1 button on the top of the clock .<br />
When the button is “up”, the alarm is activated and the Alarm 1 time and<br />
wake-to choice icon will appear on the display .<br />
seTTInG anD acTIvaTInG alaRM 2<br />
1 .<br />
2 .<br />
3 .<br />
4 .<br />
5 .<br />
6 .<br />
Press and hold the ALARM 2 seT button for 2 seconds . The clock will<br />
go into Alarm 2 set mode . Alarm 2 hour will flash .<br />
Use the VOLUMe/seT dial to choose the hour . Press the ALARM 2 seT<br />
button to save the hour . The minutes will flash .<br />
Use the VOLUMe/seT dial to choose the minutes . Press the ALARM 2<br />
seT button to save the minutes . The Alarm 2 time is saved . The Wake-to<br />
choice icon will flash .<br />
Use the VOLUMe/seT dial to select your wake-to choice from iPod,<br />
<strong>Radio</strong> or Buzzer .<br />
Press the ALARM 2 seT button to save all settings . if the ALARM 2 seT button<br />
is not pressed while the hours, minutes or wake-to choice is flashing, the alarm<br />
information will be saved and the clock will display after 5 seconds .<br />
Activate Alarm 2 by pressing the ALARM 2 button on the top of the clock .<br />
When the button is “up”, the alarm is activated and the Alarm 2 time and<br />
wake-to choice icon will appear on the display .<br />
note: the alarm sound for both alarm 1 and alarm 2 incrementally<br />
increases in volume, reaching its loudest setting in 30 seconds.<br />
12
13<br />
DeacTIvaTInG The alaRMs<br />
When the alarm sounds, press the ALARM 1 or ALARM 2 button into its “down”<br />
position to shut off the alarm .<br />
•<br />
•<br />
if the alarm wake-to choice is set to buzzer, the buzzer will sound for 20 minutes*<br />
if the alarm is not turned off or the snOOZe button isn’t pressed .<br />
if the alarm wake-to choice is set to the radio, the radio will play for 60 minutes*<br />
if the alarm is not turned off or the snOOZe button isn’t pressed .<br />
•<br />
if the alarm wake-to choice is set to play your iPod/iPhone, the iPod/iPhone<br />
will play for 60 minutes* if the alarm is not turned off or the snOOZe button<br />
isn’t pressed .<br />
*After sounding for 20 or 60 minutes (depending on Wake-to choice), the alarm<br />
will turn off and automatically reset for the following day .<br />
UsInG snooze<br />
When the alarm is sounding, press the snOOZe button to activate snooze .<br />
The alarm will sound again in 10 minutes . You may repeat this action 6 times .<br />
After the 6th snooze, the snooze function cannot be activated . if the alarm<br />
is not manually turned off, the alarm buzzer will continue to sound for 20 minutes<br />
or the iPod/iPhone or radio will continue to play for 60 minutes . The alarm will<br />
then turn off and reset for the following day .<br />
During a snooze, the Wake-to icon will blink .<br />
if the backlight is set to OFF when the alarm sounds or during a snooze,<br />
the backlight will automatically illuminate on LOW .
UsInG The sleeP fUncTIon<br />
The sleep function shuts the audio off automatically within a selected time .<br />
The sleep timer can be set for 60, 45, 30 or 15 minutes .<br />
1 .<br />
2 .<br />
3 .<br />
To choose a sleep time or to turn the sleep function OFF, press the<br />
sLeeP button to scroll through your choices of 60, 45, 30, 15 minutes<br />
and OFF .<br />
Release the sLeeP button when your choice appears on the display .<br />
While in sleep mode, press the sLeeP button once and the remaining<br />
sleep time will appear on the display for 3 seconds .<br />
note: when using a secondary audio device with the auX mode,<br />
the sleep function will turn off the clock’s audio but it will not turn<br />
off the secondary audio device.<br />
PoWeR<br />
Press the power button to turn the unit on . The last mode used will activate .<br />
Press the power button to turn the unit off .<br />
lIsTenInG To The RaDIo<br />
Fm antenna<br />
Connect the FM pigtail antenna (included) to the “FM AnTennA” socket<br />
on the back of the main unit .<br />
While in FM mode, tune in an FM station and extend the FM pigtail antenna<br />
to find the best position for reception .<br />
14
15<br />
am loop antenna<br />
Connect the AM loop antenna (included) to the “AM AnTennA” socket on<br />
the back of the main unit . While in AM mode, tune in an AM station and position<br />
the AM antenna for the best reception .<br />
listening to the radio<br />
Press the RADiO button . The display shows the last station chosen .<br />
After 5 seconds, the display returns to the current time .<br />
To choose a radio band, press the RADiO button to toggle between AM and FM .<br />
To choose a radio station on either the AM or FM bands, press the FORWARD<br />
or BACK buttons to scroll through station choices .<br />
if you press and hold the FORWARD or BACK buttons, the unit will<br />
automatically go into search mode and will stop on the next available station<br />
with the strongest signal .<br />
preset stations<br />
Tune to your preferred radio station using the FORWARD and BACK buttons .<br />
To save your selection, press and hold the preset 1, 2 or 3 button until a beep<br />
sounds . Your station is saved .<br />
To recall a preset station, press the preset button while in <strong>Radio</strong> mode .<br />
connecTInG YoUR iPod/iPhone<br />
select the correct iPod/iPhone DOCK ADAPTeR from the list on page 16,<br />
or use the one that came with your iPod/iPhone, and snap it securely into the<br />
docking area on the top of the unit .
iPod/iPhone DOCK ADAPTeRs included are as follows:<br />
insert 10: iPod classic (160 gB [2009])<br />
insert 12: iPhone<br />
insert 14: iPod touch (1st generation)<br />
insert 15: iPhone 3g/iPhone 3gs<br />
insert 16: iPod touch (2nd generation)<br />
insert 17: iPod nano (4th generation)<br />
insert 18: iPod nano (5th generation)<br />
Plug your iPod/iPhone into the dock .<br />
ipod/iphone auto play<br />
You can choose for your iPod or iPhone to start playing automatically or go directly<br />
into sleep mode when it is docked .<br />
Press and hold the iPod button until the display shows the iPod icon and the “Auto”<br />
icon . Press the iPod button once to deactivate Auto Play (AUTO is not circled –<br />
see chart below) .<br />
Press the iPod button again to activate Auto Play (AUTO is circled – see chart below) .<br />
After 3 seconds, the display will return to the clock and your Auto Play setting<br />
will be saved .<br />
������������<br />
���������������������<br />
AUTO<br />
������������<br />
�������������������<br />
AUTO<br />
16
17<br />
PlaYInG anD PaUsInG IPoD/IPhone MUsIc<br />
Press the iPod PLAY/PAUse button to pause playback . Press the iPod<br />
PLAY/PAUse button again to resume playback .<br />
fasT-foRWaRDInG anD ReWInDInG sonGs<br />
Press and hold the FORWARD or BACK button to rewind or fast-forward<br />
within a song .<br />
sKIPPInG foRWaRD anD bacKWaRD To a sonG<br />
Press and release the FORWARD or BACK button incrementally to skip<br />
forward or backward to a song .<br />
aDjUsTInG The volUMe<br />
Turn the VOLUMe dial to adjust volume from 0 to 40 .<br />
lIsTenInG To an exTeRnal soURce<br />
1 .<br />
2 .<br />
Connect one end of a 3 .5mm to 3 .5mm cable (included) to your portable<br />
audio player’s line-out or headphone jack and the other end to the “AUX in”<br />
jack on the back of the unit .<br />
Press the AUX button to select “AUX” mode . “AUX” will display for 5 seconds .<br />
3 . Adjust the volume using the VOLUMe buttons of the unit and the audio player .<br />
note: the function buttons on the unit will not control an audio player that is<br />
connected by the auX in input.<br />
UsInG aUx oUT<br />
Use the AUX OUT jack to connect your audio to additional sources .
sPecIfIcaTIons<br />
Power supply . . . . . . . . . . . . . . . . . . . . . . . . . . . . . . . . . . . . . . . . AC 100V~240V, 50/60Hz (input)<br />
DC7 .5V/2A (Output)<br />
Battery . . . . . . . . . . . . . . . . . . . . . . . . . . . . . . . . . . . . . . DC 3V×1 pc (size: CR-2032)<br />
for back-up<br />
Receiving Bands . . . . . . . . . . . . . . . . . . . . . . . . . . . . . AM/FM<br />
Tuning Range . . . . . . . . . . . . . . . . . . . . . . . . . . . . . . . . AM 520—1710 KHz<br />
FM 87 .5 - 108 .0MHz<br />
Loudspeaker . . . . . . . . . . . . . . . . . . . . . . . . . . . . . . . . . 4 0hm speaker<br />
Weight (approximate) . . . . . . . . . . . . . . . . . . . . . . . . . 2lbs 36oz .<br />
Dimensions (approximate) . . . . . . . . . . . . . . . . . . . . . 5 .75 W x 6 .25 D x 3 .75<br />
iPod/iPhone not included . iPod and iPhone are trademarks of Apple inc ., registered in the U .s . and<br />
other countries . “Made for iPod” and “Made for iPhone” mean that an electronic accessory has been<br />
designed to connect specifically to iPod or iPhone, respectively, and has been certified by the developer<br />
to meet Apple performance standards . Apple is not responsible for the operation of this device or its<br />
compliance with safety and regulatory standards .<br />
18
19<br />
TRoUbleshooTInG<br />
issue solution<br />
Cannot insert the<br />
iPod/iPhone .<br />
iPod/iPhone<br />
not functioning<br />
correctly .<br />
Confirm that you are using the correct dock adapter<br />
for your iPod/iPhone .<br />
Remove dust, lint or particles from the 30-pin<br />
connector and the iPod/iPhone’s jack, and insert<br />
the iPod/iPhone again .<br />
Remove the iPod/iPhone from the dock, wait a few<br />
seconds, and insert it again .<br />
Your iPod/iPhone software may not be up to date .<br />
Connect your iPod/iPhone to your computer and open<br />
iTunes . Check for and download any updates as required .<br />
no power . Check the connection to the AC power supply . Check<br />
and make sure the AC source is not an outlet powered<br />
by a wall switch . if it is, ensure the switch is turned on .<br />
<strong>Radio</strong> reception<br />
is poor .<br />
Tune in to the station properly .<br />
Rotate the FM or AM antenna for better reception .
TRoUbleshooTInG<br />
issue solution<br />
Preset number does<br />
not change on the<br />
display when Preset<br />
button is pressed .<br />
i hear no sound,<br />
or distorted sound,<br />
when using an<br />
audio player with<br />
the AUX in input .<br />
The unit did not<br />
remember the correct<br />
time after power was<br />
disconnected and<br />
reconnected .<br />
When two or more presets are saved to the same<br />
station, the lowest preset number will appear on the<br />
display . Refer to page 15 to save a new station to<br />
a preset number .<br />
You must adjust the volume of the external source<br />
or you may hear no sound from the unit's speakers .<br />
Turning the volume of the external audio source up<br />
too high may cause the sound from your stereo to be<br />
distorted . Reduce the volume of the external source<br />
until the distortion stops and then adjust the volume<br />
level of the main unit to a comfortable listening level .<br />
The back-up battery needs to be replaced .<br />
see page 10 for replacing the back-up battery .<br />
20
21<br />
one (1) YeaR lIMITeD WaRRanTY<br />
<strong>Brookstone</strong> ® warrants this product against defects in materials and/or workmanship<br />
under normal use for a period of One (1) YeAR from the date of purchase by the<br />
original purchaser (“Warranty Period”) . if a defect arises and a valid claim is received<br />
within the Warranty Period, at its option, <strong>Brookstone</strong> will either 1) repair the defect<br />
at no charge, using new or refurbished replacement parts, or 2) replace the product<br />
with a new product that is at least functionally equivalent to the original product, or<br />
3) provide a store credit in the amount of the purchase price of the original product .<br />
A replacement product or part, including a user-installable part installed in accordance<br />
with instructions provided by <strong>Brookstone</strong>, assumes the remaining warranty of the<br />
original product . When a product or part is exchanged, any replacement item becomes<br />
your property and the replaced item becomes <strong>Brookstone</strong>’s property . When a store<br />
credit is given, the original product must be returned to <strong>Brookstone</strong> and becomes<br />
<strong>Brookstone</strong>’s property .<br />
obtaining service: To obtain warranty service, call <strong>Brookstone</strong> Limited Warranty service at<br />
1-800-292-9819 . Please be prepared to describe the product that needs service and<br />
the nature of the problem . A purchase receipt is required . All repairs and replacements<br />
must be authorized in advance . service options, parts availability and response times<br />
will vary . You are responsible for delivery and the cost of delivery of the product or any<br />
parts to the authorized service center for replacement, per our instructions .<br />
limits and exclusions: Coverage under this Limited Warranty is limited to the United<br />
states of America, including the District of Columbia and the U .s . Territories of<br />
guam, Puerto Rico, and the U .s . Virgin islands .This Limited Warranty applies only to<br />
products manufactured for <strong>Brookstone</strong> that can be identified by the “<strong>Brookstone</strong>”<br />
trademark, trade name, or logo affixed to them or their packaging . The Limited<br />
Warranty does not apply to any non-<strong>Brookstone</strong> products . Manufacturers or<br />
suppliers other than <strong>Brookstone</strong> may provide their own warranties to the purchaser,
ut <strong>Brookstone</strong>, in so far as permitted by law, provides these products “as is .”<br />
This warranty does not apply to: a) damage caused by failure to follow instructions<br />
relating to product’s use or the installation of components; b) damage caused by<br />
accident, abuse, misuse, fire, floods, earthquake or other external causes; c) damage<br />
caused by service performed by anyone who is not a representative of <strong>Brookstone</strong>;<br />
d) accessories used in conjunction with a covered product; e) a product or part<br />
that has been modified to alter functionality or capability; f) items intended to be<br />
periodically replaced by the purchaser during the normal life of the product including,<br />
without limitation, batteries or light bulbs; g) any product sold “as is” including, without<br />
limitation, floor demonstration models and refurbished items; or h) a product that is<br />
used commercially or for a commercial purpose .<br />
<strong>Brookstone</strong> shall not Be liaBle For incidental or conseQuential<br />
damages resulting From the use oF this product, or arising<br />
out oF any Breach oF this warranty. to the eXtent permitted By<br />
applicaBle law, <strong>Brookstone</strong> disclaims any and all statutory or<br />
implied warranties, including, without limitation, warranties<br />
oF merchantaBility, Fitness For a particular purpose and<br />
warranties against hidden or latent deFects. iF <strong>Brookstone</strong><br />
cannot lawFully disclaim statutory or implied warranties, then<br />
to the eXtent permitted By law, all such warranties shall Be<br />
limited in duration to the duration oF this eXpress warranty.<br />
some states disallow the exclusion or limitation of incidental or consequential<br />
damages or how long an implied warranty lasts, so the above exclusions or limitations<br />
may not apply to you . This warranty gives you specific legal rights and you may also<br />
have other rights, which vary from state to state .<br />
22
Merrimack, new Hampshire UsA 03054 • 800-846-3000 • www .<strong>Brookstone</strong> .com<br />
647131