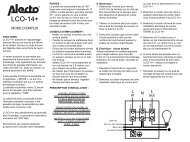
users manual - Alecto
users manual - Alecto
users manual - Alecto

You also want an ePaper? Increase the reach of your titles
YUMPU automatically turns print PDFs into web optimized ePapers that Google loves.
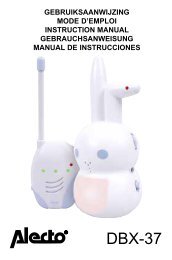
USERS MANUAL<br />
DBX-89
1 ECO MODE<br />
This <strong>Alecto</strong> DBX-89 babyphone is equipped with an unique<br />
ECO mode. Already in normal operation mode, the babyunit<br />
stops transmission when the baby is not crying. In<br />
Full Eco mode it even suppresses the controlling signals<br />
between the baby-unit and the parent unit, so no transmitting<br />
at all.<br />
Next to the Full eco mode, you can set the output power.<br />
In case you are at home with your baby not far away, you<br />
can set the babyphone in half range mode, with low transmitting<br />
power and reduced power consumption. In case<br />
the baby is not close to you, you may switch to full range.<br />
Attention: once the baby produces noise, the baby-unit is<br />
activated and contacts the parent unit. This causes a small<br />
delay which means that short sounds from the baby may<br />
not be heard by you. In case you really want to hear all<br />
sounds from the baby room, you must set the sensitivity<br />
to maximum; with this setting the baby-unit is constantly<br />
active.<br />
2
2 OVERVIEW<br />
2.1 OVERVIEW PARENT UNIT:<br />
1<br />
2<br />
3<br />
4<br />
5<br />
6<br />
7<br />
1 sound indication LED’s<br />
2 talk back button<br />
3 display (see paragraph 2.3)<br />
4 power on/off<br />
5 volume down; down button<br />
when programming<br />
6 MENU<br />
7 loudspeaker<br />
8 DC input for power adapter<br />
3<br />
12<br />
11<br />
10<br />
9 microphone (for the talk back<br />
feature<br />
10 volume up; down button when<br />
programming<br />
11 start/stop lullaby<br />
12 lamps (see paragraph 2.4)<br />
: link check<br />
: low battery / charging<br />
: FULL ECO<br />
9<br />
8
2.2 OVERVIEW BABY UNIT:<br />
1<br />
2<br />
3<br />
4<br />
5<br />
1 temperature sensor (backside<br />
baby unit<br />
2 built-in nightlight (not visible<br />
when switched-off<br />
3 display (see paragraph 2.3)<br />
4 power on/off<br />
5 selection lullaby<br />
6 volume-down<br />
7 start-stop lullaby<br />
6<br />
7<br />
8 loudspeaker<br />
9 volume-up<br />
10 page (to page the parent unit)<br />
11 DC input for power adapter<br />
12 nightlight<br />
13 microphone<br />
14 lamps (see paragraph 2.4)<br />
: power<br />
: low battery<br />
4<br />
8<br />
14<br />
13<br />
12<br />
11<br />
10<br />
9
2.3 OVERVIEW DISPLAY:<br />
on when night light is enabled<br />
off when night light is disabled<br />
on when lullaby is playing<br />
on when the speaker volume is turned<br />
off; off when the speaker volume is<br />
turned on<br />
on when sound alert is enabled<br />
flashes when sound alert is triggered<br />
on when Celsius temperature format is selected<br />
on when Fahrenheit temperature format is selected<br />
on when temperature alert is enabled, flashes when<br />
temperature alert is triggered<br />
on when vibration alert is enabled, flashes when vibration<br />
alert is triggered<br />
on when the alarm time/count down timer is set, flashes<br />
when the alarm time/count down timer is arrived<br />
5<br />
displaying of the<br />
several functions<br />
and warnings<br />
during use<br />
displaying of the<br />
several settings<br />
during programming
attery indication:<br />
full battery level<br />
2/3 battery level<br />
1/3 battery level<br />
battery empty<br />
parent unit: this indication animates in cycle while charging<br />
baby-unit: this indication does not light when the power<br />
adapter is connected<br />
2.4 OVERVIEW LAMPS:<br />
Baby unit:<br />
Lamp : Power Indicator<br />
on when the parent unit is switched on<br />
off when the parent unit is switched off<br />
Lamp : Low Battery Indicator<br />
fl ashes when low battery is detected<br />
Parent unit:<br />
Lamp : Low Battery / Charging Indicator<br />
on steadily when in charging mode<br />
blinks when low battery level is detected<br />
Lamp : Link indicator<br />
fl ashes when there is no link between baby unit and<br />
parent unit or parent unit is out of range with the baby unit.<br />
on steadily when linked to the baby unit<br />
off during FULL ECO mode<br />
in the full eco mode this lamp only lights when the parent unit<br />
actual receives noise from the baby unit; in idle state this<br />
lamp is OFF during FULL ECO mode<br />
Lamp : ECO Indicator<br />
off when FULL ECO mode feature is OFF<br />
on steadily if Full ECO setting is ON<br />
6
3 INSTALLATION<br />
3.1 PARENT UNIT:<br />
The parent unit is powered by 2 supplied rechargeable<br />
batteries. These batteries are charged through the included<br />
power adapter.<br />
1.<br />
2.<br />
3.<br />
4.<br />
5.<br />
ATTENTION:<br />
NEVER install normal batteries in the parent unit.<br />
Normal batteries cannot be charged and will<br />
damage the parent unit when charged.<br />
Remove the battery compartment cover.<br />
Insert 2 x AA rechargeable batteries,<br />
observing their polarities, into the battery<br />
compartment on the parent Unit.<br />
Replace the battery door on the Parent<br />
Unit.<br />
Connect the output plug of the mains adapter to<br />
the DC socket on the side of the baby unit and the<br />
mains adapter to the wall mains supply.<br />
The LOW BATTERY/CHARGING LED comes on<br />
and charging begins. As soon as the battery icon<br />
in the LCD lights steadily, the batteries are fully<br />
charged.<br />
NOTE<br />
If no batteries are inserted in the parent unit, it can still be<br />
powered on when connecting to the mains power.<br />
7
3.2 BABY UNIT:<br />
You can use the baby unit from the mains power or on<br />
alkaline batteries. Even if you are going to use the unit<br />
from the mains, you are recommended to insert alkaline<br />
batteries (excl.). This guarantees automatic backup in<br />
case of mains failure.<br />
1.<br />
2.<br />
3.<br />
4.<br />
Remove the battery compartment cover.<br />
Insert 4x AA alkaline batteries.<br />
Reattach the battery compartment cover.<br />
Connect the output plug of the mains adapter to<br />
the DC socket on the side of the baby unit and the<br />
mains adapter to the wall mains supply.<br />
Only use normal Alkaline batteries in the Baby unit.<br />
3.3 RECOMMENDATIONS:<br />
•<br />
•<br />
•<br />
•<br />
•<br />
•<br />
•<br />
•<br />
•<br />
Avoid exposure of the units to moisture or liquid.<br />
Clean the units with a damp cloth.<br />
Do not expose the units to extreme heat or direct<br />
sunlight.<br />
To prevent electric shock, do not open the cabinets<br />
of the baby unit, parent unit and charger.<br />
Avoid metallic contact (e.g. metal clips, keys) between<br />
the battery contacts and charging conductors.<br />
Read the marking on the mains adapter for the<br />
mains supply required for this baby monitor.<br />
Make sure the baby unit and mains adaptor cable<br />
are always out of reach of the baby.<br />
Never place the baby unit inside your baby’s cot,<br />
bed or playpen.<br />
Never cover the units such as with clothes, towels or<br />
blankets.<br />
8
•<br />
Follow the local regulations regarding the disposal<br />
of your packing materials, exhausted batteries and<br />
used units. Wherever possible, recycle those materials.<br />
9
4 USING YOUR BABY<br />
MONITOR<br />
Please read these instructions carefully, and be reminded<br />
that this baby monitor is just intended as an aid. It is not a<br />
substitute for responsible, correct parental supervision.<br />
4.1 POWER ON/OFF:<br />
2 sec.<br />
2 sec.<br />
provided the parent unit is off, press<br />
and hold for about 2<br />
seconds to switch-ON the unit<br />
provided the parent unit is on, press<br />
and hold for about 2<br />
seconds to switch-OFF the unit<br />
4.2 LINK CHECK:<br />
As soon as the parent unit is turned on, it starts looking<br />
for the baby unit.<br />
1. The link-led blinks and the text [SEARCHING]<br />
2.<br />
comes on the display<br />
As soon as the parent unit finds the baby unit, the<br />
link-LED lights steadily,<br />
3. In case the parent unit cannot find the baby unit<br />
within a period of 30 seconds (because it is not yet<br />
switched on, the batteries of the baby-unit are empty<br />
or the distance is too large), the text [ NOT LINKED]<br />
comes on the display and attention tones sound<br />
every 10 seconds.<br />
10
4.3 LANGUAGE:<br />
It is recommended to fi rst set the language so that all text<br />
comes on the LCD in your favorite language. By default<br />
the English language is programmed.<br />
You only have to set the language onto the parent unit, the<br />
baby unit will be synchronized automatically.<br />
2x<br />
Menu<br />
- +<br />
Menu<br />
press the MENU button 2x<br />
fi nd the required language<br />
press the MENU button to confi rm and<br />
to store the setting<br />
briefl y press the POWER button to end<br />
the programming mode<br />
4.4 MONITORING:<br />
As soon as the baby unit detects a sound, it will send it to<br />
the parent unit.<br />
- +<br />
receiving volume:<br />
press the - button to decrease the<br />
volume or the + button to increase the<br />
volume (5 levels + volume-OFF)<br />
You will hear an extra beep when the<br />
lowest or the highest level is reached and<br />
when you press the - or + button.<br />
the icon lights when the volume is<br />
set to off (no sound)<br />
11
Optical indication:<br />
the sound is also displayed visually<br />
by LED’s; monitoring can therefore be<br />
carried out even when the volume has<br />
been reduced or switched off altogether<br />
4.5 SOUND ALERT:<br />
With the volume set to off, the babyphone can still warn<br />
you with beep-tones that the baby is crying loud.<br />
2x<br />
Menu<br />
- +<br />
Menu<br />
enable/disable sound alert:<br />
press the MENU button<br />
fi nd the option [ SOUND ALERT ]<br />
press the menu button 2x:<br />
if the alert is currently off, it will now be<br />
set to on; if the alert is currently on, it<br />
will now be set to off<br />
briefl y press the POWER button to end<br />
the programming mode<br />
sound alert indication:<br />
the icon is on when sound alert is<br />
enabled and it flashes when the sound<br />
alert is triggered<br />
12
4.6 VIBRA ALERT:<br />
If the vibrator is set on, the parent unit will vibrate when the<br />
noise level from the baby unit reaches the level that turns<br />
on LEDs 3, 4 and 5 while the loudspeaker volume of parent<br />
unit is switched off.<br />
2x<br />
Menu<br />
- +<br />
Menu<br />
enable/disable vibra alert:<br />
press the MENU button<br />
fi nd the option [ VIBRATOR ]<br />
press the menu button 2x:<br />
if the alert is currently off, it will now be<br />
set to on; if the alert is currently on, it<br />
will now be set to off<br />
briefl y press the POWER button to end<br />
the programming mode<br />
sound alert indication:<br />
the icon is on when vibra alert is<br />
enabled and it flashes when the vibra<br />
alert is triggered<br />
You might use this feature in combination with the feature<br />
of Sound alert.<br />
13
4.7 LULLABIES:<br />
5 Different lullabies are programmed into this babyphone<br />
Menu<br />
- +<br />
Menu<br />
- +<br />
Menu<br />
start/stop:<br />
press button to play<br />
press button again to stop<br />
(you can also press button on the baby unit to<br />
start playing the lullabies)<br />
lullaby indication:<br />
the icon is on when the baby unit is<br />
playing lullabies<br />
select lullabies from the Parent unit:<br />
press the MENU button<br />
fi nd the option [ LULLABY ]<br />
press the MENU button<br />
look for the desired lullaby<br />
press the MENU button to confi rm and<br />
to store the setting<br />
briefl y press the POWER button to end<br />
the programming mode<br />
14
- +<br />
Menu<br />
- +<br />
Menu<br />
- +<br />
Menu<br />
15min.<br />
select lullabies from the Baby unit:<br />
press button to select another lullaby<br />
control the volume on the Baby unit:<br />
Press the - button to decrease the<br />
volume or the + button to increase the<br />
volume<br />
control the volume on the Parent unit:<br />
press the MENU button<br />
fi nd the option [BABY VOLUME]<br />
press the MENU button<br />
set the required volume<br />
(attention: the actual volume does not change<br />
yet)<br />
press the MENU button to confi rm and<br />
to store the setting<br />
(only now the new volume setting will be effective)<br />
briefl y press the POWER button to end<br />
the programming mode<br />
Play time:<br />
the maximum play time for one or for<br />
all lullabies is 15 minutes<br />
15
4.8 NIGHTLIGHT:<br />
You can control the nightlight directly on the baby unit or<br />
remotely by the parent unit.<br />
2x<br />
Menu<br />
- +<br />
Menu<br />
control the nightlight on the Baby unit:<br />
press the button to switch-on/off the<br />
nightlight<br />
control the nightlight on the Parent unit:<br />
press the MENU button<br />
fi nd the option [ NIGHTLIGHT ]<br />
press the menu button 2x:<br />
if the nightlight is currently off, it will<br />
now be set to on; if the nightlight is currently<br />
on, it will now be set to off<br />
briefl y press the POWER button to end<br />
the programming mode<br />
night light indication:<br />
the icon is on when the night light<br />
is switched on<br />
16
4.9 TALK BACK:<br />
Talk<br />
- +<br />
Menu<br />
- +<br />
Menu<br />
- +<br />
Menu<br />
Press and hold TALK on the Parent unit<br />
to speak to the baby.<br />
The display on the Parent unit shows<br />
[ TALK ] and the display on the Baby<br />
unit show [ TALKBACK ]<br />
control the volume on the Baby unit:<br />
press the - button to decrease the<br />
volume or the + button to increase the<br />
volume<br />
control the volume on the Parent unit:<br />
press the MENU button<br />
fi nd the option [ BABY VOLUME ]<br />
press the MENU button<br />
set the required volume<br />
(attention: the actual volume does not change<br />
yet)<br />
press the MENU button to confi rm and<br />
to store the setting<br />
(only now the new volume setting will be effective)<br />
briefl y press the POWER button to end<br />
the programming mode<br />
17
4.10 SENSITIVITY:<br />
You can adjust the sensitivity on the Parent Unit to monitor<br />
the sound from Baby Unit:<br />
Menu<br />
- +<br />
Menu<br />
- +<br />
Menu<br />
press the MENU button<br />
fi nd the option [ SENSITIVITY ]<br />
press the MENU button<br />
select the required level<br />
There are fi ve levels of sensitivity which are<br />
indicated by lighted blocks:<br />
level 1 represents lowest sensitivity<br />
level 4 represents a high sensitivity<br />
level 5 represents the highest sensitivity (the<br />
microphone is activated all the time)<br />
You will hear an extra beep when the lowest or the<br />
highest level is reached and when you press the - or<br />
+ button.<br />
press the MENU button to confi rm and<br />
to store the setting<br />
briefl y press the POWER button to end<br />
the programming mode<br />
4.11 ROOM TEMPERATURE AND ALERT:<br />
In idle state the display of both the Baby unit and the<br />
Parent unit indicates the temperature of the Baby room in<br />
degrees Celsius (°C) or in degrees Fahrenheit (°F). With<br />
this option you can set the format, the limits and enable or<br />
disable the Temperature alert.<br />
18
Menu<br />
- +<br />
Menu<br />
- +<br />
[ FORMAT ]<br />
[ MIMIMUM ]<br />
[ MAXIMUM ]<br />
[ ALERT ON/OFF ]<br />
Menu<br />
- +<br />
Menu<br />
press the MENU button<br />
fi nd the option [ TEMPERATURE ]<br />
press the MENU button<br />
use the buttons -/+ to select between:<br />
to alter between Celsius and<br />
Fahrenheit<br />
to set the minimum temperature<br />
(in between 11°C (50°F) and 21°C(68°F))<br />
to set the maximum temperature<br />
(in between 22°C (69°F) and 39°C(99°F))<br />
to enable or disable the temperature<br />
alert<br />
press the MENU button<br />
use the buttons -/+ to change the<br />
settings<br />
press the MENU button to confi rm and<br />
to store the setting<br />
briefl y press the POWER button to end<br />
the programming mode<br />
19
temperature alert indication:<br />
the icon is on when the temperature<br />
alert is enabled<br />
working temperature alert:<br />
If the temperature goes beyond the<br />
minimum or maximum level, “COLD”<br />
or “HOT” indication displays and the<br />
current temperature flashes in the<br />
displays of both Units.<br />
If the Temperature alert is set to On, an alert will be sound<br />
at the Parent Unit.<br />
4.12 ALARM:<br />
Alarm feature is useful for you to remind yourself for some<br />
special arrangements, like feeding time, etc.<br />
Menu<br />
- +<br />
Menu<br />
press the MENU button<br />
fi nd the option [ ALARM ]<br />
press the MENU button<br />
20
[ OFF ]<br />
- +<br />
[ SET TIMER ]<br />
use the buttons -/+ to select between:<br />
[ OFF ] and [ SET TIMER ]<br />
press the MENU button to disable the<br />
alarm<br />
press the MENU button to set the alarm<br />
feature<br />
1. pres the MENU button and use -/+ to set the<br />
hours<br />
2. pres the MENU button and use -/+ to set the<br />
minutes<br />
3. pres the MENU button and use -/+ to toggle<br />
between [ ONCE ] and [ REPEATED ]<br />
briefl y press the POWER button to end<br />
the programming mode<br />
alarm indication:<br />
the icon is on when the timer is activated;<br />
in the lower part of the display<br />
you can see the timer time<br />
working alarm:<br />
- in the lower part of the display you can see the alarm time;<br />
when it reaches 00:00 it will beep for up to 30 seconds; press<br />
any button to stop the alarm<br />
- in case you selected [ REPEATED ] now the alarm starts<br />
again with the count down<br />
- a repeated alarm can be disabled by selecting OFF in the<br />
menu or by switching off of the parent unit<br />
21
4.13 PAGING THE PARENT UNIT:<br />
Use this feature to call the parent unit in case you need help<br />
in the baby room or to find the parent unit. The parent unit<br />
must be switched-on to use this feature.<br />
press the button to generate tones at<br />
the parent unit for 120 seconds; the<br />
text [ Paging ] comes on the display<br />
you may end this signaling by again<br />
pressing button or by pressing any<br />
key on the parent unit<br />
The volume of these tones is fixed.<br />
In case the volume of the parent unit was set to off, when paging the<br />
volume will be set to on and remain on.<br />
4.14 RANGE:<br />
In case you are close to you baby, you might decide to<br />
reduce the transmitting power<br />
Menu<br />
- +<br />
Menu<br />
[ HALF RANGE ? ]<br />
[ FULL RANGE ? ]<br />
Menu<br />
press the MENU button<br />
fi nd the option [ ECO RANGE ]<br />
press the MENU button<br />
depending on the present setting, when<br />
pressing the button MENU you now set<br />
the babyphone into [ HALF RANGE? ]<br />
or [ FULL RANGE? ]<br />
22
Please be informed that the power setting only takes effect<br />
30 seconds after the baby unit is idle (no transmitting).<br />
The effective ranges depend on your local circumstances<br />
and should be found out empirically.<br />
4.15 FULL ECO:<br />
When FULL ECO is activated, there is no transmitting at<br />
all when the baby is not crying.<br />
2x<br />
Menu<br />
- +<br />
Menu<br />
press the MENU button<br />
fi nd the option [ FULL ECO ]<br />
press the menu button 2x:<br />
if the Full Eco Mode is currently off, it<br />
will now be set to on; if the Full Eco Mode<br />
is currently on, it will now be set to off<br />
Attention:<br />
• Lullaby playback and a maximum sensitivity (level 5)<br />
will temporarily disable the Full ECO feature if Full<br />
ECO setting is set to ON. After stopping lullaby playback<br />
or reducing the sensitivity level, Full ECO feature<br />
will be resumed.<br />
• Attention: The link check is not active in Full Eco<br />
mode; see paragraphe 5.1.<br />
23
5 OTHERS<br />
5.1 LINK CHECK:<br />
As soon and as long the parent unit is in contact with the<br />
baby unit, the link-LED on the parent unit lights steadily.<br />
When the baby unit gets out of range (or is powered off),<br />
the link-LED on the parent unit starts blinking and the<br />
text [ SEARCHING ] comes on the display. In case the<br />
link is not restored within 30 seconds, a beeptoon sounds<br />
every 10 seconds and the text [ NOT LINKED ] comes on<br />
the display.<br />
Once the link between the parent unit and the baby unit is<br />
restored, the link-LED will light steadily and the text [ NOT<br />
LINKED ] will disappear from the display.<br />
Also during the power up of the units, the link-LED will<br />
blink for a couple of seconds in which period the units are<br />
looking for each other. When the link is made, the LED will<br />
light steadily.<br />
Attention: the link check does not function when the FULL<br />
ECO MODE is set. The link-LED than only lights when the<br />
parent unit actually receives noise from the baby unit; in<br />
idle state this lamp is OFF during FULL ECO mode, even<br />
when the units are in range.<br />
24
5.2 BATTERY INDICATION:<br />
Both the parent unit and the baby unit are equipped with a<br />
battery level indicator in the display:<br />
: full battery level<br />
: 2/3 battery level<br />
: 1/3 battery level<br />
: battery empty<br />
Baby unit:<br />
* the battery indicator is off when the baby unit is<br />
powered by the power adapter<br />
* the battery indicator is on and indicates the capacity<br />
when the baby unit is powered by batteries<br />
* when the battery indicator on the baby unit indicates<br />
flat batteries ( ), the text [ BU LOW BATT! ]<br />
comes on the display of the parent unit; it is advised<br />
to now directly replace the batteries in the baby<br />
unit or to connect the power adapter; (attention:<br />
when the parent unit is in the alarm mode, this warning<br />
text will not come on the display)<br />
* in case you do not change the batteries or do not<br />
connect the power adapter, the baby unit will switch<br />
off after a while; the link-LED on the parent unit will<br />
start blinking and the text [ NOT LINKED ] will come<br />
on the display of the parent unit; after you replace<br />
the batteries or connect the power adapter, the set<br />
functions as normal again<br />
Parent unit:<br />
* the charging of the batteries is indicated with an animated<br />
battery icon; as soon as the batteries are<br />
charged, this icon shows ‘battery full’ ( )<br />
25
* in idle state this icon shows the actual capacity of the<br />
batteries<br />
* soon after the battery icon shows ‘empty batteries’<br />
( ), the parent unit will switch-off; reconnect the<br />
power adapter to get the parent unit function again<br />
5.3 RESTORE TO DEFAULT:<br />
As follow the settings of the babyphone can be restored to<br />
the default values:<br />
2x<br />
Menu<br />
- +<br />
Menu<br />
Parent unit:<br />
press the MENU button<br />
fi nd the option [ RESET ]<br />
press the MENU button 2x<br />
The parent unit switches off and on again and the settings<br />
are restored to their default values:<br />
Sensitivity: level 3 Temperature Format: Celsius<br />
Nighlight: on Temperature Alert: off<br />
Language: xx Temperature Low: 14°C<br />
Lullaby: nr. 1 Temperature High: 39°C<br />
Sound Alert: off Volume parent unit: level 1<br />
Vibration: off Full Eco Mode: off<br />
Volume baby unit: level 3 Manual ECO mode: Big room<br />
Timer: off<br />
26
6 (SAFETY) INSTRUCTIONS<br />
AND TIPS<br />
6.1 GENERAL:<br />
The Babyphone is for the detection of sound by<br />
which the guarding of babies, little children and the<br />
helpless is a common used feature. Be advised<br />
that this babyphone is never capable to meet with<br />
the presence of an adult or a parent.<br />
Each time before use, check the functionality of the<br />
set. Be advised to regularly check the link during<br />
use.<br />
The use of the babyphone is restricted to detection<br />
of sounds within own premises. Any other person<br />
who is present or might be present within the room<br />
that is monitored should be notified of the presence<br />
of the installed babyphone.<br />
The usage of the wireless room monitor is free of<br />
license. It cannot be guaranteed that the transmission<br />
is without interference caused by other wireless<br />
systems or atmospheric disturbance.<br />
In case the babyphone is not in use, please switchoff<br />
using the power button. If not in use for a longer<br />
period, disconnect the power adapter and remove<br />
the batteries.<br />
27
6.2 TEMPERATURE INDICATION:<br />
The temperature sensor is located on the backside<br />
of the baby unit. To ensure a correct reading you<br />
may not cover this sensor or place the unit in direct<br />
sunlight. Avoid placing next to a heating device.<br />
The range is 10°C to 39°C. Attention: the temperature<br />
indication is indicative only. Please count with<br />
a possible deviation of about 5% to10%<br />
6.3 MULTIPLE UNITS:<br />
It is not possible to extend this babyphone with<br />
multiple parent units or multiple baby units. In case<br />
more baby’s are to be watched, some more complete<br />
units should be purchased. These can be used<br />
next to each and will not disturb each other.<br />
6.4 REACH:<br />
The reach of the babyphone is approximately 50<br />
meters indoor and 300 meter outdoor. Please be<br />
informed that large buildings, metal constructions,<br />
atmospheric disturbances and other wireless devices<br />
can influence this reach.<br />
6.5 BATTERY LIFE TIME:<br />
Parent unit:<br />
With fully charged rechargeable batteries with a<br />
capacity of 750mAh you can use the parent unit for<br />
up to 24 hours without the power adapter.<br />
Baby unit:<br />
When alkaline batteries are installed, the baby unit will<br />
function for about 24 hours without the power adapter.<br />
28
6.6 POWER SUPPLY:<br />
Power adapters:<br />
Use only the mains adapters supplied with this baby<br />
monitor. Incorrect adapter type(s) can cause damage<br />
to the unit(s).<br />
Power consumption of the power adapters:<br />
Baby unit: in off mode: 0,0W<br />
in on mode, baby asleep:
6.7 MAINTENANCE:<br />
Never use chemical cleansers to clean the cabinet,<br />
the cabinet may only be cleaned with a moist cloth.<br />
Always disconnect the babyphone from the mains<br />
(remove the power adapters) before cleaning.<br />
6.8 DISPOSAL OF THE DEVICE (ENVIRONMENT):<br />
At the end of the product lifecycle, you should<br />
not throw this product into the normal household<br />
garbage but bring the product to a collection<br />
point for the recycling of electrical and electronic<br />
equipments. Exhausted batteries may never<br />
be disposed of in household waste but must be<br />
handed in at your local depot for chemical waste.<br />
30
7 DECLARATION OF<br />
CONFORMITY<br />
This babyphone complies with the essential<br />
requirements and provisions as described in the<br />
European Directive 1999/5/EC.<br />
The declaration of conformity is<br />
available on the website<br />
WWW.ALECTO.INFO<br />
8 TECHNICAL<br />
SPECIFICATIONS<br />
No. of channels: 120<br />
Frequency: 1881.792 - 1897.344 MHz<br />
Power supply of Baby Unit: Switching mode power supply<br />
6V/450mA/<br />
4x AA alkaline batteries<br />
Power supply of Parent Unit: Switching mode power supply,<br />
6V/300mA/<br />
2x 750mAH rechargeable batteries<br />
Transmitting power: Max. 250mW<br />
Operating temperature: 10°C to 39°C<br />
Storage temperature: 0°C to 60°C<br />
Temperature accuracy: ±1°C (at 25°C)<br />
31
9 TROUBLESHOOTING<br />
Link light on the<br />
parent unit does<br />
not come on<br />
Link light on<br />
the parent unit<br />
fl ashes<br />
Low battery light<br />
on the baby unit<br />
fl ashes<br />
Low battery light<br />
on the parent<br />
unit fl ashes<br />
The parent unit<br />
beeps<br />
Cannot hear<br />
sound or baby<br />
cry from the<br />
parent unit<br />
•<br />
•<br />
•<br />
•<br />
•<br />
•<br />
•<br />
•<br />
•<br />
•<br />
•<br />
•<br />
•<br />
•<br />
Check whether the parent unit is powered on.<br />
Check whether the supplied rechargeable batteries<br />
are correctly installed and that they are not drained.<br />
Recharge the parent unit by connecting it to the power<br />
supply.<br />
The parent unit and the baby unit may be out of<br />
range with each other. Reduce the distance between<br />
the units.<br />
The baby unit may be switched off. Press POWERkey<br />
to switch on the baby unit.<br />
Alkaline batteries in the baby unit are running low.<br />
Replace alkaline batteries or connect the baby unit to<br />
the mains power.<br />
Rechargeable batteries in the parent unit are running<br />
low. Connect the parent unit to the mains power with<br />
the supplied power adaptor for recharging.<br />
Lost connection with the baby unit. Reduce the distance<br />
between the parent unit and the baby unit.<br />
The baby unit may be switched off. Press POWERkey<br />
to switch on the baby unit.<br />
Rechargeable batteries in parent unit are running<br />
low. Connect the parent unit to the mains power with<br />
the supplied power adaptor for recharging.<br />
The volume level in the parent unit may be set too<br />
low, increase the volume level of the parent unit.<br />
The microphone sensitivity level of the baby unit may<br />
be set too low. Increase the sensitivity level of the<br />
baby unit.<br />
The parent unit and the baby unit may be out of<br />
range with each other. Reduce the distance between<br />
the units.<br />
32
The parent unit<br />
is too sensitive<br />
to room sounds<br />
The baby<br />
monitor system<br />
produces a<br />
high-pitched<br />
noise<br />
Alkaline batteries<br />
in the baby<br />
unit are running<br />
low quickly<br />
Rechargeable<br />
batteries in the<br />
parent unit are<br />
running low<br />
quickly<br />
Talk back<br />
feature is not<br />
working<br />
•<br />
•<br />
•<br />
•<br />
•<br />
•<br />
The microphone sensitivity level of the baby unit may<br />
be set too high. Decrease the microphone sensitivity<br />
level of the baby unit from the parent unit.<br />
The parent unit and the baby unit are too close to<br />
each other. Make sure the parent unit and baby unit<br />
are at least 1.5 metre away from each other.<br />
The speaker volume of the parent unit maybe set too<br />
high. Decrease the volume of the parent unit.<br />
The microphone sensitivity level of the baby unit may<br />
be set too high which causes the baby unit to transmit<br />
more often. Decrease the microphone sensitivity level<br />
of the baby unit from the parent unit.<br />
The volume level of the baby unit may be set too high<br />
which consumes power. Decrease the volume level of<br />
the baby unit.<br />
The volume level of the parent unit may be set too<br />
high which consumes power. Decrease the volume<br />
level of the parent unit.<br />
•<br />
Check that the volume is loud enough at the baby unit.<br />
In case the babyphone still does not operate correctly,<br />
please disconnect the power adapters and remove the<br />
batteries. Wait for some minutes and install batteries and<br />
connect the power adapters again. In case the malfunction<br />
still persists, please contact your dealer.<br />
33
10 CONTENTS<br />
1 ECO MODE .................................................... 2<br />
2 OVERVIEW<br />
2.1 OVERVIEW PARENT UNIT ........................... 3<br />
2.2 OVERVIEW BABY UNIT ................................ 4<br />
2.3 OVERVIEW DISPLAY .................................... 5<br />
2.4 OVERVIEW LAMPS ....................................... 6<br />
3 INSTALLATION<br />
3.1 PARENT UNIT ................................................ 7<br />
3.2 BABY UNIT .................................................... 8<br />
3.3 RECOMMENDATIONS .................................. 8<br />
4 USING YOUR BABY MONITOR<br />
4.1 POWER ON/OFF ........................................... 10<br />
4.2 LINK CHECK .................................................. 10<br />
4.3 LANGUAGE ................................................... 11<br />
4.4 MONITORING ................................................ 11<br />
4.5 SOUND ALERT .............................................. 12<br />
4.6 VIBRA ALERT ................................................ 13<br />
4.7 LULLABIES .................................................... 14<br />
4.8 NIGHTLIGHT .................................................. 16<br />
4.9 TALK BACK .................................................... 17<br />
4.10 SENSITIVITY ................................................. 18<br />
4.11 ROOM TEMPERATURE AND ALERT ........... 18<br />
4.12 ALARM ........................................................... 20<br />
4.13 PAGING THE PARENT UNIT......................... 22<br />
4.14 RANGE .......................................................... 22<br />
4.15 FULL ECO ...................................................... 23<br />
34
5 OTHERS<br />
5.1 LINK CHECK .................................................. 24<br />
5.2 BATTERY INDICATION ................................. 25<br />
5.3 RESTORE TO DEFAULT ............................... 26<br />
6 (SAFETY) INSTRUCTIONS AND TIPS<br />
6.1 GENERAL ...................................................... 27<br />
6.2 TEMPERATURE INDICATION ....................... 28<br />
6.3 MULTIPLE UNITS .......................................... 28<br />
6.4 REACH ........................................................... 28<br />
6.5 BATTERY LIFE TIME ..................................... 28<br />
6.6 POWER SUPPLY ........................................... 29<br />
6.7 MAINTENANCE ............................................. 30<br />
6.8 DISPOSAL OF THE DEVICE<br />
(ENVIRONMENT) .......................................... 30<br />
7 DECLARATION OF CONFORMITY .............. 31<br />
8 TECHNICAL SPECIFICATIONS .................... 31<br />
9 TROUBLESHOOTING ................................... 32<br />
10 CONTENTS.................................................... 34<br />
11 GUARANTEE................................................. 36<br />
35
11 GUARANTEE<br />
You have a guarantee of 24 MONTHS after the date of purchase of<br />
this babyphone. We guarantee during this period the free repair of<br />
defects caused by material- and construction faults. This at the importers<br />
discretion. It is only possible to claim to the guarantee when<br />
you enclose your purchase ticket with the babyphone.<br />
HOW TO ACT:<br />
If you notice a defect, consult the <strong>manual</strong> first. If this <strong>manual</strong> gives<br />
you no definite answer, consult your dealer with a clear description of<br />
your complaint. He will collect the device together with this guarantee<br />
card and the dated purchase ticket and he will take care of a prompt<br />
repair, respectively free sending to the importer.<br />
THE GUARANTEE EXPIRES:<br />
When used inexpert, faulty connections, leaking and faulty placed<br />
batteries, use of unoriginal parts or accessories, negligence and<br />
defects caused by fire, flood, stroke of lightning and natural disasters.<br />
With unqualified modifications or repairs by third persons. With incorrect<br />
transport without a suitable packing. If the device is not handed<br />
in with the correct filled in guarantee card and the purchase ticket.<br />
NOT UNDER THIS GUARANTEE: cords, plugs and batteries.<br />
All further responsibilities, in particular subsequent damages, are<br />
excluded.<br />
ver NL1.0<br />
Service<br />
Help<br />
36<br />
+31 (0) 73 6411 355