

Playstation 2 repair guide
Playstation 2 repair guide
Playstation 2 repair guide

You also want an ePaper? Increase the reach of your titles
YUMPU automatically turns print PDFs into web optimized ePapers that Google loves.
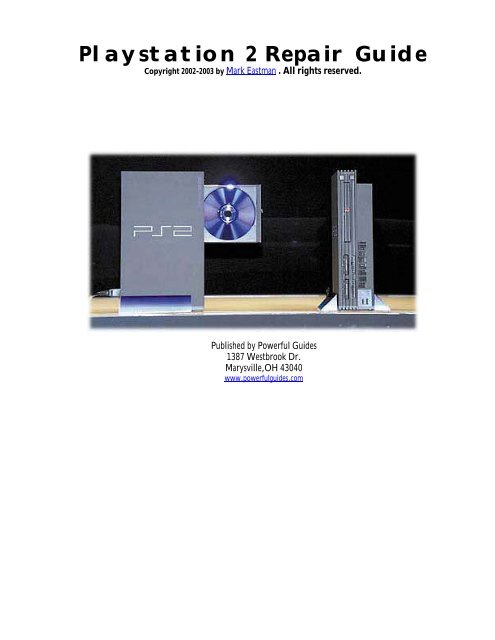
<strong>Playstation</strong> 2 Repair Guide<br />
Copyright 2002-2003 by Mark Eastman . All rights reserved.<br />
Published by Powerful Guides<br />
1387 Westbrook Dr.<br />
Marysville,OH 43040<br />
www.powerful<strong>guide</strong>s.com
WARNING<br />
The <strong>Playstation</strong> 2 is a high-tech piece of equipment. Fixing the console yourself should<br />
not be done unless completely necessary. You may risk electrical shock so please make<br />
sure your unit is unplugged and take additional steps to ensure your safety.<br />
These <strong>repair</strong>s require you to open your PS2 case which will void your warranty. If your<br />
console is still under warranty please think about taking these steps carefully before<br />
beginning.<br />
DISCLAIMER<br />
This information is being sold for educational purposes only! I cannot be held<br />
responsible for any adverse effects to your PS2 if you decide to use this information. The<br />
responsibility is ALL YOURS. I am NOT a Sony Certified PS2 technician. These<br />
procedures are a result of my interpretation of what others have reported as well as my<br />
own experience with the <strong>repair</strong>ing of PS2 consoles. It is my belief that all of these<br />
procedures have been used with positive results for other PS2 owners. Therefore, they<br />
should work for you.<br />
COPYRIGHT<br />
This information is protected by copyright. It is for use by the original purchaser only.<br />
Anyone attempting to resell or distribute this information without prior written<br />
authorization of the owner will be prosecuted. If you know of someone who is illegally<br />
selling or distributing this information please contact me at marke60@powerful<strong>guide</strong>s.com<br />
LICENSE AGREEMENT-MUST READ<br />
When you purchased this <strong>guide</strong> you were issued a license. This license is monitored<br />
electronically for abuse. DO NOT distribute this document to friends or family members.<br />
This license is good for use on one or two computers ONLY. Any license that is being<br />
abused will be terminated and you will not be able to open your book again. Please refer<br />
friends and family who would like a copy to www.powerful<strong>guide</strong>s.com/ps2 .<br />
2
INTRODUCTION<br />
Hi,<br />
My name is Mark. I have been an electronic technician for almost 25 years now. My goal here is to help you fix<br />
your PS2 quickly and at a cost well below what you would pay a <strong>repair</strong> shop to do it for you . I have broken<br />
down the steps into simple terms and hopefully made it a task that almost anyone could do. I hope it works for<br />
you. Even if the <strong>guide</strong> does not fix your particular problem I have shown you how to get a working one for the<br />
price of a simple <strong>repair</strong> at most <strong>repair</strong> shops. Don’t get hung up on getting YOUR PS2 fixed. Your goal should<br />
be to get a working PS2 and that’s it.<br />
Sincerely,<br />
Mark Eastman<br />
FIRST THINGS FIRST<br />
When working on your PS2 you need to always make sure you are working in a clean, well-organized<br />
environment. Always make sure your PS2 is UNPLUGGED. NEVER work on your PS2 on carpet. The carpet<br />
static can actually cause damage to the PS2. Move to an area that is not carpeted, like a kitchen table.<br />
There are minor variations in each version of the PS2 console. Some of the screws may be in slightly different<br />
locations than those shown in the diagrams here. With a little common sense and persistence you should be able<br />
to use the procedures written in this <strong>guide</strong> on your console even if it is not exactly the same version.<br />
Do not get in a hurry and make sure you read through and understand what it is you are doing before you start.<br />
Plan your work - Work your plan.<br />
USING ADOBE ACROBAT READER<br />
The navigation bar at the top of the reader allows you to view your document in three different<br />
sizes, “Fit Width”, “Fit In Window” or “Actual Size”. You can also adjust the size by using the<br />
+ or – buttons on either side of the size box. These features in conjunction with the 4 different<br />
ways available to turn the pages using the keyboard, mouse or the navigation buttons on the<br />
program itself, make it an ideal way to view your document without being distracted by the<br />
actual program. If you are not familiar with Acrobat Reader, I would recommend you view the<br />
help file and take a moment to familiarize yourself with the program before proceeding. It will<br />
make your reading this document much more enjoyable<br />
3
TABLE OF CONTENTS<br />
Click on the section you want to jump or just scroll to the page.<br />
WHERE TO BUY PLAYSTATION 2 PARTS ................................................................................................... 5<br />
WHAT VERSION DO YOU HAVE? ................................................................................................................. 6<br />
RESETTING THE DVD PASSWORD............................................................................................................... 7<br />
VOLTMETER TRAINING................................................................................................................................. 8<br />
POWER SUPPLY PROBLEMS.......................................................................................................................... 9<br />
DISC READ ERRORS ...................................................................................................................................... 14<br />
DIAGNOSTICS MODE.................................................................................................................................... 15<br />
FIXING DISC SLIPPAGE ................................................................................................................................ 16<br />
SECOND DISC READ ERROR ADJUSTMENT PROCEDURE.................................................................... 22<br />
CD TRAY ALIGNMENT ................................................................................................................................. 24<br />
LASER VOLTAGE ADJUSTMENTS.............................................................................................................. 28<br />
LASER VOLTAGE ADJUSTMENT FOR VERSION 4 ON UP...................................................................... 32<br />
REPLACING THE EJECT RIBBON CABLE.................................................................................................. 36<br />
MY PLAYSTATION 2 IS STILL BROKEN-NOW WHAT?........................................................................... 39<br />
INTRODUCTION TO BUYING AND SELLING ON EBAY ......................................................................... 40<br />
HOW TO BUY AND SELL ON EBAY ............................................................................................................ 41<br />
SELLING ON EBAY ........................................................................................................................................ 41<br />
THE AUCTION IS OVER- NOW WHAT? ...................................................................................................... 43<br />
BUYING ON EBAY ......................................................................................................................................... 44<br />
I WON THE AUCTION NOW WHAT? ........................................................................................................... 45<br />
SENDING IN YOUR CONSOLE FOR REPAIR.............................................................................................. 46<br />
WHERE TO BUY CHEAP PS2 GAMES.......................................................................................................... 48<br />
4
WHERE TO BUY PLAYSTATION 2 PARTS<br />
Powerful Guides recommends VIDEOGAMEREPAIR.COM for replacement parts.<br />
Also, if after using this book you are still having trouble and you opt to send it in for <strong>repair</strong>,<br />
VIDEO GAME REPAIR will give all of our customers a $10.00 discount on their flat rate labor<br />
fee.<br />
Instead of $49.95 labor fee you will only pay $39.95. Please see the section at the end of the<br />
book called “My console is still broke- Now what?” for complete details.<br />
5
WHAT VERSION DO YOU HAVE?<br />
Some of the procedures in this book require you to know what version your PS2 console is. It is a fairly simple<br />
process to determine your PS2 version. Please follow the steps below to correctly determine your PS2 version.<br />
On the back of your PS2 you need to locate the tag<br />
that has the model number on it. (see diagram)<br />
Use the following chart to correctly determine your PS2 version:<br />
Version 9 SCPH-50000, 50001, 50002, 50003 or 50004<br />
Version 8 – released SCPH-39000 or SCPH-39006 (GH-022 BIOS 090).<br />
in Japan only<br />
Version 7 SCPH-39000, 39001, 39002, 39003, 39004 or 37000<br />
Version 5/6 SCPH-30000R, SCPH-30001 R, SCPH-30002 R, SCPH-30003 R, SCPH-30004 R,<br />
SCPH-30006 R, SCPH-30000, SCPH-30001, SCPH-30002, SCPH-30003 and SCPH-<br />
30004<br />
Version 4 SCPH-30000, SCPH-30001, 35001, SCPH-30002, 35002, SCPH-30003, 35003,<br />
SCPH-30004, 35004<br />
Version 1-3 Flip the console over and count the screw covers. If you have 10 then you have a<br />
version 1, 2, or 3. Version 4 and higher have only 8<br />
6
RESETTING THE DVD PASSWORD<br />
Have a parental password on the DVD player that you have forgotten and need to reset it? Follow the procedure<br />
below to take care of it.<br />
1. Pop in a DVD movie (anyone will work)<br />
2. While you are watching the DVD movie, press select and a small menu should show up.<br />
3. Go to "Setup" and you will access a menu with the parental control setting.<br />
4. When it asks you for a password enter the 4-digit number "7444"<br />
5. It will again prompt you to type in the Password!<br />
6. Now type in any code (Preferably all Zeros "0000..")<br />
7. Scroll down on the Movie ratings option to where you are highlighting the Word "off"<br />
7
VOLTMETER TRAINING<br />
IF YOU KNOW HOW TO USE A VOLTMETER TO READ VOLTAGES AND MEASURE<br />
RESISTANCE THEN YOU CAN SKIP THIS SECTION<br />
Before doing some of the techniques in this manual you are going to need to know how to use a voltmeter. They<br />
are very easy to use and it won't take long to get you up to speed even if you have never used one before. If you<br />
don't own a voltmeter then you may need to buy one or borrow one. WAIT TO SEE IF ONE IS REALLY<br />
NEEDED BEFORE BUYING ONE! Each section tells you what tools are needed to complete the testing and<br />
troubleshooting in that section.<br />
Here is what my voltmeter looks like. They come in<br />
various shapes and sizes and can be picked up at most<br />
hardware stores or at Radio Shack. They can be very<br />
expensive or you can get them pretty cheap. A cheap<br />
one is all that is needed for this project. Notice that<br />
there are two wires coming out of it. One is red and the<br />
other black. Red is the (+) positive lead and Black is<br />
the (-) Negative lead. None of the measurements we<br />
will be doing are dependent on having the positive and<br />
negative leads connected in a particular order. All of<br />
the measurements can be taken with either lead in<br />
either position indicated. That will make it easy for<br />
you.<br />
Next, we need to go over the setting on the voltmeter<br />
that we will be using. This will vary from meter to<br />
meter. Most of them use the same symbols and<br />
wording so you should be able to figure it out on yours<br />
by looking at the description and picture here. The first<br />
setting is Ohms (See picture). This is the setting you<br />
use to check fuses and to adjust the laser voltages. All<br />
measurements you will be taking are less than 2000<br />
Ohms so you will need to pick the scale that most<br />
closely matches this setting. Many meters, like the one<br />
shown use an auto-scaling feature. This makes it so you<br />
don't have to worry about what scale to pick. So if you<br />
have to buy a meter you may want to pick one up that<br />
has this feature built in.<br />
That's it for the voltmeter training. In each section that we use the voltmeter there will be more detailed<br />
instructions on exactly what to do. So don't panic if you don't feel like you quite understand it yet. You will get<br />
more details when needed.<br />
8
TOOLS NEEDED:<br />
• Normal Philips head screwdriver (Hardware Store)<br />
• Needle-Nosed pliers (optional)<br />
• Voltmeter (Hardware store or Radio Shack)<br />
POWER SUPPLY PROBLEMS<br />
If you are experiencing power supply problems then more than likely your <strong>Playstation</strong> 2 will not come on at all.<br />
It is plugged in and the switch is on, but you have no lights. There are a couple of things you can check that may<br />
be a simple fix to your problem. WARNING-ALL TESTING THAT IS DESCRIBED HERE IS<br />
DONE WITH THE PS2 UNPLUGGED. PLEASE MAKE SURE YOUR UNIT IS<br />
UNPLUGGED BEFORE TESTING TO PREVENT ACCIDENTAL ELECTRICAL<br />
SHOCK.<br />
• First, make sure that the outlet you are plugged in to is good by unplugging you PS2, and plugging it into a<br />
socket in a different room. If it doesn't work there either then proceed to the next step.<br />
• Before we take any measurements we need to make sure the voltmeter is working. Put the meter on the<br />
Ohms setting. Test it by touching your red and black lead together. You should get a reading of 0 or a very<br />
low number when touched and nothing when not touching.<br />
To test the power cord take one lead and attach it to<br />
one prong that plugs into the wall and the other lead<br />
into one of the holes that plug into the PS2. You<br />
should get a low reading just like you did when you<br />
tested above. If not, move to the other hole. Do that for<br />
each hole and prong to check both wires inside the<br />
cable. If both check good then you are ready for the<br />
next step. If not, then you have a bad cord and it will<br />
need to be replaced.<br />
9
The remaining checks will require that the PS2 cover be removed. Follow these steps to<br />
safely and easily remove it.<br />
A. Flip your PS2 over so that the bottom is facing up<br />
B. Remove all the screw covers. (There should be 6<br />
screw covers, 4 made of rubber (outer edges) and 2 made of<br />
plastic (in the middle), that need to be removed. Indicated<br />
in photo by the white lines. You can use a knife or small<br />
jewelers flat blade screwdriver for this. There should be 2-4<br />
more screw covers on the outer side of the base,<br />
underneath the controller ports. Indicated in photo by red<br />
lines. The older model PS2’s have 4 screw covers, while<br />
the newer ones have only 2. Remove them all, and you<br />
should now have a total of 8-10 screws unveiled.<br />
Set the screw covers aside.<br />
C. Use your knife to cut the warranty tape that is covering<br />
the seam between the back and the top cover. (By the<br />
power switch). Just trace the seam through the tape with the<br />
knife so that it will not be holding you back when you go to<br />
remove the top later.<br />
D. Using the normal sized Phillips head screwdriver, Make sure all of the screws are removed, and put them<br />
aside.<br />
NOTE: Some of the screws are longer than others. It is VERY IMPORTANT that you remember where the<br />
longer screws go. You may want to mark the holes with a piece of tape or some other way so that you will know<br />
which holes the long screws go into. If you do not remember where the long screws go, you could put a hole<br />
through a circuit board by trying to force the long screw in where it is not supposed to be.<br />
10
E. The PS2 shell should now be ready to remove.<br />
ONLY the UPPER side (with the PS2 logo) needs to<br />
be removed for this step - Leave the BOTTOM side<br />
on. WARNING-Be very careful when taking the<br />
upper shell off, or you could damage the PS2.<br />
Place the PS2 horizontally, with the PS2 logo facing<br />
up and the front facing you.<br />
Pull up on the cover from the back and work it free and lift about 1/2 inch. Move the shell forward a little,<br />
sideways, so that the Eject/Reset buttons are not blocking the shell and the CD tray comes clear, and it can be<br />
lifted off. Just play around with it a little and you should get it.<br />
Then, lift it at an angle, like opening the cover of a<br />
book. Take the bottom (Vertically speaking) of the<br />
shell, with the PS2 logo on it, and lift it an angle.<br />
WARNING-Lift slowly and be careful not to break<br />
the ribbon cable going to the reset and eject buttons.<br />
You should notice a small wire around the area where<br />
the Reset/Eject buttons are. The wire should be taped<br />
to the top of the Lens cover. Remove the tape, and<br />
then carefully lift the cover so that it is lying flat, and<br />
the PS2 is open like a book, connected at the middle<br />
by the wire.<br />
OPTIONAL: If you have or can get a couple of<br />
clips that hold stacks of paper they make an<br />
excellent clip for holding your PS2 cover firmly to<br />
the PS2 base. This will reduce your risk of<br />
accidentally tearing your ribbon cable. See photo.<br />
11
Now we are going to test the power switch. MAKE<br />
SURE THE POWER SWITCH IS IN THE ON<br />
POSITION. Put one voltmeter lead on one of the<br />
pins that the power cable plugs into and the other on<br />
one of the pins of the white plug just inside the case.<br />
You should get a 0 reading or a short. If not trying<br />
moving to the other pin. A good plug will show a short<br />
between each pin on the back and one of the wires on<br />
the inside when the power switch is in the on position.<br />
Last we will check the fuses. There are two located on<br />
the power supply board. (see photo)<br />
Take your voltmeter and put a lead on each side of a<br />
fuse. You should read a short. If you don't, then the<br />
fuse is blown and will need to be replaced. Read the<br />
value of the fuse either written on the circuit board<br />
beneath the fuse or on the silver connection on the end<br />
of the fuse. The fuse by the power plug on mine is<br />
3.25A (amps).<br />
You may open your PS2 to find that your power<br />
supply looks like this (see diagram) You cannot get to<br />
the components as described above. You will need to<br />
remove the bottom cover of the console and flip the<br />
console upside down.<br />
12
Remove the 4 screws as indicated in the diagram and<br />
lift the power supply board out and check the fuses.<br />
The power switch and other checks are the same as on<br />
the other board.<br />
Every version of PS2 has a slightly different set of fuses in it. To convert the numbers on the fuses to an actual<br />
value take the number and multiply by .04. For example, if the number on your fuse is 25 CCP2E25 then you<br />
take 25 * .04 =1.0 or 1amp. You would use a 1 amp fuse to replace this one. If you end up with a weird<br />
amperage like .52 just use a .5 amp fuse. You just need something close as possible to the actual value to keep<br />
things working safely.<br />
You can get your replacement fuses at Radio Shack or any electronics store. Replace them and if they blow<br />
again then you have more serious problems with your power supply board and it is suggested you seek out a<br />
replacement. I suggest using www.videogame<strong>repair</strong>.com for this, but there are others. Just search the internet<br />
for PS2 parts and find a replacement board. I found them to be about $25-$35.<br />
13
DISC READ ERRORS<br />
It seems that there are many people who are having disc read errors on their PS2 consoles for no apparent<br />
reason. They get it on some discs or DVD's and not on others. There is no logical pattern to the problem.<br />
Obviously you don't want to pay someone $120.00 to fix the problem, and so you have purchased this<br />
information in hopes of getting to the bottom of it.<br />
A study of the problem reveals that there can be a couple of different things causing it. First, is the laser that<br />
reads the disc is dirty. Since lasers are very sensitive, it only takes a small spec of dirt to mess the whole thing<br />
up. Second, it could be that the disc is not spinning on the spindle correctly, thus the laser cannot read it. Certain<br />
games (mainly blue discs) not working and others working fine usually signify this problem. One other<br />
symptom of the disc not spinning on the spindle correctly is that you will get some scratching noises while the<br />
game is in. This NEEDS to be <strong>repair</strong>ed before your games are ruined.<br />
All of the procedures listed are simple and easy ones that practically anyone can do. They are listed in order<br />
from the easiest fix to the hardest. Even the hardest one is not that hard but why go through the trouble if you<br />
don't have too? Please DO NOT BE IN A HURRY and jump into this without completely reading the steps in<br />
the process and making sure you understand them before getting started.<br />
Try this before you do anything else. Get a<br />
can of compressed air. Eject the CD tray outward and<br />
spray the air into the PS2 aiming it at where the laser<br />
is located. This may be all that is needed to fix your<br />
problem.<br />
14
DIAGNOSTICS MODE<br />
This procedure rarely works for anyone but since it only takes a few minutes to do it is worth a try before<br />
opening up your <strong>Playstation</strong> 2 console.<br />
• Turn on your PS2 WITHOUT a disc in it and wait for it to come up to the MAIN MENU screen<br />
• Press the "Triangle" button<br />
• Use your UP directional buttons and select CONSOLE and then press the "Triangle" button<br />
• Use your direction buttons again and select ON and then press the X button<br />
• Insert a disc and the console will automatically start the diagnostics<br />
MOVE ON TO THE NEXT STEP IF THIS DID NOT WORK<br />
15
FIXING DISC SLIPPAGE<br />
A disc slipping can be the culprit that is causing your read errors and it is quite easy to fix. The reason that the<br />
discs are slipping is because the magnet around the spindle has weakened and it allows the disc to slip when it<br />
begins to spin. The first two steps listed here are ways to increase the weight of your discs and balance them to<br />
prevent the slippage. These are both methods being used successfully by others, but obviously these are not<br />
technically based fixes. These fixes are a quick fix to the underlying problem and may not fix the problem. Use<br />
them if you want, but if you don't feel comfortable putting tape on your discs knowing there is a possibility that<br />
your problem will still not be fixed then go directly to STEP 3<br />
STEP 1. Take a strip of masking tape and place it on<br />
the title side (side with the writing) from the very edge<br />
of the disc towards the middle of the disc without<br />
getting any on the shiny part in the center of the disc.<br />
Then take another piece and do the same thing on the<br />
other side of the hole so that when you're done you<br />
will have a straight line going across the title side of<br />
your disc. Stick the disc back in and see if your<br />
problem is solved.<br />
STEP 2. This is another variation of the first trick. On<br />
the shiny side of your disc- (the play side) take a small<br />
piece of 1/2 scotch tape and place it at an angle in the<br />
center circular area by the hole. That's it-stick the disc<br />
back in and see if the read error is fixed. Doesn't get<br />
much easier than this.<br />
The next procedure is the actual strengthening of the magnet and the cleaning of the laser lens. It is a bit more<br />
involved but the chances that this will get your machine working again are high. Before you try the remaining<br />
<strong>repair</strong> steps in this manual you may want to print out a copy of these instructions. It's not really that hard and<br />
using a little common sense will go along way towards helping you make the <strong>repair</strong> quickly and easily.<br />
16
STEP 3.Make sure you have a nice, clean, well-lit area to work in. You might want to get a small bowl or cup<br />
to put your parts in so you will not lose them.<br />
The things you need for this next project are:<br />
• Normal Philips head screwdriver (Hardware Store)<br />
• Jewelry (Small) Philips head screwdriver (Radio Shack)<br />
• Q tips (Drug Store)<br />
• Rubbing Alcohol (Isopropyl) (Drug Store)<br />
• A very small low strength magnet. You can get one from Radio Shack (P/N 64-1895)<br />
or Try this - Ever seen those refrigerator shopping lists made from that very thin sheet magnet material?<br />
Cut two small pieces and use them. (Walmart or Kmart for sheet magnet)<br />
• Compressed air (Radio Shack)<br />
• Needle-Nosed pliers (optional)<br />
• White silicone grease (optional)<br />
A. Flip your PS2 over so that the bottom is facing up.<br />
B. Remove all the screw covers. (There should be 6<br />
screw covers, 4 made of rubber (outer edges) and 2 made of<br />
plastic (in the middle), that need to be removed. Indicated<br />
in photo by the white lines. You can use a knife or small<br />
jewelers flat blade screwdriver for this. There should be 2-4<br />
more screw covers on the outer side of the base,<br />
underneath the controller ports. Indicated in photo by red<br />
lines. The older model PS2’s have 4 screw covers, while<br />
the newer ones have only 2. Remove them all, and you<br />
should now have a total of 8-10 screws unveiled.<br />
Set the screw covers aside.<br />
17
C. Use your knife to cut the warranty tape that is covering<br />
the seam between the back and the top cover. (By the<br />
power switch). Just trace the seam through the tape with the<br />
knife so that it will not be holding you back when you go to<br />
remove the top later.<br />
D. Using the normal sized Phillips head screwdriver, Make sure all of the screws are removed, and put them<br />
aside.<br />
NOTE: Some of the screws are longer than others. It is VERY IMPORTANT that you remember where the<br />
longer screws go. You may want to mark the holes with a piece of tape or some other way so that you will know<br />
which holes the long screws go into. If you do not remember where the long screws go, you could put a hole<br />
through a circuit board by trying to force the long screw in where it is not supposed to be.<br />
E. The PS2 shell should now be ready to remove.<br />
ONLY the UPPER side (with the PS2 logo) needs to<br />
be removed for this step - Leave the BOTTOM side<br />
on. WARNING-Be very careful when taking the<br />
upper shell off, or you could damage the PS2.<br />
Place the PS2 horizontally, with the PS2 logo facing<br />
up and the front facing you.<br />
Pull up on the cover from the back and work it free and lift about 1/2 inch. Move the shell forward a little,<br />
sideways, so that the Eject/Reset buttons are not blocking the shell and the CD tray comes clear, and it can be<br />
lifted off. Just play around with it a little and you should get it.<br />
18
Then, lift it at an angle, like opening the cover of a<br />
book. Take the bottom (Vertically speaking) of the<br />
shell, with the PS2 logo on it, and lift it an angle.<br />
WARNING-Lift slowly and be careful not to break<br />
the ribbon cable going to the reset and eject buttons.<br />
You should notice a small ribbon cable around the<br />
area where the Reset/Eject buttons are. The cable<br />
should be taped to the top of the Lens cover. Remove<br />
the tape, and then carefully lift the cover so that it is<br />
lying flat, and the PS2 is open like a book, connected<br />
at the middle by the ribbon cable.<br />
OPTIONAL: If you have or can get a couple of<br />
clips that hold stacks of paper they make and<br />
excellent clip for holding your PS2 cover firmly to<br />
the PS2 base. This will reduce your risk of<br />
accidentally tearing your ribbon cable. See photo.<br />
F. Use the compressed air and spray out the inside of your PS2, especially the fan. When you feel like all dust<br />
has been removed proceed.<br />
G. Look for a small white circle with a little gray piece of metal in the center.<br />
H. Stick your replacement magnet (from old HD, etc)<br />
on the metal. NOTE: If using a sheet magnet cut two<br />
small pieces and stick them on the metal.- The idea is<br />
to increase the strength of the existing magnet.<br />
19
NOTE: Here is a picture of the one I just did with<br />
the sheet magnets in place. It's up to you at this<br />
point if you want to continue. This may be all that<br />
is needed to fix your problem. Put the cover back<br />
on and try it out. If it doesn't work you will need to<br />
take the cover back off and then continue with the<br />
next step, or you can continue now. The choice is<br />
yours.<br />
I. Next you will clean the laser lens. To gain access to<br />
the lens, you need to remove the lens cover. The lens<br />
cover is the piece that holds the place where you just<br />
attached the magnets. To remove the lens cover,<br />
simply take out the 2-4 screws located on the side with<br />
the Jewelry screwdriver. Place the screws aside, and<br />
lift the lens cover. NOTE:The lower left corner has a<br />
latch tab that needs to be pulled slightly left before<br />
you can lift it up. See photo.<br />
You should now see the lens, a small circular glass<br />
piece located in the back of the disc tray.<br />
J. Spray the area around the lens with the compressed<br />
air.<br />
K. Dip a Q-Tip in the rubbing alcohol. Make sure that<br />
you don't fill it so much that it is dripping. Take the Q-<br />
Tip and carefully yet firmly rub the lens in a circular<br />
motion for 30 seconds. Then, using a dry Q-Tip, dry<br />
off the lens in the same circular motions. The lens<br />
should now be clean.<br />
20
L. This next photo is just to show you a little more<br />
detail on what is going on around the spindle. The<br />
magnet on top attracts to the magnet in the cover and<br />
pushes the game down onto surface. The black rubber<br />
ring is what touches the game in the center so make<br />
sure it is grease free. You might want to brush it with<br />
the rubbing alcohol while you are cleaning the lens.<br />
The silver ring is spring loaded and goes down when<br />
pushed. Make sure it is moving or else your game will<br />
not seat firmly. Just put a game on the spindle and<br />
slightly push down on it. You should see it move.<br />
M. One more check can be done while you have the<br />
covers off. GENTLY push the laser assembly<br />
backwards to see if it is sliding freely on the travel<br />
rods. It will feel a little rough since the power is off<br />
.You are looking to make sure that the laser assembly<br />
is not coming into contact with anything else and can<br />
travel freely. You want to also make sure that the<br />
ribbon cable attached is not bending as the laser<br />
assembly moves backwards. If there is a bend in the<br />
cable you can strengthen it by wrapping a small piece<br />
of paper around the bent joint and taping it with scotch<br />
tape. Just make sure that the ribbon has free travel<br />
back through the slot it goes through in the case. This<br />
problem is rare.<br />
OPTIONAL: If you want you can clean the rods<br />
with Q-tips and reapply a thin layer of lubricating<br />
gel. (Radio Shack-#64-2326) Don't use to much.<br />
Make sure to do the optional step above if you have<br />
grinding sounds coming from your PS2<br />
N. Put the PS2 back together. Place the lens cover back on, making sure that it’s tight and snug in position.<br />
Screw it in place. Then, tape the wire back onto the lens cover and flip the shell back into place on the PS2.<br />
Screw the screws back in, making sure the longer screws are going into the correct holes. Put the screw covers<br />
back into place, and you’re done.<br />
One of these techniques should have fixed your DISC READ ERROR problems. Your PS2 should now be<br />
ready to go. If it is still not working then you have more serious problems than most. The laser may need to be<br />
replaced or the voltage adjusted. See the table of contents for the latter.<br />
21
SECOND DISC READ ERROR ADJUSTMENT PROCEDURE<br />
Read through this entire procedure before starting so you have a clear understanding of what needs to be<br />
done.<br />
If the previous procedure did not work for you there is one more thing you should try before going with the<br />
laser voltage adjustment procedure. This will only work on version 3 and higher PS2 consoles. If you don’t<br />
know what version you have it won’t hurt to try the procedure, but the problem is that the adjustment you make<br />
will not stay on version 1 & 2 consoles. It will revert back to it’s default setting.<br />
Before you get started you need to have as many different types of game disc as you can to make the best<br />
possible adjustment. Get a DVD, a silver or gold back disc, and a purple or blue back disc. When you have one<br />
of each then you can proceed.<br />
1. Use the <strong>repair</strong> <strong>guide</strong> to remove your top cover again<br />
2. Remove the disc tray assembly cover again just like you did when you were cleaning the lens.<br />
Take a look at the picture on the right. The small white<br />
wheel is what you are going to be adjusting in this<br />
procedure.<br />
What this little wheel does is adjust the angle of the CD tray. This will effect the angle that the laser hits the<br />
CD. Do not get carried away making big adjustments on this. It only takes a small change to get BIG results.<br />
WARNING- You are going to have to plug in your unit and hook it to a TV<br />
just like you were going to play it to make this adjustment. It is very dangerous<br />
to work on electrical equipment with the covers off. You could be shocked or<br />
killed. Be extremely careful-Don’t be in a hurry!<br />
1.Hook the unit to the TV and plug it in and turn it on.<br />
2. Press the eject button so that the tray slides forward.<br />
3. You should now have a clear view of the wheel pointed out in the picture above. You will also see a metal<br />
tab that hold the wheel in place.<br />
4. Take a felt tip marker and mark the point where the wheel meets the tab so that you will always be able to go<br />
back to your starting point.<br />
22
5. Turn the wheel about 1/8 of a turn. Put the CD tray cover back on. You DO NOT need to put the screws in.<br />
just hold it down lightly with your hand. Put in one of your game discs and push it in and see if it works. You<br />
may have to use the browser to load each disc you are testing.<br />
If it works then eject the tray and try another disc. Do this for each disc you have. If you can get all three types<br />
to load and play then you are done. Turn off the unit and reassemble.<br />
If all three do not work, then turn the wheel another 1/8 turn and try it again. Keep doing this until you find the<br />
spot where all three discs will work for you.<br />
REMEMBER- If you open the cover after testing and the wheel is back to it’s original position then you<br />
have a version 1 or 2 PS2 console and this will not work for you. There is nothing you can do to make the<br />
wheel stop returning to it’s original position.<br />
23
CD TRAY ALIGNMENT<br />
Fix for disc tray not opening after console has been dropped<br />
This procedure will not fix all consoles that have a disc tray that won’t open. There are other problems that can<br />
cause this problem as well. In most cases this will only work on consoles that won’t open, but that still have the<br />
blue light on the eject button.<br />
Flip your PS2 over so that the bottom is facing up.<br />
Remove all the screw covers. (There should be 6 screw<br />
covers, 4 made of rubber (outer edges) and 2 made of<br />
plastic (in the middle), that need to be removed. Indicated<br />
in photo by the white lines. You can use a knife or small<br />
jewelers flat blade screwdriver for this. There should be 2-4<br />
more screw covers on the outer side of the base,<br />
underneath the controller ports. Indicated in photo by red<br />
lines. The older model PS2’s have 4 screw covers, while<br />
the newer ones have only 2. Remove them all, and you<br />
should now have a total of 8-10 screws unveiled.<br />
Set the screw covers aside.<br />
24
Use your knife to cut the warranty tape that is covering the<br />
seam between the back and the top cover. (By the power<br />
switch). Just trace the seam through the tape with the knife<br />
so that it will not be holding you back when you go to<br />
remove the top later.<br />
Using the normal sized Phillips head screwdriver, Make sure all of the screws are removed, and put them aside.<br />
NOTE: Some of the screws are longer than others. It is VERY IMPORTANT that you remember where the<br />
longer screws go. You may want to mark the holes with a piece of tape or some other way so that you will know<br />
which holes the long screws go into. If you do not remember where the long screws go, you could put a hole<br />
through a circuit board by trying to force the long screw in where it is not supposed to be.<br />
The PS2 shell should now be ready to remove. ONLY<br />
the UPPER side (with the PS2 logo) needs to be<br />
removed for this step - Leave the BOTTOM side on.<br />
WARNING-Be very careful when taking the upper<br />
shell off, or you could damage the PS2.<br />
Place the PS2 horizontally, with the PS2 logo facing<br />
up and the front facing you.<br />
Pull up on the cover from the back and work it free and lift about 1/2 inch. Move the shell forward a little,<br />
sideways, so that the Eject/Reset buttons are not blocking the shell and the CD tray comes clear, and it can be<br />
lifted off. Just play around with it a little and you should get it.<br />
Then, lift it at an angle, like opening the cover of a<br />
book. Take the bottom (Vertically speaking) of the<br />
shell, with the PS2 logo on it, and lift it an angle.<br />
WARNING-Lift slowly and be careful not to break<br />
the ribbon cable going to the reset and eject buttons.<br />
You should notice a small ribbon cable around the<br />
area where the Reset/Eject buttons are. The cable<br />
should be taped to the top of the Lens cover. Remove<br />
the tape, and then carefully lift the cover so that it is<br />
lying flat, and the PS2 is open like a book, connected<br />
at the middle by the ribbon cable.<br />
25
OPTIONAL: If you have or can get a couple of<br />
clips that hold stacks of paper they make and<br />
excellent clip for holding your PS2 cover firmly to<br />
the PS2 base. This will reduce your risk of<br />
accidentally tearing your ribbon cable. See photo.<br />
Next you will remove the lens cover. To remove the<br />
lens cover, simply take out the 2-4 screws located on<br />
the side with the Jewelry screwdriver. Place the screws<br />
aside, and lift the lens cover. NOTE:The lower left<br />
corner has a latch tab that needs to be pulled slightly<br />
left before you can lift it up. See photo.<br />
Once the cover is removed you will be able to see two<br />
small screws that hold the CD tray in place. (See<br />
diagram). These screws needs to be removed.<br />
26
Now, lift up on that edge and pull up and forward a<br />
little. You should then be able to lift that whole side<br />
up at an angle and slide the tray completely out.<br />
Once you have it out...you will see a little gear on the<br />
front left side. This is the gear that makes the tray go<br />
in and out.<br />
There is also a piece of plastic in the front that slides<br />
left and right. Make sure it is all the way to the left.<br />
Now put the tray back in the way you took it out.<br />
When you get to the end you will have to jiggle and<br />
move it around a little to get the tray aligned with the<br />
gear. ( try moving the tab that the screws mount in. It<br />
slides back and forth) It will drop down when it aligns<br />
correctly. Put the screws back in and reassemble the<br />
console.<br />
Hopefully your CD tray will work now.<br />
27
LASER VOLTAGE ADJUSTMENTS<br />
WARNING!-Adjusting your laser voltage is pushing the envelope of a do-it-yourself procedure.<br />
This should only be done as a last resort for getting your games to work. Do not do this until<br />
you have tried the cleaning of the laser lens and the increasing of the magnet strength.<br />
DO NOT ADJUST THE LASER VOLTAGE IF:<br />
If you do not get the "Disc Read Error" message in the browser when trying to load problem discs.<br />
Your PS2 only gets errors on certain CD or DVD games and not ALL.<br />
YOU MAY NEED TO ADJUST THE LASER VOLTAGE IF:<br />
You can play games on CD but not on DVD<br />
You can play games on DVD but not on CD<br />
You can't play ANY games and have already cleaned the laser in the steps listed earlier.<br />
TOOLS NEEDED:<br />
Philips head screwdriver<br />
Very small jewelers flat blade screwdriver<br />
Needle-nosed pliers (optional)<br />
Voltmeter<br />
A friend to help<br />
Adjusting the laser voltages involves taking the bottom off of your PS2. So let's get started.<br />
This procedure is for version 1-3 – Please see next section for version 4 and higher.<br />
A. Flip your PS2 over so that the bottom is facing up.<br />
B. Remove all the screw covers. (There should be 6<br />
screw covers, 4 made of rubber (outer edges) and 2 made of<br />
plastic (in the middle), that need to be removed. Indicated<br />
in photo by the white lines. You can use a knife or small<br />
jewelers flat blade screwdriver for this. There should be 2-4<br />
more screw covers on the outer side of the base,<br />
underneath the controller ports. Indicated in photo by red<br />
lines. The older model PS2’s have 4 screw covers, while<br />
the newer ones have only 2. Remove them all, and you<br />
should now have a total of 8-10 screws unveiled.<br />
Set the screw covers aside.<br />
28
C. Use your knife to cut the warranty tape that is covering<br />
the seam between the back and the top cover. (By the<br />
power switch). Just trace the seam through the tape with the<br />
knife so that it will not be holding you back when you go to<br />
remove the top later.<br />
D. Using the normal sized Phillips head screwdriver, Make sure all of the screws are removed, and put them<br />
aside.<br />
NOTE: Some of the screws are longer than others. It is VERY IMPORTANT that you remember where the<br />
longer screws go. You may want to mark the holes with a piece of tape or some other way so that you will know<br />
which holes the long screws go into. If you do not remember where the long screws go, you could put a hole<br />
through a circuit board by trying to force the long screw in where it is not supposed to be.<br />
E. Gently pull up on the back of the bottom cover and<br />
slide it forward and place it on the side. You should<br />
see two metal shields covering the circuitry on the<br />
bottom.<br />
F. Remove the expansion slot cover from the back of<br />
the PS2. It just slide out<br />
G. Remove the 1 screw in each plate that is holding it<br />
down and gently remove both shields.<br />
29
H. Now that the shields are removed you are going to lift and fold back the expansion slot to reveal the laser<br />
voltage adjustments. BE VERY CAREFUL-YOU WILL BE MOVING RIBBON CABLE AND CAN<br />
BREAK IT IF NOT DONE CAREFULLY.<br />
Gently pull up on the outer edge of the expansion bay and fold over to the right and GENTLY lay it on top of<br />
the circuit board to the right. (See Photos)<br />
I. Now that the expansion slot is out of the way you<br />
should be able to see the controls that adjust the laser<br />
voltage. (See photo)<br />
J. The one on the left is for adjusting CD games and the one on the right is for adjusting DVD games. Make<br />
sure you only mess with the one that is giving you problems. Before you get started you should carefully<br />
mark the current location of the adjustments so you can go back to them if needed. You can do this by<br />
using a sharpie pen to put a small dot at the 12 o'clock position on each screw and then another on the<br />
circuit board to line it up with. When turning the adjustments you only need to turn VERY SLIGHTLY.<br />
(1 degree at a time) Turning to the right is increasing the voltage and to the left is decreasing the voltage.<br />
In most cases you will want to INCREASE the voltage.<br />
30
K. Before you get started lets get a reading of exactly<br />
where the adjustment is set. Using your voltmeter in<br />
the Ohms reading setting put 1 lead at the bottom of<br />
the adjustment and the other in the upper left corner<br />
(see photo). Write this reading down so you can go<br />
back to it if needed. Using a very small screwdriver<br />
carefully turn the adjustment to the right about 1<br />
degree. Take a measurement again. You will then<br />
have to put everything back together and try it. If it<br />
does not work you can keep adjusting it over and over<br />
until it works. I have found that the CD adjustment<br />
can be anywhere between 950-1200 ohms and the<br />
DVD can be between 650-1000 ohms. This can be a<br />
very time consuming process but it will work for some<br />
of you. The key is to be patient and careful. If you get<br />
in a hurry you may pass the point where it works or<br />
you may damage something taking it apart.<br />
OPTIONAL ADJUSTMENT PROCEDURE<br />
Use this procedure at your own risk and the risk of damaging your <strong>Playstation</strong> 2. This procedure will speed up<br />
the process for you but it involves working on the <strong>Playstation</strong> 2 while it is plugged in and circuit boards are<br />
exposed. The choice is yours.<br />
HERE WE GO:<br />
• Stand the PS2 on it's side so the power button is at the top. Have a friend hold it for you and make sure that<br />
the expansion bay does not touch the exposed circuits on the adjacent board.<br />
• Plug in the PS2 (power and video) and load a problem disc.<br />
• Turn the adjustment pot 1 degree and reload the disc to see if it helped.<br />
• Repeat the process until you have moved the adjustment 20 degrees. If you have not had success move it<br />
back to the beginning spot and go the opposite direction up to 20 degrees.<br />
I have never seen the adjustment needed to be turned more than 30 degrees although I have heard that some<br />
people have had to turn it up to 180 degrees on PS2 that have a modchip and they are reading backup CD-R<br />
games.<br />
Before you finish lower the PS2 to the horizontal position and try the game as well as several others to make<br />
sure you don't need some more fine adjustments. Some people have reported that a slightly higher setting is<br />
needed in the horizontal direction than in the vertical.<br />
Turn off your PS2 and reassemble.<br />
31
LASER VOLTAGE ADJUSTMENT FOR VERSION 4 ON UP<br />
I stated earlier that the version 1-3 adjustment procedure was just on the edge of what I think the average do-ityourselfer<br />
could do, and this procedure for version 4 and higher is even a little more difficult than the last. I<br />
have included it though to make the book more complete. Proceed at your own risk.<br />
You will need silicon grease while doing this procedure. Radio Shack-#64-2326 . Best to get it before you start<br />
A. Flip your PS2 over so that the bottom is facing up.<br />
B. Remove all the screw covers. (There should be 6<br />
screw covers, 4 made of rubber (outer edges) and 2 made of<br />
plastic (in the middle), that need to be removed. Indicated<br />
in photo by the white lines. You can use a knife or small<br />
jewelers flat blade screwdriver for this. There should be 2-4<br />
more screw covers on the outer side of the base,<br />
underneath the controller ports. Indicated in photo by red<br />
lines. The older model PS2’s have 4 screw covers, while<br />
the newer ones have only 2. Remove them all, and you<br />
should now have a total of 8-10 screws unveiled.<br />
Set the screw covers aside.<br />
C. Use your knife to cut the warranty tape that is covering<br />
the seam between the back and the top cover. (By the<br />
power switch). Just trace the seam through the tape with the<br />
knife so that it will not be holding you back when you go to<br />
remove the top later.<br />
D. Using the normal sized Phillips head screwdriver, Make sure all of the screws are removed, and put them<br />
aside.<br />
NOTE: Some of the screws are longer than others. It is VERY IMPORTANT that you remember where the<br />
longer screws go. You may want to mark the holes with a piece of tape or some other way so that you will know<br />
which holes the long screws go into. If you do not remember where the long screws go, you could put a hole<br />
through a circuit board by trying to force the long screw in where it is not supposed to be.<br />
32
The PS2 shell should now be ready to remove. ONLY<br />
the UPPER side (with the PS2 logo) needs to be<br />
removed for this step - Leave the BOTTOM side on.<br />
WARNING-Be very careful when taking the upper<br />
shell off, or you could damage the PS2.<br />
Place the PS2 horizontally, with the PS2 logo facing<br />
up and the front facing you.<br />
Pull up on the cover from the back and work it free and lift about 1/2 inch. Move the shell forward a little,<br />
sideways, so that the Eject/Reset buttons are not blocking the shell and the CD tray comes clear, and it can be<br />
lifted off. Just play around with it a little and you should get it.<br />
Then, lift it at an angle, like opening the cover of a<br />
book. Take the bottom (Vertically speaking) of the<br />
shell, with the PS2 logo on it, and lift it an angle.<br />
WARNING-Lift slowly and be careful not to break<br />
the ribbon cable going to the reset and eject buttons.<br />
You should notice a small ribbon cable around the<br />
area where the Reset/Eject buttons are. The cable<br />
should be taped to the top of the Lens cover. Remove<br />
the tape, and then carefully lift the cover so that it is<br />
lying flat, and the PS2 is open like a book, connected<br />
at the middle by the ribbon cable.<br />
Next you will remove the lens cover. To remove the<br />
lens cover, simply take out the 2-4 screws located on<br />
the side with the Jewelry screwdriver. Place the screws<br />
aside, and lift the lens cover. NOTE:The lower left<br />
corner has a latch tab that needs to be pulled slightly<br />
left before you can lift it up. See photo.<br />
33
Plug the unit in and hit the eject button so the tray<br />
comes out and then unplug the unit. Lease the tray in<br />
the out position. You then need to remove the screws<br />
that are holding the rods that the laser assembly travels<br />
on. (see picture)<br />
Next you will remove the rods one by one. Just lift in<br />
the back where you removed the screw and then slide<br />
it out. It works the same on both sides. Be careful not<br />
to touch the laser lens while doing this. Also, be<br />
careful because there are things on the bottom of the<br />
laser assembly. It’s best to hold it on the sides.<br />
Once the rods are removed flip the laser up carefully<br />
to expose the underside of it. You will see the two<br />
adjustments marked in the picture.<br />
34
. Before you get started lets get a reading of exactly where the adjustment is set. Using your voltmeter in the<br />
Ohms reading setting put 1 lead at the bottom of the adjustment and the other in the upper left corner (see<br />
previous photo). Write this reading down so you can go back to it if needed. Using a very small screwdriver<br />
carefully turn the adjustment to the right about 1 degree. Take a measurement again. You will then have to put<br />
everything back together and try it. If it does not work you can keep adjusting it over and over until it works.<br />
I have found that the CD adjustment can be anywhere between 950-1200 ohms and the DVD can be<br />
between 650-1000 ohms. This can be a very time consuming process but it will work for some of you. The key<br />
is to be patient and careful. If you get in a hurry you may pass the point where it works or you may damage<br />
something taking it apart.<br />
OPTIONAL- If you don’t have an ohm meter you may also just turn the adjustment about 1 degree at a time.<br />
Make sure to mark your starting point with a felt tip pen.<br />
After you are completely done doing this alignment make sure to use the grease mentioned at the beginning or<br />
something similar to grease up the rods that the laser slides on. I’m sure they are dry after the laser has been slid<br />
on and off so many times. This will make sure that it can travel freely after it is reassembled.<br />
35
REPLACING THE EJECT RIBBON CABLE<br />
Sometimes your ribbon cable may become broken or just break loose from the connector on one end or the<br />
other. It’s fairly easy to replace or reconnect. Just use the procedure below.<br />
If you need a new ribbon cable Click Here<br />
This procedure is going to start with the top already removed. Since this has been covered so many times in this<br />
book, you should have no problem getting the top off by now.<br />
Depending on what your exact problem is will determine what part of this procedure you will need to do. The<br />
procedure listed will take you through replacing the entire cable. If you just need to reattach one end then<br />
jump to the step that deals with that particular end.<br />
First you need to remove the cable from the eject/reset<br />
button assembly. To do this you will need to remove<br />
the assembly from the console cover. After you<br />
remove the screws from the cover and have the cover<br />
flipped over you will see the assembly (see picture)<br />
Use a small bladed screwdriver to lift up on the back<br />
of the assembly and it will come loose. Be careful<br />
when pulling the buttons through the holes in the<br />
console so that they do not get hung up and break.<br />
36
Once the assembly is loose you will be able to remove<br />
the cable (or reattach it). As you can see the blue side<br />
of the cable is facing towards the circuit board.<br />
Tip- The cable just slides in to this connector. Just<br />
gently push it in while holding it close to the end to<br />
keep it from bending.<br />
Now we need to remove the other side of the cable.<br />
First you need to remove the two screws holing the<br />
controller port in place. After you remove them you<br />
can pull out on it a little, but be careful. There is a<br />
cable attached. You can remove the cable if you wish,<br />
it will make it a little easier to handle when turning the<br />
console over, but it is not necessary. Next you need to<br />
remove the bottom cover from the console and flip<br />
everything over.<br />
You should now have the console flipped upside down<br />
with the bottom cover removed. You then will remove<br />
the 2 screws holding the expansion bay in place. Then<br />
remove the expansion bay.<br />
37
Once the cover is removed you will be able to see<br />
where the ribbon cable connects. The blue side is<br />
facing up in this picture.<br />
Tip- This connector opens up wide on one end and<br />
then after you place the cable in it snaps shut. Open<br />
it up carefully before inserting or removing the<br />
cable.<br />
Carefully reassemble the console. You may want to check the operation of the cable before putting the top<br />
cover back on. Just remember to be careful when working on live equipment.<br />
38
MY PLAYSTATION 2 IS STILL BROKEN-NOW WHAT?<br />
Hopefully you were able to fix your <strong>Playstation</strong> 2 and are now back to playing games. If you are reading this<br />
though then that means that the methods did not work for you. Don’t worry.<br />
You now have 2 paths to choose from for your next course of action. You can<br />
A.) Send in your console for <strong>repair</strong> to our approved <strong>repair</strong> facility- You will get a $10.00 discount off of<br />
their standard rate.<br />
B.) Sell your console on Ebay and buy a working used one.<br />
The choice is yours and no matter what way you decide to go, it is covered in the sections below.<br />
In this next section I’m going to show you how to get rid of your broken PS2 console and get a WORKING<br />
used or maybe even a NEW one for a net cost of less than $100.00 which includes the price of this <strong>guide</strong>. So,<br />
you see you are still better off then you were if you had paid the $120 for <strong>repair</strong>.<br />
I will <strong>guide</strong> you step by step how to do this.<br />
The way we are going to do this by selling your broken PS2 for parts on Ebay which should get you a price<br />
between $50 - $85. After that you will buy a working PS2 either new or used for between $125 - $175. If you<br />
do the math you will see that your net cost will be around $75.00. If you add in the price of the manual then<br />
your total cost is still only $95.00 which means you have saved over $25.00 by NOT paying the $120 to <strong>repair</strong><br />
your PS2.<br />
39
INTRODUCTION TO BUYING AND SELLING ON EBAY<br />
Ebay is in my opinion the absolute best place on the internet to get a deal on ANY item. If you have never<br />
explored Ebay then you are in for a real treat. Before you begin dealing in this new world I want to make a<br />
couple of points that are CRITICAL to your Ebay future.<br />
1. Sign-up for a Paypal account.<br />
Paypal was recently purchased by Ebay and is becoming an integral part of accepting and making payments<br />
for auctions on Ebay. The benefits of Paypal are that you don’t have to wait for days to get paid or to make<br />
payments, thus you can finish a transaction quickly.<br />
Paypal does charge a small fee for their services but it is well worth it. You will not have to write out a<br />
check, deposit a check, get a money order, or mail anything. Having a Paypal account also allows you to<br />
accept payment from people who want to pay by credit card.<br />
If you paid for this <strong>guide</strong> through Paypal then you are already a member. You can verify your address and<br />
setup your bank account with them and start accepting and making payments quickly. Just login to your<br />
Paypal account and follow the directions to do it.<br />
2. Develop your feed back rating.<br />
Your Ebay reputation is based on feedback you receive from other Ebay members after you have completed<br />
a transaction. It is EXTREMELY IMPORTANT to keep your feedback positive. The higher your<br />
feedback number goes the better people feel about dealing with you. The same goes for you when buying<br />
from someone on Ebay. Look at their feedback number. The higher the better. You can click on the number<br />
and read what others have said about that particular member. Below is a picture of what you will see when<br />
looking at an auction page. Note the red lines pointing to the buyer and sellers feedback rating. This is what<br />
you want to keep going up on your own account and what you want to look at before buying from someone<br />
else.<br />
P.S. marke is my personal Ebay membership. As you can see I have developed a rating of 165.<br />
Buying on Ebay is a legally binding contract between you and the seller. REMEMBER THAT! Don’t bid<br />
if you don’t intend to buy. Don’t bid and then buy it somewhere else unless you know that you are not going<br />
to get it.<br />
Ebay charges sellers fees for listing their goods. Plus, you are charged a fee based on the final selling price.<br />
If you bid and then don’t pay the seller is still charged the fees by Ebay and has to file a complaint with<br />
Ebay about you and then request a credit to get his/her money back.<br />
If the complaint is filed then Ebay will send you an email telling you this and give you 10 days to work<br />
things out. If you don’t then Ebay will issue you a warning when the final credit request is given. You get 3<br />
warnings and you are gone from Ebay forever.<br />
40
So, be a good Ebayer from the beginning. It’s a great place to do business. Pay for what you bid for and win<br />
and stay in contact with the seller after the auction. Treat others as you want them to treat you.<br />
HELP TIP-You don’t have to do this but it might get you a higher price for<br />
your PS2 console. Buy a few items that you need (a couple of PS2 games)<br />
and get the seller to post feedback for you. Make sure to do the same for<br />
him/her. It makes people feel better when spending money to see a good<br />
feedback rating versus a 0. Some people will not bid if your feedback is 0 so<br />
the price of your item does not reach it’s full potential.<br />
HOW TO BUY AND SELL ON EBAY<br />
Getting Registered On Ebay – Required for buying and selling<br />
• Click Here to go to the Ebay Website<br />
• At the very top of the page click on the “sign in” link<br />
• On the left hand side of the page click on the “Register” button<br />
• Fill in the blanks and make sure that you use a valid email address- you will have to verify your<br />
information with it.<br />
HELP NOTE- When picking a username –DO NOT pick a name that<br />
might be offensive to others or that might be viewed as illegitimate. You<br />
will be dealing with people that don’t know you, and you don’t want to start<br />
off on the wrong foot. Here are some examples – illwill , demonspawn,<br />
agentbadboy,serpentile. You get the idea?<br />
After that there will be a couple of more steps and you will be sent an email to confirm your registration. Follow<br />
the instructions in the email to successfully setup your new Ebay account.<br />
SELLING ON EBAY<br />
Next I will walk you through selling your broken PS2 console on Ebay. Included are links to some tools to help<br />
you get a higher price if you want to use them. (You don’t have to use my tools-they are there if you need<br />
them) Let’s get started.<br />
• Sign in<br />
• Click on the SELL link at the top of the page<br />
• Make sure that the “Sell Items at online Auction” is clicked and then press “Continue”<br />
• Next is the category selection – First In Box 1 Click on “Consumer Electronics”<br />
• In Box 2 Click on “Video Games”<br />
• In Box 3 Click on “Sony <strong>Playstation</strong> 2”<br />
• In Box 4 Click on “Systems”<br />
• Go to the bottom of the page and Click “Continue”<br />
Next you will begin to enter the information you need that will pertain to your auction. First is the Auction Title<br />
and then the Description. The Description can be just typed in by you or you can use HTML (Webpage) format<br />
to make your auction page a little spiffier. I have made a HTML auction template for you that can be<br />
downloaded by clicking here. Save it to your desktop and open it up and copy and paste it into the Description<br />
box if you want to use it. – More about this later.<br />
41
OK..let’s get started on the next part of getting your auction listed.<br />
• In the Item Title Box Type “<strong>Playstation</strong> 2 Console – Needs Repair”<br />
• Now if you are using my template you need to copy it and paste it into the Description Box. If you are<br />
not going to use it then you need to type in your description. NOTE- If you use my template you can<br />
change the description by adding or deleting text, just be careful to NOT delete any of the coding<br />
around and in the text.<br />
• Go to the bottom of the page and click on the “Continue” Button<br />
Your now page 3 which is called “Pictures and Details”- Follow the steps below for each<br />
• Duration – 7 days is a good auction length.- You can go longer if wanted but it will cost you.<br />
• Start Time-Start the auction right after your done. Note- It’s best to start between 6-10 PM.<br />
• Quantity- “1”<br />
• Starting Price- “9.95”<br />
• Reserve Price- This is optional. If you don’t care how much you get for your console leave it blank. If<br />
you don’t want to sell it unless you get a certain amount then put that amount in this box. This is kept<br />
secret from bidders but if your price is not met then the auction will say “Reserve Price Not met”<br />
Having a reserve price will sometimes discourage people from bidding. Personally on an auction for a<br />
broken PS2 console I wouldn’t care what I got for it. It’s worthless as is.<br />
• Buy it Now Price- This is optional. This is a price that you will take for your console right now. In other<br />
words if you will take $60.00 then put $60.00 in this box and someone can end the auction instantly buy<br />
paying you $60.00 for your item. This only works until someone else bids on the auction at your starting<br />
bid. Once that happens then the BUY IT NOW option will go away.<br />
• Private Auction- Leave this Unchecked<br />
• City, State- Just Put the State you are shipping from<br />
• Region- I do not use this but you can if you want. Just select the Closest major market you live by.<br />
• Pictures- This is where you would normally add your pictures. I have a default PS2 console picture<br />
included in my template so there is no need for you to add any unless you want to.<br />
• List Designer- You can use this if you want but NOT if you are using my template. If you want to use<br />
this you can but you will need to have your own picture to upload.<br />
• Gallery Picture- No need for one on this auction<br />
• Listing Upgrades- No need for any<br />
• Gift Services- Do Not show as a gift<br />
• Free Page Counter- This is up to you<br />
• Click “Continue” at the bottom of the page<br />
The next section is Payment and Shipping<br />
• Seller Accepted Payment Methods – Just Click on all of the buttons that apply to you. If you will<br />
accept Paypal then make sure to put your Paypal email address in the box listed.<br />
• Shipping Costs – Buyer Pays Shipping Costs – And if you use my template it states that $12.00 is the<br />
Shipping cost so you can fill in the blanks on the next part. Insurance is optional so make it so and put<br />
that price in. The cost of insurance is $1.30 for the first $50.00 and an additional $1.00 per $50.00 after<br />
that. So, $2.30 would cover up to $100.00.<br />
• Payment Instructions- Tell them that you will contact them after the auction with payment instructions.<br />
• Ship to Locations- Select “US Only” Shipping outside the US can be a REAL hassle. My auction<br />
template states that the shipping cost quoted is for the lower 48 states only. Shipping to Hawaii and<br />
Alaska can be more so you want to make sure to get an accurate price on shipping if your winning<br />
42
idder is from one of these two states and request the additional money required to ship.<br />
• Escrow- Does not apply to this auction<br />
• Click “Continue” at the bottom of the page<br />
Next you will just review everything you entered to make sure it is correct before starting your auction. DON’T<br />
Worry if the description section looks a little squeezed together. It will look normal when displayed on a<br />
complete webpage by itself.<br />
If you see a mistake just click on the link on the right hand side of that sections title that says “Edit Shipping<br />
and Handling” or “Edit Title and Description”. Then once you have made your changes on that particular page<br />
then Click on the “Save Changes” button at the bottom of the page.<br />
When you are all done and ready to begin your auction click on “Submit Listing”<br />
Your auction will be viewable almost immediately by millions of people and over the next seven days you<br />
should receive several bids and hopefully will get a nice price for your broken console. Somewhere between<br />
$50 and $80 dollars.<br />
You may get a few emails from potential bidders wanting to know specifics about your PS2 console like model<br />
number and if controllers are included and things like that. Email them back as quickly as possible and BE<br />
HONEST.<br />
THE AUCTION IS OVER- NOW WHAT?<br />
You will be sent an email from Ebay telling you that your auction is over. Of course you will probably be<br />
monitoring your auction and know it is over before you get the email but that’s beside the point. For easy<br />
monitoring of all of your Auction activities use the “My Ebay” link at the top of any page.<br />
The first thing you need to do is make contact with the buyer and giving him instructions on how he can pay<br />
and where to mail his payment to if paying by check or money order. Make this short and sweet. Be clear and<br />
give the exact price you are expecting from him/her. The auction price plus shipping. Ask the buyer to respond<br />
to let you know that they received your email and to give you a shipping address.. Give them a day or so, some<br />
people don’t check their email but once a day.<br />
Once the buyer responds you can expect to receive payment from them in a few days or within 1 week for sure.<br />
When you receive payment then send a quick email to the buyer and tell them you got it and when you will be<br />
shipping their package. If it is a check then you will need to deposit it and wait for it to clear. If it is a money<br />
order or if they pay by Paypal then you can ship immediately. Box up the console and pack it well. You can<br />
ship either USPS (post office) or UPS. If you use UPS then use the shipping option on Paypal (if you have an<br />
account.) It will save you some money.<br />
I like to use delivery confirmation if sending by USPS for tracking purposes. This will cost you 40 cents but it is<br />
worth it knowing that your package has been delivered. UPS has tracking numbers on every package. If you<br />
have a tracking number you can also email that to your buyer so he can see that the package is on it’s way.<br />
43
NOTE- I can’t stress enough how important it is to stay in touch with your buyer during the exchange<br />
process. Try to think of it from his point of view. He is sending you money in the mail- He wants to know<br />
if you got it and what your next action is.-Did you ship it yet? If so, when is he going to get it? Lack of<br />
contact can really make for a BAD transaction. Even though everything goes smoothly it can make a<br />
person feel uncomfortable NOT knowing what is happening on the other side. If you contact the person<br />
and let them know what is going on they will feel much better and give you GOOD feedback at the end.<br />
Once you see that the buyer has received his item send him an email stating that and say thanks for the business<br />
and ask for positive feedback. Tell them that you will be leaving some for them as well. Don’t wait for them to<br />
give you some before you give them some. Go to your “My Ebay” link and see what feedback you need to<br />
leave. Follow the instructions and you will be done. Hopefully the buyer will do the same for you but not<br />
everyone will leave you feedback. My rating is 165 currently but I have probably done over 300 transactions on<br />
Ebay. Some people just won’t go through the steps, or they forget. You have 90 days to leave feedback on<br />
someone.<br />
BUYING ON EBAY<br />
Note- Even if you have bought on Ebay before you may want to read this section. I have included a<br />
couple of secrets that you might not know about on getting a good price.<br />
Buying on Ebay is a lot easier than selling. To find you a good working used or new PS2 console just do a<br />
search from the Home page for “PS2 console” or “PS2 console new”. Either one of these should pull up<br />
multiple auctions for you.<br />
To get an idea of what price you will have to pay just click on the<br />
“Completed Items” link on the left side of the page listed under the<br />
Display Heading.<br />
This will show you all of the auctions that have ended in the last 30 days<br />
for the particular item you are searching for. You can use this to get an<br />
idea of how much you can expect to pay for the item that you will be<br />
bidding on.<br />
You will want to read the descriptions of some of them to see if any<br />
accessories were included etc. Some items that seem like they went really<br />
cheap did so for a reason. You will need to read the description to find out<br />
why.<br />
When you find an item you would like to buy take a look at the buyers feedback rating. Is it good? Read some<br />
of the feedback on him by clicking on the feedback number. This will give you a better idea of what you can<br />
expect if you buy from this particular person.<br />
My advice is to steer clear of sellers with negative feedback. I don’t mean 1 or 2 but a lot. You can be the judge<br />
but more than a few can indicate that the seller may not be organized or truthful. Whatever the reason you will<br />
be increasing your chances of having a bad transaction.<br />
There are plenty of other people out there with good feedback that you can buy from so why risk buying from<br />
44
someone who has a bad feedback rating?<br />
OK…enough said about that. Read through the descriptions of the auctions and look at the feedback rating of<br />
the seller. Look at the terms of the auction. Can you pay with Paypal, does he take checks? How much is<br />
shipping? All of these factors along with the description of the item being sold should help you decide what<br />
item you want to bid on.<br />
NOTE- In a hurry? Find an auction that you like that has the Buy it Now display on it and if that price is<br />
acceptable then go to the bottom of auction page and BUY IT NOW.<br />
If you are ready to bid on an auction then go to the bottom of the auction page and fill-in the box that says<br />
“Your Maximum Bid”. That means the maximum price you are willing to pay for the item. Ebay will increment<br />
the bids but only high enough for you to be the high bidder. Here’s a better way-Go to Auction Stealer . Signup<br />
for an account –It’s FREE. Then enter the auction info into this account to attempt to steal the auction away.<br />
What it does it bid on the auction in the last few seconds. That way your maximum bid is not sitting there<br />
waiting on someone to come along and run it up and then outbid you by $1.00 in the last minute. Auction<br />
Stealer will monitor the auction and will not bid if the auction does not meet the requirements you spell out<br />
when setting up the bid. It’s not hard and you can get 5 bids a week for free. If you want to use it beyond that<br />
you will have to pay a small fee.<br />
Either way you should be able to acquire a working PS2 for about $120.00. So your approximate net cost for<br />
getting a working console is $120(working console) - $60(your broken console) + $20 (This <strong>guide</strong>) = $80.00. A<br />
saving of over $40.00 from the $120 that some <strong>repair</strong> shops would have charged you. ($120 + shipping)<br />
I WON THE AUCTION NOW WHAT?<br />
If you win an auction you will receive notice from Ebay. If you have the option of paying by Paypal and that is<br />
the option you choose then goto the auction page and click on the Paypal link. Make sure that you know what<br />
the shipping is. If you don’t then you will need to wait on the seller to contact you or you can send them an<br />
email requesting a total.<br />
The goal here is to get your auction paid for as quickly as possible and have the item shipped to you. Remember<br />
to stay in close contact with the seller. Don’t be discouraged if you don’t get the kind of contact you want.<br />
Some people are just not that good at customer service and don’t take care of the details.<br />
If your seller has good feedback then you WILL get your item. If you have a problem then email him/her and<br />
try to work it out. When all is done make sure to leave them positive feedback and ask them to do the same for<br />
you.<br />
45
SENDING IN YOUR CONSOLE FOR REPAIR<br />
If you decide to send in your console for <strong>repair</strong> to our approved <strong>repair</strong> facility you will receive a $10.00<br />
discount from their standard $49.95 flat rate labor fee. Your rate will be $39.95 plus parts.<br />
Please feel free to call them if you have questions at 888-662-5827. Tell Mark that Powerful Guides sent you.<br />
Please email us at cs@powerful<strong>guide</strong>s.com if you have any problems.<br />
If you are not at all interested in <strong>repair</strong>ing your system<br />
yourself feel free to send it to us and we will <strong>repair</strong> it<br />
for you. Our flat rate <strong>repair</strong> service is $39.95 plus<br />
$10.00 shipping and handling. If you are interested in<br />
this service feel free to fill out this form and print it<br />
out on your printer. Once you have done so go ahead<br />
and ship your PS-2 to us along with this info page.<br />
Also include the symptoms you are experiencing.<br />
This part is very important as the technicians can do a<br />
much better job knowing exactaly what's happening.<br />
Our tech service takes 72 hours from the day we<br />
receive your PS-2 and return shipping usually takes<br />
about 3-5 working days. Make sure to include all of<br />
your shipping info along with return address,<br />
"DAYTIME PHONE NUMBER" and billing info.<br />
Include a check or money order in the amount of<br />
$49.95 for the cost of the <strong>repair</strong> or we will contact you<br />
for your Credit Card info. Please be sure to fill out all<br />
fields listed below as this will expedite your <strong>repair</strong><br />
much quicker and also help our technicians do a better<br />
job with your system <strong>repair</strong>.<br />
The first step in the <strong>repair</strong> process is to fill out and print the form below. Your next step is to read and sign the<br />
form at the bottom. If you do not sign your form we will not proceed with any service once we receive your<br />
gaming system. Your next step is to round up an appropriate shipping box for your game system to be packed<br />
up in for it's long journey to Salt Lake City, Utah. The most important thing is to make sure the box is large<br />
enough to accommodate for the required packing material to protect it from damage. Please include only the<br />
game system and <strong>repair</strong> form, cables and cords just cost you more due to the added weight so don't ship them<br />
to us. From there wrap up the system and again do not forget the signed Repair Form. Please include a<br />
Personal Check/Money Order or Credit Card info for payment. Please send your boxed up unit to the address<br />
below.<br />
Video Game Repair<br />
2358 South Redwood Road<br />
West Valley City, UT 84119<br />
801-908-7223<br />
Fill out the form below and send it in with your console.<br />
46
Referral Form from Powerful Guides<br />
Name ___________________________________________________________________<br />
Address ___________________________________________________________________________<br />
City ________________________________ State _________ Zip _____________________________<br />
Email ________________________________________________________________<br />
Phone _________________________________ Daytime Number If we can not talk to you during business<br />
hours your system goes to the back of the line.<br />
Model # ______________________________________ Serial # ___________________________________<br />
Total Enclosed $49.95 ($39.95 labor + $10.00 return shipping)<br />
Payment Method – circle one<br />
Check Money Order Credit Card<br />
Credit Card Number __________________________________________ Exp. Date __________________<br />
Description of problem with console<br />
We/I authorize Video Game Repair (Herein referred to as "VGR") to diagnose/<strong>repair</strong> my gaming system and understand that VGR is<br />
not responsible for any lost or stolen items in the mail or any other shipping method. We/I also authorize VGR to charge my credit<br />
card the amount listed above. We/I also understand that all <strong>repair</strong>ed systems are tested by qualified technicians before they are<br />
shipped out to the customer. We/I also authorize VGR to make the necessary <strong>repair</strong>s to the unit and understand that if We decide the<br />
system is not economically feasible to have <strong>repair</strong>ed We/I will be held responsible to pay the required shipping fee of $10.00 per unit<br />
and a diagnostic charge of $20.00 per unit to have the system returned to me. We/I also will not hold VGR responsible for any <strong>repair</strong><br />
damage done to my system if We/I have opened it up after We/I receive it back from the <strong>repair</strong> depot. We/I also understand that some<br />
<strong>repair</strong>s take longer than expected due to parts availability and will not hold VGR responsible for any <strong>repair</strong> deadlines either expressed<br />
or implied. We/I also understand that certain <strong>repair</strong>s might take additional time due to the nature of the <strong>repair</strong> and promise to be<br />
patient in the <strong>repair</strong> process of my system.<br />
Repair cost "does not" include main board replacement due to bad mods. The mainboard cost is $79.95 extra if<br />
needed. *Also there is a $59.95 "Additional Charge" on laser eye's if one is needed for "Disk Read" error<br />
corection.<br />
Signature (Don’t forget to sign) _________________________________________________<br />
47
WHERE TO BUY CHEAP PS2 GAMES<br />
Even if you fixed your PS2 by one of the techniques in my <strong>guide</strong> you can benefit from Buying and Selling on<br />
Ebay. It is a great place to sell your unwanted games and to pick up new games as a great price. Just follow the<br />
steps I described above for buying and selling your console and do it for games. You can’t get them cheaper<br />
anywhere.<br />
CONCLUSION<br />
Hopefully you have been able to get your problem resolved one way or the other. If my <strong>guide</strong> helped you I<br />
would really appreciate hearing from you and getting a testimonial. Please send me an email to<br />
marke60@powerful<strong>guide</strong>s.com .<br />
If you have friends or family that you think would be interested in this <strong>guide</strong> then be sure to refer them to our<br />
website, but signup as an affiliate first and earn some money for doing it! Click Here to go to the affiliate<br />
information page.<br />
If you have any comments that you think would make this <strong>guide</strong> better I would appreciate hearing them. Please<br />
send an email to the same address as above. I look forward to hearing from you.<br />
Mark Eastman<br />
Powerful Guides<br />
www.powerful<strong>guide</strong>s.com<br />
48