Setting Up the MIXTRACK PRO in Traktor - Numark
Setting Up the MIXTRACK PRO in Traktor - Numark Setting Up the MIXTRACK PRO in Traktor - Numark
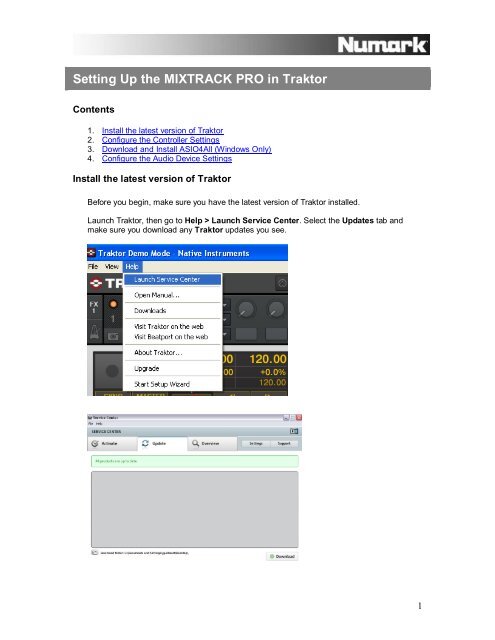
Setting Up the MIXTRACK PRO in Traktor Contents 1. Install the latest version of Traktor 2. Configure the Controller Settings 3. Download and Install ASIO4All (Windows Only) 4. Configure the Audio Device Settings Install the latest version of Traktor Before you begin, make sure you have the latest version of Traktor installed. Launch Traktor, then go to Help > Launch Service Center. Select the Updates tab and make sure you download any Traktor updates you see. 1
- Page 2 and 3: Configure the Controller Settings 1
- Page 4 and 5: 3. Select the MixTrack Pro as the A
<strong>Sett<strong>in</strong>g</strong> <strong>Up</strong> <strong>the</strong> <strong>MIXTRACK</strong> <strong>PRO</strong> <strong>in</strong> <strong>Traktor</strong><br />
Contents<br />
1. Install <strong>the</strong> latest version of <strong>Traktor</strong><br />
2. Configure <strong>the</strong> Controller <strong>Sett<strong>in</strong>g</strong>s<br />
3. Download and Install ASIO4All (W<strong>in</strong>dows Only)<br />
4. Configure <strong>the</strong> Audio Device <strong>Sett<strong>in</strong>g</strong>s<br />
Install <strong>the</strong> latest version of <strong>Traktor</strong><br />
Before you beg<strong>in</strong>, make sure you have <strong>the</strong> latest version of <strong>Traktor</strong> <strong>in</strong>stalled.<br />
Launch <strong>Traktor</strong>, <strong>the</strong>n go to Help > Launch Service Center. Select <strong>the</strong> <strong>Up</strong>dates tab and<br />
make sure you download any <strong>Traktor</strong> updates you see.<br />
1
Configure <strong>the</strong> Controller <strong>Sett<strong>in</strong>g</strong>s<br />
1. In <strong>Traktor</strong>, go to Help > Start Setup Wizard.<br />
2. In <strong>the</strong> w<strong>in</strong>dow that opens, click Next.<br />
3. Next, you’ll be asked, Are you us<strong>in</strong>g a USB/FireWire controller? Choose Yes, <strong>the</strong>n click<br />
Next.<br />
2
4. On <strong>the</strong> next page, next to Choose your manufacturer, choose <strong>Numark</strong>.<br />
The selection you make next to Choose your model will depend on which version of <strong>Traktor</strong><br />
you are us<strong>in</strong>g.<br />
IMPORTANT mak<strong>in</strong>g <strong>the</strong> <strong>in</strong>correct selection <strong>in</strong> this step will prevent your controller<br />
from controll<strong>in</strong>g <strong>the</strong> software properly.<br />
<strong>Traktor</strong> LE users should choose Mixtrack LE here.<br />
<strong>Traktor</strong> <strong>PRO</strong> and <strong>Traktor</strong> Duo users should choose Mixtrack here.<br />
5. Click Next, <strong>the</strong>n click F<strong>in</strong>ish on <strong>the</strong> last page to close <strong>the</strong> Setup Wizard W<strong>in</strong>dow.<br />
Download and Install ASIO4All (W<strong>in</strong>dows Only)<br />
ASIO4All is a low latency audio driver which allows <strong>Traktor</strong> to access <strong>the</strong> two sets of stereo<br />
outputs <strong>in</strong> <strong>the</strong> <strong>MIXTRACK</strong> <strong>PRO</strong>’s built-<strong>in</strong> audio device.<br />
1. Visit http://www.asio4all.com.<br />
2. Click <strong>the</strong> l<strong>in</strong>k titled ASIO4ALL 2.10 - English to download <strong>the</strong> <strong>in</strong>staller.<br />
3. Once downloaded to your computer, launch <strong>the</strong> <strong>in</strong>staller ASIO4ALL_2_10_English.exe.<br />
Once <strong>in</strong>stalled, proceed to <strong>the</strong> next section of this guide.<br />
Configure <strong>the</strong> Audio Device <strong>Sett<strong>in</strong>g</strong>s<br />
1. Open <strong>the</strong> Preferences menu <strong>in</strong> <strong>Traktor</strong> by click<strong>in</strong>g <strong>the</strong> button <strong>in</strong> <strong>the</strong> upper-right of <strong>the</strong><br />
screen.<br />
2. In <strong>the</strong> upper-left of <strong>the</strong> w<strong>in</strong>dow that opens, select Audio Setup.<br />
3
3. Select <strong>the</strong> MixTrack Pro as <strong>the</strong> Audio Device.<br />
W<strong>in</strong>dows<br />
1. For Audio Device, select ASIO4All v2.<br />
2. Next, click <strong>Sett<strong>in</strong>g</strong>s. In <strong>the</strong> w<strong>in</strong>dow that opens, click <strong>the</strong> selection button next to USB<br />
Audio Device to highlight. This is <strong>the</strong> <strong>MIXTRACK</strong> <strong>PRO</strong>. Once selected, close this<br />
w<strong>in</strong>dow.<br />
Mac<strong>in</strong>tosh<br />
For Audio Device, select <strong>MIXTRACK</strong> <strong>PRO</strong>.<br />
4. Next, on <strong>the</strong> right-hand side of <strong>the</strong> w<strong>in</strong>dow, select Output Rout<strong>in</strong>g. The <strong>MIXTRACK</strong> <strong>PRO</strong><br />
has two sets of stereo outputs.<br />
W<strong>in</strong>dows<br />
1. Set Mix<strong>in</strong>g Mode to Internal.<br />
2. Set Output Monitor to…<br />
L 3: USB Audio Device 3<br />
R 4: USB Audio Device 4<br />
3. Set Output Master to…<br />
L 1: USB Audio Device 1<br />
R 2: USB Audio Device 2<br />
4
Mac<strong>in</strong>tosh<br />
Set Mix<strong>in</strong>g Mode to Internal.<br />
Set Output Monitor to…<br />
L 3: Back Left<br />
R 4: Back Right<br />
Set Output Master to…<br />
L 1: Front Left<br />
R 2: Front Right<br />
You should be set up and ready to go.<br />
5


