AG 15D AV Digital Home Theater Receiver - TEAC Europe GmbH
AG 15D AV Digital Home Theater Receiver - TEAC Europe GmbH
AG 15D AV Digital Home Theater Receiver - TEAC Europe GmbH

You also want an ePaper? Increase the reach of your titles
YUMPU automatically turns print PDFs into web optimized ePapers that Google loves.
Z<br />
9A10229100<br />
<strong>AG</strong>-<strong>15D</strong><br />
<strong>AV</strong> <strong>Digital</strong> <strong>Home</strong> <strong>Theater</strong> <strong>Receiver</strong><br />
OWNER’S MANUAL
2<br />
Contents<br />
Thank you for choosing <strong>TEAC</strong>. Read this manual carefully<br />
to get the best performance from this unit.<br />
Contents . . . . . . . . . . . . . . . . . . . . . . . . . . . . . . . . . . . . . . . . . 2<br />
How to Reset the Settings to the FACTORY DEFAULTS . . . . . . . 2<br />
Before Use . . . . . . . . . . . . . . . . . . . . . . . . . . . . . . . . . . . . . . . . 3<br />
Connection (FM antenna) . . . . . . . . . . . . . . . . . . . . . . . . . . . . . 4<br />
Connection (AM antenna). . . . . . . . . . . . . . . . . . . . . . . . . . . . . 5<br />
Connections . . . . . . . . . . . . . . . . . . . . . . . . . . . . . . . . . . . . . . . 6<br />
Example: Connection to a DVD player . . . . . . . . . . . . . . . . . 8<br />
Example: Connection to Video Cassette Recorders . . . . . . . . 9<br />
Speaker Connections . . . . . . . . . . . . . . . . . . . . . . . . . . . . . . . 10<br />
Positioning of the Speakers . . . . . . . . . . . . . . . . . . . . . . . . . . . 11<br />
Names of Each Control . . . . . . . . . . . . . . . . . . . . . . . . . . . . . . 12<br />
Battery Installation . . . . . . . . . . . . . . . . . . . . . . . . . . . . . . . . . 16<br />
Remote Control Unit. . . . . . . . . . . . . . . . . . . . . . . . . . . . . . . . 16<br />
Speaker Configuration . . . . . . . . . . . . . . . . . . . . . . . . . . . . . . 20<br />
Basic Operation. . . . . . . . . . . . . . . . . . . . . . . . . . . . . . . . . . . . 26<br />
Dubbing the audio and video signals separately . . . . . . . . . . . 30<br />
Dubbing from VIDEO 2 or 3 to VIDEO 1 . . . . . . . . . . . . . . . . . 30<br />
Surround Mode . . . . . . . . . . . . . . . . . . . . . . . . . . . . . . . . . . . 31<br />
DOLBY PRO LOGIC IIx MUSIC parameters. . . . . . . . . . . . . . 34<br />
Speaker Layouts for Dolby Virtual Speaker . . . . . . . . . . . . . 35<br />
Dynamic Range Compression . . . . . . . . . . . . . . . . . . . . . . . . . 36<br />
Tuner . . . . . . . . . . . . . . . . . . . . . . . . . . . . . . . . . . . . . . . . . . . 36<br />
Preset Tuning . . . . . . . . . . . . . . . . . . . . . . . . . . . . . . . . . . . . . 38<br />
OSD (On-Screen Display) . . . . . . . . . . . . . . . . . . . . . . . . . . . . . 39<br />
Speaker Setup (Auto) . . . . . . . . . . . . . . . . . . . . . . . . . . . . . . . 42<br />
Troubleshooting . . . . . . . . . . . . . . . . . . . . . . . . . . . . . . . . . . . 44<br />
Specifications . . . . . . . . . . . . . . . . . . . . . . . . . . . . . . . . . . . . . 45<br />
Code List . . . . . . . . . . . . . . . . . . . . . . . . . . . . . . . . . . . . . . . . 46<br />
Function Table . . . . . . . . . . . . . . . . . . . . . . . . . . . . . . . . . . . . 54<br />
How to Reset the Settings to the FACTORY DEFAULTS<br />
Memory Backup<br />
If the power supply is interrupted for 14 days or longer, the<br />
settings kept in memory (such as preset stations and speaker<br />
settings) will be erased.<br />
Restoring factory settings<br />
If you have made a lot of changes to the setup, and want to<br />
restart from a known set of options, restore the unit to the<br />
factory settings as follows:<br />
1.With the unit in the standby mode, briefly press the<br />
STANDBY/ON switch while holding down the MEMORY<br />
button.<br />
• Release the MEMORY button immediately after pressing the<br />
STANDBY/ON switch.<br />
The model name, etc. appears on the display.<br />
2. Press the MEMORY button.<br />
The unit turns standby.<br />
3. Press the POWER switch to turn the unit off.<br />
All memories are erased, and the unit returns to the factory<br />
settings.
Read this before operation<br />
< As the unit may become warm during operation, always leave<br />
sufficient space around the unit for ventilation.<br />
The ventilation holes should not be covered. Make sure there<br />
is at least 50 cm of space above and at least 10 cm of space<br />
on each side of the unit. Do NOT place anything on top of the<br />
unit.<br />
< The voltage supplied to the unit should match the voltage as<br />
printed on the rear panel. If you are in any doubt regarding<br />
this matter, consult an electrician.<br />
< Choose the installation location of your unit carefully. Avoid<br />
placing it in direct sunlight or close to a source of heat. Also<br />
avoid locations subject to vibrations and excessive dust, heat,<br />
cold or moisture.<br />
< Do not place the unit on the amplifier/receiver.<br />
< Do not open the cabinet as this might result in damage to the<br />
circuitry or electrical shock. If a foreign object should get into<br />
the unit, contact your dealer or service company.<br />
< When removing the power plug from the wall outlet, always<br />
pull directly on the plug, never yank the cord.<br />
< Do not attempt to clean the unit with chemical solvents as<br />
this might damage the finish. Use a clean, dry or slightly<br />
damp cloth.<br />
< Keep this manual in a safe place for future reference.<br />
Before Use<br />
CAUTION Regarding Placement<br />
To maintain proper ventilation, be sure to leave a space<br />
around the unit (from the largest outer dimensions including<br />
projections) equal to, or greater than, shown below.<br />
Left and Right Panels : 10 cm<br />
Rear Panel : 10 cm<br />
Top Panel : 50 cm<br />
CAUTION<br />
The product shall not be exposed to dripping or splashing and<br />
that no object filled with liquids, such as vases, shall be placed<br />
on the product.<br />
Do not install this equipment in a confined space such as a<br />
book case or similar unit.<br />
“DTS”, “DTS-ES”, “DTS 96/24” and “Neo:6” are trademarks<br />
of <strong>Digital</strong> <strong>Theater</strong> Systems, Inc.<br />
Manufactured under license from Dolby Laboratories.<br />
“Dolby”, “Pro Logic” and the double-D symbol are<br />
trademarks of Dolby Laboratories.<br />
3
4<br />
CAUTION:<br />
< Switch off the power to all equipment before making<br />
connections.<br />
< Read the instructions of each component you intend to use<br />
with this unit.<br />
< Be sure to insert each plug securely. To prevent hum and<br />
noise, avoid bundling the signal interconnection cables<br />
together with the AC power cord or speaker cables.<br />
FM Indoor Antenna<br />
In an area with strong FM signals, the T-type FM antenna<br />
provided with this unit is sufficient.<br />
Extend the antenna into a “T” shape and connect the two<br />
wires at the base of the “T” to the provided matching<br />
transformer, as shown.<br />
After completing connection, plug the transformer into the<br />
“FM 75Ω” socket. Extend the top of the “T” and tune the<br />
tuner to your favorite station (see page 36). Adjust the<br />
antenna in a suitable location like a window frame or wall<br />
until the reception is best and then affix the antenna in that<br />
position using thumb tacks, push pins or any other suitable<br />
means.<br />
Connection (FM antenna)<br />
FM Outdoor Antenna<br />
In an area where FM signals are weak, it will be necessary to<br />
use an 75-ohm unbalanced-type outdoor FM antenna.<br />
Generally, a 3-element antenna will be sufficient; if you live in<br />
an area where the FM signals are particularly weak, it may be<br />
necessary to use one with 5 or more elements.<br />
< Disconnect the FM indoor antenna when using an outdoor<br />
antenna.
AM Indoor Loop Antenna<br />
The high-performance AM loop antenna provided with this<br />
unit is sufficient for good reception in most areas.<br />
To stand the loop antenna on a surface, fix the claw to the<br />
slot in the antenna base.<br />
Connect the loop antenna’s wires to the AM antenna<br />
terminals.<br />
How to connect:<br />
Press the lever, insert the end of the cord, then release the<br />
lever. Make sure it is fastened securely by pulling the cord<br />
lightly. Make sure only the bare, stripped wire is inserted in<br />
the jack and that no plastic insulation is preventing contact<br />
between the antenna wire and terminal.<br />
Place the antenna on a shelf or hang it on a window frame,<br />
etc., in the direction which gives the best reception. Keep all<br />
other wires such as power cords, speaker wires or<br />
interconnect wires as far away as possible from the antenna.<br />
AM Outdoor Antenna<br />
AM Loop Antenna<br />
Connection (AM antenna)<br />
< If the AM loop antenna provided does not deliver sufficient<br />
reception (often due to being too far from the transmitter or<br />
in a concrete building, etc.), it may be necessary to use an<br />
outdoor AM antenna.<br />
Use either a high quality commercial AM antenna or, if not<br />
available, an insulated wire more than 5 m long, strip one<br />
end, and connect this to the terminal as shown.<br />
The antenna wire should be strung outdoors or indoors near<br />
a window. For better reception, connect the GND terminal to<br />
a reliable ground.<br />
Note:<br />
Even when using an outdoor AM antenna, do not disconnect<br />
the AM loop antenna.<br />
5
6<br />
TAPE<br />
DVD, CD, etc.<br />
C<br />
AUDIO AUDIO<br />
L R R L<br />
LINE OUT LINE IN<br />
CENTER<br />
CD-R, MD, etc.<br />
DIGITAL OUT<br />
D<br />
DVD player or Decoder<br />
DIGITAL IN<br />
A B<br />
L R R L R L<br />
FRONT SURROUND SURROUND<br />
BACK<br />
7.1CH AUDIO OUT<br />
DIGITAL<br />
SUBWOOFER<br />
C<br />
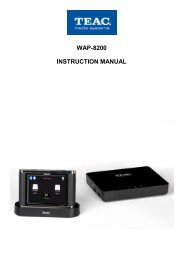
Connections<br />
CAUTION:<br />
< Switch off the power to all equipment before making<br />
connections.<br />
< Read the instructions of each component you intend to use<br />
with this unit.<br />
< Be sure to insert each plug securely. To prevent hum and<br />
noise, avoid bundling the signal interconnection cables<br />
together with the AC power cord or speaker cables.<br />
Connection to audio/video components<br />
A<br />
B<br />
C<br />
D<br />
DIGITAL IN terminals<br />
Used for the input of digital audio signals. Connect these<br />
digital input terminals to the appropriate digital output<br />
terminals of the digital audio source unit such as a DVD or<br />
CD player.<br />
Use a good quality RCA coaxial cable or optical digital cable.<br />
DIGITAL OUT terminal<br />
The digital signals coming in through the DIGITAL IN<br />
terminals are sent out through this terminal.<br />
Connect to the digital input terminal of a digital recording<br />
device such as a CD recorder using a commercially-available<br />
optical digital cable.<br />
< When inserting the plug of the optical cable, the protective<br />
shutter of the terminal will open and you should hear it click<br />
into position when fully inserted. Be careful that you do not<br />
force the plug, because this could result in damage to the<br />
protective shutter, the cable, or the unit itself.<br />
AUDIO IN/OUT jacks<br />
Analog 2-channel audio signal is input or output from these<br />
jacks. Connect the component with commercially-available<br />
RCA cables.<br />
Make sure to connect:<br />
white plug q white jack (L: left channel)<br />
red plug q red jack (R: right channel)<br />
EXTERNAL IN jacks<br />
If your DVD player or decoder has 6, 7 or 8-channel analog<br />
audio outputs, connect them with good quality RCA cables.<br />
< If the component to be connected has only 6 channel<br />
outputs, do not use the SURROUND BACK jack.<br />
< If the component to be connected has only 7 channel<br />
outputs, connect the surround back speaker to the<br />
SURROUND BACK L jack.
Connection to a TV and video components<br />
E<br />
F<br />
COMPONENT IN/OUT jacks<br />
COMPONENT VIDEO provides the best video quality and<br />
should be used as your first choice.<br />
If your DVD player and TV (or monitor) have COMPONENT<br />
VIDEO jacks, connect them with quality component video<br />
cables.<br />
S-VIDEO or VIDEO jacks<br />
VIDEO<br />
OUT<br />
DVD, VCR, etc.<br />
S-VIDEO<br />
OUT<br />
S-VIDEO connection is your second choice and is superior to<br />
the standard composite video connection.<br />
If the component has an S-VIDEO jack, connect it with a<br />
high quality S-VIDEO cable.<br />
If neither COMPONENT VIDEO nor S-VIDEO is available,<br />
connect the component with a high quality RCA cable<br />
designed for video applications.<br />
< The video signal from COMPONENT, S-VIDEO or VIDEO jacks<br />
cannot be mixed.<br />
For example, the signal input into the COMPONENT IN jacks<br />
is output from the COMPONENT OUT jacks only.<br />
Be sure to connect all the components via the same kind of<br />
jacks.<br />
F<br />
VIDEO<br />
PR PB Y<br />
COMPONENT<br />
VIDEO OUT<br />
G<br />
H<br />
E<br />
PR PB Y<br />
COMPONENT<br />
VIDEO IN<br />
TV (MONITOR)<br />
VIDEO<br />
IN<br />
AC OUTLET (switched)<br />
Not available for Hong Kong / Australia model.<br />
This outlet is active only when the unit is on.<br />
Caution:<br />
Make sure that the total power consumption of all<br />
equipment connected to the outlet(s) does not exceed 100<br />
watts.<br />
AC Power Cord<br />
G<br />
S-VIDEO IN<br />
Insert the supplied AC power cord in the <strong>AG</strong>-<strong>15D</strong>’s socket.<br />
After all other connections are complete, connect the plug<br />
to the AC wall socket.<br />
Do not use any power cords other than the one included<br />
with this unit to avoid fire, electric shock, etc. If you are not<br />
going to use the unit for some time, disconnect the power<br />
cord from the wall socket. (Leaving the power cord<br />
unconnected for longer than 14 days will cause the tuner<br />
memory presets to be lost.)<br />
Be sure to connect the power cord to an AC outlet which<br />
supplies the correct voltage.<br />
Hold the power plug when plugging or unplugging the<br />
power cord.<br />
H<br />
7
8<br />
Connections (Example: Connection to a DVD player)<br />
DIGITAL<br />
DIGITAL OUT VIDEO OUT<br />
DVD<br />
SCART, COMPONENT, etc.<br />
VIDEO IN<br />
TV (MONITOR)
Connections (Example: Connection to Video Cassette Recorders)<br />
VCR (VIDEO1)<br />
LINE<br />
OUT<br />
R L L R<br />
LINE<br />
IN<br />
AUDIO<br />
VCR (VIDEO2)<br />
S-VIDEO S-VIDEO<br />
IN OUT<br />
VIDEO<br />
R L<br />
LINE<br />
OUT<br />
S-VIDEO<br />
OUT<br />
S-VIDEO<br />
IN<br />
TV (MONITOR)<br />
9
10<br />
SUB<br />
WOOFER<br />
SUBWOOFER<br />
Caution:<br />
To avoid damaging the speakers with a sudden high-level<br />
signal, be sure to switch the power off before connecting the<br />
speakers.<br />
Check the impedance of your speakers. Connect speaker with<br />
an impedance of 6 ohms or more.<br />
The black speaker terminals are - (negative).<br />
Generally, the + side of the speaker cable is marked to make<br />
it distinguishable from the - side of the cable. Connect this<br />
marked side to the + terminal and the unmarked side to the<br />
black - terminal.<br />
Prepare the speaker cables for connection by stripping off<br />
approximately 10 mm or less of the outer insulation.<br />
(Removing too much insulation may lead to a short circuit if<br />
the bared wired should come in contact with each other.)<br />
Twist the strands of the stripped wires tightly together :<br />
Speaker Connections<br />
FRONT<br />
SPEAKER<br />
SURROUND<br />
SPEAKER<br />
CENTER<br />
SPEAKER<br />
SURROUND<br />
BACK<br />
SPEAKER<br />
FRONT<br />
SPEAKER<br />
Caution:<br />
The metal portions of the two separate wires should not<br />
touch or an electrical short can occur. Shorted wires can<br />
create a fire hazard or induce a failure in your equipment.<br />
How to connect:<br />
SURROUND<br />
BACK<br />
SPEAKER<br />
SURROUND<br />
SPEAKER<br />
1. Turn the terminal cap counterclockwise to loosen it. The<br />
speaker terminal caps cannot be fully removed from the base.<br />
2. Insert the wire into the terminal fully and turn the terminal<br />
cap clockwise to securely connect it:<br />
Make sure none of the wire insulation is under the terminal,<br />
only the bare, stripped wire.<br />
3. Make sure it is fastened firmly by pulling the cable lightly.
SURROUND<br />
(LEFT)<br />
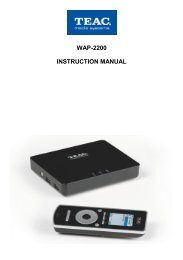
Positioning of the Speakers<br />
A<br />
FRONT<br />
B<br />
CENTER<br />
A<br />
FRONT<br />
(LEFT)<br />
(RIGHT)<br />
D<br />
SURROUND BACK<br />
(LEFT)<br />
D<br />
SURROUND BACK<br />
(RIGHT)<br />
SUBWOOFER<br />
C C<br />
SURROUND<br />
(RIGHT)<br />
The positioning of speakers differs according to the size and acoustics of the listening room.<br />
While actually listening to a program source, try various speaker positions to determine which<br />
layout provides the best surround effect.<br />
< Ideally, position all the speakers in a circle, with the same distance from your listening position.<br />
< Place the speakers connected to “L” to your left, and “R” to your right.<br />
A<br />
Front speakers<br />
Use magnetically shielded speakers, if you are using them near your TV.<br />
Place the front speakers in front of the listening position, to the left and right of a TV.<br />
Front speakers are required for all surround modes.<br />
B Center speaker<br />
Use a magnetically shielded speaker if you are using it near your TV. Place a center speaker<br />
between the front speakers, on or below the TV. This speaker stabilizes the sound image.<br />
C Surround Left and Right speakers<br />
Install these speakers above the level of the listener’s ears, directly to the left and right (or<br />
slightly behind) of your listening position.<br />
D Surround Back Left and Right speakers<br />
Place the surround back speakers at the back of the listening position facing the front at a<br />
slightly higher position than the surround left and right speakers. Point slightly downward.<br />
E Subwoofer<br />
Reproduces powerful and deep bass sounds.<br />
Use a sub-woofer with built-in amplifier referred to as a “powered sub-woofer”. Subwoofers<br />
are most effective when placed on or near the floor and in a corner of the room. Refer to the<br />
instructions that came with your sub-woofer for placement suggestions.<br />
E<br />
11
12<br />
Front Panel<br />
Names of Each Control 1<br />
A B C D E F G H I J K L<br />
c<br />
a O<br />
b Z Y X W V U T S R Q P N<br />
Remote Control Unit<br />
A<br />
W<br />
X<br />
C<br />
a<br />
L<br />
V<br />
T<br />
S<br />
F<br />
M
A<br />
STANDBY/ON<br />
When the POWER switch of the main unit is depressed, use<br />
this button to turn the unit on or standby.<br />
B POWER<br />
Press this switch to turn the unit standby or off.<br />
The equipment draws nominal non-operating power from<br />
the AC outlet with its POWER switch in the OFF position.<br />
C FUNCTION<br />
Use this knob (or buttons of the remote control unit) to select<br />
a source.<br />
D Standby indicator<br />
This indicator lights when the unit is in the standby mode.<br />
When the unit is turned on, it goes off.<br />
E Speaker indicator<br />
F<br />
This indicator lights when the SPEAKER button is set to on.<br />
EXTERNAL IN<br />
Use this button to select the source connected to the<br />
EXTERNAL IN jacks.<br />
G DIGITAL INPUTS<br />
Use this button to select one of the digital input terminals.<br />
H DYNAMIC RANGE<br />
I<br />
J<br />
Use this button to compress the dynamic range during<br />
playback of a disc recorded in Dolby <strong>Digital</strong>.<br />
CINEMA EQ<br />
Use this button to turn on or off the cinema equalizer.<br />
Display<br />
When the unit is on, the current status of the unit is displayed.<br />
K Remote Sensor<br />
L<br />
When operating the remote control unit, point it towards the<br />
remote sensor.<br />
MASTER VOLUME<br />
Turn this knob (or press the VOLUME buttons of the remote<br />
control unit) to adjust the master volume.<br />
M VIDEO 3 INPUT jacks<br />
You can connect a component such as a portable CD, game<br />
player, etc. to these jacks.<br />
When using these jacks, remove the cap. When you don’t use<br />
them, leave the cap in place.<br />
N BAND<br />
Use this button to select FM or AM.<br />
O TUNING/PRESET<br />
In the manual tuning mode, use these buttons to tune in a<br />
station.<br />
In the preset tuning mode, use these buttons to select a preset<br />
channel.<br />
P FM MODE<br />
In FM tuner mode, use this button to select stereo or<br />
monaural.<br />
Q MEMORY<br />
Use this button to store preset channels into memory.<br />
R TUNING MODE<br />
Use this button to select a tuning mode.<br />
S PARAMETER<br />
T<br />
Use this button to change parameters of DOLBY PRO LOGIC IIx<br />
MUSIC, DOLBY VIRTUAL SPEAKER and DOLBY HEADPHONE.<br />
STEREO<br />
Use this button to select stereo mode. Sound is output only<br />
from the front speakers (and the sub-woofer).<br />
U Power indicator<br />
This indicator lights when the unit is on.<br />
V DSP<br />
Use these buttons to select a surround mode.<br />
W AUTO<br />
Use this button to change the decoding mode of digital<br />
signals.<br />
X SPEAKER SETUP<br />
Use this button to start speaker configuration.<br />
Y SELECT/LEVEL<br />
Use these buttons to adjust the level of each speaker, etc.<br />
Z TONE MODE<br />
Use this button to select a tone mode.<br />
a CHANNEL SELECTOR<br />
Select a speaker by pressing this button repeatedly, and adjust<br />
the level using the LEVEL buttons.<br />
b SPEAKER<br />
c<br />
Use this button to turn on or off the speakers.<br />
on : Sound is output from the speakers.<br />
off : No sound is output from the speakers.<br />
PHONES<br />
For private listening, insert the headphones plug into this jack,<br />
and adjust the volume by turning the MASTER VOLUME knob.<br />
13
14<br />
A<br />
B<br />
C<br />
D<br />
E<br />
F<br />
G<br />
H<br />
I<br />
J<br />
K<br />
Names of Each Control 2<br />
L<br />
M<br />
N<br />
O<br />
G<br />
H<br />
P<br />
Note:<br />
< To simplify explanations, instructions refer to names of<br />
buttons and controls on the front panel, making no mention<br />
of the use of remote control unit.<br />
< Names colored in blue are mainly used for the receiver.<br />
Remote Control Unit<br />
A<br />
Remote Select buttons (RECEIVER, CD, TAPE/MD, TV,<br />
VCR, DVD, CABLE, SAT)<br />
You have to select the device you want to operate by pressing<br />
the corresponding button, or the remote control will not<br />
work at all.<br />
If you want to operate the receiver, first press the RECEIVER<br />
button, and then press other buttons (POWER, VOLUME, etc.)<br />
to operate the receiver.<br />
B CH/LEVEL<br />
Use these buttons to adjust the level of each speaker.<br />
When controlling TV or VCR, these buttons can be used to<br />
select a channel.<br />
C T.TONE<br />
Use this button to output the test tone.<br />
D Direction buttons (up/down/left/right)<br />
Use these buttons to select an item in the OSD.<br />
< Following RDS-functions are not available for this model:<br />
RDS, PTY SELECT, EON TA, EON PTY, SEARCH MODE<br />
E ENTER<br />
F<br />
Use this button to enter your selection.<br />
SLEEP<br />
Use this button to set sleep timer.<br />
G TUNING<br />
Use these buttons to tune in a station.<br />
H PRESET<br />
I<br />
Use these buttons to select a preset channel.<br />
SELECT<br />
After pressing the SP SETUP or the PARAMETER button, use<br />
these buttons to change the setting.
J Numeric buttons<br />
Front Panel Display<br />
When controlling a device other than receiver, these buttons<br />
can be used to select track numbers, TV channel, etc.<br />
K MACRO (M1, M2, M3)<br />
L<br />
Use these buttons to execute the programmed macro<br />
functions.<br />
LED<br />
When buttons are pressed, LED will light.<br />
M MUTING<br />
Use this button to mute the sound temporarily.<br />
N OSD<br />
Use this button to display the OSD (on-screen display).<br />
O DIMMER<br />
Use this button to dim or turn off the display.<br />
P P.SCAN<br />
Use this button to scan preset channels.<br />
a displays current status.<br />
b surround mode<br />
c<br />
illuminates when the multi-channel sound is downmixed to<br />
stereo, or when an FM stereo broadcast is tuned.<br />
d illuminates when a station is tuned.<br />
e illuminates when sleep timer is set.<br />
f<br />
illuminates when preset tuning mode is selected.<br />
g blinks when the MEMORY button is pressed.<br />
h meter<br />
i<br />
j<br />
a b<br />
c d e f g<br />
HVS ST. TUNED<br />
DTS ES 96/24 NEO:6 MPEG D EX PL x DSP AUTO DIGITAL<br />
b<br />
illuminates when tone control is set to off.<br />
illuminates or blinks when a digital source is selected.<br />
MEMORY<br />
DIRECT<br />
k illuminates when the decoding mode is set to “IN-AUTO”.<br />
k<br />
j<br />
i<br />
h<br />
15
16<br />
1. Remove the battery compartment cover.<br />
2. Insert two “AAA” (R03, UM-4) dry batteries. Make sure that<br />
the batteries are inserted with their positive “+” and negative<br />
“_” poles positioned correctly.<br />
3. Close the cover.<br />
Battery Installation<br />
Battery Replacement<br />
If the distance required between the remote control unit and<br />
main unit decreases, the batteries are exhausted. In this case<br />
replace the batteries with new ones.<br />
Precautions concerning batteries<br />
< Be sure to insert the batteries with correct positive “+” and<br />
negative “_” polarities.<br />
< Use batteries of the same type. Never use different types of<br />
batteries together.<br />
< Rechargeable and non-rechargeable batteries can be used.<br />
Refer to the precautions on their labels.<br />
< When the remote control unit is not to be used for a long<br />
time (more than a month), remove the batteries from the<br />
remote control unit to prevent them from leaking. If they leak,<br />
wipe away the liquid inside the battery compartment and<br />
replace the batteries with new ones.<br />
< Do not heat or disassemble batteries and never dispose of old<br />
batteries by throwing them in a fire.<br />
Remote Control Unit 1<br />
How to use the Remote Control Unit<br />
1<br />
2<br />
3<br />
Turn on the main power of the component to be<br />
operated.<br />
Select the component to be operated by pressing the<br />
corresponding REMOTE SELECT button for that<br />
component.<br />
When you want to control the <strong>TEAC</strong> <strong>AG</strong>-<strong>15D</strong> receiver, press<br />
the RECEIVER button.<br />
Point the remote control unit towards the remote<br />
sensor on the front panel of the component you want<br />
to control, and press the buttons to operate.<br />
Buttons available for each device are listed on page 54.<br />
< Even if the remote control unit is operated within the effective<br />
range, remote control operation may be impossible if there<br />
are any obstacles between the unit and the remote control.<br />
< If the remote control unit is operated near other products<br />
which generate infrared rays, or if other remote control<br />
devices using infrared rays are used near the unit, it may<br />
operate incorrectly. Conversely, the other products may<br />
operate incorrectly.
Entering a Setup Code<br />
The supplied universal remote control unit can operate not<br />
only this receiver but also up to 7 most popular brands of<br />
audio and video components such as CD players, cassette<br />
decks, TVs, cable boxes, VCRs, DVD players, satellite receivers,<br />
and so on.<br />
To operate components other than this receiver, you should<br />
enter the setup code for each component.<br />
The factory default setup code of CD and DVD is “000”. You<br />
will be able to control certain <strong>TEAC</strong>’s CD player and DVD<br />
player with this code. If the code doesn’t work, try other<br />
codes.<br />
1 Turn on the component to be controlled.<br />
2 Pick up the setup code from the list on page 46-53.<br />
3<br />
Press and hold down both the ENTER button and the<br />
corresponding REMOTE SELECT button.<br />
CD: CD player<br />
TAPE/MD: cassette tape deck or MD deck<br />
TV: TV<br />
VCR: video tape deck<br />
DVD: DVD player<br />
CABLE: cable box<br />
SAT: satellite receiver<br />
< The LED will flicker once. If the LED did not flicker, try again.<br />
< You cannot select the RECEIVER button, as it is exclusive for<br />
the <strong>AG</strong>-<strong>15D</strong> receiver.<br />
4<br />
Pointing the remote control unit towards the remote<br />
sensor of the component, enter the 3-digit setup code<br />
using the numeric buttons.<br />
< If the code is accepted successfully, the LED will blink twice. If<br />
the LED did not blink twice, try step 3 and 4 again.<br />
< To check if the entered code is correct, press the POWER,<br />
PLAY, CHANNEL, etc. If the buttons work, the code is correct.<br />
If the buttons don’t work, repeat steps 2 to 4 trying each<br />
code for your component until you find one that works.<br />
Manufacturers may use different setup codes for the same<br />
product category. Therefore, it is important to check if the<br />
code you have entered operates as many controls as possible.<br />
If only a few functions operate, check if another code works<br />
with more buttons.<br />
17
18<br />
Using a Punch-through Function<br />
This remote control unit may be programmed to operate<br />
either “RECEIVER volume punch-through” or “TV volume<br />
and/or TV channel punch-through” in conjunction with any of<br />
the eight components controlled by this remote control unit.<br />
For example, since this receiver will likely be used as the<br />
sound system controller while watching TV, you may want to<br />
adjust this receiver’s volume although this remote control is<br />
set to control the TV. Controlling the <strong>Receiver</strong> volume level<br />
while the remote is set to operate the TV is referred to a<br />
“Punch-Through”.<br />
A RECEIVER volume punch-through:<br />
To program “RECEIVER volume punch-through”, press and<br />
hold down both the RECEIVER button and the VOLUME(+)<br />
button for more than 1 second.<br />
To delete the punch-through, press and hold down both the<br />
RECEIVER button and the VOLUME (–) button for more than 1<br />
second.<br />
B TV volume punch-through:<br />
To program “TV volume punch-through”, press and hold<br />
down both the TV button and the VOLUME (+) button for<br />
more than 1 second.<br />
To delete the punch-through, press and hold down both the<br />
TV button and the VOLUME (–) button for more than 1<br />
second.<br />
Remote Control Unit 2<br />
C<br />
TV channel punch-through:<br />
To program “TV channel punch-through”, press and hold<br />
down both the TV button and the CH/LEVEL (+) button for<br />
more than 1 second.<br />
To delete the punch-through, press and hold down both the<br />
TV button and the CH/LEVEL (–) button for more than 1<br />
second.<br />
< If programming or deleting is performed successfully, the LED<br />
will flicker twice.<br />
< If you want to delete all punch-through functions, press and<br />
hold down both the RECEIVER button and the AUTO button<br />
for more than 1 second:<br />
Note:<br />
You can program only one “volume punch-through”.<br />
Program either “RECEIVER volume punch-through” or “TV<br />
volume punch-through”.
Macro Function<br />
1<br />
2<br />
This function enables you to program up to 10 sequential<br />
operations into a single button.<br />
You can store up to three sequences (macros) into the M1,<br />
M2 and M3 buttons.<br />
Press and hold down both the ENTER button and one of<br />
three numeric buttons (1, 2 or 3) corresponding to the<br />
number of MACRO button (M1, M2 or M3) for more<br />
than 1 second.<br />
For example, if you want to program a macro into the M1<br />
button, press the ENTER button and “1”.<br />
The LED will flicker once.<br />
Press the operation buttons you want to program in<br />
order.<br />
Note:<br />
You should press the corresponding REMOTE SELECT buttons<br />
before pressing each operation button.<br />
Example:<br />
You want to play a DVD on the DVD player connected to<br />
VIDEO 2 jacks of this receiver. You can set a macro to turn on<br />
all the components (<strong>Receiver</strong>, DVD player and TV) and start<br />
playing the movie all in one press of a button. Once you have<br />
put your remote into the learning mode as shown in the step<br />
above, enter the following:<br />
1. Press the RECEIVER button to control the receiver.<br />
2. Press the STANDBY/ON button to turn the receiver on.<br />
3. Press the RECEIVER button.<br />
4. Press the VIDEO 2 button to select the input source.<br />
5. Press the TV button to control the TV.<br />
6. Press the STANDBY/ON button to turn the TV on.<br />
7. Press the DVD button to control the DVD player.<br />
8. Press the STANDBY/ON button to turn the DVD player on.<br />
9. Press the DVD button.<br />
10. Press the PLAY button to start playback.<br />
3 Press the ENTER button to store the macro.<br />
If the macro is programmed successfully, the LED will flicker<br />
twice.<br />
< If you program a new macro into a MACRO button, the<br />
previously programmed macro will be overwritten.<br />
To delete a macro program:<br />
Perform steps 1 and 3 , but ignore step 2 .<br />
Using a Macro<br />
Point the remote control unit towards the remote sensors of<br />
the components to be controlled, and press the MACRO<br />
button (M1, M2 or M3).<br />
< The codes programmed into a MACRO button will be<br />
transmitted at an interval of 0.5 seconds. However, some<br />
components may not be able to complete one operation in<br />
0.5 seconds and may miss the next code. In this case, the<br />
macro function cannot control the corresponding<br />
components correctly.<br />
< Be sure to use the remote control unit within the effective<br />
range of all the components.<br />
< This function may not work correctly on some components.<br />
19
20<br />
It is important to perform speaker configuration prior to using<br />
the unit.<br />
To enjoy multi-channel surround sound, such as 5.1, you need 5<br />
speakers (Front Left, Center, Front Right, Surround Right,<br />
Surround Left) and a powered sub-woofer.<br />
In addition to above, you will need surround back speakers for<br />
7.1 channel surround sound.<br />
Speaker Setup (Auto)<br />
If a microphone is connected to this unit, you can use the<br />
automatic speaker setup function. See page 42 for details.<br />
Speaker Configuration 1<br />
Speaker Setup<br />
3<br />
1 2 4<br />
5<br />
< When no action is taken for 8 seconds, the Speaker Setup<br />
mode will be cancelled.<br />
1 Press the POWER switch.<br />
The unit enters standby mode, and the STANDBY indicator<br />
lights.<br />
2 Press the STANDBY/ON switch to turn the unit on.<br />
The STANDBY indicator goes off.
3<br />
Press the SPEAKER SETUP button.<br />
“SUB-W Y” or “SUB-W N” appears on the display.<br />
Each time the SPEAKER SETUP button is pressed, the mode is<br />
changed as follows:<br />
sub-woofer setting<br />
speaker size setting (Front)<br />
speaker size setting (Center)<br />
speaker size setting (Surround)<br />
speaker size setting (Surround Back)<br />
distance (Front Left)<br />
distance (Front Right)<br />
distance (Center)<br />
distance (Surround Left)<br />
distance (Surround Right)<br />
distance (Surround Back Left)<br />
distance (Surround Back Right)<br />
Crossover Frequency<br />
< The SPEAKER SETUP button will not work when the SPEAKER<br />
button is set to off. In that case, press the SPEAKER button to<br />
turn the speakers on and then press the SPEAKER SETUP<br />
button.<br />
< The SPEAKER SETUP button will not work when EXTERNAL IN<br />
is selected. In that case, press the EXTERNAL IN button to turn<br />
it off and then press the SPEAKER SETUP button.<br />
4 Press the SELECT buttons to change the setting.<br />
5<br />
For details of each setting, see page 22 to 25.<br />
Repeat step 3 and 4 to set other configurations.<br />
When all the configurations has been finished, press the<br />
MEMORY button (or the ENTER button of the remote<br />
control unit) to save the changes and exit the Speaker<br />
Setup mode.<br />
Be sure to press the MEMORY button within 8 seconds, or<br />
the changes will be cancelled.<br />
21
22<br />
Subwoofer Setting<br />
SUB W-Y (Subwoofer-Yes):<br />
Select this when a powered sub-woofer is connected.<br />
SUB W-N (Subwoofer-No):<br />
Select this when no sub-woofer is connected.<br />
< If you select “SUB-W N (no subwoofer)”, the front speaker is<br />
automatically set to “L”.<br />
< To enjoy the full home theater experience, we recommend<br />
the use of a powered sub-woofer.<br />
Speaker Size Setting<br />
Each time the SELECT button is pressed, the setting is<br />
changed as follows:<br />
L (Large):<br />
Select this when the connected speakers can fully reproduce<br />
sounds below the crossover frequency (see page 22).<br />
S (Small):<br />
Select this when the connected speakers are rather small and<br />
cannot reproduce sounds below the crossover frequency.<br />
When this setting is selected, bass frequencies below the<br />
crossover frequency are output from the sub-woofer (if no<br />
sub-woofer is connected, from the front speakers).<br />
N (None):<br />
Select this when no speaker is connected. The sound is<br />
output from the front (or surround) speakers.<br />
< Depending on your selection, settings available for each<br />
speaker changes.<br />
Speaker Configuration 2<br />
Surround Back Speaker Setting<br />
< When the surround left and right speakers are set to “SURR N<br />
(none)”, the surround back speaker is also set to “SURR-B N<br />
(none)” automatically.<br />
SURR-B L 2c (Surround Back-Large):<br />
Select this when 2 large surround back speakers are<br />
connected.<br />
SURR-B L 1c (Surround Back-Large):<br />
Select this when a large surround back speaker is connected.<br />
SURR-B S 2c (Surround Back-Small):<br />
Select this when the 2 surround back speakers are rather<br />
small.<br />
SURR-B S 1c (Surround Back-Small):<br />
Select this when the surround back speaker is rather small.<br />
SURR-B N (Surround Back-None):<br />
Select this when no surround back speaker is connected.<br />
The surround back channel will be output from surround left<br />
and right speakers.<br />
Distance (front, center, surround)<br />
Input the distance from your listening position to front, center<br />
and surround speakers. The delay time is automatically<br />
adjusted to improve the surround effect.<br />
You can change the setting from 0.1 to 9 meters, at 0.1<br />
meter’s step.<br />
Abbreviations<br />
FRONT L: front left<br />
FRONT R: front right<br />
CENTER: center<br />
SURR L: surround left<br />
SURR R: surround right<br />
SURR-BL: surround back left<br />
SURR-BR: surround back right<br />
Crossover Frequency<br />
You can change the setting from 40 to 130 Hz in 10 Hz steps.<br />
When the speaker size is set to “Small”, bass frequencies<br />
below the crossover frequency you set here are output from<br />
the sub-woofer (if no sub-woofer is connected, from the front<br />
speakers).<br />
The default setting is 80 Hz.
Balancing relative volume between<br />
speakers using Test Tone<br />
The test tone function is useful to adjust the relative volume<br />
between speakers.<br />
Once the balance is set, you don’t have to change the<br />
balance as long as the speakers aren’t moved.<br />
< It is also possible to adjust the relative volume during playback<br />
of DVD. See page 24 for details.<br />
< Use the remote control from your listening position.<br />
< The T.TONE button will not work when the SPEAKER button<br />
is set to off. In that case, press the SPEAKER button to turn<br />
the speakers on.<br />
< The T.TONE button will not work when EXTERNAL IN is<br />
selected. In that case, press the EXTERNAL IN button to turn it<br />
off.<br />
1 Press the T.TONE button.<br />
The test tone is emitted from each speaker in the following<br />
order at 2.5-second intervals.<br />
FL, C, FR, SR, BR, BL, SL, SW<br />
< If certain speakers are not being used, (for example, no center<br />
speaker) the noise sequencer will automatically skip over that<br />
channel.<br />
2 Adjust the master volume to the normal listening level.<br />
3<br />
Adjust the volume of each speaker so that the test tone<br />
from each speakers sounds the same.<br />
< The level of the speaker emitting the test tone can be<br />
changed by pressing the LEVEL buttons.<br />
< The level can be adjusted in 1 dB steps from –15 dB to +15<br />
dB.<br />
< If you press the CH SEL (CHANNEL SELECTOR) button, the<br />
test tone stays there. To go to the next speaker, press the CH<br />
SEL button again.<br />
4 When the setting has been finished, press the T.TONE<br />
button to stop the test tone.<br />
23
24<br />
Balancing relative volume between<br />
speakers during playback of DVD<br />
1<br />
(During playback of DVD,) press the CH SEL (CHANNEL<br />
SELECTOR) button.<br />
Each time the CH SEL button is pressed, the channel is<br />
changed as follows:<br />
REF.1, REF.2 or USER FL C FR SR BR<br />
DTS L<br />
DD L<br />
SW SL BL<br />
REF.1 or REF.2: stored setting<br />
USER: “USER” appears only when the current setting is<br />
different from REF.1 or REF.2.<br />
If the balance has already been set using the test tone<br />
function, you don’t have to change the setting of<br />
speakers.<br />
If you want to change the LFE level for Dolby <strong>Digital</strong> or DTS,<br />
press the CH SEL button repeatedly until “DD L (Dolby <strong>Digital</strong><br />
LFE)” or “DTS L (DTS LFE)” appears on the display.<br />
(LFE: Low Frequency Effect)<br />
< A speaker set to “None” or “No” will not appear on the<br />
display.<br />
< When STEREO or Dolby Virtual Speaker is selected, or when<br />
the SPEAKER button is set to off, only the front speakers will<br />
appear on the display.<br />
Speaker Configuration 3<br />
2<br />
Within 5 seconds, press the LEVEL buttons to change<br />
the level.<br />
< The level of speakers can be adjusted in 1 dB steps from –15<br />
dB to +15 dB.<br />
< The LFE level can be adjusted in 1 dB steps from –10 dB to 0<br />
dB. The default setting is 0 dB. Lower the LFE level if<br />
necessary.<br />
Repeat step 1 and 2 to change other settings.<br />
When all the configurations have been finished, leave the unit<br />
idle for 5 seconds to exit the Channel Select mode.
How to store your channel level setting<br />
1<br />
2<br />
CHANNEL SELECTOR<br />
LEVEL<br />
When all the settings have been finished in step 2 of<br />
page 24, press the MEMORY button of the main unit.<br />
“1” blinks on the display.<br />
MEMORY<br />
Within 5 seconds, press the LEVEL button to select<br />
“REF.1” or “REF.2”.<br />
3 Within 3 seconds, press the MEMORY button to save<br />
and exit.<br />
How to call the stored setting<br />
1<br />
CHANNEL SELECTOR<br />
LEVEL<br />
Press the CHANNEL SELECTOR (CH SEL) button to<br />
display USER, REF.1 or REF2.<br />
2 Press the LEVEL button to select “REF.1” or “REF.2”.<br />
25
26<br />
1 Press the POWER switch.<br />
The unit enters standby mode, and the standby indicator<br />
lights.<br />
2 Press the STANDBY/ON switch to turn the unit on.<br />
3<br />
1 2<br />
3 4 5<br />
The power indicator lights, and the standby indicator goes<br />
off.<br />
Select a source by turning the FUNCTION knob (or<br />
pressing one of the FUNCTION buttons of the remote<br />
control unit).<br />
TUNER* CD AUX TAPE<br />
VIDEO 3 VIDEO 2<br />
*: frequency is displayed.<br />
VIDEO 1<br />
The selected source is shown on the front panel’s display.<br />
< If one of the FUNCTION buttons or EXT IN button of the<br />
remote control unit is pressed in the standby mode, the unit is<br />
turned on with the selected source automatically.<br />
< If the source is connected to EXTERNAL IN jacks, press the<br />
EXTERNAL IN button and proceed to step 5 .<br />
Basic Operation 1<br />
4<br />
When you selected VIDEO(1, 2 or 3) or CD in step 3 ,<br />
press the DIGITAL INPUTS button repeatedly to select<br />
the terminal.<br />
o1: Select this when the source is connected to DIGITAL IN<br />
(OPTICAL 1) terminal.<br />
o2: Select this when the source is connected to DIGITAL IN<br />
(OPTICAL 2) terminal.<br />
c1: Select this when the source is connected to DIGITAL IN<br />
(COAXIAL 1) terminal.<br />
c2: Select this when the source is connected to DIGITAL IN<br />
(COAXIAL 2) terminal.<br />
A: Select this when the source is connected to analog<br />
AUDIO IN jacks.<br />
< DIGITAL indicator blinks when the unit cannot perceive the<br />
digital signal. In that case, connect a digital device to the<br />
DIGITAL IN terminal, switch it on, and select the terminal by<br />
pressing the DIGITAL INPUTS button.<br />
< You can hear the sound from the selected DIGITAL IN<br />
terminal as far as VIDEO (1,2 or 3) or CD has been selected in<br />
step 3 .<br />
5 Play the source, and gradually turn up the volume to<br />
the required level by turning the VOLUME knob.
Recording a Source<br />
1. Select a source to be recorded by turning the FUNCTION<br />
knob (or pressing one of the FUNCTION buttons of the<br />
remote control unit).<br />
2. Start recording.<br />
< The volume and tone control have no effect on the recording<br />
signals.<br />
< The analog signals input from the EXTERNAL IN jacks cannot<br />
be recorded.<br />
Speaker On/Off<br />
Press the SPEAKER button to turn the speakers on or off.<br />
When ON is selected, the SPEAKER indicator lights.<br />
Headphones<br />
For private listening, first reduce the volume level on the<br />
receiver to minimum. Then insert the plug from your<br />
headphones into the PHONES jack, and adjust the volume by<br />
turning the VOLUME knob.<br />
If you want to cut off the sound from speakers, press the<br />
SPEAKER button to turn it off.<br />
< When the SPEAKER button is set to off, the multi-channel<br />
sound is downmixed to 2 channel automatically.<br />
< When EXTERNAL IN is selected, only the front left and right<br />
channels are output from the PHONES jack.<br />
Dolby Headphone<br />
Dolby Headphone technology allows you to listen to music,<br />
watch movies, or play video games with the dramatic<br />
surround effects of a 5.1-channel soundtrack through any<br />
set of headphones. Best of all, “listener fatigue,” a<br />
phenomenon commonly associated with headphone<br />
playback, is replaced by a spacious, natural sound field that<br />
listeners can enjoy for hours.<br />
Dolby Headphone offers three listening modes, each based<br />
on acoustic measurements of real rooms.<br />
With the SPEAKER button set to off, press the DSP<br />
button to select a listening mode.<br />
The “UH” indicator appears on the display.<br />
DH1 (Studio)<br />
DH1 (Studio) is a small, well-damped room appropriate for<br />
both movies and music-only recordings.<br />
DH2 (Cinema)<br />
DH2 (Cinema) is a more acoustically “live” room, especially<br />
suited for music but also great for movies.<br />
DH3 (Hall)<br />
DH3 (Hall) is a larger room, more like a concert hall or movie<br />
theatre.<br />
< When the source is 2-channel stereo, press the PARAMETER<br />
button repeatedly to select a listening mode for 2-channel<br />
source:<br />
MOVIE<br />
Surround effect suitable for movies.<br />
MUSIC 1<br />
Surround effect suitable for music.<br />
MUSIC 2<br />
Less surround effect compared to MUSIC 1.<br />
Press the STEREO button to turn Dolby Headphone off.<br />
27
28<br />
EXTERNAL IN (8 channel direct input)<br />
If the source is connected to EXTERNAL IN jacks, press the<br />
EXTERNAL IN button. “EXT IN” appears on the display, and<br />
up to 8 discrete analog signals can be heard from speakers.<br />
Press the EXTERNAL IN button again (or select any other<br />
source by turning the FUNCTION knob) to cancel the<br />
EXTERNAL IN function.<br />
Cinema Equalizer<br />
The Cinema Equalizer compensates for edgy or shrill movie<br />
sound tracks.<br />
When the CINEMA EQ button is pressed once, the current<br />
status (“C-EQ OFF” or “C-EQ ON”) is scrolled. Press the<br />
button again to select on or off.<br />
< This function does not work with 96 kHz PCM (2CH stereo)<br />
signals.<br />
Basic Operation 2<br />
Muting<br />
To mute the sound temporarily, press the MUTING button.<br />
Press the MUTING button again to restore the sound. If you<br />
change the volume during the muting, the muting will be<br />
cancelled.<br />
< While muting is engaged, “MUTE” blinks on the display.<br />
Dimmer<br />
You can dim or turn off the front panel’s display by pressing<br />
the DIMMER button:<br />
< When the display is turned off, pressing any button will turn<br />
the display on.<br />
< This function will be cancelled when the STANDBY/ON or the<br />
POWER switch is pressed.<br />
< When you set the sleep timer, the display is dimmed<br />
automatically.
Tone Control<br />
1. Press the TONE MODE button.<br />
“TONE OFF” or “TONE ON” appears on the display.<br />
< If no button is pressed for 5 seconds, the tone mode will be<br />
cancelled.<br />
< The TONE MODE button will not work when EXTERNAL IN is<br />
selected.<br />
2. If the tone mode is off, press the SELECT button to turn<br />
it on.<br />
3. Press the TONE MODE button to select “BASS” or<br />
“TRBL”.<br />
Each time the TONE MODE button is pressed, the mode is<br />
changed as follows:<br />
BASS TRBL TONE ON<br />
To adjust the level of low frequency sound range, select<br />
“BASS”.<br />
To adjust the level of high frequency sound range, select<br />
“TRBL (treble)”.<br />
4. Press the LEVEL buttons to change the setting.<br />
The level can be adjusted in 1 dB steps from –10 to +10.<br />
< If you want to turn off the tone mode, select “TONE ON” and<br />
press the SELECT button to turn it off. “DIRECT” indicator<br />
lights.<br />
< Tone control does not work when the digital signals of DTS or<br />
Dolby <strong>Digital</strong> are input, or when EXTERNAL IN is selected.<br />
Sleep Timer<br />
The power can be switched off after a specified amount of<br />
time.<br />
Press the SLEEP button repeatedly until desired time appears<br />
on the display.<br />
SLEEP 10 (20 ... 90):<br />
The power will be switched off 10 (20 ... or 90) minutes<br />
later.<br />
Normal display:<br />
The sleep timer is off.<br />
When you set the sleep timer, the display is dimmed, and the<br />
remaining time is displayed.<br />
29
30<br />
Dubbing from VIDEO 2 or 3 to VIDEO 1<br />
1 Select VIDEO 2 or 3 by turning the FUNCTION knob.<br />
2<br />
3<br />
Start recording on the VCR connected to VIDEO 1 REC<br />
jacks.<br />
Start playback on the VCR connected to VIDEO 2 or 3<br />
INPUT jacks.<br />
The audio and video signals input from VIDEO 2 or 3 are<br />
output from VIDEO 1 REC jacks.<br />
< Copy protected DVD discs cannot be dubbed.<br />
< The video signal from S-VIDEO or VIDEO jacks cannot be<br />
mixed. Be sure to connect all the components via the same<br />
kind of jacks.<br />
Dubbing the audio and video signals separately<br />
3<br />
4<br />
While dubbing the video signal of VIDEO 2 or 3, you can<br />
replace the sound from VCR with the sound from an audio<br />
source such as CD.<br />
1 Select the video source to be recorded (VIDEO 2 or 3)<br />
using the FUNCTION buttons of the remote control unit.<br />
2<br />
Select the audio source to be recorded (CD, TAPE, etc.)<br />
using the FUNCTION buttons of the remote control unit.<br />
Do not turn the FUNCTION knob of the main unit, or the<br />
video source selection in step 1 might be cancelled.<br />
Start recording on the VCR connected to VIDEO 1 REC<br />
jacks.<br />
Start playback of the video and audio source to be<br />
recorded.<br />
The picture from the video component appears on the TV,<br />
and the sound from the audio component is output from the<br />
speakers.
When EXTERNAL IN is selected, the DSP and the AUTO button<br />
do not work.<br />
1<br />
If a digital device is connected to DIGITAL IN terminals,<br />
select desired decoding mode by pressing the AUTO<br />
button.<br />
Each time the AUTO button is pressed, the decoding mode is<br />
changed as follows:<br />
IN-AUTO (default):<br />
The appropriate decoding mode is selected automatically.<br />
Usually, select this.<br />
IN-DTS:<br />
Select this only when the input signal is DTS.<br />
IN-PCM:<br />
Select this only when the input signal is PCM.<br />
< The AUTO button works only when the function is set to<br />
VIDEO or CD and the digital input is selected.<br />
< When IN-AUTO is selected, noise may be heard during<br />
playback of a DVD recorded in DTS format. In this case, select<br />
IN-DTS.<br />
< If the selected decoding mode does not match with the input<br />
signal, “DIGITAL” indicator will blink and no sound will be<br />
heard.<br />
2<br />
Select the desired surround mode by pressing the DSP<br />
button.<br />
Each time the DSP button is pressed, the surround mode<br />
changes.<br />
Surround Mode 1<br />
A<br />
When Dolby <strong>Digital</strong> signals are input and IN-AUTO is selected,<br />
the surround mode is set to DOLBY DIGITAL automatically.<br />
If you press the DSP button, you can select one of the<br />
following surround modes:<br />
B<br />
C<br />
D<br />
When the source is Dolby <strong>Digital</strong> EX:<br />
DOLBY DIGITAL EX, DOLBY VS REF, DOLBY VS WIDE<br />
When the source is Dolby <strong>Digital</strong> 5.1:<br />
DOLBY DIGITAL, DOLBY PRO LOGIC IIx MOVIE, DOLBY PRO<br />
LOGIC IIx MUSIC, DOLBY VS REF, DOLBY VS WIDE<br />
When the source is Dolby <strong>Digital</strong> 2-channel:<br />
DOLBY PRO LOGIC IIx MOVIE, DOLBY PRO LOGIC IIx MUSIC,<br />
DOLBY PRO LOGIC, DOLBY VS REF, DOLBY VS WIDE<br />
When DTS signals are input and IN-AUTO or IN-DTS is<br />
selected, the surround mode is set to DTS or DTS-ES<br />
automatically.<br />
If you press the DSP button, you can select one of the<br />
following surround modes:<br />
When the source is DTS-ES:<br />
DTS-ES, DOLBY VS REF, DOLBY VS WIDE<br />
When the source is DTS:<br />
DTS, DTS+NEO:6, DOLBY VS REF, DOLBY VS WIDE<br />
When MPEG signals are input and IN-AUTO is selected, the<br />
surround mode is set to MPEG automatically. The DSP button<br />
doesn’t work.<br />
When the source is PCM (2-channel stereo) and IN-AUTO or<br />
IN-PCM is selected, or when analog stereo signals are input,<br />
you can select one of the following surround modes:<br />
DOLBY PRO LOGIC IIx MOVIE, DOLBY PRO LOGIC IIx MUSIC,<br />
DOLBY PRO LOGIC, DOLBY VS REF, DOLBY VS WIDE, DTS<br />
NEO:6 CINEMA, DTS NEO:6 MUSIC, THEATER, HALL,<br />
STADIUM<br />
< When the DSP button is pressed once, the current surround<br />
mode is displayed. Press the DSP button repeatedly to select<br />
any other surround mode.<br />
< When you press the DSP button, the sound is cut off for a<br />
moment.<br />
< When the surround back speaker is set to “None”, Dolby Pro<br />
Logic II appears instead of Dolby Pro Logic IIx.<br />
< DOLBY DIGITAL or DOLBY DIGITAL EX can be selected only<br />
during playback of a DVD disc recorded in DOLBY DIGITAL<br />
format.<br />
< The DSP indicator lights when THEATER, HALL or STADIUM is<br />
selected.<br />
(DSP: <strong>Digital</strong> Signal Processor)<br />
31
32<br />
STEREO<br />
Press the STEREO button to select the stereo mode.<br />
“STEREO” is scrolled, and sound is output from front<br />
speakers (and the sub-woofer if connected).<br />
To cancel the stereo mode, select any other surround mode<br />
by pressing the DSP button.<br />
< If you select the stereo mode while the digital signal of<br />
DOLBY DIGITAL or DTS are being input, the multi-channel<br />
sound is downmixed to 2-channel.<br />
< If the SPEAKER button is set to off while the digital signal of<br />
DOLBY DIGITAL or DTS are being input, the multi-channel<br />
sound is downmixed to 2-channel automatically. And when<br />
the SPEAKER button is set to on, it will return to the previous<br />
surround mode.<br />
DTS (DTS <strong>Digital</strong> Surround)<br />
During playback of a DVD disc recorded in DTS format, the<br />
surround mode is set to DTS automatically.<br />
DTS <strong>Digital</strong> Surround delivers up to 5.1 channels with lower<br />
audio compression than Dolby <strong>Digital</strong>. It provides the clarity<br />
and dynamics of the original master soundtrack.<br />
DTS-ES (Extended Surround)<br />
This is a new multi channel digital signal format that greatly<br />
improves the 360-degree surround impression and space<br />
expression thanks to further expanded surround signals. This<br />
format is compatible with the conventional DTS format.<br />
In addition to the 5.1 channels of DTS, DTS-ES also offers the<br />
surround back (sometimes also referred to as “surround<br />
center”) channel for surround playback with a total of 6.1<br />
channels. For the optimum playback of DTS-ES, you need 6<br />
speakers and a powered sub-woofer.<br />
< The surround back channel information is matrixed into the<br />
surround left and right channels. When played with 5<br />
speakers, the surround back channel signals are output from<br />
the surround left and right speakers so that none of the signal<br />
components are lost.<br />
Surround Mode 2<br />
There are two formats for DTS-ES:<br />
DTS-ES Discrete 6.1<br />
Because the signals for 6.1 channels (including the surround<br />
back channel) are fully independent, it is possible to achieve a<br />
sense that the acoustic image are moving about freely among<br />
the background sounds surrounding the listener from 360<br />
degrees.<br />
DTS-ES Matrix 6.1<br />
With this format, the additional surround back channel<br />
signals undergo matrix encoding and are input to the<br />
surround left and surround right channels beforehand. During<br />
playback, they are decoded to the surround left, surround<br />
right and surround back channels.<br />
When DTS-ES Discrete 6.1 or Matrix 6.1 sources are decoded<br />
with a DTS-ES decoder, the format is automatically detected<br />
upon decoding and the optimum surround mode is selected.<br />
DTS 96/24<br />
DTS 96/24 delivers up to 24-bit, 96kHz audio in 5.1-channels.<br />
Compared to typical 48kHz/16-bit discs, greater bit depths<br />
provide extended dynamic range, while higher sampling rates<br />
allow wider frequency response.<br />
DTS NEO:6<br />
With the high precision digital matrix decoder used for DTS-<br />
ES Matrix 6.1, DTS NEO:6 gives you 6.1 multi-channel<br />
surround sound from any stereo source.<br />
< DTS NEO:6 will not work on monaural source.<br />
DTS NEO:6 Cinema<br />
This mode is optimized for movies.<br />
Decoding is performed with emphasis on separation<br />
performance to achieve the same atmosphere with 2-channel<br />
sources as with 6.1-channel sources.<br />
DTS NEO:6 Music<br />
This mode is suitable for music.<br />
The front left and front right signals bypass the decoder and<br />
are played directly so there is no loss of sound quality, and<br />
the effect of the surround signals from the center, surround<br />
left, surround right and surround back channels adds a<br />
natural sense of expansion to the sound field.<br />
Dolby <strong>Digital</strong><br />
During playback of a DVD disc recorded in DOLBY DIGITAL<br />
format, the surround mode is set to DOLBY DIGITAL or<br />
DOLBY DIGITAL EX automatically.<br />
Dolby <strong>Digital</strong> delivers up to 5 totally discrete, full frequency<br />
audio channels (front left and right, center, and surround left<br />
and right), plus 0.1 channel called LFE (Low-Frequency<br />
Effects). LFE delivers a separate non-directional bass signal to<br />
the sub-woofer for more dynamic deep bass sound effects.
Dolby <strong>Digital</strong> Surround EX<br />
This mode creates the back (sometimes also referred to as<br />
“surround center”) signals from the surround left and right<br />
signals in Dolby <strong>Digital</strong> 5.1 channel source using a matrix<br />
decoder and provides 6.1 channel surround playback. With<br />
this additional channel, you can experience more dynamic<br />
and realistic moving sound.<br />
< As the surround back channel is matrix-encoded onto the left<br />
and right surround channels, no information is lost when<br />
played with 5 speakers.<br />
< When Dolby <strong>Digital</strong> EX sources are decoded with a Dolby<br />
<strong>Digital</strong> EX decoder, the format is automatically detected upon<br />
decoding and the Dolby <strong>Digital</strong> EX mode is selected.<br />
However, some Dolby <strong>Digital</strong> EX sources may be detected as<br />
Dolby <strong>Digital</strong> sources. In this case, the Dolby <strong>Digital</strong> EX mode<br />
should be selected manually to play these sources.<br />
Dolby Pro Logic IIx and Dolby Pro Logic II<br />
Dolby Pro Logic IIx technology processes any native stereo or<br />
5.1 signal into a 6.1- or 7.1- channel output, creating a<br />
seamless, natural surround soundfield that immerses you in<br />
the entertainment experience.<br />
Dolby Pro Logic II technology gives you 5.1-channel surround<br />
sound from any stereo program material, as well as Dolby<br />
Surround encoded material.<br />
< When the surround back speaker is set to “None”, Dolby Pro<br />
Logic II appears instead of Dolby Pro Logic IIx.<br />
MOVIE mode:<br />
This mode is optimized for movies or Dolby Surround<br />
encoded materials. This mode is also appropriate for use with<br />
video games.<br />
MUSIC mode:<br />
The Music mode creates a rich and enveloping surround<br />
ambience from stereo sources such as music CDs.<br />
Music mode also features three additional user controls:<br />
Dolby Center Width adjusts the balance of the main vocals<br />
in the center and front channels.<br />
Dolby Panorama creates a seamless, wraparound surround<br />
effect.<br />
Dolby Dimension creates a deeper or shallower surround<br />
sound field.<br />
< DOLBY PRO LOGIC IIx and DOLBY PRO LOGIC II will not work<br />
on monaural source.<br />
Dolby Pro Logic<br />
Dolby Pro Logic is a matrix decoder that decodes the four<br />
channels of surround sound (front left, center, front right and<br />
surround) that have been encoded onto the stereo<br />
soundtracks of Dolby Surround encoded material such as VHS<br />
movies. The surround channel is monaural, but is played<br />
through two surround speakers.<br />
Dolby Virtual Speaker<br />
Dolby Virtual Speaker technology simulates a highly realistic<br />
5.1-speaker surround sound listening environment from as<br />
few as two speakers. Dolby Virtual Speaker technology also<br />
creates a wider two-channel environment during playback of<br />
stereo CDs and MP3 content, and when combined with Dolby<br />
Pro Logic II processing, delivers a virtual surround listening<br />
experience from any high-quality stereo source.<br />
Listening Modes<br />
Dolby Virtual speaker lets you switch between two listening<br />
modes. In Reference mode (DOLBY VS REF), the width of the<br />
front sound image is defined by the actual distance between<br />
your two speakers. In Wide mode (DOLBY VS WIDE), the<br />
width of the image seems to extend beyond the speakers.<br />
THEATER<br />
This mode provides a three dimensional surround effect<br />
similar to that of movie theater.<br />
HALL<br />
This mode is suitable for orchestral music such as classical<br />
music or opera.<br />
STADIUM<br />
This mode provides the expansive sound field to achieve the<br />
true stadium effect when watching baseball or soccer<br />
games.<br />
33
34<br />
You can adjust the parameters for DOLBY PRO LOGIC IIx MUSIC.<br />
1<br />
2<br />
3<br />
1<br />
Select DOLBY PRO LOGIC IIx MUSIC mode by pressing<br />
the DSP button.<br />
Select the parameter to be changed by pressing the<br />
PARAMETER button.<br />
Each time the PARAMETER button is pressed, the parameter is<br />
changed as follows:<br />
PANO C-WID DIMEN<br />
DOLBY PRO LOGIC IIx MUSIC parameters<br />
2<br />
3<br />
Within 8 seconds, press the SELECT button to change<br />
the value.<br />
PANO (panorama):<br />
This mode extends the front stereo image to include the<br />
surround speakers for an exciting wraparound effect with<br />
side wall imaging. Select “ON” or “OFF”.<br />
The default setting is “OFF”.<br />
C-WID (center width control):<br />
This adjusts the center image so it may be heard only from<br />
the center speaker, only from the left/right speakers as a<br />
phantom image, or from all three front speakers to varying<br />
degrees.<br />
The adjustable range is from 0 to 7. The default setting is<br />
“0”.<br />
DIMEN (dimension control):<br />
This adjusts the sound-field either towards the front or<br />
towards the rear. The adjustable range is from –4 to +2. The<br />
default setting is “–1”.<br />
Repeat step 2 and 3 to adjust other parameters.<br />
When all the configurations have been finished, leave the unit<br />
for 8 seconds to exit.
Dolby Virtual Speaker technology virtualizes the missing<br />
speakers; in Wide mode, it virtualizes the necessary speakers and<br />
enhances the surround experience.<br />
There are four speaker layouts for Dolby Virtual Speaker.<br />
1<br />
Select DOLBY VS REF or DOLBY VS WIDE mode by<br />
pressing the DSP button.<br />
2 Press the PARAMETER button to change the setting.<br />
Each time the PARAMETER button is pressed, the setting is<br />
changed as follows:<br />
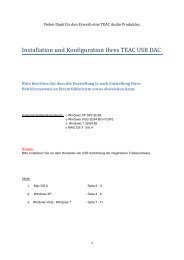
DVS 2SPK (2-Speaker Layout)<br />
Select this when only two speakers (Front L/R) are available.<br />
The missing speakers (Center and Surround L/R) will be<br />
virtualized.<br />
DVS 3SPK (3-Speaker Layout)<br />
Select this when three speakers (Front L/R and Center) are<br />
available.<br />
The missing speakers (Surround L/R) will be virtualized.<br />
DVS 4SPK (4-Speaker Layout)<br />
Select this when four speakers (Front L/R and Surround L/R)<br />
are available.<br />
The missing speaker (Center) will be virtualized.<br />
DVS 5SPK (5-Speaker Layout)<br />
Select this when five speakers (Front L/R, Center and<br />
Surround L/R) are available.<br />
Dolby Virtual Speaker technology enhances the surround<br />
experience.<br />
< DVS 4SPK and DVS 5SPK is available for DOLBY VS Wide<br />
mode only.<br />
Speaker Layouts for Dolby Virtual Speaker<br />
2SPK (REF) 2SPK (WIDE)<br />
3SPK (REF) 3SPK (WIDE)<br />
4SPK (WIDE)<br />
5SPK (WIDE)<br />
Black: physically existent speakers<br />
White: Virtual speakers<br />
35
36<br />
Dynamic Range Compression<br />
In many listening situations, you may find loud passages<br />
objectionable. Adjusting this setting allows you to compress the<br />
sounds into a range that you may find more suitable for a<br />
particular listening situation. Dolby <strong>Digital</strong> satisfies these needs<br />
through the dynamic range controlling.<br />
Select one of the followings to fit the individual listening<br />
situation of the audience.<br />
During playback of DVD, press the DYNAMIC RANGE button<br />
repeatedly until desired setting appears on the display.<br />
DYNR 0.0 (off):<br />
Audio with uncompressed dynamic range. Select this when<br />
you don’t want to compress the dynamic range.<br />
DYNR 0.5:<br />
Audio with partially compressed dynamic range.<br />
DYNR 1.0:<br />
Audio with fully compressed dynamic range.<br />
< The default setting is “DYNR 0.0”.<br />
< This function is effective only when playing back a DVD disc<br />
recorded in Dolby <strong>Digital</strong> format on the DVD player<br />
connected via DIGITAL IN terminal. This control has no effect<br />
on other discs.<br />
< This function may not work with some discs.<br />
1<br />
Tuner<br />
1 3 2 4<br />
Select TUNER by turning the FUNCTION knob (or press<br />
the TUNER button of the remote control unit).<br />
Make sure the antennas have been connected (see page 4-5).<br />
2 Select AM or FM by pressing the BAND button.<br />
< If the BAND button is pressed while the source other than<br />
TUNER was selected, the source will be switched to TUNER<br />
automatically.<br />
3<br />
Press the TUNING MODE button to select the tuning<br />
mode.<br />
Each time the TUNING MODE button is pressed, the tuning<br />
mode changes as follows:<br />
Automatic tuning mode<br />
(“AUTO” indicator lights on the display.)<br />
Manual tuning mode<br />
(no indicator)<br />
Preset tuning mode<br />
(“PRESET” indicator lights.)<br />
Select the Manual tuning mode or the Automatic tuning<br />
mode.<br />
< When using the remote control unit, you can skip this step.
4 Press the TUNING/PRESET button to tune in a station. FM MODE Button<br />
In the Automatic tuning mode, the unit starts searching for a<br />
station. When a station is tuned in, the tuning process will<br />
stop automatically.<br />
If you want to stop the tuning process, press the TUNING<br />
MODE button.<br />
In the Manual tuning mode, hold down the TUNING/PRESET<br />
button and release it when the station is tuned in.<br />
When the TUNING/PRESET button is pressed momentarily, the<br />
frequency changes by a fixed step (FM: 50 kHz steps, AM: 9<br />
kHz steps).<br />
When using the remote control unit:<br />
Hold down the TUNING button of the remote control unit for<br />
more than 0.5 seconds.<br />
When a station is tuned in, the tuning process will stop<br />
automatically.<br />
If you want to stop the tuning process, press the TUNING<br />
button.<br />
When the TUNING button of the remote control unit is<br />
pressed momentarily (0.5 second or less), the frequency<br />
changes by a fixed step.<br />
Press the TUNING button repeatedly until the station you<br />
want to listen to is found.<br />
Repeat this step until the station you want to listen to<br />
is found.<br />
< “TUNED” is displayed when a broadcast is correctly tuned in.<br />
Pressing this button alternates between Stereo mode and<br />
Mono mode.<br />
Stereo:<br />
FM stereo broadcasts are received in stereo and the “ST”<br />
indicator lights in the display.<br />
Mono:<br />
To compensate for weak FM stereo reception, select this<br />
mode. Reception will now be forced monaural, reducing<br />
unwanted noise.<br />
37
38<br />
You can store up to 30 stations.<br />
Manual Memory Presetting<br />
1 Tune in a station you want to listen to (see steps 1<br />
4 of page 36).<br />
to<br />
2 Press the MEMORY button.<br />
TUNING MODE<br />
MEMORY TUNINIG/<br />
PRESET<br />
3 While the “MEMORY” indicator is blinking, select a<br />
preset channel to store the station using the<br />
TUNING/PRESET buttons (or the PRESET buttons of the<br />
remote control unit), and then press the MEMORY<br />
button.<br />
To store more stations, repeat steps 1<br />
to 3 .<br />
Preset Tuning<br />
How to select preset stations<br />
1<br />
If “PRESET” indicator isn’t lit, press the TUNING MODE<br />
button to select the preset tuning mode.<br />
< When using the remote control unit, you can skip this step.<br />
2 Press the TUNING/PRESET buttons (or the PRESET<br />
buttons of the remote control unit) repeatedly until the<br />
desired preset station is found.<br />
Scanning preset stations<br />
Press the P.SCAN button of the remote control unit. Preset<br />
stations stored in memory are scanned at 5 seconds intervals.<br />
When the station you want to listen to is found, press the<br />
P.SCAN button again to stop scanning.
If a TV is connected to this unit, you can use the OSD (onscreen<br />
display) to set up the unit.<br />
Make sure your TV is connected to the receiver and turned<br />
on.<br />
< Any on-screen display shown on the TV will not be recorded<br />
onto VIDEO 1.<br />
1 Press the OSD button.<br />
The main menu appears on the TV screen.<br />
< If a normal TV (4:3) is connected and you press the OSD<br />
button during playback of DVD, the screen might be distorted<br />
for a short while. It is not a malfunction.<br />
< Use the OSD button to display or exit the Setup menu.<br />
< Buttons which can be used in the menu are shown at the<br />
bottom of the screen.<br />
Example:<br />
MAIN MENU<br />
SPEAKER SETUP<br />
FUNCTION SELECT<br />
SURROUND MODE<br />
CH LEVEL SETUP<br />
AUTO OSD : ON<br />
5b:MOVE<br />
OSD:END ENTER:SEL.<br />
5b : Press the Up or Down button to move the cursor.<br />
To advance to the next page, press the Up or Down<br />
button repeatedly.<br />
gt : Press the Left or Right button to change the setting.<br />
OSD : Press the OSD button to end and exit the main menu.<br />
ENTER : Press the ENTER button to select the setting.<br />
ENTER (blink): Press the ENTER button to change the setting.<br />
2<br />
Select a menu using the up/down buttons (5/b).<br />
OSD (On-Screen Display) 1<br />
3 Press the ENTER button.<br />
4<br />
5<br />
The selected menu appears on the screen.<br />
Change the setting using the up/down/left/right<br />
buttons (5bgt) and the ENTER button. Press the OSD<br />
button to go back to the main menu (or the previous<br />
page).<br />
See page 40-41 for details.<br />
Repeat steps 2 to 4 to select and set other items.<br />
When all the settings have been finished, press the OSD<br />
button to exit the main menu.<br />
< Depending on your selections for the input source, input<br />
signal, decoding mode, surround mode, speaker settings,<br />
etc., the conditions of each menu may differ.<br />
39
40<br />
A<br />
Speaker Setup (Auto)<br />
B<br />
See page 42 for details.<br />
Speaker Setup (Manual)<br />
MANUAL SETUP<br />
SUBWOOFER - YES<br />
FRONT - LARGE<br />
CENTER - LARGE<br />
SURR - LARGE<br />
SURR B - 2CH LARGE<br />
b<br />
5b:MOVE gt:CHANGE<br />
OSD:BACK<br />
MANUAL SETUP<br />
5<br />
FRONT L DISTANCE 3.0m<br />
FRONT R DISTANCE 3.0m<br />
CENTER DISTANCE 3.0m<br />
SURR L DISTANCE 1.5m<br />
SURR R DISTANCE 1.5m<br />
b<br />
5b:MOVE gt:CHANGE<br />
OSD:BACK<br />
MANUAL SETUP<br />
5<br />
SURR BL DISTANCE 1.5m<br />
SURR BR DISTANCE 1.5m<br />
CROSSOVER FREQ 80Hz<br />
5b:MOVE gt:CHANGE<br />
OSD:BACK<br />
Speaker size setting<br />
Select the speaker you want to change using the up/down<br />
buttons, and press the ENTER button to change the setting.<br />
Distance, Crossover Frequency<br />
Select an item you want to change using the up/down<br />
buttons, and press the left/right buttons to change the<br />
setting.<br />
Press the OSD button to go back to the main menu.<br />
OSD (On-Screen Display) 2<br />
C<br />
Function Select<br />
FUNCTION SELECT<br />
DIGITAL INPUT<br />
VIDEO SELECT<br />
TONE CONTROL<br />
5b:MOVE<br />
OSD:BACK ENTER:SEL<br />
Select an item you want to change using the up/down<br />
buttons, and press the ENTER button.<br />
<strong>Digital</strong> Input<br />
Select the terminal using the up/down buttons, and press<br />
the OSD button to go back to the previous page.<br />
Video Select<br />
Only when one of TUNER, CD, TAPE and AUX is selected,<br />
you can select a video input source to enjoy the audio and<br />
video signals separately.<br />
Select a video source (VIDEO 1, 2 or 3) using the up/down<br />
buttons, and press the OSD button to go back to the<br />
previous page.<br />
Tone Control<br />
Select ON or OFF by pressing the ENTER button.<br />
Select BASS or TREBLE using the up/down buttons, and<br />
press the LEFT/RIGHT buttons to change the setting.<br />
Press the OSD button to go back to the main menu.<br />
< You cannot select this when the digital signals of DTS or<br />
Dolby <strong>Digital</strong> are input.
D Surround Mode<br />
F<br />
Auto OSD<br />
E<br />
SURROUND MODE<br />
DOLBY PLIIx MOVIE<br />
DOLBY PLIIx MUSIC<br />
DOLBY PRO LOGIC<br />
DOLBY VS REF<br />
DOLBY VS WIDE<br />
b<br />
OSD:BACK 5b:SELECT<br />
Select one of the surround modes using the up/down<br />
buttons, and press the OSD button to go back to the main<br />
menu.<br />
Channel Level Trim<br />
CH LEVEL TRIM<br />
REF. 1<br />
FL ------- -------<br />
C ------- -------<br />
FR ------- -------<br />
SR ------- -------<br />
BR ------- ------b<br />
5b:MOVE gt:CHANGE<br />
OSD:BACK ENTER:MEMO<br />
Select a channel using the UP/DOWN buttons, and press the<br />
LEFT/RIGHT buttons to change the level.<br />
Press the OSD button to go back to the main menu.<br />
< A channel which is set to “NONE” in the speaker setup<br />
menu cannot be selected.<br />
How to store the setting in REF.1 or REF.2<br />
1.After changing the speaker’s level, press the ENTER button.<br />
“1” blinks on the screen.<br />
2.Press the LEFT or RIGHT button to select “REF.1” or<br />
“REF.2”.<br />
3.Press the ENTER button.<br />
4.Press the OSD button to go back to the main menu.<br />
How to call the stored setting<br />
1.Select USER, REF.1 or REF2 using the up/down buttons.<br />
2.Press the LEFT or RIGHT button to select “REF.1” or<br />
“REF.2”.<br />
3.Press the OSD button to go back to the main menu.<br />
MAIN MENU<br />
SPEAKER SETUP<br />
FUNCTION SELECT<br />
SURROUND MODE<br />
CH LEVEL SETUP<br />
AUTO OSD : ON<br />
5b:MOVE<br />
OSD:END ENTER:SEL.<br />
Press the ENTER button to select on or off.<br />
When “AUTO OSD” is set to ON, messages corresponding<br />
to each operation will appear on the screen. If you feel them<br />
disturbing your movie enjoyment, set to OFF.<br />
< The messages will disappear in several seconds.<br />
41
42<br />
The test tone for the automatic speaker setup is very loud.<br />
Keep away from the speakers to protect your ears.<br />
If a TV is connected to this unit, you can use the OSD (on-screen<br />
display) to set up the unit.<br />
Make sure your TV is connected to the receiver and turned on.<br />
1<br />
Connect a microphone to the MIC jack on the rear<br />
panel, and set it up on your listening position.<br />
2 Press the OSD button.<br />
3 Select “SPEAKER SETUP” and “AUTO” using the ENTER<br />
button.<br />
Speaker Setup (Auto)<br />
4 Check the options.<br />
Number of available speakers<br />
Press the 5 or b button (or the SPEAKER SETUP button of<br />
the main unit) to select the number of speakers connected<br />
to the unit.<br />
AUTO SETUP<br />
ALL CHANNEL<br />
FL-C-FR-SR-SL<br />
FL-FR-SR-SL<br />
FL-C-FR<br />
FL-FR<br />
g:CUTOFF 80Hz :START<br />
t:SW 5b:MOVE OSD:BACK<br />
ALL CHANNEL (SET ALL):<br />
Front x2, Center x1, Surround x2,<br />
Surround Back x1 or 2<br />
FL-C-FR-SR-SL (SET 3/2):<br />
Front x2, Center x1, Surround x2<br />
FL-FR-SR-SL (SET 2/2):<br />
Front x2, Surround x2<br />
FL-C-FR (SET 3/0):<br />
Front x2, Center x1<br />
FL-FR (SET 2/0):<br />
Front x2<br />
Subwoofer<br />
Press the t button (or the SELECT button of the main<br />
unit) to select Yes or No.<br />
When a powered sub-woofer is connected, select Yes.<br />
(“S” appears on the right side of the display.)<br />
Cut off frequency<br />
Press the g button (or the SELECT button of the main<br />
unit) repeatedly.<br />
You can change the setting from 40 to 130 Hz in 10 Hz<br />
steps. The default setting is 80 Hz.
5 Press the ENTER button (or the MEMORY button of the 7<br />
Press the ENTER (or the MEMORY button) to save the<br />
main unit) to start the automatic speaker setup.<br />
setting and exit the Speaker setup mode.<br />
The microphone perceives the test tone emitted from each<br />
speaker, and adjusts the size, distance and relative volume<br />
automatically.<br />
< If you want to stop the test tone, press the ENTER button (or<br />
the MEMORY button of the main unit).<br />
Other buttons won’t work during the automatic speaker<br />
setup.<br />
6<br />
If the automatic speaker setup has been finished<br />
successfully, the result appears on the screen, and “SET<br />
MEMO” appears on the display.<br />
< Speaker polarity (+ or –) appears on the screen. If “–”<br />
appears, check the connection to the speaker.<br />
< If you don’t want to save the result, press the g button (or<br />
the SELECT button of the main unit) to exit.<br />
< If no front speaker (or no microphone) is connected,<br />
“ERROR” appears on the screeen and the display.<br />
In this case, press the g button (or the SELECT button of<br />
the main unit) to exit, turn the power off, and check the<br />
connection to the front speakers and microphone. Try again<br />
from step 1 .<br />
If the test result isn’t reliable:<br />
1. Set the TEST LEVEL (volume of the test tone) to MEDIUM or<br />
LARGE using the 5 button (or the TONE MODE button of the<br />
main unit).<br />
You might get the better result with higher volume.<br />
2. Press the t button (or the SELECT button of the main<br />
unit) to retry.<br />
“COMPLETE” briefly appears on the display.<br />
< If you aren’t satisfied with the result, see page 20 to adjust<br />
the setting manually.<br />
Note<br />
It is possible to use the automatic speaker setup function<br />
without the OSD, though it is rather difficult.<br />
Instead of step 2 and 3 , hold down the SPEAKER<br />
SETUP button for more than 1 second.<br />
“SET ALL S” appears on the display.<br />
< If you want to cancel the automatic speaker setup function,<br />
hold down the SPEAKER SETUP button for more than 1<br />
second once again.<br />
43
44<br />
If you experience any problems with the unit, please take a<br />
moment to look through this chart and see if you can solve the<br />
problem yourself before you call your dealer or a <strong>TEAC</strong> service<br />
center.<br />
No power<br />
e Check the connection to the AC power supply. Check and<br />
make sure the AC source is not a switched outlet and that,<br />
if it is, the switch is turned on. Make sure there is power to<br />
the AC outlet by plugging another item such as a lamp or<br />
fan.<br />
There is no sound or only a very low-level sound is heard.<br />
e Adjust the volume by turning the MASTER VOLUME knob.<br />
e If the SPEAKER indicator isn’t lit, press the SPEAKER button<br />
to turn it on.<br />
e Check that the speakers and components are connected<br />
securely.<br />
e Check the operation of the connected component.<br />
e Check the audio output setting of your DVD player.<br />
e Select the proper source using the FUNCTION knob and the<br />
DIGITAL INPUTS button.<br />
e Select the proper surround mode (see page 31).<br />
e If “MUTE” is blinking on the display, press the MUTING<br />
button to restore the sound.<br />
No sound from surround or center speakers.<br />
e Check the speaker setting (see page 20).<br />
e Check the channel level setting (see page 23-24).<br />
e Select the proper surround mode (see page 31).<br />
e Check the audio output setting of your DVD player. Play a<br />
multi-channel source.<br />
Severe hum or noise is heard.<br />
e Check that the speakers are connected securely.<br />
e Make sure the line cords and speaker cables are as far away<br />
from the AC supply as possible.<br />
“DIGITAL” indicator blinks.<br />
e The unit cannot perceive the digital signal (see page 26).<br />
e Select the proper decoding mode by pressing the AUTO<br />
button (see page 31).<br />
No picture.<br />
e Check that the system is connected properly.<br />
e Turn on the TV.<br />
e Make sure you have selected the proper video input on the<br />
TV so that you can view the pictures.<br />
e Select the proper video source using the FUNCTION knob.<br />
Troubleshooting<br />
Cannot view the on-screen display as it rolls rapidly.<br />
e The color system of the receiver does not match your TV.<br />
Connect a PAL TV.<br />
Cannot listen to any station, or signal is too weak.<br />
e Make sure the antenna is properly connected.<br />
e Tune in the station properly.<br />
e If a TV is near the unit, turn it off.<br />
e Install the antenna again after relocating it to a better<br />
reception position.<br />
e An external antenna may be required.<br />
Though the broadcast is stereo, it sounds monaural.<br />
e Press the FM MODE button.<br />
Remote control doesn’t work.<br />
e Select the component to be controlled by pressing the<br />
REMOTE SELECT buttons (RECEIVER, CD, AUX, TV, VCR,<br />
DVD, CABLE, SAT) of the remote control unit. (Even when<br />
the REMOTE SELECT buttons are pressed without pointing<br />
at the main unit, the selection of the remote control unit will<br />
be changed.)<br />
If you want to control the receiver, first press the RECEIVER<br />
button, and then press buttons to operate.<br />
e Press the POWER switch of the main unit to turn it standby.<br />
e If the batteries are dead, change the batteries.<br />
e Use remote control unit within the range (5m) and point at<br />
the front panel.<br />
e Clear obstacles between the remote control unit and the<br />
main unit.<br />
e If a strong light is near the unit, turn it off.<br />
If normal operation cannot be recovered, unplug the<br />
power cord from the outlet and plug it again.<br />
Maintenance<br />
If the surface of the unit gets dirty, wipe with a soft cloth or<br />
use diluted mild liquid soap. Be sure to remove any excess<br />
completely. Do not use thinner, benzine or alcohol as they<br />
may damage the surface of the unit.
Amplifier Section<br />
Output Power<br />
100 W + 100 W (Stereo, 0.2 % THD, 20 Hz to 20 kHz, 6 Ω)<br />
120W + 120W (6 Ω, JEITA)<br />
Surround Output Power . . . . . . . . . . . . . . 125 W per channel<br />
(0.7 % THD, 1 kHz, 6 Ω, only one channel driven)<br />
160 W per channel (6 Ω, JEITA)<br />
Total Harmonic Distortion . . . . . 0.09 % (at 95 W, 1 kHz, 6 Ω)<br />
Audio Input Sensitivity/Impedance. . . . . *LINE: 200 mV/47 kΩ<br />
Output Level/Impedance (TAPE REC). . . . . . . 200 mV / 2.2 kΩ<br />
Frequency Response . . . . . *LINE: 20 Hz to 50 kHz, +0 / –3 dB<br />
Signal-to-Noise Ratio . . . . . . . . . . . . . . . . *LINE: 90 dB (IHF-A)<br />
Tone Control . . . . . . . . . . . . . . . . . . BASS: ± 10 dB at 100 Hz<br />
TREBLE: ± 10 dB at 10 kHz<br />
<strong>Digital</strong> Audio Section<br />
Sampling Frequency . . . . . . 32 kHz, 44.1 kHz, 48 kHz, 96 kHz<br />
<strong>Digital</strong> Input Level . . . . . . . . . . . . . COAXIAL (75 Ω): 0.5 Vp-p<br />
OPTICAL (660nm): –15 dBm to –21 dBm<br />
Video Section<br />
Video Format (OSD) . . . . . . . . . . . . . . . . . . . . . . . . . . . . . PAL<br />
S-Video output<br />
Y (luminance) - Output level . . . . . . . . . . . . . 1 Vp-p (75 Ω)<br />
C (color) - Output level . . . . . . . . . . . . . 286 mVp-p (75 Ω)<br />
Jacks . . . . . . . . . . . . . . . . . . . . . . . . . . . . . . . S-VIDEO jack<br />
Video output<br />
Output level . . . . . . . . . . . . . . . . . . . . . . . . . 1 Vp-p (75 Ω)<br />
Jacks . . . . . . . . . . . . . . . . . . . . . . . . . . . . . . . . . . RCA jack<br />
Component video output (Y, PB, PR)<br />
Y-Output level . . . . . . . . . . . . . . . . . . . . . . 1.0 Vp-p (75 Ω)<br />
PB, PR-Output level . . . . . . . . . . . . . . . . . . . 0.7 Vp-p (75 Ω)<br />
Jacks . . . . . . . . . . . . . . . . . . . . . . . . . . . . . . . . . RCA jacks<br />
FM Tuner Section (Without notes 100.1 MHz, 65 dBf)<br />
Tuning Range. . . . . . . 87.5 MHz to 108.0 MHz (50 kHz steps)<br />
Total Harmonic Distortion (1 kHz). Mono: 0.5%, Stereo: 0.8%<br />
Frequency Response. . . . . . . . . . . . . . 30 Hz to 15 kHz, ±3 dB<br />
Stereo Separation (1 kHz) . . . . . . . . . . . . . . . . . . . . . . . 40 dB<br />
Signal-to-Noise Ratio . . . . . . . . . . . . . . . . . . . . . Mono: 70 dB<br />
Stereo: 65 dB<br />
Specifications<br />
AM Tuner Section<br />
Tuning Range . . . . . . . . . 522 kHz to 1,611 kHz (9 kHz steps)<br />
Usable Sensitivity. . . . . . . . . . . . . . . . . . . . . . . . . . . 500 µV/m<br />
Total Harmonic Distortion . . . . . . . . . . . . . 1.5% at 100 dB/m<br />
Signal-to-Noise Ratio . . . . . . . . . . . . . . . . . 40 dB at 100 dB/m<br />
General<br />
Power Requirements<br />
Hong Kong / Australia model. . . . . . . . . . AC 230 V, 50 Hz<br />
China model . . . . . . . . . . . . . . . . . . . . . . AC 220 V, 50 Hz<br />
Power Consumption. . . . . . . . . . . . . 300 W (STANDBY : 3 W)<br />
AC Outlet . . . . . . . . . . . . . . . . . . . . . . . . . . . . . switched x 1<br />
(except Hong Kong / Australia model, total 100 W max.)<br />
Dimensions (W x H x D) . . . . . . . . . . . . . 435 x 143 x 372 mm<br />
Weight (net) . . . . . . . . . . . . . . . . . . . . . . . . . . . . . . . . 10.4 kg<br />
Standard Accessories :<br />
Power Cord x 1<br />
AM Loop Antenna x 1<br />
FM T-type Antenna x 1<br />
FM Matching Transformer x 1<br />
Microphone x 1<br />
Remote Control Unit (UR-427) x 1<br />
Battery (AAA, R03, UM-4) x 2<br />
Owner’s Manual x 1<br />
* LINE means CD, TAPE, VIDEO.<br />
• Design and specifications are subject to change without<br />
notice.<br />
• Weight and dimensions are approximate.<br />
• Illustrations may differ slightly from production models.<br />
45
46<br />
TV<br />
ADMIRAL 050 134<br />
AKAI 093 049 123<br />
ALBA 068<br />
ALBIRAL 116<br />
ALCATEL 022<br />
AMSTRAD 158 021<br />
ANAM 155 156 157<br />
ARC EN CIEL 028 039 043 145 081<br />
ARISTONA 099 049 050 019 142 149 078<br />
ARTHUR MARTIN 053 139 117 120 122 123 125 128<br />
ASA 050 055 057 113 134<br />
ATLANTIC 099 111<br />
AUDIOSONIC 054<br />
AUSIND 053<br />
AUTOVOX 099 144 055 019 057 069<br />
BAIRD 083<br />
BASICLINE 006<br />
BAUR 011<br />
BEKO 023 049<br />
BLAUPUNKT 094 100 102 111 114<br />
BRANDT 028 039 040 043 145 081<br />
BRION VEGA 050<br />
BRUNS 048 050<br />
BSR 059 110 132<br />
BUSH 033 068 124 074<br />
CENTURY 098 101 050 079 136<br />
CGE 016 101 124 079 132 136<br />
CIHAN 065<br />
CLARIVOX 048 116<br />
CONDOR 099 111<br />
CONTEC 087<br />
CONTINENTAL EDITION 028 039 040 043 145 081<br />
CROSLEY 101 050 109<br />
CROWN 147<br />
CTC CLATRONIC 046<br />
DAEWOO 089<br />
DECCA 099 060 063 115 118<br />
DEGRAAF 036<br />
DIXI 049 090<br />
DRYNATRON 049<br />
DUAL 099 141<br />
DUAL-TEC 096 099 132<br />
DUMONT 046 050 057 073<br />
ELBE 016 116<br />
ELBIT 065<br />
ELCIT 046 097 103 050 109 127 132<br />
ELMAN 046 132<br />
ELTA 090<br />
Code List 1<br />
EMERSON 158 098 050<br />
ERRES 049 142<br />
EUROPHON 098 046 097 099 051 115 132<br />
FERGUSON 146 040 041 150 057 061 116 149<br />
FIDELITY 099 149<br />
FINLUX 034 046 053 055 057 109 113 073<br />
074 079<br />
FISHER 015 048 050 052 109 136<br />
FORGESTONE 149<br />
FORMENTI 099 053 109 111 125<br />
FORTRESS 137<br />
FRABA 075<br />
FRONTECH 054<br />
FUJITSU 025<br />
FUNAI 054 059<br />
GBC 109 132<br />
GEC 099 060 109 115 134 088<br />
GELOSO 103 109 132 134 090<br />
GOLDSTAR 092 003 017 099 049 075 076 077<br />
090 152<br />
GOODMANS 033 049 060 077<br />
GORENJE 066 136<br />
GREATZ 001<br />
134<br />
058 109 122 123 128 129 130<br />
GRANADA 033<br />
134<br />
099 049 058 060 142 115 125<br />
GRUNDIG 094 100 057 058 108 112 114 082<br />
HANSEATIC 033 047 099 049 109 139 111<br />
HANTAREX 097<br />
HEMMERMANN 127<br />
HIFIVOX 028 039 043 145 081<br />
HINARI 158 033 045 143 090<br />
HITACHI 014 033 034 036 099 145 056 109<br />
139 110 067 117 132 134 084 091<br />
081 088<br />
HYPER 093 099<br />
IMPERIAL 016 101 124 079 132 133<br />
INGELEN 001 058 109 122 128 129 130 134<br />
INKEL 000<br />
INNO HIT 093 098 097 099 143 077 090<br />
INTERFUNK 047 049 050 145 058 109 142 123<br />
128 129 091<br />
IRRADIO 093 143 053 077 090<br />
ITT 001 140 058 105 109 122 123 128<br />
148 129 130 134 135 083 089<br />
JVC 033 154<br />
KTV 099<br />
KAISUI 006
KARCHER 006<br />
KENDO 098<br />
KENNEDY 144 019 109<br />
KORTING 050 059 111<br />
KRIESLER 099 049 050 019 142 149 078<br />
LENOIR 099<br />
LOEWE OPTA 008 097 047 049 050 115 072<br />
LOGIK 118 149<br />
LUMA 049 120 134<br />
LUXOR 058 139 117 120 123 129 135 083<br />
M<strong>AG</strong>NADYNE 046 097 103 050 109 115 127 132<br />
M<strong>AG</strong>NAFON 046 097 099 051 053 115<br />
MARANTZ 049<br />
MATSUI 158 099 106 060 118 068 134 090<br />
McMICHAEL 088<br />
MEMOREX 090<br />
METZ 094 050 114 133<br />
MINERVA 094 100 057 058 114<br />
MISTRAL 149<br />
MITSUBISHI 033 035 047 049 050 062 118 119<br />
148 080 138<br />
MIVAR 097 099 115 077<br />
MULTITECH 046 099 115 136<br />
MURPHY 134<br />
MAONIS 096 144 019 110 134<br />
NATIONAL 042 104 109<br />
NEC 033 085<br />
NECKERMANN 099 050 139 120 136<br />
NEI 049<br />
NIKKAI 060<br />
NOBLEX 015<br />
NOBLIKO 098 046 099 053 057<br />
NOGAMATIC 028 039 043 145 081<br />
NOKIA 001 140 058 105 109 122 123 128<br />
148 129 130 134 135 083 089<br />
NORDMENDE 028 032 039 043 145 131 091 081<br />
OCEANIC 109 064 123<br />
ONCEAS 099<br />
OPTONICA 137<br />
ORION 158 059 118 068 127 090<br />
OSAKI 060<br />
OSIO 077<br />
OSUME 087<br />
OTTO VERSAND 033 047 049 109 139<br />
P.T ACTTRON 065<br />
PAEL 099 053<br />
PANASONIC 030 042 095 104 107 109 121 126<br />
PATHE CINEMA 099 111 116 132<br />
PERDIO 060<br />
PHILCO 016<br />
136<br />
030 101 050 109 124 079 132<br />
PHILIPS 009 010 013 018 024 099 049 050<br />
019 142 148 149 078 088<br />
PHOENIX 099 053 109 111 125<br />
PHONOLA 099 049 050 019 142 149 078<br />
PIONEER 020 049 145 091<br />
PRANDONI-PRINCE 098 097 053 115 134<br />
PREMIER 124<br />
PRINCE 098 097 053 134<br />
PROTECH 049 054<br />
PYE 099 049 050 019 142 148 149 078<br />
QUASAR 046 097 051 053 077<br />
QUELLE 047 099 100 049 053 055 057 058<br />
111<br />
128<br />
112 113 114 118 123 073 074<br />
RADIOLA 099 049 050 019 142 149 078<br />
RADIOMARELLI 046 097 103 050 109 062 127 132<br />
RANK 074<br />
RBM 074<br />
REDIFFUSION 062 123 134<br />
REX 096 144 019 141 110 069 134<br />
ROBOTRON 048 050<br />
RTF 048 050<br />
SABA 028 031 032 037 039 040 043 097<br />
050 145 115 120 086 091 081<br />
SAISHO 158 099 118 119 068 090<br />
SALORA 053 139 117 120 122 123 125 128<br />
135 083<br />
SAMBERS 046 097 051 053 115 077<br />
SAMPO 121<br />
SAMSUNG 015<br />
153<br />
026 099 054 077 136 090 151<br />
SANYO 001 002 005 033 044 048 060 113<br />
118 071 054 136<br />
SBR 049 142 148 149 088<br />
SCHAUB LORENZ 001 058 109 122 123 128 129<br />
130 134<br />
SCHNEIDER 096 099 049 050 052 019 141 109<br />
142 125 149 078 132<br />
SEG 046<br />
SEI 158 059<br />
SELECO 016 096 144 019 141 110 069 134<br />
SHARP 033 087 137<br />
SIAREM 046 097 050 109 115<br />
SICATEL 116<br />
SIEMENS 005 094 036 100 111 114 087<br />
47
48<br />
SIERA 099 049 050 019 142 149 078<br />
SILVER 054<br />
SINGER 016 046 050 109<br />
SINUDYNE 158 046 050 059 109 127<br />
SONOKO 049 090<br />
SONY 146 007 027 033 038 118<br />
STERN 096 144 019 110 069 134<br />
TANDBERG 133<br />
TANDY 099 060 137<br />
TASHIKO 002 033<br />
TATUNG 099 060 063 065 115 118<br />
TEC 096 099 132<br />
TELE<strong>AV</strong>IA 028 039 040 043 145 091 081<br />
TELEFUNKEN 028 041 145 150 086 091<br />
TELETECH 090<br />
TELEVIDEON 099 053 109 111 125<br />
TENSAI 049<br />
THOMSON 012<br />
081<br />
028 032 039 040 043 145 091<br />
THORN-FERGUSON 014 040 041 054 150 057 061<br />
116 149 086<br />
TOCOM 029<br />
TOSHIBA 004 016 033 070 074<br />
TRANS CONTINENTS 098 097 053 134<br />
TRIUMPH 158<br />
UHER 052 111 125<br />
ULTRA VOX 098 046 099 050 109 120<br />
UNIVERSUM 092 034 054 077<br />
UNIVOX 116<br />
VEG<strong>AV</strong>OX 079<br />
VOXSON 050 134<br />
WATSON 111<br />
WATT RADIO 046 099 051 109 116 127<br />
WEGA 033<br />
WHITE WESTINGHOUSE 099 111 038<br />
YOKO 099<br />
ZANUSSI 096 144 019 110 069 134<br />
ZOPPAS 096 144 019 110 134<br />
Code List 2<br />
VCR<br />
AIWA 011 042<br />
AKAI 042 022 052 032 033<br />
ALBA 008 020<br />
AMSTRAD 011<br />
ANITSCH 009<br />
ARC EN CIEL 042 056 052<br />
ARISTONA 045 031<br />
ASA 018<br />
BAIRD 042 033<br />
BAUER. BOSCH 014 043<br />
BLAUPUNKT 014 043 055 031 054 040<br />
BRANDT ELECTRONIQUE 042 056 052<br />
BRIONVEGA 041<br />
BUSH 008 020<br />
C.EDISON 041<br />
CANON 014<br />
CAPEHART 020<br />
CGE 011 042 052<br />
CONTINENTAL EDISON 042 056 052<br />
CRAIG 000 013<br />
CURTIS MATHES 019<br />
DAEWOO 001 020 021<br />
DAYTRON 020<br />
DECCA 011 042<br />
DEGRAAF 003 006 011 045 018<br />
DUAL 042 052<br />
DUMONT 003 011 018<br />
DYNATECH 011<br />
EMERSON 002 010 011 019 025<br />
FERGUSON 042 059 030 052 034 036<br />
FIDELITY 011<br />
FINLANDIA 003 018<br />
FINLUX 003 006 011 018<br />
FISHER 000 003 005<br />
FUNAI 011<br />
GE 019<br />
GENERAL 014<br />
GOLDSTAR 004 062<br />
GOODMANS 008 011 046<br />
GRAETZ 041 042 056 050 052 038<br />
GRANADA 003 005 018<br />
GRUNDIG 014 043 018 055 031 053 054<br />
HANSEATIC 043<br />
HARMAN-KARDON 004<br />
HIFIVOX 042 056 052<br />
HINARI 002 008 024 027<br />
HITACHI 006 007 011 042 057<br />
IMPERIAL 011
INGELEN 042 056 052 038<br />
INGERSOL 027<br />
ITT 005 041 042 056 050 052 033 038<br />
JENSEN 042<br />
JVC 042 056 060 030 052 063<br />
KENWOOD 005 042 060<br />
KRIESLER 045 031<br />
KUBA 043<br />
LLOYD 011<br />
LOEWE OPTA 014 018 029 031<br />
LOGIK 008 027<br />
LUXOR 033 038<br />
M<strong>AG</strong>NADYNE 041<br />
M<strong>AG</strong>NASONIC 038<br />
M<strong>AG</strong>N<strong>AV</strong>OX 019<br />
MARANTZ 004 014 046 018 031<br />
MATUI 010 025 027<br />
MEMOREX 000 003 005 011 045<br />
METZ 014 043 031 054 037<br />
MGA 017<br />
MINERVA 055 054<br />
MINOLTA 006 007<br />
MITSUBISHI 060 017 049<br />
MTC 011 013<br />
MULTITECH 008 011<br />
MURPHY 011<br />
NAONIS 042 056 052<br />
NATIONAL 040<br />
NEC 004 042 060 052<br />
NECKERMANN 002 041 014 042 052<br />
NOGAMATIC 042 056 052<br />
NOKIA 003<br />
038<br />
005 041 042 056 050 052 033<br />
NORDMENDE 039 042 056 052 053 035<br />
OPTONICA 045 046<br />
ORION 002 010 025 027<br />
OSAKI 011<br />
OTTO VERAND 043<br />
P. CINEMA 014<br />
PALLADIUM 041 014<br />
PANASONIC 023 051 040<br />
PATHE MARCONI 042 056 052<br />
PENTAX 006 007<br />
PERDIO 011<br />
PHILIPS 012 014 045 046 018 029 031<br />
PHONOLA 014 045 018 029 031<br />
PIONEER 060<br />
PORTLAND 020<br />
PROLINE 011<br />
PYE 014 045 018 029 031<br />
QUARTZ 005<br />
QUELLE 002 044 054<br />
RADIOLA 045 031<br />
RADIOMARELLI 041<br />
RCA 019<br />
REALISTIC 000 003 005 011 013 045 046<br />
REX 042 056 052<br />
SABA 039 042 056 052 035<br />
SAISHO 002 010 025 027<br />
SALORA 005 017<br />
SAMSUNG 013 019 032 061<br />
SANSUI 042 060<br />
SANYO 000 003 005 025 038<br />
SBR 018 029<br />
SCHAUB LORENZ 041 042 056 050 052<br />
SCHNEIDER 008 011 045 031<br />
SEI-SINUDYNE 027<br />
SELECO 042 056 052<br />
SENTRA 020<br />
SHARP 045 046 105 048<br />
SHINTOM 008<br />
SIEMENS 014 043 055 031 054 038<br />
SIERA 045 031<br />
SINUDYNE 027<br />
SONY 044 015 016 026 028<br />
STERN 042 056 052<br />
STS 006<br />
SUNKAI 025<br />
SYLVANIA 011 017<br />
SYMPHONIC 011 017<br />
TASHIKO 011<br />
TATUNG 011 042<br />
<strong>TEAC</strong> 011 042<br />
TEKNIKA 011<br />
TELE<strong>AV</strong>IA 042 056 052<br />
TELEFUNKEN 042 056 052<br />
TENOSAL 008<br />
THOMSON 042 056 052<br />
THORN-FERGUSON 039 042 059 030 052 034 036<br />
TOSHIBA 001 042 056 017 058 052<br />
TOTELEVISION 013<br />
UHER 042<br />
ULTRA VOX 041<br />
UNITECH 013<br />
UNIVERSUM 041 014 043<br />
URANYA 041<br />
49
50<br />
VECTOR 004<br />
VICTOR 042 060<br />
VIDITAL 041<br />
WESTING HOUSE 041<br />
WARDS 019<br />
YAMAHA 004 042<br />
ZANUSSI 042 056 052<br />
ZENDER 052<br />
ZOPPAS 042 056<br />
Code List 3<br />
DVD<br />
DENON 017<br />
GE 003 004<br />
JVC 007<br />
LG 011 010<br />
M<strong>AG</strong>N<strong>AV</strong>OX 019<br />
MITSUBISHI 001<br />
ONKYO 009<br />
PANASONIC 015<br />
PHILIPS 019<br />
PIONEER 002 023<br />
PROSCAN 003 004<br />
RCA 003 004<br />
SAMSUNG 016 008<br />
SHERWOOD 024<br />
022<br />
010 011 012 013 014 020 021<br />
SONY 005<br />
<strong>TEAC</strong> 000 025<br />
THOMSON 003 004<br />
TOSHIBA 006<br />
VIETA 014<br />
YAMAHA 019<br />
ZENITH 011 010
CABLE<br />
ABC 002 003 009 030 006 008<br />
Allegro 018 021<br />
Archer 018 026<br />
Bell&Howell 009<br />
Century 018<br />
Citizen 018 021<br />
Comtronics 014<br />
Contec 011<br />
Easten 001<br />
Emerson 026<br />
Everquest 010 014<br />
Focus 022<br />
Garrard 018<br />
Gemini 010<br />
General Instrument033 032 006 034<br />
GoldStar 017 014<br />
Goodmind 026<br />
Hamlin 012 020 004 013<br />
Hitachi 006<br />
Jasco 010 018 021<br />
Jerrold 002 007 033 032 009 010 006 034<br />
Memolex 000<br />
Movie Time 015<br />
NSC 015<br />
Oak 011<br />
Optimus 031<br />
Panasonic 000 016 031<br />
Paragon 000<br />
Philips 018<br />
Pioneer 017 025<br />
Popular Mechanics 022<br />
Pulsar 000<br />
Quasar 000<br />
RCA 031<br />
Radio Shack 010 021 026 028<br />
Recoton 022<br />
Regal 012 020<br />
Regency 001<br />
Rembrandt 006<br />
Runco 000<br />
SL Marx 014<br />
Samsung 017 014<br />
Scientific Atlanta 003 023 030 027<br />
Signal 010 014<br />
Signature 006<br />
Sprucer 031<br />
Starcom 002 010<br />
Stargate 010 014 026<br />
Starquest 010<br />
TV86 015<br />
Teleview 014<br />
Tocom 007 008<br />
Toshiba 000<br />
Tusa 010<br />
Unika 018<br />
Universal 018 019<br />
Viewstar 015<br />
Zenith 000 024<br />
Zentek 022<br />
51
52<br />
SAT<br />
ALBA 030<br />
AMSTRAD 008 019 027<br />
ARCON 021<br />
ARISTONA 016<br />
ASTRA 028<br />
BLAUPUNKT 033<br />
BUSH 016<br />
CH.MASTER 030<br />
CITY COM 005<br />
DDC 030<br />
DYNASAT 005<br />
ECHOSTAR 002 009 032 020<br />
EMME ESSE 005<br />
FAIT 005<br />
FERGUSON 014 041 016 017 018<br />
FINLUX 006 007 013<br />
FRACARRO 005<br />
FTE 022<br />
GOLDSTAR 004 021<br />
GRAETZ 026 037<br />
GROTHUSEN 004<br />
GRUNDIG 033 016 018 036<br />
HINARI 030<br />
HIRSCHMANN 003 006<br />
HITACHI 013<br />
INGELEN 026 037<br />
ITT 034<br />
ITT-NOKIA 032 018 026 037<br />
JERROLD 038 014<br />
KATHREIN 005 022 023<br />
KOSMOS 004<br />
KRIESLER 016<br />
LENCO 004 021<br />
LUXOR 026 037<br />
M<strong>AG</strong>AI 022<br />
MARANTZ 012<br />
MASPRO 016<br />
MATSUSHITA 000<br />
METZ 036<br />
MINERVA 036<br />
MULTISTAR 022<br />
MURATO 004<br />
NEC 040<br />
NEIRU 021<br />
NOKIA 026 037<br />
NORSAT 015<br />
PACE 001 042 016 017 018 044<br />
PANASONIC 032<br />
Code List 4<br />
PHILIPS 003 011 012 029<br />
PHONOLA 016<br />
PROSAT 030<br />
PYE 016<br />
QUADRAL 030<br />
QUELLE 036<br />
RADIOLA 016<br />
REDIFFUSION 015<br />
SABA 035<br />
SALORA 026<br />
SAMSUNG 003 022<br />
SAT PARTNER 004<br />
SATPORTNER 021<br />
SCHAUB LORENZ 026 037<br />
SCHNEIDER 005 016<br />
SIEMENS 033 036<br />
SIERA 016<br />
SILVA 004 021<br />
SKY 039<br />
STARCOM 038<br />
STARSAT 022<br />
TECHNISAT 003<br />
TELEFUNKEN 025<br />
TELESYSTEM 005<br />
THORN-FERGUSON 010 014 041 016 017 018 043<br />
TRIAD 004<br />
UNIDEN 022<br />
UNITED CABLE 038<br />
V TECHNOLOGY 004<br />
VORTEC 003 024 025<br />
ZENDER 022
CD<br />
ADCOM 021<br />
AIWA 045 039 022<br />
AKAI 046<br />
AUDIO 016<br />
ARC EN CIEL 036 014 027 030 031 018 230<br />
DENON 054<br />
FISHER 006<br />
H/K 017 012 047 016<br />
JVC 028 034 001<br />
KENWOOD 003 020 010 029 006<br />
MARANTZ 015 014<br />
MONDIAL 033<br />
NAD 048 002 042<br />
NAKAMICHI 049<br />
NIKKO 016<br />
ONKYI 013 037 011 021 038<br />
PANASONIC 051 052<br />
PHILPS 014<br />
PIONEER 005 008 041<br />
RCA 007 009<br />
REALISTIC 045<br />
SANSUI 040<br />
SHARP 019 053<br />
SHERWOOD 059 035 023 019 056 057 058<br />
SONY 050 024 025 026<br />
<strong>TEAC</strong> 000 060 061<br />
TECHNICS 051 004 052<br />
VICTOR 001<br />
YAMAHA 044 043 016<br />
TAPE/MD<br />
DAEWOO 002<br />
DENON 012<br />
GOLDSTAR 004<br />
KENWOOD 003<br />
M<strong>AG</strong>N<strong>AV</strong>OX 010<br />
OPTIMUS 007<br />
PANASONIC 013<br />
PHILIPS 010<br />
POINNEER 014 009<br />
RCA 006<br />
REALISTIC 007<br />
SAMSUNG 001 005<br />
SHARP 003 011<br />
SHERWOOD 015 016 017<br />
<strong>TEAC</strong> (TAPE) 000 018<br />
<strong>TEAC</strong> (MD) 019 020<br />
TECHINCS 013<br />
TOSHIBA 003<br />
YAMAHA 008<br />
53
54<br />
REMOTE<br />
SELECT CD TAPE/MD TV VCR DVD CABLE SAT<br />
STANDBY<br />
(POWER OFF)<br />
PLAY<br />
STANDBY<br />
(POWER OFF)<br />
FORWARD<br />
PLAY<br />
Function Table<br />
POWER<br />
STANDBY<br />
(POWER OFF)<br />
CHANNEL<br />
INPUT<br />
SELECTOR<br />
VOLUME<br />
MUTING<br />
POWER POWER<br />
STANDBY<br />
(POWER OFF)<br />
CHANNEL CHANNEL CHANNEL<br />
INPUT<br />
SELECTOR<br />
VOLUME<br />
MUTING<br />
PLAY<br />
STANDBY<br />
(POWER OFF)<br />
AUDIO<br />
SUBTITLE<br />
ZOOM<br />
SETUP<br />
MENU<br />
5bgt<br />
ENTER<br />
DISPLAY<br />
RETURN<br />
PLAY<br />
REVERSE<br />
PAUSE PAUSE PAUSE<br />
PLAY<br />
POWER POWER<br />
STANDBY<br />
(POWER OFF)<br />
INPUT<br />
SELECTOR<br />
VOLUME<br />
MUTING<br />
STANDBY<br />
(POWER OFF)<br />
INPUT<br />
SELECTOR<br />
VOLUME<br />
MUTING
REMOTE<br />
SELECT CD TAPE/MD TV VCR DVD CABLE SAT<br />
STOP<br />
SKIP<br />
REPEAT<br />
STOP<br />
RECORD<br />
STOP STOP<br />
RECORD TITLE<br />
SEARCH SEARCH SEARCH<br />
REPEAT<br />
0-9, +10 0-9, +10 0-9, +10 0-9, +10 0-9, +10 0-9, +10<br />
The functions of the buttons differ in accordance with the component selected by the REMOTE SELECT buttons.<br />
< Depending on the component, some functions may not be available or may work differently.<br />
< For details about functions, refer to the operating manual of each component.<br />
SKIP<br />
PAL/NTSC<br />
55
Z<br />
<strong>TEAC</strong> CORPORATION 3-7-3, Nakacho, Musashino-shi, Tokyo 180-8550, Japan Phone: (0422) 52-5081<br />
<strong>TEAC</strong> AMERICA, INC. 7733 Telegraph Road, Montebello, California 90640 Phone: (323) 726-0303<br />
<strong>TEAC</strong> CANADA LTD. 5939 Wallace Street, Mississauga, Ontario L4Z 1Z8, Canada Phone: (905) 890-8008<br />
<strong>TEAC</strong> MEXICO, S.A. De C.V Campesinos N°184, Colonia Granjas Esmeralda, Delegacion Iztapalapa, CP 09810, México DF Phone: (525) 581-5500<br />
<strong>TEAC</strong> UK LIMITED 5 Marlin House, Croxley Business Park, Watford, Hertfordshire, WD18 8TE, U.K. Phone: 01923-819699<br />
<strong>TEAC</strong> EUROPE <strong>GmbH</strong> Bahnstrasse 12, 65205 Wiesbaden-Erbenheim, Germany Phone: 0611-71580<br />
<strong>TEAC</strong> ITALIANA S.p.A. Via C. Cantù 11, 20092 Cinisello Balsamo, Milano, Italy Phone: 02-66010500<br />
<strong>TEAC</strong> AUSTRALIA PTY., LTD. 280 William Street, Melbourne VIC 3000, Australia Phone: (03) 9672-2400<br />
A.B.N. 80 005 408 462<br />
This appliance has a serial number located on the rear panel. Please record<br />
the model number and serial number and retain them for your records.<br />
Model number Serial number<br />
0205 . MA-0966A