Avr335 - Atmel
Avr335 - Atmel
Avr335 - Atmel

You also want an ePaper? Increase the reach of your titles
YUMPU automatically turns print PDFs into web optimized ePapers that Google loves.
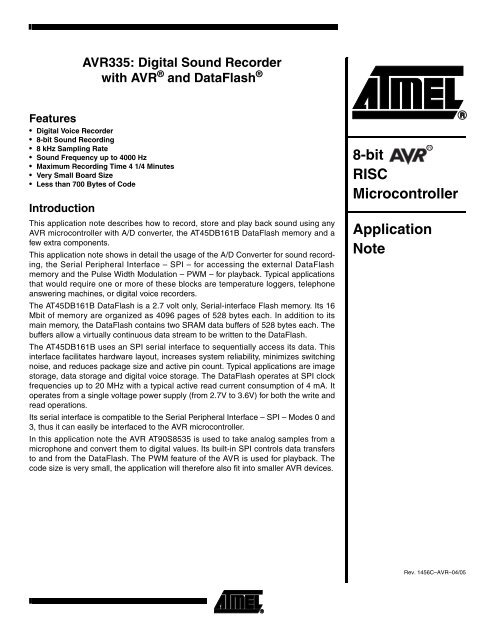
AVR335: Digital Sound Recorder<br />
with AVR ® and DataFlash ®<br />
Features<br />
• Digital Voice Recorder<br />
8-bit Sound Recording<br />
8 kHz Sampling Rate<br />
Sound Frequency up to 4000 Hz<br />
Maximum Recording Time 4 1/4 Minutes<br />
Very Small Board Size<br />
Less than 700 Bytes of Code<br />
Introduction<br />
This application note describes how to record, store and play back sound using any<br />
AVR microcontroller with A/D converter, the AT45DB161B DataFlash memory and a<br />
few extra components.<br />
This application note shows in detail the usage of the A/D Converter for sound recording,<br />
the Serial Peripheral Interface – SPI – for accessing the external DataFlash<br />
memory and the Pulse Width Modulation – PWM – for playback. Typical applications<br />
that would require one or more of these blocks are temperature loggers, telephone<br />
answering machines, or digital voice recorders.<br />
The AT45DB161B DataFlash is a 2.7 volt only, Serial-interface Flash memory. Its 16<br />
Mbit of memory are organized as 4096 pages of 528 bytes each. In addition to its<br />
main memory, the DataFlash contains two SRAM data buffers of 528 bytes each. The<br />
buffers allow a virtually continuous data stream to be written to the DataFlash.<br />
The AT45DB161B uses an SPI serial interface to sequentially access its data. This<br />
interface facilitates hardware layout, increases system reliability, minimizes switching<br />
noise, and reduces package size and active pin count. Typical applications are image<br />
storage, data storage and digital voice storage. The DataFlash operates at SPI clock<br />
frequencies up to 20 MHz with a typical active read current consumption of 4 mA. It<br />
operates from a single voltage power supply (from 2.7V to 3.6V) for both the write and<br />
read operations.<br />
Its serial interface is compatible to the Serial Peripheral Interface – SPI – Modes 0 and<br />
3, thus it can easily be interfaced to the AVR microcontroller.<br />
In this application note the AVR AT90S8535 is used to take analog samples from a<br />
microphone and convert them to digital values. Its built-in SPI controls data transfers<br />
to and from the DataFlash. The PWM feature of the AVR is used for playback. The<br />
code size is very small, the application will therefore also fit into smaller AVR devices.<br />
8-bit<br />
RISC<br />
Microcontroller<br />
Application<br />
Note<br />
Rev. 1456C–AVR–04/05<br />
1
Theory of Operation Before the analog speech signal can be stored in the DataFlash it has to be converted<br />
into a digital signal. This is done in multiple steps.<br />
2 AVR335<br />
Figure 1. Example Analog Signal<br />
X(t)<br />
0<br />
First, the analog signal (Figure 1) is converted into a time discrete signal by taking periodic<br />
samples (Figure 2). The time interval between two samples is called the “sampling<br />
period” and its reciprocal the “sampling frequency”. According to the sampling theorem,<br />
the sampling frequency has to be at least double the maximum signal frequency. Otherwise<br />
the periodic continuation of the signal in the frequency domain would result in<br />
spectral overlap, called “aliasing”. Such an aliased signal can not be uniquely recovered<br />
from its samples.<br />
A speech signal contains its major information below 3000 Hz. Therefore a low-pass filter<br />
can be used to band-limit the signal.<br />
For an ideal low-pass filter with a cut-off frequency of 3000 Hz the sampling frequency<br />
must be 6000 Hz. Depending on the filter, the filter slope is more or less steep. Especially<br />
for a first order filter like the RC-filter used in this application it is necessary to<br />
choose a much higher sampling frequency. The upper limit is set by the features of the<br />
A/D-converter.<br />
Determining the digital values that represent the analog samples taken at this sampling<br />
frequency is called “quantization”. The analog signal is quantized by assigning an analog<br />
value to the nearest “allowed” digital value (Figure 3). The number of digital values is<br />
called “resolution” and is always limited, for example to 256 values for an 8-bit digital<br />
signal or 10 values in this example. Therefore quantization of analog signals always<br />
results in a loss of information. This “quantization error” is inversly proportional to the<br />
resolution of the digital signal. It is also inversly proportional to the signal’s “dynamic<br />
range”, the range between minimum and maximum values (3 to 8 in this example). The<br />
A/D converter of the AT90S8535 microcontroller can be adjusted to the dynamic range<br />
of the signal by setting AGND and AREF to the minimum and maximum signal values.<br />
On the other hand, the microphone amplifier can be adjusted to cover the ADC’s<br />
dynamic range as presented later.<br />
Both methods reduce the quantization error. In addition, the latter method also<br />
increases the signal-to-noise ratio – SNR – and should therefore be preferred.<br />
Figure 4 shows the digital values that represent the analog signal. These are the values<br />
that are read as ADC conversion results.<br />
In this application, the signal has a minimum and a maximum value which are never<br />
exceeded. The parts of the signal below the minimum and above the maximum value do<br />
not contain any information. They can be removed in order to save memory.<br />
t<br />
1456C–AVR–04/05
1456C–AVR–04/05<br />
AVR335<br />
This is done by downshifting the whole signal and discarding the part above the “max”<br />
value (Figure 5).<br />
Figure 2. Time Discrete Signal<br />
Figure 3. Quantized Signal<br />
Figure 4. Digital Signal<br />
X(t)<br />
0 1 2 3 4 5 6 7 8 9<br />
X(t)<br />
9<br />
8<br />
7<br />
6<br />
5<br />
4<br />
3<br />
2<br />
1<br />
0 1 2 3 4 5 6 7 8 9<br />
X(t)<br />
9<br />
8<br />
7<br />
6<br />
5<br />
4<br />
3<br />
2<br />
1<br />
0 1 2 3 4 5 6 7 8 9<br />
Figure 5. Bit-reduced Digital Signal<br />
X(t)<br />
9<br />
8<br />
7<br />
6<br />
5<br />
4<br />
3<br />
2<br />
1<br />
0 1 2 3 4 5 6 7 8 9<br />
n<br />
n<br />
n<br />
n<br />
max<br />
3
4 AVR335<br />
In this application the resulting signal has 8 bits. This signal can now be stored in the<br />
DataFlash.<br />
The DataFlash does not require a separate erase cycle prior to programming. When<br />
using the "Buffer to Main Memory Page Program with Built-In Erase" or "Main Memory<br />
Page Program Through Buffer" commands, the DataFlash will automatically erase the<br />
specified page within the memory array before programming the actual data. If systems<br />
require faster programming throughputs (greater than 200K bps), then areas of the main<br />
memory array can be pre-erased to reduce overall programming times. An optional<br />
"Page Erase" command is provided to erase a single page of memory while the optional<br />
"Block Erase" command allows eight pages of memory to be erased at one time. When<br />
pre-erasing portions of the main memory array, the "Buffer to Main Memory Page Program<br />
without Built-In Erase" command should be utilized to achieve faster programming<br />
times.<br />
The first method is the most code efficient, as no extra erase cycles have to be implemented.<br />
However this application note uses the block erase to illustrate how large<br />
portions of the memory can be pre-erased if so desired. Erasing the entire memory can<br />
take up to a few seconds.<br />
After the memory has been erased, data can be recorded until all pages are filled up.<br />
For writing to the DataFlash, Buffer 1 is used. When this buffer is filled up (with 528 samples)<br />
the buffer is written to the main memory while the 529th conversion is done. Data<br />
is recorded until the “Record” button is released or the memory is full. If the entire memory<br />
is filled up, no new data can be stored before the DataFlash is erased. If the memory<br />
is only partly filled and the “Record” button is pressed a second time, the new data is<br />
appended directly to the existing data.<br />
Playback of sound is always started at the beginning of the DataFlash. It stops when<br />
either all recorded data is played back or when the “Playback” button is released.<br />
The DataFlash allows reading back data either directly from a main memory page or by<br />
copying a page to one of the two buffers and reading from the buffer. The direct access<br />
method is not suitable for this application as two addresses, one for page and one for<br />
byte position, and a long initialization sequence have to be transferred to the DataFlash<br />
for each single byte. This takes much longer than one PWM cycle, which is 510 clock<br />
cycles for an 8-bit PWM signal.<br />
Therefore, one memory page is copied to one of the two buffers. While data is read from<br />
this buffer the next memory page is copied into the other buffer. When all data has been<br />
read from the first buffer reading continues on the other buffer, while the first one is<br />
reloaded.<br />
Reading data from the DataFlash buffer is synchronized to the PWM frequency.<br />
Figure 6. Two Example PWM Cycles<br />
PWM Counter<br />
8<br />
7<br />
6<br />
5<br />
4<br />
3<br />
2<br />
1<br />
0<br />
1 2 3 4 5 6 7 8 7 6 5 4 3 2 1 0 1 2 3 4 5 6 7 8 7 6 5 4 3 2 1 0<br />
PWM Cycle Number<br />
1456C–AVR–04/05
1456C–AVR–04/05<br />
AVR335<br />
The digital value is played back by using pulse width modulation (PWM). In Figure 6,<br />
samples 2 and 3 of the example signal are shown. One cycle of the PWM signal consists<br />
of a counter counting up to the maximum value that can be represented by the<br />
given resolution (8 in this example), and counting down to zero again. The output is<br />
switched on when the PWM counter matches the value of the digital signal value and is<br />
switched off when it falls below this value again. Therefore the dark area represents the<br />
power of the signal at that sample. Figure 7 shows the PWM output signal for the example<br />
signal.<br />
The PWM frequency has to be at least twice the signal frequency. A PWM frequency at<br />
least four times higher is recommended, depending on the output filter.<br />
This can be achieved either by reducing signal frequency, increasing system clock frequency<br />
or reducing signal resolution.<br />
Figure 7. Filtered PWM Output Signal<br />
X(t)<br />
9<br />
8<br />
7<br />
6<br />
5<br />
4<br />
3<br />
2<br />
1<br />
In this application the cut-off frequency of the output filter is set to 4000 Hz, which is<br />
roughly one quarter of the PWM frequency (15,686 Hz).<br />
The system clock speed and the PWM resolution determines the PWM frequency.<br />
With an 8 MHz system clock, the frequency for a 10-bit PWM is 3922 Hz (8 MHz / 2 2 10<br />
= 3922 Hz), 7843 Hz for 9-bit resolution, and 15,686 Hz for 8-bit resolution.<br />
Only the last value is high enough to serve as carrier frequency for the 4000 Hz signal.<br />
Therefore, the original 10-bit digital sample is converted to 8 bits.<br />
The output filter smoothens the output signal and removes the high-frequency PWM<br />
carrier signal. The resulting output signal for the example signal now looks somehow<br />
like the drawing in Figure 8. Except for the quantization errors (which are very large in<br />
this example as only 8 digital values are used) and a missing amplification, the signal<br />
looks almost like the analog input signal (Figure 1).<br />
Figure 8. PWM Output Signal<br />
0 1 2 3 4 5 6 7 8 9<br />
X(t)<br />
9<br />
8<br />
7<br />
6<br />
5<br />
4<br />
3<br />
2<br />
1<br />
0 1 2 3 4 5 6 7 8 9<br />
max<br />
n<br />
n<br />
5
Microcontroller and<br />
Memory Circuit<br />
6 AVR335<br />
Figure 9. Microcontroller and Memory Circuit Diagram<br />
V cc<br />
from microphone circuit<br />
(Connector Pin 2)<br />
GND<br />
1K<br />
erase<br />
record<br />
playback<br />
V cc<br />
GND<br />
V cc<br />
PB3<br />
ADC0<br />
PD0<br />
PD1<br />
PD2<br />
AGND<br />
GND<br />
XTAL1<br />
AVR<br />
AT90S8535<br />
GND<br />
8MHz<br />
XTAL2<br />
PB0<br />
PB1<br />
PB2<br />
PB4<br />
MOSI<br />
MISO<br />
SCK<br />
OC1B<br />
AVcc AREF<br />
22pF 22pF<br />
to filter and amplifier circuit<br />
(Connector Pin 3)<br />
RESET V<br />
cc<br />
RDY/BSY<br />
WP<br />
CS<br />
SI<br />
SO<br />
SCK<br />
DataFlash<br />
AT45DB161B<br />
The user can control the sound system with three pushbuttons, called “Erase”, “Record”<br />
and “Playback”. If the pushbuttons are not pressed, the internal pull-up resistors provide<br />
VCC at PD0 - PD2. Pushing a button pulls the input line to GND.<br />
As feedback for the user, an LED indicates the status of the system.<br />
The DataFlash is directly connected to the AVR microcontroller using the SPI bus. In<br />
case the ISP feature is used to reprogram the AVR, the pull-up resistor on the Chip<br />
Select line (CS) prevents the DataFlash from going active. If the ISP feature is not used,<br />
this resistor can be omitted.<br />
The analog voltage, AVCC, is connected to VCC by an RC low-pass filter. The reference<br />
voltage is set to AVCC.<br />
The oscillator crystal with two 22 pF decoupling capacitors generates the system clock.<br />
ISP (MOSI)<br />
V cc<br />
ISP (MISO)<br />
100R<br />
100nF<br />
GND<br />
ISP (SCK)<br />
V cc<br />
10K<br />
GND<br />
V cc<br />
GND<br />
1456C–AVR–04/05
Microphone and<br />
Speaker Circuit<br />
Implementation<br />
1456C–AVR–04/05<br />
Figure 10. Microphone and Speaker Circuit Diagram<br />
5<br />
4<br />
3<br />
2<br />
1<br />
V cc<br />
Microphone<br />
GND<br />
R4<br />
1K<br />
C2<br />
1µF<br />
R8 R6<br />
470R 5K<br />
C1 R9<br />
1µF 1K<br />
GND<br />
6 -<br />
C7<br />
1nF<br />
5 +<br />
U1B<br />
7<br />
LM 324<br />
V cc<br />
AVR335<br />
The microphone amplifier is a simple inverting amplifier. The gain is set with R1 and R9<br />
(gain = R1 / R9). R4 is used to power the microphone and C1 blocks any DC component<br />
to the amplifier. R2 and R3 set the offset. R5 and C8 form a simple first order low-pass<br />
filter. In addition R5 protects the amplifier from any damage if the output is shortcircuited.<br />
The speaker circuit consists of a 5th-order, low-pass Chebychev filter and a unary-gain<br />
amplifier.<br />
The filter is made up by two stagger-tuned, 2nd-order Chebychev filters (R6, R7, R8,<br />
C2, C7 and R7, R10, R11, C9, C5) and a passive 1st-order filter (R11, C4). The cut-off<br />
frequencies of these three filters are slightly shifted against each other (“staggered”) to<br />
limit passband ripple of the whole filter circuit. The overall cut-off frequency is set to<br />
4000 Hz, which is roughly one-quarter of the PWM frequency (15,686 Hz).<br />
The unary-gain amplifier prevents the circuit from getting feedback from the output.<br />
C3 blocks any DC component to the speaker.<br />
Setup When the program is started the ports have to be set up. This is done in the “setup”<br />
subroutine.<br />
The SPI protocol defines one device as a master and the other devices connected to<br />
this master as slaves. In this application the AVR microcontroller functions as a master<br />
and the DataFlash as a slave. As the AT90S8535 is the only master in this application<br />
the SS pin can be used as an I/O pin.<br />
The SPI of the AT90S8535 is defined as an alternative function of Port B (PB5 to PB7).<br />
In this application the control signals for the DataFlash are also set up on Port B (PB0 to<br />
PB2 and PB4). The free pin (PB3) is used to control the status LED. For master setup,<br />
R3<br />
10K<br />
R2<br />
10K<br />
GND<br />
10K<br />
3<br />
+<br />
Vcc U1A<br />
4<br />
1<br />
2<br />
-<br />
11 LM 324<br />
C5<br />
R1<br />
GND<br />
100nF<br />
R7 R10<br />
1K8 15K<br />
-<br />
10 +<br />
C9<br />
2n2<br />
GND<br />
9<br />
U1C<br />
LM 324<br />
8<br />
R5<br />
12K<br />
R11<br />
12K<br />
GND<br />
13<br />
-<br />
12 +<br />
C4<br />
22nF<br />
C8<br />
4n7<br />
GND<br />
U1D<br />
14<br />
LM 324<br />
C3<br />
1µF<br />
V cc<br />
1<br />
2<br />
3<br />
4<br />
Connector<br />
GND<br />
GND<br />
Vcc C6<br />
100nF<br />
GND<br />
5<br />
4<br />
3<br />
2<br />
1<br />
Loudspeaker/<br />
Headphones<br />
7
8 AVR335<br />
the signals Serial Clock (SCK), Master Out/Slave In (MOSI), Chip Select (CS), Write<br />
Protect (WP) and Reset (RST) are outputs, whereas Master In/Slave Out (MISO) and<br />
Ready/Busy (RDY/BSY) are inputs. With PB3 for the LED also defined as an output the<br />
Data Direction Register for Port B is set up as 0xBD.<br />
Then the PortB is set to a defined status with all outputs high and internal pull-up resistors<br />
on the inputs.<br />
The A/D converter of the AT90S8535 is connected to PortA. Therefore PortA is defined<br />
as a high-impedance input.<br />
PortD serves as an input for the pushbuttons and as an output for the PWM signal. Here<br />
the PWM function of Timer1 on the output pin PD4 is used.<br />
In the end, interrupts are enabled. In this application two interrupts (“ADC” and “Timer1<br />
Overflow”) are used, which are enabled and disabled directly in the subroutine when<br />
they are required.<br />
The Main Loop In the main loop, the three pushbuttons are scanned. If one of them is pressed, the LED<br />
is turned on to show that the system is busy and the corresponding subroutine is called.<br />
An extra loop is performed, until the button is released, as a software debounce for the<br />
“Erase” and “Playback” functions.<br />
During the main loop, the LED is turned off to indicate that the system is running idle.<br />
Figure 11. The Main Loop<br />
Setup Ports<br />
NO<br />
NO<br />
NO<br />
Start<br />
Record<br />
Button<br />
Pressed<br />
?<br />
Erase<br />
Button<br />
Pressed<br />
?<br />
Play Back<br />
Button<br />
Pressed<br />
?<br />
LED Off<br />
YES<br />
YES<br />
YES<br />
Record<br />
Erase<br />
Play Back<br />
Erase<br />
Button<br />
Released<br />
?<br />
YES<br />
Play Back<br />
Button<br />
Released<br />
?<br />
YES<br />
NO<br />
NO<br />
1456C–AVR–04/05
Erase The DataFlash can be optionally pre-erased.<br />
1456C–AVR–04/05<br />
Figure 12. Erase<br />
Erase<br />
Set Block Counter to Zero<br />
Set New-data Flag<br />
Enable SPI<br />
All Blocks Erased ?<br />
NO<br />
Enable DataFlash<br />
Transmit<br />
"Block Erase" Opcode<br />
Transmit Block Address<br />
Transmit Don't Cares<br />
Disable DataFlash<br />
Increment Block Counter<br />
Block Erase Ready ?<br />
YES<br />
YES<br />
NO<br />
Disable SPI<br />
AVR335<br />
When the “Erase” subroutine is called, a flag is set which indicates that in the next<br />
recording cycle the new data can be stored at the beginning of the DataFlash.<br />
The SPI has to be set up for accessing the DataFlash. No interrupts are used here. The<br />
data order for the DataFlash is MSB first and the AT90S8535 is the master.<br />
The DataFlash accepts either the SCK signal being low when CS toggles from high to<br />
low (SPI Mode 0) or the SCK signal being high when CS toggles from high to low (SPI<br />
Mode 3) with a positive clock phase. In this application the SPI is set up in Mode 3. In<br />
Return<br />
9
10 AVR335<br />
order to get the fastest data transfer possible, the lowest clock division is chosen, running<br />
the SPI bus at 2 MHz if an oscillator crystal of 8 MHz is used.<br />
To perform a block erase, the CS line is driven low and the opcode 0x50 is loaded into<br />
the DataFlash followed by two reserved bits (zeros), the 9-bit block address, and 13<br />
don’t care bits. This sequence is transferred to the slave bytewise. After each byte, the<br />
SPI Status Register – SPSR – is checked until the SPI Interrupt Flag indicates that the<br />
serial transfer is complete. After the whole sequence is written, erasing of the block is<br />
started when the CS line is driven high. The Ready/Busy pin is driven low by the<br />
DataFlash until the block is erased. Then the next block will be erased in the same way<br />
as the current. This takes place until all 512 blocks are erased. An erased location reads<br />
0xFF.<br />
Record The record subroutine consists of the setup of the A/D converter and an empty loop<br />
which is performed as long as the “Record” button is pressed. The ADC0 pin is used in<br />
this application which requires the ADC Multiplexer Select Register (ADMUX) being set<br />
to zero. In the ADC Control and Status Register (ADCSR) the ADC is enabled with a<br />
clock division factor of 32, set to single conversion mode, interrupts enabled, and the<br />
interrupt flag is cleared. The A/D conversion is also immediately started. The first conversion<br />
takes longer than the following conversions (832 oscillator cycles instead of<br />
448). After this time, the ADC interrupt occurs indicating that the conversion is finished<br />
and the result can be read out of the ADC Data Register.<br />
The analog signal from the microphone circuit is sampled at 15,686 Hz. This is the same<br />
frequency as the output (PWM) frequency.<br />
To achieve a sampling frequency of 15,686 Hz, a sample has to be taken every<br />
510 cycles (15,686 Hz x 510 = 8 MHz). To get one A/D conversion result, each<br />
510 clock cycles the ADC is run in single conversion mode with an ADC clock division<br />
by 32. A single conversion takes 14 ADC cycles. Therefore a conversion will be ready<br />
after 14 x 32 = 448 cycles.<br />
When a conversion is finished an interrupt occurs. The interrupt routine then performs a<br />
loop to fill in the missing 510 - 448 = 62 cycles, before a new A/D conversion is started.<br />
The 10-bit conversion result represents the value at the A/D converter input pin 2 cycles<br />
after the conversion has started. These 10 bits cover the range from AGND to AREF,<br />
which is 0 to 5V in this application. The microphone circuit output signal, however, is limited<br />
to the range of 2.3V to 3.5V. Therefore the 10-bit conversion result is subtracted by<br />
a value representing the minimum input voltage. This is 0x1D5 for 2.3V. The part of the<br />
data representing signal values above 3.5V is removed by cutting off the two MSBs.<br />
This is done automatically when the conversion result is handed over to the “write to<br />
flash” subroutine, as its variable “flash_data” is defined as type “char” (8-bit). The final 8bit<br />
data has then to be written to the DataFlash before the next A/D conversion interrupt<br />
occurs.<br />
1456C–AVR–04/05
1456C–AVR–04/05<br />
Figure 13. Record<br />
Record<br />
Initialize SPI<br />
Initialize and Start ADC<br />
YES<br />
ADC Ready ?<br />
YES<br />
Record<br />
Button<br />
Pressed<br />
?<br />
Loop for 62 Cycles<br />
Start A/D Conversion<br />
Read Data From ADC<br />
Convert Data to 8 bit<br />
Write to Flash<br />
NO<br />
NO<br />
Return<br />
AVR335<br />
11
Write to DataFlash Figure 14. Write to DataFlash<br />
12 AVR335<br />
YES<br />
NO<br />
Write to Flash<br />
New-data Flag Set ?<br />
YES<br />
Set Page Counter and<br />
Buffer Counter to Zero<br />
Clear New-data Flag<br />
DataFlash Busy ?<br />
NO<br />
Enable DataFlash<br />
Transmit<br />
"Buffer Write" Opcode,<br />
Buffer Address and Data<br />
Disable DataFlash<br />
Buffer Full ?<br />
YES<br />
Set Buffer Counter to Zero<br />
Memory Full ?<br />
NO<br />
Enable DataFlash<br />
Transmit<br />
"Buffer to Page" Opcode,<br />
Page Address and<br />
Don't Cares<br />
Disable DataFlash<br />
Increment Page Counter<br />
Return<br />
NO<br />
YES<br />
LED Off<br />
Record<br />
Button<br />
Released<br />
?<br />
YES<br />
NO<br />
1456C–AVR–04/05
1456C–AVR–04/05<br />
AVR335<br />
Writing data to the DataFlash is done by writing first to a buffer and when this buffer is<br />
full writing it’s contents to one page of the main memory.<br />
In the subroutine “write_to_flash” the variable “j” represents the byte number in the<br />
buffer and the variable “k” the page number the buffer will be written to. If the new-data<br />
flag indicates that the DataFlash is empty, both counters are set to zero.<br />
If the memory already contains some data, the variables indicate the next free location<br />
in memory, which ensures that new data is directly appended to the memory contents.<br />
In order to preserve the contents of these variables across two function calls, they are<br />
declared as static variables.<br />
To write data to the buffer, the CS line is driven low and the opcode 0x84 is loaded into<br />
the DataFlash. This is followed by 14 don’t care bits and the 10-bit address for the position<br />
within the buffer. Then the 8-bit data is entered.<br />
This sequence is transferred to the slave bytewise. After each byte the SPI Status Register<br />
– SPSR – is checked until the SPI Interrupt Flag indicates that the serial transfer is<br />
complete. After the whole sequence is written the CS line is driven high.<br />
If the buffer is full and there are empty pages left, the buffer is copied to the next page of<br />
the DataFlash. As the memory has been erased earlier, data can be written without<br />
additional erasing.<br />
If the memory is filled, a loop is executed until the “Record” button is released. Any data<br />
recorded while the memory is full will be lost.<br />
Playback In the “Playback” subroutine, the contents of the DataFlash are read out and modulated<br />
as an 8-bit PWM running at 15,686 Hz. To achieve higher speed, data is not read out<br />
directly from the main memory but alternately transferred to one of the two buffers and<br />
then read from the buffer. In the meantime the next memory page is copied into the<br />
other buffer. For the PWM, the 16-bit Timer/Counter1 is used with the PWM output on<br />
OC1B. This is defined in the Timer/Counter Control Registers A and B<br />
(TCCRA/TCCRB). For running the PWM at the highest possible frequency, the PWM<br />
clock divider is set to 1.<br />
When the set-up is done, the first page is copied into Buffer 1 by driving the CS line low<br />
and transferring the appropriate commands to the DataFlash. The page-to-buffer transfer<br />
is started when the CS line is driven high again. When the Ready/Busy pin is driven<br />
high by the DataFlash, Buffer 1 contains valid data. Then the next page transfer to<br />
Buffer 2 is started. As both buffers are independent from each other, data can already<br />
be read from Buffer 1 while the DataFlash is still busy copying data from the second<br />
page to Buffer 2.<br />
For reading a byte from a buffer, a dummy value has to be written to the DataFlash. A<br />
write action of the master to an SPI slave causes their SPI Data Register – SPDR – to<br />
be interchanged. After writing a dummy byte to the DataFlash, the SPDR of the AVR<br />
microcontroller contains the output data from the DataFlash.<br />
13
14 AVR335<br />
Figure 15. Playback<br />
Playback<br />
Set Page Counter to Zero<br />
Initialize PWM<br />
Initialize SPI<br />
Next Page to Next Buffer<br />
Next Page<br />
to Next Buffer<br />
Ready<br />
?<br />
YES<br />
End of Memory<br />
Reached<br />
?<br />
NO<br />
Button<br />
for Playback<br />
Pressed<br />
?<br />
YES<br />
Increment Page Counter<br />
Next Page to Next Buffer<br />
Active Buffer to Speaker<br />
Toggle Active Buffer<br />
NO<br />
YES<br />
NO<br />
Stop PWM<br />
Stop SPI<br />
Return<br />
When the PWM counter contains the value “0”, a Timer1 overflow interrupt occurs. This<br />
interrupt is used to synchronize data output from the DataFlash to the PWM frequency.<br />
When a value from the buffer has been shifted to the AVR microcontroller, a loop is performed<br />
until the Timer1 overflow interrupt occurs. Then the data is written to the<br />
Timer/Counter1 Output Compare Register B (OCR1B), being automatically latched to<br />
the PWM output when the PWM counter contains its maximum value (255 for 8-bit<br />
PWM).<br />
After the last value of the buffer is read, the active buffer is toggled.<br />
1456C–AVR–04/05
1456C–AVR–04/05<br />
AVR335<br />
If the entire memory has been played back, all interrupts are disabled and the<br />
Timer/Counter1 is stopped.<br />
Figure 16. Next Page to Next Buffer<br />
Next Page to Next Buffer<br />
DataFlash<br />
Busy?<br />
NO<br />
Enable DataFlash<br />
Transmit<br />
"Page to Buffer" Opcode,<br />
Page Number and<br />
Don't Cares<br />
Disable DataFlash<br />
Return<br />
YES<br />
15
16 AVR335<br />
Figure 17. Active Buffer to Speaker<br />
Active Buffer to Speaker<br />
Set Buffer Counter to Zero<br />
Enable DataFlash<br />
Transmit<br />
"Buffer Read" Opcode,<br />
Start Buffer Address<br />
and Don't Cares<br />
Complete Buffer<br />
Read<br />
?<br />
NO<br />
Send Dummy Value<br />
to DataFlash<br />
DataFlash<br />
Busy<br />
?<br />
YES<br />
Copy Data From<br />
SPI Data Register to<br />
PWM Data Register<br />
Increment Buffer Counter<br />
YES<br />
NO<br />
Enable DataFlash<br />
Return<br />
1456C–AVR–04/05
Using the STK200<br />
Development Board<br />
1456C–AVR–04/05<br />
AVR335<br />
The application described in this note can be tested and modified using the STK200<br />
Development Board. In this case some points have to be noticed.<br />
Chip Socket This application uses the A/D converter. Therefore the microcontroller has to be placed<br />
in the socket labelled “A/D parts” and the microphone amplifier output connected to the<br />
header connectors labelled “Analog”.<br />
Jumpers According to the set-up in the “setup_all” subroutine all jumpers on pins used for other<br />
purposes than pushbuttons or the LED have to be removed. For the described application<br />
these are on Port B the jumpers 0 to 2 and 4 to 7 and on Port D jumper 4.<br />
SPI Resistors In order to avoid interference between the on-board SPI and devices connected to the<br />
pin headers labelled “Port B”, 10 kΩ resistors are inserted between the chip socket and<br />
the Port B headers PB 5 to PB 7. If the DataFlash is going to be connected to these pin<br />
headers, the resistors have to be bypassed by soldering a bridge across their connectors<br />
on the reverse side of the STK200.<br />
Using the On-board SPI Short circuiting the resistors between the chip socket and the Port B header connectors<br />
may cause some problems if using the on-board SPI for program download and verification,<br />
when a device is connected to the Port B header connectors. If problems occur it<br />
will help either to disconnect the device during program download and verification, or to<br />
solder a 10 kΩ resistor between PB4 and V CC according to Figure 9.<br />
Modification and<br />
Optimization<br />
The microphone output signal may vary depending on the type of microphone used. To<br />
achieve best results it is important to choose the microphone amplifier gain that delivers<br />
a maximum output signal closest to AREF.<br />
Data is written into the DataFlash almost as it is read from the A/D converter. Compressing<br />
this data might be possible and useful if a longer recording time or a stereo signal is<br />
required.<br />
In this application two ways of implementing a status flag are shown.<br />
One way is to use a global variable (i.e. the “wait” variable used in the “playback” subroutine).<br />
The other way is to use an unused bit in a register. In the “erase” subroutine,<br />
the ACIS1 bit of the Analog Comparator Control And Status Register (ACSR) is used to<br />
indicate that new data has to be stored next. As long as the analog comparator is not<br />
used this does not have any negative effects on the program performance, but frees one<br />
register from a blocking global variable.<br />
The sampling frequency of 15,686 Hz (respectively 510 clock cycles) is generated by an<br />
ADC interrupt and a delay loop. This can be replaced by an independent timer<br />
(Timer/Counter0 or Timer/Counter2), if they are not used on other purposes.<br />
References 1. Proakis, J.G. and Manolakis, D.G. (1992)<br />
Digital Signal Processing: Principles, Algorithms, and Applications<br />
Second Edition<br />
2. Datasheets:<br />
<strong>Atmel</strong> AVR AT90S8535<br />
<strong>Atmel</strong> AT45DB161B DataFlash<br />
17
Resources<br />
Bill of Materials<br />
18 AVR335<br />
Table 1. Peripheral Usage<br />
Peripheral Description Interrupts<br />
Timer 1 8-bit PWM Timer 1 Overflow (PWM Counter at Zero)<br />
3 I/O pins PORT B SPI to Access DataFlash<br />
4 I/O pins PORT B DataFlash Control Lines<br />
1 I/O pin PORT B Status LED<br />
1 I/O pin PORT A ADC Input A/D conversion ready<br />
3 I/O pins PORT D Pushbuttons<br />
1 I/O pin PORT D PWM Output<br />
Table 2. Microcontroller and Memory Circuit<br />
Component Value Description<br />
R1 10 kΩ Pull-up Resistor for DataFlash “Chip<br />
Select” Line<br />
R2 1 kΩ LED Resistor<br />
R3 100Ω Analog Voltage Filter Resistor<br />
LED Status Indicator<br />
C1, C2 22 pF Clock Signal Circuit Capacitors<br />
C3 100 nF Analog Voltage Filter Capacitor<br />
Oscillator Crystal 8 MHz Clock Signal Generation<br />
DataFlash AT45DB161B 16-Mbit Serial Interface Flash Memory<br />
AVR ATmega8535 Enhanced RISC Flash Microcontroller<br />
Table 3. Microphone and Speaker Circuit<br />
Component Value Description<br />
R1 10 kΩ Feedback Resistor for Microphone<br />
Amplifier<br />
R2 10 kΩ Offset for Microphone Amplifier<br />
R3 10 kΩ Offset for Microphone Amplifier<br />
R4 1 kΩ Microphone Power Resistor<br />
R5 12 kΩ Microphone RC Filter Resistor<br />
R6 5 kΩ Chebychev Filter Resistor<br />
R7 1 kΩ Chebychev Filter Resistor<br />
R8 470Ω Chebychev Filter Resistor<br />
R9 1 kΩ Input Resistor for Microphone Amplifier<br />
R10 15 kΩ Chebychev Filter Resistor<br />
1456C–AVR–04/05
1456C–AVR–04/05<br />
Table 3. Microphone and Speaker Circuit (Continued)<br />
Component Value Description<br />
R11 12 kΩ Earphones RC Filter Resistor<br />
C1 1 µF AC Coupling for Microphone<br />
C2 1 µF Chebychev Filter Capacitor<br />
C3 1 µF AC Coupling for Earphones<br />
C4 22 nF Earphones RC Filter Capacitor<br />
C5 100 nF Chebychev Filter Capacitor<br />
C6 100 nF De-coupling Capacitor<br />
C7 1 nF Chebychev Filter Capacitor<br />
C8 4.7 nF Earphones RC Filter Capacitor<br />
C9 2.2 nF Chebychev Filter Capacitor<br />
U1 LM324 Quad Op-amp<br />
2 standard jack<br />
sockets<br />
3.5 mm<br />
AVR335<br />
Microphone Standard PC Microphone with 3.5 mm<br />
Connector<br />
Earphones Standard with 3.5 mm Connector<br />
19
<strong>Atmel</strong> Corporation <strong>Atmel</strong> Operations<br />
2325 Orchard Parkway<br />
San Jose, CA 95131, USA<br />
Tel: 1(408) 441-0311<br />
Fax: 1(408) 487-2600<br />
Regional Headquarters<br />
Europe<br />
<strong>Atmel</strong> Sarl<br />
Route des Arsenaux 41<br />
Case Postale 80<br />
CH-1705 Fribourg<br />
Switzerland<br />
Tel: (41) 26-426-5555<br />
Fax: (41) 26-426-5500<br />
Asia<br />
Room 1219<br />
Chinachem Golden Plaza<br />
77 Mody Road Tsimshatsui<br />
East Kowloon<br />
Hong Kong<br />
Tel: (852) 2721-9778<br />
Fax: (852) 2722-1369<br />
Japan<br />
9F, Tonetsu Shinkawa Bldg.<br />
1-24-8 Shinkawa<br />
Chuo-ku, Tokyo 104-0033<br />
Japan<br />
Tel: (81) 3-3523-3551<br />
Fax: (81) 3-3523-7581<br />
Memory<br />
2325 Orchard Parkway<br />
San Jose, CA 95131, USA<br />
Tel: 1(408) 441-0311<br />
Fax: 1(408) 436-4314<br />
Microcontrollers<br />
2325 Orchard Parkway<br />
San Jose, CA 95131, USA<br />
Tel: 1(408) 441-0311<br />
Fax: 1(408) 436-4314<br />
La Chantrerie<br />
BP 70602<br />
44306 Nantes Cedex 3, France<br />
Tel: (33) 2-40-18-18-18<br />
Fax: (33) 2-40-18-19-60<br />
ASIC/ASSP/Smart Cards<br />
Zone Industrielle<br />
13106 Rousset Cedex, France<br />
Tel: (33) 4-42-53-60-00<br />
Fax: (33) 4-42-53-60-01<br />
1150 East Cheyenne Mtn. Blvd.<br />
Colorado Springs, CO 80906, USA<br />
Tel: 1(719) 576-3300<br />
Fax: 1(719) 540-1759<br />
Scottish Enterprise Technology Park<br />
Maxwell Building<br />
East Kilbride G75 0QR, Scotland<br />
Tel: (44) 1355-803-000<br />
Fax: (44) 1355-242-743<br />
RF/Automotive<br />
Theresienstrasse 2<br />
Postfach 3535<br />
74025 Heilbronn, Germany<br />
Tel: (49) 71-31-67-0<br />
Fax: (49) 71-31-67-2340<br />
1150 East Cheyenne Mtn. Blvd.<br />
Colorado Springs, CO 80906, USA<br />
Tel: 1(719) 576-3300<br />
Fax: 1(719) 540-1759<br />
Biometrics/Imaging/Hi-Rel MPU/<br />
High Speed Converters/RF Datacom<br />
Avenue de Rochepleine<br />
BP 123<br />
38521 Saint-Egreve Cedex, France<br />
Tel: (33) 4-76-58-30-00<br />
Fax: (33) 4-76-58-34-80<br />
Literature Requests<br />
www.atmel.com/literature<br />
Disclaimer: The information in this document is provided in connection with <strong>Atmel</strong> products. No license, express or implied, by estoppel or otherwise, to any<br />
intellectual property right is granted by this document or in connection with the sale of <strong>Atmel</strong> products. EXCEPT AS SET FORTH IN ATMEL’S TERMS AND CONDI-<br />
TIONS OF SALE LOCATED ON ATMEL’S WEB SITE, ATMEL ASSUMES NO LIABILITY WHATSOEVER AND DISCLAIMS ANY EXPRESS, IMPLIED OR STATUTORY<br />
WARRANTY RELATING TO ITS PRODUCTS INCLUDING, BUT NOT LIMITED TO, THE IMPLIED WARRANTY OF MERCHANTABILITY, FITNESS FOR A PARTICULAR<br />
PURPOSE, OR NON-INFRINGEMENT. IN NO EVENT SHALL ATMEL BE LIABLE FOR ANY DIRECT, INDIRECT, CONSEQUENTIAL, PUNITIVE, SPECIAL OR INCIDEN-<br />
TAL DAMAGES (INCLUDING, WITHOUT LIMITATION, DAMAGES FOR LOSS OF PROFITS, BUSINESS INTERRUPTION, OR LOSS OF INFORMATION) ARISING OUT<br />
OF THE USE OR INABILITY TO USE THIS DOCUMENT, EVEN IF ATMEL HAS BEEN ADVISED OF THE POSSIBILITY OF SUCH DAMAGES. <strong>Atmel</strong> makes no<br />
representations or warranties with respect to the accuracy or completeness of the contents of this document and reserves the right to make changes to specifications<br />
and product descriptions at any time without notice. <strong>Atmel</strong> does not make any commitment to update the information contained herein. <strong>Atmel</strong>’s products are not<br />
intended, authorized, or warranted for use as components in applications intended to support or sustain life.<br />
© <strong>Atmel</strong> Corporation 2005. All rights reserved. <strong>Atmel</strong> ® , logo and combinations thereof, AVR ® , and AVR Studio ® are registered trademarks,<br />
and Everywhere You Are SM are the trademarks of <strong>Atmel</strong> Corporation or its subsidiaries. Other terms and product names may be trademarks of<br />
others.<br />
Printed on recycled paper.<br />
1456C–AVR–04/05