Xerox Document Centre 440/432/420 User Guide
Xerox Document Centre 440/432/420 User Guide Xerox Document Centre 440/432/420 User Guide
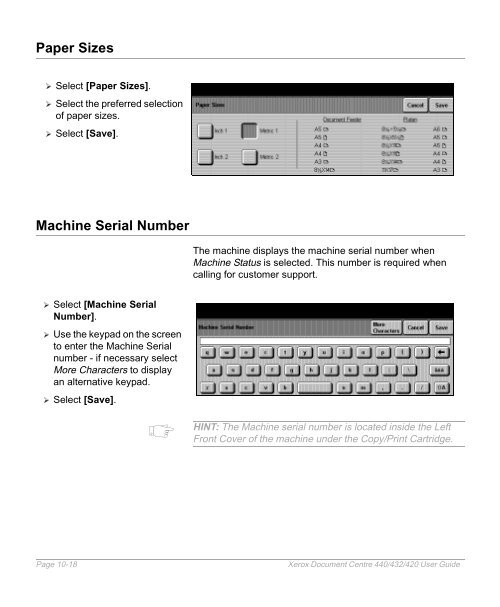
Paper Sizes � Select [Paper Sizes]. � Select the preferred selection of paper sizes. � Select [Save]. Machine Serial Number � Select [Machine Serial Number]. � Use the keypad on the screen to enter the Machine Serial number - if necessary select More Characters to display an alternative keypad. � Select [Save]. The machine displays the machine serial number when Machine Status is selected. This number is required when calling for customer support. HINT: The Machine serial number is located inside the Left Front Cover of the machine under the Copy/Print Cartridge. Page 10-18 Xerox Document Centre 440/432/420 User Guide
Xerox Supplies Number / Supplies Tel. Number � Select [Xerox Supplies Number] or [Supplies Tel. Number]. � Use the numeric keypad on the screen to enter the Xerox Supplies telephone number. � Select [Save] and [Close]. � Select another Setup or select [Exit] to exit the setup screens. The machine displays the Xerox supplies telephone number when Machine Status is selected. Xerox Document Centre 440/432/420 User Guide Page 10-19 Setups
- Page 217 and 218: Scanning with Internet Services Pub
- Page 219 and 220: Template Services Services provide
- Page 221 and 222: Services Parameters Description Pri
- Page 223 and 224: Services Parameters Description Red
- Page 225 and 226: Template Operations Once a System A
- Page 227 and 228: selected and the hard copy document
- Page 229 and 230: Scan to Fax Scan with Local Copy To
- Page 231 and 232: 9 Paper and other media The DC440/4
- Page 233 and 234: � Pull out the paper tray towards
- Page 235 and 236: � Referring to the tray labels, l
- Page 237 and 238: � Following the copier labels, lo
- Page 239 and 240: � Pull open tray 1 and, holding t
- Page 241 and 242: � Use the handle on the front to
- Page 243 and 244: Storing and Handling Paper Always u
- Page 245 and 246: 8 1/2” x 11” Letter Paper 8 1/2
- Page 247 and 248: Media Use Specifications Preprinted
- Page 249 and 250: Media Use Specifications Card stock
- Page 251 and 252: 10 Setups The DC440/432/420 is desi
- Page 253 and 254: Fax Setups enable the Fax specific
- Page 255 and 256: � Select the button for the setup
- Page 257 and 258: Access the Machine Setups � Selec
- Page 259 and 260: Date/Time Setup � Select [Date/Ti
- Page 261 and 262: Walkup Screen To change the default
- Page 263 and 264: Power Save/Sleep Mode (Auto Off/Sle
- Page 265 and 266: � Select [Localization. � Selec
- Page 267: Touch Screen Contrast � Select [T
- Page 271 and 272: Unavailable Features Some types of
- Page 273 and 274: Disabled Component Service/ Feature
- Page 275 and 276: Disabled Component Foreign Interfac
- Page 277 and 278: Disabled Component Service/ Feature
- Page 279 and 280: Copy Setups Quick Pathway �Select
- Page 281 and 282: . � Select [Normal]. � Use the
- Page 283 and 284: Output � Select [Output]. � Use
- Page 285 and 286: Expert Image Quality � Select [Ex
- Page 287 and 288: � Select [Edge Erase]. � Use th
- Page 289 and 290: � Select [Fax Setups]. Fax Termin
- Page 291 and 292: � Select [Local ID]. If more than
- Page 293 and 294: � Select the second [Company Logo
- Page 295 and 296: � Select [Duplex Printing]. � M
- Page 297 and 298: � Select [A3 x 11” x 17”].
- Page 299 and 300: � Select [Transmission Report].
- Page 301 and 302: � Select [Lighter/Darker]. � Us
- Page 303 and 304: Fax Mailboxes G3 like Super G3, thi
- Page 305 and 306: � Select [Delete Mailbox]. � Se
- Page 307 and 308: � Select [Files for Polling]. �
- Page 309 and 310: Outgoing Fax Options. � Select [O
- Page 311 and 312: � Select [Redial Count]. � Sele
- Page 313 and 314: Incoming Fax Options � Select any
- Page 315 and 316: � Select [Receive Header Print].
- Page 317 and 318: Auditron Setups Quick Pathway �Se
Paper Sizes<br />
� Select [Paper Sizes].<br />
� Select the preferred selection<br />
of paper sizes.<br />
� Select [Save].<br />
Machine Serial Number<br />
� Select [Machine Serial<br />
Number].<br />
� Use the keypad on the screen<br />
to enter the Machine Serial<br />
number - if necessary select<br />
More Characters to display<br />
an alternative keypad.<br />
� Select [Save].<br />
The machine displays the machine serial number when<br />
Machine Status is selected. This number is required when<br />
calling for customer support.<br />
HINT: The Machine serial number is located inside the Left<br />
Front Cover of the machine under the Copy/Print Cartridge.<br />
Page 10-18 <strong>Xerox</strong> <strong>Document</strong> <strong>Centre</strong> <strong>440</strong>/<strong>432</strong>/<strong>420</strong> <strong>User</strong> <strong>Guide</strong>


