Xerox Document Centre 440/432/420 User Guide
Xerox Document Centre 440/432/420 User Guide Xerox Document Centre 440/432/420 User Guide
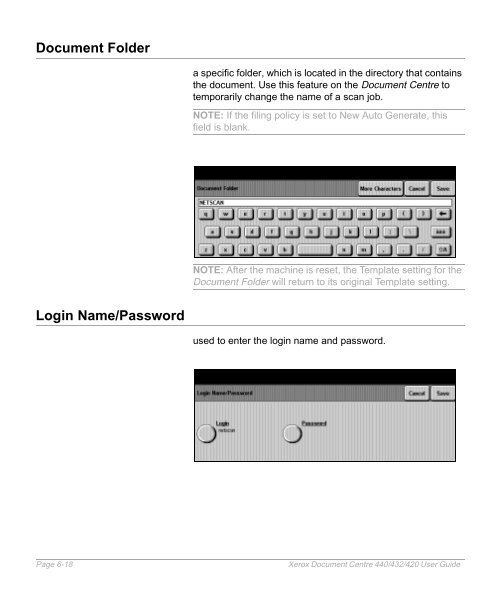
Document Folder Login Name/Password a specific folder, which is located in the directory that contains the document. Use this feature on the Document Centre to temporarily change the name of a scan job. NOTE: If the filing policy is set to New Auto Generate, this field is blank. NOTE: After the machine is reset, the Template setting for the Document Folder will return to its original Template setting. used to enter the login name and password. Page 6-18 Xerox Document Centre 440/432/420 User Guide
Filing Policy use to temporarily change the filing policy of the files being created. NOTE: After the machine is reset, the Filing Policy setting will return to its original template setting. There are four options available: Filing Policy Description New Auto Generate automatically names documents being scanned. New Exact names documents being scanned using a value defined by the user. If a file or folder with the same name already exists it will not be overwritten by the device and the scan job is aborted. Overwrite replaces existing files that have the same name as the job being scanned. Append adds to an existing Single Page TIFF file that has the same name as the job being scanned. The Document Centre creates a separate TIFF 6.0, Multipage Tiff or PDF formatted file for each page it scans. Xerox Document Centre 440/432/420 User Guide Page 6-19 Scan to File
- Page 133 and 134: Transmission Report � Load the do
- Page 135 and 136: Delayed Start The following options
- Page 137 and 138: Advanced Features (Fax) Quick Pathw
- Page 139 and 140: Poll Remote Fax NOTE: Build Job can
- Page 141 and 142: � Load the document. � Enter th
- Page 143 and 144: Fax Mailbox � Select [Added Featu
- Page 145 and 146: � Select [Added Features]. � Se
- Page 147 and 148: Reports & Setups (Fax) Quick Pathwa
- Page 149 and 150: Answer Mode � Select [Answer Mode
- Page 151 and 152: � Use the soft keypad to enter th
- Page 153 and 154: Maximum Store Width determines the
- Page 155 and 156: � Select [Dial Directory]. � Us
- Page 157 and 158: LAN Fax (Local Area Network Fax) LA
- Page 159 and 160: and is displayed on either the top
- Page 161 and 162: Type the job category, such as rece
- Page 163 and 164: 5 Media Print Media Print allows a
- Page 165 and 166: � Select [Media Print]. � Selec
- Page 167 and 168: 6 Scan to File The Scan option will
- Page 169 and 170: Scan to EMail (DC440/432) Quick Pat
- Page 171 and 172: Scan to File Quick Pathway �Selec
- Page 173 and 174: � Load the documents in the Docum
- Page 175 and 176: Added Features (Scan Setups) Quick
- Page 177 and 178: Basic Image Quality Adjusts the set
- Page 179 and 180: Reduce/Enlarge Adjusts the magnific
- Page 181 and 182: Erase Used to erase unwanted marks
- Page 183: Server IP Address /Server Name Docu
- Page 187 and 188: the NEXTFRD.DAT file. The next scan
- Page 189 and 190: Scan to Fax (DC440/432)/Fax Setups(
- Page 191 and 192: Managing Scan Jobs Scan to File Que
- Page 193 and 194: Use the scroll buttons to move thro
- Page 195 and 196: 7 Print When the Document Centre 44
- Page 197 and 198: placed at the end of the list of pe
- Page 199 and 200: Tower Mailbox If the Tower Mailbox
- Page 201 and 202: Type the type of job. For example,
- Page 203 and 204: Item the number in sequence for the
- Page 205 and 206: 8 Internet Services Internet Servic
- Page 207 and 208: Function Action Services Tab Radio
- Page 209 and 210: Stored Templates Stored Templates a
- Page 211 and 212: Status Tab The Status tab allows us
- Page 213 and 214: Feature Name Action Connectivity: T
- Page 215 and 216: Maintenance Tab Maintenance provide
- Page 217 and 218: Scanning with Internet Services Pub
- Page 219 and 220: Template Services Services provide
- Page 221 and 222: Services Parameters Description Pri
- Page 223 and 224: Services Parameters Description Red
- Page 225 and 226: Template Operations Once a System A
- Page 227 and 228: selected and the hard copy document
- Page 229 and 230: Scan to Fax Scan with Local Copy To
- Page 231 and 232: 9 Paper and other media The DC440/4
- Page 233 and 234: � Pull out the paper tray towards
<strong>Document</strong> Folder<br />
Login Name/Password<br />
a specific folder, which is located in the directory that contains<br />
the document. Use this feature on the <strong>Document</strong> <strong>Centre</strong> to<br />
temporarily change the name of a scan job.<br />
NOTE: If the filing policy is set to New Auto Generate, this<br />
field is blank.<br />
NOTE: After the machine is reset, the Template setting for the<br />
<strong>Document</strong> Folder will return to its original Template setting.<br />
used to enter the login name and password.<br />
Page 6-18 <strong>Xerox</strong> <strong>Document</strong> <strong>Centre</strong> <strong>440</strong>/<strong>432</strong>/<strong>420</strong> <strong>User</strong> <strong>Guide</strong>


