service manual sacd/dvd receiver - Diagramas Gratis - Diagramas ...
service manual sacd/dvd receiver - Diagramas Gratis - Diagramas ...
service manual sacd/dvd receiver - Diagramas Gratis - Diagramas ...

You also want an ePaper? Increase the reach of your titles
YUMPU automatically turns print PDFs into web optimized ePapers that Google loves.
HCD-S550/S880<br />
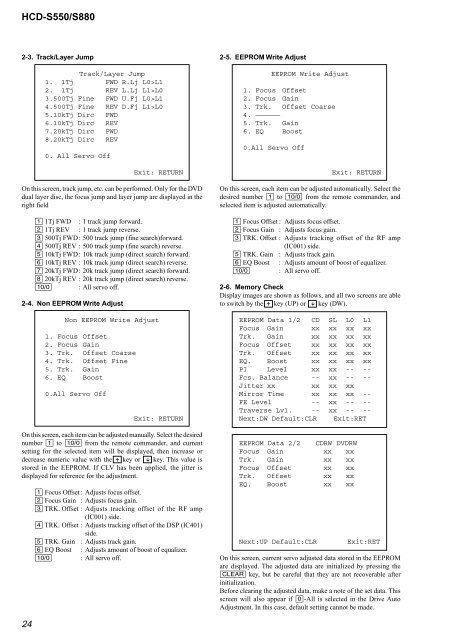
2-3. Track/Layer Jump<br />
24<br />
Track/Layer Jump<br />
1. 1Tj FWD R.Lj L0>L1<br />
2. 1Tj REV L.Lj L1>L0<br />
3.500Tj Fine FWD U.Fj L0>L1<br />
4.500Tj Fine REV D.Fj L1>L0<br />
5.10kTj Dirc FWD<br />
6.10kTj Dirc REV<br />
7.20kTj Dirc FWD<br />
8.20kTj Dirc REV<br />
0. All Servo Off<br />
Exit: RETURN<br />
On this screen, track jump, etc. can be performed. Only for the DVD<br />
dual layer disc, the focus jump and layer jump are displayed in the<br />
right field<br />
[1] 1Tj FWD : 1 track jump forward.<br />
[2] 1Tj REV : 1 track jump reverse.<br />
[3] 500Tj FWD: 500 track jump (fine search)forward.<br />
[4] 500Tj REV : 500 track jump (fine search) reverse.<br />
[5] 10kTj FWD: 10k track jump (direct search) forward.<br />
[6] 10kTj REV : 10k track jump (direct search) reverse.<br />
[7] 20kTj FWD: 20k track jump (direct search) forward.<br />
[8] 20kTj REV : 20k track jump (direct search) reverse.<br />
[10/0] : All servo off.<br />
2-4. Non EEPROM Write Adjust<br />
Non EEPROM Write Adjust<br />
1. Focus Offset<br />
2. Focus Gain<br />
3. Trk. Offset Coarse<br />
4. Trk. Offset Fine<br />
5. Trk. Gain<br />
6. EQ Boost<br />
0.All Servo Off<br />
Exit: RETURN<br />
On this screen, each item can be adjusted <strong>manual</strong>ly. Select the desired<br />
number [1] to [10/0] from the remote commander, and current<br />
setting for the selected item will be displayed, then increase or<br />
decrease numeric value with the O key or o key. This value is<br />
stored in the EEPROM. If CLV has been applied, the jitter is<br />
displayed for reference for the adjustment.<br />
[1] Focus Offset : Adjusts focus offset.<br />
[2] Focus Gain : Adjusts focus gain.<br />
[3] TRK. Offset : Adjusts tracking offset of the RF amp<br />
(IC001) side.<br />
[4] TRK. Offset : Adjusts tracking offset of the DSP (IC401)<br />
side.<br />
[5] TRK. Gain : Adjusts track gain.<br />
[6] EQ Boost : Adjusts amount of boost of equalizer.<br />
[10/0] : All servo off.<br />
2-5. EEPROM Write Adjust<br />
EEPROM Write Adjust<br />
1. Focus Offset<br />
2. Focus Gain<br />
3. Trk. Offset Coarse<br />
4. ——————<br />
5. Trk. Gain<br />
6. EQ Boost<br />
0.All Servo Off<br />
Exit: RETURN<br />
On this screen, each item can be adjusted automatically. Select the<br />
desired number [1] to [10/0] from the remote commander, and<br />
selected item is adjusted automatically.<br />
[1] Focus Offset : Adjusts focus offset.<br />
[2] Focus Gain : Adjusts focus gain.<br />
[3] TRK. Offset : Adjusts tracking offset of the RF amp<br />
(IC001) side.<br />
[5] TRK. Gain : Adjusts track gain.<br />
[6] EQ Boost : Adjusts amount of boost of equalizer.<br />
[10/0] : All servo off.<br />
2-6. Memory Check<br />
Display images are shown as follows, and all two screens are able<br />
to switch by the O key (UP) or o key (DW).<br />
EEPROM Data 1/2 CD SL L0 L1<br />
Focus Gain xx xx xx xx<br />
Trk. Gain xx xx xx xx<br />
Focus Offset xx xx xx xx<br />
Trk. Offset xx xx xx xx<br />
EQ. Boost xx xx xx xx<br />
PI Level xx xx -- --<br />
Fcs. Balance -- xx -- --<br />
Jitter xx xx xx xx<br />
Mirror Time xx xx xx --<br />
FE Level -- xx -- --<br />
Traverse Lv1. -- xx -- --<br />
Next:DW Default:CLR Exit:RET<br />
EEPROM Data 2/2 CDRW DVDRW<br />
Focus Gain xx xx<br />
Trk. Gain xx xx<br />
Focus Offset xx xx<br />
Trk. Offset xx xx<br />
EQ. Boost xx xx<br />
Next:UP Default:CLR Exit:RET<br />
On this screen, current servo adjusted data stored in the EEPROM<br />
are displayed. The adjusted data are initialized by pressing the<br />
[CLEAR] key, but be careful that they are not recoverable after<br />
initialization.<br />
Before clearing the adjusted data, make a note of the set data. This<br />
screen will also appear if [0]-All is selected in the Drive Auto<br />
Adjustment. In this case, default setting cannot be made.