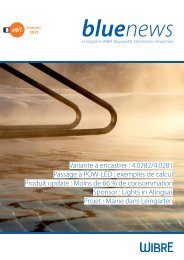
InstallatIon · Manual 4.0271 · 4.0272 - Wibre Elektrogeräte Edmund ...
InstallatIon · Manual 4.0271 · 4.0272 - Wibre Elektrogeräte Edmund ...
InstallatIon · Manual 4.0271 · 4.0272 - Wibre Elektrogeräte Edmund ...

You also want an ePaper? Increase the reach of your titles
YUMPU automatically turns print PDFs into web optimized ePapers that Google loves.
<strong>InstallatIon</strong> <strong>·</strong> <strong>Manual</strong><br />
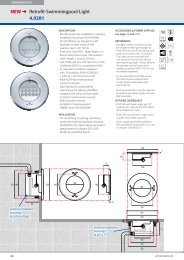
<strong>4.0271</strong> <strong>·</strong> <strong>4.0272</strong> <strong>·</strong> 4.0273 <strong>·</strong> 4.0274 <strong>·</strong> 4.0275<br />
Swimmingpool-Lights and built-in pot<br />
1. application<br />
Wall mounted swimming pool spotlights for lighting public<br />
and private swimming pools. Suitable to be installed into:<br />
<strong>·</strong> concrete pools with tiles<br />
<strong>·</strong> metal and plastic lined pools<br />
<strong>·</strong> concrete built pools lined with foil<br />
<strong>·</strong> concrete built pools lined with gummed foil<br />
<strong>·</strong> Special constructions on request<br />
2. operating and safety instructions<br />
These lights are only to be used under water. They are especially suitable for use in sea water and saline<br />
pools. The water should have a ph-value of between 7 and 8 and be free from metal corroding oxidants. The<br />
lights are only to be connected up to WIBRE transformers.<br />
<strong>·</strong> Don’t cover the glass panes with unsuitable items. This leads to overheating of the glass surface, thereby<br />
damaging the seal.<br />
<strong>·</strong> Touching the glass for a long time can cause burns.<br />
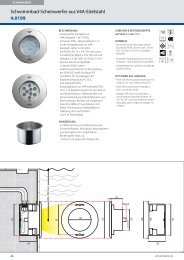
3. Construction<br />
The lamp consists of:<br />
<strong>·</strong> stainless steel marine grade, material no. 316L, 1.4539<br />
<strong>·</strong> safety glass (ESG)<br />
<strong>·</strong> silicone seal (temperature resistant)<br />
<strong>·</strong> reflector made of anodized pure aluminium<br />
WIBRE <strong>Elektrogeräte</strong> <strong>Edmund</strong> Breuninger GmbH & Co. KG <strong>·</strong> Liebigstrasse 9 <strong>·</strong> 74211 Leingarten/Germany<br />
Telefon: +49 (0) 7131 9053-0 <strong>·</strong> Telefax: +49 (0) 7131 9053-19 <strong>·</strong> E-Mail: info@wibre.de<br />
98<br />
226<br />
169<br />
226<br />
<strong>·</strong> WIBRE special light bulbs<br />
QT12 100 W/12 V (Art. 7.0325.00.00), QT16 175 W/12 V (Art. 7.2217.00.00)<br />
QT16 200 W/30 V (Art. 7.0217.00.00), QT16 400 W/30 V (Art. 7.0417.00.00)<br />
POW-LED with 18 x 2 Watt, 700 mA, white or RGB-color change 24 x 1 W, 350 mA<br />
<strong>·</strong> cable gland PG16, stainless steel material no. 1.4571, 1.4539<br />
<strong>·</strong> 3 m special water resistant connected cable 2 x 2,5 qmm, 2 x 4 qmm, 8 x 0,5 qmm<br />
<strong>·</strong> Protection IP68 up to 3 m<br />
<strong>·</strong> Protection class III<br />
<strong>·</strong> Weight without connection lead is 3 kg<br />
4. light technology<br />
The optimum built-in depth as measured from the water surface to the middle of the spotlight is 50-60 cm!<br />
The rolled up length of flex must be long enough in order for the spotlight to be unscrewed under water<br />
and then placed on the edge of the pool when a light bulb needs to be replaced.<br />
Standards for efficient underwater lighting WIBRE recommends DIN67526 for public areas, e.g. sport stadium<br />
illumination with a lighting current of 1000lm/sq.m of water surface. For private swimming pools<br />
WIBRE recommends 500lm/sq.m. Lamp lighting currents of the light bulbs available:<br />
QT12, 100 W/12 V, 2200 lm<br />
QT16, 175 W/12 V, 5100 lm<br />
QT16, 200 W/30 V, 5800 lm<br />
QT16, 400 W/30 V, 11600 lm<br />
POW-LED 18 x 3 W, 700 mA, white, 24 V-DC<br />
POW-LED 24 x 1 W, 350 mA, RGB, 24 V-DC<br />
POW-LED 27 x 3 W, 700 mA, white, 12 V-DC<br />
POW-LED 27 x 3 W, 700 mA, RGB, 12 V-DC<br />
The beam angle is horizontal, symmetrical, with 80°and vertical, asymmetrical, with 45°. These values<br />
appertain to the medium air.<br />
258<br />
3m V4A<br />
Gr. 316L<br />
<strong>4.0271</strong> <strong>4.0272</strong> 4.0275 4.0274<br />
183<br />
95<br />
Edelstahl<br />
WK-Nr.<br />
1.4539<br />
49<br />
13<br />
180<br />
1/4
<strong>InstallatIon</strong> <strong>·</strong> <strong>Manual</strong><br />
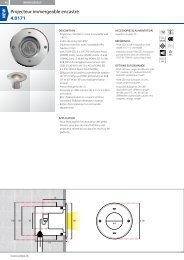
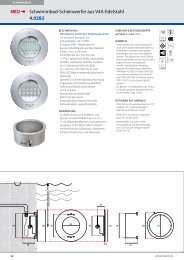
1. Spotlight <strong>4.0271</strong>/<strong>4.0272</strong>/<br />
4.0273/4.0275<br />
2. Built-in pot 4.0274<br />
3. 2 x screws M6x80 V4A<br />
4. Plastic fastening ring (9.0271.00.15)<br />
5. 2 x screws M6x20 V4A<br />
Flat seal pool wall<br />
5. Installation of the built-in pot (4.0274)<br />
as well as mounting the fasteners<br />
The safety precautions should be adhered to during installation.<br />
5.1 Installation in concrete lined pool (set in the concrete)<br />
Do not damage the protective foil on the built-in pot. Remove this foil after installation of the interior parts<br />
has been completed! Avoid any contact with the reinforcing construction steel in the concrete.<br />
Measure the recommended depth for built-in pot (circle 204 mm). Then attach it to the formwork with<br />
the M6x60 screws so that the lead thread joint is set at an angle of 45° to the side. The inset nuts are to be<br />
aligned horizontally and vertically. (see 5.1) Now attach the cable protective hose to the built-in pot and<br />
lay out the hose. If possible lay the hose out above the surface of the water in a broad radius so that the<br />
power supply lead can be easily shoved in it. After removing the formwork, place back the tile right up to<br />
the inside rim of the built-in pot. Now remove the protective foil from the built-in pot. The plastic fastening<br />
ring (4) then fix to the fastening bracket (8) with the V4A M6x80 (3) screws. It is horizontally aligned<br />
and tightened up until it lies firmly on the wall tile. It maybe necessary at a later stage to tighten up the<br />
nut on the fastening bracket.<br />
Don‘t tighten the plastic fastening ring to strong (use existing socket key).<br />
5.2 Installation in a concrete pool lined with foil<br />
In this case the installation of the built-in pot is the same as into a concrete pool. Remove the foil off the<br />
built-in pot before fixing the pool liner foil!<br />
After the pool liner foil has been fixed, cut out the required size of opening for the spotlight<br />
(Ø 182 mm) as well as the holes for the (Ø 7 mm) V4A M6x30 screws. The stainless steel pressure flange<br />
4.0274.00.25 can be used as a template here. The M6x30 screws are now fitted with the plastic shaped<br />
washers, then screwed through the holes in the stainless steel pressure flange, through the flat seal, pool<br />
liner foil and flat seal. Make sure you screw them in this order! Finally they are firmly tightened up in the<br />
insert nuts in the built-in pot.<br />
Attention: Fit the flat seals and plastic shaped washers as shown in the illustration.<br />
The pool liner foil must lie between the flat seals of the stainless steel pressure flange 4.0274.00.25. The<br />
plastic fastening ring and the fastening bracket are not required for installation in the foil lined pool. The<br />
spotlights are fitted directly with two screws M6 x 20, V4A (5) to the stainless steel pressure flange.<br />
5.3 Installation in thin walled metal and plastic lined pools<br />
Remove the protective foil off the built-in pot! Measure the size for the required opening<br />
(Ø 182 mm) for the spotlight and the respective holes (Ø 7 mm) for the V4A M6x30 screws with the help<br />
of the stainless steel pressure flange 4.0274.00.25. Make sure you get the correct vertical position for the<br />
2/4<br />
2<br />
Flat seal<br />
8<br />
stainless steel<br />
pressure flange<br />
V4A-screw<br />
M6x30<br />
plastiv shaped<br />
washer<br />
Spotlight<br />
9<br />
6. 2 x plastic plain washers<br />
7. Screwed cable gland with<br />
a PG16 cap nut16 (9.0271.00.16)<br />
8. Mounting bracket (9.0274.00.10)<br />
9. Special underwater cable<br />
4<br />
3<br />
V4A-wall<br />
7<br />
1<br />
5<br />
6<br />
Spotlight<br />
welded<br />
IP68<br />
5.0<br />
concrete wall<br />
adhesive flange<br />
Flat seal<br />
Mortar filling<br />
5.3 5.4 5.5<br />
tile<br />
Flat seal<br />
Spotlight<br />
V4A-screw<br />
M6x30<br />
plastiv shaped<br />
washer<br />
5.1 Spotlight 5.2<br />
adhesive foil<br />
Spotlight<br />
mortar<br />
Tile + mortar optimum 14 mm!<br />
pool liner foil<br />
Flat seal<br />
stainless steel<br />
pressure flange<br />
threaded joint clip. Then cut out the hole in the pool wall. The M6x30 screws are now fitted with the plastic<br />
shaped washers, then screwed through the holes in the stainless steel pressure flange, through the flat<br />
seal, pool wall and flat seal. Make sure you screw them in this order! Finally they are firmly tightened up in<br />
the insert nuts in the built-in pot.<br />
Attention: Fit the flat seals and plastic shaped washers as shown in the illustration. The pool liner foil must<br />
lie between the flat seals of the stainless steel pressure flange 4.0274.00.25.<br />
The plastic fastening ring and the fastening bracket are not required for installation in thin walled metal<br />
and plastic pools. The spotlights are fitted directly with two screws M6 x 20, V4A (5) to the stainless steel<br />
pressure flange.<br />
5.4 Installation in stainless steel pools<br />
Remove the protective foil off the built-in pot! Measure the size for the required opening<br />
(Ø 182 mm) for the built-in pot. Make sure you get the correct vertical position for the threaded joint clip.<br />
Then cut out the hole in the pool wall. Fix the built-in pot to the stainless steel pool wall from backside and<br />
weld the built-in pot to the wall in IP68.<br />
The plastic fastening ring (4) then fix to the fastening bracket (8) with the V4A M6x80 (3) screws. It is<br />
horizontally aligned and tightened up until it lies firmly on the wall tile. It maybe necessary at a later stage<br />
to tighten up the nut on the fastening bracket.<br />
5.5 Installation in a concrete pool with gummed foil<br />
In this case the installation of the built-in pot is the same as into a concrete pool. Remove the protective<br />
foil off the built-in pot and tightly screw the stainless steel flange 4.0274.55.55 to the built-in pot with<br />
the respective flat seal and the V4A screws. Avoid any hollow spaces developing behind the flange! Now<br />
the foil is laid out throughout the pool. Afterwards the plastic fastening ring is screwed to the fastening<br />
bracket with the V4A M6x80 screws. It is horizontally aligned and tightened up so tightly that that it lies<br />
firmly on the gummed layer. Tighten up the nut on the fastening bracket whenever required. Don‘t tighten<br />
the plastic fastening ring to strong (use existing socket key).<br />
5.6 Flush mounting installation in concrete pools with tiles for 4.0275<br />
In this case the installation of the built-in pot is the same as into a concrete pool, but the plastic adapter<br />
ring is necessary to be mounted after moulding concrete. the plastic adapterring has to be screwed to the<br />
build-in pot, the tiles should be the same level than the adapter ring. (see 5.6) .<br />
Afterwards the plastic fastening ring is screwed to the fastening bracket with the V4A M6x80 screws. It is<br />
horizontally aligned and tightened up so tightly that that it lies firmly on the plastic adapter ring. Tighten<br />
up the nut on the fastening bracket whenever required. Don‘t tighten the plastic fastening ring to strong<br />
(use existing socket key).<br />
In case of other construction please contact us!<br />
seal<br />
WIBRE <strong>Elektrogeräte</strong> <strong>Edmund</strong> Breuninger GmbH & Co. KG <strong>·</strong> Liebigstrasse 9 <strong>·</strong> 74211 Leingarten/Germany<br />
Telefon: +49 (0) 7131 9053-0 <strong>·</strong> Telefax: +49 (0) 7131 9053-19 <strong>·</strong> E-Mail: info@wibre.de<br />
tile<br />
plastic adapter ring<br />
Spotlight<br />
V4A-screw M6x10<br />
plastic<br />
fastening ring<br />
V4A-screw M6x20<br />
5.6
<strong>InstallatIon</strong> <strong>·</strong> <strong>Manual</strong><br />
Spotlight connection<br />
f. e.: 5.0410.00.01<br />
connection sek 1 x 200 W/30 V<br />
fastening ring<br />
fastening ring<br />
7.0<br />
Spotlight connection<br />
f. e.: 5.0420.00.01<br />
connection sek 1 x 400 W/30 V<br />
6. Installation of spotlight<br />
If any screws get lost then only replace them with screws made out of V4A or respectively order spare<br />
screws from WIBRE, who use special materials.<br />
Lay the spotlight on the edge of the pool. Pull the special cable through the threaded joint and the cable<br />
protection tube and screw it to the pressure tight screwed cable gland. On installation of the spotlight fold<br />
the special cable without snarling it inside the built-in pot. Place the spotlight in the built-in pot and fix<br />
it with the supplied V4A M6x20 screws and plastic plain washers on the plastic flange ring or respectively<br />
directly on the stainless steel pressure flange (4.0274.00.25). Don‘t tighten the plastic fastening ring to<br />
strong (use existing socket key). The length of the rolled up cable must be measured long enough for the<br />
spotlight to be unscrewed under water, placed on the edge of the pool for the bulb to be replaced when<br />
required.<br />
WIBRE <strong>Elektrogeräte</strong> <strong>Edmund</strong> Breuninger GmbH & Co. KG <strong>·</strong> Liebigstrasse 9 <strong>·</strong> 74211 Leingarten/Germany<br />
Telefon: +49 (0) 7131 9053-0 <strong>·</strong> Telefax: +49 (0) 7131 9053-19 <strong>·</strong> E-Mail: info@wibre.de<br />
6.0<br />
7.1<br />
11<br />
12<br />
10<br />
Double spotlight connection<br />
f. e.: 5.0420.00.01<br />
connection sek 2 x 200 W/30 V<br />
13<br />
14<br />
7. transformer<br />
Please observe the special installation instructions for WIBRE transformers. The transformers supplied fulfil<br />
the requirements of the WIBRE swimming pool spotlights and installation stipulations. They will grant you<br />
a flawless service and an optimum lifespan. The transformers are designed for permanent installation at<br />
a location.<br />
Attention: For safety reasons only original WIBRE transformers are to be used. These are designed as isolating<br />
transformers. They have no galvanised connection to the primary side.<br />
5.0100.00.00 Transformer 100VA<br />
ta40°C/E IP65 T:1.0A<br />
prim: 230 V 50/60 Hz<br />
sec: 12 V/AC 2 x 50 W<br />
5.0311.00.00 Transformer 200VA<br />
ta40°C/E IP65 T:1.6A<br />
prim: 230 V 50/60 Hz<br />
sec: 12 V/AC 2 x 100 W<br />
5.0410.00.01 Transformer 200VA<br />
ta40°C/E IP65 T:2,0A<br />
prim: 230 V 50/60 Hz<br />
sec: 30 V/DC 1 x 200 W<br />
5.0420.00.01 Transformer 400VA<br />
ta40°C/E IP65 T:3,15A<br />
prim: 230 V 50/60 Hz<br />
sec: 30 V/DC 2 x 200 W<br />
9<br />
16<br />
8<br />
15<br />
1<br />
6.1<br />
7.2<br />
1. Built-in pot 4.0274<br />
8. Cable<br />
9. Cable protection tube<br />
10. Connection piece DK68<br />
11. Nut<br />
12. O-Ring<br />
13. Rubber gasket ring<br />
(9.0268.00.20 – 2 x 2,5)<br />
14. Pressure washer (9.0268.00.22)<br />
15. Pressure screw (9.0268.00.24)<br />
16. Clamp for cable protection tube<br />
3/4
<strong>InstallatIon</strong> <strong>·</strong> <strong>Manual</strong><br />
4/4<br />
1 2 4 7 3 6 5<br />
8. light bulbs and replacement of light bulbs<br />
Only the special WIBRE low voltage halogen bulbs are to be used for underwater applications.<br />
QT12 100 W/12 V (7.0325.00.00) QT16 175 W/12 V (7.2217.00.00)<br />
QT16 200 W/30 V (7.0217.00.00) QT16 400 W/30 V (7.0417.00.00)<br />
The light bulbs can be changed in a water filled swimming pool provided the spotlight installation had previously<br />
been appropriately carried out. This will facilitate a cost-effective and economical maintenance.<br />
Switch off the WIBRE swimming pool spotlight and make sure it cannot be accidentally switched on again.<br />
Unscrew both the hexagon head cap screws above and below the glass pane with the respective plastic<br />
plain washers. Remove the spotlight from the built-in casing and lay it with the glass pane face down<br />
on a soft base to avoid any scratches occurring. Carefully check over the cable and don’t pull on it as this<br />
can cause damage and cause leakiness of the spotlight. Cables that are damaged in any manner must be<br />
replaced.<br />
Now loosen the union nut (5) of the screwed cable gland using the WIBRE special wrench or an SW30 fork<br />
wrench. Carefully remove the cable silicone seal (3) together with the light bulb holder (2). Inspect the<br />
cable seal (3) for any damage. If there is any kind of damage the cable must be replaced. Used tools must<br />
be clean and proper.<br />
Loosen the two upper screws (4) of the holder (2) with the 1,5 sized inside hexagon sokket head wrench.<br />
Remove the bulb (1) and replace it with a new one. Make sure you don’t touch the bulb with your fingers<br />
and take care that the bulb sits properly. Now lightly screw up the bulb to fit snugly. Put the holder back<br />
into the spotlight and fit it with the two clips accurately in the two conduits of the screwed cable gland.<br />
Insert the cable silicone seal making sure that it fits absolutely tightly.<br />
Screw on the union nut and tighten up. Now roll up the spotlight cable without any snarling to avoid any<br />
pinch points or damage occurring. Roll it into the built-in pot and insert the spotlight after it. Screw in the<br />
two V4A M6x20 screws with plastic plain washers and tighten up.<br />
9. General maintenance information<br />
<strong>·</strong> Do not let the spotlight come into contact with metal corroding cleaning agents or acids when the swimming<br />
pool is being cleaned.<br />
<strong>·</strong> The use of acidic cleaning agents on or near spotlights constructed out of stainless steel should be avoided<br />
at all times.<br />
<strong>·</strong> Regularly clean spotlights and their casings to avoid the build up of extraneous rust deposits.<br />
<strong>·</strong> Evaporation of swimming pool water can lead to the build up of a deposit of dirt particles and to an increase<br />
of chloride. If sufficient cleaning is not carried out it punctuated corrosion will occur.<br />
<strong>·</strong> Attention: Do not use steam jets when cleaning.<br />
<strong>·</strong> Protect the spotlight from freezing.<br />
<strong>·</strong> Lost screws may only be replaced with V4A screws.<br />
<strong>·</strong> Depending on how often the pool is used (number of active days) and the quality of the water, there<br />
should be a replacement of the glass pane seals and threads every 5 to 7 years.<br />
10. spare parts to WIBRE <strong>4.0271</strong> <strong>·</strong> <strong>4.0272</strong> <strong>·</strong> 4.0273 <strong>·</strong> 4.0274 <strong>·</strong> 4.0275<br />
WIBRE halogen special bulbs<br />
QT12 100 W/12 V . . . . . . . . . . . . . . . . . . . . . . . . . . . . . . . . . . . . . . . . . . . . 7.0325.00.00<br />
QT16 175 W/12 V . . . . . . . . . . . . . . . . . . . . . . . . . . . . . . . . . . . . . . . . . . . . 7.2217.00.00<br />
QT16 200 W/30 V . . . . . . . . . . . . . . . . . . . . . . . . . . . . . . . . . . . . . . . . . . . . 7.0217.00.00<br />
QT16 400 W/30 V . . . . . . . . . . . . . . . . . . . . . . . . . . . . . . . . . . . . . . . . . . . . 7.0417.00.00<br />
Light bulb holder, steatite . . . . . . . . . . . . . . . . . . . . . . . . . . . . . . . . . . . . . . . 9.0271.00.13<br />
Rippled glass, tempered, clear . . . . . . . . . . . . . . . . . . . . . . . . . . . . . . . . . . . . 9.0271.00.04<br />
Rippled glass, tempered, frosted . . . . . . . . . . . . . . . . . . . . . . . . . . . . . . . . . . . 9.0272.00.04<br />
Mould seal, glass pane, silicone . . . . . . . . . . . . . . . . . . . . . . . . . . . . . . . . . . . 9.0271.00.05<br />
Cap nut M5, V4A 1.4571 . . . . . . . . . . . . . . . . . . . . . . . . . . . . . . . . . . . . . . . . 9.0271.00.10<br />
Plain washer, PP for cap nut M5 . . . . . . . . . . . . . . . . . . . . . . . . . . . . . . . . . . . 9.0271.00.11<br />
Screws M6 x 20, V4A . . . . . . . . . . . . . . . . . . . . . . . . . . . . . . . . . . . . . . . . . . 9.0271.00.01<br />
Plastic fastening ring, POM . . . . . . . . . . . . . . . . . . . . . . . . . . . . . . . . . . . . . . 9.0271.00.15<br />
Screwed cable gland seal insert, silicone . . . . . . . . . . . . . . . . . . . . . . . . . . . . . . 9.0271.00.06<br />
O-ring for screwed cable gland . . . . . . . . . . . . . . . . . . . . . . . . . . . . . . . . . . . . 9.0271.00.07<br />
8<br />
1. Light bulbs<br />
2. Steatite connection<br />
3. Silicone cable seal<br />
4. 1.5 inside hexagon head cap screw<br />
5. Union nut<br />
6. Special underwater cable<br />
7. Pressure disk<br />
Screwed cable gland, V4A complete with seal insert, O-ring . . . . . . . . . . . . . . . . . . . 9.0271.00.16<br />
Special underwater cable, per metre, 2x2.5 qmm . . . . . . . . . . . . . . . . . . . . . . . . . 9.6150.02.25<br />
Special underwater cable, per metre, 2x4.0 qmm . . . . . . . . . . . . . . . . . . . . . . . . . 9.6150.02.40<br />
Special underwater cable, per metre, 2x6.0 qmm . . . . . . . . . . . . . . . . . . . . . . . . . 9.6150.02.60<br />
Fastening bracket, POM . . . . . . . . . . . . . . . . . . . . . . . . . . . . . . . . . . . . . . . . 9.0274.00.10<br />
Special underwater cable, per metre, 2x2.5 qmm . . . . . . . . . . . . . . . . . . . . . . . . . 9.0274.00.01<br />
Nut M6 for fastening bracket . . . . . . . . . . . . . . . . . . . . . . . . . . . . . . . . . . . . . 9.0274.00.02<br />
Compressed threaded joint for built-in pot, complete . . . . . . . . . . . . . . . . . . . . . . . 9.0274.00.21<br />
11. ancillary parts to <strong>4.0271</strong> <strong>·</strong> <strong>4.0272</strong> <strong>·</strong> 4.0274<br />
Safety transformer IP65, 12 V-AC/100 VA . . . . . . . . . . . . . . . . . . . . . . . . . . . . . . 5.0100.00.00<br />
Safety transformer IP65, 12 V-AC/200 VA . . . . . . . . . . . . . . . . . . . . . . . . . . . . . . 5.0311.00.00<br />
Safety transformer IP65, 12 V-AC/350 VA . . . . . . . . . . . . . . . . . . . . . . . . . . . . . . 5.0103.00.00<br />
Safety transformer IP65, 30 V-DC/200 VA . . . . . . . . . . . . . . . . . . . . . . . . . . . . . . 5.0410.00.01<br />
Safety transformer IP65, 30 V-AC/400 VA . . . . . . . . . . . . . . . . . . . . . . . . . . . . . . 5.0420.00.01<br />
Stainless steel pressure flange, V4A, with flat seals<br />
for foil lined and thin walled pools . . . . . . . . . . . . . . . . . . . . . . . . . . . . . . . . . . 4.0274.00.25<br />
Gummed flange, V4A for pools lined with gummed foil<br />
or a liquefied coating . . . . . . . . . . . . . . . . . . . . . . . . . . . . . . . . . . . . . . . . . . 4.0274.55.55<br />
Conduit box IP67, cast aluminium . . . . . . . . . . . . . . . . . . . . . . . . . . . . . . . . . . 4.0069.00.00<br />
Conduit box IP67, cast ferrite . . . . . . . . . . . . . . . . . . . . . . . . . . . . . . . . . . . . . 4.0069.01.00<br />
Conduit box IP67, stainless steel . . . . . . . . . . . . . . . . . . . . . . . . . . . . . . . . . . . 4.0069.02.00<br />
Conduit box IP68, stainless steel . . . . . . . . . . . . . . . . . . . . . . . . . . . . . . . . . . . 4.0690.00.00<br />
Plexiglas coloured pane, yellow . . . . . . . . . . . . . . . . . . . . . . . . . . . . . . . . . . . 4.0265.04.00<br />
Plexiglas coloured pane, red . . . . . . . . . . . . . . . . . . . . . . . . . . . . . . . . . . . . . 4.0265.05.00<br />
Plexiglas coloured pane, blue . . . . . . . . . . . . . . . . . . . . . . . . . . . . . . . . . . . . . 4.0265.06.00<br />
Plexiglas coloured pane, green . . . . . . . . . . . . . . . . . . . . . . . . . . . . . . . . . . . . 4.0275.07.00<br />
Tool kit for replacing light bulbs, 1 special wrench for<br />
screwed cable gland, 1 x 1.5 inside hexagon socket<br />
head wrench for changing light bulbs . . . . . . . . . . . . . . . . . . . . . . . . . . . . . . . . <strong>4.0271</strong>.00.20<br />
12. Warranty conditions<br />
The following warranty times and conditions are valid from the day of delivery:<br />
<strong>·</strong> 24 months on WIBRE underwater spotlights<br />
<strong>·</strong> Light bulbs are not included in the warranty<br />
<strong>·</strong> Proven faults appertaining to material, construction or processing fall under the warranty of the manufacturer.<br />
<strong>·</strong> We accept no liability for damages arising through negligence of the operating instructions or improper<br />
repair work.<br />
<strong>·</strong> No liability is accepted for installation carried out contrary to the instructions or for the use of inappropriate<br />
light bulbs.<br />
<strong>·</strong> We reserve the right to instigate any technical improvements without prior notice.<br />
<strong>·</strong> We cannot accept liability for the condition of tightness arising from unauthorized screwing of the 8 cap<br />
nuts of the spotlight. Any dismantling of the spotlight is not authorized prior to permission having first<br />
been obtained from WIBRE. Basically any spotlight that is defect should be sent back to WIBRE.<br />
WIBRE <strong>Elektrogeräte</strong> <strong>Edmund</strong> Breuninger GmbH & Co. KG <strong>·</strong> Liebigstrasse 9 <strong>·</strong> 74211 Leingarten/Germany<br />
Telefon: +49 (0) 7131 9053-0 <strong>·</strong> Telefax: +49 (0) 7131 9053-19 <strong>·</strong> E-Mail: info@wibre.de<br />
W045 Stand 02.12 - Technische Änderungen vorbehalten - Für Druckfehler übernehmen wir keine Haftung