
You also want an ePaper? Increase the reach of your titles
YUMPU automatically turns print PDFs into web optimized ePapers that Google loves.
800<br />
1200<br />
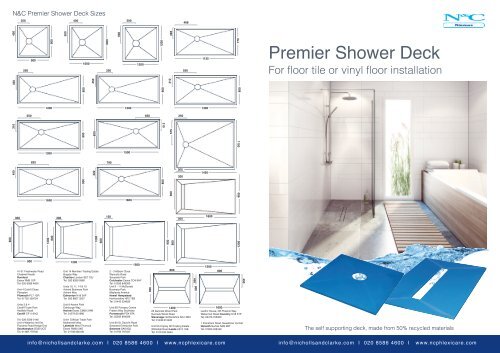
N&C <strong>Premier</strong> <strong>Shower</strong> <strong>Deck</strong> Sizes<br />
350<br />
400<br />
500<br />
468<br />
900<br />
1000<br />
1200<br />
770<br />
450<br />
500<br />
600<br />
285<br />
250<br />
900<br />
1000<br />
250<br />
1200<br />
550<br />
1135<br />
<strong>Premier</strong> <strong>Shower</strong> <strong>Deck</strong><br />
For floor tile or vinyl floor installation<br />
800<br />
900<br />
800<br />
400<br />
450<br />
310<br />
1200<br />
1200<br />
1300<br />
550<br />
650<br />
250<br />
310<br />
310<br />
800<br />
800<br />
575<br />
1150<br />
1300<br />
1500<br />
825<br />
790<br />
450<br />
320<br />
300<br />
300<br />
1450<br />
900<br />
800<br />
1650<br />
1800<br />
300<br />
300<br />
150<br />
600<br />
1200<br />
600<br />
1200<br />
600<br />
900<br />
600<br />
900<br />
300<br />
1800<br />
900<br />
41-51 Freshwater Road<br />
Chadwell Heath<br />
Romford<br />
Essex RM8 1SP<br />
Tel: 020 8586 4600<br />
Unit 4 Cothill Close<br />
Plympton<br />
Plymouth PL7 1SR<br />
Tel: 01752 339724<br />
Units 3 & 4<br />
Cardiff Trade Park<br />
Hadfield Road<br />
Cardiff CF11 8AQ<br />
Tel: 029 2039 0146<br />
Unit 4 Waterloo Ind Est<br />
Flanders Road Hedge End<br />
Southampton SO30 2QT<br />
Tel: 01489 779700<br />
1200<br />
Unit 14 Meridian Trading Estate<br />
Bugsby Way<br />
Charlton London SE7 7SJ<br />
Tel: 020 8269 5960<br />
Units 10, 11, 14 & 15<br />
Advent Business Park<br />
Advent Way<br />
Edmonton N18 3AF<br />
Tel: 020 8807 3227<br />
Unit 8 Ascent Park<br />
Edinburgh Way<br />
Harlow Essex CM20 2HW<br />
Tel: 01279 621980<br />
Unit1 Cliffside Trade Park<br />
Motherwell Way<br />
Lakeside West Thurrock<br />
Essex RM20 3XD<br />
Tel: 01708 680180<br />
2 - 3 Altbarn Close<br />
Wyncolls Road<br />
Severalls Park<br />
Colchester Essex CO4 9HY<br />
Tel: 01206 849300<br />
Unit 9 - 11 McDonald<br />
Business Park<br />
Maylands Avenue<br />
Hemel Hempstead<br />
Hertfordshire HP2 7EB<br />
Tel: 01442 234635<br />
Unit 8D Pompey Centre<br />
Fratton Way Southsea<br />
Portsmouth PO4 8TA<br />
Tel: 02392 894599<br />
1500<br />
Unit 8A St. David’s Road<br />
Swansea Enterprise Park<br />
Swansea SA6 8QL<br />
Tel: 01792 797337<br />
900<br />
800<br />
1400<br />
25 Gunnels Wood Park<br />
Gunnels Wood Road<br />
Stevenage Hertfordshire SG1 2BH<br />
Tel: 01438 315400<br />
Unit E5 Copley Hill Trading Estate<br />
Whitehall Road Leeds LS12 1HE<br />
Tel: 0113 243 5644<br />
450<br />
900<br />
1500<br />
800<br />
1600<br />
Leofric House, Off Phoenix Way<br />
Waterman Road Coventry CV6 5TP<br />
Tel: 02476 705300<br />
1 Frensham Road, Sweetbriar Ind Est<br />
Norwich Norfolk NR3 2BT<br />
Tel: 01603 409169<br />
450<br />
The self supporting deck, made from 50% recycled materials<br />
info@nichollsandclarke.com I 020 8586 4600 I www.ncphlexicare.com info@nichollsandclarke.com I 020 8586 4600 I www.ncphlexicare.com
Installation Guide<br />
The N&C <strong>Premier</strong> <strong>Shower</strong> <strong>Deck</strong> is ideal for creating a level access wet floor with ease. As the strongest available floor<br />
former in the UK market, accepting up to 470kg, the robust structure is manufactured using high precision moulds for<br />
strength and durability. With a self supporting structure, N&C <strong>Premier</strong> <strong>Shower</strong> <strong>Deck</strong> can be placed directly onto<br />
underfloor joists.<br />
N&C <strong>Premier</strong> Linear <strong>Shower</strong> <strong>Deck</strong> is the perfect solution for use in wet rooms. With built in falls, the gradients in the<br />
deck encourage the swift removal of waste water.<br />
22mm<br />
Strong and durable base made from 50% recycled material<br />
22mm and 24mm profiles<br />
Can be tiled directly on to or covered in vinyl<br />
Built in gradients for water removal to the waste, minimum 2%<br />
Ideal for total level access<br />
Waste offset to avoid joists in most circumstances<br />
Pre-cut waste outlet suitable for gravity waste<br />
Self supporting, no requirement for additional<br />
support underneath<br />
Can be trimmed by up to 60mm on each edge<br />
Accepts over 470kg loading<br />
Manufactured using high precision metal moulds<br />
The <strong>Premier</strong> <strong>Shower</strong> <strong>Deck</strong>’s 22mm profile allows easy<br />
installation into either timber or concrete shower areas.<br />
Level<br />
Access<br />
Offset<br />
Waste<br />
Timber Installation<br />
Cut to<br />
Length<br />
100%<br />
Recyclable<br />
Lifetime<br />
Warranty<br />
N&C <strong>Premier</strong> <strong>Shower</strong> <strong>Deck</strong><br />
N&C <strong>Premier</strong> Linear <strong>Shower</strong> <strong>Deck</strong><br />
Screeded / Concrete<br />
Installation<br />
Installation<br />
1. Place the deck in position and draw an outline around<br />
it.<br />
2. Cut away floorboards within this area. Screeded or<br />
Concrete floors should have the area removed to allow<br />
the deck to be flush with the remainder of the room and<br />
for the gulley to fit deeper into the floor.<br />
3. Make sure the deck rests flat on the joists. Add<br />
support if necessary to ensure the deck sits flat. Ensure<br />
the floor joists have minimum 400mm centres. If not, add<br />
more support by screwing 4” x 2” timbers to the<br />
underside of the floorboards with extra noggins<br />
according to BS 5268 and to BS 6178 if using joist<br />
hangers. The perimeter of the deck must be supported<br />
by minimum 4” x 2” joists so that no part of the deck is<br />
overhanging (support with extra 4” x 2” noggins if<br />
necessary).<br />
Ensure there are minimum 400mm x 400mm centres at<br />
this overhanging point so the perimeter is fixed and solid<br />
so there is no movement.<br />
For the Linear shower deck, noggins or structural<br />
supports need to be added to the joists by adding 4” x<br />
2” timber noggins and supports as per BS 5268 and to<br />
BS 6178 if using joist hangers. Timber noggins and<br />
supports are required to add extra support for the<br />
channel around its perimeter and the perimeter of the<br />
gulley hole. Ensure the supports cover the rebate of the<br />
hole to accept the screws. Ensure that the supports are<br />
flush with the hole and are not proud. For additional<br />
information see Phlexiline gulley instructions on how to<br />
install.<br />
4. Mark the exact position where the drain will be and fix<br />
the waste pipe into position so the trap can be slotted<br />
into place upon completion. Cut a hole for connecting<br />
the waste pipe to the gulley outlet. Keep the piece from<br />
this hole, as you will need it to make good after the gulley<br />
outlet is connected. Do not cut into any joists unless<br />
necessary. Before cutting into any joists, you must<br />
consult with a structural engineer and refer to joist<br />
regulations BS 5268 and to BS 6178 if using joist<br />
hangers.<br />
5. Using a spirit level check that the joists are level. The<br />
joists and floor must be made sound and secure<br />
according to BS 5268 and for BS 6178 if using joist<br />
hangers. If there is still movement, do not install. Once<br />
the joists are level, lay out the deck into position on the<br />
floor.<br />
6. With the shower deck placed in position, using a<br />
masonry drill make pilot holes through the edge of the<br />
deck in the countersunk holes to the timber below. Using<br />
a slightly wider masonry drill bit, bore a few millimetres<br />
into the holes so the screws can be placed into the unit.<br />
7. Fit the appropriate shower gulley to the deck for sheet<br />
flooring (read on until step 14) or for a tiled installation,<br />
see steps 13 - 19.<br />
8. Fix the deck onto the floor. Do not over tighten the<br />
screws.<br />
9. Attach the gulley outlet to the waste pipe with<br />
appropriate coupling, not supplied.<br />
10. Ensure the floor is flush with the deck, it may be<br />
necessary to add a layer of plywood/tile backer board<br />
sealed with an appropriate sealant.<br />
11. Lay a continuous sheet of vinyl over the floor and use<br />
the Phlexiknife to cut a perfect circle over the gulley.<br />
12. Fix this into position using the clamping ring.<br />
13. Nicobond wet room self-adhesive tanking<br />
sheet/tapes/ tanking system and Nicobond wet room<br />
waterproofing membrane system should be used when<br />
tiling the<br />
shower area and room.<br />
14. When fixing ceramic /porcelain tiles lightly sand the<br />
surface of the <strong>Premier</strong> <strong>Shower</strong> <strong>Deck</strong> with the abrasive<br />
paper supplied within the packaging and remove excess<br />
dust first. Then cover the whole premier shower deck<br />
with Nicobond Wet Room Self Adhesive Tanking sheet<br />
and tapes ensuring that you overlap the deck/subfloor<br />
joints, also ensuring it is clamped in securely to the<br />
clamping ring of the gulley or if using the linear gulley<br />
over the deck/gulley joint up to the linear grate where<br />
possible.<br />
15. Clean off any excess dust from the surface of the<br />
Nicobond Wet Room Self Adhesive Tanking sheet and<br />
tapes before using Nicobond Rapidflex adhesive to fix<br />
tiles to the surface. Nicobond Starlike waterproof grout<br />
should then be applied for a complete waterproof<br />
solution.<br />
16. Tiled Floors. Using the same Phleximax gulley, a tile<br />
grate 155mm should be centred above this and fixed<br />
into position. Tiling should begin from this tile edge<br />
outwards.<br />
17. Large format tiles should be enveloped cut or<br />
mosaics can be used.<br />
18. Ensure the Nicobond Rapidflex tile adhesive and<br />
Starlike grout used to fix the tiles has fully cured before<br />
the end user uses the shower.<br />
19. Hand these instructions to the end user after<br />
installation is finished.<br />
info@nichollsandclarke.com I 020 8586 4600 I www.ncphlexicare.com info@nichollsandclarke.com I 020 8586 4600 I www.ncphlexicare.com