Allspraypainted Magazine #05 2023
Allspraypainted Magazine #05 2023 Sophisticated DIY Projects! https://allspraypainted.com/
Allspraypainted Magazine #05 2023
Sophisticated DIY Projects!
https://allspraypainted.com/

You also want an ePaper? Increase the reach of your titles
YUMPU automatically turns print PDFs into web optimized ePapers that Google loves.
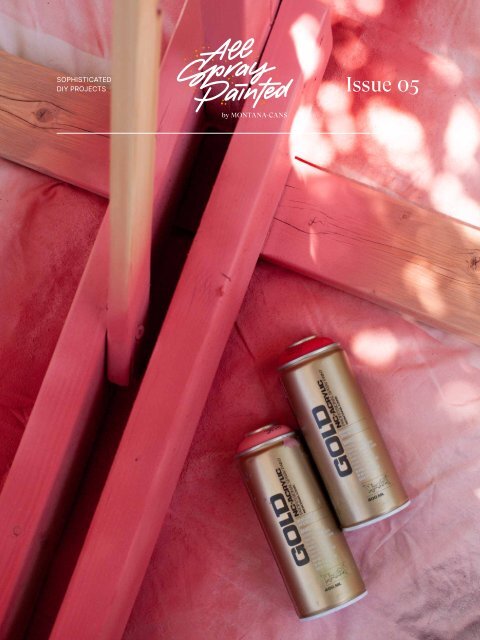
SOPHISTICATED<br />
DIY PROJECTS<br />
Issue 05<br />
by MONTANA-CANS
<strong>Magazine</strong><br />
allspraypainted<br />
ALLSPRAYPAINTED.COM
Contents<br />
4 Editorial<br />
6<br />
Marble Effect Tables<br />
Makeover<br />
14 allspraypainted meets<br />
Sarah Hartmann<br />
Interview<br />
24 Hammock<br />
Vivid Color Makeover<br />
Upcycling<br />
32 allspraypainted meets<br />
Vera Wohlleben<br />
Interview<br />
44 Rainbow Stationery<br />
Makeover
allspraypainted <strong>Magazine</strong><br />
54 Refurbished Bird House<br />
Upcycling<br />
64 allspraypainted meets<br />
Hassan Abu-Izmero aka HABU<br />
Interview<br />
72<br />
Frosty Christmas Baubles<br />
DIY<br />
80 The Marker and Vase Project<br />
Interior
Editorial<br />
4<br />
Create your<br />
own world!<br />
In our editorial notes of the 2021 allspraypainted <strong>Magazine</strong>, we left 2021 behind with a „can-do“ attitude.<br />
It was time to brush our shoulders off and move forward into the new year with some lightheartedness<br />
and lust for creativity. A moment to relish what will become, versus what the world had just<br />
left behind. Upon reviewing all the amazing projects, videos, and interviews, it is very fair to say that<br />
we „did it“. We transformed our environments into exactly the way we like them to be. With our own<br />
hands one project at a time. You could even say we „created our own world“.<br />
The rearview mirror shows an exemplary array of achievements. We didn‘t just buy prefabricated<br />
decoration that broke as soon as it was placed into position to celebrate the seasons, we made our<br />
own. Thanks to our supportive group of artists and creation specialists, every project took us one<br />
step further down the path of creative independence as we completed simple, intermediate, and<br />
complicated tasks. And boy didn‘t it feel good when each finished project took up its new place in our<br />
homes or daily lives.<br />
These creative journeys allowed us to widen our skill sets and build on the knowledge we had already<br />
acquired from all our previous creations. It didn‘t matter if it was a well-shaken can of GLITTER, CRA-<br />
CKLE, MARBLE, NIGHT GLOW, GLASS PAINT, RUST, VINTAGE, GRANIT Effect, or even our favorite<br />
good old Montana GOLD colors. Each project showed us that we can do it, and we can do it the way<br />
we like it.<br />
Apart from the rewards of the physical aspects of the allspraypainted projects (the objects themselves),<br />
2022 also presented us with plenty of mental stimulation. When our hands stayed still for long<br />
enough, our minds absorbed the fascinating insights that the allspraypainted Meets program shared<br />
with us. For the first time, we were introduced to a male feature artist Hassan Abu-Izmero, or as most<br />
people on YouTube know him, Habu. An eye-opening experience that introduced us to the possibilities<br />
of combining our favorite Montana Cans spray paints (in Habu‘s case Metal PRIMER, Montana<br />
GOLD, and CRACKLE spray) with metal. While we also got to know the work of Sarah Hartmann and<br />
Vera Wohlleben, who showed us that in the home office or remote working world, it is possible to<br />
merge your living style with making a living creatively.<br />
This time, to close 2022 with a tailwind coming from behind us, we say use this momentum in <strong>2023</strong><br />
and keep creating the world you want to live in. A world that the allspraypainted team is committed<br />
to continuing to inspire you in, assist you with projects and creative ideas, and above all offer you a<br />
place of fun and enjoyment that always leaves you with a tangible creative result. Bring on <strong>2023</strong> and<br />
all the amazing artistic projects it has to offer. Happy Crafting!
6<br />
Marble Effect Tables<br />
EVEN MORE MARBLE POSSIBILITIES
Makeover Marble Effect Tables<br />
8<br />
The Montana MARBLE Effect 400ml color range has long found a place in the list<br />
of must-have materials for our DIY tool kit. Its wide range of application possibilities<br />
has added flair and creativity to the most surprising array of projects.<br />
MARBLE Effect has found its way into our workspaces, onto our pinboards, on<br />
our clocks, onto our Christmas cards, Easter decorations, and even our bathrooms.<br />
And that are just some of the projects MARBLE Effect spray has enhanced<br />
and uplifted. With the release of the new colors Marble Copper, Marble<br />
Yellow, and Marble Grey, it was inevitable that we would shake up these newcomers<br />
for a project that would highlight their introduction into the color range.<br />
And when we found some beautiful small wooden tables, the stars aligned and<br />
the Marble Effect Table project was born. Here is what we did!
allspraypainted <strong>Magazine</strong>
Makeover<br />
Marble Effect Tables<br />
10<br />
BEFORE<br />
The key to this project aside from the new Montana<br />
MARBLE Effect colors is wooden tables. No doubt<br />
you can find the table or tables of your choice at<br />
home decor stores, furniture stores, second-hand<br />
stores, or yard sales. New or used, all you need are<br />
tables that you adore, with wooden tops. We were<br />
lucky enough to find a small set of three that progressed<br />
in size which made the ideal surfaces to try<br />
out the cool new MARBLE Effect colors.<br />
The first thing to establish is if your tabletops<br />
are removable or fixed. If removable, make it happen<br />
to ensure the easiest access to the top. If fixed, cover<br />
the base of your table with scrap paper or a plastic<br />
bag and affix with masking tape under your tabletop(s)<br />
in a nonvisible area. If your tables do not have<br />
white tops as ours did, it isn't hard to change them<br />
so they do. With some sandpaper, remove the surface<br />
coating (if one exists), or sand down the wood<br />
lightly so you have a neutral surface to start with.<br />
Using either Montana UNIVERSAL Primer or Montana<br />
GOLD in the color Shock White, apply thin even coats<br />
to your tabletop as desired. If required, repeat this<br />
process and allow it to dry for at least an hour. That's<br />
the hardest part done!<br />
Once your tabletops have dried and the bases<br />
are either detached or protected, it is time to add<br />
some new MARBLE Effect color. To let the colors shine<br />
and breathe, our goal was to apply one color over<br />
the white surface of each table. One table in Marble<br />
Copper, one in Marble Yellow, and one table in Marble<br />
Grey. You may decide to mix the colors, or even<br />
use another colorway by using a different surface<br />
color other than white. At a distance of 15cm to 25cm<br />
away from each tabletop, apply your MARBLE Effect<br />
color in slow even strokes. The further away from<br />
the tabletop, you apply it, the more time the paint<br />
strands will have to separate in the air to land on the<br />
tabletop organically like real marble. The closer you<br />
apply it, the more like a spider's web it will appear.<br />
If you think it needs it, add a squirt here and there<br />
in the areas that lack coverage. And if you do not<br />
feel confident to start with, why not try a little on<br />
some scrap cardboard to get a feel for the effect<br />
you want and the distance that effect requires.<br />
Having left your tables to dry overnight, the<br />
final touch before reapplying your tabletops or<br />
taking off the paper/plastic coverings from your<br />
base(s) is to varnish them. Choosing the Montana<br />
VARNISH 400ml spray finish of your choice,<br />
apply in slow even strokes at a distance of about<br />
15cm. Montana Gloss, Semi-Gloss, or Matt<br />
VARNISH will protect the table's surface making<br />
it more resistant to scratches, UV exposure, and<br />
dints while giving it the look you want in the finish<br />
you have chosen. We went for the Gloss finish<br />
for that added touch of shine and prestige. Allow<br />
drying overnight before reapplying your tabletops<br />
to their bases.<br />
Of course, you remembered the golden rules<br />
when using spray paint which are; to ensure<br />
all surfaces were clean and free of dust and oils,<br />
to shake well for 2-3 minutes, remove the nozzle<br />
and turn the can upside-down to allow the black<br />
safety ring to fall out (where applicable), and then<br />
reapply the nozzle and trigger to test the can<br />
away from surfaces.
Makeover<br />
Marble Effect Tables<br />
12<br />
AFTER<br />
So let‘s review the situation. The tables are all dry,<br />
the tops have been reapplied where applicable or the<br />
plastic and paper covering protecting the bases of<br />
the tables where the tops were fixed has been removed.<br />
Everything has been allowed to dry and cure for<br />
more than 24 hours and the tables are now identifiable<br />
as the MARBLE Effect Copper, Yellow, and Grey<br />
ones. Oh, and not forgetting they look great! Now<br />
you need to figure out where to put them and how<br />
they will be used. But until then, don‘t hesitate to just<br />
look at them for a little while and appreciate what you<br />
have achieved.<br />
This project is no more than 30-60 minutes<br />
of actual work time depending on how big your tabletops<br />
are if they need to be primed or removed,<br />
and how many tables you chose to paint. There is<br />
no getting this wrong so creators of any skill level<br />
can take this project, or practice applying the MAR-<br />
BLE Effect spray onto some scrap cardboard to build<br />
confidence before touching the table(s). The less is<br />
more approach has achieved a finish that looks a lot<br />
more than less!<br />
Well done and happy Crafting!<br />
MATERIALS USED<br />
• The new Montana MARBLE Effect<br />
400ml colors Marble Copper,<br />
Marble Yellow, and Marble Grey<br />
• Montana UNIVERSAL Primer<br />
(optional)<br />
• Montana GOLD Shock White<br />
(optional)<br />
• Montana VARNISH<br />
(finish of your choice)<br />
• Wooden tables (of your choice)<br />
• Gloves<br />
• Mask<br />
• Drop sheet<br />
• Sandpaper (optional)<br />
• Scrap paper or a plastic bag<br />
• Masking tape
<strong>Allspraypainted</strong> Lookbook 13
14<br />
allspraypainted<br />
meets<br />
Sarah Hartmann<br />
„CREATING IN COMMUNITY IS ALWAYS BETTER“
allspraypainted meets Sarah Hartmann<br />
16<br />
As she sits in her beautiful Berlin apartment, sunlight peeking through curtains<br />
illuminating all her DIY projects scattered around her home, they shine like trophies<br />
of memories made a new. The 27-year-old designer and prolific DIY home<br />
project creator humbly describes herself as just „creating things in my home“ on<br />
her Instagram profile. A profile that non only caters to 154K followers, but also is<br />
a great source of inspiration and communication when doing the thing she loves<br />
most. DIY projects.<br />
It must be in the blood, as Sarah‘s fascination with reworking, up-cycling, and<br />
reinterpreting vintage objects and furniture were passed onto her by her mother<br />
who was herself an avid bargain hunter for just the right objects. What started<br />
as simply decorating her flat as she eased into living alone in adult life, turned<br />
into a passion that led to more objects, more furniture, and more ways to give<br />
them facelifts. Facelifts that are inspired by her love of 70s design and color<br />
combinations. Pastels and browns to be precise.
allspraypainted <strong>Magazine</strong> 17<br />
But what is old, eventually becomes<br />
new. And when it‘s old again, it‘s time<br />
to reach out to her community for<br />
feedback, inspiration, and tips. Selftaught,<br />
her DIY vocabulary is heavily<br />
supported by her activeness online.<br />
Not only on Instagram where she can<br />
express herself documenting her creative<br />
process for all to see and learn<br />
but also with the genuine interaction<br />
with her followers and friends, who<br />
also play an active role in what she<br />
does. Whether it be feedback and tips,<br />
or links to ads and bargains for objects<br />
and furniture that help Hartmann find<br />
just the right materials for her ideas.
allspraypainted meets<br />
Sarah Hartmann<br />
18<br />
With a special spot in her heart for violets, the browns<br />
and earth tones that often accompany them look right at<br />
home. Her projects are mainly focused on the changing<br />
of color and color combinations to breathe new life into<br />
already interesting objects. Meaning little more than some<br />
sand paper, some primer, and color are all that is needed<br />
to make things happen. That was until we introduced her to<br />
the Montana GRANIT Effect spray and Montana METALLIC<br />
spray lines which introduced different origins of color and<br />
texture. The GRANIT Effect gave new life to a simple wooden<br />
display tray, while the Montana METALLIC sprays put<br />
some funk back into a classy vintage lamp base and vase.
allspraypainted <strong>Magazine</strong><br />
To have such a clear idea and direction at such a young age was<br />
as intriguing for us as the work itself. The perfect invitation for us<br />
to reach out and request to Meet, Sarah Hartmann for a little chat.<br />
The cold, yet partly sunny Berlin day played out as backdrop, and<br />
Sarah Hartmann gave us a little insight into her creative life.
allspraypainted meets<br />
Sarah Hartmann<br />
20<br />
ALLSPRAYPAINTED<br />
How did your career start? Is there a moment when<br />
you knew that creative work as your preferred way<br />
of working?<br />
SARAH<br />
There was no specific moment when I knew that I<br />
wanted to work creatively, it felt like it had already<br />
been decided for me. As a child, my dream job was<br />
to be an artist, then later a fashion designer, and finally,<br />
I studied graphic design. My current profession<br />
takes place mainly on screen, so I love the hands-on<br />
aspect of DIY projects even more.<br />
ALLSPRAYPAINTED<br />
Where do you find the most inspiration?<br />
SARAH<br />
I find most of my inspiration through the exchange in<br />
the interior community on social media. Just like in<br />
fashion, trends come and go faster than you can look<br />
and I try not to follow them too much, but instead,<br />
make my interpretation of them.<br />
ALLSPRAYPAINTED<br />
What role do craft materials play in your work?<br />
SARAH<br />
Craftsmanship is the basis of all my projects. I am not<br />
a professional in this field and somehow taught myself<br />
everything. Accordingly, failed projects are just<br />
as much a part of the learning process as successful<br />
ones.<br />
ALLSPRAYPAINTED<br />
How did your interest in interior design come about?<br />
SARAH<br />
The interest in vintage furniture and interior themes I<br />
share with my mom, who helped me back then when<br />
I moved into my first apartment alone. It was the moment<br />
I could choose the right Mid Century furniture<br />
that I wanted. Through my studies, I got to know<br />
some designers and styles and became more and<br />
more interested in interior design. In my apartment, I<br />
could finally really let off steam and not have to compromise<br />
with any of my choices.<br />
ALLSPRAYPAINTED<br />
Part of your concept for allspraypainted meets is a<br />
lamp you paint. What is the process of designing projects<br />
and which part is your favorite?<br />
SARAH<br />
I work with little to no mood boards, and usually don't<br />
plan my projects in advance. Since I work mostly with<br />
second-hand furniture and decor, the found item itself<br />
dictates my next steps. Mostly I choose items<br />
that get a whole new modern look through a new color.<br />
To do this, I roughen the material a bit with sandpaper<br />
and then I can get started with the paint. I love<br />
to see how the old object (through the new color)<br />
suddenly gets its place in my apartment and becomes<br />
part of my decor as if it had always been there.<br />
ALLSPRAYPAINTED<br />
How would you rate the role of Instagram in the context<br />
of your work?<br />
SARAH<br />
Instagram plays a big role in my work. It is the platform<br />
on which I and my work take place the most.<br />
Starting with the inspiration that floods on my phone<br />
every day from posts from all over the world. I also<br />
like to let my followers participate in my projects<br />
through Instagram by letting them determine what<br />
color to use in my Stories or asking for tips and tricks.<br />
ALLSPRAYPAINTED<br />
Which color or effect in the Montana product line do<br />
you like the most?<br />
SARAH<br />
I just worked with the GRANIT Effect Spray for the<br />
first time and I'm really excited about the end result. I<br />
didn't think the effect would look and feel so good on<br />
the wood tray. With the GRANIT Effect Spray, you can<br />
immediately create a whole new look without much<br />
effort. This can be used to quickly and successfully<br />
implement small DIY projects with great ease.<br />
ALLSPRAYPAINTED<br />
How balanced is the proportion between digital and<br />
analog in your work?<br />
SARAH<br />
As far as my digital work goes, you need to consider<br />
the sometimes very tedious and time-consuming research<br />
work for second-hand vintage furniture and<br />
accessories. Most of my finds I have bought through<br />
classified ads or auction platforms online where you<br />
usually have to act quickly to get a bargain. Accordingly,<br />
I spend a lot of time on various platforms<br />
for vintage furniture to compare and negotiate. The<br />
analog part is much more fun for me as it is the actual<br />
process of working on the furniture and seeing<br />
it transform. Of course, mistakes happen and some<br />
things just don't work out or the right tool is missing.<br />
But I haven't yet had a slip-up that I couldn't somehow<br />
fix. In the end, none of my projects are perfect,<br />
but that's probably what makes them so charming.
allspraypainted <strong>Magazine</strong> 21
allspraypainted meets<br />
Sarah Hartmann<br />
22
allspraypainted <strong>Magazine</strong><br />
23<br />
ALLSPRAYPAINTED<br />
What are your plans for 2022?<br />
SARAH<br />
Almost half of the year 2022 is already over and I‘m<br />
just incredibly grateful that I could already inspire so<br />
many people with my projects. I hope in the coming<br />
months that I take more time to be able to implement<br />
even more projects and involve my community even<br />
more. It‘s a lot of fun to document the creative process<br />
and exchange ideas about it.<br />
ALLSPRAYPAINTED<br />
How important is color in your work?<br />
SARAH<br />
I think what makes me different from other creative<br />
profiles is the color selection. I don‘t shy away from<br />
color but pay attention to a harmonious overall picture.<br />
My world of color is very much inspired by the<br />
70s. I particularly love the interplay of pastels and<br />
browns. Even if I no longer like a particular color in<br />
my project or it simply no longer fits into the overall<br />
concept, it can be easily changed again with a new<br />
color or Effect spray.<br />
Whether it's Mid Century, the 70s, or another<br />
period in time that turn you on, or you have<br />
your own niche in furniture and object upcycling,<br />
Sarah Hartmann has that special something<br />
that we can all get inspired by. A child of<br />
now with a passion for the past makes for a<br />
great combination in creativity. As does her<br />
role as creator in the modern day communities<br />
both online and offline. We can't wait to<br />
see what else is round the corner in her cosy<br />
Berlin abode.<br />
ALLSPRAYPAINTED<br />
Has the exchange with your community changed the<br />
way you work?<br />
SARAH<br />
The exchange with my community is very important<br />
to me. My followers even send me ads for special<br />
finds, which of course makes my work easier. I also<br />
always have an open ear for any interior questions<br />
and try to answer every message. I‘m especially happy<br />
to see photos and videos of projects that are inspired<br />
by my DIYs.<br />
Watch the video via<br />
montana.link/nadine<br />
@allspraypainted
24<br />
Hammock<br />
Vivid Color Makeover<br />
FROM FLAT TO FLASH
Upcycling Hammock Vivid Color Makeover<br />
26<br />
The forces of nature can‘t be denied. The sun, the wind, the rain, and everything<br />
else that mother nature throws at us all take their toll on the things we<br />
own. Especially if those things are outdoor furniture. And a fabulous garden<br />
hammock is no exception. Thanks to the sun and the rain, after a few years in<br />
use an outdoor hammock can go from fancy to flat. The perfect invitation for a<br />
Hammock vivid color makeover. With a small selection of your favorite Montana<br />
GOLD can colors, Montana MARBLE Effect, and some Montana Gloss VARNISH,<br />
anything is possible. Read on to find out what we did.
allspraypainted <strong>Magazine</strong><br />
27<br />
The first step is to remove the hammock material from the base and<br />
prepare the wooden parts of your hammock for painting. If required, clean<br />
off any dust and dirt. A steel brush can remove moss or harder material that<br />
may have dried on the wood. Then it‘s time to start sanding. Depending on<br />
the surface of the wood, start with rough sandpaper and then repeat with<br />
smoother sandpaper as desired to remove any scratches. Remove any of<br />
the remaining dust and prepare your space for painting.<br />
Painting can be as difficult or as easy as you want it to be. Should you<br />
want to make specific pieces in specific colors as we did, then cover the<br />
pieces you don‘t want to color with masking tape and leave the painting<br />
surfaces exposed. Apply the colors, allow to dry, and repeat if required.<br />
Ideally, leave at least 1-2 hours drying time per color section, or if you have<br />
the option, leave each section to dry overnight. As each color is applied and<br />
has dried, cover it with masking tape to protect the new color and expose<br />
the next piece you want to paint. We had 5 colors that we used and wanted<br />
them to be vivid and dynamic.<br />
If you want to keep it simple and save time, the easy way is to just paint<br />
your pre-prepared hammock base completely in one session with one Montana<br />
GOLD color. Or paint all the colors you want organically in one session<br />
without masking off individual pieces. Regardless of the way you chose,<br />
allow the hammock base to dry overnight.
Upcycling Hammock Vivid Color Makeover<br />
28<br />
We wanted the feet at the base of our hammock<br />
to have the effect of stability and of being grounded.<br />
The way we did this is by painting them with Montana<br />
GOLD Shock Black first, and once dry we coated<br />
them with Montana MARBLE White. A simple process<br />
that gave the appearance of a solid stone base, or a<br />
marble base to be more accurate.<br />
Once the colors were on and the base had<br />
dried, we threw the hammock material in the washing<br />
machine which made it look like new. This left us with<br />
the final touch which was to coat the hammock with<br />
Montana VARNISH to seal the wood. At the same<br />
time, we would be illuminating the color and giving<br />
extra UV protection so that there is more time before<br />
the next hammock makeover is needed. We chose<br />
MONTANA Gloss VARNISH so the color would shine<br />
and the wood‘s surface had the ultimate sealing possible.<br />
The more coats you put on, the more protection<br />
is achieved, but it is important to allow overnight<br />
drying before putting the hammock back into use.<br />
No matter how hard that may seem seeing as it now<br />
looks so good.<br />
So there you have it. Your hammock is back in<br />
service, the sun is shining, and the wood has a new<br />
lease on life with some extra protection from the elements.<br />
More inviting than ever before, the Hammock<br />
vivid color makeover has added another amazing<br />
personal touch to your living space. Being a project<br />
for all skill levels means you can be a beginner or a<br />
pro, and enjoy it just as much. All you need is the<br />
materials, some patience, and about 2-3 hours of actual<br />
working time depending on how much effort you<br />
want to put into the preparation.<br />
And while on the subject of preparation, should<br />
you want to apply a primer to your hammock base,<br />
the Montana PRIMER Universal is the ideal coating<br />
before you apply the Montana GOLD colors. And<br />
don‘t forget to shake all your cans well for 2-3 minutes<br />
and remove the safety ring from under the cap<br />
before painting. You can‘t go wrong.<br />
Good luck and happy crafting.
allspraypainted <strong>Magazine</strong><br />
29
Upcycling<br />
Hammock Vivid Color Makeover<br />
30<br />
MATERIALS USED<br />
• Montana GOLD can colors<br />
of your choice<br />
• Montana MARBLE Effect White<br />
• Montana VARNISH Gloss<br />
• A wooded based<br />
self-standing hammock<br />
• Sandpaper<br />
• Masking tape<br />
• Gloves<br />
• Mask<br />
• Drop sheets or protective material
<strong>Allspraypainted</strong> Lookbook 31
32<br />
allspraypainted<br />
meets<br />
Vera Wohlleben<br />
„WHEN AESTHETICS LEAD TO THE PATH OF WELLBEING“
allspraypainted meets Vera Wohlleben<br />
34<br />
If you are a gourmet chef that creates tasty culinary delights, it‘s not<br />
enough to just tell your customers that your recipe in a recipe book<br />
tastes great. With the help of great styling, photography, and editing,<br />
what previously just sounded good to eat can become visually transferred<br />
into an amazing anticipated edible experience that seems to<br />
be only one cooking session away.<br />
Whether it‘s creating food, home interiors, or DIY projects in this<br />
holistic approach, it is in the strengths of aesthetics, harmony, and<br />
balance that many ideas can blossom once they come to life. Just<br />
like all the projects and activities that have been featured on allspraypainted<br />
that was created and photographed by Vera Susanna<br />
Wohlleben from www.nicestthings.com
allspraypainted <strong>Magazine</strong> 35
allspraypainted <strong>Magazine</strong> 37<br />
Since 2011, Vera has been building up<br />
a profession from her love of creating<br />
things, whether they be physical<br />
objects, homewares, interiors, or food,<br />
regardless of edible or drinkable. All<br />
with her signature touch of harmony<br />
and balance, black and white, and color<br />
tonal variations. What sets her aside<br />
from the rest is not only her ideas<br />
and the final products, but also the<br />
manner in which she expertly photographs,<br />
edits, and presents her work<br />
in a way that makes her creations look<br />
as if they are on a level of their own.<br />
This talented 38-year-old doesn‘t just<br />
go as far as just creating aesthetically<br />
driven work, she lives it! A large majority<br />
of what you see is made, developed,<br />
photographed, digitally edited,<br />
and then put into use in her own<br />
home. A home that is part studio, part<br />
office, part living space, and part work<br />
of art. Variations of black and white<br />
greet visitors in every corner, even in<br />
her wardrobe.
allspraypainted meets Vera Wohlleben<br />
38<br />
In 2011 not only did this self-confessed<br />
wine passionista start her career<br />
path as an aesthetics professional,<br />
but she also turned her back on a<br />
career in medicine that she successfully<br />
studied and completed in the<br />
neighboring city (and home of the<br />
Montana Cans headquarters), Heidelberg.<br />
Since then her hobby blog<br />
developed its way further as a trendsetting<br />
hybrid food/interior/lifestyle/<br />
travel blog. A blog which she says<br />
even today in the age of multiple<br />
social media platform possibilities is<br />
still the main calling card to reach her<br />
audience and obtain her most serious<br />
clientele.<br />
There are many reasons why Vera‘s<br />
work has been featured on allspraypainted,<br />
and aesthetic is a word that<br />
always comes to mind. This is why<br />
we wanted to dig deeper and find out<br />
what it is that makes Vera and her<br />
work as appealing as it is. Where did<br />
this sense of taste and mood come<br />
from and what is it that makes Vera<br />
as versatile as she is? Here is what<br />
she had to say.
allspraypainted <strong>Magazine</strong> 39
allspraypainted meets Vera Wohlleben<br />
40<br />
ALLSPRAYPAINTED<br />
How did your career start? Is there a moment when<br />
you knew that creative work was your preferred way<br />
of working?<br />
VERA<br />
Completely unplanned. As a balance to medical<br />
school, I started a blog in 2011 where I uploaded my<br />
recipes, food photography, and creative projects.<br />
Suddenly the first client inquired and wanted to give<br />
me money for my work. I could hardly believe it. But<br />
I immediately seized the opportunity. I registered my<br />
business at the end of 2011 and have been working<br />
as a content creator, photographer, and stylist for<br />
food, drinks, and photo stills for 11 years.<br />
I knew from early childhood that I loved creative work<br />
after I gave my parent's light beige carpet a complete<br />
wax crayon makeover. Which didn't bad at all,<br />
by the way. I noticed it every day at work as well. I<br />
think everyone has a superpower. Mine is aesthetics.<br />
If you can recognize it and then make it your profession,<br />
that is the greatest of luck.<br />
ALLSPRAYPAINTED<br />
Where do you find most of your inspiration?<br />
VERA<br />
I got a lot from my parents in terms of culinary, lifestyle,<br />
and style. In my childhood, we spent a lot of<br />
time in France and that's where I still find a lot of my<br />
inspiration. Whether it be through magazines, a visit<br />
to the supermarket or small boutiques, a whole vacation,<br />
or talking to friends there.<br />
The change of seasons always inspires me a lot too.<br />
Nature has it all when it comes to colors and compositions.<br />
Nature never creates kitsch. And I love exploring<br />
cities on my own.<br />
ALLSPRAYPAINTED<br />
What role does color play in your work?<br />
VERA<br />
When it comes to color, I'm pretty sensitive - which<br />
isn't always comfortable. When colors don't match, it<br />
affects me physically. I could even go as far as saying<br />
it hurts me sometimes. That's why my house is<br />
decorated absolutely purist in white with a few black<br />
accents. In my work, I like to go all out but keep it<br />
harmonious. That's what I love about Montana Cans.<br />
With the GOLD Line, we don't just have a few clumsy<br />
primary colors, but beautifully sensitively coordinated<br />
stylish nuances. I like to have these tones around<br />
me, which is why many of my projects for allspraypainted<br />
have kept a place in my own personal living<br />
space.
allspraypainted <strong>Magazine</strong> 41<br />
ALLSPRAYPAINTED<br />
How did your interest in interior design come about?<br />
VERA<br />
Actually, it also came through my parents. They<br />
always modeled and created mindful, beautiful,<br />
thoughtful environmental spaces for us, albeit in a<br />
completely different style than mine. English Library<br />
Style was the favorite in the past whereas it is the<br />
Provence Style today. I would even go so far as to<br />
say that I not only have an interest in interior design<br />
but that an aesthetically pleasing, uncluttered living<br />
space is fundamentally important to my well-being.<br />
ALLSPRAYPAINTED<br />
Part of your concept for allspraypainted meets are<br />
versatile Montana marble-coated cubes that you<br />
paint. What is the process of designing projects, and<br />
which part is your favorite?<br />
VERA<br />
Quite classic, I think: first the brainstorming and research.<br />
Then I get all the materials, I then implement<br />
the project, and take pictures. To be honest, working<br />
with my hands is not my main focus. What I enjoy<br />
more than the design itself is the editing of the photos.<br />
This is where I can perfect the photos and get<br />
the most out of them. And the very best thing is the<br />
contemplation after the fact. When you can just sit<br />
and look at the finished project that you are satisfied<br />
with.<br />
ALLSPRAYPAINTED<br />
How would you assess the role of Instagram in the<br />
context of your work?<br />
VERA<br />
Instagram may have its pros and cons, but like any<br />
tool, it's as good or as bad as the person using it. For<br />
me, it's a great acquisition tool that helps me show<br />
my work to the world and connect with clients in a<br />
straightforward way. It's also a wonderful resource<br />
for inspiration.<br />
ALLSPRAYPAINTED<br />
Which color or effect in the Montana product line do<br />
you like best?<br />
VERA<br />
Definitely Marble. There is more use of texture than<br />
color here, I love the elegant, monochromatic look.<br />
The effect is never the same, a minimal change in the<br />
spray angle produces a completely different result. I<br />
really like this organic randomness with a very reduced<br />
look and feel.
allspraypainted meets Vera Wohlleben<br />
42<br />
ALLSPRAYPAINTED<br />
How balanced is the proportion between digital and<br />
analog in your work?<br />
VERA<br />
About fifty-fifty, with a bit more desk work, client<br />
communication, writing proposals and concepts,<br />
research, image editing, retouching, copy editing,<br />
reporting, and accounting... For me, it's perfect like<br />
that.<br />
ALLSPRAYPAINTED<br />
What are your plans for <strong>2023</strong>?<br />
VERA<br />
If there's one thing I've learned, the best things that<br />
happen are unplanned. I never sat down and made<br />
the plan; " I'm turning my back on medicine now and<br />
becoming a content creator." It just happened. But<br />
you have to see the doors that open, be brave, and<br />
walk through them. So my only plan is to continue to<br />
trust my intuition, accept new situations with open<br />
arms and turn them into the best for me.<br />
ALLSPRAYPAINTED<br />
What does blogging mean to you?<br />
VERA<br />
Even though the community aspect in the form of<br />
comments and mutual visits has largely fallen asleep,<br />
the blog is still my home on the WWW. It's where<br />
I present my work, where I'm not dependent on<br />
external apps and their algorithms, and where I've<br />
collected almost all my projects in one place. Next<br />
to social media, the blog was and is my number one<br />
acquisition tool, my digital business card.<br />
ALLSPRAYPAINTED<br />
Has the exchange with your community changed the<br />
way you work?<br />
VERA<br />
It certainly has, whether consciously or subconsciously.<br />
Social media is not only a give but also a take<br />
for us content creators. Here is a tip for a store with<br />
beautiful photo accessories, there is a recipe that<br />
someone from the community sends me - the exchange<br />
among like-minded people is fun and always<br />
brings new inspiration.
allspraypainted <strong>Magazine</strong> 43<br />
It comes to no surprise that Vera‘s surname Wohlleben actually translates<br />
from German to English as wellbeing. Wellbeing which radiates from her<br />
private life, her creative life, and her professional life. It is with great pleasure<br />
that we celebrate allspraypainted Meets with Verena Susanna Wohlleben<br />
and all her Nicethings.
44<br />
Rainbow Stationery<br />
COLORING YOUR CREATIVE JOURNAL
Makeover<br />
Rainbow Stationery 46<br />
The journal, diary, sketchbook, or even the notebook are all names<br />
for that special little analog book where you write, draw, and plot<br />
down your ideas. Even now in the digital age, there is nothing more<br />
rewarding than putting pencil to paper when an idea comes flooding<br />
into your head that needs to take shape. However, the journal<br />
itself is not always an inspiring book to look at. Which is nothing<br />
that a little spray paint can‘t fix. That‘s when we got a great idea.<br />
An idea that would land on the outside of the journal, rather than<br />
inside it. The perfect time for Rainbow stationery.
allspraypainted <strong>Magazine</strong> 47
Makeover Rainbow Stationery<br />
48<br />
BEFORE<br />
Our journal was ideal for the purpose we used it for. It had a nice<br />
white paper that was well bound and a good spine. Our best<br />
friend when it came to writing down thoughts, drawing ideas, or<br />
taking those important notes that would need to refer back to at<br />
some point. However, our journal was completely white! We gathered<br />
our other materials in the form of 5 Montana GOLD spray<br />
paint colors, some book covering film, and a black FINE Montana<br />
ACRYLIC marker. Then we were ready to add some color.<br />
The colors we chose were dynamic and bright. To be exact<br />
we used Sweet Dream, Strawberry, Shrimp Dark, Citrus, and<br />
Malachite. Or if you want to keep it simple, think rainbow colors.<br />
Before applying the colors, there was a little trick that we<br />
did using the book covering film that would allow us to create<br />
a „Notes“ heading on the front. We cut a moderate sized oval<br />
out of the film to function as a mask and peeled off the back.<br />
We then stuck it softly onto the front cover where we wanted<br />
it. Once the paint color had been sprayed on, this oval would be<br />
removed leaving an oval of blank white paper where we could<br />
write the word „Notes“ or anything else we may want to with our<br />
black ACRYLIC marker.<br />
Remembering to shake each can well for 2-3 minutes ensuring<br />
that we could hear the mixing balls moving freely, we then<br />
turned the cans upside down, removing the nozzle and allowing<br />
the black safety ring to fall out from under it. Once the nozzles<br />
were reapplied, it was color on! With the notebook open on our
allspraypainted <strong>Magazine</strong><br />
49<br />
painting surface, we then proceeded to apply one line of color<br />
at a time so that the front, back, and spine were all softly coated.<br />
One by one the colors were sprayed on and our rainbow<br />
color scheme faded roughly from dark to light. In one session<br />
the whole notebook was covered with color and the pages were<br />
protected as they were face down on our drop sheet. We could<br />
barely wait for it to dry so we could start using it.<br />
Before that moment could come, there was one final step.<br />
Peeling off the book covering film so we could draw the word<br />
„Notes“ in the new blank space. Thankfully we had applied the<br />
film at just the right pressure meaning it peeled off easily without<br />
tearing the book. With a little creative swing, we titled our notebook<br />
and then left it to dry completely overnight before using it.
Interior Rainbow stationery<br />
50
allspraypainted <strong>Magazine</strong><br />
51
Makeover<br />
Rainbow Stationery<br />
52
allspraypainted <strong>Magazine</strong><br />
53<br />
AFTER<br />
If you saw your notebook in a shop, it would probably<br />
be the first one you gravitate to. The bland white<br />
front and back covers were now illuminating rainbow<br />
colors and the handwritten cover title was the perfect<br />
personalizing touch.<br />
The whole process was only 20-30 minutes of<br />
work and something anyone at any skill level could<br />
do. If you wanted to challenge yourself a little more,<br />
you could consider getting a little more complicated<br />
with your book covering film shape, or how (and<br />
what) you apply to the masked area with your marker(s)<br />
once the book covering film was removed.<br />
Alternatively, the painting aspect of the project<br />
could also be simplified or made more challenging.<br />
If you wanted to make it easier, how about applying<br />
just one or fewer colors? If you wanted to make it<br />
more challenging, you could apply your paint differently,<br />
use a stencil, or integrate a drawing element<br />
with Montana ACRYLIC markers once the paint had<br />
dried. A piece of cardboard or scrap paper could be a<br />
good practicing material if you wanted to experiment<br />
before touching your journal.<br />
It is fair to say the Rainbow stationery idea is<br />
a good one. Now you can start jotting down those<br />
notes and ideas for your future sensational spray<br />
painted craft projects.<br />
Good luck and happy Crafting.
54<br />
Refurbished Bird<br />
House<br />
KEEPING YOUR BIRDHOUSE FRESH FOR ALL SEASONS
Upcycling Refurbished Bird House<br />
56<br />
Finally! The sun is out and any excuse to do things outside in the fresh air is<br />
welcomed. The grass is growing, the garden desperately needs attention, and<br />
there are a million things to do around the house—yet another great excuse to<br />
do a creative DIY project instead before hitting the practical stuff. And upon one<br />
look around the garden, the tired old birdhouse is just a suitable object to get<br />
some cans out and do a refurb. Or refurbish if you want to get technical.
allspraypainted <strong>Magazine</strong><br />
57<br />
BEFORE<br />
With little more than some sandpaper, a few of your favorite<br />
Montana GOLD colors, some white MARBLE 400ml spray, Montana<br />
VARNISH, and a black ACRYLIC marker, you have all you<br />
need to turn your birdhouse, into a luxury hotel for birds.<br />
Our birdhouse had spent quite some time out in the sun<br />
and the rain. The paint on the roof had faded and varnish on<br />
the uncolored wooden parts had deteriorated and started peeling.<br />
With some sandpaper or even better an orbital sander if you<br />
have access to one, sand down the whole birdhouse. The nooks<br />
and crannies you will need to do by hand. Dust it off and wipe it<br />
down with a damp cloth. Once clean and dry, you can start masking<br />
the areas of the birdhouse you don‘t want to color.<br />
We covered these areas with card and cloth, but any flexible<br />
material that prevents the paint from hitting the wood will<br />
do. As we painted the different sections, we also covered the<br />
newly painted areas to protect them as well. To start with our<br />
roof was the only wood exposed and our vigorously shaken pink<br />
Montana GOLD can with the safety ring taken out was ready to<br />
do its thing.<br />
Smooth, thin even coats were applied and if your wood has<br />
cracks or openings, don‘t be afraid to do multiple coats to ensure<br />
everything is properly coated. keeping the main body of<br />
our birdhouse covered, we followed this same procedure for<br />
the roof, the sides, and the base, protecting each surface after<br />
we painted it. The roof became pink (Lichee), the sides orange<br />
(Blast Orange), and the base was pre-primed with black (Shock<br />
Black), but this was only preparation for our special addition.<br />
A coating of Montana MARBLE 400ml spray, in the color white,<br />
was added to the base which meant we were now ready to unpack.<br />
Having removed all the covering, our pink roofed, orange<br />
walled, marble-based birdhouse was complimented with the raw<br />
look of natural wood at the front and back.<br />
Our EXTRA FINE Montana ACRYLIC EMPTY marker was at<br />
the ready as we filled the barrel with black ACRYLIC refill paint.<br />
Remember to unscrew in a clockwise direction and screw tight<br />
counterclockwise, you can mix any color you want from any of<br />
the ACRYLIC paint colors. But we chose black and used it to accentuate<br />
the screw tops that could be seen in the pink paint. Or<br />
you can just buy a black prefilled one.<br />
All that was left to do was to apply a few coats of Montana<br />
VARNISH to protect and seal the wood and give it all the oneover<br />
finish that we wanted. We chose Montana VARNISH Matt to<br />
highlight the grain of the wood and keep it as natural-looking as<br />
we could. The UV blockers in the VARNISH would also help protect<br />
the birdhouse from the elements all the longer, so the new<br />
5-star birdhouse would stay looking good for as long as it can.
allspraypainted <strong>Magazine</strong><br />
59
allspraypainted <strong>Magazine</strong><br />
63<br />
AFTER<br />
The Montana Matt VARNISH did a great job of coating the birdhouse and<br />
protecting all the parts. This will make a big difference when the birdhouse<br />
is exposed to heat and rain, minimizing and slowing down the process of<br />
the wood expanding and contracting, letting in water, and splitting the paint<br />
coating over time. The colors look great but they come alive next to the beautifully<br />
sanded and sealed natural wood.<br />
If the birds aren‘t happy with the color scheme, the bees will be! And<br />
with this beautiful little touch, you may have conjured up the strength to<br />
start tackling some of those other necessary tasks, like pulling weeds and<br />
mowing the lawn. In as little as a morning or afternoon, this project can be<br />
done and dusted. And if you don‘t have an old birdhouse and don‘t want to<br />
make one, there are many options available in hardware stores that you can<br />
get to work on. Another job well done.<br />
Happy Crafting!
64<br />
allspraypainted<br />
meets<br />
Hassan Abu-Izmero<br />
aka HABU<br />
„MAKE. SLEEP. REPEAT“
allspraypainted meets Hassan Abu-Izmero aka HABU<br />
66<br />
In the quaint little town of Heddesheim Germany, in the region of<br />
Baden-Württemberg, there is a whole lot more going on than one might<br />
think. Sure, the lake down the road has always attracted people from far<br />
and wide to cool off for a summer swim. But somewhere, hidden away<br />
in an industrial estate, there is also a workshop making, sleeping, and<br />
repeating. A workshop that is being watched by over 450,000 followers<br />
on YouTube, facebook, TikTok and Instagram from around the globe!<br />
And who are they watching? Hassan Abu-Izmero, or as he is affectionately<br />
known on all his social media platforms, HABU.
allspraypainted meets Hassan Abu-Izmero aka HABU<br />
68<br />
HABU has long identified himself as a maker, artist, and craftsman. But he does<br />
a pretty good job of being a prolific content creator as well. His career which<br />
started as a metalworker and welder would probably have been enough to keep<br />
him busy. But the drive to create and explore other materials, which had been<br />
inside him since he was a kid, was too much to just go down one path. A learning<br />
curve that got him filming his early creations and loading them up to You-<br />
Tube as a hobby. Or at least as a hobby in the beginning. At some point, he set<br />
himself the goal to make, document, and upload one project per week. As easy<br />
as Make. Sleep. Repeat. A motto that has become his slogan that reflects and<br />
defines his „just do it“ attitude.
allspraypainted <strong>Magazine</strong> 69<br />
After one year of creating and documenting, he got<br />
so good at what he was doing that he was able to<br />
leave his job and do his projects full time. HABU<br />
Official was born and the world was just about to<br />
become a more creative DIY place. HABU, who<br />
seems to have no limits in creating his projects, has<br />
made everything from e-bikes to chicken coops,<br />
camper conversions to knives, furniture, tables, and<br />
beyond. Using any material he can get his hands on<br />
from metal to wood, leather to plastics, resins to all<br />
things recycled. And of course, Montana Cans aerosol<br />
products which he became accustomed to in his<br />
experimentations with graffiti as a youth.
allspraypainted meets Hassan Abu-Izmero aka HABU<br />
70<br />
As well as creating an amazing shelf project right before<br />
our eyes, we also took some of his precious time<br />
out to have a chat with the man himself to try and<br />
figure out what makes his creative mind tick. Here is<br />
what he had to say:<br />
ALLSPRAYPAINTED<br />
How did your career start? Was there a moment<br />
when you knew that handcraft work is your preferred<br />
way of working?<br />
HABU<br />
It all started as a hobby and that's how the passion<br />
for it developed. Crafting should be the preferred<br />
way of working for all of us because EVERYTHING is<br />
a form of craft.<br />
ALLSPRAYPAINTED<br />
Where do you find most of your inspiration?<br />
HABU<br />
I find most of my inspiration in nature, where my mind<br />
is free, far away from any technology.<br />
ALLSPRAYPAINTED<br />
What role do craft materials play in your work?<br />
HABU<br />
For me, all materials play a big role, as they are the<br />
core of my work. I am particularly drawn to experimenting<br />
with different or new materials!<br />
ALLSPRAYPAINTED<br />
What do you think about the concept of upcycling?<br />
HABU<br />
Upcycling or recycling is extremely important and<br />
will inevitably become a bigger and bigger issue. In<br />
this regard, it is even nicer to be able to inspire people<br />
with my projects.<br />
ALLSPRAYPAINTED<br />
Part of your concept for "allspraypainted Meets" was<br />
a shelf that you built and painted yourself. What is<br />
your design process when you undertake your projects,<br />
and which part of the process is your favorite?<br />
HABU<br />
The favorite part of most projects for me is the planning.<br />
That's because I don't really do any of it! Or at<br />
least, very rarely. I like to jump straight into the deep<br />
end as it is always very refreshing for me. I'm lucky<br />
that I almost always have a picture in my mind of how
allspraypainted <strong>Magazine</strong> 71<br />
my project will look when it's finished. And it is this<br />
image in my mind that I then simply work towards.<br />
Even if I don't know what step 3 will be, I always know<br />
what the first step is. This then leads to the second<br />
step, and so on. I see it as a no-brainer, so to speak.<br />
ALLSPRAYPAINTED<br />
How would you rate the role of YOUTUBE in the context<br />
of your work?<br />
HABU<br />
Since YOUTUBE is my main mouthpiece to the public,<br />
it plays a large role in what I do. Of course, everything<br />
would always work out without it, but this way I<br />
think I reach the most people.<br />
ALLSPRAYPAINTED<br />
Which color or effect in the Montana Cans aerosol<br />
ranges do you like the most?<br />
HABU<br />
My favorite colors are the Montana GOLD colors<br />
Shock Black and Shock Red, and my favorite effect is<br />
the Montana CRACKLE Effect can, in the color Traffic<br />
Black.<br />
ALLSPRAYPAINTED<br />
How much of a balance is there between the proportions<br />
of the digital and analog aspects of your work?<br />
HABU<br />
As a content creator, it is quite clear that 50% of my<br />
work takes place in the workshop and the remaining<br />
50% is digital. Of that 50% digital work, video and<br />
image editing are the core.<br />
ALLSPRAYPAINTED<br />
What are your plans for 2022 if you have any?<br />
HABU<br />
My plans for 2022 are as simple and as clear as always;<br />
Just do it! My uncle used to say: Expect nothing,<br />
and live frugally on surprises!<br />
ALLSPRAYPAINTED<br />
How long have you been working with spray paint?<br />
HABU<br />
Montana Cans have accompanied me since my childhood.<br />
I too have left my tags and some graffiti here<br />
and there. Therefore, I was always aware of the quality<br />
of Montana Cans products compared to other<br />
paints. "Can spray on anything!" has always been the<br />
motto for me!<br />
ALLSPRAYPAINTED<br />
Has the connection and exchange with your online<br />
community changed your way of working?<br />
HABU<br />
Yes totally! Because here, unlike on television, there<br />
is direct contact with the audience. Not only have<br />
great friendships developed, but there is also a great<br />
exchange of know-how, which is extremely useful for<br />
me and us all. It helps us progress quickly! The Maker<br />
Community is therefore one of the cornerstones on<br />
which my work is built!<br />
Watching HABU work so comfortably with all the tools and materials he<br />
does is an inspiring experience, to say the least. His self-confidence is<br />
enough to make any DIYer, regardless of male or female, want to go out<br />
and try whatever it is they want to do. And if happens to be with metal,<br />
then our new knowledge of how helpful Montana ACETONE, Metal PRI-<br />
MER, and CRACKLE sprays are, could be a benefit in getting the best<br />
possible results. Just like all of HABU‘s projects. We look forward to seeing<br />
his skills put to even more good use in the near future.
72<br />
Frosty Christmas<br />
Baubles<br />
A NEW LOOK FOR YOUR CHRISTMAS TREE
DIY Frosty Christmas Baubles<br />
74<br />
Is there such a thing as a Christmas tree without Christmas baubles? I think not.<br />
Or at least it would be a shame if the tree was bare of those beautiful round<br />
balls, that seem to be a universal symbol for Christmas trees all over the world.<br />
But baubles year in and year out, that gets old too. That is until you read further<br />
and learn about our Frosty Christmas Bauble project where we took the humble<br />
Christmas bauble to the next level. This is bound to become your next favorite<br />
Christmas project!
HOW IT WAS DONE<br />
Here is an idea without reinventing the wheel; a new style of Christmas bauble. „Great“<br />
you may say to yourself but the Christmas bauble has been around for as long as the<br />
Christmas tree and everything has been done before. Not exactly... Our Frosty Christmas<br />
Bauble project was fueled by exactly this challenge. The same round form, and a<br />
new way to dress it up. All we needed was the new Montana GOLD Fluorescent color<br />
F6200 Active Cyan, Montana PRIMER Universal, and some Montana MARBLE Effect in<br />
the color white. Our two designs were a Frosty bauble and a Glow under-UV light fluoro<br />
bauble.<br />
THE FROSTY BAUBLE<br />
The frosty bauble is a stroke of simple genius. We had white plastic baubles of various<br />
sizes to work with and knew that we wanted a sleek and timeless finish. But if you<br />
have colored baubles, it is no problem as the first coat of paint will color them white.<br />
Already having put on our gloves and mask in our covered painting area, the first step<br />
apart from buying some Montana PRIMER Universal and some Montana MARBLE in<br />
the color white, was to shake all our cans vigorously for 2-3 minutes till we could hear<br />
the mixing ball moving freely. Then by turning the can upside down and removing the<br />
nozzle, we allowed the black safety ring to fall out from under the cap and re-attached<br />
it to the valve of the can. A quick spray away from any objects and the can was ready<br />
to go.<br />
While holding one bauble at a time, take your Montana PRIMER Universal and<br />
evenly coat the whole ball. Spray the bauble with gentle even strokes at about 15 to 20<br />
centimeters distance to prevent too much paint from landing in one spot and forming<br />
drips. Once dry repeat the process, but this time with the Montana MARBLE spray.<br />
Allow the white strands of marble a little more distance from the bauble so they can<br />
organically land on it forming a white-on-white frosted look. The closer the spray is to<br />
the bauble, the closer together the strands will be. And that‘s it! All you need to do is let<br />
them dry and hang them on the tree. And what a beautiful discreet look they now have.
76<br />
THE UV FLUORO BAUBLE<br />
The key to our glowing baubles is the Montana GOLD Fluorescent<br />
color Active Cyan, and a UV light. As mentioned, our baubles<br />
were white, to begin with. If yours aren‘t, that is nothing that<br />
a coat of Montana PRIMER Universal or Montana GOLD Shock<br />
White can‘t fix. After having shaken your cans and gone through<br />
the preparation procedures, apply your paint in thin even layers<br />
trying to avoid drips. Then let it dry overnight.<br />
Normally the fast drying characteristics of most Montana<br />
cans would allow the application of new colors relatively quickly.<br />
But in the case of our UV fluoro baubles, we need to apply rubber<br />
bands to the surface which requires strong cured paint. If<br />
your balls are white to start with, this doesn‘t apply. Taking your<br />
rubber bands, apply them in various directions around the bauble<br />
so that they sit tight against the bauble. Add as many as you<br />
wish overlapping them as desired. Where the rubber bands are,<br />
no paint will attach to the bauble leaving interesting lines of varied<br />
strengths. Having prepared your Active Cyan can spray thin<br />
even coats to your bauble so it is all covered yet avoiding drips.<br />
Allow drying. And if you have the time, allow drying overnight.<br />
Once the paint is at least touch-dry, carefully remove all<br />
the rubber bands. What is left is Active Cyan baubles with white<br />
varying lines that have soft and hard edges. They look very suave<br />
as they are in natural daylight. But the magic really happens<br />
when they are exposed to ultraviolet light and they glow in the<br />
dark. The darker the room or space, the more intense the glowing<br />
effect will be.<br />
This is a super simple project with two very unique and<br />
innovative results. You and your guests will no longer ignore the<br />
Christmas tree in the loungeroom as these beautiful baubles will<br />
demand your attention and celebration. A contemporary touch<br />
to classic Christmas decor. And it only took less than 5 minutes<br />
of actual work time. To make this project even more appealing,<br />
it can be done by anyone old enough to use spray paint at any<br />
skill level.<br />
All that is left to do now is enjoy Christmas and see what<br />
else is under the tree.<br />
Merry Christmas and happy Crafting.
DIY<br />
Frosty Christmas Baubles<br />
78<br />
MATERIALS USED<br />
• Montana GOLD Active Cyan<br />
• Montana PRIMER Universal<br />
• Montana MARBLE White<br />
• Plastic Christmas baubles<br />
• An Ultraviolet light<br />
• Rubber bands<br />
• Gloves<br />
• Mask<br />
• Drop sheet
80<br />
The Marker and<br />
Vase Project<br />
REDESIGNING VASES WITH MARKERS AND COLOR
Interior<br />
The Marker and Vases Project 82
allspraypainted <strong>Magazine</strong><br />
83<br />
Imagine you have that itching feeling to create something that will brighten up<br />
your home, office, or living space but you don‘t need anything and you‘re not<br />
sure where to start. Sound familiar? You may see this as a small creative mental<br />
block, but we see it as an opportunity to do something just for fun. We have a<br />
solution so you can get your hands dirty faster than you think. We like to call it<br />
„The Marker and Vase project“. Although brushes are also allowed. Read on and<br />
get inspired.<br />
HOW WE DID IT<br />
This project is another one of those moments where you may<br />
think, „why didn‘t I think of this before“. When you go to second-hand<br />
shops, yard sales, hardware stores, or home furnishing<br />
stores, how often have you seen simple ceramic vases that<br />
have great shapes but not always great designs on them? You<br />
may even have some of them at home now or in the basement<br />
gathering dust. The adventure starts here! Grab your vases and<br />
give them a good clean removing any dust, dirt, oils, or residues.<br />
Ensure they are completely dry and grab some white acrylic<br />
paint or a Montana Universal PRIMER can and prepare for the<br />
next step.<br />
If your vases are not already white, you first need to make<br />
them white so you can paint and draw on them. For surfaces that<br />
are smooth or glazed, shake your Montana Universal PRIMER<br />
well for 2-3 minutes till you hear the mixing balls moving freely.<br />
Then turn the can upside down, remove the nozzle to allow the<br />
black safety ring under it to fall out, and then re-apply it spraying<br />
in a neutral direction to ensure it is working correctly. Place your<br />
vase(s) on your drop sheet and spray in thin even coats till you<br />
have coated it completely. If required, leave 5 minutes or more,<br />
and then re-apply. If your surface was sandable with some fine<br />
sandpaper, we recommend this before application but ensure<br />
your vase or vases are clean again before priming.<br />
If your vase is uncoated or matt in finish, you also have the<br />
option to prime it with white acrylic paint. The better quality of<br />
the paint, the better the finish. But if you‘re just having fun, even<br />
leftover house paint will do the job but not last as long. Paint it<br />
on with a brush as desired and allow it to dry completely.<br />
Your primed white vases are dry and now begging for<br />
attention. Using your collection of prefilled Montana ACRYLIC<br />
markers, your Montana EMPTY markers, Montana ACRYLIC<br />
Paint Refills, and your paintbrushes prepare your space for drawing<br />
and painting.<br />
The Montana ACRYLIC Markers simply need to be shaken,<br />
unwrapped, and then pumped softly a few times on a scrap piece<br />
of paper to start the flow of paint to the tip. Once they are<br />
flowing, the occasional shake and re-pump are required to keep<br />
the paint flowing at your desired rate<br />
The Montana EMPTY or ACRYLIC EMPTY markers work<br />
the same as the ACRYLIC markers mentioned above, with the<br />
exception that you can fill them with whichever color you want.
Interior<br />
The Marker and Vases Project 84<br />
Unscrew the head of your EMPTY marker (anti-clockwise for<br />
Montana EMPTY, clockwise for Montana ACRYLIC EMPTY), and<br />
remove the plastic valve so the marker barrel is clear. Using your<br />
Montana 25ml ACRYLIC Refill Paint colors of your choice, squirt<br />
the color or mix of colors into the marker barrel leaving enough<br />
space in the barrel to re-insert the plastic valve, and re-screw<br />
the maker head on, in the appropriate direction. Then shake and<br />
pump as mentioned previously.<br />
If you are using brushes, simply squirt your chosen Montana<br />
Paint Refill Colors in any kind of cup or container you like<br />
so that you can dip the brush in to re-load it. Should you want to<br />
do this project over an extended time, or want to keep the colors<br />
you are creating, consider using sealable air-tight containers<br />
that you can re-use at any time.<br />
The designs you apply can be as complicated or as simple<br />
as you like. Either just look at your vase and see what comes out<br />
of you, or maybe do a little research for inspiration before you<br />
get started. And if you still have a creative block, think about<br />
where you want to show off your vase, or what you want to put in<br />
it? A theme may come to you in this process that you didn‘t think<br />
of previously. And at the very worst, look at the shape of your<br />
vases and create shapes and patterns that complement their<br />
form. Sometimes the simplest things, or the colors you combine<br />
with each other, can be the art you didn‘t realize you had within<br />
you. If it is a creative block your trying to break, don‘t think too<br />
much. Put a marker or brush to the surface and let your instinct<br />
take over.<br />
This is a super simple project for all skill levels. Depending<br />
on the priming required and the sizes of your vases, you can<br />
spend as little as 10-30 minutes on each vase, or lose yourself<br />
for hours. If you want to store the vases outside, we recommend<br />
applying Montana VARNISH in the finish of your choice to resist<br />
the elements. Ensure that each vase has dried for over 24 hours<br />
before varnishing. If your vase is indoors with minimal chance of<br />
unwanted touching or scratching, this may not be required.<br />
Who knows, you may have created a historic urn for generations<br />
to come to discover? And if not, the most important thing<br />
was that you had fun.<br />
Well done and Happy Crafting!
allspraypainted <strong>Magazine</strong><br />
85
Interior<br />
The Marker and Vases Project<br />
86<br />
MATERIALS USED<br />
• Montana ACRYLIC markers<br />
(Sizes of your choice. We used FINE)<br />
• Montana EMPTY or ACRYLIC EMPTY<br />
• Markers (Sizes of your choice.<br />
We used 2mm and 15mm)<br />
• Montana Paint Refill 25ml<br />
(Colors of your choice)<br />
• Paintbrushes (size of your choice)<br />
• Montana Universal PRIMER (Optional)<br />
• Montana VARNISH<br />
(Optional. Finish of your choice)<br />
• Vases (Ceramic or natural<br />
materials preferable)<br />
• Gloves, mask (If using Montana<br />
Universal PRIMER)<br />
• White acrylic paint (if not using<br />
Montana Universal PRIMER)<br />
• Cups or containers to mix paint<br />
• Drop sheet or surface cover
Media Owner and Publisher:<br />
MONTANA-CANS /<br />
allspraypainted.com<br />
© <strong>2023</strong> allspraypainted.com<br />
All rights reserved.<br />
Reprinting, even in part,<br />
only with the approval of<br />
the publisher.<br />
MONTANA-CANS<br />
Häusserstraße 36<br />
69115 Heidelberg<br />
Deutschland<br />
Phone +49 (0) 6221 36 333 0<br />
info@montana-cans.com<br />
www.allspraypainted.com<br />
Creative direction of allspraypainted by Leonie Specht<br />
Creators<br />
Vera from nicestthings.com<br />
Lisa from itsprettynice.com<br />
Jordan from @jordankatz<br />
Hassan from habu-official.com<br />
Sarah from @saraheartmann represented by @0360works<br />
Danny and Martin from schreiberpoetter.de<br />
Graphic Design<br />
Dominik from @dominikkeller_of
SOPHISTICATED<br />
DIY PROJECTS<br />
#ALLSPRAYPAINTED #ALLSPRAYPAINTEDMEETS #MONTANACANS
ALLSPRAYPAINTED.COM<br />
FOLLOW US @ALLSPRAYPAINTED<br />
505072