Operating Instructions For Pressure Cask - Speidel Tank
Operating Instructions For Pressure Cask - Speidel Tank
Operating Instructions For Pressure Cask - Speidel Tank

Create successful ePaper yourself
Turn your PDF publications into a flip-book with our unique Google optimized e-Paper software.
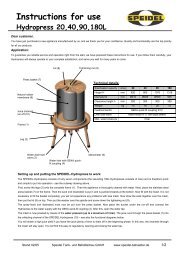
<strong>Pressure</strong> cask<br />
5.2 Replacing the gas bottle:<br />
If you would like to refill the bottle with additional gas, or you simply want to remove the<br />
bottle because the pressure is insufficient, first close the bottle at the valve (4b) of the<br />
pressure relief valve. Ensure that the gas bottle and the exit port (4b) of the pressure relief<br />
valve are closed! Now, remove the quick release (2a) from the male coupling (1b). The<br />
hose, pressure relief valve, and gas bottle can now be removed from the vessel. A check<br />
valve (1) constantly safeguards the pressure inside of the cask.<br />
5.3 Maintenance/Inspection:<br />
• <strong>For</strong> safety reasons, the pressurized beverage cask must be inspected during regular<br />
intervals. Here, compliance with all current national regulations pertaining to the safe<br />
operation of pressure vessels is mandatory.<br />
• If the vessel was damaged, immediate inspection is necessary.<br />
• Maintenance/inspection is recommended at least once a year.<br />
• Visible changes such as cracks or other damage are not acceptable.<br />
• All threaded connections must be free of damage, must not show wear and tear and/or<br />
contamination.<br />
• The pressure limiting valves must remain clean at all times, as sticky residue is<br />
common when handling juices.<br />
• If purchasing a CO2 bottle, a TÜV inspection is required every 10 years. Please<br />
contact your gas specialist.<br />
6 Range of application<br />
6.1 Sweet cider with any desirable alcohol level<br />
Use the pressurized beverage cask without connecting it to the gas bottle or attaching any<br />
additional fittings. Thus, the cask can be used without adding any ancillary equipment.<br />
No tools are required! Do not remove the blind plug, item 0.<br />
• If you prefer a clearer sweet cider with less alcohol content, it is recommended to<br />
transfer the juice into another vessel after pressing and keep it there for 3 - 4 hours.<br />
This will remove the cloudiness from the juice. Ensure to remove all spoiled fruit<br />
prior to the pressing procedure.<br />
• After pressing, or once the must has settled, fill the beverage cask immediately with<br />
the respective fruit juice.<br />
• Now, you can determine the alcohol content of the beverage. Once the cask has been<br />
filled, immediately close it in order to obtain a sweet cider with less alcohol later on.<br />
The longer you keep the cask open, the longer the fermentation will last, and the<br />
alcohol level in the beverage will be increased. If the vessel is kept open for 3 to 4<br />
days and subsequently closed, the result will be a much higher alcohol content. Ensure<br />
that the juice will not ferment completely, otherwise, the beverage will not be left with<br />
a residual sweetness, and additional fittings (see Application 3) will be required.<br />
• As soon as the cask is closed, pressure is generated inside of the vessel caused by the<br />
fermentation until this process is stopped on its own. This way, you will always have a<br />
Page 8 of 16