Operating Instructions For Pressure Cask - Speidel Tank
Operating Instructions For Pressure Cask - Speidel Tank
Operating Instructions For Pressure Cask - Speidel Tank

Create successful ePaper yourself
Turn your PDF publications into a flip-book with our unique Google optimized e-Paper software.
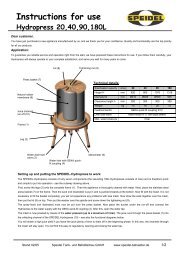
Connection<br />
Gas bottle (4d)<br />
<strong>Pressure</strong> cask<br />
5 How to work with the pressurized beverage cask<br />
5.1 Filling the vessel with gas properly:<br />
(for the use with a CO2/carbon dioxide gas connection)<br />
1. The following additional equipment is required: SPEIDEL gas set, pressure relief<br />
valve (adjustable from 0 - max. 10 bar) and lockable gas bottle with the respective<br />
application gas, see accessories (carbon dioxide).<br />
2. Use a socket wrench, size 6, to remove blind plug (0) from tap (A).<br />
3. At the lower end (1a), screw coupler unit (1) including seal into the lock (0) of the<br />
tap (A).<br />
4. Firmly attach the hose's threaded connector (3b) to the exit port (4a) of the pressure<br />
relief valve.<br />
5. Now, connect the quick release of the hose (2a) to the male coupling (1b). Simply<br />
press in – done!<br />
6. The other end of the hose (2b) is pre-assembled with the threaded hose connection<br />
(3a).<br />
7. Subsequently, ensure all components are properly connected. Before connecting the<br />
valve (4b), set the pressure relief valve to "ZU" (CLOSED) and totally remove the<br />
operating pressure set screw (4c); this will prevent immediate pressure build-up.<br />
8. Now, connect the relief valve (4d) with the proper gas bottle.<br />
9. The system is now ready to be used. Depending on the application, the vessel can<br />
now be pressurized to a maximum of 10 bar (should this pressure be exceeded, the<br />
relief valve will be activated!)<br />
10. Open the gas bottle. The bottle's pressure will be displayed on the pressure gauge.<br />
Now, you can open the valve (4b) on the pressure relief valve and set the appropriate<br />
pressure, using the setscrew (4c). The operating pressure will be displayed on the<br />
pressure gauge and the relief valve.<br />
SPEIDEL pressure relief valve<br />
SPEIDEL gas set (1-3)<br />
(4) Tap (A)<br />
(4c)<br />
(4a)<br />
(4b)<br />
Quick release (3)<br />
(3b)<br />
(3a)<br />
(2b)<br />
Hose (2)<br />
Page 7 of 16<br />
(2a)<br />
(1b)<br />
Coupler unit (1)<br />
(1a)<br />
Seal<br />
Locking device (0)