Operating Instructions For Pressure Cask - Speidel Tank
Operating Instructions For Pressure Cask - Speidel Tank
Operating Instructions For Pressure Cask - Speidel Tank

Create successful ePaper yourself
Turn your PDF publications into a flip-book with our unique Google optimized e-Paper software.
Translation of original<br />
<strong>Operating</strong> <strong>Instructions</strong><br />
<strong>For</strong><br />
<strong>Pressure</strong> <strong>Cask</strong><br />
Item No.: 47014<br />
Issue August 2011
TABLE OF CONTENTS<br />
1 GENERAL INFORMATION ............................................................................... 3<br />
2 SAFETY INSTRUCTIONS ................................................................................. 4<br />
3 GENERAL INFORMATION ............................................................................... 4<br />
4 INTRODUCTION OF THE PRESSURE CASK.................................................. 5<br />
4.1 Components and scope of supply........................................................................................................... 5<br />
4.2 Technical data ......................................................................................................................................... 5<br />
4.3 Prior to first use ...................................................................................................................................... 5<br />
4.4 How to place the pressure cask.............................................................................................................. 5<br />
4.5 Transporting the pressure cask. ............................................................................................................ 6<br />
4.6 How to clean the beverage cask ............................................................................................................. 6<br />
4.7 How to store the pressure cask .............................................................................................................. 6<br />
5 HOW TO WORK WITH THE PRESSURIZED BEVERAGE CASK ................... 7<br />
5.1 Filling the vessel with gas properly:...................................................................................................... 7<br />
5.2 Replacing the gas bottle: ........................................................................................................................ 8<br />
5.3 Maintenance/Inspection:........................................................................................................................ 8<br />
6 RANGE OF APPLICATION............................................................................... 8<br />
6.1 Sweet cider with any desirable alcohol level......................................................................................... 8<br />
6.2 Low-alcoholic sweet cider ...................................................................................................................... 9<br />
6.3 Containers that keeps your fermented beverage fresh........................................................................ 9<br />
6.4 Soda water/carbonated mineral water.................................................................................................. 9<br />
7 TROUBLESHOOTING..................................................................................... 10<br />
8 WARRANTIES................................................................................................. 10<br />
9 EU CONFORMITY DECLARATION................................................................ 12
<strong>Pressure</strong> cask<br />
1 General information<br />
Dear Customer,<br />
You purchased a new product from <strong>Speidel</strong>. Thank you very much for your trust. When it<br />
comes to our products, quality and functionality are of our primary concern.<br />
Intended use:<br />
This pressure cask was designed and manufactured to produce and store all kinds of<br />
sweet cider, in particular unfermented juices. Fermentation itself or exterior pressure<br />
prevents or slows down further fermentation, which keeps the juice/cider sweet or makes<br />
it sweeter. Furthermore, it can also be used for the optimal storage of fermented juices<br />
such as wine and fruit juices. The cask is not intended for and not suitable for the storage<br />
of aggressive media or other fluids.<br />
<strong>Operating</strong> instructions:<br />
In order to ensure your new pressure cask will work reliably and safely from the first time<br />
you use it and throughout its entire operating life, we have written these instructions.<br />
Please read them carefully before using the product for the first time. If you follow these<br />
tips and instructions carefully, the unit will work to your utmost satisfaction and will last<br />
you for a long time to come. Should you decide to pass this product on to a third party,<br />
please ensure to hand over the operating manual as well. To ensure, that you will enjoy<br />
your newly purchased grinder, please observe the following safety and operating<br />
instructions.<br />
Declaration of Conformity<br />
We, SPEIDEL <strong>Tank</strong>- und Behälterbau GmbH, herewith declare that the "<strong>Pressure</strong> cask"<br />
referred to in these instructions to which this declaration relates, conforms with the<br />
European requirements for food items and the Pressurised Equipment Directive 97/23/EG<br />
.<br />
Manufacturer:<br />
<strong>Speidel</strong> <strong>Tank</strong>- und Behälterbau GmbH<br />
Krummenstrasse 2<br />
D-72131 Ofterdingen<br />
Germany<br />
www.speidels-hausmosterei.de<br />
www.speidel-behaelter.de<br />
Page 3 of 16
<strong>Pressure</strong> cask<br />
2 Safety instructions<br />
Please consider the following instructions:<br />
• Risk of suffocation! Only operate the pressure cask and it's ancillary equipment in<br />
well ventilated rooms in order to prevent the risk of suffocation caused by escaping<br />
CO2 (e.g., when bleeding the pressure relief valve).<br />
• The pressure cask has been designed for a maximum 10 bar! The pressure relief valve<br />
has been set to a maximum pressure of 10 bar. If the pressure is exceeded, the valve<br />
opens and gas will escape.<br />
• The greatest possible care must be taken when working with or around any<br />
pressurised equipment (e.g., cask, pressure reducing valves, gas bottles, etc.).<br />
• Never store pressurised vessels in direct sunlight or operate these vessels inside<br />
excessively hot rooms.<br />
• When working with gases, a pressure reducing valve must be used that is set to a<br />
maximum operating pressure of 10 bar. You may purchase an CO2 pressure reducing<br />
valve from us.<br />
• Do not use the pressure cask as pressure reservoir or buffer vessel for gases with high<br />
pressure thresholds/changing pressure loads, as is the case when constantly filling and<br />
emptying cycles are being used.<br />
• Individual components require merely a tight fit. Never use excessive torque!<br />
• Do not use any tools to tighten the tap (A). Simply tighten all screws manually.<br />
• Risk of injury! Never remove the tap (A), the blind plug (0) or the coupling unit (1)<br />
while the cask is pressurised.<br />
• The product shall only be used as stated in the description of its intended use, and<br />
while technically safe and in flawless condition. Please ensure the units safe condition<br />
prior to any use.<br />
• Carefully read the operating instructions of the pressure cask and how to use the<br />
pressure reducing valve.<br />
Children and frail users:<br />
• Risk of suffocation! <strong>For</strong> the safety of your children, please remove or keep all<br />
packaging material (cardboard, Styrofoam, etc.) out of their reach.<br />
• This cask and its accessories are not intended for the use by persons (including<br />
children) with limited physical, sensory, or mental capabilities and shall not be<br />
operated by persons lacking experience and/or knowledge about the equipment.<br />
Unless, however, such person is supervised by another person who is familiar with<br />
relevant safety regulations, or the personnel has been instructed on how to operate the<br />
equipment properly.<br />
• If children are present, they must be under constant supervision in order to ensure they<br />
remain out of harm's way and do not play with the cask.<br />
3 General information<br />
• Experts recommend CO2/carbon dioxide as application gas. Therefore, SPEIDEL<br />
offers only accessory fittings for the use with carbon dioxide. <strong>For</strong> applications 1-3,<br />
any gas used in the gastronomy can be used. However, you will need a special<br />
pressure release valve and a different type of gas bottle. Please contact your gas<br />
specialist.<br />
Page 4 of 16
<strong>Pressure</strong> cask<br />
• If purchasing a CO2 bottle, a TÜV inspection is required every 10 years. Please<br />
contact your gas specialist.<br />
• To refill any gas bottle, we highly recommend contacting you local gas specialist. You<br />
may also have your gas bottle refilled at a specialised beverage supply firm.<br />
• If using CO2 for pressurisation, please ensure that the gas bonds with the beverage and<br />
carbonic acid is formed. If you remove the gas supply, the pressure inside of the cask<br />
will be reduced (this is a natural reaction when carbonic acid forms in the beverage).<br />
• When tapping the average, foam will be generated. Therefore, it is recommended to<br />
use a mug with a large belly and opening.<br />
• Never fill the pressure cask to its rim. Always leave at least several centimeters of air<br />
space from the top.<br />
• Use the tap carefully! Larger or coarse pieces of fruit should be filtered out after<br />
pressing and before filling the cask.<br />
• Ensure to keep oxygen out of the pressure cask.<br />
4 Introduction of the pressure cask<br />
4.1 Components and scope of supply<br />
Basic equipment:<br />
• Stainless steel pressure vessel (unpacked)<br />
• Tap (A) (in carton) consisting of: stainless steal threat with seal, pressure gauge (0 to<br />
15 bar), certified safety valve, stainless steel riser pipe for top discharge with ball<br />
valve, optional blind plug for gas set.<br />
Accessories:<br />
• Gas set consisting of coupler unit (1) , connecting the cask's threaded connection and<br />
hose; hose (2), quick-release (3) to connect between hose and pressure relief valve,<br />
seals (Order No.: 47015)<br />
• <strong>Pressure</strong> relief valve for CO2. (Order No.: 47057)<br />
• 2-kg gas bottle (CO2/carbon dioxide). (Order No.: 47058)<br />
• Cleaning brush, with drill attachment (Order No.: 47009)<br />
4.2 Technical data<br />
<strong>Cask</strong> dimensions: Ø40cm x H54cm<br />
Dimensions incl. installed fittings Ø40cm x H83cm<br />
Weight: 12.0 kg<br />
Weight incl. tap: 13.5 kg<br />
Max. operating pressure 10 bar<br />
4.3 Prior to first use<br />
Prior to its first use, ensure to clean the cask and the tap one more time – refer to Chapter<br />
"Cleaning instructions for the pressure cask".<br />
4.4 How to set up the pressure cask<br />
Prior to its use, the pressure cask must be placed on a solid, stable, and level base frame.<br />
Please note that the pressure cask can weigh up to 60 kg while filled. Avoid an unsteady<br />
Page 5 of 16
<strong>Pressure</strong> cask<br />
base frame. The room should be well ventilated and high temperatures or direct exposure<br />
to sunlight should be avoided.<br />
4.5 How to transport the pressure cask<br />
The beverage cask must only be transported after it has been depressurized. In order to<br />
prevent damage, the cask must be secured properly during transport.<br />
4.6 How to clean the beverage cask<br />
Please remember: hygiene is number one!<br />
Only if you sterilize the cask and the tap inside and outside immediately prior to filling<br />
the vessel can you be awarded with a delicious beverage. It is of utmost importance to<br />
clean the vessel properly the first time. Hygiene is important to guarantee your success.<br />
Therefore, SPEIDEL offers a cleaning brush that allows you to keep your pressure cask<br />
spick and span.<br />
When you are cleaning the vessel for the first time, use hot water to rinse it several times.<br />
Use the brush (supplied) to clean the tap. Once the pressurised beverage cask has been<br />
emptied, it must be cleaned thoroughly. Never let any remains become sticky and adhere<br />
to the inside/outside of the vessel. Before refilling the vessel it may remain under residual<br />
pressure; however, thorough cleaning shall always take place prior to the refilling<br />
process.<br />
Use commercially available cleaning agents to clean all stainless steel parts. Do not use<br />
abrasive cleaners or sponges and brushes that may cause scratches. Please ensure to<br />
remove all cleaning agent residue and rinse the pressurised beverage cask properly.<br />
Moreover, we also recommend to use baking powder as cleaning age. Fill the vessel with<br />
water. Add 1 to 3 packages of baking powder. Use the tap to close the cask and let it sit<br />
for 1 to 2 days. Subsequently, rinse thoroughly.<br />
These recommendations and instructions have been determined during numerous tests.<br />
Those values are based on experience; however, we cannot provide any guaranties. Never<br />
use chlorine or cleaning agents containing chlorine; it will damage the stainless steel.<br />
Before opening the beverage cask, ensure the vessel has been depressurized<br />
4.7 How to store the pressure cask<br />
The pressurised beverage cask must be stored in a dry place. Avoid any contact with<br />
ferrous or corroded equipment.<br />
Only operate the pressurised beverage cask and its ancillary equipment in well ventilated<br />
rooms in order to prevent the risk of suffocation caused by escaping CO2 (e.g., when<br />
bleeding the pressure relief valve).<br />
Never store pressurised vessels in direct sunlight or operate these vessels inside<br />
excessively hot rooms.<br />
Keep children away from all gas fittings, pressure relief valves or gas bottles.<br />
Page 6 of 16
Connection<br />
Gas bottle (4d)<br />
<strong>Pressure</strong> cask<br />
5 How to work with the pressurized beverage cask<br />
5.1 Filling the vessel with gas properly:<br />
(for the use with a CO2/carbon dioxide gas connection)<br />
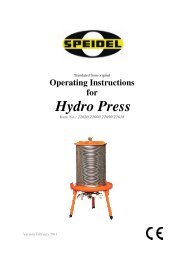
1. The following additional equipment is required: SPEIDEL gas set, pressure relief<br />
valve (adjustable from 0 - max. 10 bar) and lockable gas bottle with the respective<br />
application gas, see accessories (carbon dioxide).<br />
2. Use a socket wrench, size 6, to remove blind plug (0) from tap (A).<br />
3. At the lower end (1a), screw coupler unit (1) including seal into the lock (0) of the<br />
tap (A).<br />
4. Firmly attach the hose's threaded connector (3b) to the exit port (4a) of the pressure<br />
relief valve.<br />
5. Now, connect the quick release of the hose (2a) to the male coupling (1b). Simply<br />
press in – done!<br />
6. The other end of the hose (2b) is pre-assembled with the threaded hose connection<br />
(3a).<br />
7. Subsequently, ensure all components are properly connected. Before connecting the<br />
valve (4b), set the pressure relief valve to "ZU" (CLOSED) and totally remove the<br />
operating pressure set screw (4c); this will prevent immediate pressure build-up.<br />
8. Now, connect the relief valve (4d) with the proper gas bottle.<br />
9. The system is now ready to be used. Depending on the application, the vessel can<br />
now be pressurized to a maximum of 10 bar (should this pressure be exceeded, the<br />
relief valve will be activated!)<br />
10. Open the gas bottle. The bottle's pressure will be displayed on the pressure gauge.<br />
Now, you can open the valve (4b) on the pressure relief valve and set the appropriate<br />
pressure, using the setscrew (4c). The operating pressure will be displayed on the<br />
pressure gauge and the relief valve.<br />
SPEIDEL pressure relief valve<br />
SPEIDEL gas set (1-3)<br />
(4) Tap (A)<br />
(4c)<br />
(4a)<br />
(4b)<br />
Quick release (3)<br />
(3b)<br />
(3a)<br />
(2b)<br />
Hose (2)<br />
Page 7 of 16<br />
(2a)<br />
(1b)<br />
Coupler unit (1)<br />
(1a)<br />
Seal<br />
Locking device (0)
<strong>Pressure</strong> cask<br />
5.2 Replacing the gas bottle:<br />
If you would like to refill the bottle with additional gas, or you simply want to remove the<br />
bottle because the pressure is insufficient, first close the bottle at the valve (4b) of the<br />
pressure relief valve. Ensure that the gas bottle and the exit port (4b) of the pressure relief<br />
valve are closed! Now, remove the quick release (2a) from the male coupling (1b). The<br />
hose, pressure relief valve, and gas bottle can now be removed from the vessel. A check<br />
valve (1) constantly safeguards the pressure inside of the cask.<br />
5.3 Maintenance/Inspection:<br />
• <strong>For</strong> safety reasons, the pressurized beverage cask must be inspected during regular<br />
intervals. Here, compliance with all current national regulations pertaining to the safe<br />
operation of pressure vessels is mandatory.<br />
• If the vessel was damaged, immediate inspection is necessary.<br />
• Maintenance/inspection is recommended at least once a year.<br />
• Visible changes such as cracks or other damage are not acceptable.<br />
• All threaded connections must be free of damage, must not show wear and tear and/or<br />
contamination.<br />
• The pressure limiting valves must remain clean at all times, as sticky residue is<br />
common when handling juices.<br />
• If purchasing a CO2 bottle, a TÜV inspection is required every 10 years. Please<br />
contact your gas specialist.<br />
6 Range of application<br />
6.1 Sweet cider with any desirable alcohol level<br />
Use the pressurized beverage cask without connecting it to the gas bottle or attaching any<br />
additional fittings. Thus, the cask can be used without adding any ancillary equipment.<br />
No tools are required! Do not remove the blind plug, item 0.<br />
• If you prefer a clearer sweet cider with less alcohol content, it is recommended to<br />
transfer the juice into another vessel after pressing and keep it there for 3 - 4 hours.<br />
This will remove the cloudiness from the juice. Ensure to remove all spoiled fruit<br />
prior to the pressing procedure.<br />
• After pressing, or once the must has settled, fill the beverage cask immediately with<br />
the respective fruit juice.<br />
• Now, you can determine the alcohol content of the beverage. Once the cask has been<br />
filled, immediately close it in order to obtain a sweet cider with less alcohol later on.<br />
The longer you keep the cask open, the longer the fermentation will last, and the<br />
alcohol level in the beverage will be increased. If the vessel is kept open for 3 to 4<br />
days and subsequently closed, the result will be a much higher alcohol content. Ensure<br />
that the juice will not ferment completely, otherwise, the beverage will not be left with<br />
a residual sweetness, and additional fittings (see Application 3) will be required.<br />
• As soon as the cask is closed, pressure is generated inside of the vessel caused by the<br />
fermentation until this process is stopped on its own. This way, you will always have a<br />
Page 8 of 16
<strong>Pressure</strong> cask<br />
fruity beverage. Due to the constant tapping, the alcohol content will change slightly<br />
during the course of time. The freshness, however, will always remain.<br />
6.2 Low-alcoholic sweet cider<br />
<strong>For</strong> the operation of the pressure cask an additional gas set, a pressure relief valve (CO2),<br />
and a gas bottle (carbon dioxide) are required (see 'Accessories'). To operate the cask<br />
with a gas connection, please read the section "Filling the cask with gas properly".<br />
• When producing a non-alcoholic beverage, particular attention must be paid to<br />
hygiene and the quality of the fruit that is to be used. Never use spoiled fruit. The<br />
quality of the fruit juice depends on the grade and cleanliness of the fruit.<br />
• It is recommended to transfer the juice into another vessel after pressing and keep it<br />
there for 3 - 4 hours. This will remove the cloudiness from the juice.<br />
• Subsequently, fill the pressure cask immediately with the fresh and clean juice.<br />
• In order to prevent potential fermentation, add carbon dioxide at a pressure of 9 bar.<br />
Keep the gas bottle and all fittings connected to the pressure cask. When removing the<br />
gas bottle (see "Replacing the gas bottle"), it is normal that the pressure during CO2<br />
saturation is reduced (this is a natural reaction when carbonic acid forms in the<br />
beverage).<br />
• First, you will be left with a non-alcoholic fruit juice. During the course of time, the<br />
alcohol content may increase slightly inside the pressure cask, due to the repeated<br />
tapping. This is a natural process and cannot be completely remove without additives;<br />
however, the high pressure clearly slows down this process.<br />
• Please observe the following: The fresher the fruit, the longer you will be able to keep<br />
your juice non-alcoholic.<br />
6.3 Containers that keeps your fermented beverage fresh<br />
<strong>For</strong> the operation of the pressure cask an additional gas set, a pressure relief valve (CO2),<br />
and a gas bottle (carbon dioxide) are required (see 'Accessories'). To operate the cask<br />
with a gas connection, please read the section "Filling the cask with gas properly".<br />
• This procedure is widely used in the beverage industry. Carbon dioxide is used in<br />
many beverages. Today, even beer brewers and wine makers use carbon dioxide.<br />
Carbon dioxide effectively improves the quality of the beverage. During wine<br />
production, adding CO2 reduces the amount sulphurisation required.<br />
• Add any fermented beverage (wine, cider, beer, etc.) to you pressure cask.<br />
• Now, add carbon dioxide and pressurise the cask to 0.5 to 1 bar. The low pressure is<br />
sufficient to keep the beverage fresh. Keep the gas bottle and all fittings connected to<br />
the pressure cask.<br />
6.4 Soda water/carbonated mineral water<br />
<strong>For</strong> the operation of the pressure cask an additional gas set, a pressure relief valve (CO2),<br />
and a gas bottle (carbon dioxide) are required (see 'Accessories'). To operate the cask<br />
with a gas connection, please read the section "Filling the cask with gas properly".<br />
Page 9 of 16
<strong>Pressure</strong> cask<br />
• Take advantage of your good quality domestic water. Information about the quality<br />
and characteristics of your domestic water can be obtained from your respective local<br />
authorities.<br />
• Safe you money - and no more lugging heavy cases of mineral water When<br />
considering a three-person household and regular usage, the pressure cask including<br />
all fittings will pay for itself within approx. one year (depending on daily usage).<br />
• Fill your pressure cask with potable water up to approx. 3 litres less than the total<br />
volume. This leaves a greater effective area for the carbon dioxide to react with the<br />
water and ensures a faster saturation.<br />
• Subsequently, close the keg and pressurize (9 bar) the vessel with carbon dioxide.<br />
After approx. 24 hours the water inside a 50 litre keg will have been saturated and you<br />
are left with slightly carbonated mineral water.<br />
• After more saturation (max. 2 days), you may shut off the carbon dioxide supply and<br />
properly remove the gas bottle (see “Replacing the gas bottle”).<br />
• The colder the drinking water that you're using to produce the soda, the better and<br />
faster the saturation occurs.<br />
• As soon as the CO2 dissolves in the water it is formed into carbonic acid, and the<br />
pressure drops to approximately 3 to 5 bar.<br />
7 Troubleshooting<br />
Never repair the cask/fittings yourself; always consult a qualified technician. In order to<br />
avoid any kind of danger, components may only be replaced or repaired by the<br />
manufacturer, our customer service department, or a qualified technician.<br />
8 Warranties/procedure<br />
Warranty claims are excluded if:<br />
• the information and instructions provided in this operating manual have not been<br />
observed,<br />
• the pressure cask and its equipment were operated improperly, handled incorrectly, or<br />
were insufficiently maintained. This also includes the proper and approved spare<br />
parts, and if operating equipment have not been used as recommended by the<br />
manufacturer,<br />
• the pressure cask was used contrary to its intended application,<br />
• existing safety equipment on the keg and its connecting parts or inside the filling and<br />
discharging fittings was not used, disconnected or maintained/inspected incorrectly,<br />
• modifications were carried out without the prior written permission of the<br />
manufacturer,<br />
• pertinent safety regulations were not taken into consideration during the operation of<br />
the pressure cask,<br />
• changes or modification without the express permission by the manufacturer are<br />
carried out,<br />
• the pressure cask was modified by unauthorized personnel.<br />
• Only such juices and additives may be stored that do not present a risk of corrosion for<br />
the cask itself and its equipment.<br />
Page 10 of 16
<strong>Pressure</strong> cask<br />
• The beverage cask must only be transported after it has been depressurized.<br />
• Only the following equipment components shall be used with the pressure keg:<br />
(1) pressure gauge,<br />
(2) pressure limiting valve (safety valve).<br />
Warranties:<br />
• All legal warranty conditions apply. The warranty period for the use by noncommercial<br />
consumers is reduced to the regulations applicable to commercial<br />
customers, if such non-commercial consumer uses the product - even if only in part -<br />
for commercial purposes.<br />
• Any warranty claim presented to us or one of our dealerships must be accompanied by<br />
a copy of the purchase order. In order to verify our warranty, please refer to the terms<br />
and conditions mentioned below.<br />
• To ensure prompt processing of all warranty claims, discrepancies must be brought to<br />
our attention immediately after detection and must be submitted in writing, including a<br />
description of the defect and, if possible, photographs should be attached to the claim.<br />
• Warranties do not apply to defects caused by noncompliance with the operating<br />
manual, improper handling, or normal wear and tear to be expected of the product.<br />
Warranty claims are also excluded for fragile parts or consumables, such as seals,<br />
gaskets, etc. Furthermore, warranty claims are excluded if repairs are performed by<br />
personnel other than authorized representatives or dealerships.<br />
Processing:<br />
In the unlikely event that your product requires repair during the warranty period, please<br />
contact us, submitting the respective warranty claim. The fastest and easiest option is<br />
returning the unit, or presenting a notice of defect to your authorized<br />
dealer/representative, or by contacting us directly:<br />
E-mail: verkauf@speidel-behaelter.de<br />
or fax to: 0049 – (0)7473 -9462-99<br />
Please indicate your complete address and contact information. Furthermore, we<br />
require the type designation of the equipment under claim, a short description of the<br />
malfunction (if possible, please include photographs), the date of purchase (copy of<br />
the invoice) and the name of the dealership from where you have purchased the new<br />
product.<br />
Once we have verified your notice of effect, we will contact you as soon as possible and<br />
explain further procedures. Please do not ship the unit as "carriage forward", "freight<br />
collect" or by similar shipping methods.<br />
Page 11 of 16
<strong>Pressure</strong> cask<br />
9 EU Conformity Declaration<br />
Page 12 of 16
<strong>Pressure</strong> cask<br />
Page 13 of 16
<strong>Pressure</strong> cask<br />
Page 14 of 16
<strong>Pressure</strong> cask<br />
Page 15 of 16
<strong>Pressure</strong> cask<br />
de<br />
Sie vermissen eine Betriebsanleitung in einer verständlichen Sprache. Dann kontaktieren Sie bitte Ihren<br />
zuständigen Händler oder Importeur.<br />
en You miss an instruction manual in an accessible language. Then please contact your local dealer or distributor.<br />
fr<br />
Vous manquez un manuel d'instructions dans un langage accessible. Alors s'il vous plaît contacter votre<br />
revendeur ou distributeur local.<br />
es<br />
¿Echa de menos un manual de instrucciones en un lenguaje accesible. Entonces, por favor contacte a su<br />
vendedor o distribuidor local.<br />
pt<br />
Você perde um manual de instruções em linguagem acessível. Então, por favor contacte o seu revendedor ou<br />
distribuidor local.<br />
pl<br />
Tęsknisz instrukcja w przystępnym językiem. Następnie skontaktuj się z lokalnym sprzedawcą lub<br />
dystrybutorem.<br />
no<br />
Du savner en bruksanvisning på et lett tilgjengelig språk. Deretter kan du kontakte din lokale forhandler eller<br />
distributør.<br />
fi<br />
Menetät ohjekirjanen ymmärrettävällä kielellä. Sitten ota yhteyttä paikalliseen jälleenmyyjään tai<br />
maahantuojaan.<br />
sv<br />
Du missar en bruksanvisning på ett lättillgängligt språk. Vänligen kontakta din lokala återförsäljare eller<br />
distributör.<br />
da Du går glip af en brugsvejledning på et tilgængeligt sprog. Så kontakt din lokale forhandler eller distributør.<br />
it<br />
Ti manca un manuale di istruzioni in un linguaggio accessibile. Quindi contattare il rivenditore o distributore<br />
locale.<br />
el<br />
Χάνετε από εγχειρίδιο χρήσης σε προσιτή γλώσσα. Στη συνέχεια, επικοινωνήστε µε τον τοπικό αντιπρόσωπο ή<br />
διανοµέα.<br />
hu<br />
Hiányzik egy használati utasítás hozzáférhetı nyelven. Ezután vegye fel a kapcsolatot a helyi forgalmazóval<br />
vagy a forgalmazó.<br />
nl Je mist een handleiding in een toegankelijke taal. Neem dan contact op met uw lokale dealer of distributeur.<br />
ro<br />
E dor de tine un manual de instrucŃiuni într-un limbaj accesibil. Apoi, vă rugăm să contactaŃi distribuitorul local<br />
sau distribuitor.<br />
ru<br />
Вы не пропустите инструкцию на доступном языке. Тогда, пожалуйста, свяжитесь с вашим местным<br />
дилером или дистрибьютором.<br />
sk<br />
Vám chýba návod na použitie v zrozumiteľným jazykom. Potom sa obráťte sa na miestneho predajcu alebo<br />
distribútora.<br />
sl Pogrešaš navodila v razumljivem jeziku. Potem se obrnite na lokalnega prodajalca ali distributerja.<br />
bg<br />
Можете да пропуснете инструкциите за употреба на достъпен език. Тогава, моля свържете се с местния<br />
дилър или дистрибутор.<br />
sr<br />
Мисс Иоу упутства на приступачан језику. Затим контактирајте локалног дистрибутера или<br />
дистрибутера.<br />
hr<br />
Vi propustiti pouku priručnik na pristupačan jeziku. Zatim obratite se svojem lokalnom zastupniku ili<br />
distributeru.<br />
cs Vám chybí návod k použití v srozumitelným jazykem. Pak se obraťte se na místního prodejce nebo distributora.<br />
tr Eğer erişilebilir bir dilde bir kullanım kılavuzu özledim. Daha sonra yerel satıcınıza veya distribütör başvurun.<br />
zh 你错过易懂的语言中的一个指导手册。那么请联系您当地的经销商或分销商。<br />
ja<br />
ko<br />
th<br />
vi<br />
あなたがアクセス可能な言語での取扱説明書を欠場。その後、お近くの販売店または特約店までご<br />
連絡ください。<br />
��� �� ��� �� ������ ���. �� �� �� ��� ��� �� ����<br />
����� ����.<br />
คุณพลาดคู�มือการเรียนการสอนในภาษาที่สามารถเข�าถึง<br />
จากนั้นกรุณาติดต�อตัวแทนจําหน�ายหรือตัวแทนจําหน�ายใกล�บ�านของคุณ<br />
Bạn bỏ lỡ một sách hướng dẫn bằng ngôn ngữ dễ tiếp cận. Sau ñó xin vui lòng liên hệ ñại lý ñịa phương của<br />
bạn hoặc nhà phân phối.<br />
Page 16 of 16