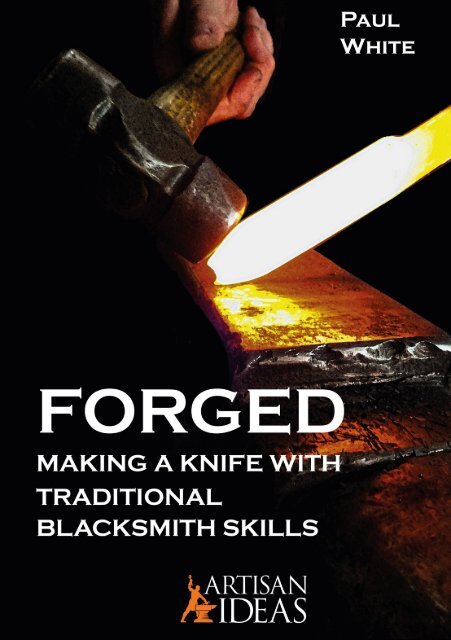
FORGED: Making a Knife with Traditional Blacksmith Skills
This book will teach you to hand build a knife using the traditional method of blacksmiths of old — FORGING. Traditional forging of a knife blade is a process which uses the ancient techniques of moving hot steel with hammer and anvil alone into a knife-form that is ready for filing, heat treating and sharpening with no or very minimal electric grinding. This book also teaches traditional fit-and-finish skills using only hand tools. It explains an ancient riveted full-tang handle construction system that surpasses modern methods. In the author's words; "In my early blacksmithing years, I was lucky to get to know some old smiths who wrangled hot iron every day just to make a living. They unselfishly taught me traditional blacksmithing skills and knife forging methods. Every time I use those skills and methods, I honor their friendships, and by teaching you, the reader, we keep alive the memory of those old-time iron pounders." Hardcover, 132 pages, 150 photos and illustrations, $29.95.
This book will teach you to hand build a knife using the traditional method of blacksmiths of old — FORGING.
Traditional forging of a knife blade is a process which uses the ancient techniques of moving hot steel with hammer and anvil alone into a knife-form that is ready for filing, heat treating and sharpening with no or very minimal electric grinding.
This book also teaches traditional fit-and-finish skills using only hand tools. It explains an ancient riveted full-tang handle construction system that surpasses modern methods.
In the author's words; "In my early blacksmithing years, I was lucky to get to know some old smiths who wrangled hot iron every day just to make a living. They unselfishly taught me traditional blacksmithing skills and knife forging methods. Every time I use those skills and methods, I honor their friendships, and by teaching you, the reader, we keep alive the memory of those old-time iron pounders."
Hardcover, 132 pages, 150 photos and illustrations, $29.95.

You also want an ePaper? Increase the reach of your titles
YUMPU automatically turns print PDFs into web optimized ePapers that Google loves.
10<br />
CHAPTER I<br />
What is the Frontier or “Work” <strong>Knife</strong>?<br />
The Frontier knife was around long before there was an American “Frontier”.<br />
This style knife can be viewed in books and museums in many countries and<br />
cultures, ancient and contemporary, around the globe. They consist of blade and<br />
handle—as basic as it gets. The Frontier style of that simple blade and handle<br />
seems to be universal. From Irish Celts to Peruvian Incas and the Alaskan Aleut;<br />
they all came up <strong>with</strong> the same style.<br />
In North America the design ranges from straight points, to drop points, to clip<br />
points <strong>with</strong> guards, or no guards, from small to large blades. Then there were<br />
English, Dutch and French trade knives of the 1700s that looked like chunky<br />
little Bowies (long before Bowies) and small to large butcher knives. Add to that<br />
skinning knives, carving knives, scalping knives, fighting knives and all manner<br />
of utility and cleaving knives.<br />
Tradesmen in every period developed specialty knives to work leather into<br />
shoes and saddles, canvas into sails and sacks, wood into baskets and bowls<br />
and prairie sod into homesteads. Every adventurer and settler flooding into the<br />
American heartland carried an abundance of knives and no doubt used them for<br />
their original purpose and beyond. History records them being called Bowies or<br />
“long” knives or simply “big” knives. Could they all be considered “Frontiers”?<br />
From what I can tell “Frontier” was a term made popular by twentieth century<br />
Mountain-Man/Buck-Skinner re-enactors for their big all-purpose belt knife or<br />
smaller patch knife. However, even earlier, around the turn of the 20th century,<br />
the Schrade <strong>Knife</strong> Company made a pocket and fixed blade knife series that<br />
carried the name “Frontier”, and they still do (now made in China since 2004).<br />
In 1956 as a twelve-year-old boy in Tampa, Florida, I had a Western Auto, mango<br />
killing, Davy Crockett, “Bowie” type knife <strong>with</strong> a Bakelite sheath and handle<br />
that got me into big trouble. As an adult my friend Gus, who taught me knifemaking,<br />
called the Frontier simply a “Work <strong>Knife</strong>”.<br />
Made popular by the battle of the Alamo (1836) the “Bowie” became the term<br />
used, right up until about 1890, for any all-purpose, large camp, homestead and/<br />
or fighting knife. Bowies and Frontiers were carried by trappers, mountain men,<br />
waggoneers, gamblers, homesteaders, buffalo hunters, Civil War soldiers, Indian<br />
fighting soldiers, or soldier fighting Indians residing in or traveling between the<br />
Mississippi River and the California shore.<br />
During that era Bowies or Frontiers were a constant companion to the pioneer<br />
packing a single-shot, muzzle-loading rifle or pistol. If their one-shot firearms<br />
were ineffective the only protection these frontiersmen had in close quarters as a
second line of defense from bear or river pirates was their big knife. Old tintype<br />
photos, from those early times, reveal their Bowies/Frontiers always being worn<br />
or brandished proudly and out front.<br />
They called them Bowies, but we are told by historians that Bowie knives varied<br />
widely in overall size, blade design, and handle style. The Bowie of today looks<br />
nothing like those first Bowies. To the folks of that era the word “Bowie” was a<br />
general term for any big, long, sharp knife. Today we usually regard a Bowie to<br />
have a clip point, a double quillon (aka quillion) and a fancy coffin style handle<br />
design, while a Frontier we view as a drop point <strong>with</strong> no guard and a simple<br />
handle. If you are not familiar <strong>with</strong> some of those terms, you soon will be.<br />
Read the True West magazine article about the Bowie knife by acclaimed historian<br />
of the American West, Phil Spangenberger. It is an excellent short history of the<br />
Bowie, the Americans that carried them, and its cousin, the Frontier.<br />
Frontiers and Bowies were no doubt made by both urban and rural blacksmiths.<br />
They supplied the cutlery needs of the “Go West Young Man” pioneers on that<br />
great crusade sparked by John O’Sullivan and his belief in the inevitability of<br />
Manifest Destiny.<br />
The Frontier knife taught in this book is a simple, all-purpose knife <strong>with</strong> a<br />
wooden handle, no guard, three copper rivets, and a five-inch, drop point<br />
blade, just as those knives of days gone by. The skills gained from this build will<br />
prepare you for a more involved design on your next build. Your Frontier will<br />
look and perform exactly like those few vintage, well worn blades still around<br />
that survived the actual frontier. By completing the Frontier as explained in this<br />
book you are joining in the historic experience of making a knife that is truly an<br />
American classic and will become a treasured family heirloom.<br />
The Bowie (top) <strong>with</strong> its clip point and finger guard is designed as a fighting knife. The Frontier (bottom)<br />
is more of a multipurpose blade <strong>with</strong> a drop point and simpler handle construction.<br />
11
24<br />
Forging in the <strong>Traditional</strong> Way<br />
Forging is forging is forging, traditional or “modern”, hand-held hammer, power<br />
hammer, hydraulic press or what-have-you. Forging is forging. However, forging<br />
a knife in the traditional way is not just pounding a piece of steel into a rough<br />
blade-like shape, laying the hammer down, and then grinding to completion.<br />
<strong>Traditional</strong> forging means little or no stock removal by grinding, and shaping<br />
<strong>with</strong> hammer alone.<br />
Historically the smith forged much the same as we do, the difference being, he<br />
ground much less or not at all. Other than files, hand-stones or a foot or hand<br />
cranked sharpening round stone he had no grinding method or apparatus that<br />
could come close to a modern stone or belt grinder. He formed knives and set<br />
their bevels <strong>with</strong> only his hammer. He connected converging lines and dissimilar<br />
thicknesses while maintaining overall balance and weight. He honored complex<br />
blade geometry and final surface appearance while sustaining the desired width<br />
and breadth from pommel to tip, all the while keeping everything straight and<br />
true <strong>with</strong>out burning it up. <strong>Traditional</strong>ly the smith put more time and hammer<br />
strikes on the front end of the project and less time on the back end <strong>with</strong>out<br />
major stock removal in the completion of his knife.<br />
TIP: Watch some videos of farriers making tongs, forge tools and horseshoes. That<br />
is traditional blacksmithing! Also view videos of Alec Steele making his threepound<br />
hammers. They give the rest of us an idea of what traditional forging is all<br />
about. It’s about hammer control, eye-hand coordination, speed, power and most<br />
importantly, telling the steel where to go.<br />
Old-Timers and Their Forging Techniques<br />
The old-timers forged their blades this way for three reasons:<br />
The first was that iron and especially steel were, for many centuries, precious<br />
materials (i.e. hard to come by) until the Bessemer process came along in 1856.<br />
Smiths were not about to grind away, even if they could, half of what cost so much.<br />
Since the beginning, forge welding a steel bit into the edge of an iron ax, chisel or<br />
knife saved steel. Conservation of material was paramount to the smith because<br />
there was so little of it. Even well into the 19th century, rural smiths made their<br />
steel go as far as it could. One of my favorite memories was helping Ben Deal<br />
point a plow <strong>with</strong> an old rasp (note: both Jim and Ben Deal had acquired Rural<br />
<strong>Blacksmith</strong>ing degrees from Tuskegee University in Alabama shortly after WWI).<br />
The second was that the complex process of bringing power and abrasives,<br />
usually sandstone, together in a readily available and dependable form was<br />
not always available to the frontier blacksmith. There were examples in history<br />
where independent smiths or other craftsmen developed ingenious devices and<br />
contraptions for forming metal and wood but they were not in the mainstream<br />
of development and production.
And the third was that stock removal, until relatively modern times, could<br />
not compete <strong>with</strong> the work-a-day-blacksmith for time expended, quality of, or<br />
the production of goods. For countless generations they were truly artisans in<br />
iron and steel; they just didn’t know they were. To them it was a day’s work;<br />
“Something attempted, something done, has earned a night’s repose”.<br />
Daily they forged, forcing and finessing lumps of steel into functional implements,<br />
apparatus, utensils, old-time paraphernalia and of course, blades, using just a<br />
hammer and a handful of hardy and fuller tools. Those old smiths could produce a<br />
near-finished plow part, wagon fitting, kitchen spoon, mason’s chisel or knife blade<br />
by hammer pounding alone. For centuries in Europe, North America, Asia and<br />
across the globe, they were the black metal “smyths”— the masters of their craft.<br />
<strong>Traditional</strong> blacksmithing can still be seen at places such as Colonial Williamsburg<br />
in Virginia, The National Ornamental Metal Museum in Memphis, Tennessee,<br />
The <strong>Blacksmith</strong> Museum in Elk City, Oklahoma, The Old Millstone Forge in New<br />
Jersey, The Museums at Lisle Station Park in Illinois, and many local history<br />
museums and settlements across our great land.<br />
Forge to Finish<br />
A smith of old cleaned up his work but most likely didn’t polish up a blade to make<br />
it glisten like a piece of jewelry. We do. The occasional presentation knife or sword,<br />
made for the king or a wealthy knight or later a railroad executive, was probably<br />
finished bright. When families or soldiers passed armor, weapons and tools down<br />
through generations they remained bright through constant use and cleaning. Much<br />
of a museum’s restoration of ancient weapons is just that, rust prevention and rust<br />
removal from tools and weapons neglected for extremely long periods.<br />
When steel or iron is bright its surface must be repeatedly rubbed down <strong>with</strong><br />
creek sand or coated <strong>with</strong> pitch, painted or constantly oiled to keep the rust at bay.<br />
Rust is the enemy. Paint has been used since the beginning to protect wood and<br />
metal. I learned at the Tower of London that full-suit armor was usually painted<br />
on the inside surface to prevent rusting caused by the presence of constant body<br />
moisture. Most craftsmen, cabinetmakers, shipwrights or blacksmiths, through<br />
the ages, brewed their own paint, and each recipe or even each batch was different.<br />
Commercial paints for metal or other surface coverings, finishing techniques,<br />
protective chemicals and polishing equipment were only marginally effective or<br />
weren’t universally utilized until the latter end of the nineteenth century.<br />
The simplest of a wire brush didn’t come along commercially until late in the 19th<br />
century (John Osborn, 1887). Over the centuries many a knife and smith-made tool<br />
were completed <strong>with</strong> only the working edge having a shine from the apprentice’s<br />
file or stone. The remainder of the edge or blade remained black as the day it came<br />
from the forge. But otherwise, that black oxidation on the steel from the coal fire and/<br />
or an oil quenching (explained in Chapter VI) stayed <strong>with</strong> the blade a long time.<br />
25
That oxidized surface has been used by smiths since forging began as a form of<br />
covering to protect the bare metal that’s underneath from rust’s attack. A hot<br />
beeswax finish is the most notable ancient form of protection which we know and<br />
still use today.<br />
Raw, bare, working steel is rarely seen, then or now, as it will rust away. Today<br />
we cover our steel in many ways such as painting, galvanizing, Parkerizing,<br />
chromate conversion and bluing. All of these are some form of chemical treatment<br />
to or on the steel’s surface. Rust is the primary reason that stainless steel knives<br />
were developed. Stainless was first called “Rust-less Steel”. Stainless is popular<br />
for knives today because of the rust inhibitors it contains.<br />
TECHNICAL ADVANCES USEFUL IN KNIFE FINISHING<br />
Steel Wool: England, 1896.<br />
Factory Made Paint: David Averill, 1867.<br />
Commercial Sandpaper: Isaac Fisher, 1834.<br />
Belt Grinder: Otis Davidson, 1894.<br />
Sanding Machine: Edward Fischer, 1924.<br />
<strong>Traditional</strong> Forging Today<br />
We will make a knife much the way it was done in olden days—<strong>FORGED</strong>. At<br />
times it may seem difficult… and that is because it is. There are about 300 things<br />
that can go wrong when making a knife either the traditional way or by stock<br />
removal. Our job is to make as few mistakes as possible and know what to do when<br />
something does go south. I’ll do my best to make the process understandable,<br />
accomplishable and enjoyable.<br />
I have taught others how to do this for some forty years. By learning these skills,<br />
you will help keep the knowledge of blacksmithing alive. Also, you and I will<br />
then have a partnership in this great chain of blacksmithing knowledge, linking<br />
us to smiths of the past… all brothers and sisters at the anvil.<br />
TIP: View the NOVA program, The Viking Sword. It is an outstanding study about<br />
steel, the Vikings, and a Wisconsin smith all brought together by carbon.<br />
Progressive Forging Stages of the Frontier <strong>Knife</strong><br />
The storyboard on the next page shows you the progressive nature of basic<br />
forging and forge-beveling. Like all smith projects it shows the step-by-step,<br />
gradual development of the knife handle and blade from a simple billet. You<br />
should consult these images from time-to-time as your knife progresses. Visualto-three-dimensional<br />
expression is truly a helpful process and the smith’s friend.<br />
Chapter IV breaks down each step of the forge-beveling process <strong>with</strong> additional<br />
instruction, drawings and photographs.<br />
26
27
You will connect eye-hand coordination <strong>with</strong> speed and force. Practice both<br />
indexing and coverage for a lath strip or two. After completing a lath strip<br />
divided <strong>with</strong> 1-inch dots do the same exercises <strong>with</strong> ½-inch dots. Then do the<br />
same thing <strong>with</strong> 1/4-inch dots. Sections of lath can be held <strong>with</strong> the vice grips and/or<br />
the knife tongs. When you finally hit actual hot steel this muscle memory exercise<br />
will pay big dividends.<br />
Forging the <strong>Knife</strong> Handle<br />
We begin forging <strong>with</strong> the handle because forging the blade first would require<br />
you to grip the thin finished blade <strong>with</strong> tongs or vice grips and then forge the<br />
handle. A blade-first sequence would surely result in the blade being misshaped<br />
or otherwise damaged by the gripping pressure of the tongs or vise grips while<br />
you forge the handle.<br />
Remember that the knife billet is 1/8-inch thick, 1-inch wide and eight-inches long,<br />
<strong>with</strong> a notch at the mid-way point of four inches (for info on the notch see previous<br />
section: Bar Stock Used for the Frontier <strong>Knife</strong>).<br />
Blade Geometry<br />
Before your first hammer blow, understanding knife blade geometry and<br />
terminology (see figure below) will be essential for our author-to-reader<br />
communication and for your success. A knife is thick at the spine, thin at the<br />
cutting edge, and narrow and pointy at the tip. A bevel has to be forged from<br />
cheek to cutting edge and done at the proper angle. The handle must have a length<br />
and width that conform to the user’s hand and which “feels” right. The knife’s<br />
overall appearance should be pleasing to the eye and it should be balanced in<br />
the hand. All the various elevations and angles of its hammered surface should<br />
merge into each other <strong>with</strong> gradual, graceful lines delivered by you in a few<br />
hectic yet measured seconds. Therefore, it’s a good idea to have your intended<br />
blade geometry in your mind’s eye before bringing your hot steel to the anvil.<br />
The forging of a blade is not unlike sculpting <strong>with</strong> a hammer. And like a sculptor it<br />
has always been a helpful thing for me to sketch the intended blade in a full-scale<br />
drawing, sometimes even making a three-dimensional wooden or clay model.<br />
Either of these allow for that eye-hand-brain connection we spoke of earlier. It<br />
also encourages a creative approach giving greater control to the artisan smith.<br />
30
The Handle<br />
Begin your Frontier knife by forging the handle. It doesn’t matter which fourinch<br />
section you begin <strong>with</strong> to make the handle; the remaining four-inch section<br />
will become the blade. Place the billet in the forge and heat it from its end to the<br />
notch in the middle which you previously made. The notch allows your eye to<br />
separate the handle steel from the blade steel when hammering. When striking<br />
blows on the handle don’t let any blows fall beyond the notch and onto the blade<br />
section.<br />
The primary forging technique in forming the handle will be drawing out.<br />
Drawing out is a thinning of the width and lengthening of the billet through<br />
overlapping hammer blows. The steel is in a malleable state when hot, and the<br />
hammer blows push the steel away from the center of the hammer’s face. This<br />
makes the width of the handle thinner while its length increases slightly.<br />
The forging of the handle will take several heats. Each heat consists of putting<br />
the piece one time into the forge until it becomes a bright red/orange color and<br />
then forging (hammering) until the color is almost gone. The steel, when the<br />
red color is gone, is considered “cold” and can’t be hammered until more heat<br />
is applied to it in the forge. Hammering your billet at this cold temperature will<br />
damage the steel, so take another heat.<br />
As mentioned, forge the handle end of the billet first. Secure the blade end of<br />
the billet <strong>with</strong> your vise grips. You are going to reduce the width of the handle<br />
from 1-inch to ¾-inch by drawing out. You are only reducing the width of the bar<br />
by 1/4-inch, so be gentle. Remember the entire drawing out process will require<br />
several trips to the forge then to the anvil and back to the forge, etc. Take your<br />
time.<br />
Drawing the Handle<br />
The first hammer blow <strong>with</strong> the round face hammer. Subsequent overlapping blows will follow all the way<br />
to the notch and the opposite billet edge will be flat against the anvil face for the entire trip.<br />
31
BLACKSMITH SECRET: Whether you use coal or gas, there are hot and (relatively)<br />
cool spots in your forge. Move your steel once or twice when heating to get an<br />
even heat on your billet.<br />
If these drawing out procedures sound difficult at first, that’s because they are.<br />
Read the above a few times, look at the drawings and, if possible, watch a video<br />
on the subject. There’s one of me doing this on YouTube. Then practice. Some<br />
students prefer to practice on inexpensive low-carbon (1018) mild steel bars of<br />
the same dimension before they move on to their high-carbon billet. The 1018<br />
will also be easier to move around, when hot, than the 1080.<br />
TIP: Remember that you are only taking the billet from 1-inch to ¾ of an inch.<br />
That is only a quarter-of-an-inch difference. It may become flatter quicker than<br />
you think. Adjust your power.<br />
After each vertical pass that draws-out the handle, you should make a series of<br />
light horizontal “flattening” blows <strong>with</strong> the flat face of your rounding hammer.<br />
This process will retain the overall 1/8-inch thickness of the handle and “dress”<br />
both edges of the handle. A flatter tool (if you have one) placed on the flat of the<br />
handle and struck <strong>with</strong> a sledgehammer will result in the same outcome—a flat<br />
handle.<br />
The flatter tool does just that; it makes the entire surface flat as a pancake.<br />
BLACKSMITH SECRET: When returning your billet to the forge think about what<br />
you are going to do next before you bring the hot steel out again. Place your piece<br />
in such a manner so that you can remove it and hammer immediately <strong>with</strong>out<br />
losing precious seconds looking and thinking about where to place it on the anvil<br />
or hit the piece next. Plan ahead.<br />
34
The completed handle will now be slightly longer than its original 4-inch length<br />
because of your having drawn out the metal, Drawing-out rearranges the steel in<br />
the handle. The final length added, due to the drawing out process, will be about<br />
1-inch, sometimes more. Note the drawing below comparing the original billet<br />
length to your knife at this stage.<br />
The handle, after forging, will be about ½-inch longer than its original four inches due to the drawing<br />
out process.<br />
This particular handle went from the original billet length of four-inches to almost five-inches.<br />
The suggested handle length of 4-1/2-inches may be too long or too short for some<br />
smiths’ grips. It can be reduced or increased in length to fit the builder’s hand<br />
and grasp. Often, it’s helpful for you to hold another knife that fits your hand,<br />
while holding a ruler in your other hand for precise measurement.<br />
35
CHAPTER III<br />
Forging the Blade<br />
When completed, the blade, like the handle, will be about 1-inch longer.<br />
There are laws of physics, influences of thermal dynamics, and mysteries of<br />
blacksmithing that govern the happenings of what follows in Chapters III<br />
and IV. Most of them concern the mechanical and physical properties of steel<br />
which affect its ductility, elasticity, thermal conductivity and microstructure. As<br />
blacksmiths we may not fully understand these compositional and engineering<br />
dynamics, but we must respect their dominance of and unrelenting predictability<br />
regarding hot steel. Control them and you will control the steel.<br />
Gus put it this way one summer afternoon as we were forging: “Paul, you have<br />
to tell the steel where to go. All by itself it doesn’t know. If a smith pulls hot iron<br />
or steel from the fire and just begins to hammer away <strong>with</strong>out understanding the<br />
partnership between himself and his metal nothing good will happen.”<br />
So then, this control of and “partnership” <strong>with</strong> hot iron is what happens next.<br />
Remember…. “I AM THE BOSS OF MY STEEL”.<br />
BLACKSMITH SECRET: When compelled to use your fingertips to feel if a piece of<br />
steel is hot or not, DON’T! Use the back of your fingers and not your fingertips. A<br />
burn on your fingertips will hurt for a long time and make you dysfunctional for a<br />
few days or longer. Whereas if you use the back of your fingers, while still painful,<br />
the burnt flesh experience won’t slow down your progress.<br />
Pointing the Tip of the Billet (Blade):<br />
Look at the back edge of a well-made knife and you’ll see the full thickness of<br />
the blade at the ricasso gradually getting thinner as your eye moves to the point.<br />
This is good. That gradual line begins at the first heat of blade formation.<br />
A top-down view of a finished blade.<br />
38
To prepare for the counter-bending step we will point (not a finished point but a point-like shape on the<br />
tip of the billet). When this is done the blade, like the handle, will be about 1-inch longer and will be ready<br />
for the counter-bending step of forming the blade.<br />
Pointing and Thinning of the Tip<br />
The goal now is to put some slight thinning and pointing to the tip of the blank<br />
(i.e. the bar, or billet). Pull your piece from the heat and place what is to become its<br />
cutting edge up, vertical and perpendicular to the far edge (top) of the anvil. Raise<br />
your left vise-grip hand up, bringing the bar from edge-flat on the anvil to about<br />
a 45° angle. Lock your left hand holding the vise grips against your body. Whack<br />
<strong>with</strong> the flat face of the hammer coming from the far side of the anvil. Hammer<br />
back toward yourself. It will be an awkward angle for you, but it’s necessary. In<br />
the blacksmith business it’s called upsetting on the angle.<br />
Upsetting on the angle puts a slight point on the billet and moves some of the metal mass toward the end,<br />
making the billet a bit longer and fatter.<br />
The “Bird’s Beak” happens naturally when “bunching” hot metal.<br />
39
Building the Railroad Spike Jig<br />
Counter-bending begins <strong>with</strong> the counter-bending jig. These are made by forging<br />
a steel bar ¾-inch to 1-inch square and about five-inches long into a “bottom swage”<br />
device. This looks something like a cradle. It can be placed into your anvil’s hardy<br />
hole or locked in a vise. You don’t necessarily need to weld the hardy stud on the<br />
bottom, just lock it in the vise. A banana would fit nicely into this cradle (see page<br />
48). File a groove into the top right edge to “catch” the point. I use railroad spikes<br />
to make this jig. On page 49 is a drawing of the exact radius of the curve taken from<br />
my shop notes. As you make more knives you may choose to change that radius<br />
depending upon factors between you, your tools, and your steel.<br />
Counter-Bending<br />
Blade across railroad spike jig just before the first strike.<br />
42
Blade distorted from the force of the strike. Note the tip is to the viewer’s left and the blade is on its side. These<br />
kinds of bends are difficult to avoid due to the force of the hammer’s blow and the thinness of the billet.<br />
Blade straightened out and ready for another blow. Note that the blade tip is pushed further up the hill<br />
of the jig.<br />
Note the “air” between the billet and the spike. The blade is almost resting at the bottom of the jig. The<br />
next blow will force it completely into the concavity of the railroad spike jig.<br />
43
The blade is traveling uphill and is ready for another strike. Note the tiny bit of air beneath the blade.<br />
The nearly completed counter-bend awaits the hammer’s final blow to close the sliver of distance between the<br />
orange-hot billet/blade and the bottom of the railroad spike swage.<br />
A successful counter-bend resting <strong>with</strong>in the swage. Note the distinct bent blade half of the billet and the other<br />
straight handle half. There are rarely counter-bends that are exactly alike. All are slightly different. Get yours as<br />
close to the pictures and drawings as you can.<br />
46
There will be one or two additional heats and taps on the anvil face to re-flatten and<br />
realign the billet. Straighten the handle along both the handle edge and the flat axis.<br />
Poor Smith’s Counter-Bending Jig<br />
A third way to make a hot-blade counter-bending jig is to place the blade between<br />
two ¾-inch square blocks of wood and secure them 4-inches apart. Position your<br />
hot bar belly up from tip to notch. Hit the bar hard in the middle a few times<br />
and you’ll be somewhere “in the neighborhood”. Remember that the extent to<br />
which you counter-bend depends on how much you intend to draw and thin<br />
the opposite edge, as dictated by Newton’s law. <strong>Blacksmith</strong>ing sometimes is<br />
“somewhere in the neighborhood” (Newton didn’t say that - I did). Keep the<br />
handle section arrow straight.<br />
Using any of the three methods, where the handle meets the blade (the ricasso),<br />
there will sometimes be a slight funny little “S” curve due to some mystery forces.<br />
It’s Newton’s fault again. Use your flat-face hammer and make everything true<br />
to the world. Consult the storyboard. Make your finished billet look like the<br />
drawing and the photos. On page 49 is a full-sized drawing of the swage and<br />
billet. Please feel free to trace or photocopy this drawing for your use.<br />
Once the bar has the proper blade counter-bend from tip to ricasso and a straight<br />
handle from ricasso to pommel you are ready to forge-bevel the cutting edge.<br />
Poor Smith’s Counter-Bending Jig.<br />
47
This represents the blade/billet after the counter-bend. The counter-bend is about thirty-five degrees.<br />
48
Make Your Own Railroad Spike Jig<br />
This full scale drawing is a tracing of the actual RR swage<br />
in my shop. Please feel free to copy it and make your own.<br />
This curve is part of a 4-inch radius.<br />
49
CHAPTER IV<br />
Forge-Beveling<br />
TIP: The most important principle in this section is to OVERLAP HAMMER<br />
BLOWS. The right edge of your previous hammer blow becomes the center point<br />
of your next hammer blow.<br />
Forge-beveling allows a consistent pushing of the hot steel in all directions<br />
at each blow. The physics are consistent, predictable and reliable. At each<br />
strike the force of the rounding hammer head pushes the bottom half of the blade<br />
and the spine in opposite directions. The tip-to-choil forces are contained for the<br />
most part by the blade’s mass. It’s much like when the smith makes breakfast<br />
sausage patties. Imagine pushing the center of that sausage patty down <strong>with</strong><br />
the heel of your hand (hammer) against the counter (anvil). The patty spreads<br />
out in all directions <strong>with</strong> a dimple in the center, the same as the steel. With<br />
repeated overlapping blows the bevel thins and widens downward as the spine<br />
stretches upward. The resulting geometry is a thinning and reshaping of the<br />
blade between the cheek line and the cutting edge. A bevel is forged and formed<br />
<strong>with</strong> your rounding hammer, anvil and blacksmith’s eye.<br />
Once forge-beveling is mastered you can actually form a hollow “grind” by<br />
hollow forging (another lesson, another book).<br />
NOTE: Look at a knife <strong>with</strong> the pommel to the left and the point to the right,<br />
cutting edge down and spine up. For reference and description this is the right<br />
side of the blade.<br />
50
This is the RIGHT side (i.e. right-hand side) of the knife blade.<br />
Setting the Bevel<br />
The forge-beveling procedure is advanced forging. Beveling <strong>with</strong> a hammer is<br />
a <strong>Blacksmith</strong> Secret used by few these days. Learn this method and you will<br />
certainly be connected to the smiths of old.<br />
This forge-beveling procedure takes me six heats or more, at minimum; three<br />
on each side. Theoretically, one heat per line, three lines per side (explained<br />
below in Half, Fourth, Eighth). Make these passes down the bottom half of the<br />
blade traveling its full length. Because you might be a beginner it may take many<br />
more passes than six. You may need more heats due to being hammer shy or<br />
because of rookie hesitation. You may start and stop frequently due to underheating,<br />
overheating, dropped blades, re-positioning your piece or “Where’s my<br />
hammer?”. All of those are OK. We all do them.<br />
Half, Fourth, Eighth<br />
Let’s go through the forge-beveling principle. First think cross-section geometry.<br />
Develop a visual in your brain of the relative distance from the center point of<br />
the hammer face to the bottom one-half of your blade as you travel along its<br />
length from ricasso to tip.<br />
Do this by visualizing one-half, one-fourth, one-eighth. If we were to saw a<br />
blade vertically in half and view it in cross section, we would see that its shape<br />
is thickest at the top, along its spine. It holds that dimension down to the cheek<br />
(about the halfway point) and then dramatically loses thickness as it approaches<br />
the cutting edge. This is the bevel. Your bevel. Think halfway from cheek line to<br />
cutting edge. This is the 1/2 line.<br />
This traditional way to set this bevel can only be acquired <strong>with</strong> dozens of<br />
latitudinal hammer strikes passing from left to right at those three descending<br />
levels: 1/2, 1/4, 1/8. Remember one-half, one-fourth, one-eighth.<br />
51
BLACKSMITH SECRET: To gauge forging heat have a wooden box close by and<br />
away from any direct light. Hold your blade in the box to see the true forging heat.<br />
Even when hot the “red” is sometimes difficult to see in a lighted room. However,<br />
the red will show in the shade of your box. This means you are above forging heat<br />
and will thus avoid potential edge cracks. Remember this is high carbon steel<br />
and your working parameters are narrower. Iron can be worked over a greater<br />
temperature <strong>with</strong>out damage. At the end of each forging and before you lose<br />
forging heat in your blade use the last few seconds to straighten and align your<br />
work. Make all lines right <strong>with</strong> the world.<br />
Forge-Beveling<br />
The successful counter-bend is placed at the “bottom” of the anvil <strong>with</strong> the choil just at the anvil’s corner<br />
next to the table. Several hammer blows are placed at the halfway point/line and then the hammer travels<br />
down the blade to the smith’s right.<br />
This shot shows the smith’s hammer making the first blow at the choil.<br />
54
This same blade is cooled to black heat. Note the overlapping hammer blows at the bottom half of the<br />
blade while, at the top, along the spine and above the blows, it remains untouched by the hammer’s<br />
rounded face.<br />
The blade is heated, flipped to the “top” of the anvil, tipped to 12° and the same process is repeated.<br />
Photo of the same cooled blade. Note that it is beginning to smooth and the counter-bend is beginning to<br />
straighten. The soapstone line divides the bevel from the spine area.<br />
55
Here the smith is forging the bevel at the top of the anvil. The cooler, dark area, shows where the hammer<br />
has just fallen as the smith indexes from the choil toward the tip. Note that the edge of the blade is barely<br />
at the edge of the anvil so the hammer can “fall-off” and not strike the anvil’s edge.<br />
Remember to always do the tipping 10-12°on each and every forge-bevel trip down the blade.<br />
This is after a first pass on both sides and at the 1/2 line of the knife from choil to tip. Note the counterbend<br />
has just started to straighten out.<br />
56
The second pass on both sides at the 1/4 line brings the blade a little straighter <strong>with</strong> the bevel dropping<br />
down a bit more and becoming thinner.<br />
The third pass on both sides at the 1/8 line brings the blade nearly straight and the edge now has the<br />
beginning of that “dime” thinness.<br />
This particular blade took a fourth pass but as can be seen the spine is thick and the bevel is nearly<br />
formed. It took some tweaking here and there to align the blade <strong>with</strong> the handle but now it is ready for<br />
its profile to be shaped.<br />
57
This photo shows that same knife blank <strong>with</strong><br />
a rough soap stone profile. The original billet<br />
demonstrates where we were and to where we got<br />
<strong>with</strong> lots of heats and hammer blows.<br />
58<br />
This photo shows the same blade next to an original<br />
billet, comparing the thickness of the forged edge to<br />
the unforged edge. Note the uniformity in thickness/<br />
thinness of the forged edge.<br />
Another Way to Explain This:<br />
How to Set the Bevel <strong>with</strong> Hammer and Anvil<br />
Take a heat. Place the bar at the bottom left hand edge of the anvil <strong>with</strong> only a trace<br />
of the anvil visually showing around the bottom corner of the bar (see drawing).<br />
The notch will be at the very left-bottom corner face of the anvil. Your first blow<br />
will be just below the middle of the blade at the front edge of the ricasso. In the<br />
drawing I have marked that spot <strong>with</strong> an “X”. Tip the blade to 10° - 12° and place<br />
a half-dozen solid blows on top of each other at the “X”. This will smush-out that<br />
entire corner of the bar, at the choil and<br />
at the ½ mark. It will also begin to set the<br />
bevel angle. Later the smushed part can<br />
be forged and filed square. Take a heat.<br />
Because your piece is shaped like a<br />
downward banana, you’ll have to index<br />
the next series of heats-and-hits. All your<br />
blows along the 1/2, 1/4, and 1/8 lines will<br />
start at that “X” spot on each of those three
lines: X at the 1/2, X at the 1/4 and X at the 1/8. Pull the bar to your left, indexing, past<br />
the same spot on the anvil’s corner. Maintain the 10° to 12° angle. This “pull” is only<br />
a fraction of an inch at a time. Remember the wooden lath exercise from Chapter II.<br />
Pound down the length of the bar; hit-index-hit-index-hit-index, on-and-on to the<br />
end of the blank. It may take twenty or thirty blows and more than one heat.<br />
Right Side of the <strong>Knife</strong> at the Bottom of the Anvil<br />
It sounds awkward but it’s quite efficient. Bam, bam, bam, bam…. goes the<br />
smith. Take another heat. Flip the bar to the left side and place at the top of the<br />
anvil. Tip to 10-12°. From that “X” spot begin the indexing and striking again.<br />
Heats-and-hits, heats-and-hits. Strike while the iron is hot. Keep hammering in<br />
the same anvil spot and move the bar. Index on the top anvil corner pulling<br />
the bar left, down the left side of your billet,<br />
overlapping your hammer blows as the bar<br />
passes under your hammer. Bam-Bam-Bam<br />
goes the smith. Simple! If you can hammer<br />
to the tip <strong>with</strong>out running out of heat first,<br />
great, but if heat runs out take another<br />
heat, tip and start where you left off. Heatstraighten-and-hit.<br />
The sound will be bambam-bam-bam-bam<br />
in rapid succession.<br />
Remember the center of your next blow will<br />
be at the right edge of your last blow.<br />
All the way to the end. It’s a balance between heat, power, speed and accuracy.<br />
Your banana blade will try to move and curl-up on the flat axis. After each heat<br />
give it some light straightening-out taps <strong>with</strong> your flat hammer face. Hold the<br />
blade at arm’s length, look down the line, see the bumps and lumps, give it some<br />
more taps to straighten it out then back to the heat.<br />
Same as Above Said in a Different Way<br />
<strong>with</strong> Different Drawings<br />
Place the bar at the anvil’s edge, tip to<br />
12°. Strike several solid blows <strong>with</strong> your<br />
hammer’s round face just at the halfway<br />
point at the first “X” of the bar (at what<br />
will become the choil) and not a fraction<br />
above. At that same latitude travel the<br />
distance “toward” the right, indexing<br />
down the counter-bend curve to the tip<br />
of the bar or as far as the heat will allow.<br />
Go the distance. As you index “down”<br />
the right and then the left side of the billet<br />
(blade) increasing lengths will hang off the<br />
anvil. Keep it level, see the drawing.<br />
Left side of the bar (knife) at the top of the anvil.<br />
Note the bar bending upwards. Straighten <strong>with</strong><br />
light taps.<br />
59
TIP: Many smiths I see on knife videos or TV shows forge the blade’s edge smack in<br />
the center of the anvil face! Do not do this! Three bad things happen when you do.<br />
The first bad thing is that part of the hammer’s face/edge frequently hits the anvil<br />
and not your piece. That transfers energy into the anvil and not your blade thus<br />
reducing the drawing out effect sought. The second bad thing is that the repeated<br />
hammer blows will damage the anvil face. The third bad thing is that something<br />
other than a straight and uniform forge line is going to be made down the blade.<br />
62<br />
Let’s Go Over the Forge-Beveling Technique<br />
Just Once More<br />
Striking at the bottom of the anvil, index your way down the blade at the 1/2 line<br />
to the point. Flip to the left side at the top of your anvil. Tip to 12° and do the<br />
same on that side, at the top of the anvil. Next pass. Start at the left-hand bottom<br />
corner of the anvil again and forge (index) down the blade at the 1/4 line. Flip<br />
and do the left side of the blade at the top of the anvil. Then do the same at the<br />
bottom of the anvil on the right side of the blade at the 1/8 line. Flip. Again, down<br />
the 1/8 line at the anvil top and stop.<br />
TIP: Remember that the number of strikes, blows or whacks you give the blade<br />
depends upon its response to your power, the blade’s heat level, and the weight of<br />
the hammer. As the blade straightens out, back off on the power. The blade should<br />
get straight about the same time the bevel gets thinner.<br />
Hold the blade out and away from you at arm’s length. Look down the line,<br />
heat and tap, straighten it out <strong>with</strong> light hammer taps, look again, hold all sides<br />
against a metal ruler for a straight edge to all compass points, spine, edge and<br />
both sides.<br />
If you see spots on the blade that you missed or to which you gave only light<br />
hammer blows, heat and tap a couple times at that point. Check compass points<br />
and align. Take out those little waves in the cutting edge now. They will be most<br />
difficult to remove after hardening. Use Heat and Lock Technique 2 explained<br />
and illustrated on pages 69-71.<br />
Take out little lumps and bumps and check the overall thickness for high/low<br />
points and all-around appearance. If you have a flatter in your tool inventory<br />
now is the time to use it on both the handle and cheek. A flatter will not affect<br />
the bevel. Run soapstone along the surface of the blade and bevel to see telltale<br />
highs and lows and hooks and crooks. Fix them <strong>with</strong> light taps of your flat-face<br />
hammer, after heating of course.<br />
A good habit to get into early in your knifemaking experience is to lay the blade on<br />
a flat surface and check for flatness. See if it spins. If it doesn’t, it’s flat.
Another habit to form is to lay it aside, let it cool to room temperature, and<br />
then feel your blade. Not only will you be normalizing it by doing this but your<br />
fingers will join <strong>with</strong> your eyes and give unmistakable messages to your brain<br />
about the blade’s overall geometry as they travel along its surface. Your brain is<br />
a wonderful thing. It helps you to become the BOSS of your STEEL.<br />
The Most Common Mistakes Made by Students<br />
in <strong>Traditional</strong> <strong>Knife</strong> Forging<br />
BLADE ONE<br />
A correctly forged knife. The handle has been reduced to ¾-inch in width. It runs<br />
straight and true for about 4-1/4-inches. The blade tip is correctly narrowed and<br />
thinned <strong>with</strong> its length almost 5 inches. Total length is 9-1/4 inches. This blade is<br />
ready for surface finishing, pre-sharpening and then heat treating.<br />
BLADE TWO<br />
This smith was overly aggressive <strong>with</strong> the handle. Lots of power but no control.<br />
Those deep indentations were caused by his hammer not being parallel to the<br />
anvil face. This could have been fixed but the smith chose to get it right on a<br />
practice billet then start over <strong>with</strong> a new steel billet – a good choice.<br />
63
BLADE THREE<br />
The student’s knife is the bottom one. A perfectly forged handle, as is the blade<br />
and its point. However, the fledgling smith over counter-bent the blade to about<br />
90 degrees. Had I allowed her to continue through to completion the knife would<br />
have never straightened out and would have been more of a pruning hook. The<br />
smith started over. Note the correct counter-bend above which is at about 30°.<br />
BLADE FOUR<br />
This smith started <strong>with</strong> excellent hammer control forming the handle to the<br />
correct specs. However, the point was drawn out too thin and narrow. Remember<br />
the next step will be counter-bending which brings the blade under tremendous<br />
stress and so it needs to be “beefy” at this stage. Blade length is already at 5-plus<br />
inches, which is too long. That is about 3/4-inch longer than the expected finished<br />
blade. This could have been salvaged by cutting the tip down ½-inch but the<br />
smith chose to start over. Again, a good choice.<br />
64
BLADE FIVE<br />
This smith also made a beautiful handle, ¾-inch by 4-1/4-inches, outstanding.<br />
However, when forge-beveling, his hammer blows did not follow those three<br />
center-to-edge lines traveling choil-to-tip. His blows were all over the place<br />
and his blade did not straighten out, nor could it have <strong>with</strong> such random and<br />
uncontrolled strikes. Remember, place overlapping blows along those one-half,<br />
one-quarter and one-eighth lines.<br />
TIP: The smith can learn lots by correcting these four mistakes and others as they<br />
acquire greater skills. However, many corrections of those mistakes are frequently<br />
beyond the fledgling knife maker’s current ability and skill set. Those incomplete<br />
knives can always be saved and reworked another day when your skills are refined<br />
through practice. I usually encourage my students when making mistakes to shut<br />
down the forge, re-read the Forge-Beveling chapter and then start over <strong>with</strong> a<br />
fresh billet.<br />
Going to the Grinder<br />
As mentioned in the Introduction, we are now going to make some use of the<br />
electric grinder, but we are only going to grind the edges.<br />
At this point in the process, after dozens of forge-beveling blows, your blade<br />
looks uneven, <strong>with</strong> less than straight edges, but as we proceed, it will get better.<br />
Look at your blade; the blade edges will be uneven, gnarly, and maybe even have<br />
a bit of a curve on top. There may be lumps in the spine due to a wild hammer<br />
blow or two. Your edge may be wavy, maybe thick, maybe thin here and there.<br />
In days of old the smith would have handed this gnarly blade to his apprentice<br />
and said, “Fix this”. The apprentice could have trimmed those uneven edges out<br />
<strong>with</strong> a hot cut or hardy then filed for an hour or so – we won’t. Hardies, hot cuts<br />
and rookies sometimes struggle <strong>with</strong> each other.<br />
65
72<br />
CHAPTER V<br />
Annealing the Blade<br />
When a smith forges steel the crystal structure of the metal always becomes<br />
deformed. It is stretched in some areas and “compressed” in others. The<br />
billet or knife may look smooth on the surface, but <strong>with</strong>in its microstructure<br />
there is stress and distortion. These contorted structures are no problem in<br />
and of themselves but in the heat treating process (explained later) they are<br />
usually responsible for bends or cracks when the steel is oil quenched to harden<br />
(Chapter VI). There are two procedures that “relax” and bring all the internal<br />
microstructures into a homogenous consistency to reduce those stresses from<br />
forging that cause bends and cracks. The first is annealing and the second is<br />
normalizing. They are similar but there are differences.<br />
Annealing usually is done after forge-beveling but before the sanding and filing<br />
of the finished forged billet into a knife. Annealing brings the steel to its ultimate<br />
“softness”, sometimes referred to by metallurgists as “dead soft”. This allows you<br />
to file, sand and finish <strong>with</strong> the least amount of elbow grease. By slowly cooling<br />
the steel through annealing, a large grain structure is grown while the atomic<br />
structure <strong>with</strong>in the steel modifies into a more workable consistency that will<br />
be as even and malleable as high carbon steel can get. Later in the heat treating<br />
process we will reduce the grain size by normalizing, quenching/hardening and<br />
lastly, tempering.<br />
Many of the same property changes happen to the microstructure of steel both<br />
in annealing and in normalization—they just happen more extensively and more<br />
slowly <strong>with</strong> annealing than <strong>with</strong> normalizing. Annealing is done to bring the<br />
steel to an optimal “softness” for hand working while normalization prepares<br />
the steel for the brutal business, as far as the steel is concerned, of oil hardening.<br />
Annealing can be done in several ways. The modern way is in a furnace especially<br />
designed for that operation. The old way is to first bring the blade to critical heat<br />
then to bury the blade in sand, ash or vermiculite until cool (several hours).<br />
I anneal in my gas forge. Like many smiths, I have annealed in a box of sand,<br />
a bucket of ash or a can of vermiculite. I now anneal solely in the forge. At the<br />
end of a day’s forging I heat and place all my blades to be annealed on the floor<br />
of my hot gas forge. To anneal first preheat a 1-inch thick steel plate as large as<br />
your forge floor because it’s the biggest mass and will take the longest to come<br />
to critical heat (1500°F). Next, bring your blade(s) to be annealed to critical heat.<br />
Then prop the plate up a bit and slide your blade(s) flat and under the plate<br />
as evenly as possible. The plate is now on the floor of the forge and on top of<br />
the blades. Keep the forge firing for ten minutes or so to ensure that the plate,<br />
blade(s) and forge walls and floor are all at critical heat. Block the entrance and<br />
all holes in the forge <strong>with</strong> fire bricks and turn the forge off. Allow the forge to cool<br />
all night. In the morning your forge should be cool and your blades annealed.
Don’t attempt to drill or file steel that has not been annealed; it’s bad on the steel,<br />
the equipment, and the smith.<br />
Normalizing: (Note: the terms and chemical reactions mentioned here are<br />
explained in more detail in the following chapter). The last normalization is<br />
done just before the hardening quench after you have finished shaping your<br />
blade <strong>with</strong> file and sandpaper. When normalizing you first bring the entire blade<br />
to critical heat (1500° F) then set it aside to cool at room temperature. This allows<br />
the trapped carbon atoms to slowly diffuse out of the ferrite structure and form<br />
into cementite, then line themselves up <strong>with</strong> the remaining ferrite structure.<br />
These two formations together are now called pearlite. Pearlite is a fine grained<br />
structure that is extremely ductile. The most important result of normalization is<br />
that it homogenizes the internal microstructure, thereby equalizing the crystalline<br />
size and “normalizing” the consistency of the blade’s steel. This process prepares<br />
the steel for an even hardening and tempering, <strong>with</strong> a reduced chance of bending<br />
or cracking. Most smiths normalize one to three times over the course of blade<br />
construction. More than three times is unnecessary.<br />
Filing and Sanding<br />
If I were grinding the final shape, I would turn on my Grizzly. I have nothing<br />
against 2 x 72 belt sanders. I like mine. But… I also like the forging process that<br />
brings a blade to near completion, then doing the final shaping and finishing<br />
<strong>with</strong> file and sandpaper sticks. That’s how Gus did it.<br />
Forging and filing can be almost as fast as grinding and buffing. That’s because we<br />
have forged the knife closer to its final form and have less to remove. After forgebeveling<br />
there is way less, hardly any, stock to be removed. Also, there are fewer<br />
high-speed grinding mistakes resulting in half finished blades on the floor at the<br />
end of the day. I do it old and slow. For me slow is more enjoyable and a lot quieter.<br />
Secure a collection of files. New files are expensive. Old half-used files are just<br />
fine and available in used tool and pawn shops, farm auctions and yard sales.<br />
When you buy a new file purchase the best quality you can. Learn to sharpen<br />
the old ones, they come out almost new. Half of your work will be done <strong>with</strong><br />
two or three flat, cross tooth and single cut large files, the other half will be <strong>with</strong><br />
sanding sticks.<br />
Consult some old smithing or machine<br />
shop publications or the internet for<br />
proper file use and techniques like cross<br />
filing. Effective filing is harder than you<br />
might think but extremely satisfying. All<br />
filing positions and processes are exactly<br />
the same when using sanding sticks.<br />
When files are totally worn out, they can<br />
be made into knives.<br />
73
Pommel Rounding<br />
Round the knife pommel <strong>with</strong> heat and the same 45° bird’s beak action you did<br />
for the point, except don’t make a bird’s beak or a point, make a half-round. Start<br />
<strong>with</strong> 45° on each edge, then lightly hammer them round at the edge, and flat on<br />
the flat. Finish by filing and sanding.<br />
Angle Iron <strong>Knife</strong> Filing Jig<br />
Build a knife filing jig <strong>with</strong> a foot long section of two-inch angle iron. Epoxy or<br />
contact cement a ¼-inch x 10-inch strip of leather to each of the edges or along<br />
the length of one edge. It is also OK to put leather on each edge and just turn<br />
it around. I’ll show both. This rig allows you to “lock-in” your knife <strong>with</strong> vise<br />
grips and file <strong>with</strong>out damaging the “soft” edge of the blade or the soft edges of<br />
the smith. This jig also prevents your knife from “hanging out” over the edge of<br />
the vise which would cause you to bend your edge each time you file. This jig is<br />
used in all the shaping, polishing and pre-sharpening phases.<br />
Files leave scratches but that’s OK. This happens because minuscule bits of the<br />
file or bits of the knife’s surface break away and lodge between the file teeth at a<br />
catawampus angle. These bits are called swarf. When you push the file, the swarf<br />
is carried along <strong>with</strong> the file and it scratches the blade’s surface. Keep a file brush<br />
or steel wire brush handy and clean your file between each attack on the blade.<br />
You can feel when the scratches happen; stop, clean and carry on. I like to see a<br />
few of those random scratches in my finished blades.<br />
Pre-Sharpening and Setting the Cutting Angle<br />
Lock the right side of the angle iron in the vise to work the left face of your blade<br />
and the opposite side when you work on the right face. Secure the blade <strong>with</strong><br />
your trusty vise grips. The leather provides a support for the thin annealed edge.<br />
Without this the blade’s edge would bend/fold over the edge of the angle iron.<br />
The angle iron, and the angle iron locked in the vise<br />
74
An angle iron jig <strong>with</strong> leather strips.<br />
The author pre-sharpening the edge while the knife is locked in the angle iron jig.<br />
The blade locked <strong>with</strong> the vice grips. Note the blade edge resting exactly at the edge of the angle iron jig.<br />
The forward handle line has been marked <strong>with</strong> rivet hole center punch cross marks.<br />
75
Have sandpaper sticks prepared <strong>with</strong> 120, 220, 320 and 400 grits and gradually<br />
work your blade’s edge from the choil down to the tip starting <strong>with</strong> the coarsest<br />
grit.<br />
Also, file and sand the upper flat of the blade between the cheek and spine, then<br />
at the ricasso, the spine and slightly at the handle. Get your blade ready for heat<br />
treatment and handle attachment. How many forge and file marks you remove<br />
is up to your vision of what your blade should look like. I like to retain file<br />
scratches, hammer tracks and oxidation mixed <strong>with</strong> those final sanded shiny<br />
patches, all mixed together. Its appearance is much like a pinto horse.<br />
BLACKSMITH SECRET: Soapy water will float away the bits of the knife cut by the<br />
file (i.e. swarf) and file teeth that break away from the file. The soapy solution will<br />
also keep oil and those random bits of file teeth suspended. Have a soup can of<br />
soapy water next to your vise and dunk your file or sandpaper stick into it from<br />
time to time.<br />
78<br />
Drilling the Holes for Handle Attachment<br />
The handle will not be attached for a few steps, but the rivet holes for the scales<br />
(the two wooden pieces for the handle) must be drilled now while the blade is in<br />
an annealed state and before the heat treating process. Instructions on punching the<br />
rivet holes, as was done in days of old, will be addressed at the end of this chapter.<br />
This knife will have three 5/32-inch wide rivet holes. Drill them <strong>with</strong> a titanium<br />
or chromium bit; steel is hard stuff. In the old days these holes were punched<br />
to size. Even after annealing, steel is hard. Place the holes equal distances apart.<br />
These measurements will vary as each knife will be a little different than the<br />
next one you make. Variation and “close” are acceptable. If a smith didn’t even<br />
measure and made three holes about where they should be it would most likely<br />
be fine. Keep the pommel hole about 5/8-inch from the end, and the front hole<br />
about 5/8-inch from the handle’s front edge, and the third hole between those two.<br />
These holes will carry 5/32-inch brass tubes into which will be inserted 1/8-inch<br />
copper rods.<br />
The system used for the handle attachment is a Tube and Rod Peen (TRP). A<br />
peen attachment is simply the use of a tiny section of rod called a rivet which<br />
attaches the handle parts together. We have various other things to do in making<br />
our Frontier knife before we attach the handle (explained in Chapter VIII) but I<br />
will describe the TRP method below so you understand how we will be using the<br />
rivet holes we just made.<br />
Rivets are one of those old inventions we think little of but could not live <strong>with</strong>out.<br />
They are responsible for holding together every skyscraper since 1880, every metal<br />
ship, until very recently, since the Monitor (1863), every iron or steel bridge since<br />
the early 1830s, every shovel or rake, and every airplane that has ever flown since<br />
shortly after the Wright brothers. A Boeing 747 has over a million rivets alone.
The Eiffel Tower a million and a half and an Airstream Travel Trailer about six<br />
thousand. This modern yet ancient fastener can also be seen in tools, weapons<br />
and machinery in museums all over the world. You have some modern examples<br />
around the house, garage, auto and surprisingly in your computer panel board<br />
and case construction.<br />
For a knife, a rivet passes through both of the handle scales and the steel blade.<br />
The protruding rivet is peened into a mushroom-like button on each side causing<br />
a clamping effect on everything in between. Not only does the button expand at<br />
the top and bottom ends but also down the shank of the rivet about 1/16-inch from<br />
the surface, binding the blade and scales tightly.<br />
When a peen connects two metals together there is rarely a problem <strong>with</strong> it working.<br />
View peen #1; it is straight and true, mushroomed at the top and bottom as it should<br />
be. The problem comes when there is a softer material being bound together on the<br />
outer surface like the wooden scales of a knife. Peen #2 shows how the peen can<br />
drop beneath the surface of the wood when peened too much or filed too close.<br />
Unless the rivets are perfectly perpendicular to the handle, they will bend at one or<br />
both ends causing the rivet to bend over at the top and/or the bottom end. Peen #3<br />
is catastrophic. The holding power is greatly diminished, the joint looks ugly and<br />
usually splits the scale. Peening successfully in wood is truly an art. It is difficult but<br />
can be done. I and other old smiths do it all the time, but we also split scales all the<br />
time. But remember — “There is hardly nothing we can’t fix”.<br />
Peening in non-stabilized wood <strong>with</strong>out using tubes, as the original Frontier<br />
handles were made, will work only about 80% of the time, even for me or other<br />
smiths who frequently peen. I have found that beginners who have never peened<br />
anything are rarely successful performing all three peens <strong>with</strong>out splitting wood<br />
or bending rivets. By using tubes your success rate will approach 100%. Each time<br />
you peen you will acquire more control of those subtle forces that accompany<br />
this ancient procedure. Peen #4 is a TUBE and ROD PEEN. Note the brass jacket<br />
around the copper rivet on Peen #4. This will be explained later.<br />
79
CHAPTER VI<br />
Heat Treatment<br />
In this first part of this chapter I will explain the technical dynamics and<br />
chemical reactions that occur <strong>with</strong>in the hot steel blade. In the second part I<br />
will cover in detail the “how to” of all four heat treatment procedures you will<br />
use in the making of a blade: annealing, normalizing, hardening, and lastly,<br />
tempering.<br />
At this point your blade is ready for heat treatment. This term does not refer<br />
to a specific procedure, but to a set of them. Under the term “heat treating” we<br />
find procedures like annealing, hardening, tempering, quenching, carburizing,<br />
welding, hot-forming, normalizing, and case hardening. I don’t usually use<br />
the term “heat treatment”. I prefer to use the name of the actual procedure in<br />
question such as annealing, hardening or tempering. But the term is commonly<br />
used in books so you should know it and understand what it refers to.<br />
Old time smiths didn’t use the heat treat term either. They usually used the term<br />
“temper” which, to them, meant two procedures: (1) the combined hardening<br />
and tempering process, and (2) the actual procedure of putting temper into<br />
a blade observing the various color changes as heat traveled through it.<br />
This dual use of the word “temper” resulted in terminology confusion, both<br />
then and now. In this section we will restrict ourselves only to the four heat<br />
treatment procedures for blade making: annealing, normalizing, hardening<br />
and tempering.<br />
The Stuff of Steel<br />
A basic understanding of steel’s chemistry and microstructure is important in<br />
being a good blacksmith. I will cover these briefly but, as I am neither a metallurgist<br />
or engineer, I encourage you to research these principles and processes further<br />
on your own. Talk <strong>with</strong> some (chemical) engineers and/or metallurgists, they<br />
know this stuff.<br />
Understand first that iron (Fe) is an element and steel is an alloy. Iron can occur<br />
naturally but steel does not. It is produced by man. Finding iron in a usable form<br />
is a natural rarity, other than that found in meteorites, or bog iron, and those are<br />
not ‘pure’ iron. All have some percentages of various impurities. Modern steel<br />
is made from the earth’s abundant iron ore deposits (rocks and minerals from<br />
which iron can be extracted), <strong>with</strong> small and controlled quantities of carbon (less<br />
than 2%) and other elements like manganese, nickel and tungsten. Before steel is<br />
steel, it’s iron <strong>with</strong> no carbon.<br />
How does that tiny bit of carbon get into the iron when making steel?<br />
82
Almost all metals are crystalline when solid. Crystals are in turn just an orderly<br />
arrangement of atoms. Iron atoms can be imagined as arranged and stacked<br />
billiard balls in a three-dimensional cube. The balls represent iron atoms <strong>with</strong><br />
spaces in between, called lattices. These spaces are where carbon or other<br />
impurities can lodge.<br />
In the world of metals, crystalline (crystal) structures are usually referred<br />
to as “grains”. When we are forging and heat treating, we are manipulating<br />
the grain of the metal. In many cases alterations to the grain will change<br />
the properties of the metal. Iron and especially steel have a special property<br />
that not all metals have. Their atoms can be rearranged more than one way<br />
<strong>with</strong> different properties which change the characteristics of the metal. These<br />
properties can be controlled by the smith through force and heat to make the<br />
steel hard, tough, soft or ‘springy’.<br />
At the steel mill iron ore is melted down and carbon is added to form steel.<br />
Adding carbon to liquid iron is something like adding sugar to hot coffee.<br />
It will dissolve. As long as the iron atoms are arranged as austenite (which<br />
happens above 1333°F) the carbon atoms will fill the spaces between the iron<br />
atoms.<br />
As the steel slowly cools (below 1333° F) the iron changes from austenite to<br />
ferrite and the spaces between the iron atoms go back to the previous separated<br />
arrangement. When that happens the carbon atoms get kicked out of the lattice<br />
structure and have to find somewhere to live. They locate along the edges of the<br />
iron crystals. When this happens, most of the carbon will chemically combine <strong>with</strong><br />
some of the iron to make a compound called iron carbide, commonly referred<br />
to as cementite. That’s a little bit like finding sugar crystals in the bottom of the<br />
coffee mug if you don’t drink all the coffee and let it get cold. Carbon atoms are<br />
much smaller than iron atoms and can easily fit into the spaces between atoms<br />
in the austenite arrangement, but not the ferrite arrangement. That’s why they<br />
move out.<br />
REMINDER: At temperatures below 1333° F the phase is called ferrite and above<br />
that temperature it is called austenite.<br />
NOTE: 1333° F, where this change occurs, is often referred to as “The Critical<br />
Heat”. Metallurgists call it the “Transformation Temperature”. In actual practice<br />
the transformation can take place over a range of temperatures. The precise<br />
start and finish temperatures vary <strong>with</strong> the type of steel, but for most plain<br />
carbon steels the upper limit is slightly less than 1500° F. That is generally<br />
the “target” that smiths shoot for. As long as you use it as your mark you will<br />
get the desired results. For plain carbon steels a good way to verify that the<br />
transformation is complete is to use a magnet. Austenite is not magnetic so<br />
when your blade no longer sticks to a magnet you know it has transformed<br />
from ferrite to austenite.<br />
83
84<br />
Annealing and Normalizing<br />
We looked at these two terms earlier. Now it’s time to talk about what happens<br />
when we heat treat our blade. Heat treating consists of several procedures done<br />
in order: annealing, normalizing, hardening and tempering. Each procedure has<br />
its own important function. Remember that when we were forging we had to be<br />
the “boss” of the steel and make it go where we wanted it to go by sheer force.<br />
In heat treating we are still going to be the boss, but this time we are going to<br />
control those crystals (grains) by using heat alone. The first thing we are going<br />
to do is make sure those grains are all the same uniform size and that they are<br />
all kept small. How? By heating them up, but not beyond critical heat. Then we<br />
let them cool slowly. This happens when we anneal and normalize. These two<br />
processes give us what we want, small and uniform grains.<br />
When forging, we are using temperatures just under 2,000 degrees. Forging<br />
pounds and pushes steel grains every which way at that heat. The forging<br />
process puts a significant amount of stress into the knife blade as a whole but it<br />
also allows the grains to grow. Big grains are bad!<br />
Grain growth is completely temperature dependent. The hotter you go, the<br />
bigger the grains get and the faster they grow until they liquefy. Grain size<br />
is manipulated only through heat treatment (time and temperature). Grain<br />
refinement can however be effected through force. That is usually accomplished<br />
in the modern steel mill through the rolling process, <strong>with</strong> both hot and cold steel.<br />
The predominant method used to normalize today by all smiths, grinders and<br />
forgers alike is to reduce the grain size by heat alone. The knife is heated back<br />
up so that the ferrite reforms into austenite and then is left to slowly cool. High<br />
heat is what we had when we were forging, but note that forging temperatures<br />
(around 1,800°F) are much higher than those we use for the current processes of<br />
annealing, normalizing and tempering. As long as we keep the temperature just<br />
a little bit above or below the critical temperature of 1500°F and don’t hold the<br />
knife at those temperatures for more than a few minutes the grains will not get<br />
so large as to be a problem.<br />
At this stage we want to cool the knife fairly slowly using the lock-in-the-vise<br />
technique. Remember that this heating and cooling cycle is called normalizing. It<br />
allows the larger grains remaining from the forging process to be refined <strong>with</strong>out<br />
adding new stresses. It also relieves the stresses that remain from forging while<br />
the blade is <strong>with</strong>in the straight containment of the vise. Normalizing can be<br />
done more than once but generally there is no benefit to doing it more than three<br />
times.<br />
Hardening and Quenching<br />
The next step in our heat treatment sequence will be hardening by quenching.<br />
We will heat the blade to critical heat (1500°F) and then quench it quickly in oil.<br />
This is where our billiard ball example becomes important again.
Above the critical temperature the carbon atoms are in those big gaps (the lattices)<br />
between the billiard balls (the iron atoms). When we cool the knife rapidly in oil<br />
the carbon atoms in the lattice don’t have enough time to get out and they get<br />
trapped in those spaces between the iron atoms.<br />
The image to conjure is that of the carbon atoms present in the austenite phase,<br />
wanting to diffuse out of solution as the steel cools and form cementite; but<br />
because of the rapidity of quenching they do not have time for this departure.<br />
The microstructure pattern is arrested, “frozen”, due to the rapid heat reduction<br />
when quenched. This suddenness forces the carbon permanently into those small<br />
interstices between the ferrite structure which results in a massive dislocation<br />
and distortion of the entire micro-crystalline structure <strong>with</strong>in the steel.<br />
The quenching and atomic distortion prevents the carbon from escaping outside<br />
the austenite phase to reform into cementite. The carbon is trapped <strong>with</strong>in the<br />
ferrite structure. The new carbon-rich crystalized substance becomes fixed-intime-and-place<br />
and the resulting internal structure is a brittle and super inelastic<br />
form of steel called martensite. The martensite will remain at this maximum<br />
hardness and nearly unusable brittle form forever if not tempered<br />
Now, because the carbon atoms are in that space, the iron atoms cannot get back<br />
into their previous strong, stacked billiard ball tower arrangement and so they<br />
get forced into a new arrangement. This one is a bit harder to visualize. I imagine<br />
the structure of martensite to be irregular—jagged, spikey, carbon particles<br />
distorting the neatly stacked billiard balls. Since the iron atoms really want to get<br />
back to the ferrite arrangement but can’t because the distorted carbon is in the<br />
way, the result is an enormous increase in hardness and strength <strong>with</strong>in the steel.<br />
This is quenched martensite which is not only extremely hard, but very brittle.<br />
Tempering<br />
Tempering is the next procedure we perform. Its purpose is to “soften” the<br />
martensite through heating. Then we perform an oil quench to arrest the softening<br />
process. The tempering of the martensite steel is done at temperatures well below<br />
the critical temperature, around 425 - 450°F. By doing this we provide sufficient<br />
heat energy for some of the carbon to escape the lattices. As this happens the iron<br />
atoms are able to get a tiny bit closer to that ferrite arrangement but not all the<br />
way there. The closer they can get to that “in-between balance” the tougher the<br />
steel will become. This is tempering.<br />
Tempering reduces those inelastic internal stresses through its slower and lesser<br />
degree of heat application. The second heating for tempering is followed by its<br />
own second oil, or water, quenching to arrest the “softening” process. Greater<br />
toughness in the steel is achieved by decreasing its hardness through tempering.<br />
We give up a little hardness for a lot of toughness when we temper.<br />
In other words, tempering slightly alters the size of, and redistributes the carbon,<br />
in the microstructure of the martensite. This reduces/relaxes the internal bonds<br />
85
Cross-bill tongs put pressure along the length of the blade that is wanting to<br />
bend. Mr. Newton’s law again. The CBTs give gentle but firm support to the<br />
blade in its time of need. Once the quench happens the blade supports itself and<br />
will stay straight forever.<br />
Because cross-bill tongs are hard to find you can substitute flat-jaw vise grips,<br />
tin-working pliers or welder’s bending pliers to do almost the same job on hot<br />
knife steel as the cross-bill tongs.<br />
The cross-bill tongs<br />
94<br />
Testing for Hardness<br />
Here is the way to test your edge. Use the small triangular or flat file in your<br />
kit—the one used to test steel types. Softly, lightly and gently, and at a low angle,<br />
pass your file across your blade’s edge. You will hear the unmistakable sound of<br />
dense, rock-hard martensite crystals. There is no other sound like it. The brittle<br />
and tight grain structure resists the file. The knife edge is even harder than the<br />
triangular test file.<br />
It’s as if you were filing flint or glass (file some flint or glass to see how it feels).<br />
The tiny teeth of the file should not bite but glide over the surface of that edge.<br />
Now pass your file down the handle’s far back edge; it should bite. It will bite, I<br />
guarantee. The far back handle has not been hardened and does not need to be.<br />
There is still enough spring in that unhardened handle steel to oppose almost<br />
any abuse it would ever experience. The handle at the ricasso can be tempered<br />
blue for flexibility after a full hardening quench, if desired.<br />
Online, and on TV programs, we see smiths <strong>with</strong> a newly hardened blade, fresh<br />
out of the oil, in one hand, and in the other a big ugly large-tooth file. They take<br />
that file and rake it across the cutting edge to test for hardness. They announce,<br />
“Now there’s a hard blade”. There is little chance they will do damage to the<br />
blade’s edge because their edge is so thick. Don’t test this way <strong>with</strong> our knife.<br />
The smith can also see the hardness after quenching. A hardened blade will<br />
“pop off” thin scale at the edge, and sometimes other areas as well. The smith<br />
can see a clean, deep dull gray surface along the cutting edge which indicates<br />
the unmistakable presence of martensite. “Now there’s a hard blade”. Proceed<br />
to tempering as soon as possible to relieve stresses from the hardening quench<br />
<strong>with</strong>in the blade.
TIP: Become more knowledgeable by hardening and tempering some test pieces<br />
of steel and practice filing, bending or breaking them to observe their limits,<br />
thereby becoming proficient at this steel testing and knowledge business.<br />
IV) TEMPERING THE BLADE<br />
We are now going to temper, not in a modern oven designed for tempering and<br />
turned to a set temperature but by using color as our guide as it travels across<br />
the heated surface of the blade. To prepare the blade for tempering only one<br />
side needs to be polished—not shiny, just bright. I usually polish-up the left<br />
side because that’s the side I’ll heat for color. Apply heat <strong>with</strong> the edge up. This<br />
is because heat will travel up from the thick spine to the thin edge evenly. It’s<br />
also the side where I place my touchmark. Old smiths used a soft red brick to<br />
“brighten” the steel. We will use progressively finer grits of wet-n-dry sandpaper.<br />
Stop at 400 grit. All we need to do is see the color as it passes along the blade, and<br />
it can pass very fast. Control the speed of the temper color band <strong>with</strong> slow heat.<br />
Control the Speed of the Temper Color Band<br />
<strong>with</strong> Slow Heat<br />
Before tempering your blade be very careful when handling it. Your hardened<br />
blade has a good chance of cracking, chipping or breaking if dropped on a cement<br />
floor or even when lying on the bench (those internal forces will sometimes pop<br />
those hard martensite crystals apart). Sometimes this damage can’t be seen or<br />
heard until later when it cracks or breaks, so be careful. Sharp cutting edges can<br />
literally crumble when meeting a hard surface, it is that brittle! Pay attention.<br />
Tempering reduces the hardness of the steel while maintaining a homogenous<br />
grain structure. A blacksmith uses temper colors (the color band) to determine the<br />
right moment to arrest this ‘softening’ process and “freeze” that molecular grain<br />
transformation. The colors are the result of an oxidation of the surface of the steel as<br />
the various temperatures travel along and through the blade. It has the appearance<br />
of a rainbow. They will soon be sanded, polished or worn away because they are<br />
so thin. They are like your children, enjoy them while they are still around.<br />
In the Middle Ages the blacksmith was a most, if not “the most”, important<br />
guy in the village. His use of temper colors down at the blacksmith shop was<br />
considered magical by everyone including other craftsmen, peasants, Kings and<br />
clergy alike. I consider temper colors magical myself. They are something akin to<br />
the Aurora Borealis, childbirth, phase transformation in steel, grandchildren and<br />
magnetism. All gifts from the Great Spirit to all her smiths everywhere pounding<br />
at the anvil. Thank you.<br />
I will not tackle the entire temper color spectrum here nor explain what temper<br />
color is best for the wide array of whatever tool is being tempered: ax, chisel,<br />
scalpel, watch spring or hammer. There is plenty of available information online<br />
95
and in other books that will teach temper color and hardening/tempering in<br />
general. I will, however, address the tempering of our work knife.<br />
NOTE: Temper colors form due to the oxidation of surface atoms coming into<br />
contact <strong>with</strong> the surrounding oxygen in the air. The thickness of this oxide is<br />
determined by the degree of heat traveling across the surface. That thickness, in<br />
turn, determines the colors that are reflected.<br />
A factory-made, mass-produced knife blade and tang usually have the same<br />
color and temper (temperature/hardness). They are not differentially tempered<br />
as we can do, one blade at a time, in a one-man or one-woman forge. A factorymade<br />
knife is hardened and tempered in a batch of hundreds, maybe thousands,<br />
of other blades. This is done in a big oven or as they pass down a production line.<br />
Either way the entire piece is produced at a single temperature and temper—<br />
blade, edge, tang, everything.<br />
The blade is sanded <strong>with</strong> 400 grit paper to shine<br />
the surface so the colors may be seen. Note that<br />
we have about 10% “carbon scoring” (oxidation) on<br />
the surface. That’s a good thing.<br />
Here the blade is in the angle-iron reflecting “oven”.<br />
The iron absorbs the heat and reflects it back to<br />
the other side of the blade, providing an ovenlike<br />
environment. The multiple rivet holes are an<br />
example of “trial-and-error”.<br />
Here the author is heating the blade against the angle iron. A glove is sufficient protection for this lowheat<br />
procedure.<br />
96
The wheat color taken on by the blade is moving left toward, and then past, the ricasso. Once the color is<br />
well into the handle the smith will quench the entire blade. The cooling rag has arrested the temper at<br />
the tip, now a vermillion color, and along the cutting edge, wheat.<br />
To differentially temper, in the old way, each hardened blade is heated, one at<br />
a time, and brought to color by hand. The old-time smith placed a heat source<br />
(e.g. a chunk of red-hot iron) on the bench or table of his anvil and the blade was<br />
brought in close <strong>with</strong> tongs. He held the blade just the right distance from the<br />
heated chunk to “draw color” and then quickly quenched in oil. What a visual! I<br />
can still see my friend Evan teaching me this so many years ago.<br />
I give in somewhat to modern utility and use a hand-held propane torch as my<br />
heat source, and so should you. Polish the left side. Pre-heat your angle iron.<br />
Hold the piece <strong>with</strong> your left hand, blade edge up (left side of the blade), and the<br />
propane torch in your right hand. Slowly swing the torch flame from ricasso to<br />
tip. Keep moving. Pause a couple seconds every-other-pass at the thick ricasso<br />
as opposed to the thin point. The propane nozzle tip is about 10-inches from<br />
the piece. Concentrate the center heat of the flame at the spine and cheek of the<br />
knife. Keep the flame away from the blade’s thin edge area and more on that<br />
thick cheek and spine. That thin edge will heat up quickly and come to color,<br />
sometimes too soon. If you “miss” your color as it passes through…start over<br />
<strong>with</strong> another hardening!<br />
A flame held directly on the blade’s edge will heat the thin steel too rapidly and<br />
take it beyond the correct temper color. Take your time. The entire heat may take<br />
up to ten minutes. We don’t want the flame to draw color to the edge too quickly.<br />
The process we seek is to “load” the thicker mass of steel in the spine <strong>with</strong> heat,<br />
then allow it to naturally and gradually travel from that thicker spine to the<br />
thinner bevel and eventually the cutting edge. By heating just the spine and<br />
keeping the direct heat away from the thinner parts the color will travel much<br />
slower and thereby give you greater control of the color’s speed. Once straw<br />
color is observed in the spine you can “tease” the straw/wheat color from the<br />
spine into the bevel/belly and finally to the edge, <strong>with</strong> quick feathering wrist<br />
movements of the propane flame.<br />
97
102<br />
CHAPTER VII<br />
Polishing<br />
Before we sharpen the cutting edge we will polish the blade’s surface. The blade<br />
could be polished later but it’s so much easier not having an attached handle<br />
to get in the way. It’s also true that sharpening an unhandled blade is much easier.<br />
By polishing and sharpening now the smith can work up to and a bit beyond<br />
the handle-blade line, making a clean look at the ricasso. That is not to say there<br />
is anything wrong <strong>with</strong> some final polishing or sharpening after your blade is<br />
handled. Progressive wet-n-dry (W/D), metal grade, sandpaper grits (120-220-320-<br />
400-800) on a flat surface or against a rag (to polish) on a flat surface (to sharpen) is<br />
another <strong>Blacksmith</strong> Secret of the past. This hand polishing process can replace the<br />
buffing wheel and all those various colored rouges used to machine polish.<br />
NOTE: Rouges are solid waxy-like bars about the size of a big sausage, sometimes<br />
round and sometimes square. They are impregnated <strong>with</strong> various sizes of abrasive<br />
material <strong>with</strong> their different colors indicating the grit number; red is fine, white is<br />
super fine etc. That grit is then transferred to the buffing wheel by holding the bar<br />
against the wheel while running it. The grit is then deposited into and on the cotton<br />
wheel. Then the buffing wheel, <strong>with</strong> the grit, polishes the blade to a mirror-like<br />
finish. Let me note that Gus had no such machine and neither do I.<br />
SAFETY NOTE: The buffing wheel is the most dangerous tool a smith could have<br />
in his or her shop. No other machine can “grab” your blade, fling it and stick it in<br />
the wall on the other side of your shop. If you use one, be careful! Hand-polishing<br />
is safer, leaves a finish that is in line <strong>with</strong> a Frontier blade, and reflects your new<br />
blacksmithing skills.<br />
Experiment first <strong>with</strong> rubbing your blade, but not the cutting edge, several times<br />
on 220 grit sandpaper placed on a flat hard surface like a flat piece of wood,<br />
work bench or chunk of granite. Have a can of water at hand <strong>with</strong> a couple<br />
drops of soap in it to keep the sandpaper from clogging up and to float away<br />
the bits of steel from the work area. Much the same job that kitchen soap does<br />
for dinner dishes. Look at the blade to see what happens. Next place a rag (as a<br />
cushion) on the same surface, then the sandpaper, and then the blade. Rub the<br />
blade vigorously. See what happens. Polish progressively through the four grits.<br />
Polish the entire blade to your liking. You can also use self-prepared sanding<br />
sticks of the same grits. Use your thumb <strong>with</strong> various grits to reduce oxidized<br />
buildup in hammered recesses if you wish.<br />
NOTE: Sandpaper or man-made sanding surfaces were used long before commercial<br />
sandpaper was available. Early forms recorded were actual hunks of sandstone or<br />
shark skin, horsetail plant, sand imbedded animal skin, or crushed seashells rolled<br />
in primitive mortar and then dried into flat or round shapes.
Here we see a gathering of sharpening, polishing<br />
and stropping materials. A slab of granite, several<br />
grits of sandpaper sheets <strong>with</strong> their corresponding<br />
sharpening sticks, a leather, a 1500 grit strop (at<br />
the bottom), and an old leather belt for your strop<br />
material or to use as test material for sharpness.<br />
Here we see the knife on the sandpaper and the<br />
sandpaper against a rag. The can of soapy water is<br />
nearby to float the swarf away from the sandpaper.<br />
This is old-time polishing.<br />
Remember, this is a hand-made blade and imperfections are desirable so not all<br />
of them need to be polished away.<br />
When polishing, lots of pressure can be brought to bear on the blade. The edge is<br />
no longer fragile, ready to crumble. Just the opposite; it is at an optimal balance<br />
between hardness and toughness. Pressure can be placed here. Pay attention<br />
though. This edge, though not at its final sharpness, will easily cut you, bad. Be<br />
careful!<br />
Sharpening<br />
Sharpened carbon steel edges are not indestructible, and they will need periodic<br />
restoration. All knife edges will dull, no matter what kind of steel or hardness.<br />
The secret to maintaining a knife’s edge is frequent and quick edge restoration.<br />
Edges are sharp because they are thin. Edges, no matter how tough, will roll,<br />
break and crumble even under normal use. This is because sharp and thin means<br />
fewer atoms at the edge and more vulnerability to damage. That’s why we seek<br />
the balance between toughness and hardness. That’s why we want that tempered<br />
martensite edge. A properly tempered, carbon steel blade edge has been and<br />
remains the sharpest and most restorable knife edge on the planet (except for<br />
obsidian).<br />
We will sharpen our Frontier blade at a 20-25° angle. The angle of a handsharpened<br />
blade along its length will always vary from tip to choil because it’s<br />
hand sharpened. Therefore, we want a balance between 20° and 25°; aim for<br />
22.5°.<br />
Most people can visualize two intersecting lines forming a 90° angle and most can<br />
imagine a 45° angle line bisecting the 90° yet most have trouble <strong>with</strong> the 22.5° line.<br />
103
Back to Sharpening<br />
If you filed and sanded properly during the construction phase your blade’s<br />
edge should be uniform and near final sharpness. All you need to do now is even<br />
the sides, thus setting the final angle, sharpen, hone and strop. Taking it to this<br />
next level of sharpness is a matter of time and elbow grease.<br />
NOTE: Teaching someone how to sharpen a knife is like teaching a little leaguer<br />
how to bat a ball. You can teach the basics but the batter will develop their own<br />
subtle nuances to the mission. I usually precede all my instructions to my baseball<br />
youths, my fledging smiths, and my own children <strong>with</strong>, “Do it my way first and then<br />
improve on it”.<br />
There are two basic sharpening methods. The first is <strong>with</strong> the angle iron jig. The<br />
second is called the “at the bench method” or sometimes the “hand sharpening<br />
method”. The angle iron jig is basically the same process as taught in the<br />
pre-sharpening section in Chapter V. It’s demonstrated again <strong>with</strong> the two<br />
photographs below.<br />
The finished and handled knife blade locked into<br />
the angle iron jig <strong>with</strong> vise grips. The sanding stick<br />
is working perpendicular to the blade’s edge at the<br />
prescribed 22.5° angle. Note the cutting edge is a<br />
little better than 1/8-inch wide. This knife was made<br />
from a farrier’s rasp. Note the “scale” effect on the<br />
surface because of that.<br />
This is the same knife viewed from the opposite<br />
direction. Once again notice the width and<br />
consistency of the sharpened edge and that<br />
important angle of 22.5°.<br />
Start bench sharpening <strong>with</strong> your lowest grit sandpaper; mine is 120 grit. Tear<br />
the sheet in half. Sit down at a comfortable height <strong>with</strong> your work at the edge of<br />
a solid table or workbench. Dip your half sandpaper sheet in soapy water and<br />
lay it on your flat granite surface that rises above the table top. Physically set and<br />
mentally mark the straight edge of the granite to your right. Start by holding the<br />
handle in your right hand <strong>with</strong> the blade pointed and angled away from you at<br />
106
about a 45°angle while the fingertips of your left hand rest at and control the tip.<br />
Sometimes it will be just one finger providing downward pressure sometimes<br />
two or more, sometimes none.<br />
Starting <strong>with</strong> the blade tip touching near the right edge and bottom of the<br />
block (remember that you can’t see the block, it’s under the sandpaper but I<br />
will reference it that way) <strong>with</strong> your right hand dipping low to maintain the<br />
22.5° angle, push the entire length of the edge away from you up and across the<br />
sandpaper. The smith maintains that angle along the cutting edge from the tip<br />
to the choil. It’s a double motion. Pushing uphill and away from yourself while<br />
the entire edge comes into contact <strong>with</strong> the sandpaper at some point. It sounds<br />
awkward, and it is, at first. Do this for two or three strokes then flip the blade, set<br />
the blade angle at the same 45° pointing away, and the same 22.5° edge angle at<br />
the choil at the top of the stone, and pull back toward yourself ending <strong>with</strong> the<br />
tip at the bottom right of your block. Do this also for two or three strokes. This<br />
balanced, symmetrical, up-then-back, opposite direction action will produce an<br />
equally sharpened edge on both sides of the knife. Dissimilar, unequal strokes<br />
make an edge unbalanced, lopsided and not nearly as sharp as it could be.<br />
NOTE: Many smiths have a sharpening visual of a one handed back and forth<br />
sliding and flipping motion to sharpen a knife (I think TV again). Even though it<br />
looks cool, maintaining the proper angles on both edges as you slide and flip, it is<br />
almost impossible. This motion is exactly what we do when stropping but not when<br />
sharpening. When that stropping motion is used to sharpen it rakes your thin edge<br />
across the stone or sandpaper at the wrong angle and will actually dull your blade<br />
as it comes into contact <strong>with</strong> the sharpening surface.<br />
The sandpaper is placed on the granite block and<br />
the block on the bench. This motion is a pull, toward<br />
the smith, starting from the choil and terminating at<br />
the tip. Note the scratches following the pull. These<br />
are shown here to demonstrate the tracking but they<br />
would be washed away if the smith was using water.<br />
This is the same knife viewed from the opposite<br />
direction. Once again notice the width and<br />
consistency of the sharpened edge and that<br />
important angle of 22.5°.<br />
107
Chapter VIII<br />
Handle Attachment<br />
The process of attaching the scales (handles) and an introduction to the Tube,<br />
Rod and Peen (TRP) system was begun when I addressed drilling the handle<br />
holes just after the annealing section in Chapter V. That is where we’ll pick up<br />
the process. Handle material is as varied as the knifemaker. In my shop, I teach<br />
students to start simple and go to complex or to use expensive materials only<br />
after some experience first <strong>with</strong> simple and cheap stuff. Wood, usually oak or<br />
walnut, was used traditionally. It’s inexpensive, attractive, and it works well.<br />
It’s been used for thousands of years. Look at some old butcher knives <strong>with</strong><br />
oak or walnut handles. Most are still as solid as when they were made. I saw<br />
some swords at Edinburgh Castle in Scotland that had full-tang, wood-riveted<br />
handles. They were as solid as when William Wallace was about. Freedom!<br />
When all my students are using the same material it’s easier for me to teach the<br />
entire group to do the same thing because they usually have the same woodhandle<br />
issues. I have them use wood their first outing as you also should. Check<br />
out the knife supply people, and you’ll literally find hundreds of handle materials.<br />
Some beginners crack, split or over file, or sand their scales before their knife is<br />
complete. Expensive scales are, well…. expensive — use wood.<br />
Start either by buying or milling your own scales from dry, clean, parent stock.<br />
Make, or purchase, an extra set just in case. I will teach you the TRP method<br />
to peen your scales successfully almost every time <strong>with</strong> no or little chance of<br />
cracking the wood. TRP is another of those <strong>Blacksmith</strong> Secrets that has been<br />
known by too few, until now. Once experience is gained <strong>with</strong> TRP the smith can<br />
rivet <strong>with</strong>out tubes much easier.<br />
Another way to increase the odds of a successful handle attachment in your favor<br />
is to use tougher material like polymers, horn, micarta, antler or bone. These<br />
work well but harder materials have their own drawbacks. Sometimes they<br />
crack, they might be hard to hand finish or they are not natural looking. Like so<br />
many things in this world, it’s a trade-off. You can also use wooden scales that<br />
have been stabilized (usually a polymer infused in a vacuum and then heated).<br />
They are tougher than their original material, they work and finish about the<br />
same as wood, and they are more split resistant. Do some fancy scales on your<br />
next knife build. Do it the old-time, inexpensive wood way first.<br />
TIP: When attaching rivets in hard material like micarta, bone, or horn, form a tiny,<br />
and I mean tiny, countersink on each outside scale hole at the three openings. Tiny<br />
is less than 1/32-inch. This is for the rod and tube to expand just a tiny bit and lock<br />
the scale in place. We don’t do this on wood because the edge force at the very top<br />
of the peen is extremely high and spreads out that same tiny distance naturally.<br />
112
NOTE: The major reason students crack scales, even <strong>with</strong> my TRP method, is hammer<br />
control. They just hit the peen too darn hard and too long. Be careful.<br />
The Tube, Rod and Peen System<br />
A way to peen your handle and almost ensure success is <strong>with</strong> the TRP method.<br />
It’s a little more time consuming but in the long run worth every extra minute.<br />
The TRP method was taught to me by Gus after I experienced many failed peens<br />
in the early days. He never told me how he came up <strong>with</strong> it, but I’m glad he did.<br />
TRP can be used <strong>with</strong> brass, nickel silver, or copper pins. I have even used 10d<br />
nails and 11-gauge copper grounding wire as peening material.<br />
When a pin/rivet/rod (interchangeable terms) is peened there are immense pressures<br />
in and along the pin. When peening there is a mushroom-like spreading of the<br />
rod material that is just above and below the handle. The more the mushroom’s<br />
top broadens, the shorter the pin becomes, and the greater the pressure pushing<br />
the handle material together. That is exactly what we want. The expanding<br />
mushroom on both the top and bottom<br />
shortens the rivet. The stationary rivet<br />
<strong>with</strong>in the handle stores tremendous<br />
collective energy from the numerous<br />
hammer taps. The resulting pressures<br />
generated can be difficult to control and<br />
maintain during construction. If the<br />
slightest wobble occurs in the pin, trouble<br />
will happen and will unevenly expand or<br />
bend the pin. Historically the trick has<br />
been to apply the maximum amount of<br />
pressure against the scales by peening<br />
<strong>with</strong>out damaging the handle material<br />
or deforming (i.e. bending) the rivets.<br />
Without the TRP method this procedure<br />
is hard to control at best.<br />
The secret of TRP is that all the collective pressure is contained <strong>with</strong>in the 5/32-inch<br />
metal jacket (TUBE) around each 1/8-inch rivet. This keeps the pressure “captured”<br />
and the rod, straight and true in the 5/32-inch hole. As a new knifemaker you may<br />
sometimes manage to bend the rivets, but it is much harder to irregularly bend<br />
the rod ends <strong>with</strong> TRP. The rods tolerate much more pressure than just a rivet<br />
<strong>with</strong>out a tube.<br />
TIP: The 5/32-inch brass tubes and one 1/8-inch brass or copper rods for your knife<br />
projects can be found at some hardware stores and always in knife supply houses.<br />
They can often get the rods in copper if you ask them to special order. Also, wood<br />
boat building dealers and roofing supply sources carry 1/8-inch copper nails that<br />
work just fine. Cut the heads and points off and you will have a ready-made rivet.<br />
113
The drawing on page 113 shows the tube and rivet inside a knife handle. Note<br />
the jacket/tube around the pin and that the spreading out of the mushroom goes<br />
a tiny bit down the pin hole spreading out the pin/rivet just below the surface.<br />
The mushroom can be filed and sanded level <strong>with</strong> the handle material or allowed<br />
to remain proud. All that is seen on the surface is six copper circles a bit wider<br />
than 1/8-inch. Just like we want.<br />
NOTE: Most modern bladesmiths use some combination of peened or un-peened<br />
brass pins and epoxy. Epoxy and pins do an outstanding job of handle connection. If<br />
old-time smiths had had epoxy, they would have adapted it to their tool inventory<br />
just like they did electric lights, power hammers, oxygen/acetylene and overalls.<br />
Preparing the Scales<br />
Scales are 7/8-inch wide x 3/8-inch thick x 4-½-inches long. They should be wider<br />
than the steel handle by about 1/8-inch.<br />
Start by sawing the scales so they are 1/8-inch larger than needed on the sides<br />
and the end of the handle. This is to guarantee a tight fit after final filing and<br />
sanding. Fit both sides several times to ensure a tight-and-right fit. Mark “right”<br />
and “left” on the inside of the scales.<br />
114<br />
<strong>Traditional</strong> Handle Riveting<br />
TIP: See the author peening a knife handle on YouTube. Search for: Paul White<br />
<strong>FORGED</strong>: <strong>Traditional</strong> <strong>Knife</strong> Peening.<br />
Historically, handles were riveted. The old-timers didn’t have epoxy. They had<br />
glue, but it was inferior by today’s standards. The trick then and now was to get<br />
the three parts of the handle lined up, held tight and then drill the holes while<br />
the parts remained tightly secured. Sometimes it’s like juggling squirrels, even<br />
nowadays. If the parts don’t stay put everything gets catawampus and out-ofline.<br />
Back in the day they used four systems: nuts and bolts, ring tongs, pine tar glue<br />
and “C” clamps. I have used all four over the years.
The glue used in olden times was pine tar resin. I will address the pine tar<br />
method only. The pine tar “glue”<br />
wasn’t expected to bond the parts<br />
together like a frontier epoxy but just<br />
to hold them firmly until they could<br />
be drilled, pinned and peened. Today,<br />
the smith can use pine tar. I have a<br />
few times. It’s messy and stinky, and<br />
sticky on my hands for hours later. Did<br />
I mention messy?<br />
For this first knife, and to ensure your success, we will use contact cement.<br />
Contact cement is a staple in the leather business. Another concession to the 21st<br />
century. Follow the directions on the bottle. Pretend the contact cement is pine<br />
tar, I do.<br />
Glue-Up<br />
Do the right scale first. Fit two or three times to make sure all is well. Put contact<br />
cement on the inside of the right scale and the right side of the handle. Wait 15<br />
minutes. Line up and press the two parts (handle & scale) together, hard. Place<br />
in vise or vise grips and lock tight for a few seconds. You are now ready for<br />
drilling the right scale.<br />
Drill Press<br />
Drill three 5/32-inch holes at your drill press through the holes already in the steel<br />
handle and on through into the scale. Keep everything true and square to the<br />
world.<br />
Glue and Drill<br />
Attach the left scale as you did the right. This time drill through the right scale<br />
past the handle and through the left scale. There you have it, straight and true 5/32-<br />
inch holes going through everything. Clean all three holes out <strong>with</strong> a handheld<br />
5/32-inch drill bit. Be careful not to widen the holes or to cause misshaping to the<br />
edges.<br />
Cut the Tubes<br />
The tubes will run the distance from scale edge to scale edge. The tubes are set<br />
in the handle before the rods are inserted. That distance will be 7/8-inch (unless<br />
you used 3/16-inch bar stock then it will be 1-1/8-inch). Cut your brass tubes 1-inch.<br />
The extra 1/8-inch on each side will stick out beyond the scales and can be filed off,<br />
thus ensuring a flat tube exactly at the surface. Cut <strong>with</strong> a hack saw. Be careful<br />
not to crush or deform the tube when locked in the vise. After cutting, lightly<br />
sand the outside surface at the tube ends to clear any burrs.<br />
115
This is a collection of student knives and one ulu. Many of the smiths represented here are from the<br />
Chicago area and others have sent their knives from far away to be in this collective picture. My thanks<br />
to their generosity. They all have made a piece of history and a family heirloom that will serve for many<br />
generations. Congratulations and enjoy. May the FORGE be <strong>with</strong> you all.<br />
122
123
128
The <strong>Blacksmith</strong><br />
Paul White has been a blacksmith for over forty years. The smith who taught<br />
Paul to make his frontier style blade was Gus Marie of Brownsville, Illinois.<br />
Gus simply called his blade a work knife and so does Paul. The knife industry<br />
romanticizes this blade style by calling it a “Frontier” or “Bush <strong>Knife</strong>”. Gus was<br />
the last of an unbroken chain of blacksmiths, originally from France, who came<br />
to the Colonies before the American Revolution.<br />
Paul’s other early mentors were Evan Cooper, an original cowboy from Utah that<br />
shod his own horses, made his own knives and branding irons, and repaired his<br />
own wagons; a real “throwback” kind of guy. The Deal brothers, Jim and Ben,<br />
both blacksmiths of Murphysboro Illinois, trained as rural smiths at Tuskegee<br />
College after the first Great War. They allowed Paul to “hang around their shop”<br />
helping out. Paul was also proud to have worked <strong>with</strong> Daryl Meier and Brent<br />
Kington of Southern Illinois University. Both men ushered in this modern era<br />
of blacksmithing and pattern-welded steel that we all enjoy. They too were an<br />
early and significant influence on Paul’s traditional training and approach to<br />
blacksmithing. Paul has treasured his friendships <strong>with</strong> these “old” smiths as<br />
much as the lessons they taught. Relocating to Northern Illinois in 1978 Paul<br />
was instrumental in establishing, equipping, teaching and demonstrating at the<br />
smith shop at Midway Village Museum in Rockford, Illinois. For many years he<br />
taught classes in general blacksmithing, Colonial hardware and, of course, knife<br />
making. He now limits his teaching to individual smiths seeking that traditional<br />
approach to blacksmithing passed-on to him from those legendary smiths of the<br />
last century. He has learned what works and what doesn’t in teaching others to<br />
build a knife. He has captured those old-time secrets in this book and wants to<br />
see other smiths enjoy traditional blacksmithing as much as he does. Paul is an<br />
old-time guy, teaching an old-time skill to make an old-time tool.<br />
Any traditional craftsman will quickly tell you that the best way not to form bad<br />
habits is to learn new skill sets from an expert. Paul’s methods will get you off to<br />
an excellent start in learning the ancient craft of blacksmithing and the artistry of<br />
knife-making. The skills gleaned from making the Frontier can then be utilized<br />
in making any style blade in the knife inventory.<br />
129