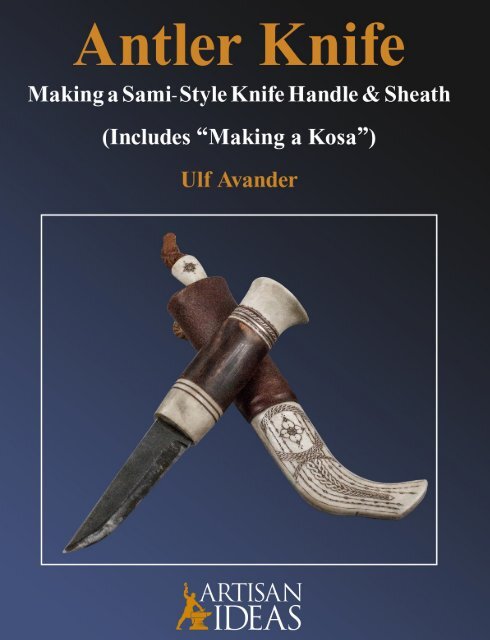
Antle Knife: Making a Sami-Style Knife Handle and Sheath
This book’s detailed step-by-step instructions concern 1) selecting and preparing the material for the knife’s handle and sheath (e.g., the antler, the leather, the wood and the bark), then 2) using the material to build a classic and authentic antler knife the Scandinavian way. Most of the comprehensive and valuable instructions in this book, whose author lives in northern Sweden, concern the intricacies of working with antler, a subject in which the author has over 50 years of experience. The instructions will help you to avoid mistakes and to learn important procedures, tricks and tips so you can develop your own style. Although the author uses reindeer antler for this knife, he explains you could also use moose or caribou antler. The author says, “I hope this book will lower the reader’s learning threshold for working with antler, easing the knifemaker into this amazing hobby, and inspire readers to use their imagination and do something new”. Hardcover, 112 pages, 208 color photos and drawings, 10-in. x 7-in x .5-in.
This book’s detailed step-by-step instructions concern 1) selecting and preparing the material for the knife’s handle and sheath (e.g., the antler, the leather, the wood and the bark), then 2) using the material to build a classic and authentic antler knife the Scandinavian way. Most of the comprehensive and valuable instructions in this book, whose author lives in northern Sweden, concern the intricacies of working with antler, a subject in which the author has over 50 years of experience. The instructions will help you to avoid mistakes and to learn important procedures, tricks and tips so you can develop your own style.
Although the author uses reindeer antler for this knife, he explains you could also use moose or caribou antler.
The author says, “I hope this book will lower the reader’s learning threshold for working with antler, easing the knifemaker into this amazing hobby, and inspire readers to use their imagination and do something new”.
Hardcover, 112 pages, 208 color photos and drawings, 10-in. x 7-in x .5-in.

You also want an ePaper? Increase the reach of your titles
YUMPU automatically turns print PDFs into web optimized ePapers that Google loves.
The <strong>Sami</strong>-<strong>Style</strong> <strong>Knife</strong> <strong>H<strong>and</strong>le</strong> <strong>and</strong> <strong>Sheath</strong>:<br />
What You Need to Know Before Beginning<br />
The author assumes you already have some knifemaking experience <strong>and</strong> that<br />
you will either make or acquire a knife blade for this project conforming to the<br />
type <strong>and</strong> dimensions given in the section "The Blade". <strong>Making</strong> the blade itself<br />
is not discussed.<br />
The instructions in this book concern collecting <strong>and</strong> preparing the material for<br />
the h<strong>and</strong>le <strong>and</strong> sheath (e.g. the antler, the leather, the wood <strong>and</strong> the bark), then<br />
using the material to build your <strong>Antle</strong>r <strong>Knife</strong> <strong>and</strong> sheath the <strong>Sami</strong> way.<br />
It is suggested that you read the book completely before beginning this project<br />
so that you can decide beforeh<strong>and</strong> what material you will look for <strong>and</strong> prepare<br />
yourself <strong>and</strong> what material you might find easier to purchase.<br />
Traditional knives <strong>and</strong> their sheaths used in northern Sweden, <strong>and</strong> in Lapl<strong>and</strong><br />
in general, employ the use of reindeer antler. As seen in the photo on this<br />
book’s cover, the unique sheath for the traditional <strong>Sami</strong>-style* knife which Ulf<br />
Av<strong>and</strong>er will teach you to construct consists of two sections: the bottom part<br />
made of reindeer antler <strong>and</strong> the top part, of leather. The knife’s h<strong>and</strong>le is made<br />
of hardwood <strong>and</strong> antler. The pommel <strong>and</strong> the guard are also made of antler.<br />
As Ulf mentions later in this book, h<strong>and</strong>les made solely of antler are very<br />
slippery <strong>and</strong> are also very cold. As attractive as it is, the knife you will construct<br />
is a functional <strong>Sami</strong>-style working knife for daily use <strong>and</strong> not an art knife, so<br />
it is essential that the h<strong>and</strong>le is made to give you a good grip <strong>and</strong> does not<br />
employ too much antler in its construction.<br />
Various spacers of Vulcan fiber, or birch bark if you prefer, will be used in the<br />
h<strong>and</strong>le’s construction <strong>and</strong> also some tin for use as a decorative b<strong>and</strong>.<br />
*The <strong>Sami</strong> (or Sapmi in the <strong>Sami</strong> language) are the nomadic people of Lapl<strong>and</strong>, which<br />
includes parts of northern Norway, Sweden, Finl<strong>and</strong> <strong>and</strong> Russia. At one time, in the<br />
English language, the <strong>Sami</strong> were referred to as Lapps or Lapl<strong>and</strong>ers, but these terms are<br />
now considered derogatory <strong>and</strong> are no longer used.<br />
6
The <strong>Antle</strong>r <strong>Knife</strong><br />
Part I: Primary Materials <strong>and</strong><br />
Preliminary Procedures<br />
The <strong>Antle</strong>r<br />
In my experience, reindeer antler is preferable to moose antler. It has a more<br />
attractive finish after being worked on <strong>and</strong> polished. It also has a more beautiful<br />
color structure. Reindeer antler isn’t normally as hard as moose antler <strong>and</strong> is<br />
therefore easier to work with.<br />
In the Northern <strong>Sami</strong> language the uncastrated reindeer bull is usually called<br />
a sarv <strong>and</strong> a castrated reindeer a härk. The sarv’s antler is preferred, since it is<br />
normally of higher quality, both in density <strong>and</strong> in shape. The reindeer cow is<br />
called a vaja. Her antler is smaller <strong>and</strong> is not suitable for making a normal-sized<br />
knife.<br />
To differentiate between an antler from a castrated <strong>and</strong> a un-castrated reindeer<br />
is not easy. With a shed antler, the form of the pedicle, which is the antler’s<br />
connection to the skull, can be of some guidance. The antler from a bull should<br />
have a convex surface where it has detached from the skull, on the underside<br />
of the pedicle, while for the castrated bull, that surface is normally concave.<br />
<strong>Antle</strong>r with a flat cross section is usually better than antler with a round cross<br />
section, since a flat antler normally has less marrow which makes it easier to<br />
shape. <strong>Antle</strong>r marrow is a porous, spongy, <strong>and</strong> softer material in comparison<br />
to the outer layers of the antler. Marrow will not take a polish, wears poorly,<br />
<strong>and</strong> discolors easily.<br />
A shed antler is better to use than an antler from a butchered reindeer since the<br />
shed antler is fully-grown <strong>and</strong> normally has less color – which is a good thing, as<br />
we shall see. A shed antler can’t normally be used if it has been lying outside on<br />
wet ground for more than two years. After that it starts to crack <strong>and</strong> it becomes<br />
mildewed <strong>and</strong> discolored. Sometimes however, if the antler is discolored to a<br />
moss green color it can still be of good quality inside.<br />
Bleaching the <strong>Antle</strong>r<br />
A fresh antler is always more distinct in color then an old antler. Sun, rain,<br />
snow <strong>and</strong> age bleach the antler. If there is a need for extra bleaching the antler<br />
can be placed in cold running water (i.e. a stream or river) for at least one year.<br />
The blood will then be drawn from the antler. When it’s time to dry an antler<br />
that has been in water for a long time it should be done outside since it gives<br />
off an unpleasant smell.<br />
7
To bleach antler with chemicals such as hydrogen peroxide takes away the<br />
natural oils from the antler. This makes it harder to obtain a beautiful surface<br />
without additional artificial treatment. Chemical bleaching gives an unnatural,<br />
almost “dead” look, to the material.<br />
Still, when the antler is too distinct in its coloration <strong>and</strong> you want to bleach it,<br />
the antler should be slightly s<strong>and</strong>ed before beginning.<br />
SAFETY WARNING: Read safety information about hydrogen peroxide<br />
before h<strong>and</strong>ling it! It will corrode your skin. It is also a highly reactive<br />
chemical. It reacts with, among other things, aluminum <strong>and</strong> copper.<br />
Wrap some paper towels around the parts that are to be bleached <strong>and</strong> add a<br />
35% solution (or as strong as you can make it) of hydrogen peroxide. Check<br />
periodically to make sure you do not over-bleach. When done, wash the<br />
antler thoroughly with water. Remember to use rubber gloves when h<strong>and</strong>ling<br />
hydrogen peroxide otherwise it will bleach your fingers <strong>and</strong> corrode your skin.<br />
You can also pour some hydrogen peroxide in a container (pay attention to<br />
what the container is made of) <strong>and</strong> let the pieces soak in the liquid. Don’t reuse<br />
the hydrogen peroxide in which you soaked the antler <strong>and</strong> don’t pour the<br />
used solution back with the unused portion.<br />
<strong>Antle</strong>r for the <strong>H<strong>and</strong>le</strong><br />
Because marrow is not as hard as the rest of the antler, the pieces you use for<br />
your knife h<strong>and</strong>le should have as little marrow as possible. If there is too much,<br />
there is the risk that when finishing the h<strong>and</strong>le you could easily s<strong>and</strong> it right<br />
down to the marrow.<br />
1 – The antler to the left in the photo has too<br />
much marrow to be useful. The middle piece<br />
is acceptable <strong>and</strong> the one to the right is perfect<br />
regarding the amount of marrow.<br />
Every antler will contain some marrow, but the antler utilized for the h<strong>and</strong>le<br />
must be compact <strong>and</strong> dense—so dense that a knifepoint can hardly be forced<br />
into the marrow.<br />
A piece of antler that is roughly the same shape as the intended final shape <strong>and</strong><br />
size of the knife h<strong>and</strong>le, which is normally oval, is of course the most suitable<br />
8
ecause there is less chance that you will inadvertently s<strong>and</strong> or file the antler<br />
down to the marrow. Exposed marrow on the h<strong>and</strong>le will gradually get darker<br />
<strong>and</strong> easily become dirty. There’s also the risk that antler with too much marrow,<br />
after a period of use, will loosen from the tang. Marrow is very soft <strong>and</strong> won’t<br />
withst<strong>and</strong> heavy use of your knife.<br />
<strong>Antle</strong>r for the Pommel<br />
The section of antler to be used for the pommel is best taken from as close as<br />
possible to the antler crown since there is the least amount of marrow in that<br />
part. Generally, the amount of marrow increases in relation to the distance<br />
from the antler crown. Furthermore, the material close to the antler crown is<br />
the closest in shape to the desired “flared” shape of the pommel (see cover<br />
photo).<br />
There are two major styles in the <strong>Sami</strong> design of an <strong>Antle</strong>r <strong>Knife</strong>; the<br />
Southern <strong>Sami</strong> <strong>and</strong> the Northern <strong>Sami</strong> traditions. They differ both in form<br />
<strong>and</strong> patterning. The Southern <strong>Sami</strong> design is more geometric whereas the<br />
Northern style uses a softer, usually floral, motif. My procedure follows the<br />
Northern <strong>Sami</strong> style.<br />
It is not necessary to use a piece of antler from close to the crown for the<br />
Southern <strong>Sami</strong> style because their pommel is not flared.<br />
<strong>Antle</strong>r for the <strong>Sheath</strong><br />
The section of antler to be used for the sheath (which has both an antler part <strong>and</strong><br />
a leather part) should be taken either from the antler’s main beam to achieve<br />
a straighter sheath, or from the frontal tine’s hook if an angled sheath shape is<br />
desired.<br />
NOTE: All antler used in making a <strong>Sami</strong>-style knife h<strong>and</strong>le <strong>and</strong> sheath is<br />
s<strong>and</strong>ed down smooth <strong>and</strong> shiny. The antler in this renowned, classic knife is<br />
not left rough or grooved.<br />
The antler shouldn’t be too curved along its length, nor should the front tine<br />
be too twisted, otherwise the sheath will either be too narrow or too thin. This<br />
becomes apparent when the two halves of the sheath are hollowed out when<br />
removing the marrow.<br />
The piece of antler used for the sheath should not be too round either. This is<br />
because the marrow core is normally the same shape as the outer part of the<br />
antler (i.e., round, oval, or flat), <strong>and</strong> must be removed. The walls of the sheath<br />
may not be thick enough after the marrow is removed.<br />
9
The ideal antler for an angled sheath is fairly flat <strong>and</strong> straight <strong>and</strong> is at about a<br />
75-degree angle to the front tine. It should also be a heavy, shed antler.<br />
A good weight for a high-quality shed antler is 3 lbs. to 4-1/2 lbs. (1.5 to 2-kgs).<br />
The Wood<br />
Curly-Grained Wood for the <strong>H<strong>and</strong>le</strong><br />
The curly-grained wood that I use for my <strong>Antle</strong>r <strong>Knife</strong> h<strong>and</strong>les comes from the<br />
roots of willow or birch. This is different than curly-grained birch which is well<br />
structured throughout the whole trunk <strong>and</strong> is commonly used for furniture.<br />
The curly-grained wood I am referring to can also be found on the trunks of<br />
willow or birch trees as burls, but these are harder to find. It is also possible to<br />
use normal protuberances, but this wood is not as compact as the wood in a<br />
burl <strong>and</strong> does not have the noticeable <strong>and</strong> beautiful variation in grain structure<br />
that burl wood has.<br />
With experience, trees with curly-grained wood in their roots can be recognized<br />
by their leaves <strong>and</strong> their visible roots.<br />
2 – Root protuberance from a willow. 3 – An ordinary protuberance with a rough surface<br />
can give a nice texture to the h<strong>and</strong>le.<br />
The leaves are smaller <strong>and</strong> more numerous than those found on most other trees.<br />
These smaller leaves grow both on the tree’s branches <strong>and</strong> also from small shoots<br />
growing out of the trunk. Some roots are often visible growing above the ground.<br />
They commonly have tiny shoots or suckers growing from them.<br />
If the moss on the root is removed <strong>and</strong> you find a rough knot, cut away some<br />
of the bark. If you see the typical dots or “birds’ eyes”, you have found curlygrained<br />
wood.<br />
10
Before you begin digging out the root, you should check on the condition of<br />
the tree’s branches. The more dried-out dead branches you see, the likelier it is<br />
that there will be rot or decay in the roots. It is rare to find curly-grained wood<br />
without some rot.<br />
When you have found curly-grained wood that you are satisfied with <strong>and</strong> you<br />
have obtained permission to cut it, the laborious work begins. You need to dig<br />
up <strong>and</strong> cut off the roots. Keep the main roots connected to the trunk or stump<br />
until you have cut off most of their length. By doing this the trunk can then be<br />
used as a lever.<br />
Curly-grained willow wood is darker than birch. This difference becomes even<br />
more noticeable when oil is applied to it. Birch is harder <strong>and</strong> denser than willow.<br />
Normally willow roots become darker the closer they are to the heartwood.<br />
The most common curly-grained wood that can be bought in Sweden is birch,<br />
in the form of planks cut from the trunk. Curly-grained birch grows sparsely<br />
here but in recent years it is being planted <strong>and</strong> grown for commercial purposes.<br />
It is important that you decide how you would like the pattern of the grain to<br />
appear on the knife h<strong>and</strong>le before sawing your curly-grained root.<br />
4 – Sawn at a right angle to the outer shape of the<br />
root.<br />
5 – Sawn horizontally.<br />
If you would like the pattern to appear as dots <strong>and</strong> rings, the piece should be<br />
sawn at right angles to the trunk (photo 4). If you prefer a winding, light <strong>and</strong><br />
dark pattern, the wood for your knife h<strong>and</strong>le should be cut in the same vertical<br />
plane as the trunk (photo 5).<br />
There is also stabilized (i.e., infused with epoxy in a vacuum) curly-grained<br />
wood available which you can purchase online, otherwise you can send off<br />
your own block of wood for stabilizing to a specialized company.<br />
11
7 – After the first hour the hide is removed<br />
<strong>and</strong> inspected. Dehairing, epidermis<br />
removal <strong>and</strong> scraping of sinews is<br />
completed.<br />
The Procedure<br />
Fill the pot with the chopped bark. Add about a cup (7-8 ounces/200 ml) of<br />
coarse salt <strong>and</strong> fill the pot up with water almost to the brim. The water you<br />
use must not be chlorinated or ferrous. Boil the bark for 1 hour then let the<br />
temperature of your brew decrease to 85°F (30° C).<br />
If the hide is very thick like the hide from an adult moose, the bark can be kept<br />
in your brew otherwise it can be removed from the decoction using a strainer.<br />
A hide that has been dried must first be soaked before you begin tanning. The<br />
salt must be cleaned off a salted hide. Excellent results are obtained when an<br />
old bark decoction is used for the first hour <strong>and</strong> a new stronger decoction is<br />
used afterwards.<br />
For the bath you can either use your boiling pot if it’s big enough, or a separate<br />
container (e.g., a plastic barrel). Put the hide in the brew <strong>and</strong> keep stirring it<br />
around for the first hour. If you don’t stir it the hide may become unevenly<br />
colored <strong>and</strong> hard to tan because the pores will get clogged with the larger<br />
particles in your tanning brew.<br />
If there are some uncolored spots on the hide it’s an indication that the epidermis<br />
wasn’t fully removed before the tanning started. Correct this immediately <strong>and</strong><br />
then put the hide back into the decoction again. Stir the hide each half hour<br />
during the first four hours. Take it out <strong>and</strong> examine it once more. Then put the<br />
hide in a new decoction bath. Use the same procedure as above when boiling<br />
a new batch of tanning solution, with the difference that this time the old<br />
decoction can be used as a base when boiling a new batch.<br />
16
The total tanning time is determined by cutting a piece of the hide <strong>and</strong> examining<br />
the cut. Leather that is to be used for the sheath (i.e., hard or stiff leather) should<br />
have a thin untanned white b<strong>and</strong> in the middle where the solution has not yet<br />
penetrated.<br />
Leather to be used for other purposes, where softer leather is needed, should<br />
be tanned all the way through. A thick hide can take up to a month to tan. A<br />
reindeer hide can take 1-2 weeks.<br />
8 – Using a well planted <strong>and</strong> stable pole is also a<br />
good method for softening.<br />
Softening<br />
NOTE: Softening is not done on leather intended for the sheath (which needs<br />
to be stiff).<br />
Softening is the next step after the hide is removed from the tanning decoction<br />
<strong>and</strong> has been drying for some time. Softening is done at regular intervals until<br />
the hide is dry <strong>and</strong> soft. The hide should be worked on with the flesh side<br />
facing out. The key to the softening process is to stretch the hide taut in all<br />
directions, from top to bottom <strong>and</strong> from left to right. Softening can be done on<br />
a tightly strung rope or on a rack. You can also wrap the hide around a wooden<br />
pole (or a clean saw-horse), pull it taut, <strong>and</strong> then repeat this on another section<br />
of the hide until you are done.<br />
Dyeing<br />
Your leather will have a light brown color from the tanning solution. It can now<br />
be dyed in different shades of reddish-brown using alder bark. Note that the<br />
pigment is in the alder’s inner bark. The leather shouldn’t be completely dry<br />
but should have a uniform amount of moisture when the dyeing is done.<br />
17
Procedure<br />
The h<strong>and</strong>le must be completed before the sheath. It will be your guide for<br />
determining the correct size <strong>and</strong> appearance of your sheath. While the h<strong>and</strong>le<br />
is best made first, the bottom part of the sheath which is made entirely of antler<br />
must be roughly planned out in advance. By doing this you will know what the<br />
best sections of antler will be to use in the h<strong>and</strong>le (i.e., if you are using the same<br />
antler for both the sheath <strong>and</strong> the h<strong>and</strong>le).<br />
The <strong>Knife</strong> <strong>H<strong>and</strong>le</strong><br />
TIP: Never put antler directly between the jaws of a vise. This could leave<br />
marks or crack the antler. Use leather shims.<br />
Leather is an excellent shim material to use between the jaws of the vise <strong>and</strong> the<br />
antler. It will not only prevent indentation marks, but it also provides friction for<br />
gripping the antler. There is also a rubber-faced magnetic shim that works well.<br />
11 – This reindeer antler weighs approximately<br />
4.4 lbs. (2 kg).<br />
Preparation<br />
Cut all the different pieces to be used for the h<strong>and</strong>le: the sections of antler, the<br />
curly-grained wood, the spacers <strong>and</strong> the tin. For the shims I normally use 3/64-<br />
inch to 5/64-inch (1-2 mm) thick rectangular pieces of Vulcan fibre or leather.<br />
They should be larger in size than the biggest piece of antler they will protect.<br />
The pieces of wood <strong>and</strong> antler might need to be filed or s<strong>and</strong>ed where they were<br />
sawn to obtain a flat <strong>and</strong> clean 90° angle. The pieces don’t have to be s<strong>and</strong>ed<br />
totally smooth but any marks from sawing or rasping need to be removed.<br />
The side of the first piece of antler which will abut the ricasso needs to be<br />
s<strong>and</strong>ed perfectly smooth since it will always be visible <strong>and</strong> will not be possible<br />
to s<strong>and</strong> afterwards.<br />
22
For the last piece of antler to be used—the top of the pommel—all rasp <strong>and</strong> saw<br />
marks should be filed off the surface now as well, but the antler doesn’t need<br />
to be s<strong>and</strong>ed at this moment.<br />
12 – If you are a beginner it helps to make<br />
the simple tool shown here to get the pieces<br />
completely flat <strong>and</strong> uniform so that when<br />
they are placed together on the h<strong>and</strong>le, they<br />
fit together snugly with no gaps. This tool is<br />
a 1/16-inch (1.5 mm) thick flat piece of iron<br />
with a hole for the antler, welded to a flat<br />
piece of iron without a hole.<br />
The Tang<br />
The tang on a h<strong>and</strong>-forged blade normally tapers from the blade’s shoulder<br />
to the tip of the tang. If yours is not like this, your tang has to be filed down<br />
to be at least the same thickness, all the way from the shoulder, to the end of<br />
the tang.<br />
13 – With a pencil, mark off the section of antler which will be used for your sheath to determine how<br />
much of the antler will be left for the pommel.<br />
23
the required size. When the inside of the antler is soft or porous, the diameter<br />
of the drill should be 1/64-inch (0.5 mm) less than the thickness of the tang. It is<br />
very important in the long run that your h<strong>and</strong>le pieces are forced tightly onto<br />
the tang. This will increase the h<strong>and</strong>le’s strength which is necessary for it to<br />
hold up to the typical stress of regular use.<br />
20 – Make a line across the center of the piece<br />
where you plan to insert the tang. This is normally<br />
the point where the marrow is widest. The<br />
orientation of the line must be the same on all<br />
remaining parts.<br />
21 – Place the tang at a perpendicular angle to the<br />
line. Mark the width of the tang.<br />
22 – Measure the width of the blade at its ricasso.<br />
This tang is 9/64-inch (3.47 mm).<br />
23 – Use the drill to bore the holes for the tang<br />
to the desired width. Use needle files to make fine<br />
adjustments.<br />
24 – Start by drilling two guide holes.<br />
26
25 – Use the drill to mill material for a slot that fits<br />
the tang for both width <strong>and</strong> thickness. Use needle<br />
files to make fine adjustments.<br />
26 – Alternative. You’ll obtain the best results<br />
if you can use a tabletop milling machine with<br />
a coordinate table. When the milling is done<br />
(usually to half of the thickness since mills are<br />
normally too short to cover the whole depth) then<br />
drill the guide holes all the way through when<br />
the piece is still in position in the machine. Next,<br />
widen the hole from the opposite side from where<br />
you just milled.<br />
27 – Force the piece into place by using a piece of<br />
wood with a hole in the middle.<br />
28 – When the piece is in the correct position,<br />
make sure that there is no gap between the ricasso<br />
<strong>and</strong> the piece of antler. Make a pencil mark on the<br />
tang where the upper part of the piece ends. This<br />
will be the starting position for the next piece.<br />
27
H<strong>and</strong>y Tool<br />
To simplify forcing the pieces into place, here is a good tool to make. Cut a<br />
straight piece of birch or other hardwood, about 1-1/2-inch (40 mm) diameter<br />
<strong>and</strong> 5-inches (130 mm) long. Bore a hole through the piece which is wider than<br />
the biggest part of the tang. This tool can then be used to evenly drive the<br />
h<strong>and</strong>le pieces onto the tang with a hammer.<br />
Assembly of the <strong>H<strong>and</strong>le</strong><br />
TIP: Before assembling, prepare a spare shim with a large hole <strong>and</strong> a spare<br />
antler piece with the same dimensions as one of the thinner ones you’re<br />
planning to use. This helps greatly if a piece is broken during assembly.<br />
34 – Drill all pieces <strong>and</strong> test them in their “almost exact” position on the tang.<br />
If contact adhesive is used, coat all the pieces with glue. If another type of glue<br />
is used, coat them one at a time.<br />
I’ve recently started using an epoxy glue which takes 24 hours to set. This is a<br />
great advantage if something interrupts you during the assembly. Furthermore,<br />
it makes an extraordinarily strong <strong>and</strong> reliable bond.<br />
All parts are forced into place in the proper sequence with your birch tool <strong>and</strong> a<br />
hammer. Keep an eye on the bottom (first) piece, so that it does not move out of<br />
position while forcing the others into place. When all the pieces are in position,<br />
the h<strong>and</strong>le is placed in a vise with a screw clamp on the opposite side. There<br />
are different tools available on the market for this purpose.<br />
30
35 – The pieces are, in this case, glued when they<br />
are pressed into position. The next piece will be a<br />
Vulcan fiber shim.<br />
36 – After all the pieces are glued, put them into<br />
a simple clamp, that you can very easily assemble,<br />
which will keep the h<strong>and</strong>le pieces tightly pressed<br />
together while the glue is drying. Make this tool<br />
with a U-shaped aluminum bar as its base, two<br />
1/2-inch (12 mm) threaded rods attached to the<br />
base with nuts. A piece of hardwood <strong>and</strong> two nuts<br />
with washers form the top bar of the clamp. Drill<br />
a hole in the hardwood that will clear any excess<br />
tang material.<br />
37 – After the glue dries cut the tang at a right<br />
angle approximately 1/16-inch (1.5 mm) above<br />
the top piece. File it down to 3/64-inch (1 mm).<br />
38 – Rivet the tang flat-even with the pommel<br />
using a ball peen hammer. If it is difficult to get<br />
the rivet to exp<strong>and</strong> enough, you can file it down<br />
after applying hammer blows, <strong>and</strong> then continue<br />
riveting.<br />
Be careful when riveting! Hammer carefully. Indentation marks can damage<br />
the antler if the ball peen hammer misses when you are riveting the tang.<br />
31
After each application, all excess oil must be removed within one hour otherwise<br />
the oil will form lumps <strong>and</strong> will harden on the outside of the wood.<br />
When the oil has dried, after about one week, it’s possible to polish the surface<br />
with a sheepskin buffer. If this doesn’t give you the finish you want, you can<br />
apply carnauba wax, beeswax, Danish oil, or as an alternative, gun-stock oil.<br />
Then the wood can be polished to a beautiful, glossy surface.<br />
SAFETY WARNING: Depending on the circumstances, paper towels or rags<br />
that have been used for wiping off linseed oil—which generates heat as it<br />
dries—can spontaneously ignite. For safety reasons, put the rags in water or<br />
burn them after use.<br />
Part III: The <strong>Sheath</strong><br />
The Bottom Half (Made from <strong>Antle</strong>r)<br />
Dividing the <strong>Antle</strong>r in Half<br />
NOTE: Your traditional <strong>Sami</strong>-style sheath will have two distinct parts, the<br />
bottom half which is made of antler <strong>and</strong> the top part which is made of leather.<br />
Remember the following when choosing the section of antler for your sheath:<br />
the external side of the antler (i.e., as it was on the reindeer’s head) is normally<br />
used for the external side of the sheath, <strong>and</strong> the internal side is normally used<br />
on the internal side of the sheath (i.e., the side which rubs against your pants).<br />
The piece of antler used for the sheath must be cut down the middle. It is difficult<br />
however to determine an exact “middle” because antler is often curved both<br />
lengthwise <strong>and</strong> crosswise. This is to be expected <strong>and</strong> is not a problem.<br />
NOTE: The antler part of your sheath will become narrower during s<strong>and</strong>ing,<br />
so always start with a section of antler which is considerably wider than the<br />
blade.<br />
Always start your cut from what will be the bottom part of your sheath, below<br />
the antler’s hook, where the antler is narrowest. Because there is less antler<br />
material there to work with, this is the most delicate part of the sheath <strong>and</strong> needs<br />
the most attention. It is important that you cut directly through the middle of<br />
this part to obtain the same amount of antler on both sides of your cut in that<br />
narrow section. Your complete cut, which must always be along a straight line<br />
(but not usually perpendicular), will most probably end up to the right or to<br />
the left of the center of the top of your antler piece. This is OK <strong>and</strong> perfectly<br />
normal. In photo 56 you can see that the cut does not finish in the middle of the<br />
top part of the antler. Cuts like this work out fine because we have more antler<br />
38
material to work with on the wider top part. Moreover, almost an inch of the<br />
antler will be covered by the leather top-part of the sheath, so this difference<br />
will not be visible.<br />
When you begin removing marrow <strong>and</strong> antler from the inside of the sheath<br />
halves, material will disappear from the bend where there is the least amount<br />
of antler. This means that if the cut isn’t in the exact middle of the curved part,<br />
the thinner half will dictate the shape <strong>and</strong> will give you a sharper “hook”.<br />
53 <strong>and</strong> 54 – Draw the line along which you will cut the antler. This will depend on which <strong>Sami</strong> style of<br />
sheath you are making. In our case it will be in the Northern <strong>Sami</strong> style, which means it will have a more<br />
pronounced hook.<br />
Working on the Interior of the <strong>Antle</strong>r Halves<br />
55 <strong>and</strong> 56 – This piece of antler bends sideways at the front tine, as antler often does; thus the cut cannot<br />
be exactly perpendicular. The cut must be made at an angle in order to have enough antler on both sides<br />
all the way to the top. The cut must go through the center part of the antler at its narrowest part on the<br />
bottom leaving an equal amount of antler on both sides. Note that the cut will not end up going through<br />
the exact middle on the top part of the antler. As previously explained, this is perfectly normal <strong>and</strong> to be<br />
expected when you make your sheath.<br />
39
64 <strong>and</strong> 65 – Draw a straight line, as illustrated, extending from the spine of the knife to the bottom of the<br />
sheath. This extension of the line will be slightly hollowed out <strong>and</strong> used for drainage.<br />
66 – Saw a groove with a depth of half the blade’s thickness plus 3/64-inch (1 mm) along the line you made.<br />
67 – Use a U-shaped chisel to hollow out the area of the sheath inside the outline you made of the blade.<br />
Always work from top to bottom to avoid having parts of the antler breaking off at the top.<br />
42
68 – Now check to see if your knife goes smoothly into the sheath. The edge should not be cutting into<br />
the antler.<br />
69 <strong>and</strong> 70 – Hold the two halves together <strong>and</strong> make a pencil mark from the groove on the top part of the<br />
antler across to the same exact spot on the other half of the sheath, then do the same thing on the bottom<br />
part of the antler.<br />
71 – Now draw a straight line between the marks<br />
you just made on the top <strong>and</strong> the bottom of the<br />
second sheath half.<br />
43
72 – Finish the compartment for the blade so that<br />
it is hollowed out at the blade point <strong>and</strong> has a<br />
smooth inclination over to the groove, which will<br />
be used for drainage.<br />
An Alternative Method Using Power Tools<br />
73 <strong>and</strong> 74 – Use a b<strong>and</strong> saw with a 12 or 14 teeth-per-inch blade. For the work you see in these photos<br />
I used a b<strong>and</strong> saw that is a bit too narrow. Normally I use a blade that is at least 1/2-inch (12 mm) wide<br />
which helps me to saw straight when needed.<br />
75 – Use a belt s<strong>and</strong>er with a 40-80 grit belt. Be<br />
aware of the fact that the belt ”eats” the material<br />
extremely quickly. Moreover, as the belt gets<br />
duller it can “burn” the antler. This means that<br />
the heat generated by an over-worn belt will<br />
harden the surface of the antler so that it becomes<br />
difficult to draw patterns on it.<br />
44
76 – Place the knife in position <strong>and</strong> trace the outline of the blade.<br />
77 <strong>and</strong> 78 – Draw the outline of the definitive shape of your sheath.<br />
45
79 <strong>and</strong> 80 – Roughly shape with a saw, rasp, or both the external part of one of the sheath halves. Next, trace<br />
the outline of that shape on the other sheath half <strong>and</strong> roughly finish the exterior part of that side as well.<br />
81 – Draw the form of the knife blade <strong>and</strong> the<br />
drainage groove. There should be a smooth<br />
transition from the knife compartment to the<br />
drainage furrow.<br />
82 <strong>and</strong> 83 – Use a grinding bit with a cylindrical shape. Use the shaft of the bit to guide you on how deep<br />
to mill on the spine side. Don’t hollow it out that deeply on the cutting edge side. When making the<br />
transition to the drainage hole use a bit with rounded tip.<br />
46
84 <strong>and</strong> 85 – Hold the sheath halves together. Make pencil marks on the right-h<strong>and</strong> half of the sheath<br />
indicating the points where the hollowed-out section begins <strong>and</strong> ends on the corresponding left-h<strong>and</strong><br />
half of the sheath. Do this both on the top <strong>and</strong> the bottom (the drainage hole) of the halves as the photos<br />
illustrate. This blade has a rectangular shoulder, which is why the hole is made rectangular as well.<br />
86 – Hold the halves together <strong>and</strong> put the knife<br />
into the sheath. Sketch the circumference of the<br />
knife making your outline 5/64-inch (2 mm)<br />
wider. The purpose of this is illustrated in photos<br />
93 <strong>and</strong> 94.<br />
87 <strong>and</strong> 88 – On the external half of the sheath (i.e. the right-h<strong>and</strong> side) mark the points in pencil where<br />
you will drill holes for the screw rivets, then drill them with a #53, 0.0595-inch (1.5 mm) bit.<br />
47
These ridges are made only on the external side of the antler sheath top. They<br />
do not extend around to the other side.<br />
To make the ridges begin by drawing two sets of horizontal lines (photo 106)<br />
about 5/64-inch (2 mm) wide <strong>and</strong> at least 1/8-inch (3 mm) apart. The topmost<br />
part of the antler is not a ridge, although it protrudes a bit. There are only two<br />
ridges.<br />
File down the 1/8-inch space in between the ridges by approximately 5/64-inch<br />
(2 mm).<br />
105 <strong>and</strong> 106 – On the right-h<strong>and</strong> side of the sheath (i.e. the external side) draw the lines delimiting the<br />
width of the two ridges which will be used for fastening the leather part of the sheath to the antler part.<br />
On the left-h<strong>and</strong> side (i.e. the internal, or body side) make a pencil mark (photo to the left) corresponding<br />
to where the bottom of the lower ridge will be on external side.<br />
107 – A good method to remove the antler between<br />
the ridges is to use a thin saw to saw down slightly<br />
into the antler making thin strips that can easily be<br />
broken off with a blunt knife.<br />
54
108 – Now finish <strong>and</strong> smooth the three grooves<br />
with the side of a flat file.<br />
109 – Remove about 5/64-inch (2 mm) between<br />
the ridges (left). The grooves have now been made<br />
smooth <strong>and</strong> the slope extending towards the top of<br />
the sheath has been completed (right).<br />
File down the groove above the upper ridge by 5/64-inch (2 mm) starting at<br />
the point closest to the ridge <strong>and</strong> decreasing the amount removed to 3/64-inch<br />
(1 mm) as you approach the top of the sheath, thus creating an upwards slope<br />
(109). Now file down by 3/64-inch (1 mm) where you drew lines on the top of<br />
the antler part of the sheath (photos 96, 97, p. 55).<br />
Next, file down the groove below the lower ridge by 5/64-inch (2 mm) at the<br />
point closest to the ridge <strong>and</strong> then slope upwards in the direction of the lower<br />
part of the sheath. Use a half-round file on the parts above <strong>and</strong> below the ridges.<br />
Now reduce the height of the two ridges by 3/64-inch (1 mm).<br />
File down the opposite side (i.e. the back) of the sheath (where no ridges were<br />
made) by 3/64 to 5/64-inch (1-2 mm) without making any ridges (photo 111).<br />
Also on the back file off about 3/64-inch (1 mm) along the pencil mark you made<br />
previously.<br />
55
117 – From the belly of the knife h<strong>and</strong>le the seam should be sewn straight up to the top. Continue with<br />
the seam over the top as shown.<br />
118 – Continue making stitches along the original seam or make a seam around the hole for the belt loop<br />
(see next section). Don’t use a cutting-needle at this stage. Finish with a flat knot.<br />
119 – Cut away approximately 3/64-inch (1 mm) of the excess leather above outside the seam but leave<br />
some extra leather around the hole for the belt loop as illustrated.<br />
60
Fig - 1<br />
• (Section 1 above) The seam is made right up<br />
against the h<strong>and</strong>le. The leather will shrink <strong>and</strong><br />
will grip the antler tightly (3)<br />
• (Section 2 above) The seam in this section is<br />
made a little more distant from the knife. The<br />
exact distance depends on how much the leather<br />
will shrink. A “normal” distance is achieved by<br />
holding a finger on the opposite side of the leather<br />
<strong>and</strong> letting the needle rise towards the finger.<br />
120 – To soften <strong>and</strong> smooth out the seam<br />
rub it back <strong>and</strong> forth with a piece of antler<br />
fashioned as follows. A 5/32-inch (4 mm)<br />
hole is drilled horizontally through a piece<br />
of antler, then the piece is cut into half<br />
horizontally through the middle of the hole<br />
thus making a channel (see drawing below).<br />
The leather must be moist when doing this!<br />
See photo to the right.<br />
Fig - 2<br />
Reindeer <strong>Antle</strong>r Tool<br />
1 2 3<br />
Drill a 4 mm<br />
hole<br />
Ream the<br />
hole<br />
Cut through the<br />
middle of the hole<br />
61
The Seam<br />
Make a shoemaker’s seam with waxed or tarred linen thread. Use a cuttingneedle<br />
on one end of the thread, <strong>and</strong> a thin darning-needle on the other.<br />
You can also use thin darning-needles on both ends of the thread. You can<br />
block the thread by sticking the needle through it. An alternative to using two<br />
needles is for you to use a h<strong>and</strong> sewing awl.<br />
Fold the leather around the knife to make sure the seam runs down the exact<br />
middle on the internal side (i.e. legside) <strong>and</strong> also make sure the bottom part of<br />
the leather is parallel to the top part of the leather. If you are a novice <strong>and</strong> don’t<br />
know how to keep an equal distance between stitches, it’s a good idea to mark<br />
where each stitch will go beforeh<strong>and</strong>.<br />
Normally an awl is used to make the holes on both sides of the leather. Make<br />
the holes for one stitch at a time, in order to maintain the same distance between<br />
stitches <strong>and</strong> maintain the same (straight) direction.<br />
In case a cutting-needle is used, this should be run through the leather first to<br />
avoid cutting the thread. Seams tend to twist away from the side where the<br />
first awl stitch is made so it’s good to switch from the side where you made the<br />
first one. Cut or punch a hole (photo 119) for the twisted leather loop (photos<br />
121–124).<br />
It’s good to put edge wax on the edge of the leather after it has been rubbed.<br />
Mold <strong>and</strong> shape the leather around the external side of the sheath using a<br />
modeling tool without sharp edges. You can emboss the leather with a pattern<br />
while it’s still wet.<br />
This type of leather (“<strong>Sami</strong>” leather) can’t be shaped, as, for example, leather<br />
that’s used for ordinary leather knife sheaths. The leather can be colored with<br />
leather dye regardless of whether it is dry or still wet.<br />
Alternative<br />
Using a sewing awl will simplify your sewing. Thread can be bought in different<br />
colors.<br />
Drying the Leather<br />
When the leather has dried for about 24 hours at room temperature, it’s time to<br />
pull the knife out of the sheath. If it’s stuck, the leather will have to be soaked<br />
again to draw the knife out.<br />
The best thing to do at this point would be to use a new piece of sheath leather.<br />
The second best is to completely soak the leather <strong>and</strong> wrap a plastic bag twice<br />
round the knife h<strong>and</strong>le, put it back in the sheath, <strong>and</strong> let it dry for at least two<br />
62
days. The disadvantage with this procedure is that in the future, when the<br />
knife is exposed to rain <strong>and</strong> then dries, without using a plastic bag it might be<br />
hard to remove the knife from your sheath.<br />
Finishing the Leather Surface<br />
When the leather has dried, it can be coated with regular wax.<br />
The Belt Loop<br />
Cut a strip from a thin piece of soft leather. The width of the strip you make<br />
will depend on the thickness of the leather you have. Normally you would cut<br />
a strip about 5/8-inch (15 mm) wide if the leather has a maximum thickness of<br />
1/16-inch (1.5 mm). It should be about 16-inches (40 cm) long.<br />
Cut the piece into 3 strips, joined at the end (i.e., don’t cut them all the way to<br />
the end). Stop cutting the three strips approximately 3/8-inch (10 mm) from the<br />
end (photo 121).<br />
121–122–123–124 – Hold the un-cut end in your left-h<strong>and</strong> between your thumb <strong>and</strong> forefinger<br />
<strong>and</strong> let the leather strips point to the right, side by side. Fold one leather strip in the form of a U<br />
with the top surface outwards (always).<br />
Twist the strip most distant from you counter-clockwise with your right thumb <strong>and</strong> right<br />
forefinger. Stretch it out <strong>and</strong> hold it with your left middle finger.<br />
Twist the next strip counterclockwise, stretch it <strong>and</strong> put it over the first, clockwise. Hold this one<br />
now, instead of the first one, with your left middle finger.<br />
Twist the third strip in the same way <strong>and</strong> put it over the first two. Start with the first one again <strong>and</strong><br />
continue until you have the whole piece twisted. After that, soak the ends <strong>and</strong> press them together.<br />
63
Fig – 5<br />
I prefer to start <strong>and</strong> finish the pattern with a half-sized basket b<strong>and</strong> as shown in the sketch. Doing this you<br />
avoid having a black “empty” space on the border of your pattern. You can simplify your sketching <strong>and</strong><br />
cutting jobs if you blacken the “empty” spaces between the b<strong>and</strong>s.<br />
Fig – 6<br />
Alternative Method 1<br />
Very similar to the first method, erase the red lines after step three.<br />
Fig – 7<br />
Alternative Method 2<br />
68
Procedures<br />
All lines, straight or curved, should be cut twice from two angles, to achieve a<br />
V-cut.<br />
Never cut deep! If you do, this will adversely affect the result. Practice your<br />
cutting by applying only very light pressure on your knife. This is difficult<br />
to do, especially after a while when we automatically—but mistakenly—start<br />
putting more pressure on the knife.<br />
If you want to make a line more dominant, make the V wider <strong>and</strong> a tiny bit<br />
deeper as well, but I’m speaking about a very small difference in depth.<br />
You should begin the second cut which will form the V by starting it from the<br />
bottom of the first cut <strong>and</strong> moving your knife forward very carefully. If you<br />
do this correctly a small antler shaving should loosen when forcing the knife<br />
forward.<br />
If you are making a complicated pattern it may be hard to know which lines to<br />
cut from which side (i.e. from the ”outside” or ”inside”). Because of this problem<br />
I try to be methodical <strong>and</strong> so I cut all lines from the ”outside” of the pattern first.<br />
When patterning a ring it is easy to underst<strong>and</strong> what the outside lines are, but<br />
when cutting other patterns this has to be “translated” to that specific pattern.<br />
As a beginner it is important to make your cuts straight. When patterning a<br />
curved line this entails moving or turning the antler instead of your patterning<br />
knife. Carving will be easier if the antler is not clamped into a vise while<br />
patterning.<br />
TIP: Cut your straight lines with a knife which has a long straight cutting<br />
edge. The longer edge will help to keep the lines straight.<br />
Use a good light which shines from behind you on your left side if you are<br />
right-h<strong>and</strong>ed.<br />
Sometimes it can be useful to change the direction of the light to highlight the<br />
shadow from the first cut.<br />
When your scrimshawing knife is pushed down in the opposite side of the V<br />
you should feel a definite “snap”.<br />
I use different patterning procedures depending on the proportions of the<br />
pattern, but I always make an estimate of the dimensions of each separate<br />
pattern to be sure there will be enough space to complete each one <strong>and</strong> that its<br />
proportions will be attractive.<br />
69
131 – Note how the braid rises from below the<br />
squares <strong>and</strong> ends “underneath” the successive<br />
braid.<br />
132 – The braid design is completed <strong>and</strong> the border<br />
between the patterns is cut.<br />
133 <strong>and</strong> 134 – The rectangular divider or border<br />
dividing the sheath’s two major patterns is made<br />
following this sequence:<br />
1) Divide the space into squares.<br />
2) Draw a center line.<br />
3) Sketch the braid from the centerline both<br />
upwards <strong>and</strong> downwards<br />
4) Sketch the black background <strong>and</strong> the S-shaped<br />
designs within the border lines<br />
72
135–136–137–138 –To make this design I first draw a grid of 5/64-inch (2 mm) squares as a guide for<br />
the pattern.<br />
1) Begin with the base lines of the pattern.<br />
2) Color the lines you have cut with water <strong>and</strong> cacao. Don’t apply oil-based color at this stage because it<br />
will be hard to sketch on the antler’s surface with a pen. The grid is wiped away, <strong>and</strong> you will now use the<br />
cut lines as guides.<br />
73
Patterns<br />
Following is a sampling of some typical “Southern” <strong>and</strong> “Northern-<strong>Sami</strong>”<br />
patterns that I frequently use plus a few <strong>Sami</strong>-style patterns I’ve created myself.<br />
74
Dividers or Borders<br />
75
80
81