modus operandi - Sapp's Instructional Websites
modus operandi - Sapp's Instructional Websites
modus operandi - Sapp's Instructional Websites

You also want an ePaper? Increase the reach of your titles
YUMPU automatically turns print PDFs into web optimized ePapers that Google loves.
Fingerprints<br />
(Unit 4)<br />
Fingerprints have long been a mainstay in the area of forensic science. Since the<br />
nineteenth century, authorities have used fingerprints to prove a person handled an object or was<br />
present in a location. Initially there were only a few ways to make prints visible. Currently,<br />
there are over one hundred different methods used to develop fingerprints, varied by the surface<br />
being examined. Each method has significantly increased the probability of recovering a useful<br />
print.<br />
Fundamental Principles of Fingerprints<br />
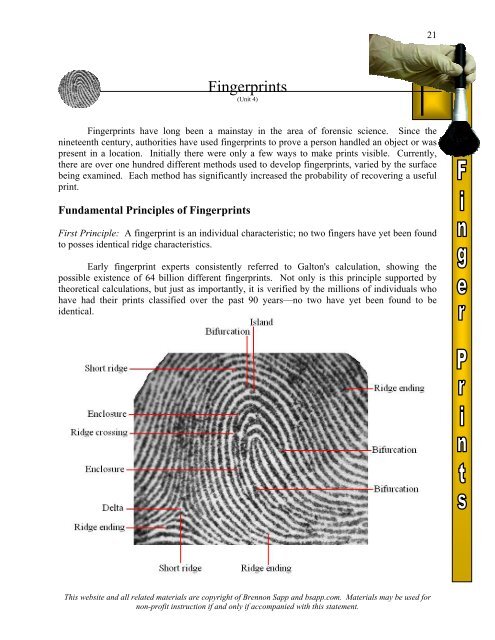
First Principle: A fingerprint is an individual characteristic; no two fingers have yet been found<br />
to posses identical ridge characteristics.<br />
Early fingerprint experts consistently referred to Galton's calculation, showing the<br />
possible existence of 64 billion different fingerprints. Not only is this principle supported by<br />
theoretical calculations, but just as importantly, it is verified by the millions of individuals who<br />
have had their prints classified over the past 90 years—no two have yet been found to be<br />
identical.<br />
This website and all related materials are copyright of Brennon Sapp and bsapp.com. Materials may be used for<br />
non-profit instruction if and only if accompanied with this statement.<br />
21
22<br />
Ridge Characteristics<br />
The individuality of a fingerprint is not determined by its general shape or pattern but by<br />
a careful study of its ridge characteristics or minutiae. It is the identity, number, and relative<br />
location of defining characteristics, such as those shown on the previous page. In a judicial<br />
proceeding, a point-by-point comparison is normally demonstrated by an expert, with the aid of a<br />
computer or using charts similar to the ones shown below.<br />
Eventually the jury will see a comparison of the characteristics of the complete<br />
fingerprint. This may be accomplished in one of two ways. A computer can slowly transpose<br />
one print over another, possibly using different colors to distinguish known and unknown prints.<br />
A more hands-on demonstration can be achieved by placing both prints on transparencies and<br />
simply sliding one print on top of the other. This has the added benefit of allowing the jury to<br />
place the prints one on top another. These demonstrations are usually not necessary since most<br />
people accept the ability of professionals to match fingerprints. However, such demonstrations<br />
are impressive to a jury and make for a convincing demonstration.<br />
This website and all related materials are copyright of Brennon Sapp and bsapp.com. Materials may be used for<br />
non-profit instruction if and only if accompanied with this statement.
Anatomy of Fingerprints<br />
Second Principle: A fingerprint will remain unchanged during an individual's lifetime.<br />
Fingerprints result from friction skin ridges found on the palm side of the fingers and<br />
thumbs. Similar friction skin ridges are also be found on the surface of the palms and the soles<br />
of the feet. These skin surfaces have been designed by nature to provide our bodies with a firmer<br />
grasp and a resistance to slippage.<br />
Each skin ridge contains rows of pores which are connected to sweat glands. It is<br />
through these pores that perspiration is released and deposited on the surface of the skin. Once a<br />
finger touches a surface, perspiration and body oils are transferred onto that surface, thereby<br />
leaving an impression of the finger's ridge pattern—a fingerprint. Prints deposited in this manner<br />
are invisible to the eye and are commonly referred to as latent or hidden fingerprints. Such<br />
prints must be developed before use in an investigation.<br />
This website and all related materials are copyright of Brennon Sapp and bsapp.com. Materials may be used for<br />
non-profit instruction if and only if accompanied with this statement.<br />
23
24<br />
Although it is impossible to change one's fingerprints, there has been no lack of effort on<br />
the part of some criminals to change or remove them. To remove or change any part of a<br />
fingerprint, an injury must reach deeply enough into the skin to damage the dermal papillae.<br />
However, for this to happen, such a wound would have to penetrate 1 to 2 millimeters beneath<br />
the skin's surface. Indeed, efforts at intentionally scarring the skin can only be self-defeating, for<br />
it would be totally impossible to obliterate all the ridges on the hand. In most situations, an<br />
attempt to alter one’s fingerprints results in a scarring which actually makes the fingerprints<br />
easier to identify<br />
Perhaps the most publicized attempt at removal of fingerprints was conducted by the<br />
notorious gangster John Dillinger. He attempted to destroy his own fingerprints by applying a<br />
corrosive acid to them. Prints taken at the morgue after Dillinger was shot to death were<br />
compared with fingerprints recorded at the time of a previous arrest. As seen below, the prints<br />
still matched!<br />
Third Principle: Fingerprints have general ridge patterns that permit them to be systematically<br />
classified.<br />
All fingerprints are divided into three classes on the basis of their general pattern: loops,<br />
whorls, and arches. Sixty to sixty-five percent of the population has loops, thirty to thirty-five<br />
percent has whorls, and about five percent has arches. These three classes form the basis of the<br />
classification system presently in use.<br />
This website and all related materials are copyright of Brennon Sapp and bsapp.com. Materials may be used for<br />
non-profit instruction if and only if accompanied with this statement.
The pattern area of a loop surrounded by two diverging ridges is known as type lines.<br />
The ridge point nearest the type-line divergence is known as a delta. A fingerprint delta<br />
resembles the silt formation that builds up as a river flows into the entrance of a lake. The core,<br />
as the name suggests, is the approximate center of the pattern where ridges curve around or<br />
circle.<br />
Loops<br />
A typical loop pattern is illustrated above. A loop must have one or more ridges that<br />
enter from one side of the print, re-curve, and exit from the same side. This results when one<br />
core and one delta is present. A print is said to open in the direction from which most of the<br />
ridges come. This is normally the direction opposite the delta. If the loop opens toward the little<br />
finger, it is called an ulnar loop; if it opens toward the thumb, it is a radial loop.<br />
This website and all related materials are copyright of Brennon Sapp and bsapp.com. Materials may be used for<br />
non-profit instruction if and only if accompanied with this statement.<br />
25
26<br />
Whorls<br />
Whorls are divided into four distinct groups, shown above: plain whorl, central pocket<br />
loop, double loop, and accidental. All whorls contain one or more cores and a minimum of two<br />
deltas. A plain whorl and a central pocket loop have at least one ridge that makes a complete<br />
circuit. This ridge may be in the form of a spiral, oval, or any variant of a circle. If an imaginary<br />
line is drawn between the two deltas contained within these two patterns, and if the line touches<br />
any one of the spiral ridges, the pattern is a plain whorl. If no such ridge is touched, the pattern<br />
is considered a central pocket loop. A double loop is made up of two loops combined into one<br />
fingerprint. This results in a print with two deltas and two cores. Often this results in an “S”<br />
shape. Any print classified as an accidental either contains two or more patterns (not including<br />
the plain arch) or is a pattern that does not fit any of the normal descriptions. Hence, an<br />
accidental may consist of a combination loop and plain whorl or loop and tented arch.<br />
Arches<br />
Arches, the least common of fingerprint patterns, contain no deltas or cores. They are<br />
divided into two groups: plain arches and tented arches. A plain arch is the simplest of all<br />
fingerprint patterns; it is formed by ridges entering from one side of the print, rising slightly and<br />
exiting on the opposite side. A tented arch is similar to a plain arch except that instead of rising<br />
smoothly at the center, there is a sharp upward thrust or spike, causing the center of the print to<br />
look like a tent. By definition, the angle of the lines on a tented print meets at less than a 90degree<br />
angle.<br />
This website and all related materials are copyright of Brennon Sapp and bsapp.com. Materials may be used for<br />
non-profit instruction if and only if accompanied with this statement.
Automated Fingerprint Identification Systems (AFIS)<br />
The heart of AFIS technology is the ability to scan and digitally encode fingerprints so<br />
they can be subject to high-speed computer processing. AFIS uses scanners to convert the image<br />
of a fingerprint into digital file. The file contains data showing ridges at their points of<br />
termination (ridge endings) and the branching of ridges into two ridges (bifurcations). Basically,<br />
the computer scans in a print and then checks every point of a print with numerous other prints at<br />
millions of times faster than a human can. Speed of comparison is not the only advantage to<br />
AFIS. With the development of high speed internet and large databases of fingerprints, an<br />
unknown print can be compared with prints all over the world in a matter of hours. At one time<br />
it was nearly impossible to identify an international criminal, but as technology advances these<br />
types of matches are becoming commonplace.<br />
Crime-Scene Fingerprints<br />
There are three kinds of crime-scene prints: visible, plastic, and latent. Visible prints are<br />
made by fingers touching a surface after they have been in contact with colored material such as<br />
blood, paint, grease, or ink. Plastic prints are ridge impressions left on a soft material such as<br />
putty, wax, soap, or dust. Latent prints (invisible prints) are impressions caused by the transfer<br />
of body perspiration or oils present on the finger to the surface of an object. Visible and plastic<br />
prints may simply be photographed and/or preserved with the object on which they are left.<br />
Latent prints, however, must be located and developed.<br />
In the past, chemical treatment for fingerprint development was reserved for porous<br />
surfaces such as paper and cardboard. However, since 1982, a chemical technique known as<br />
“Super Glue" fuming has gained wide popularity for developing latent prints on nonporous<br />
surfaces like metal, electrical tape, leather, and plastic. “Super Glue” is approximately 98 to 99<br />
percent cyanoacrylate ester, which is the chemical that interacts with a latent fingerprint. Fumes<br />
are created when cyanoacrylate ester is placed on absorbent cotton treated with sodium<br />
hydroxide. The fumes can also be created by heating the glue. The process is carried out by<br />
producing the fumes in an enclosed chamber with the object suspected of containing a fingerprint<br />
for up to six hours. The print becomes visible when fumes from the glue adhere to latent oils,<br />
usually producing a white-colored print. The fuming technique can be used before or after<br />
processing with fingerprint powders, and in fact, subsequent powdering of a fumed print may<br />
even further enhance the print's image.<br />
There are over a hundred different methods used to develop fingerprints, depending on<br />
the surface being examined. The following are some of the more common methods.<br />
This website and all related materials are copyright of Brennon Sapp and bsapp.com. Materials may be used for<br />
non-profit instruction if and only if accompanied with this statement.<br />
27
28<br />
Dusting<br />
Iodine Fuming<br />
Developing Latent Prints<br />
Dusting is the most effective way to obtain a<br />
print from a rigid non-porous surface such as glass,<br />
plastic, or metal surfaces. Using a camel hair brush,<br />
black carbon or aluminum powder is placed over the<br />
location of a suspected print. The dust adheres to the<br />
sweat and oil left behind by the person who touched<br />
the surface. Next, wide transparent tape is smoothed<br />
over the dusted area. When the tape is then removed<br />
from the surface, the dust and the print will be<br />
attached. Finally, the tape is placed onto a white card<br />
for display and comparison. Below, the print on the<br />
left was developed by dusting with carbon powder; the<br />
print on the right, using aluminum powder.<br />
Iodine fuming is an excellent way to develop prints on porous<br />
and non-porous surfaces such as paper, index cards, magazines, and<br />
cardboard. To fume a suspected latent print, the surface must be<br />
placed into a container with solid iodine. The sublimation of iodine in<br />
a closed container will cause iodine vapors to concentrate, then be<br />
absorbed by the oil and sweat left behind by human skin. The<br />
temporarily-developed<br />
print will then be visible as<br />
an orange/brown outline.<br />
Upon development, the<br />
print should be<br />
photographed for documentation. The iodine will<br />
eventually sublime from the surface of the print,<br />
allowing the print to return to its latent state. The<br />
surface is then returned to its original appearance<br />
and can even be exposed to additional developing<br />
techniques. At right: a print developed using iodine<br />
fuming.<br />
This website and all related materials are copyright of Brennon Sapp and bsapp.com. Materials may be used for<br />
non-profit instruction if and only if accompanied with this statement.
Ninhydrin Solution<br />
Ninhydrin is a chemical that reacts with amino acids to form a purple compound. This<br />
development technique is used primarily on porous surfaces such as paper, tissue, and clothing.<br />
The white powder ninhydrin must be dissolved in acetone before it can be soaked into a surface<br />
for development. The reaction will then develop the print within twenty four hours. Left:<br />
developing a print with a ninhydrin-acetone soaked brush. Right: a print developed by reacting<br />
with ninhydrin.<br />
Silver Nitrate<br />
When exposed to ultra-violet (UV) light, silver<br />
nitrate reacts with the salt in sweat to form a blackishbrown<br />
compound. Using this reaction, a suspected<br />
object is sprayed with a silver nitrate solution and the<br />
left to develop under a UV bulb. The print should<br />
become visible in five to ten minutes. This type of<br />
development is best used on porous surfaces, like paper<br />
or drywall. Top left: Spraying print with silver nitrate<br />
solution. Top right: UV light hood. Left: a print<br />
developed using silver nitrate solution and exposed to<br />
UV light.<br />
This website and all related materials are copyright of Brennon Sapp and bsapp.com. Materials may be used for<br />
non-profit instruction if and only if accompanied with this statement.<br />
29
30<br />
In recent years, there has been much advancement<br />
in the area of print developing. The use of<br />
advanced brushes and new chemical procedures<br />
make it possible to develop prints on a larger<br />
variety of surfaces. Some criminals wear gloves<br />
to avoid leaving fingerprints at a crime scene, but<br />
often they discard the gloves nearby. This is a<br />
picture of latent prints developed on the inside of<br />
a glove.<br />
This website and all related materials are copyright of Brennon Sapp and bsapp.com. Materials may be used for<br />
non-profit instruction if and only if accompanied with this statement.
Other Ridge Patterns<br />
Although not catalogued on the same scale as fingerprints, it has long been known that<br />
other parts of the body have the potential to identify a person as individually. Close examination<br />
of the fingers, palms, toes, and bottom of the feet reveals more ridges and patterns. These<br />
patterns may be used in court to link a person to a location or piece of evidence. The following<br />
are examples of such prints.<br />
This website and all related materials are copyright of Brennon Sapp and bsapp.com. Materials may be used for<br />
non-profit instruction if and only if accompanied with this statement.<br />
31
32<br />
This website and all related materials are copyright of Brennon Sapp and bsapp.com. Materials may be used for<br />
non-profit instruction if and only if accompanied with this statement.
MODUS OPERANDI<br />
I. Name (Alias) _______________________________(Place real name on back)<br />
II. Height________ Weight_______________ Shoe Size_______________<br />
III. Hair color___________ Artificially colored? Yes_____ No ______<br />
IV. Blood type: A_____ B_____ AB_____ O_____<br />
V. Right Handed? _____ Left Handed? _____<br />
Right Hand<br />
Thumb 1 st Finger 2 nd Finger 3 rd Finger 4 th Finger<br />
__________ __________ __________ __________ __________<br />
Left Hand<br />
Thumb 1 st Finger 2 nd Finger 3 rd Finger 4 th Finger<br />
__________ __________ __________ __________ __________<br />
This website and all related materials are copyright of Brennon Sapp and bsapp.com. Materials may be used for<br />
non-profit instruction if and only if accompanied with this statement.<br />
33<br />
Officer on Duty: ____________<br />
Date:____________
34<br />
Quick Reference Guide to Reading Prints<br />
The key to reading prints is not to find each and every<br />
characteristic in the prints, but to get the trend of patterns. Most<br />
prints found at a crime scene are partial prints which rarely<br />
contain all deltas and cores. It is for this reason that we must<br />
learn how to look at the trend of the lines as a whole, rather than<br />
individual lines.<br />
The following is a guide on how to recognize different<br />
types of prints. It is not meant to be taken for, or in place of the<br />
definitions. The guide is meant only to help amateur forensic<br />
scientists get a better feel for reading prints.<br />
This website and all related materials are copyright of Brennon Sapp and bsapp.com. Materials may be used for<br />
non-profit instruction if and only if accompanied with this statement.
1. Note a few characteristics that give away types of prints<br />
Double loops—always have an “S” shape<br />
somewhere in the print<br />
Plain whorls and central pocket loops—the only prints that contain a circle or spiral<br />
within the print<br />
Loops—always have some lines that enter at one side, turn, and then exit at the same side<br />
Arches—all lines enter at one side of the print and exit the other<br />
This website and all related materials are copyright of Brennon Sapp and bsapp.com. Materials may be used for<br />
non-profit instruction if and only if accompanied with this statement.<br />
35
36<br />
Note: There has been no mention of cores or deltas. These attributes can be attained by looking<br />
at the trend of the lines, not individual characteristics.<br />
2. Procedure for identifying prints<br />
Ask yourself these questions in this order:<br />
Are there any “S” shapes?<br />
[If yes, then print is a double loop]<br />
Do I see circles?<br />
[If yes, then the print is either a plain whorl (symmetrical) or a central pocket<br />
loop (not symmetrical)]<br />
Plain Whorl (symmetrical) Central Pocket Loop (not symmetrical)<br />
If there are no “S” shapes or circles, the print must have an arch or loop (easy prints to identify).<br />
Are there any lines that turn around and go back to the side from which they came?<br />
[If yes, it is a loop.]<br />
[If no, it is an arch.]<br />
*Remember to differentiate between ulnar and radial loops, and plain and tented arches.<br />
Ulnar loops open toward the pinky Radial loops open toward the thumb<br />
[Assuming the prints above are from a right hand]<br />
Plain arches are flat Tented arches are steep<br />
This website and all related materials are copyright of Brennon Sapp and bsapp.com. Materials may be used for<br />
non-profit instruction if and only if accompanied with this statement.