Convertible “Generation Next - Baby's Dream Furniture
Convertible “Generation Next - Baby's Dream Furniture Convertible “Generation Next - Baby's Dream Furniture
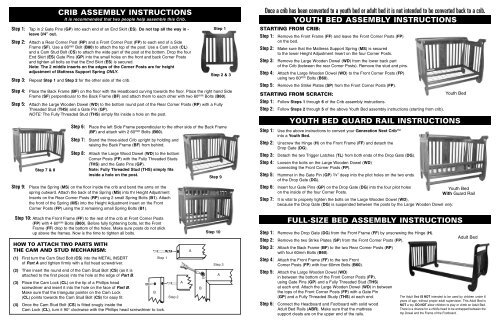
CRIB ASSEMBLY INSTRUCTIONS It is recommended that two people help assemble this Crib. YOUTH BED ASSEMBLY INSTRUCTIONS Step 1: Tap in 2 Gate Pins (GP) into each end of an End Skirt (ES). Do not tap all the way in - leave 3/4” out. Step 2: Attach a Rear Corner Post (RP) and a Front Corner Post (FP) to each end of a Side Frame (SF). Use a 80 mm Bolt (B80) to attach the top of the post. Use a Cam Lock (CL) and a Cam Stud Bolt (CS) to attach the wide part of the post at the bottom. Drop the four End Skirt (ES) Gate Pins (GP) into the small holes on the front and back Corner Posts and tighten all bolts so that the End Skirt (ES) is secured. Note: The 2 middle inserts on the edges of the Corner Posts are for height adjustment of Mattress Support Spring ONLY. Step 3: Repeat Step 1 and Step 2 for the other side of the crib. Step 6: Place the left Side Frame perpendicular to the other side of the Back Frame (BF) and attach with 2 60 mm Bolts (B60). Step 7: Stand the three-sided Crib upright by holding and raising the Back Frame (BF) from behind. Step 1 Step 2 & 3 Step 4: Place the Back Frame (BF) on the floor with the Headboard curving towards the floor. Place the right hand Side Frame (SF) perpendicular to the Back Frame (BF) and attach them to each other with two 60 mm Bolts (B60). Step 5: Attach the Large Wooden Dowel (WD) to the bottom round part of the Rear Corner Posts (RP) with a Fully Threaded Stud (THS) and a Gate Pin (GP). NOTE: The Fully Threaded Stud (THS) simply fits inside a hole on the post. Step 7 & 8 Step 8: Attach the Large Wood Dowel (WD) to the bottom round part of the Front Corner Posts (FP) with the Fully Threaded Studs (THS) and the Gate Pins (GP). Note: Fully Threaded Stud (THS) simply fits inside a hole on the post. Step 9 Step 9: Place the Spring (MS) on the floor inside the crib and bend the arms on the spring outward. Attach the back of the Spring (MS) into thr Height Adjustment Inserts on the Rear Corner Posts (RP) using 2 small Spring Bolts (B1). Attach the front of the Spring (MS) into the Height Adjustment Insert on the Front Corner Posts (FP) using the 2 remaining small Spring Bolts (B1). Step 10: Attach the Front Frame (FF) to the rest of the crib at Front Corner Posts (FP) with 4 60 mm Bolts (B60). Before fully tightening bolts, let the Front Frame (FF) drop to the bottom of the holes. Make sure posts do not stick up above the frames. Now is the time to tighten all bolts. HOW TO ATTACH TWO PARTS WITH THE CAM AND STUD MECHANISM: (1) First turn the Cam Stud Bolt (CS) into the METAL INSERT of Part A and tighten firmly with a flat head screwdriver. Step 1 (2) Then insert the round end of the Cam Stud Bolt (CS) (as it is attached to the first piece) into the hole at the edge of Part B. (3) Place the Cam Lock (CL) on the tip of a Phillips head screwdriver and insert it into the hole on the face of Part B. Make sure that the triangular pointer on the Cam Lock (CL) points towards the Cam Stud Bolt (CS) for easy fit. B (4) Once the Cam Stud Bolt (CS) is fitted snugly inside the Cam Lock (CL), turn it 90° clockwise with the Phillips head screwdriver to lock. Step 2 A A B 90° Step 10 Step 3 A Once a crib has been converted to a youth bed or adult bed it is not intended to be converted back to a crib. STARTING FROM CRIB: Step 1: Remove the Front Frame (FF) and leave the Front Corner Posts (FP) on the bed. Step 2: Make sure that the Mattress Support Spring (MS) is secured to the lower Height Adjustment Insert on the four Corner Posts. Step 3: Remove the Large Wooden Dowel (WD) from the lower back part of the Crib (between the rear Corner Posts). Remove the stud and pins. Step 4: Attach the Large Wooden Dowel (WD) to the Front Corner Posts (FP) using two 60mm Bolts (B60). Step 5: Remove the Strike Plates (SP) from the Front Corner Posts (FP). STARTING FROM SCRATCH: Step 1: Follow Steps 1 through 6 of the Crib assembly instructions. Step 2: Follow Steps 2 through 5 of the above Youth Bed assembly instructions (starting from crib). YOUTH BED GUARD RAIL INSTRUCTIONS Step 1: Use the above instructions to convert your Generation Next Crib into a Youth Bed. Step 2: Unscrew the Hinge (H) on the Front Frame (FF) and detach the Drop Gate (DG). Step 3: Detach the two Trigger Latches (TL) from both ends of the Drop Gate (DG). Step 4: Loosen the bolts on the Large Wooden Dowel (WD) connecting the Front Corner Posts (FP). Step 5: Hammer in the Gate Pin (GP) 3/4” deep into the pilot holes on the two ends of the Drop Gate (DG). Step 6: Insert four Gate Pins (GP) on the Drop Gate (DG) into the four pilot holes on the inside of the four Corner Posts. Step 7: It is vital to properly tighten the bolts on the Large Wooden Dowel (WD), because the Drop Gate (DG) is suspended between the posts by the Large Wooden Dowel only. FULL-SIZE BED ASSEMBLY INSTRUCTIONS Step 1: Remove the Drop Gate (DG) from the Front Frame (FF) by unscrewing the Hinge (H). Step 2: Remove the two Strike Plates (SP) from the Front Corner Posts (FP). Step 3: Attach the Back Frame (BF) to the two Rear Corner Posts (RP) with four 60mm Bolts (B60). Step 4: Attach the Front Frame (FF) to the two Front Corner Posts (FP) with four 60mm Bolts (B60). Step 5: Attach the Large Wooden Dowel (WD) in between the bottom of the Front Corner Posts (FP), using Gate Pins (GP) and a Fully Threaded Stud (THS) at each end. Attach the Large Wooden Dowel (WD) in between the tops of the Front Corner Posts (FP) with a Gate Pin (GP) and a Fully Threaded Study (THS) at each end. Step 6: Connect the Headboard and Footboard with solid wood Adult Bed Rails (ABR). Make sure that the mattress support cleats are on the upper end of the rails. Youth Bed Youth Bed With Guard Rail Adult Bed The Adult Bed IS NOT intended to be used by children under 6 years of age, without proper adult supervision. This Adult Bed is NOT a toy. DO NOT allow children to play or climb on Adult Bed. There is a chance for a child’s head to be entrapped between the top Dowel and the Frame of the Footboard.
CRIB ASSEMBLY INSTRUCTIONS<br />
It is recommended that two people help assemble this Crib. YOUTH BED ASSEMBLY INSTRUCTIONS<br />
Step 1: Tap in 2 Gate Pins (GP) into each end of an End Skirt (ES). Do not tap all the way in -<br />
leave 3/4” out.<br />
Step 2: Attach a Rear Corner Post (RP) and a Front Corner Post (FP) to each end of a Side<br />
Frame (SF). Use a 80 mm Bolt (B80) to attach the top of the post. Use a Cam Lock (CL)<br />
and a Cam Stud Bolt (CS) to attach the wide part of the post at the bottom. Drop the four<br />
End Skirt (ES) Gate Pins (GP) into the small holes on the front and back Corner Posts<br />
and tighten all bolts so that the End Skirt (ES) is secured.<br />
Note: The 2 middle inserts on the edges of the Corner Posts are for height<br />
adjustment of Mattress Support Spring ONLY.<br />
Step 3: Repeat Step 1 and Step 2 for the other side of the crib.<br />
Step 6: Place the left Side Frame perpendicular to the other side of the Back Frame<br />
(BF) and attach with 2 60 mm Bolts (B60).<br />
Step 7: Stand the three-sided Crib upright by holding and<br />
raising the Back Frame (BF) from behind.<br />
Step 1<br />
Step 2 & 3<br />
Step 4: Place the Back Frame (BF) on the floor with the Headboard curving towards the floor. Place the right hand Side<br />
Frame (SF) perpendicular to the Back Frame (BF) and attach them to each other with two 60 mm Bolts (B60).<br />
Step 5: Attach the Large Wooden Dowel (WD) to the bottom round part of the Rear Corner Posts (RP) with a Fully<br />
Threaded Stud (THS) and a Gate Pin (GP).<br />
NOTE: The Fully Threaded Stud (THS) simply fits inside a hole on the post.<br />
Step 7 & 8<br />
Step 8: Attach the Large Wood Dowel (WD) to the bottom round part of the Front<br />
Corner Posts (FP) with the Fully Threaded Studs<br />
(THS) and the Gate Pins (GP).<br />
Note: Fully Threaded Stud (THS) simply fits<br />
inside a hole on the post.<br />
Step 9<br />
Step 9: Place the Spring (MS) on the floor inside the crib and bend the arms on the<br />
spring outward. Attach the back of the Spring (MS) into thr Height Adjustment<br />
Inserts on the Rear Corner Posts (RP) using 2 small Spring Bolts (B1). Attach<br />
the front of the Spring (MS) into the Height Adjustment Insert on the Front<br />
Corner Posts (FP) using the 2 remaining small Spring Bolts (B1).<br />
Step 10: Attach the Front Frame (FF) to the rest of the crib at Front Corner Posts<br />
(FP) with 4 60 mm Bolts (B60). Before fully tightening bolts, let the Front<br />
Frame (FF) drop to the bottom of the holes. Make sure posts do not stick<br />
up above the frames. Now is the time to tighten all bolts.<br />
HOW TO ATTACH TWO PARTS WITH<br />
THE CAM AND STUD MECHANISM:<br />
(1) First turn the Cam Stud Bolt (CS) into the METAL INSERT<br />
of Part A and tighten firmly with a flat head screwdriver.<br />
Step 1<br />
(2) Then insert the round end of the Cam Stud Bolt (CS) (as it is<br />
attached to the first piece) into the hole at the edge of Part B.<br />
(3) Place the Cam Lock (CL) on the tip of a Phillips head<br />
screwdriver and insert it into the hole on the face of Part B.<br />
Make sure that the triangular pointer on the Cam Lock<br />
(CL) points towards the Cam Stud Bolt (CS) for easy fit.<br />
B<br />
(4) Once the Cam Stud Bolt (CS) is fitted snugly inside the<br />
Cam Lock (CL), turn it 90° clockwise with the Phillips head screwdriver to lock.<br />
Step 2<br />
A<br />
A<br />
B<br />
90°<br />
Step 10<br />
Step 3<br />
A<br />
Once a crib has been converted to a youth bed or adult bed it is not intended to be converted back to a crib.<br />
STARTING FROM CRIB:<br />
Step 1: Remove the Front Frame (FF) and leave the Front Corner Posts (FP)<br />
on the bed.<br />
Step 2: Make sure that the Mattress Support Spring (MS) is secured<br />
to the lower Height Adjustment Insert on the four Corner Posts.<br />
Step 3: Remove the Large Wooden Dowel (WD) from the lower back part<br />
of the Crib (between the rear Corner Posts). Remove the stud and pins.<br />
Step 4: Attach the Large Wooden Dowel (WD) to the Front Corner Posts (FP)<br />
using two 60mm Bolts (B60).<br />
Step 5: Remove the Strike Plates (SP) from the Front Corner Posts (FP).<br />
STARTING FROM SCRATCH:<br />
Step 1: Follow Steps 1 through 6 of the Crib assembly instructions.<br />
Step 2: Follow Steps 2 through 5 of the above Youth Bed assembly instructions (starting from crib).<br />
YOUTH BED GUARD RAIL INSTRUCTIONS<br />
Step 1: Use the above instructions to convert your Generation <strong>Next</strong> Crib<br />
into a Youth Bed.<br />
Step 2: Unscrew the Hinge (H) on the Front Frame (FF) and detach the<br />
Drop Gate (DG).<br />
Step 3: Detach the two Trigger Latches (TL) from both ends of the Drop Gate (DG).<br />
Step 4: Loosen the bolts on the Large Wooden Dowel (WD)<br />
connecting the Front Corner Posts (FP).<br />
Step 5: Hammer in the Gate Pin (GP) 3/4” deep into the pilot holes on the two ends<br />
of the Drop Gate (DG).<br />
Step 6: Insert four Gate Pins (GP) on the Drop Gate (DG) into the four pilot holes<br />
on the inside of the four Corner Posts.<br />
Step 7: It is vital to properly tighten the bolts on the Large Wooden Dowel (WD),<br />
because the Drop Gate (DG) is suspended between the posts by the Large Wooden Dowel only.<br />
FULL-SIZE BED ASSEMBLY INSTRUCTIONS<br />
Step 1: Remove the Drop Gate (DG) from the Front Frame (FF) by unscrewing the Hinge (H).<br />
Step 2: Remove the two Strike Plates (SP) from the Front Corner Posts (FP).<br />
Step 3: Attach the Back Frame (BF) to the two Rear Corner Posts (RP)<br />
with four 60mm Bolts (B60).<br />
Step 4: Attach the Front Frame (FF) to the two Front<br />
Corner Posts (FP) with four 60mm Bolts (B60).<br />
Step 5: Attach the Large Wooden Dowel (WD)<br />
in between the bottom of the Front Corner Posts (FP),<br />
using Gate Pins (GP) and a Fully Threaded Stud (THS)<br />
at each end. Attach the Large Wooden Dowel (WD) in between<br />
the tops of the Front Corner Posts (FP) with a Gate Pin<br />
(GP) and a Fully Threaded Study (THS) at each end.<br />
Step 6: Connect the Headboard and Footboard with solid wood<br />
Adult Bed Rails (ABR). Make sure that the mattress<br />
support cleats are on the upper end of the rails.<br />
Youth Bed<br />
Youth Bed<br />
With Guard Rail<br />
Adult Bed<br />
The Adult Bed IS NOT intended to be used by children under 6<br />
years of age, without proper adult supervision. This Adult Bed is<br />
NOT a toy. DO NOT allow children to play or climb on Adult Bed.<br />
There is a chance for a child’s head to be entrapped between the<br />
top Dowel and the Frame of the Footboard.


