Convertible “Generation Next - Baby's Dream Furniture
Convertible “Generation Next - Baby's Dream Furniture
Convertible “Generation Next - Baby's Dream Furniture

You also want an ePaper? Increase the reach of your titles
YUMPU automatically turns print PDFs into web optimized ePapers that Google loves.
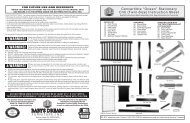
FOR FUTURE USE AND REFERENCE<br />
RETAIN THIS INSTRUCTION SHEET AND THE CRIB TOOLS IN THE ORIGINAL SACK<br />
AND SECURE IT TO THE SPRING UNDER THE MATTRESS WITH PLASTIC TIES.<br />
CARE INSTRUCTIONS: The natural warmth of wood is a lasting value. Character marks, checking and grain<br />
variations are part of the beauty of wood and, therefore, should not be a concern. If treated with care, this solid<br />
wood product will last you for many years to come. Once every week, wipe your Baby’s <strong>Dream</strong> furniture with<br />
Pledge ®, lemon oil or other similar wood treatment products. If you encounter any roughness in the finish of your<br />
new crib, fold a piece of regular white paper—not tissue or newspaper—and rub it gently against the surface until<br />
the desired smoothness is achieved. If refinishing, use a non-toxic finish specified for children’s products. Let dry,<br />
sand with a very fine product such as folded paper or dishing washing sponge and, finally, apply water-based babysafe<br />
lacquer for the perfect matching shine.<br />
WARNING!<br />
To insure your child’s safety and for your own peace of mind, be sure to follow<br />
instructions properly. Failure to follow these warnings and assembly instructions could<br />
result in serious injury or death. Before each usage or assembly, inspect the crib for<br />
damaged hardware, loose joints, missing parts or sharp edges.<br />
✔ DO NOT use the crib if any parts are missing or broken.<br />
✔ DO NOT substitute parts. Ask your dealer or write to Baby’s <strong>Dream</strong> <strong>Furniture</strong> for replacement parts and<br />
instructional literature if needed.<br />
✔ Make sure that all bolts and screws are properly tightened. DO NOT over- or under-tighten.<br />
✔ AVOID STRANGULATION: As soon as an infant can sit or stand up, close the crib gate or raise the Drop Front<br />
permanently.<br />
✔ DO NOT place the crib near a window where cords from blinds or drapes may strangle a child.<br />
✔ DO NOT tie pacifiers, necklaces or any other items around a child’s neck or on the crib parts.<br />
WARNING!<br />
Strings can cause strangulation! Do not place items with string around a child’s<br />
neck, such as hood strings or pacifier cords. Do not suspend strings over a crib<br />
or attach string toys.<br />
✔ NEVER use plastic shopping bags or other film as mattress covers, because they can cause suffocation.<br />
✔ For a newborn, adjust the spring on the highest level of the Height Adjuster and open the gate or lower the Drop<br />
Front for easy access.<br />
✔ DO NOT leave a child in a crib with an open gate or lowered Drop Front. Be sure the gate is closed or the Drop<br />
Front is raised and locked in position whenever the child is in the crib. After closing the gate or raising the Drop<br />
Front, make sure the latches are secure.<br />
✔ The child must be seated at the rear of the crib when lowering or raising the gate or Drop Front.<br />
✔ As your child grows, adjust the height of the spring down so that he/she cannot pull himself/herself out of the<br />
crib. When the child is able to pull to a standing position, set the mattress to the lowest position and remove<br />
bumper pads, large toys and other objects that could serve as steps for climbing out. When the child is able<br />
to climb out or reaches the height of 35” (90 cm), the bed should no longer be used in the form of a crib.<br />
You can continue to use this crib as a youth or toddler bed for another 2 to 3 years by using the Youth Bed<br />
Conversion Kit.<br />
ANY MATTRESS USED IN THIS CRIB MUST BE AT LEAST 27 1/4” X 51 5/8” WITH A<br />
THICKNESS NOT EXCEEDING 6”. DO NOT USE A WATER MATTRESS WITH THIS CRIB.<br />
This crib conforms to the<br />
applicable regulations promulgated<br />
by the Consumer Product<br />
Safety Commission.<br />
REV 6/03<br />
Buena Vista, GA 31803-0579<br />
www.babysdream.com<br />
This product may be covered by one<br />
or more of the following patents:<br />
D366,778; D366,970,5,077,846<br />
and other patents pending.<br />
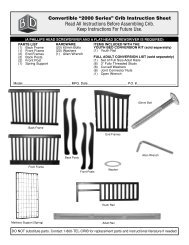
<strong>Convertible</strong> <strong>“Generation</strong> <strong>Next</strong>” Crib Instruction Sheet<br />
Read All Instructions Before Assembling Crib. Keep Instructions For Future Use.<br />
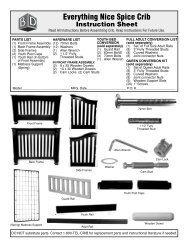
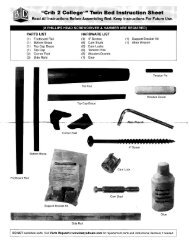
PARTS LIST (A PHILLIPS HEAD SCREWDRIVER AND A FLAT-HEAD SCREWDRIVER IS REQUIRED)<br />
BF) 1 Back Frame (largest)<br />
FF) 1 Front Frame (with Drop Gate)<br />
SF) 2 Side Frames<br />
FP) 2 Front Corner Posts (with Strike Plate)<br />
RP) 2 Rear Corner Posts (without Strike Plate)<br />
DG) 1 Drop Gate (attached to Front Frame)<br />
WD) 2 Large Wooden Dowel with 2 holes (51 3/8” long)<br />
ES) 2 End Skirts<br />
MS) 1 Mattress Support (Metal Spring)<br />
B1) 4 Small 1” Spring Bolts<br />
GP) 16 1 1/4” Gate Pins<br />
THS) 4 Fully Threaded Studs<br />
CL) 4 Cam Locks<br />
WD) Large Wooden Dowels (51 3/8” long)<br />
BF) Back Frame<br />
B1) Small<br />
Spring Bolts<br />
MS) Mattress Support<br />
FP) Front Corner Posts<br />
FF) Front Frame<br />
80mm Bolt<br />
60mm Bolt<br />
RP) Rear Corner Posts<br />
ABR) Adult Bed<br />
CS) 4 Cam Stud Bolts<br />
B60) 8 60 mm Bolts<br />
B80) 4 80 mm Bolts<br />
TL) 2 Trigger Latches (attached to Drop Gate)<br />
SP) 2 Strike Plates (attached to front Corner Posts)<br />
H) 1 Hinge (attaches Drop Gate to Front Frame)<br />
HW) 1 Hex Wrench (included)<br />
AW) 1 Allen Wrench (included)<br />
ABR) 2 Adult Bed Rails (not included with the Crib)<br />
CL) 8 Cam Locks (included with ABR)<br />
CS) 8 Cam Stud Bolts (included with ABR)<br />
OB) 1 Optional Bracket Kit (included with ABR)<br />
AW) Allen Wrench<br />
ES) End Skirt<br />
HW) Hex Wrench<br />
SF) Side Frame<br />
GP) 1 1/4 inch Gate Pin<br />
TL) Trigger Latch<br />
SP) Strike Plate<br />
THS) Fully Threaded Stud<br />
CL) Cam Lock<br />
CS) Cam Stud Bolt<br />
ABR<br />
End View
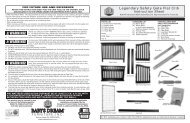
CRIB ASSEMBLY INSTRUCTIONS<br />
It is recommended that two people help assemble this Crib. YOUTH BED ASSEMBLY INSTRUCTIONS<br />
Step 1: Tap in 2 Gate Pins (GP) into each end of an End Skirt (ES). Do not tap all the way in -<br />
leave 3/4” out.<br />
Step 2: Attach a Rear Corner Post (RP) and a Front Corner Post (FP) to each end of a Side<br />
Frame (SF). Use a 80 mm Bolt (B80) to attach the top of the post. Use a Cam Lock (CL)<br />
and a Cam Stud Bolt (CS) to attach the wide part of the post at the bottom. Drop the four<br />
End Skirt (ES) Gate Pins (GP) into the small holes on the front and back Corner Posts<br />
and tighten all bolts so that the End Skirt (ES) is secured.<br />
Note: The 2 middle inserts on the edges of the Corner Posts are for height<br />
adjustment of Mattress Support Spring ONLY.<br />
Step 3: Repeat Step 1 and Step 2 for the other side of the crib.<br />
Step 6: Place the left Side Frame perpendicular to the other side of the Back Frame<br />
(BF) and attach with 2 60 mm Bolts (B60).<br />
Step 7: Stand the three-sided Crib upright by holding and<br />
raising the Back Frame (BF) from behind.<br />
Step 1<br />
Step 2 & 3<br />
Step 4: Place the Back Frame (BF) on the floor with the Headboard curving towards the floor. Place the right hand Side<br />
Frame (SF) perpendicular to the Back Frame (BF) and attach them to each other with two 60 mm Bolts (B60).<br />
Step 5: Attach the Large Wooden Dowel (WD) to the bottom round part of the Rear Corner Posts (RP) with a Fully<br />
Threaded Stud (THS) and a Gate Pin (GP).<br />
NOTE: The Fully Threaded Stud (THS) simply fits inside a hole on the post.<br />
Step 7 & 8<br />
Step 8: Attach the Large Wood Dowel (WD) to the bottom round part of the Front<br />
Corner Posts (FP) with the Fully Threaded Studs<br />
(THS) and the Gate Pins (GP).<br />
Note: Fully Threaded Stud (THS) simply fits<br />
inside a hole on the post.<br />
Step 9<br />
Step 9: Place the Spring (MS) on the floor inside the crib and bend the arms on the<br />
spring outward. Attach the back of the Spring (MS) into thr Height Adjustment<br />
Inserts on the Rear Corner Posts (RP) using 2 small Spring Bolts (B1). Attach<br />
the front of the Spring (MS) into the Height Adjustment Insert on the Front<br />
Corner Posts (FP) using the 2 remaining small Spring Bolts (B1).<br />
Step 10: Attach the Front Frame (FF) to the rest of the crib at Front Corner Posts<br />
(FP) with 4 60 mm Bolts (B60). Before fully tightening bolts, let the Front<br />
Frame (FF) drop to the bottom of the holes. Make sure posts do not stick<br />
up above the frames. Now is the time to tighten all bolts.<br />
HOW TO ATTACH TWO PARTS WITH<br />
THE CAM AND STUD MECHANISM:<br />
(1) First turn the Cam Stud Bolt (CS) into the METAL INSERT<br />
of Part A and tighten firmly with a flat head screwdriver.<br />
Step 1<br />
(2) Then insert the round end of the Cam Stud Bolt (CS) (as it is<br />
attached to the first piece) into the hole at the edge of Part B.<br />
(3) Place the Cam Lock (CL) on the tip of a Phillips head<br />
screwdriver and insert it into the hole on the face of Part B.<br />
Make sure that the triangular pointer on the Cam Lock<br />
(CL) points towards the Cam Stud Bolt (CS) for easy fit.<br />
B<br />
(4) Once the Cam Stud Bolt (CS) is fitted snugly inside the<br />
Cam Lock (CL), turn it 90° clockwise with the Phillips head screwdriver to lock.<br />
Step 2<br />
A<br />
A<br />
B<br />
90°<br />
Step 10<br />
Step 3<br />
A<br />
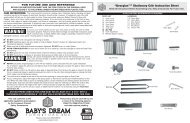
Once a crib has been converted to a youth bed or adult bed it is not intended to be converted back to a crib.<br />
STARTING FROM CRIB:<br />
Step 1: Remove the Front Frame (FF) and leave the Front Corner Posts (FP)<br />
on the bed.<br />
Step 2: Make sure that the Mattress Support Spring (MS) is secured<br />
to the lower Height Adjustment Insert on the four Corner Posts.<br />
Step 3: Remove the Large Wooden Dowel (WD) from the lower back part<br />
of the Crib (between the rear Corner Posts). Remove the stud and pins.<br />
Step 4: Attach the Large Wooden Dowel (WD) to the Front Corner Posts (FP)<br />
using two 60mm Bolts (B60).<br />
Step 5: Remove the Strike Plates (SP) from the Front Corner Posts (FP).<br />
STARTING FROM SCRATCH:<br />
Step 1: Follow Steps 1 through 6 of the Crib assembly instructions.<br />
Step 2: Follow Steps 2 through 5 of the above Youth Bed assembly instructions (starting from crib).<br />
YOUTH BED GUARD RAIL INSTRUCTIONS<br />
Step 1: Use the above instructions to convert your Generation <strong>Next</strong> Crib<br />
into a Youth Bed.<br />
Step 2: Unscrew the Hinge (H) on the Front Frame (FF) and detach the<br />
Drop Gate (DG).<br />
Step 3: Detach the two Trigger Latches (TL) from both ends of the Drop Gate (DG).<br />
Step 4: Loosen the bolts on the Large Wooden Dowel (WD)<br />
connecting the Front Corner Posts (FP).<br />
Step 5: Hammer in the Gate Pin (GP) 3/4” deep into the pilot holes on the two ends<br />
of the Drop Gate (DG).<br />
Step 6: Insert four Gate Pins (GP) on the Drop Gate (DG) into the four pilot holes<br />
on the inside of the four Corner Posts.<br />
Step 7: It is vital to properly tighten the bolts on the Large Wooden Dowel (WD),<br />
because the Drop Gate (DG) is suspended between the posts by the Large Wooden Dowel only.<br />
FULL-SIZE BED ASSEMBLY INSTRUCTIONS<br />
Step 1: Remove the Drop Gate (DG) from the Front Frame (FF) by unscrewing the Hinge (H).<br />
Step 2: Remove the two Strike Plates (SP) from the Front Corner Posts (FP).<br />
Step 3: Attach the Back Frame (BF) to the two Rear Corner Posts (RP)<br />
with four 60mm Bolts (B60).<br />
Step 4: Attach the Front Frame (FF) to the two Front<br />
Corner Posts (FP) with four 60mm Bolts (B60).<br />
Step 5: Attach the Large Wooden Dowel (WD)<br />
in between the bottom of the Front Corner Posts (FP),<br />
using Gate Pins (GP) and a Fully Threaded Stud (THS)<br />
at each end. Attach the Large Wooden Dowel (WD) in between<br />
the tops of the Front Corner Posts (FP) with a Gate Pin<br />
(GP) and a Fully Threaded Study (THS) at each end.<br />
Step 6: Connect the Headboard and Footboard with solid wood<br />
Adult Bed Rails (ABR). Make sure that the mattress<br />
support cleats are on the upper end of the rails.<br />
Youth Bed<br />
Youth Bed<br />
With Guard Rail<br />
Adult Bed<br />
The Adult Bed IS NOT intended to be used by children under 6<br />
years of age, without proper adult supervision. This Adult Bed is<br />
NOT a toy. DO NOT allow children to play or climb on Adult Bed.<br />
There is a chance for a child’s head to be entrapped between the<br />
top Dowel and the Frame of the Footboard.