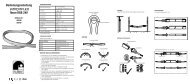
Date Code Number: Series Model number Draft 07/10/10 ... - Rutec
Date Code Number: Series Model number Draft 07/10/10 ... - Rutec
Date Code Number: Series Model number Draft 07/10/10 ... - Rutec

You also want an ePaper? Increase the reach of your titles
YUMPU automatically turns print PDFs into web optimized ePapers that Google loves.
EN<br />
Attention!<br />
Connect the power supplier and the LED in a correct way to the receiver<br />
before connecting the power supplier to the electricity network.<br />
A faulty connection of the LED diodes (polarity inversion) could damages<br />
them, therefore pay attention during their connection by respecting the<br />
polarity.<br />
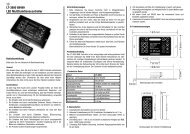
1- GENERAL DESCRIPTION<br />
This device allows to dimmer the LEDs with common anode supplied with<br />
fxed tension from 12 to 24V. dc.<br />
This type of LED can also be called “LED strips”.<br />
It is possible to connect for every output a quantity of LED for a maximum<br />
consumption of 5A.<br />
The general power supply of the device has to be by a power supplier which<br />
can supply the power and tension needed.<br />
Possibility to create scenes, ON/OFF control.<br />
Possiblity to dimmer the light from the transmitter.<br />
Possibility of the following functions:<br />
- Control of the pre-settled scenes with 7-channel transmitter.<br />
- Possibility to memorise up to 4 scenes for each transmitter.<br />
- Possibility to change in each moment the chosen scene.<br />
- Memorisation via radio of a new transmitter (without accessing the receiver).<br />
- Delete via radio of a transmitter or a channel without accessing the receiver.<br />
- Possibility to memorise up to 42 transmitters.<br />
- Acoustic (buzzer) indication of memorisation and delete operation.<br />
2- Device pushbuttons:<br />
- P1: Manual control pushbutton for load functioning test.<br />
- P2: Pushbutton for transmitters memorisation.<br />
- P3: Pushbutton for delete transmitter or all memorised codes.<br />
Pushbuttons combinations:<br />
- P1 + P3: Activation or deactivation of last setting memory function.<br />
- P1 + P2: Programming for the identifcation <strong>number</strong> of a receiver.<br />
3- LED indication<br />
- LED 2: Receiving of a radio signal.<br />
- LED 4: Active memory function.<br />
4- Activation-deactivation memory to the scene pack function (light memory)<br />
Memory function activated: by controlling the load in ON/OFF mode, the<br />
memory function adjusts at the turning-on the luminosity on the last settled value.<br />
The memory function is deactivated by using the 7-channel transmitter.<br />
Memory function deactivated: the light turn on at the maximum value.<br />
Activation-deactivation memory function: press at the same time the push buttons<br />
P1 + P3, the LED 4 will commutate its status.<br />
The dimmer receiver of default gets out with memory function in OFF.<br />
5- Input manual pushbutton for light adjusting<br />
Short impulse (< 800mS) = ON/OFF<br />
Long impulse (> 800mS) = adjusting upgrade or downgrade.<br />
Attention: when it arrives on max. or min. it will stop (time range 7 sec.)<br />
6- Memorisation standard transmitter channels (memorisation from<br />
receiver)<br />
ATTENTION: The frst transmitter can only be memorized using the receiver.<br />
TELECO AUTOMATION SRL - Via dell’Artigianato, 16 - 3<strong>10</strong>14 Colle Umberto (TV) ITALY<br />
TELEPHONE: ++39.0438.388511 FAX: ++39.0438.388536<br />
This document is the property of Teleco Automation Srl who reserves all reproduction and copying rights<br />
6.1- Memorisation of particular transmitters with 7-channels<br />
1- Press and hold down the pushbutton P2, the buzzer will sound continuously.<br />
2- Transmit one of the channels Ch1-Ch2-Ch3-Ch4 of the transmitter which<br />
is to be memorised, once the channel is memorised, the buzzer will sound<br />
intermittently, release the pushbutton.<br />
Repeat points 1 and 2 to memorise ulterior transmitter.<br />
The memorised transmitter will have of default the following settings of scenes:<br />
- Pushbutton Ch1: Luminosity at maximum<br />
- Pushbutton Ch2: Luminosity at 75%<br />
- Pushbutton Ch3: Luminosity at 50%<br />
- Pushbutton Ch4: Luminosity at the minimum.<br />
- Pushbutton Ch7: Switches off the light.<br />
<strong>Code</strong> <strong>Number</strong>: <strong>Series</strong> <strong>Model</strong> <strong>number</strong> <strong>Draft</strong><br />
TVSTRD868ST24<br />
T379.02<br />
6.2- Memorisation of single channel transmitters with dimming function:<br />
By memorizing in this way, the channel memorised with Dimmer function. With<br />
short impulses the light turns on and off; by holding the push button pressed the<br />
light intensity increases or decreases.<br />
1. Press the push button P2 of the receiver twice and hold it down, the buzzer will<br />
sound continuously.<br />
2. Transmit the channel to be memorised, the memorisation is signalised by an<br />
intermittent sound of the buzzer; release the push button.<br />
6.3- Memorisation of single channel transmitters with ON function:<br />
By memorizing in this way, the channel memorised with On function turn on the<br />
light.<br />
1. Press the push button P2 of the receiver three times and hold it down, the<br />
buzzer will sound continuously.<br />
2. Transmit the channel to be memorised, the memorisation is signalised by an<br />
intermittent sound of the buzzer; release the push button.<br />
6.4- Memorisation of single channel transmitters with OFF function:<br />
By memorizing in this way, the channel memorised with Off function turn off the<br />
light.<br />
1. Press the push button P2 of the receiver four times and hold it down, the buzzer<br />
will sound continuously.<br />
2. Transmit the channel to be memorised, the memorisation is signalised by an<br />
intermittent sound of the buzzer; release the push button.<br />
7 - Change the level of light intensity of the scenes<br />
7.1 Case 1:<br />
- press the pushbutton of the scene which is to be modifed, the load will turn on<br />
at its value;<br />
- adjust the new value with the two pushbuttons Ch5 Ch6;<br />
- hold down the OFF pushbutton for 5 sec., during this time the load will turn off;<br />
- after 5 sec. the buzzer of the receiver will sound for 5 sec. and the load will turn<br />
on at the new value.<br />
7.2 Case 2: (more receivers have memorised the same 7-channel transmitter)<br />
In the case that several receivers have the same 7-channel transmitter memorised,<br />
and each receiver must have a different scene value, proceed with the<br />
programming of the identifcation <strong>number</strong> of the receiver. Once the identifcation<br />
<strong>number</strong> is programmed it is possible to select the desired receiver by means of the<br />
push buttons.<br />
7.3 To set an identifcation <strong>number</strong> of a receiver:<br />
The identifcation of the <strong>number</strong> which has been associated to the dimmer is<br />
displayed by means of the leds L4 and L3: the fashings of the led 4 represent the<br />
tens and the fashings of the led 3 represent the ones.<br />
1. Press the push buttons P1 and P2 of the receiver at the same time; the led L2<br />
turns on.<br />
2. After approx. one second the leds L4 and L3 start fashing in order to indicate<br />
the identifcation <strong>number</strong> which has been associated. For example: if the<br />
associated <strong>number</strong> is 13, the led L4 fashes one time and the led L3 fashes 3 time.<br />
3. Press the push button P3 until the <strong>number</strong> to be associated to the dimmer. Max.<br />
20 identifcation <strong>number</strong>. Each time the push button P3 is pressed, the led L2 turns<br />
off. After having reached twentieth <strong>number</strong> the led 2 fashes. In the case of error,<br />
reset the counting by pressing P2.<br />
4. Memorise the set identifcation <strong>number</strong> and exit the procedure by pressing P1.<br />
The buzzer will sound for 5 sec.<br />
This operation has to be done in each receiver which has the 7 channel transmitter<br />
in common.<br />
7.4- Scenes changing procedure:<br />
1. Press and hold one of the 4 channels (Ch1, Ch2, Ch3, Ch4) of the transmitter<br />
concerned for 5 seconds down.<br />
2. After these 5 seconds, the turning-off , the turning-on of the lights and the<br />
sound of the buzzer signalise the entering in the procedure of the scenes changing.<br />
3. Press the pushbutton Ch5 of the transmitter (dimmer UP) or the push button<br />
Ch6 of the transmitter (dimmer DOWN) in order to select a dimmer.<br />
The selected dimmer will be the one with the turned-off light; if the light intensity<br />
of the selected dimmer is above 50%, the light will turn off, otherwise if the light<br />
is lower than 50% the light turns on and then turns off.<br />
In each dimmer is set an identifcation <strong>number</strong> which corresponds to the <strong>number</strong><br />
of pressings of the push button Ch5 (see “set the identifcation <strong>number</strong> of a<br />
receiver)<br />
<strong>Date</strong><br />
<strong>07</strong>/<strong>10</strong>/<strong>10</strong>
4. Once the dimmer is selected, press the channel of the scene which is to be<br />
modifed. The dimmer turns on at the maximum value, whilst the others remain<br />
turned-on and blocked.<br />
5. Set with the push buttons Ch5 and Ch6 the new light value. In this procedure it<br />
is possible to dim from the minimum to the maximum value. In order to memorise<br />
the OFF scene, press another time the channel of the scene which has just been<br />
selected.<br />
6. Press the push button Ch7 OFF to exit and memorise the new scene. The<br />
memorisation is signalised by the turning-off and turning-on of the charge at the<br />
memorised value.<br />
With this operation all the other dimmers will be unblocked and will return to the<br />
state in point 3. In order to modify the scene of another dimmer, repeat the points<br />
3-6.<br />
7. Press the push button OFF to exit the procedure; all lights will turn off.<br />
8- Memorisation transmitter channels (ulterior transmitter, memorised with<br />
addressing)<br />
By memorising a 7 channel transmitter , the transmitter acquires the same<br />
functions and the same scenes of the 7 channel transmitter used for the addressing<br />
in point 2.<br />
1- Press the pushbutton P3 of the transmitter, the buzzer will sound continuously.<br />
2- Press within 5 seconds a channel present in the memory of the receiver<br />
(addressing), the buzzer will stop sounding for 1 sec. and then carry on for 5 sec.<br />
3- Transmit the channel which is to be memorised, once the channel is memorised,<br />
the buzzer will sound intermittently, release the pushbutton.<br />
Repeat points 1-2 and 3 to memorise ulterior channels.<br />
9- Delete of a single channel or transmitter from receiver<br />
1- Press and hold down P3, the buzzer will sound with slow intervals.<br />
2- Transmit the channel or transmitter which is to be cancelled, once it is<br />
cancelled the buzzer will sound continuously.<br />
Repeat points 1 and 2 to cancel ulterior transmitter.<br />
CH2<br />
CH5<br />
CH6<br />
CH1<br />
CH1<br />
CH2<br />
CH3<br />
CH4<br />
TVTXC868A<strong>07</strong><br />
TVTXW868A42<br />
CH3<br />
CH4<br />
CH7 OFF<br />
CH5<br />
CH6<br />
CH7 OFF<br />
SEL<br />
9.1- Delete of all memorised codes from receiver<br />
1- Press two times and hold down P3, the buzzer will sound with quick intervals.<br />
2- Hold down the pushbutton, once it is cancelled after <strong>10</strong> sec. the buzzer will<br />
sound continuously.<br />
9.2- To cancel via radio a code through a transmitter already set in the<br />
memory<br />
1) Press P3 of the transmitter for three times at regular intervals within 5 seconds,<br />
buzzer will sound intermittently slowly.<br />
2) Transmit the code which is to be cancelled within 5 seconds, once the<br />
code has been cancelled buzzer will sound continuously.<br />
To cancel ulterior codes repeat points 1 and 2<br />
The receiver works with all transmitters of the TVLINK series.<br />
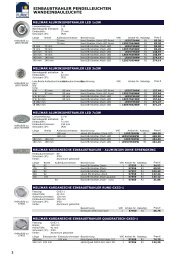
TECHNICAL SPECIFICATIONS<br />
-Power supply 12 Vdc to 24 Vdc<br />
-Max. power for each output 4A<br />
-Cable sections in input and output 1,5 mm<br />
-Reception frequency 868.3 MHz<br />
-Intermediate frequency IF <strong>10</strong>.7 MHz<br />
-Sensibility (fnely tuned signal) 1 µV<br />
-Operating temperature range -20° - +60°C<br />
In the view of a constant development of their products, the manufacturer reserves the right for<br />
changing technical data and features without prior notice.<br />
TVTXQ868A<strong>07</strong>/42<br />
CH1<br />
CH2<br />
CH3<br />
CH4<br />
CH5<br />
CH6<br />
CH7 OFF<br />
CH1<br />
CH2<br />
CH3<br />
CH4<br />
CH5<br />
CH6<br />
CH7 OFF<br />
SEL
IT<br />
Attenzione!<br />
Prima di collegare l’alimentatore alla rete elettrica assicurarsi che<br />
l’alimentatore e i LED siano collegati correttamente al ricevitore.<br />
Un errato collegamento dei diodi LED (inversione di polarità) potrebbe<br />
danneggiarli, fare pertanto molta attenzione al loro collegamento<br />
rispettando le polarità.<br />
1- DESCRIZIONE GENERALE<br />
Questo dispositivo permette di dimmerare più LED a anodo comune<br />
alimentati a tensione fssa da 12 a 24Vdc. Questo tipo di led è anche<br />
chiamato Strips-led.<br />
E’ possibile collegare ad ogni uscita una quantità di led per un consumo<br />
massimo di 5A.<br />
L’alimentatore del dispositivo deve fornire la tensione e la corrente<br />
richiesta dal dispositivo e dai led collegati.<br />
Possibilità di creare scenari, comando ON/OFF<br />
Possibilità di dimmerare i led da trasmettitore.<br />
Possibilità delle seguenti funzioni:<br />
- Comando di scenari preimpostati con trasmettitore a 7 canali.<br />
- Possibilità di memorizzare fno a 4 scenari per ogni trasmettitore.<br />
- Possibilità di cambiare in qualsiasi momento lo scenario scelto.<br />
- Memorizzazione via radio di un nuovo trasmettitore (senza accedere al<br />
ricevitore) .<br />
- Cancellazione via radio di un trasmettitore o di un canale senza accedere al<br />
ricevitore.<br />
- Possibilità di memorizzare fno a 42 trasmettitori.<br />
- Indicazione sonora con buzzer delle operazioni di memorizzazione e<br />
cancellazione.<br />
2- Pulsanti presenti sul dispositivo:<br />
- P1: Pulsante manuale di comando per prova funzionamento carico .<br />
- P2: Pulsante memorizzazione telecomandi.<br />
- P3: Pulsante per la cancellazione dei trasmettitori o di tutti i codici in memoria<br />
Combinazioni pulsanti:<br />
- P1+P3: Inserimento o disinserimento funzione memoria utima impostazione.<br />
- P1+P2: Inserimento numero identifcativo ricevitore<br />
3- Indicazione LED<br />
- LED2 : Ricezione di un segnale radio in corso.<br />
- LED4 : Funzione memoria attiva.<br />
4- Inserimento disinserimento funzione memoria (light memory)<br />
Con la funzione memoria attiva, comandando il carico in modo ON/OFF al<br />
momento dell’accensione la lumiosità si regola sull’ultimo valore impostato.<br />
La funzione memoria non è abilitata con l’uso dei tx 7 ch.<br />
Con la funzione memoria disattivata, al momento dell’accensione la lumiosità si<br />
regola al massimo.<br />
Per attivare o disattivare la funzione memoria:<br />
Premere contemporaneamente i tasti (P1+P3) il led4 commuterà il suo stato.<br />
Il ricevitore dimmer di default esce con la funzione memoria ad OFF.<br />
5- Ingresso pulsante manuale per regolazione luce<br />
Impulso corto (800mS) = regolazione in salita o discesa<br />
Attenzione: arrivato al max. o al min. si ferma (tempo di escursione 7sec.)<br />
6- Memorizzazione canali telecomando standard (da ricevitore)<br />
ATTENZIONE la memorizzazione del primo telecomando può avvenire solo tramite<br />
ricevitore.<br />
TELECO AUTOMATION SRL - Via dell’Artigianato, 16 - 3<strong>10</strong>14 Colle Umberto (TV) ITALY<br />
TELEPHONE: ++39.0438.388511 FAX: ++39.0438.388536<br />
This document is the property of Teleco Automation Srl who reserves all reproduction and copying rights<br />
6.1- Memorizzazione canali telecomandi particolari 7 canali<br />
1- Premere e tenere premuto il pulsante P2, il buzzer emette un suono continuo.<br />
2- Trasmettere uno dei canali Ch1-Ch2-Ch3-Ch4 del telecomando da memorizzare,<br />
l’avvenuta memorizzazione è indicata da un suono intermittente del buzzer; rilasciare<br />
il tasto.<br />
Ripetere i punti 1 e 2 per memorizzare un ulteriore telecomando.<br />
<strong>Code</strong> <strong>Number</strong>: <strong>Series</strong> <strong>Model</strong> <strong>number</strong> <strong>Draft</strong><br />
TVSTRD868ST24<br />
T379.02<br />
Il telecomando memorizzato avrà di default le seguenti impostazioni di scenario:<br />
-Tasto Ch1: Luminosità al massimo<br />
-Tasto Ch2: Luminosità al 75%<br />
-Tasto Ch3: Luminosità al 50%<br />
-Tasto Ch4: Luminosità al minimo<br />
-Tasto Ch7 OFF: Spegne la luce<br />
6.2- Memorizzazione canale singolo con funzione dimmer<br />
Il canale del tramettitore memorizzato in questo modo avrà la funzione dimmer.<br />
Con impulsi corti si accende e si spegne la luce, mantenendo premuto il pulsante si<br />
incrementa o decrementa la luminosità.<br />
1- Premere due volte e tenere premuto il pulsante P2 del ricevitore, il buzzer emette<br />
un suono continuo.<br />
2- Trasmettere il canale da memorizzare, l’avvenuta memorizzazione è indicata da un<br />
suono intermittente del buzzer, rilasciare il tasto.<br />
6.3- Memorizzazione canale singolo con funzione ON<br />
Il canale del tramettitore memorizzato in questo modo avrà la funzione ON (accende la<br />
luce).<br />
1- Premere tre volte e tenere premuto il pulsante P2 del ricevitore, il buzzer emette<br />
un suono continuo.<br />
2- Trasmettere il canale da memorizzare, l’avvenuta memorizzazione è indicata da un<br />
suono intermittente del buzzer, rilasciare il tasto.<br />
Per inserire un ulteriore canale da ricevitore ripetere i punti 1 e 2.<br />
6.4- Memorizzazione canale singolo con funzione OFF<br />
Il canale del tramettitore memorizzato in questo modo avrà la funzione OFF (spegne la<br />
luce).<br />
1- Premere quattro volte e tenere premuto il pulsante P2 del ricevitore, il buzzer<br />
emette un suono continuo.<br />
2- Trasmettere il canale da memorizzare, l’avvenuta memorizzazione è indicata da un<br />
suono intermittente del buzzer, rilasciare il tasto.<br />
Per inserire un ulteriore canale da ricevitore ripetere i punti 1 e 2.<br />
7.0- Cambiare i livelli di intensità luminosa dei scenari<br />
7.1- Caso 1:<br />
- premere il tasto della scena che si vuole modifcare, il carico si accende al suo<br />
valore;<br />
- regolare il nuovo valore con i due tasti dedicati Ch5 e Ch6;<br />
- tener premuto il tasto OFF per 5 sec. , durante questo tempo il carico si spegne;<br />
- dopo i 5 secondi il buzzer del ricevitore suonerà per 5 sec ed il carico si accende al<br />
nuovo valore.<br />
7.2- Caso 2 (più ricevitori hanno memorizzato lo stesso trasmettitore a 7 canali)<br />
Nel caso in cui ci siano più ricevitori con memorizzato lo stesso trasmettitore 7<br />
canali, e si vuole regolare in ogni ricevitore un diverso valore di scenario, si deve<br />
procedere con la programmazione del numero identifcativo nel ricevitore. Una volta<br />
programmata la priorità si può selezionare il ricevitore desiderato tramite pulsanti.<br />
7.3- Per settare il numero identifcativo di un ricevitore:<br />
Il numero identifcativo che è stato associato al dimmer è indicato attraverso i led L4<br />
e L3: i lampeggi del led 4 rappresenta le decine, i lampeggi del led 3 rappresenta le<br />
unità.<br />
1. Premere assieme i tasti P1 e P2 del ricevitore il led 2 si accende.<br />
2. Premere il tasto P3 fno al raggiungimento del numero che si vuole associare<br />
al dimmer. Al massimo sono permessi 20 numeri identifcativi. Ogni volta che si<br />
preme il tasto P3 il led 2 si spegne, al raggiungimento del ventesimo numero il led 2<br />
lampeggia. Nel caso di errore resettare il conteggio premendo P2.<br />
3. Memorizzare il numero identifcativo impostato e uscire dalla procedura premendo<br />
P1. Il buzzer suonerà per 5 secondi.<br />
Questa operazione dovrà essere fatta in ogni ricevitore che ha in comune il<br />
trasmettitore 7 canali.<br />
7.4- Procedura per cambiare gli scenari:<br />
1. Premere e tenere premuto per 5 secondi uno dei quattro canali (Ch1, Ch2, Ch3,<br />
Ch4) del trasmettitore interessato.<br />
2. Passati i 5 secondi, lo spegnimento e la successiva riaccensione delle luci, assieme<br />
al suono del buzzer segnalano l’entrata nella procedura di cambio scenario.<br />
3. Premere il tasto Ch5 del trasmettitore (dimmer UP) o il tasto Ch6 del trasmettitore<br />
(dimmer DOWN) per selezionare un dimmer.<br />
Il dimmer selezionato sarà quello con la luce spenta. Se l’intensità della luce<br />
impostata è superiore al 50% la luce si spegne, altrimenti se l’intensità della luce è<br />
inferiore al 50% la luce si accende e poi si spegne. In ogni dimmer è impostato il<br />
numero identifcativo che corrisponde al numero di pressioni del tasto Ch5 (V edi “Per<br />
settare il numero identifcativo di un ricevitore”).<br />
4. Una volta selezionato il dimmer premere il canale dello scenario che si vuole<br />
modifcare. Il dimmer si accende al valore massimo, mentre tutti gli altri rimangono<br />
bloccati accesi.<br />
<strong>Date</strong><br />
<strong>07</strong>/<strong>10</strong>/<strong>10</strong>
5. Impostare con i tasti Ch5 e Ch6 il nuovo valore di luce, in questa procedura è<br />
possibile dimmerare dal valore minino al valore massimo. Se si volesse memorizzare<br />
lo scenario Ch7 OFF è possibile farlo premendo nuovamente il canale dello scenario<br />
appena selezionato.<br />
6. Premere il tasto Ch7 OFF per uscire e memorizzare il nuovo scenario, la<br />
memorizzazione è segnalata dallo spegnimento e dalla riaccensione del carico al<br />
valore memorizzato.<br />
Con questa operazione tutti gli altri dimmer vengono sbloccati e riprendono il loro<br />
stato come fossimo arrivati al punto 3. A questo punto per modifcare lo scenario di<br />
un altro dimmer ripercorrere i passi dal punto 3 al punto 6.<br />
7. Premere il tasto Ch7 OFF per uscire dalle procedure, tutti i le luci si spengono.<br />
8- Memorizzazione canali da telecomando (trasmettitori supplementari)<br />
Memorizzando un trasmettitore a 7 canali, il trasmettitore acquisisce le stesse<br />
funzioni e i valori di scena del tramettitore a 7 canali che si usa al punto 2.<br />
1- Premere il pulsante P3 del trasmettitore, il buzzer emette un suono<br />
continuo.<br />
2- Premere, entro 5 secondi un canale già presente nella memoria del<br />
ricevitore, il buzzer interrompererà il suono per 1 secondo e riprenderà<br />
a suonare per altri 5 secondi.<br />
3- Trasmettere il canale da memorizzare, l’avvenuta memorizzazione è<br />
indicata da un suono intermittente del buzzer, rilasciare il tasto.<br />
Ripetere i punti 1-2-3 per memorizzare via radio un altro canale.<br />
9- Cancellazione di un singolo canale o telecomando dal<br />
ricevitore<br />
1- Premere e tenere premuto il tasto P3, il buzzer suona ad<br />
intervalli lenti.<br />
2- Trasmettere il canale o il telecomando da cancellare, l’avvenuta<br />
cancellazione è segnalata dal suono continuo del buzzer.<br />
Ripetere i punti 1 e 2 per una ulteriore cancellazione.<br />
9.1- Cancellazione di un canale via radio<br />
-Premere il tasto P3 del trasmettitore per tre volte entro un tempo di cinque<br />
secondi, il buzzer emetterà un suono intermittente lento.<br />
-trasmettere il codice da cancellare, una volta cancellato il buzzer<br />
emetterà un suono continuo.<br />
9.2- Cancellazione dell’intera memoria dal ricevitore<br />
1- Premere due volte e tenere premuto il tasti P3, il buzzer suona ad<br />
intervalli veloci.<br />
2- Tenere premuto il tasto, l’avvenuta cancellazione è segnalata dopo <strong>10</strong><br />
sec. dal suono continuo del buzzer.<br />
CH2<br />
CH5<br />
CH6<br />
CH1<br />
CH1<br />
CH2<br />
CH3<br />
CH4<br />
TVTXC868A<strong>07</strong><br />
TVTXW868A42<br />
CH3<br />
CH4<br />
CH7 OFF<br />
CH5<br />
CH6<br />
CH7 OFF<br />
SEL<br />
SPECIFICHE TECNICHE<br />
-Alimentazione 12V to 24 V dc<br />
-Potenza massima per ogni uscita 4A<br />
-Sezione cavi in ingresso e uscita 1,5 mm<br />
-Frequenza ricezione 868.3 MHz<br />
-Frequenza intermedia IF <strong>10</strong>.7 MHz<br />
-Sensibilità (segnale a buon fne) 1 µ V<br />
-Temperatura di funzionamento -20° - +60°C<br />
Nell’ottica di un continuo sviluppo dei propri prodotti, il produttore si riserva il diritto di<br />
apportare modifche a dati tecnici e prestazioni senza preavviso.<br />
TVTXQ868A<strong>07</strong>/42<br />
CH1<br />
CH2<br />
CH3<br />
CH4<br />
CH5<br />
CH6<br />
CH7 OFF<br />
CH1<br />
CH2<br />
CH3<br />
CH4<br />
CH5<br />
CH6<br />
CH7 OFF<br />
SEL
DE<br />
Achtung!<br />
Schließen Sie das Netzteil und die LEDs korrekt an den Empfänger an<br />
bevor Sie das Netzteil an die Stromversorgung anschließen. Ein Fehler<br />
im Anschluß der LEDs (verkehrte Polung) kann diese beschädigen.<br />
Achten sie deshalb unbedingt auf eine korrekte Polung.<br />
1 - Allgemeine Gerätebeschreibung<br />
Dieses Gerät dient dazu LED Stripes mit gemeinsamer Anode und einer<br />
festen Spannung zwischen 12 und 24 Volt zu dimmen. Der Ausgang kann mit<br />
Stripes bis zu max. 4A belastet werden.<br />
Das Netzteil ist entsprechend vorzusehen.<br />
Es können Szenen eingespeichert werden.<br />
Folgende Funktionen sind möglich:<br />
- Kontrolle der voreingestellten Szenen über 7 Kanal Sender<br />
- Bis zu 4 Szenen pro Sender können eingestellt werden.<br />
- Die gewählten Szenen können jederzeit geändert werden<br />
- Einlernen von neuen Sendern über Funk (ohne Zugang zum Empfänger)<br />
- Löschen von Kanälen oder Sendern über Funk (ohne Zugang um<br />
Empfänger)<br />
- Speichermöglichkeit von bis zu 42 Sendern<br />
- Akustische Signale beim Lernen und Löschen von Sendern<br />
2 Taster am Gerät:<br />
- P1: Taster für Funktionstest der LEDs<br />
- P2: Speichertaste zum Einspeichern der Funksender<br />
- P3 Taster zum Löschen einzelner Sender oder Kanäle sowie zum<br />
kompletten Löschen aller Sender aus dem Gerät.<br />
Tastenkombinationen:<br />
- P1 + P3: Aktivierung / Deaktivierung der Funktion “letzte Einstellung”<br />
(siehe Punkt 4 der Anleitung)<br />
- P1 + P2: Programmierung einer Identifikationsnummer am Gerät<br />
(siehe Punkt 7.3)<br />
3 - LED Anzeigen<br />
- LED 2: Eingang eines Funksignals<br />
- LED 4: Anzeige “letzte Einstellung aktiv / deaktiv<br />
4 - Aktivierung / Deaktivierung der Funktion “letzte Einstellung”<br />
Funktion aktiv: Bei Ansteuerung der LEDs über die Ein / Aus Funktion<br />
wird die letzte Lichtintensität beim Einschalten wieder<br />
hergestellt.<br />
Diese Funktion ist bei 7 Kanal Sender deaktiviert.<br />
Funktion deaktiviert: Das Licht wird immer mit maximaler Stärke eingeschaltet<br />
Aktivieren / Deaktivieren der Funktion: Drücken Sie gleichzeitig die Taster P1<br />
und P3. Die LED 4 zeigt die Statusveränderung an.<br />
In Werkseinstellung ist die Funktion deaktiviert.<br />
5 - Eingang Tasteranschluss zur Lichteinstellung<br />
Kurze Impulse (800mS = stärkeres oder schwächeres Licht<br />
Achtung: Bei Erreichen des Maximums der Minimums stoppt die Funktion.<br />
(Zeitbedarf ca. 7 Sekunden)<br />
6 - Speichern von Funkkanälen am Empfänger<br />
ACHTUNG: Der erste einzulernende Sender muss am Empfänger eingelernt<br />
werden.<br />
6.1 - Einspeichern von 7 Kanal Sendern<br />
1 - Drücken sie den Taster P2 und halten Sie ihn gedrückt. Ein<br />
durchgehender Summton ist zu hören.<br />
2 - Drücken Sie eine der Kanaltasten 1 bis 4 des einzulernenden Senders.<br />
Sowie der Sender gespeichert wurde wechselt der Summton zu<br />
unterbrochenen Summtönen. Geben Sie jetzt den Taster P2 frei.<br />
Wiederholen Sie die Vorgänge 1 und 2 für jeden einzulernenden Sender.<br />
Folgende Szenen und Funktionen sind voreingestellt.<br />
- Kanaltaste Ch1: Leuchtstärke max.<br />
- Kanaltaste Ch2: Leuchtstärke 75%<br />
- Kanaltaste Ch3: Leuchtstärke 50%<br />
- Kanaltaste Ch4: Leuchtstärke min.<br />
- Kanaltaste Ch5: Dimmen<br />
- Kanaltaste Ch6: Dimmen<br />
- Kanaltaste Ch7: Schaltet das Licht aus<br />
Teleco Automation GmbH - Hallbergmooserstr. 5<br />
85445 Schwaig<br />
Tel.: +49 (0) 8122 9563024 Fax: +49 (0) 8122 9563026<br />
This document is the property of Teleco Automation Srl who reserves all reproduction and copying rights<br />
6.2 - Speichern von 1 Kanal Sendern mit Dimmfunktion:<br />
Beim Einspeichern auf diese Art wird jeder einzelne Kanal des Senders mit<br />
Dimmfunktion gespeichert. Kurze Impulse schalten das Licht ein oder Aus.<br />
Lange Impulse dimmen rauf oder runter.<br />
1. Drücken Sie den Taster P2 des Empfängers 2mal und halten Sie ihn dann<br />
gedrückt. Ein durchgehender Summton ist zu hören.<br />
2. Senden Sie einzulernenden Kanal. Wenn er eingelernt wurde wechselt der<br />
Summton zu Unterbrechungen. Geben Sie jetzt den Taster P2 wieder frei.<br />
6.3 - Speichern von einzelnen Kanälen mit Ein Funktion:<br />
Beim Einspeichern auf diese Art wird jeder gespeicherte Kanal des Senders mit<br />
Einschaltfunktion gespeichert. Der Kanal schaltet nur Ein.<br />
1 - Drücken Sie den Taster P2 des Empfängers 3mal und halten Sie ihn dann<br />
gedrückt. Ein durchgehender Summton ist zu hören.<br />
2. Senden Sie einzulernenden Kanal. Wenn er eingelernt wurde wechselt der<br />
Summton zu Unterbrechungen. Geben Sie jetzt den Taster P2 wieder frei.<br />
6.4 - Speichern von einzelnen Kanälen mit Aus Funktion:<br />
Beim Einspeichern auf diese Art wird jeder gespeicherte Kanal des Senders mit<br />
Ausschaltfunktion gespeichert. Der Kanal schaltet nur Aus.<br />
1 - Drücken Sie den Taster P2 des Empfängers 4mal und halten Sie ihn dann<br />
gedrückt. Ein durchgehender Summton ist zu hören.<br />
2. Senden Sie einzulernenden Kanal. Wenn er eingelernt wurde wechselt der<br />
Summton zu Unterbrechungen. Geben Sie jetzt den Taster P2 wieder frei.<br />
7 - Wechsel der Lichtstärke in den Szenen<br />
7.1 - Fall 1<br />
- Wählen Sie über die entsprechende Kanaltaste die Szene die geändert werden<br />
soll. Das Licht geht mit dem eingestellten Wert an.<br />
- ändern Sie die Lichtstärke mit den Tasten Ch5 und Ch6.<br />
- halten Sie jetzt den Aus Taster (Ch7)für 5 Sekunden gedrückt. Das Licht geht<br />
aus.<br />
- nach 5 Sekunden summt der Empfänger für 5 Sekunden und das Licht geht<br />
mit dem neu eingestellten Wert an.<br />
7.2 Fall 2: (mehrere Empfänger haben denselben 7 Kanal Sender eingelernt.)<br />
Wenn ein 7 Kanal Sender auf mehrere Empfänger eingespeichert wurde, aber<br />
trotzdem jeder Empfänger individuelle Szenenwerte haben soll, geben wir jedem<br />
Empfänger eine Identifikationsnummer. Wenn diese programmiert sind ist es<br />
möglich den gewünschten Empfänger mittels der Sendetasten auszuwählen.<br />
7.3 Einstellen einer Identifikationsnummer am Empfänger:<br />
Die am Empfänger eingestellte Identifikationsnummer wird durch die LEDs 4<br />
und 3 angezeigt. Dabei werden durch die LED 4 die Zehner und durch die LED 3<br />
die Einer angezeigt.<br />
1. Drücken sie gleichzeitig die Tasten P1 und P2 des Empfängers. Die LED 2<br />
leuchtet auf.<br />
2. Nach ca. 1 Sekunde beginnen die LEDs 4 und 3 zu blinken und zeigen damit<br />
die eingestellte Identifikationsnummer an. Beispiel: die eingestellte<br />
Identifikationsnummer ist 13. Die LED 4 blinkt 1mal und die LED 3 blinkt<br />
3mal.<br />
3. Mit dem Taster P3 stellen Sie die gewünschte Identifikationsnummer ein. Mit<br />
jedem Drücken des Tasters P3 erhöhen Sie die Zahl um eins. Bei jedem Druck<br />
des Tasters erlischt die LED 2. Die höchste einstellbare Zahl ist 20. Wenn die<br />
Zahl 20 erreicht ist blinkt die LED 2. Sie können die Zählung durch Drücken<br />
von P2 zurückstellen.<br />
4. Speichern Sie die eingestellte Identifikationsnummer durch verlassen des<br />
Einstellmodus durch Drücken von P1. Der Summer ertönt für 5 Sekunden.<br />
Dieser Vorgang muss bei jedem Empfänger durchgeführt werden der von einem<br />
gemeinsam genutzten 7 Kanal Sender angesteuert wird.<br />
7.4 Änderung von Szenen<br />
1. Drücken sie eine der 4 Kanaltasten (Ch1, Ch2, Ch3, Ch4) des gewünschten<br />
Senders und halten Sie sie für 5 Sekunden gedrückt.<br />
2. Nach diesen 5 Sekunden schaltet das Licht aus und wieder an und ein Summen<br />
ertönt. Dadurch wird angezeigt das das Lernprogramm für die Szenenänderung<br />
eingeschaltet ist.<br />
3. Mit den Kanaltasten Ch5 (zählt nach oben) und Ch6 (zählt nach unten) wählen<br />
Sie den entsprechenden Empfänger an Hand seiner Identifikationsnummer. Der<br />
gewählte Empfänger zeigt seine Auswahl dadurch an das sein Licht<br />
ausgeschaltet ist. Sollte der eingestellte Lichtwert unter 50% sein so wird das<br />
Licht zuerst ein- und dann wieder ausgeschaltet.<br />
Die eingestellte Identifikationsnummer können Sie abfragen wie unter Punkt 7.3<br />
beschrieben.<br />
<strong>Code</strong> <strong>Number</strong>: <strong>Series</strong> <strong>Model</strong> <strong>number</strong> <strong>Draft</strong><br />
TVSTRD868ST24 T379.02<br />
<strong>Date</strong><br />
<strong>07</strong>/<strong>10</strong>/<strong>10</strong>
4. Nachdem der Empfänger ausgewählt wurde drücken Sie den Kanal dessen<br />
Szene Sie ändern möchten. Der Empfänger schaltet mit maximalem Wert ein<br />
während die anderen Empfänger auf ihren eingestellten Werten bleiben.<br />
5. Mit den Tastern Ch5 und Ch6 bestimmen Sie jetzt die neue Lichteinstellung.<br />
Sie können von Minimum bis Maximum dimmen. Um die Szene auszuschalten<br />
drücken Sie jetzt nochmals die der Szene zugeordnete Kanaltaste.<br />
6. Drücken sie die Taste Ch7 um die Einstellungen zu speichern und den<br />
Einstellvorgang zu verlassen. Die Speicherung wird durch Aus- und<br />
Einschalten des Empfängers auf dem gewünschten Wert angezeigt.<br />
Damit werden auch alle anderen Empfänger wieder freigeschaltet und Sie<br />
befinden sich wieder bei Punkt 3. Wenn Sie weitere Szenen anderer Empfänger<br />
ändern wollen wiederholen sie die Punkte von 3 bis 6.<br />
7. Drücken sie nochmals die Taste Ch7 um den Einstellvorgang komplett zu<br />
verlassen. Alle angesteuerten Lichter gehen aus.<br />
8 - Einspeichern von weiteren 7 Kanal Sendern über Funk<br />
Beim Einspeichern eines 7 Kanal Senders über Funk übernimmt der neue Sender<br />
die gleichen Funktionen und Szeneneinstellungen wie sie der zum Einspeichern<br />
(siehe Punkt 2) benutzte vorhandene Sender hat.<br />
1 - Drücken sie den Taster P3 eines bereits am Empfänger eingelernten 7 Kanal<br />
Senders. Sie hören einen durchgehenden Summton vom Empfänger.<br />
2 - Drücken sie innerhalb von 5 Sekunden eine der bereits eingespeicherten<br />
Kanaltasten. Der Summton stoppt für 1 Sekunde und summt dann 5 Sekunden<br />
weiter.<br />
3 - Senden Sie jetzt einen der Kanäle des neuen Senders. Wenn er eingespeichert<br />
wurde ändert sich der Summton zu Intervallen. Geben Sie die Kanaltaste jetzt<br />
frei.<br />
Zum Einlernen weiterer Sender wiederholen Sie die Punkte 1 bis 3.<br />
9 - Löschen eines einzelnen Kanals oder Senders vom Empfänger<br />
1 - Drücken sie die Taste P3 des Empfängers und halten Sie sie gedrückt. Sie<br />
hören einen Summton in langsamen Intervallen.<br />
2 - Drücken sie den zu löschenden Kanal oder Sendertaster. Nach erfolgter<br />
Löschung ist der Summton durchgehend.<br />
Zum Löschen weiterer Sender wiederholen Sie die Punkte 1 und 2.<br />
CH2<br />
CH5<br />
CH6<br />
CH1<br />
CH1<br />
CH2<br />
CH3<br />
CH4<br />
TVTXC868A<strong>07</strong><br />
TVTXW868A42<br />
CH3<br />
CH4<br />
CH7 OFF<br />
CH5<br />
CH6<br />
CH7 OFF<br />
SEL<br />
9.1 - Löschen aller Kanäle und Sender vom Empfänger<br />
1 - Drücken sie den Taster P3 zweimal und halten Sie ihn gedrückt. Ein Summton<br />
in schnellen Intervallen ist hörbar.<br />
2 - Halten Sie den Taster für mehr als <strong>10</strong> Sekunden gedrückt. Wenn der Summton<br />
durchgehend wird, ist der Senderspeicher komplett gelöscht.<br />
9.2 - Löschen eines Senders oder Kanals über Funk<br />
1 - Drücken sie die Taste P3 des Senders innerhalb von 5 Sekunden 3mal in<br />
regelmäßigen Abständen. Ein langsamer unterbrochener Summton ist zu<br />
hören.<br />
2 - Senden Sie den zu löschenden Kanal innerhalb von 5 Sekunden. Nach der<br />
Löschung wechselt der Summton auf durchgehend.<br />
Zum Löschen weiterer Kanäle wiederholen sie die Punkte 1 und 2.<br />
Der Empfänger arbeitet mit allen Sendern der TVLINK Baureihe.<br />
TECHNISCHE EIGENSCHAFTEN<br />
-Stromversorgung 12 Vdc to 24 Vdc<br />
-Max. Leistung pro Ausgang 4A<br />
-Kabelquerschnitte Ein/ Ausgang 1,5 mm<br />
-Empfangsfrequenz 868.3 MHz<br />
-Intermediate Frequenz IF <strong>10</strong>.7 MHz<br />
-Sensibilität (feinabgestimmtes Signal) 1 µV<br />
-maximale Umgebungstemperatur im Betrieb<br />
-20° - +60°C<br />
Im Hinblick auf technische Entwicklungen und kontinuierliche<br />
Produktverbesserungen behält sich der Hersteller das Recht auf Änderungen<br />
technischer <strong>Date</strong>n und Funktionen ohne vorherige Ankündigung vor.<br />
TVTXQ868A<strong>07</strong>/42<br />
CH1<br />
CH2<br />
CH3<br />
CH4<br />
CH5<br />
CH6<br />
CH7 OFF<br />
CH1<br />
CH2<br />
CH3<br />
CH4<br />
CH5<br />
CH6<br />
CH7 OFF<br />
SEL
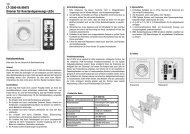
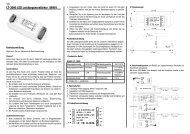
Power on<br />
LED<br />
Anzeige Betrieb<br />
Ausgang zu r Slave<br />
Uscita per lo<br />
slave<br />
Output for slave<br />
Sortie pou r slave Positiv e 12 to 24 V<br />
+<br />
-<br />
L3<br />
LED 2-3-4 P3<br />
P2<br />
P1<br />
Positiv e 12 to 24 V<br />
+<br />
+<br />
-<br />
12 t o 24 V dc<br />
Power supply 12 bis 24 V dc<br />
Stromversorgung -<br />
L3<br />
Black<br />
Schwarz<br />
Red<br />
Rot Or n<br />
External push button<br />
On - Off - Dimm function a ge<br />
Externer Taster<br />
Funktion: Ein - Aus - Dimmen<br />
Ausgang zu r Slave<br />
Uscita per lo<br />
slave<br />
Output for slave<br />
Sortie pou r slave